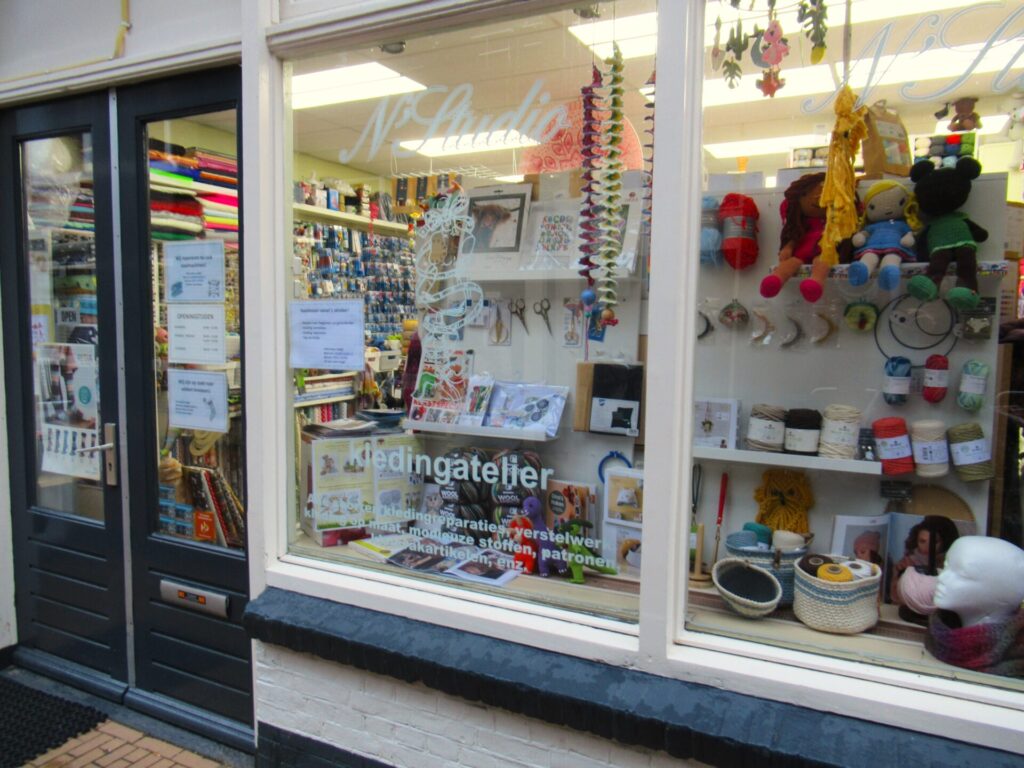
Hello! Can you smell the scent of spices wafting to you from my kitchen through the internet? I’ll give you the recipe further on, but first I’d like to talk a bit about buttons. My Norwegian cardi still needed buttons, so I went to a nearby haberdashery shop. On a drizzly morning, when everything else in the street was still closed, it was a haven of colour and cosiness.
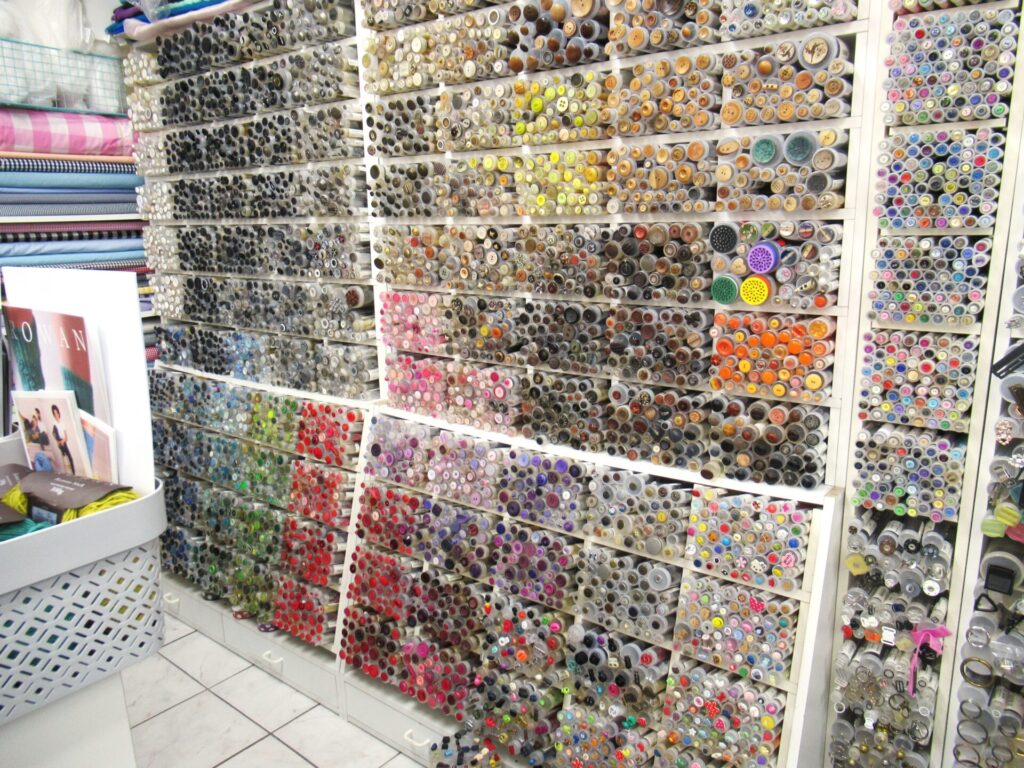
It is a tiny shop, crammed with sewing and knitting notions, tools and yarns. And they have a fabulous button wall.
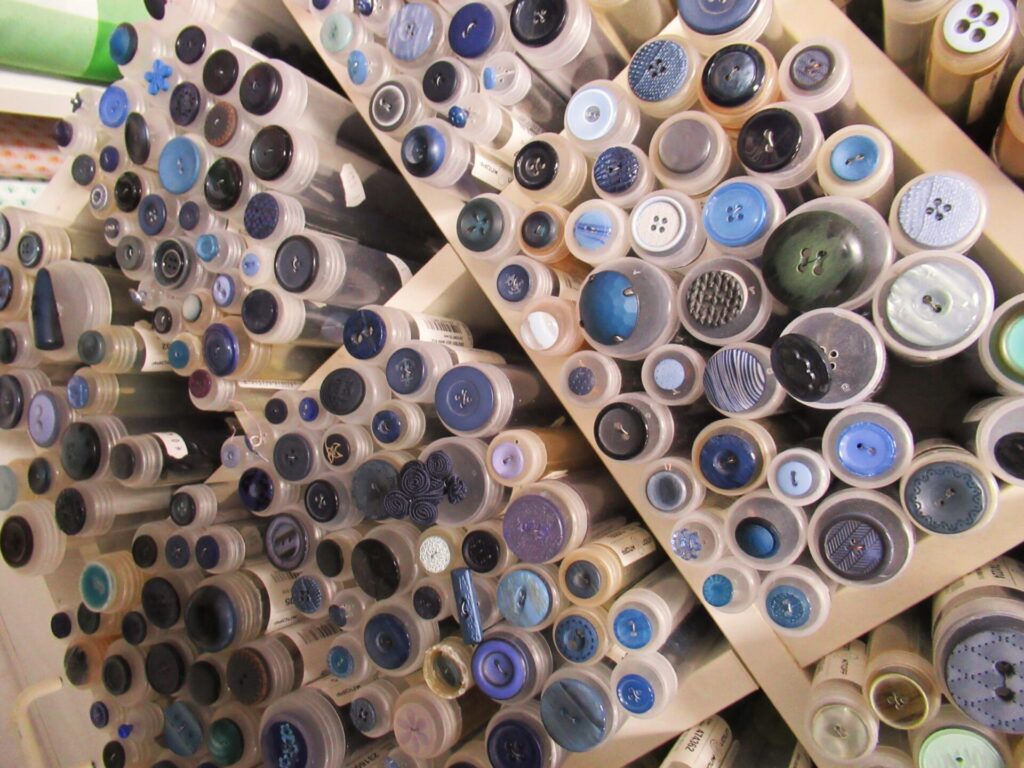
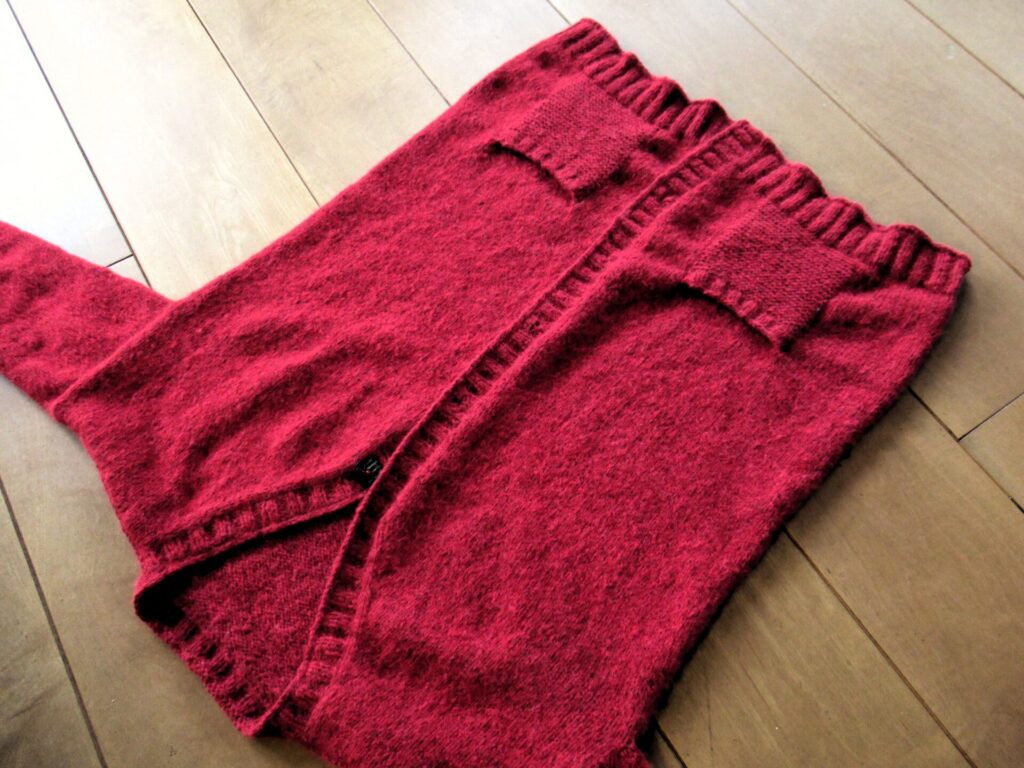
The cardigan I knit is a kind of greyish, fairly dark blue. So, I first looked at blue buttons.
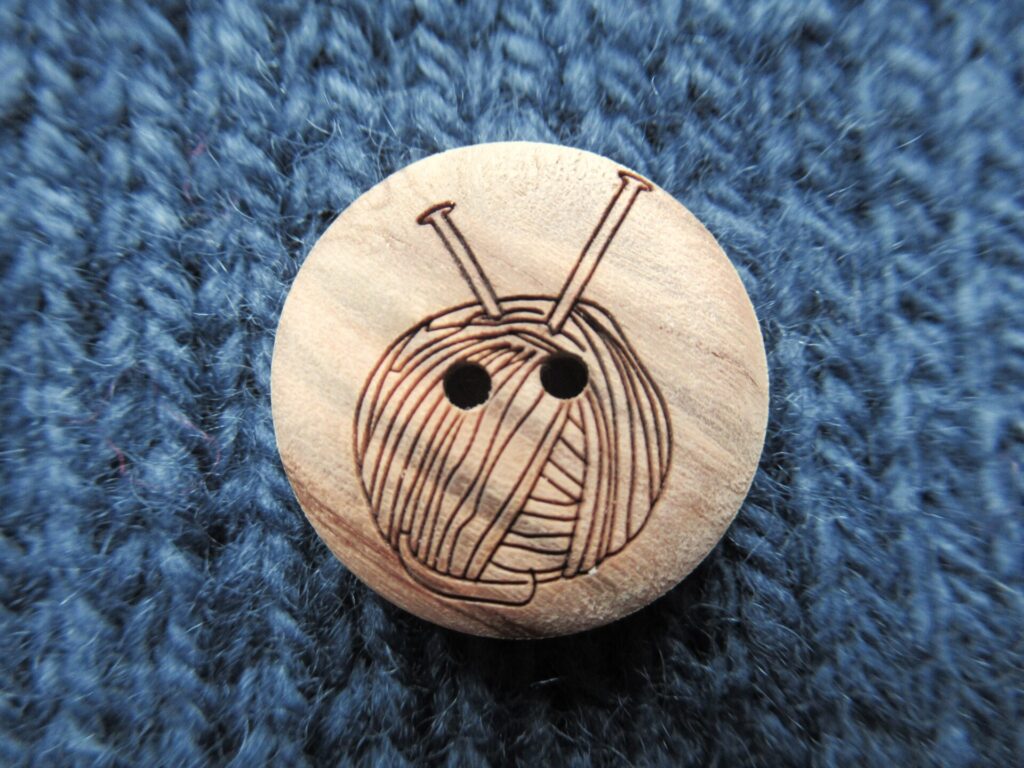
I found some in the right size that matched my yarn exactly, but… they looked a bit dull. Looking at the wooden button section for something more exciting, I fell in love with these – aren’t they fun?
The cardigan I sewed them on to is the Lang Yndlingskofte from Kofteboken 2 (this beautiful Norwegian book can be found here on Ravelry). It’s the cardigan I steeked in this blogpost. The yarn I used is CaMaRose ‘Økologisk Hverdagsuld’ (100% organic wool, 150m/164yds/50g). It is warm and light, and became very nice and soft after washing. A really, really lovely yarn. I’ve shortened the cardi by 10 cm/4 inches, but it is still fairly long and would also be great worn with a dress.
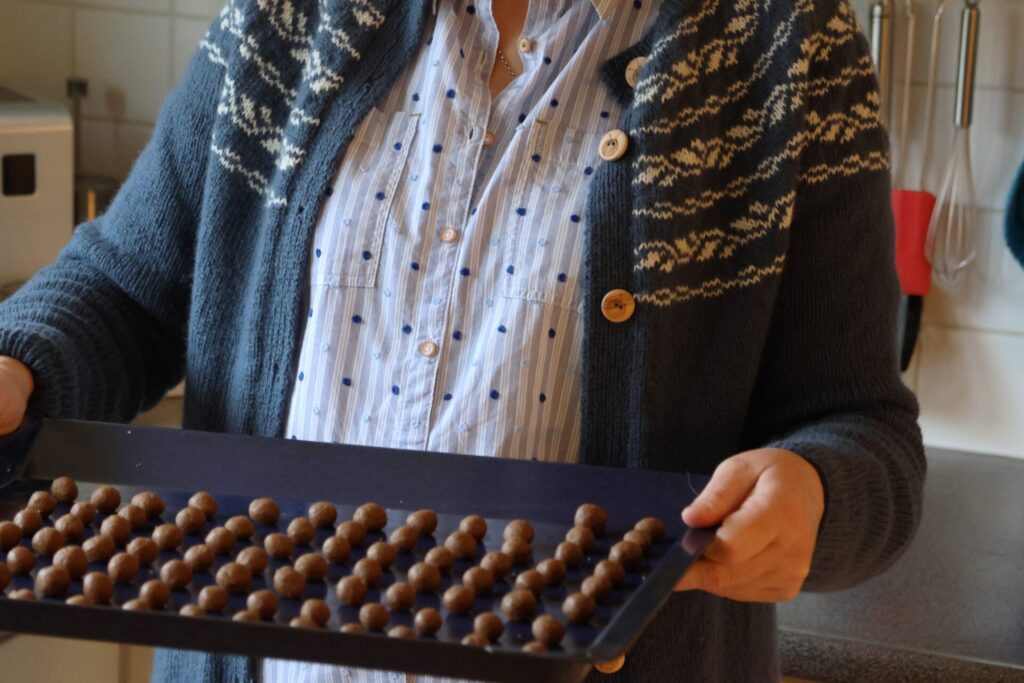
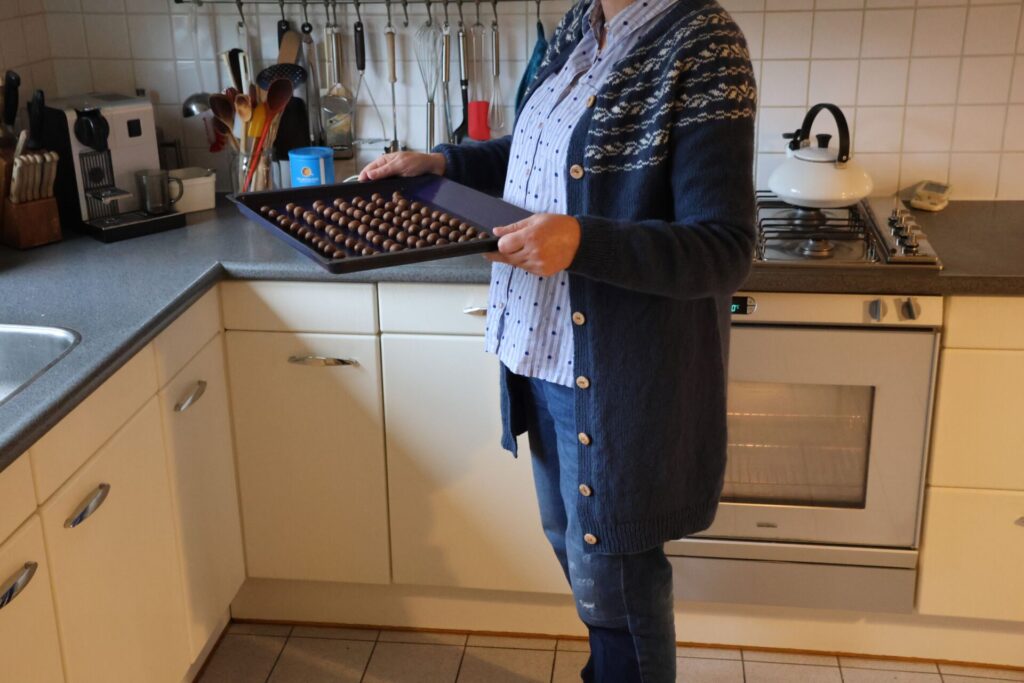
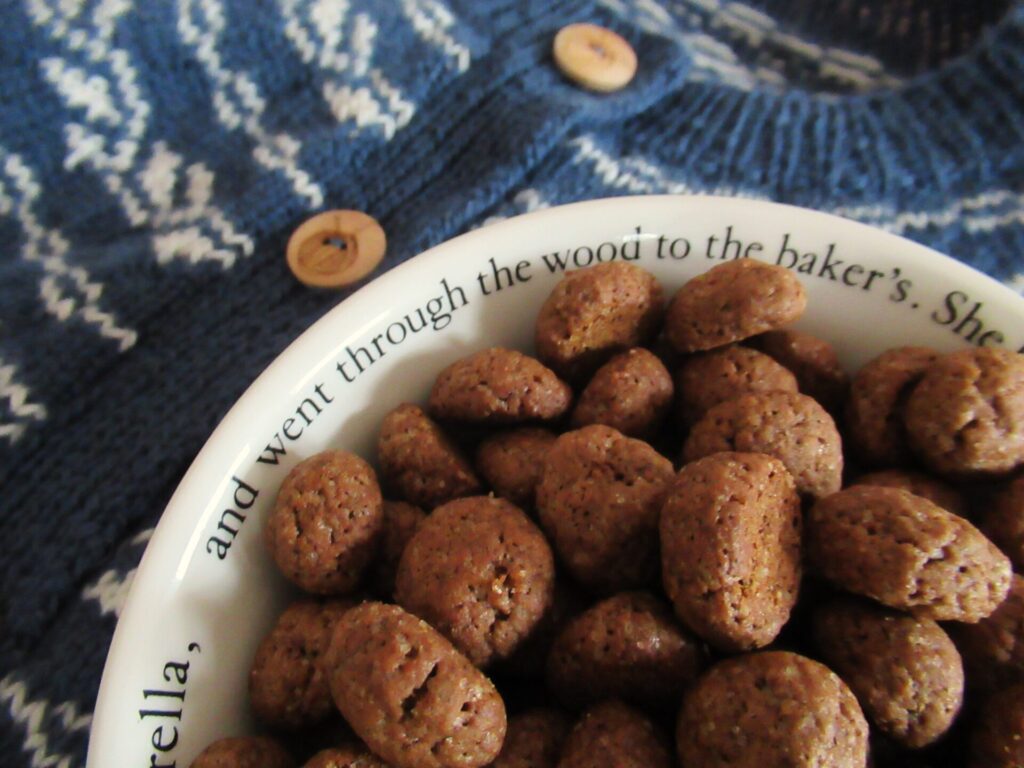
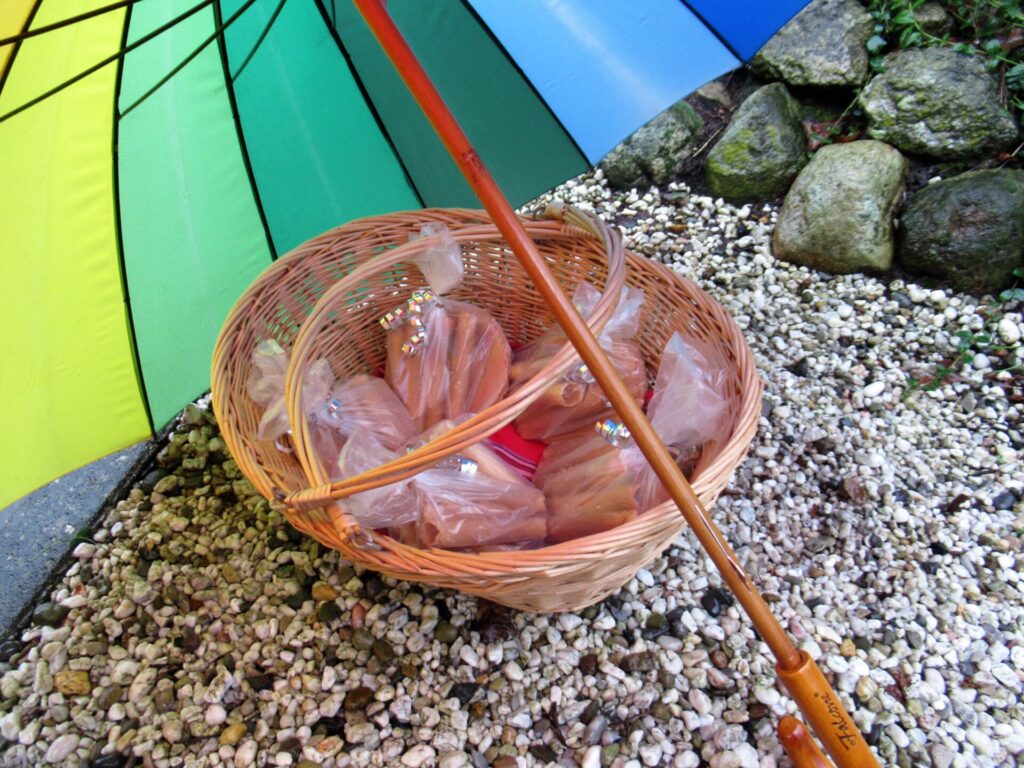
So, what is that on the baking tray I’m holding in my hands? Kruidnootjes! Kruidnootjes (literally: spice nuts) are a traditional Dutch Sinterklaas treat. In the Netherlands, Sinterklaas is celebrated with gifts on December 5th, the eve of Saint Nicholas’ Day. Three weeks before the day, the venerable Sinterklaas arrives in the country by steamboat. We welcome him with special songs, and in the weeks leading up to the celebration we eat tons of kruidnootjes. They’re great to bake with children. Here is my recipe:
Kruidnootjes
(makes about 100)
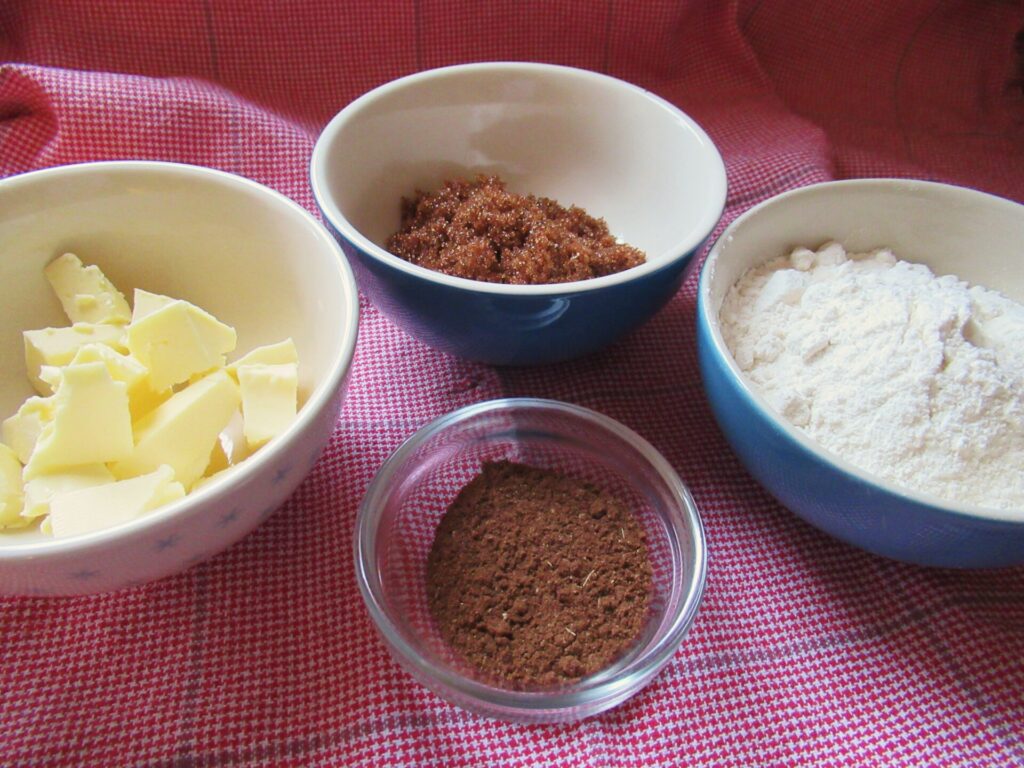
Ingredients:
100 g self-raising flour
50 g dark brown muscovado sugar
40 g unsalted butter (softened)
1 tablespoon mixed spice*
A pinch of salt
2 tablespoons milk
*The Dutch spice mix used in this and other traditional recipes is called speculaaskruiden. It does not always have exactly the same ingredients, but is usually a blend of: ground cinnamon, coriander, aniseed, ginger, nutmeg, cardamon and cloves. Sometimes it also contains pepper or allspice. If you can’t get speculaaskruiden where you live, why not make your own? A beautifully illustrated recipe can be found here.
Method:
Knead all the ingredients together by hand until they form a ball. Wrap the ball in clingfilm and place it in the fridge for 30 minutes.
Preheat the oven to 175˚C/345˚F (hot air: 160˚C/320˚F)
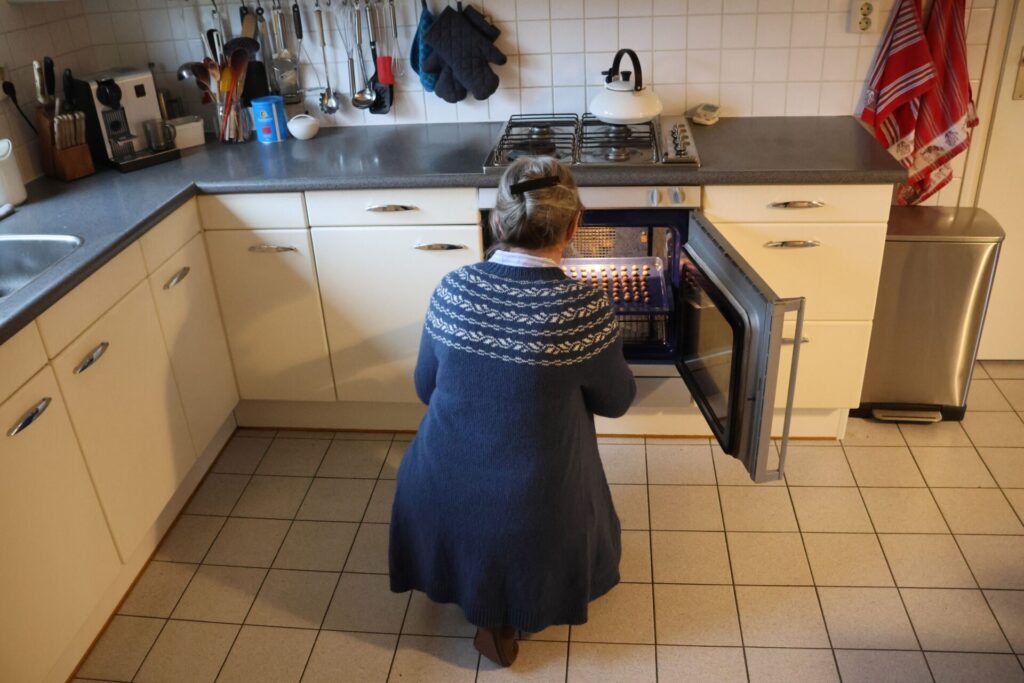
Roll the dough into about 100 small balls (approx. 1.5 cm/½ inch in diameter). Place them on a lightly greased baking tray.
Place them in the oven…
… and bake for 20 minutes.
Leave to cool until they are nice and crunchy.
Eat straightaway or store in an airtight container
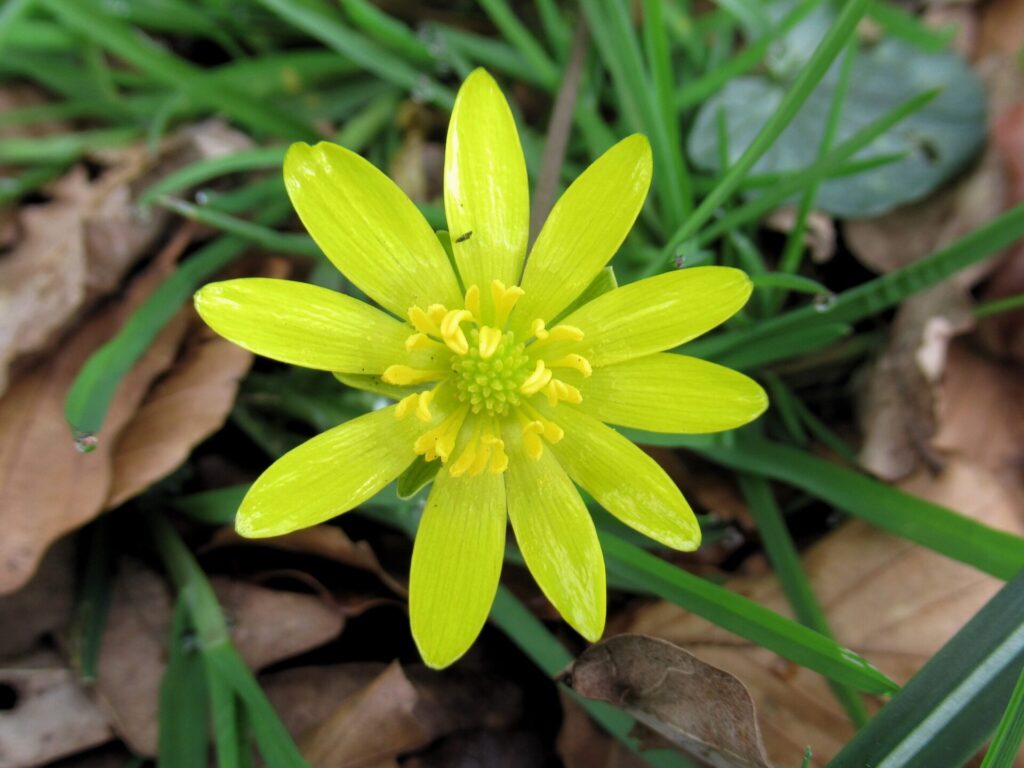
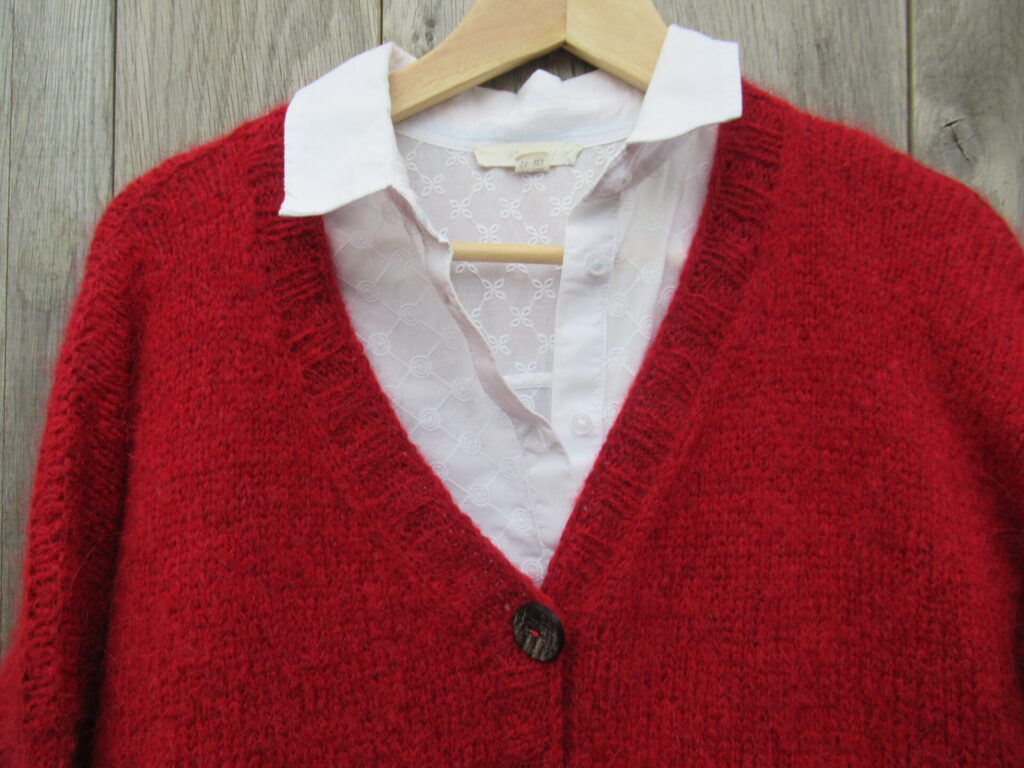
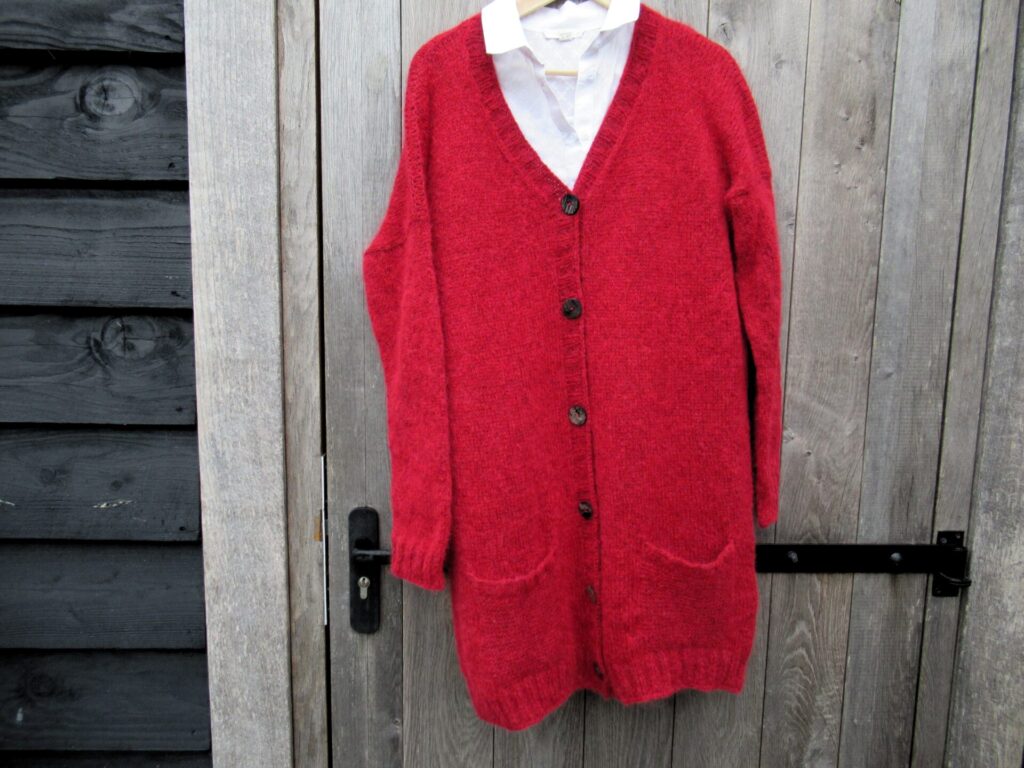
Hello! I hope this finds you all well. From some of you in the US I’ve heard that you’ve had a thick blanket of snow recently and spring seems far away. Here, March has brought rain and hail storms as well as some milder days. Judging by the flowers and the birds spring is in the air. But judging by the cardigan I’ve just finished winter is around the corner. My knitting is sadly out of sync with the seasons again. Before going on to more spring-like things, let me tell you about it first.
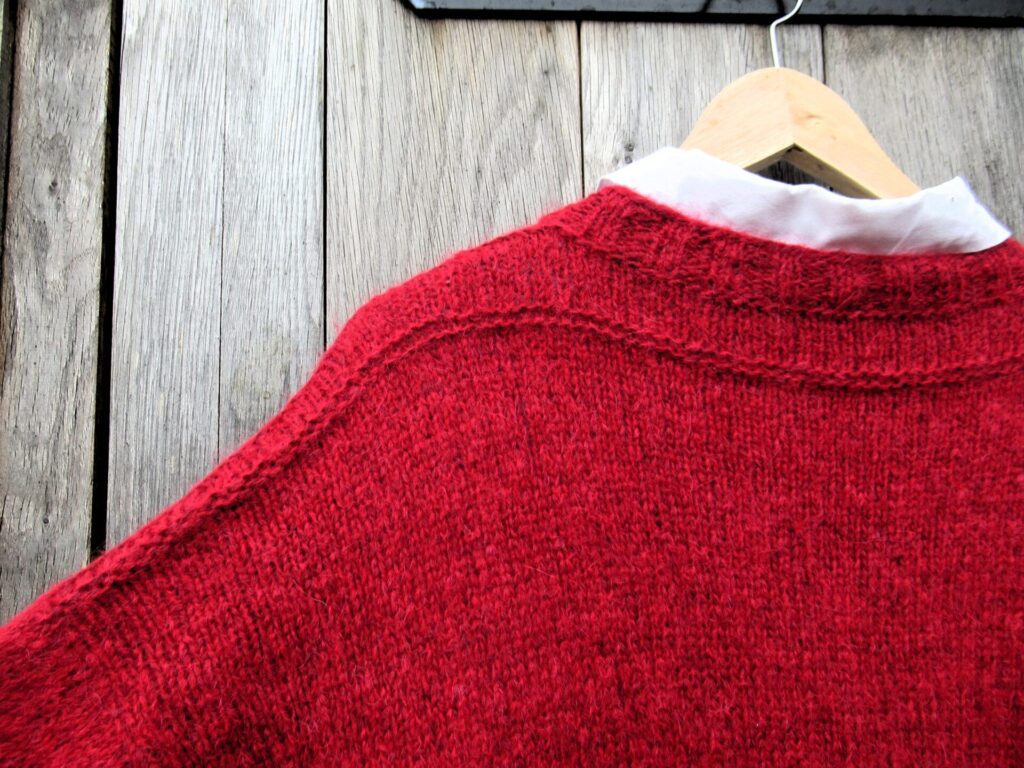
This is the Air Cardigan from Finnish designer Suvi Simola, and the yarn I’ve used is Garnstudio Drops ‘Air’ in Crimson, a beautiful deep and warm red. It is long, oversized and very cosy. Size M is 86 cm (33¾”) long, with 64 cm (25½”) bust width.
The Air cardigan is knit from the top down and the sleeves are knit on. The only seaming to be done afterwards is the sides of the pocket linings. The pattern is very clear and has photo tutorials for several techniques. The one thing I didn’t like about it, is the stretchy bind-off used for the sleeve and body ribbings. Can you see how wavy the bottom is? I painstakingly unpicked it and re-did it using an ordinary bind-off.
What I do like a lot, are the decorative purl ridges on shoulders and upper back. This is where the knitting starts, with a narrow strip with short rows for shaping. From the purl ridges on either side of this strip stitches are picked up for fronts and back. Very nice!
All in all, a lovely design. It is knit on 5 mm (US 8) needles and should be a quick knit for someone who doesn’t have a dozen projects on the go simultaneously. Oh well, when the first chilly autumn days come, I’ll have a cosy cardigan ready and waiting.
And now – spring things!
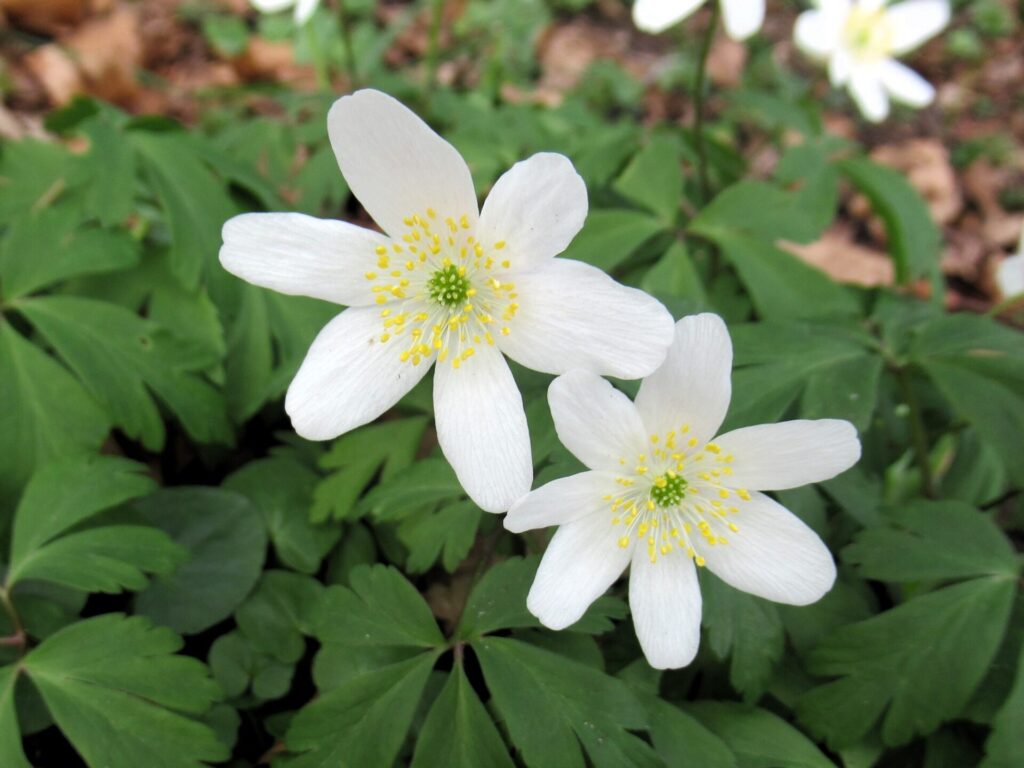
It’s blossom time. And it’s also wood anemone time.
Wood anemones are not very common in these parts. They mainly grow in ancient woodlands and on historic country estates. Places where it is as if time has stood still and the rest of the world with all its woes and worries seems far away.
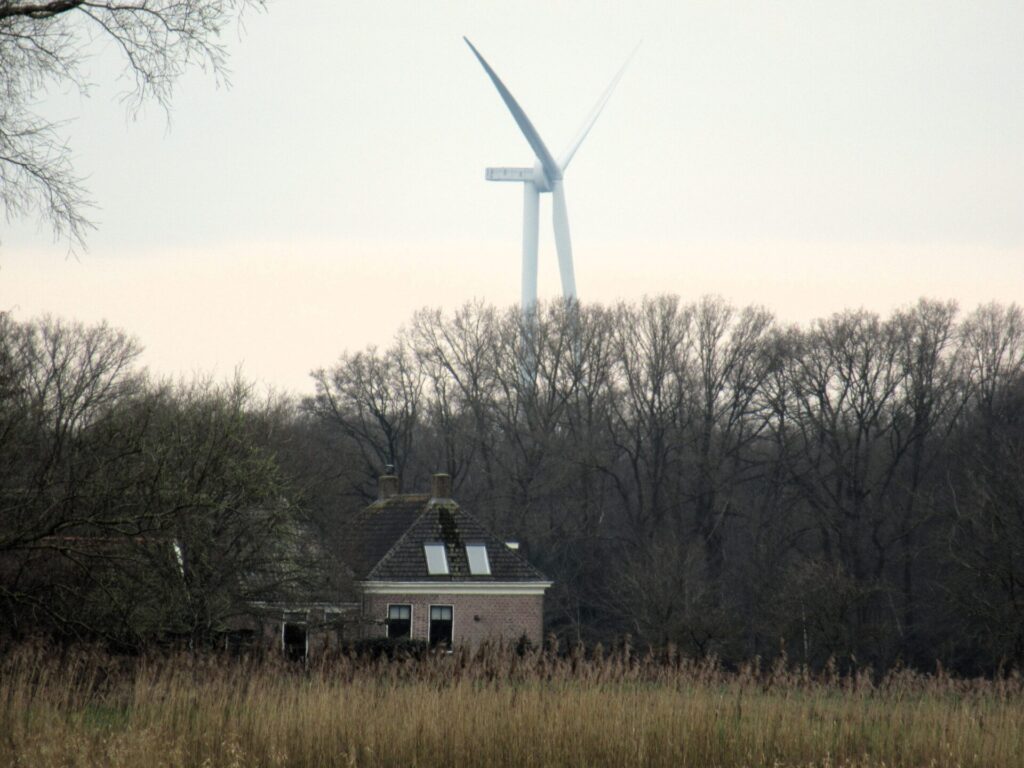
Where a distant wind turbine is the only sign of modern times.
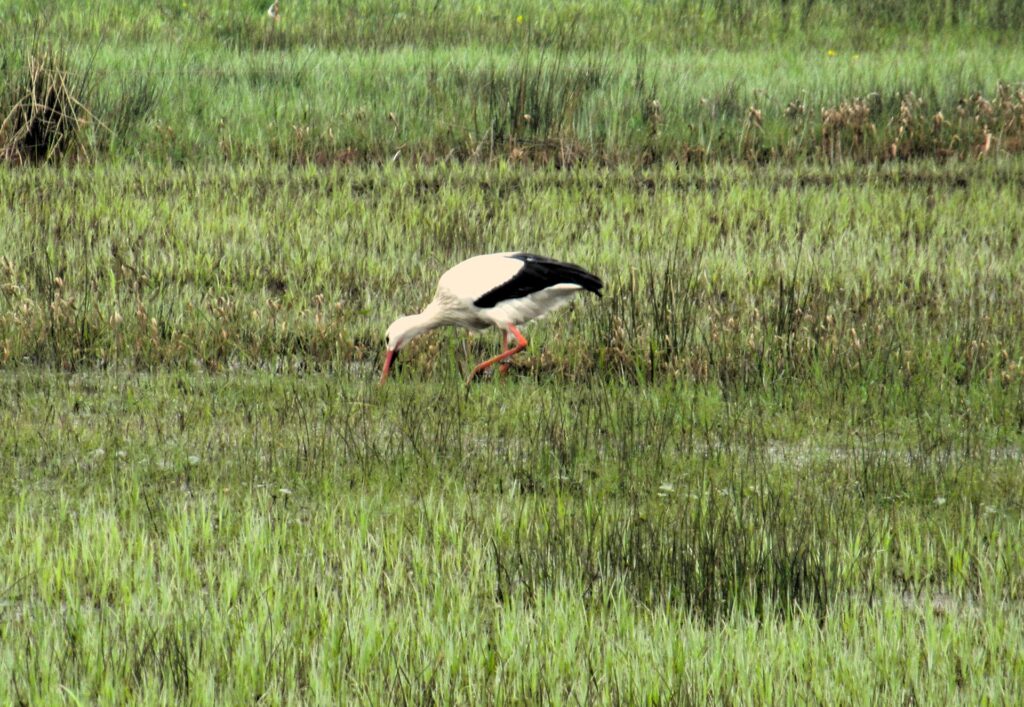
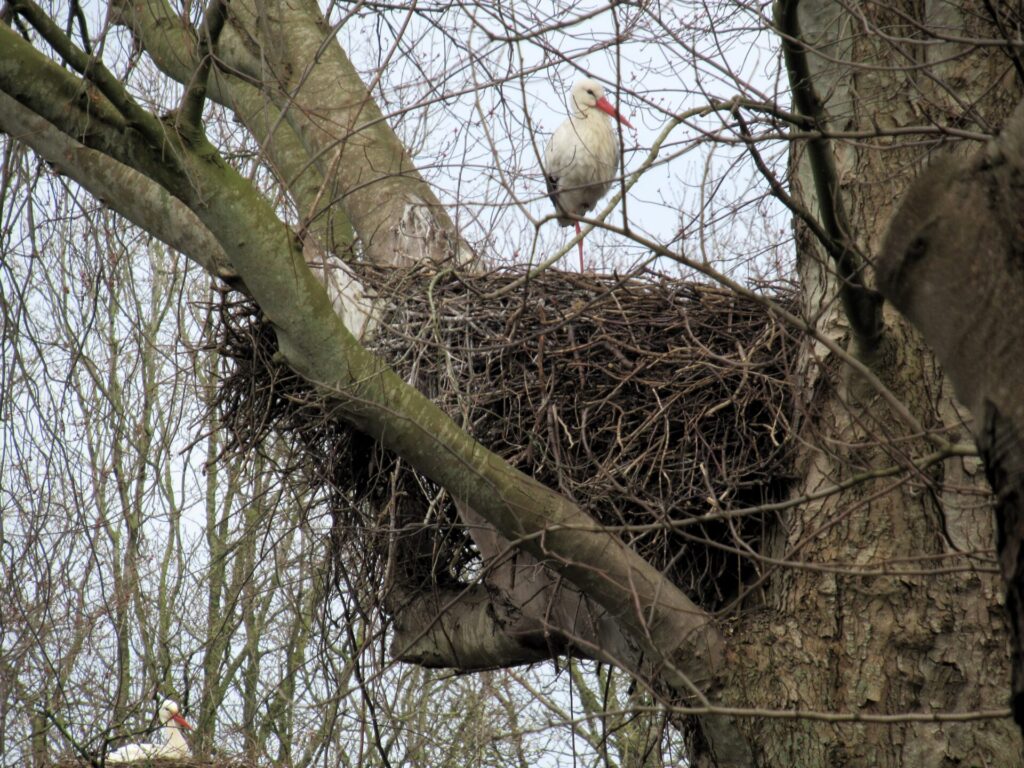
In one of these dreamy wood anemone woods many white storks are nesting. When you see them out in the water meadows foraging for frogs and moles, you don’t hear them.
But from their nests their bill clattering can be heard far and wide.
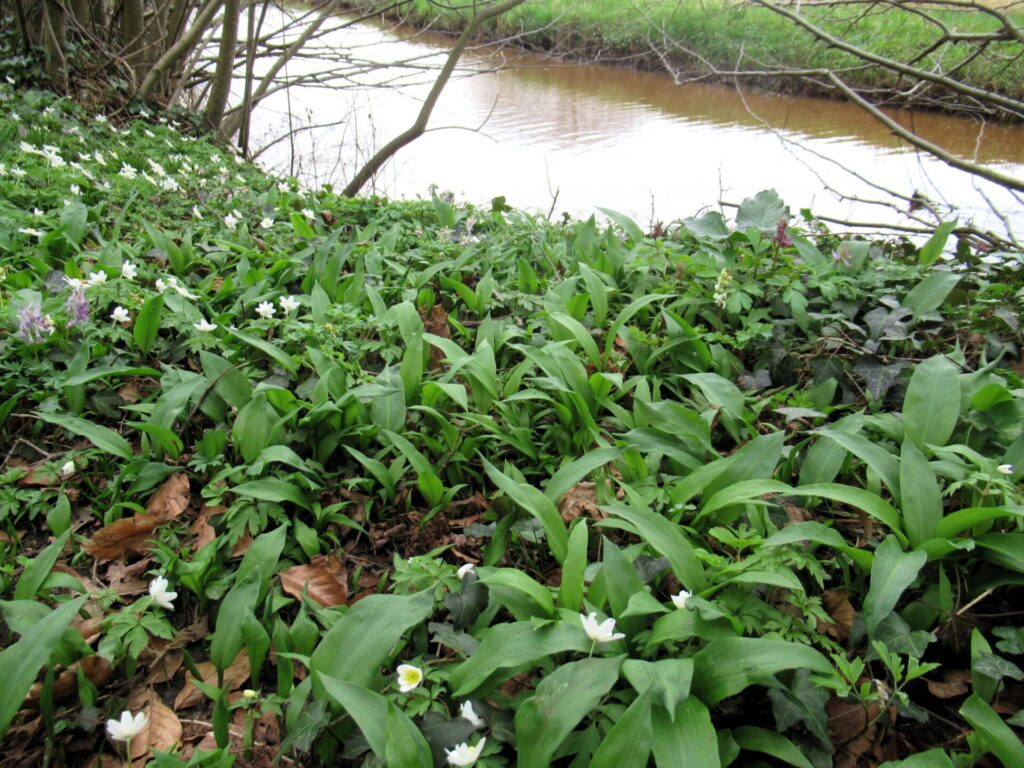
In some places, the wood anemones grow together with wild garlic.
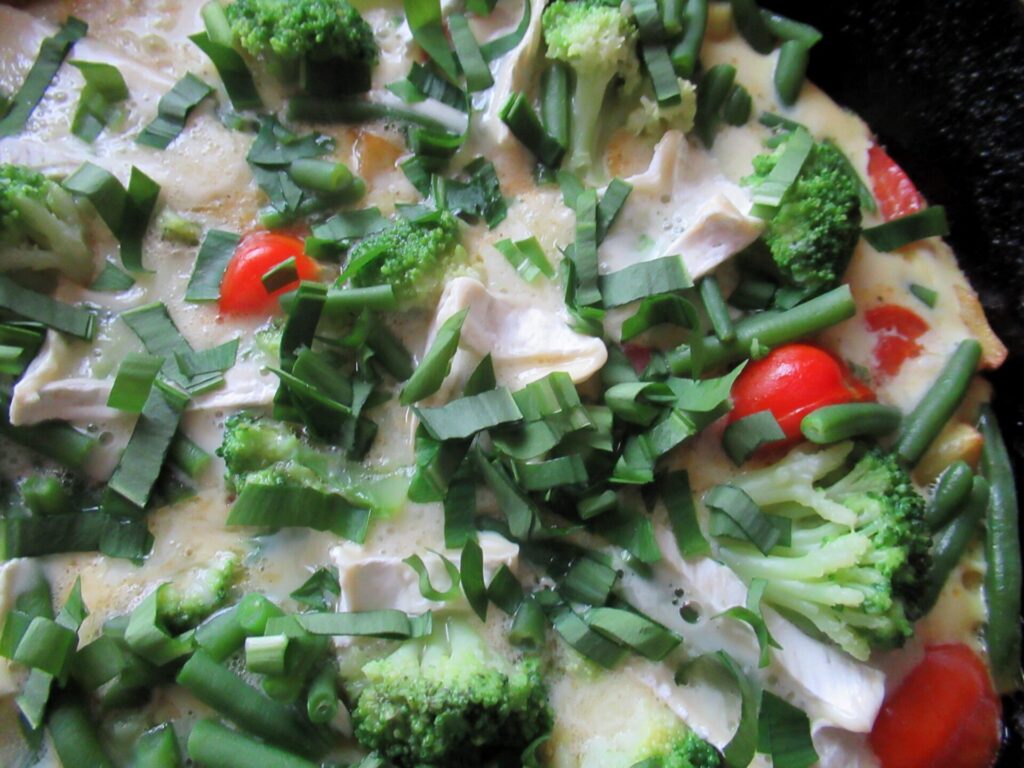
I wouldn’t dream of picking it here, but fortunately we also have a small patch of not-so-wild wild garlic in our garden. And that brings me to a recipe I’d like to share with you – Potato and veg frittata with Camembert and wild garlic (can also be made without wild garlic). Our young hens are so productive that we have of necessity become very creative with eggs. And then there are enough eggs left to feed many of our neighbours, too.
Potato and Veg Frittata with Camembert and Wild Garlic
(Serves 2-3)
Ingredients
500 g potatoes
2 tbsp olive or sunflower oil
100 g green beans
150 g broccoli
100 g cherry tomatoes
4 eggs
50 ml milk
Salt & pepper
100 g Camembert or similar
A small bunch of wild garlic leaves (if you don’t have access to wild garlic, just leave it off or use chives instead)
Method
Rinse the vegetables. Trim and halve the beans, divide the broccoli into small florets and cut the tomatoes in half.
Bring a pan of water to the boil. Add the green beans and broccoli, bring to the boil again and cook for 5 minutes. (If using frozen cook for 2 minutes.) Drain in a colander and rinse with cold water to stop the cooking process.
Peel and cube the potatoes. Heat the oil in a large frying pan and sauté the potatoes on medium heat for 10 minutes (until almost done).
Meanwhile beat the eggs in a bowl with the milk and plenty of seasoning, and cut the Camembert into wedges.
Add the tomatoes, green beans and broccoli, arranging the florets in a nice pattern if you like.
Pour over the egg mixture and place the Camembert wedges on top of everything.
Cover with a lid and leave to cook on low heat until the eggs are set (about 10-15 minutes).
Meanwhile rinse the wild garlic, pat dry and cut into strips.
Just before serving, sprinkle the wild garlic over the frittata.
Hello! I know that some of you are on holiday, while others are off enjoying a fabulous weekend at a Fiber Fest. So maybe you’re reading this in front of your tent, on the veranda of your summer cottage, or in your hotel room. Or during your coffee break at home or at work. I like imagining all these different surroundings and look forward to reading about them on your blogs, Ravelry or elsewhere.
Nothing much is happening here at the moment. We’re at home, doing some work and just living our lives, and I thought this week I’d write about several of my small summer pleasures. First of all: rain.
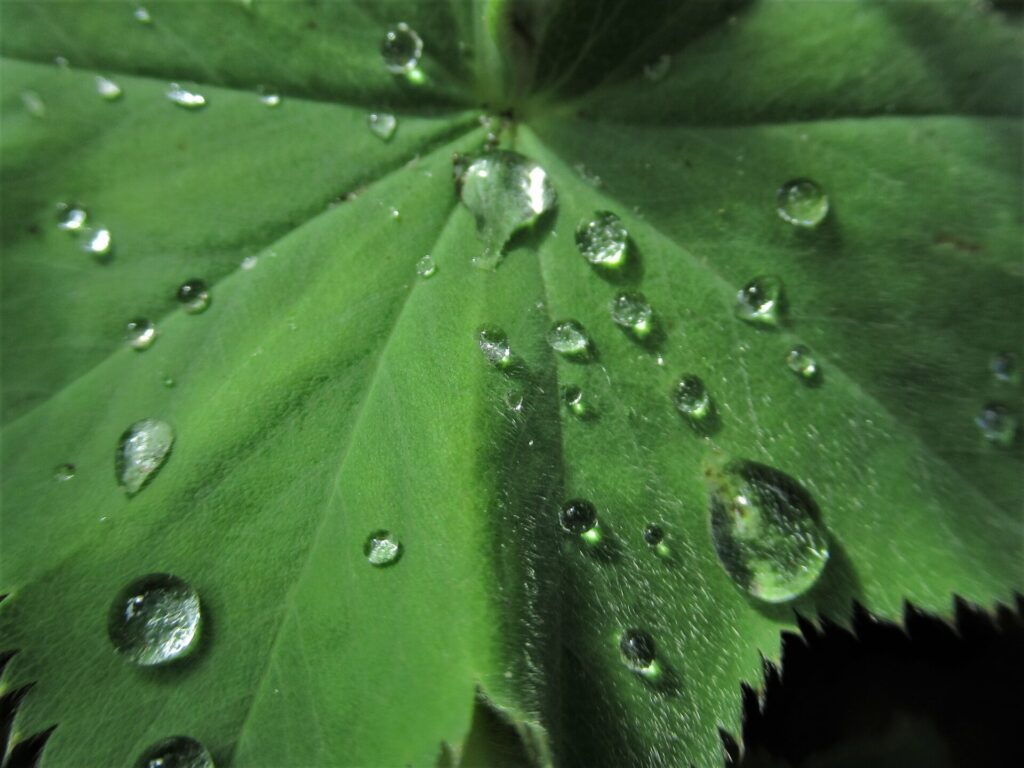
We’ve had so much rain this week! Is that a pleasure? Yes, for me it is. After the hot and dry start to the summer, I love the muted light, the freshness and the wetness of it all. And our soil, plants and trees really need it.
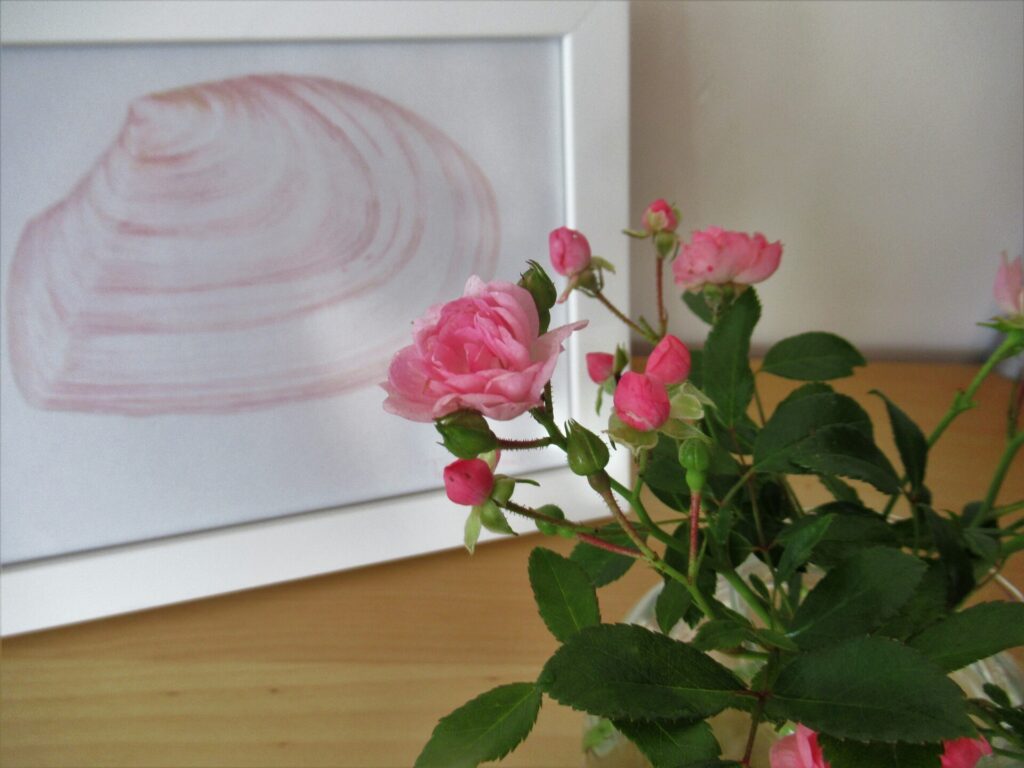
The garden is perking up and another of my small summer pleasures is strolling through it, looking at the flowers, butterflies and insects. I’ve picked a few sprays of miniature roses for a small glass vase (top). We also have a tiny fuchsia bush, with flowers like elfin ballerinas.
In a recent episode of BBC’s Gardener’s World, there was an elderly couple who had dedicated their lives to growing miniature fuchsias. On the one hand, incredibly twee. What a thing to dedicate your life to! But on the other, so peaceful – there are far worse things to do with one’s life.
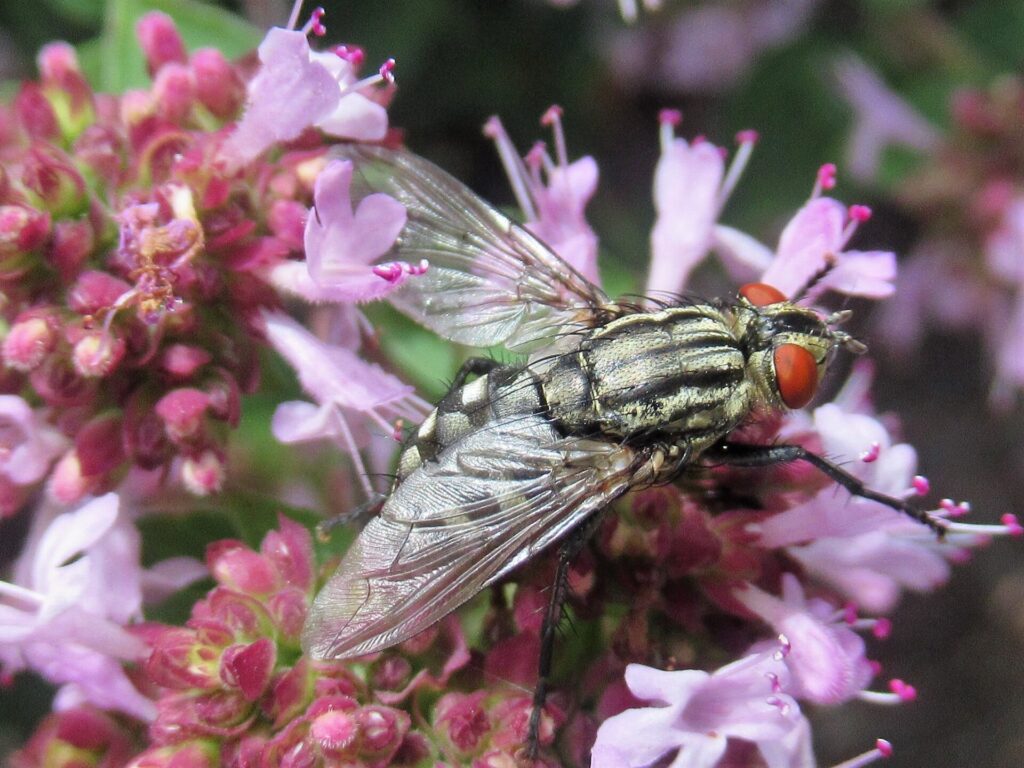
Speaking of peaceful, how can I ever swat a fly again, now that I’ve looked at this one from up close? With its veined glassy wings, its huge red eyes and its checkerboard-pattered backside it’s a beautiful creature.
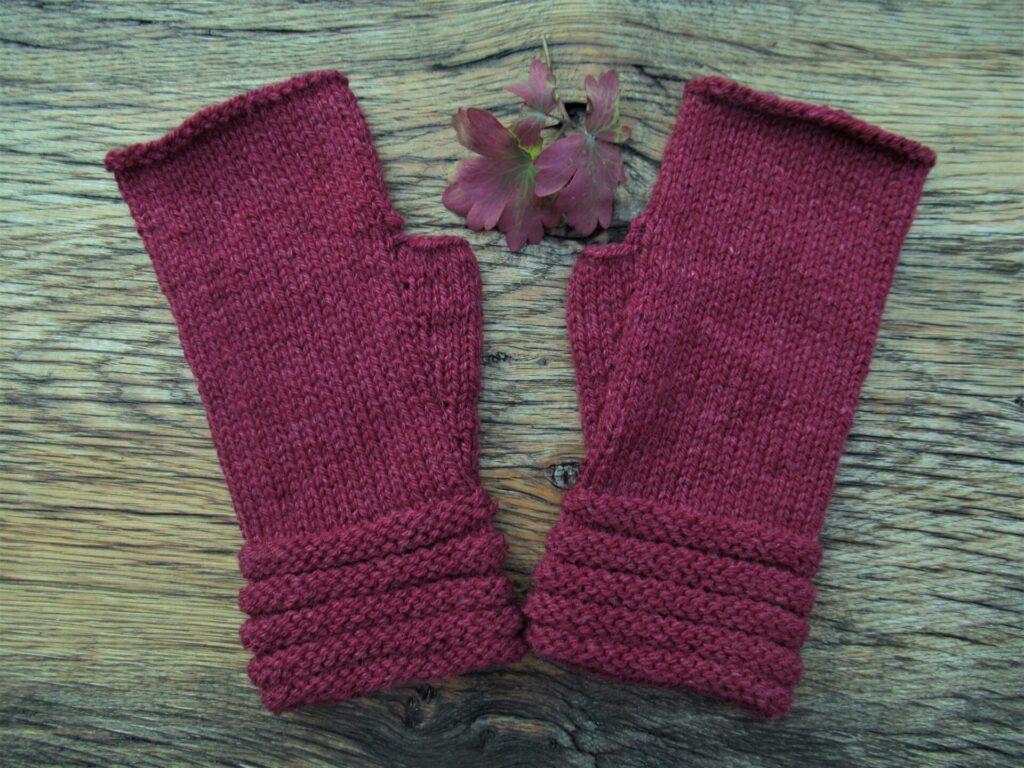
My small summer knitting projects are also giving me a lot of pleasure. I just finished a pair of Welted Fingerless Gloves for our daughter, to replace a pair that was worn to shreds. They took 34 grams of Fonty’s ‘Tartan 3’, a yarn dyed using a more sustainable method than usual.
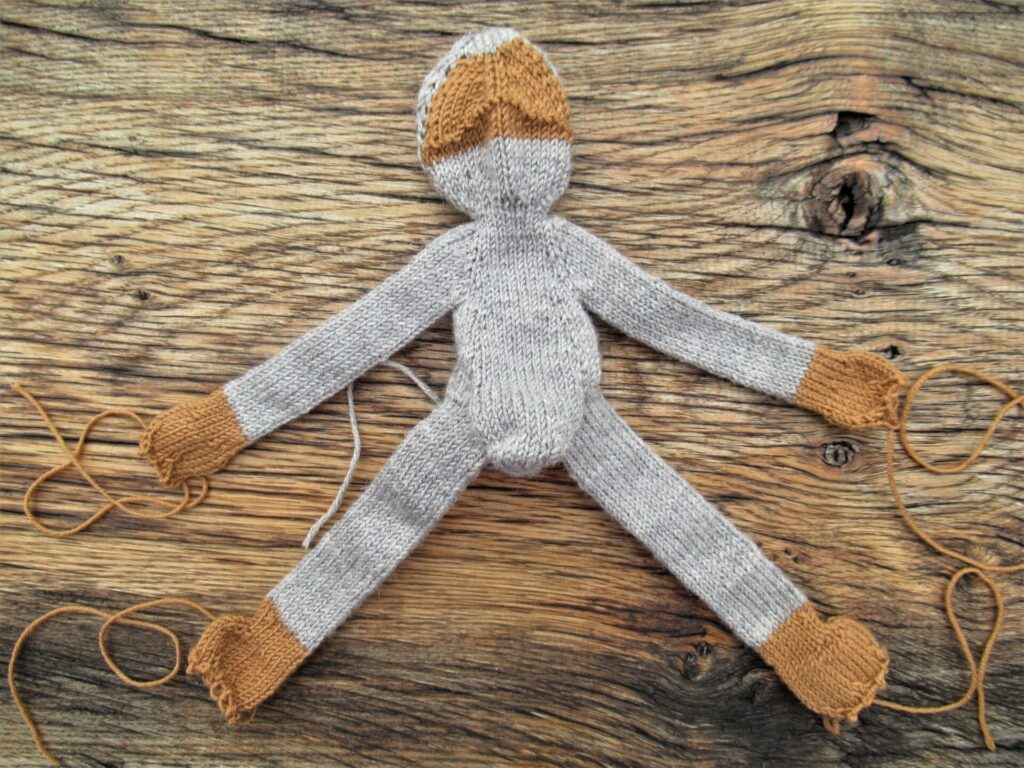
On my needles now is a small monkey for our grandson. More about that soon, when it’s finished.
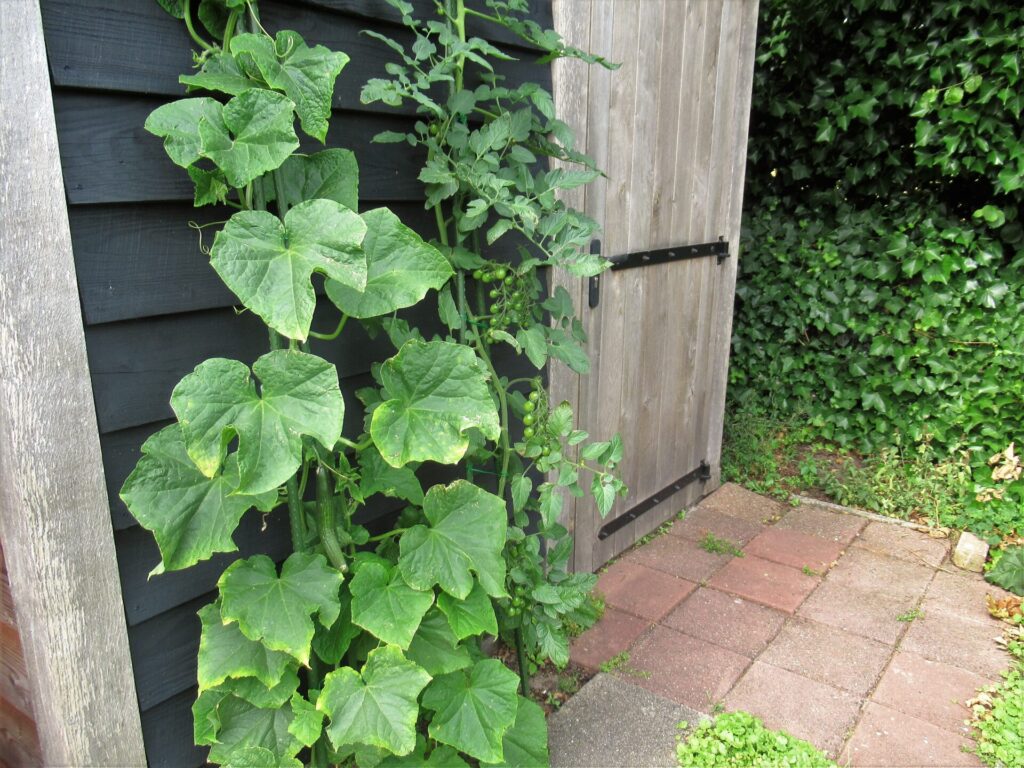
We do not have a vegetable garden anymore, but we do have some vegetables in our garden. Rocket and spinach on last year’s compost heap. Rhubarb plants here and there. And one tomato and one cucumber plant against our tool shed.
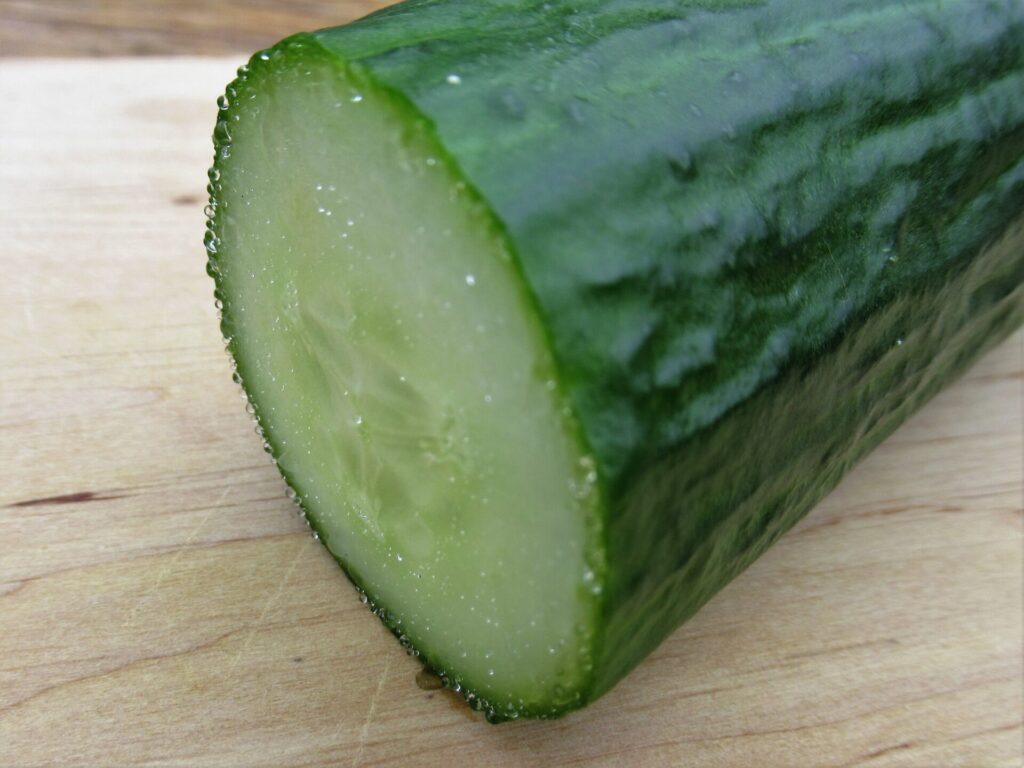
The tomatoes are not ripe yet, but we’ve already harvested three wonderfully fresh and crunchy cucumbers – another small summer pleasure.
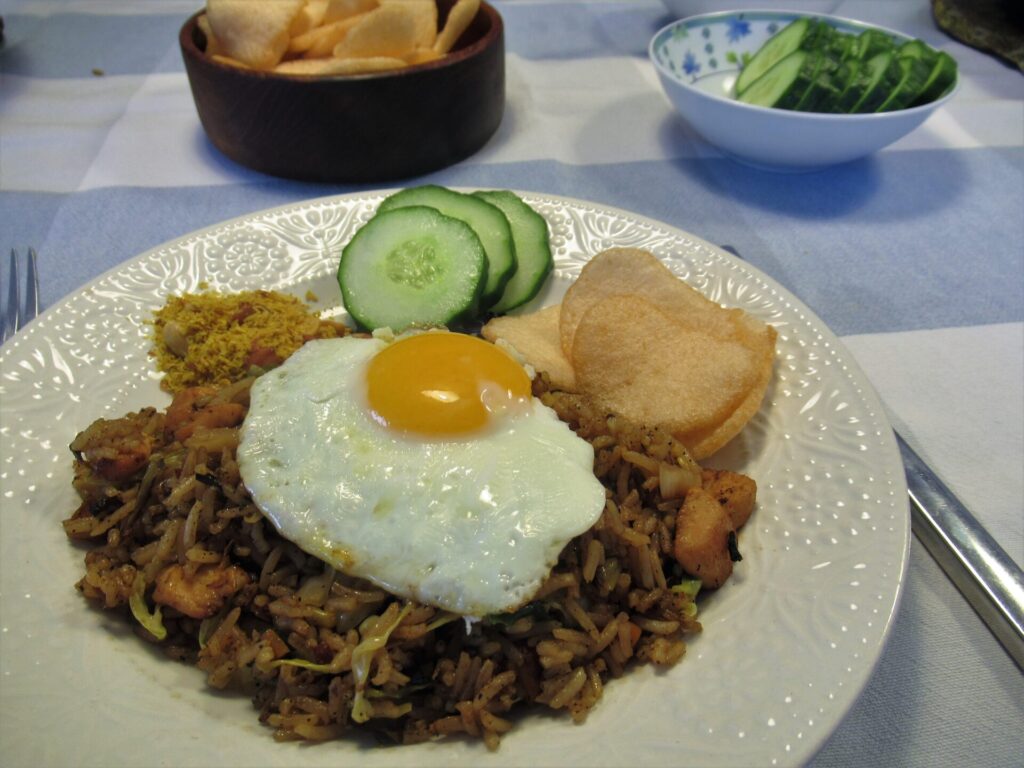
The other day we ate slices of cucumber with an Indonesian-style meal. (We have a large Indonesian community and their food culture has been an important influence on Dutch cuisine.) While I was cooking and laying the table, I thought you might like my recipe for Nasi Goreng and took some pictures. It’s an easy weekday meal and I’ve made it countless times over the years.
I don’t usually measure the quantities and sometimes vary with the ingredients, but I’ve done my best to write up a cookable recipe. My version is only slightly spicy. My husband likes it hot and adds lots of sambal.
Nasi Goreng
Serves 2
Ingredients
125 g white rice
1 tbsp sunflower oil
150 g chicken breast, cut into cubes, or a vegetarian alternative
1 onion, chopped
2 tsp ground coriander seeds
½ tsp ground cumin
1 tsp sambal brandal (a mild, fried sambal)
1 medium carrot, finely diced
150 g finely shredded pointy cabbage
½ tbsp ketjap asin (salty soy sauce)
½ tbsp ketjap manis (sweet soy sauce)
Salt
Method
The day before:
Cook the rice, leave to cool and store in the fridge (It is essential to do this ahead of time or you’ll get a very sticky Nasi Goreng)
On the day:
Heat the oil in a wok and fry the chicken cubes on high heat until lightly browned
Reduce the heat to medium, add the onion and fry until slightly transparent
Add the sambal brandal, ground coriander and cumin and stir for 2 mins
Turn up the heat, add in the carrot and cabbage and stir fry for about 3 mins
Reduce the heat to low, mix in the cooked rice and the two kinds of ketjap, and heat through
Add salt to taste
To serve:
This time we ate the Nasi Goreng with sliced cucumber, prawn crackers, serundeng (seasoned roasted coconut with peanuts) and fried egg.
Sometimes I also serve it with stir-fried bean sprouts, atjar tjampoer (sweet-and-sour pickles) and/or satay (peanut) sauce
Hello, and welcome to an autumnal post filled with fungi (and some yarn).
Autumn is a magical time in the forest. It’s the time of rustling leaves underfoot. The time of warm reds, oranges, yellows and browns. The time of golden light on some days, and a fog that shrinks the world and muffles all sound on others. It is also the time of mysterious mushrooms and treacherous toadstools.
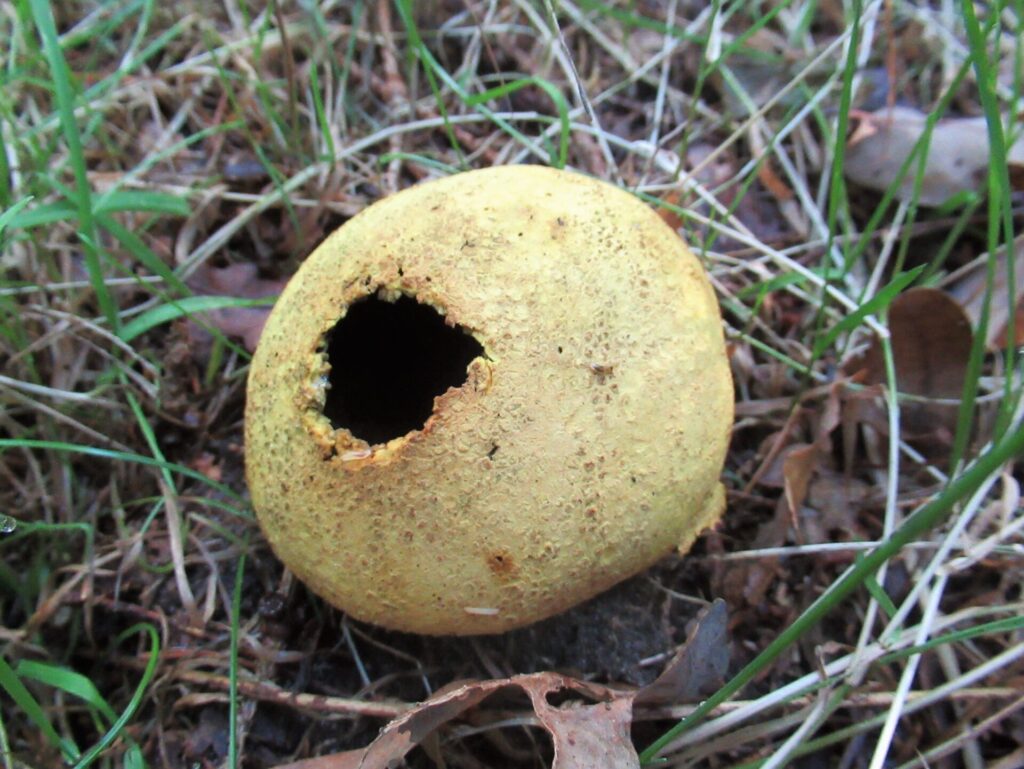
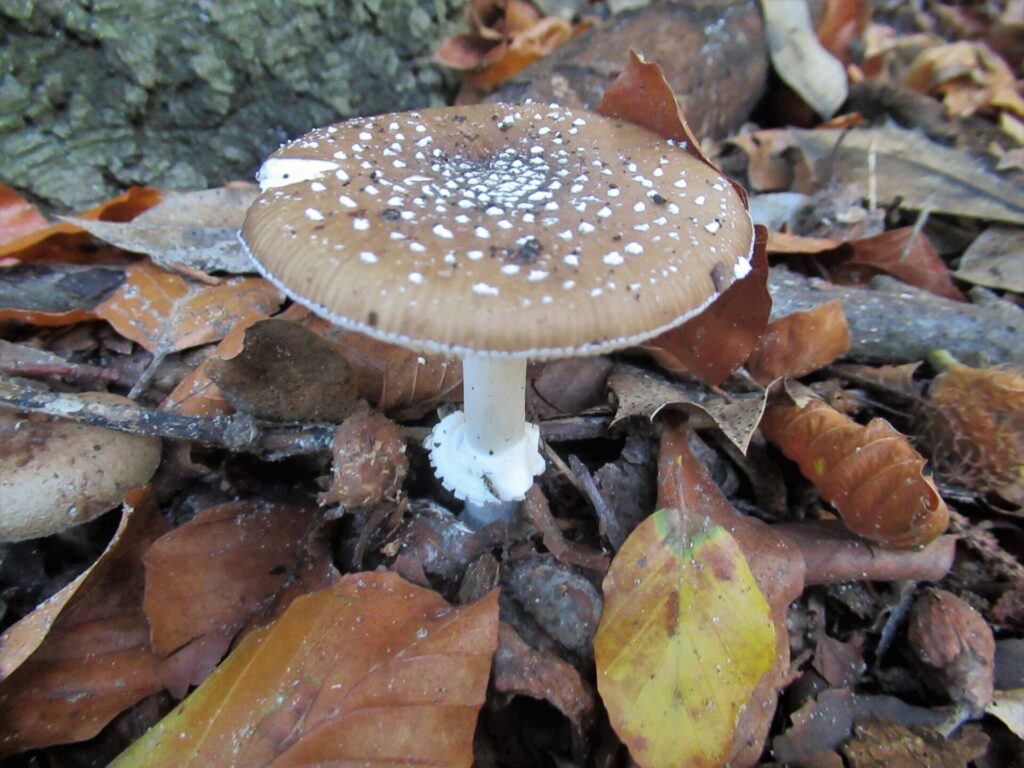
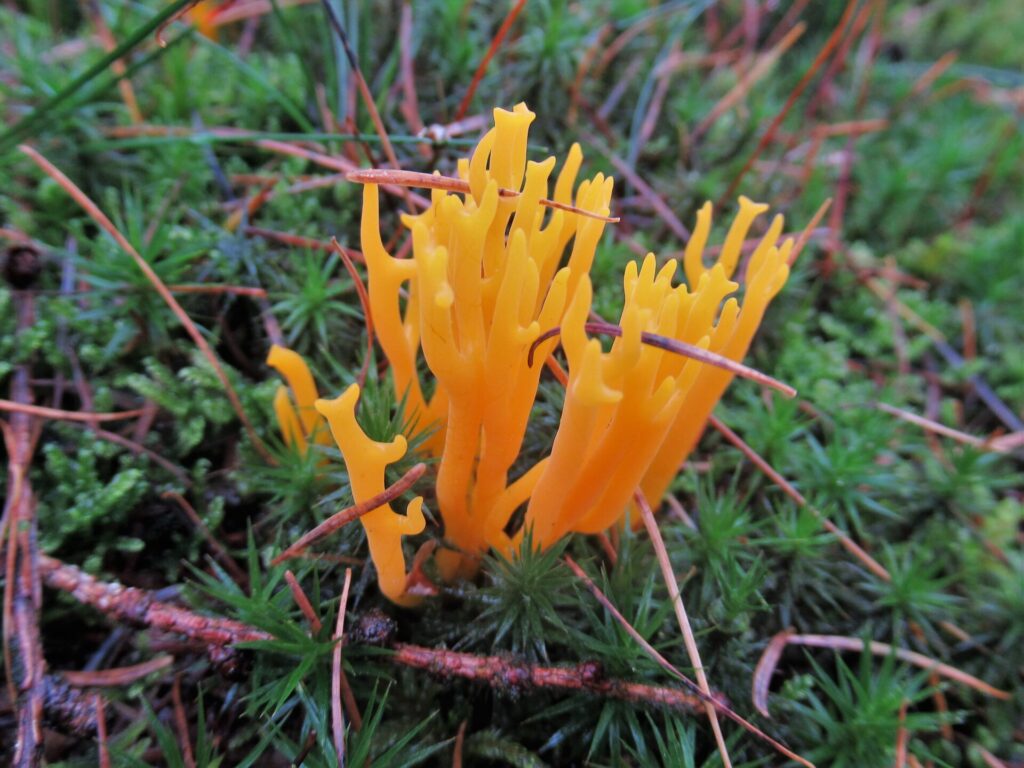
On our walks we marvel at the masses of fabulous fungi popping up this year, and some of them seem to stare back at us open-mouthed.
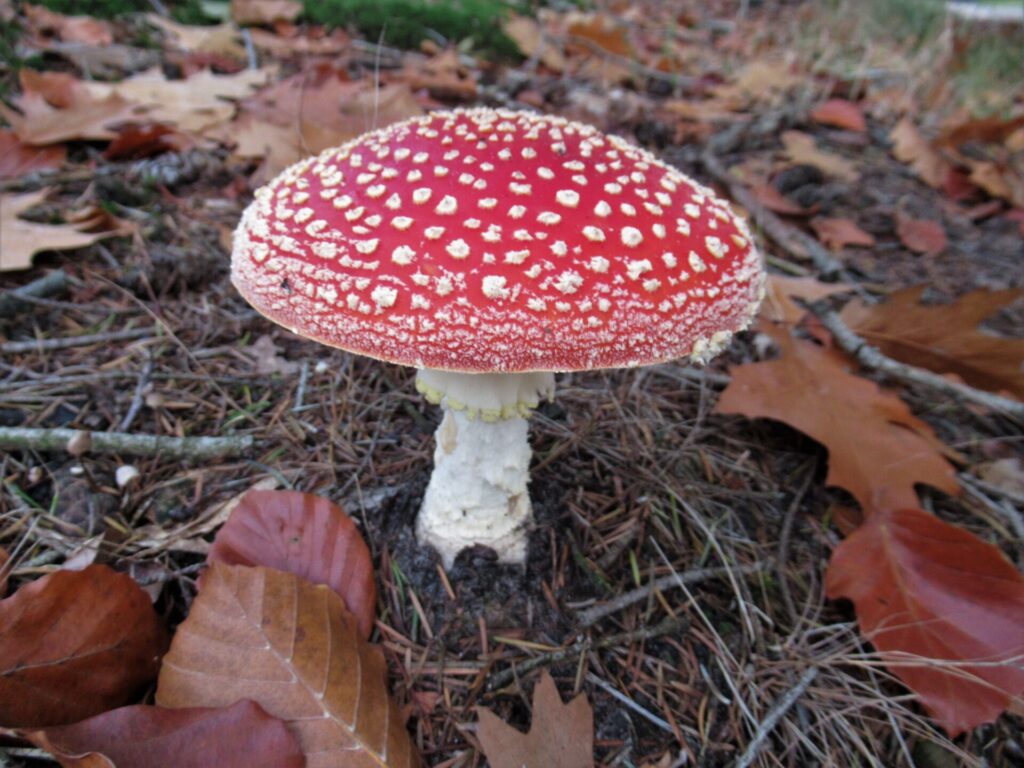
Beware of the poisonous panther cap – some say that it can make you fly, but I wouldn’t like to give it a try:
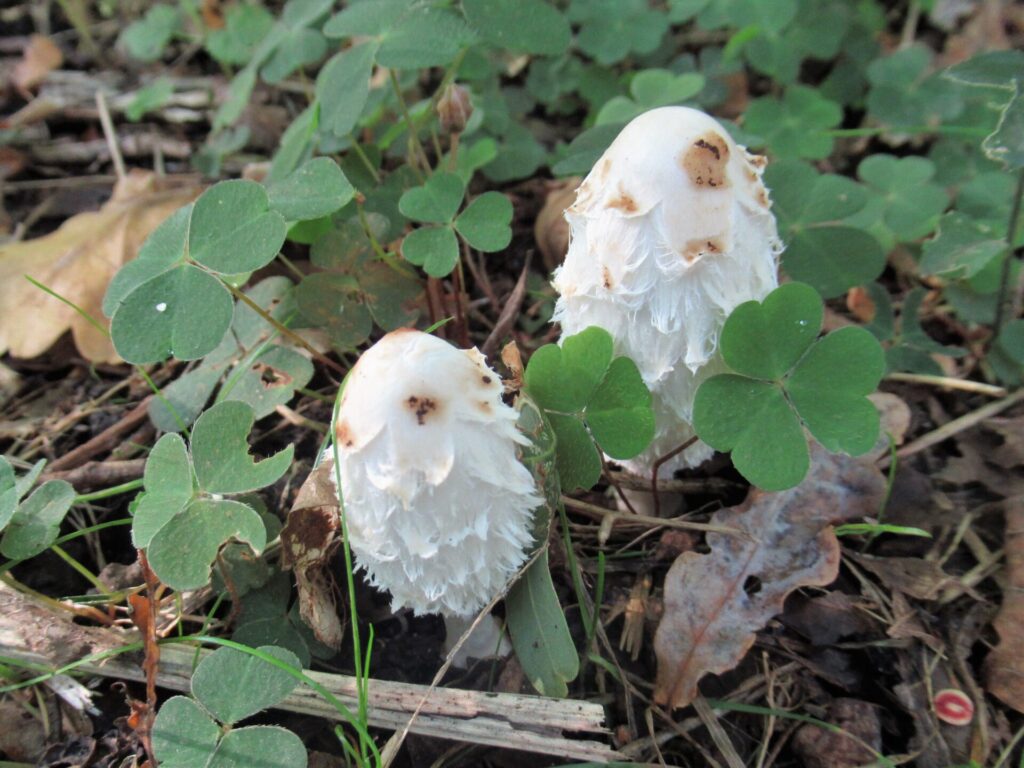
I’m not sure I’d like to try these babies either, although they are edible:
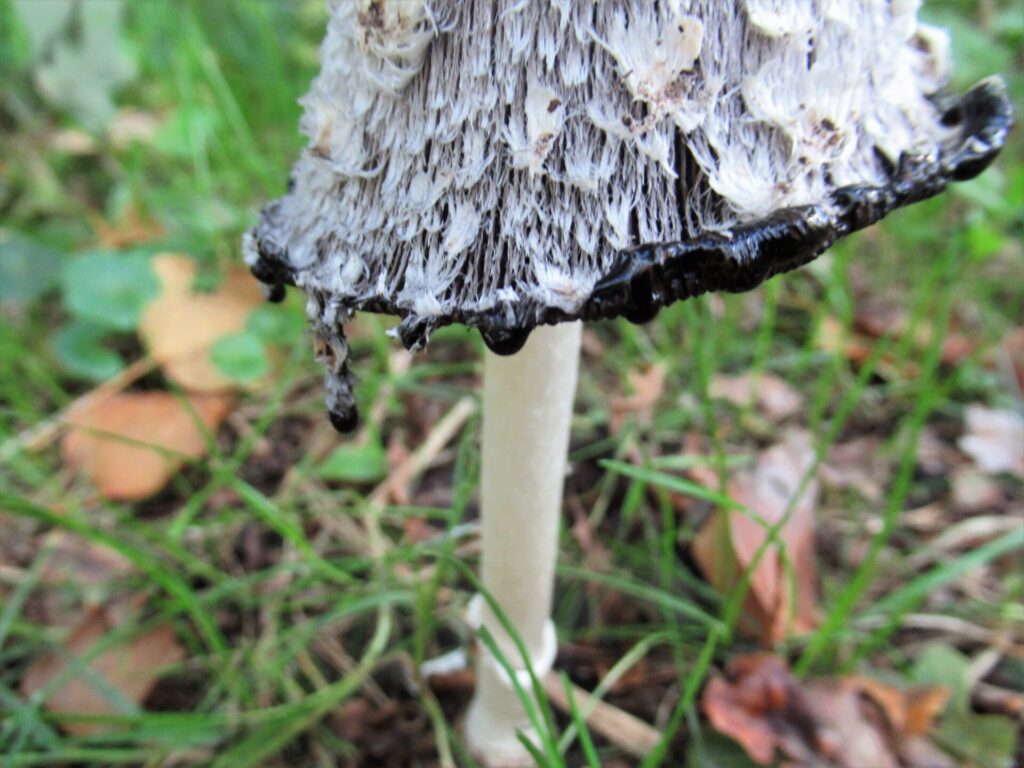
They don’t look too bad when young, but all grown up they look vile, dripping their viscous black ink.
It’s easy to believe in fairy tales, walking through the forest in autumn. I mean, who doesn’t think of gnomes seeing something like this?
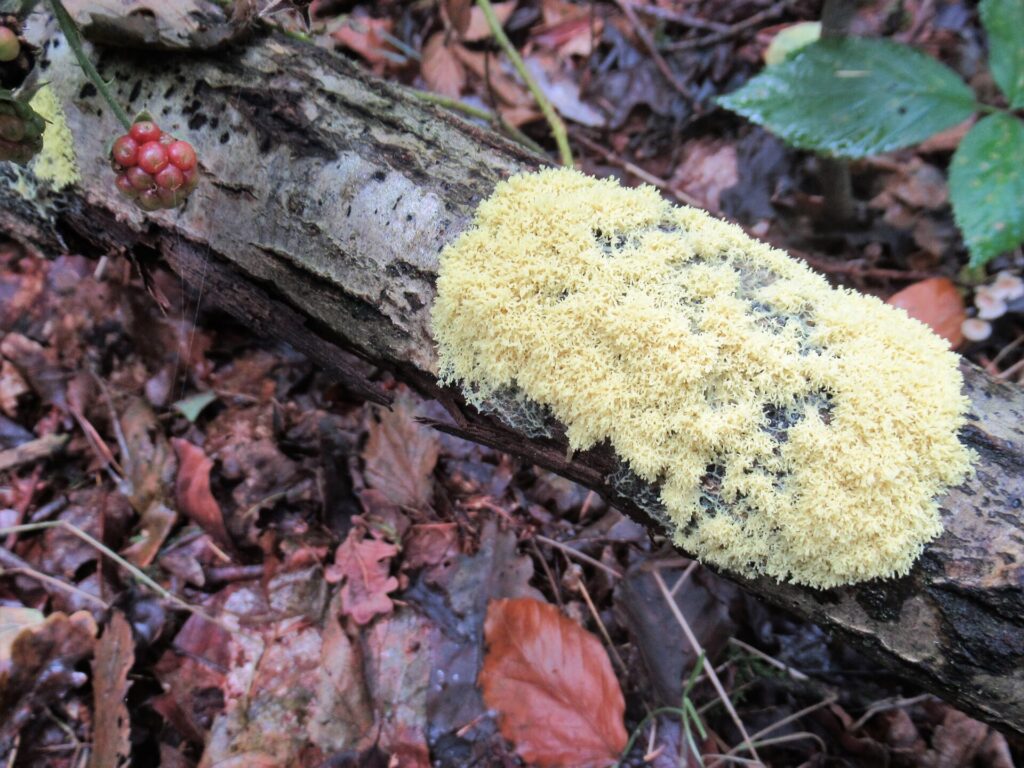
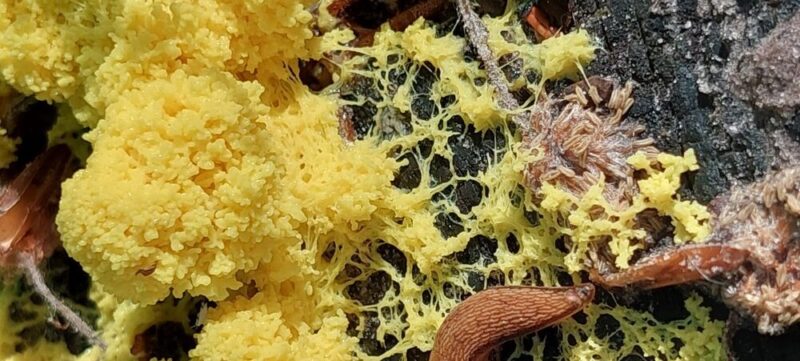
And the fungus below certainly has fairy tale-like qualities (of the creepy kind). It can move, sort of like a slug, even leaving a slime trail. In Dutch it is called heksenboter (witches’ butter).
In the picture above it is cream coloured, like real butter, but more often it is bright yellow.
The yellow colour explains its English name – scrambled egg slime. It also goes by another name. (Please skip the next line if you’re squeamish):
Dog vomit slime mold
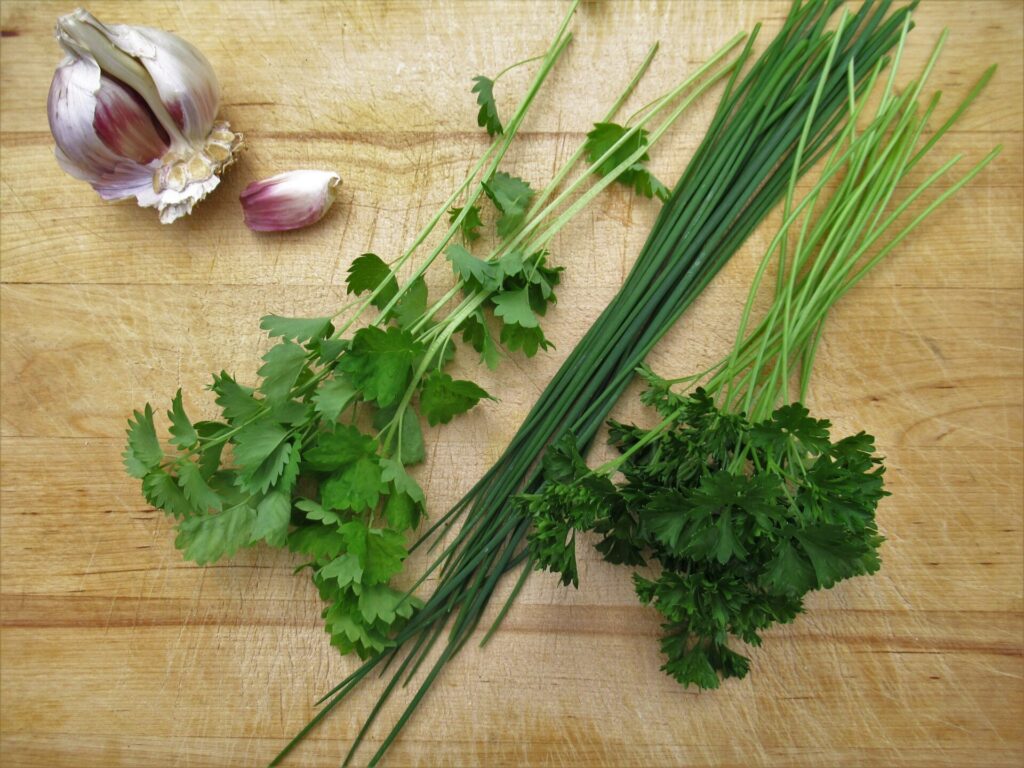
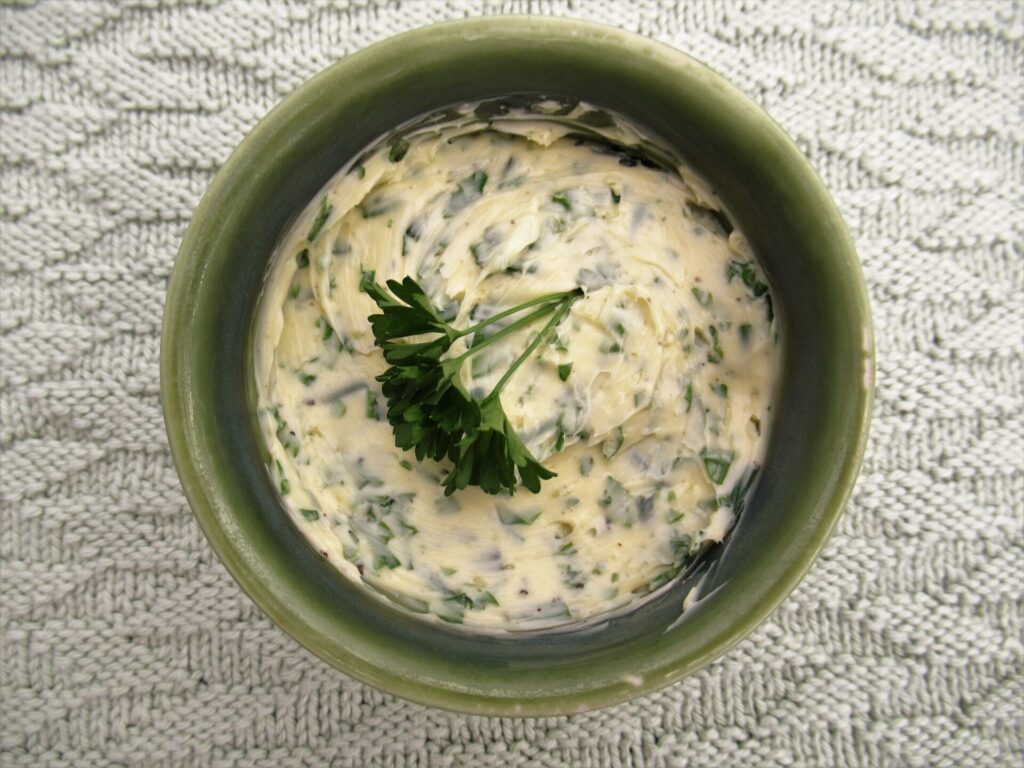
Well, we certainly aren’t scraping that off the branches to spread on our baguettes! No, I really prefer making my own herby ‘witches’ butter’. There are two things that always go into it: garlic and parsley. For the rest I vary with the herbs I use.
Parsley doesn’t do well in our garden, so that is shop-bought. Until the first night frosts our herb patch provides us with chives. And on the left there’s a herb that I discovered and planted a couple of years ago – salad burnet (kleine pimpernel in het NL). It is an evergreen that gives fresh cucumbery-tasting leaves all year round.
Here is my very simple recipe:
Herby Witches’ Butter
Ingredients:
150 grams unsalted butter
1 clove of garlic, pressed or finely grated
Small bunch of parsley
Some chives and salad burnet (or other fresh herbs)
Coarse sea salt
Black pepper
Method:
Leave the butter to soften at room temperature for a while
Mix in the garlic with a fork
Chop up the chives. Strip the leaves of the other herbs from their stalks and chop up as well
Combine the herbs with the garlicky butter
Season with freshly ground black pepper and sea salt
Delicious with some crusty bread, salad, and a bowl of soup. Pumpkin soup would be great, or my Simple Mushroom Soup (recipe in blogpost Soup and Socks).
The butter jar was photographed on one of the dish cloths I knit a couple of years back and wrote about here. I also wrote a post about the organic yarns I used for them here. So how are these yarns holding up after two years of frequent use?
First of all, I need to tell you that I’ve ignored the yarn manufacturers’ washing instructions, washed the dish cloths at 60˚C/140˚F and put them in the dryer on rainy days. Despite the rough treatment they’ve had, none of the dish cloths show any holes. For the rest, from worst to best, here are the results:
3) Rosários4 ‘Bio Love’: Alas, alas. This was the yarn I loved best, but it is the yarn that has faded most and looks the shabbiest now. I still think it is a great yarn for things that do not need to be washed quite as often, though.
2) Lang Yarns ‘Baby Cotton’: This has kept its colour and looks good when dry, but when wet stretches a lot and feels rather thin. So, not great for dish cloths, but fine for baby or other garments.
1) Surprisingly, the winner is Anna & Clara ‘100% cotton 8/4’. This was the least expensive yarn and has performed the best by far. Actually, these dish cloths still look as good as new.
Well, that’s all for today. Bye for now, and if you go mushrooming – be careful!!!
The long, very hot and very dry summer finally seems to be coming to an end here. I’m ever so grateful for the rain we’ve had the past couple of days, and am hoping for lots more as everything is parched. The only thing that has done well in our garden this year are our grapes.
My summer knitting projects are also nearing completion – more about those soon, I hope. But today, it’s Raspberry Ripple day!
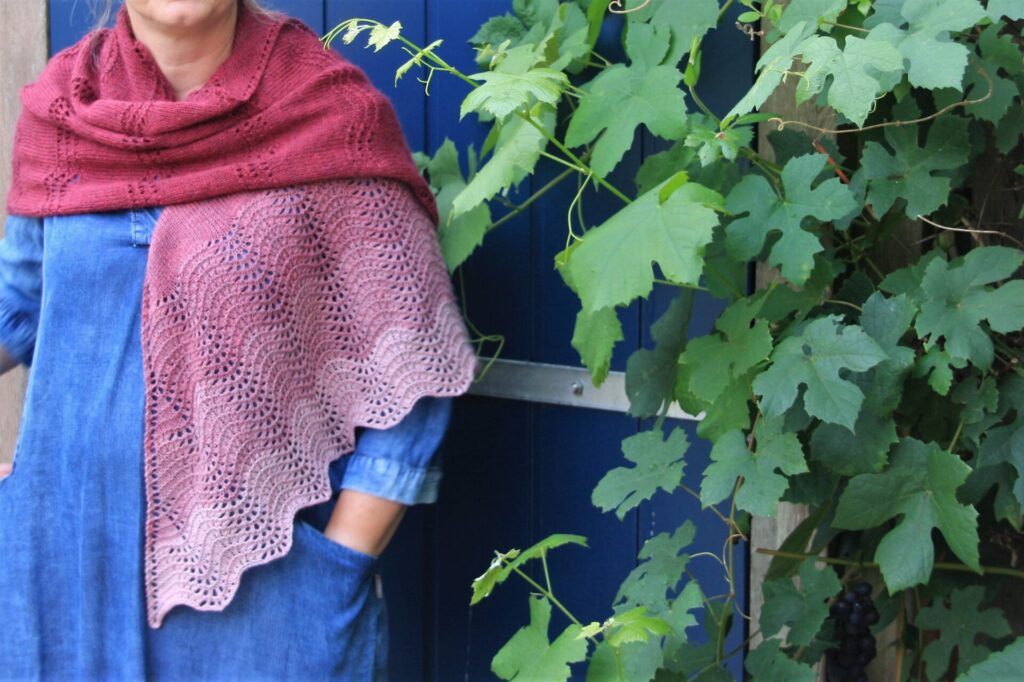
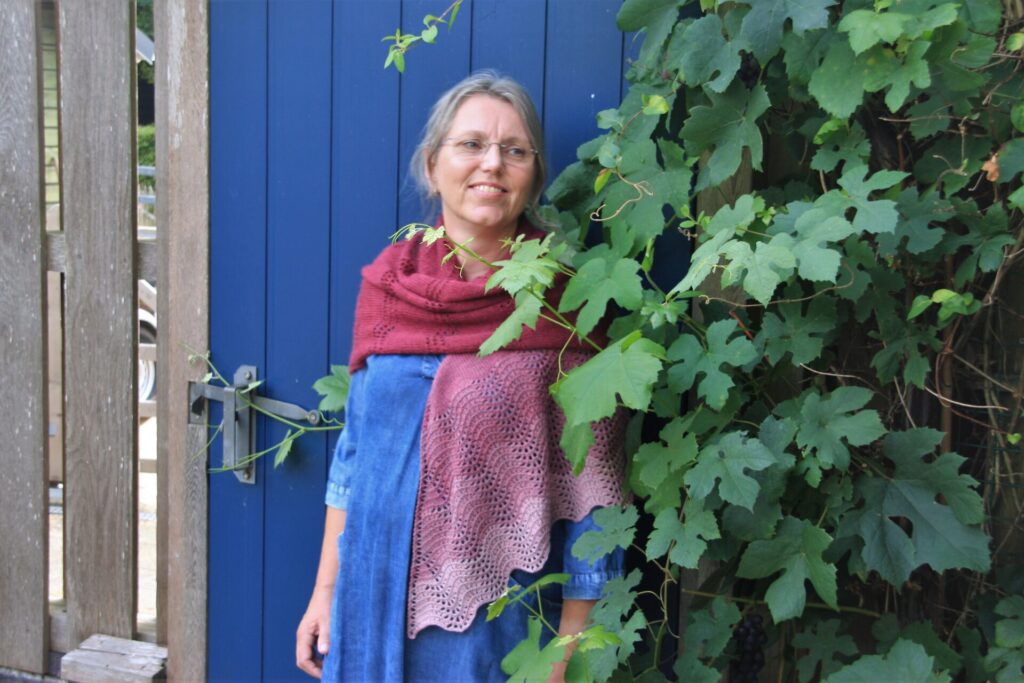
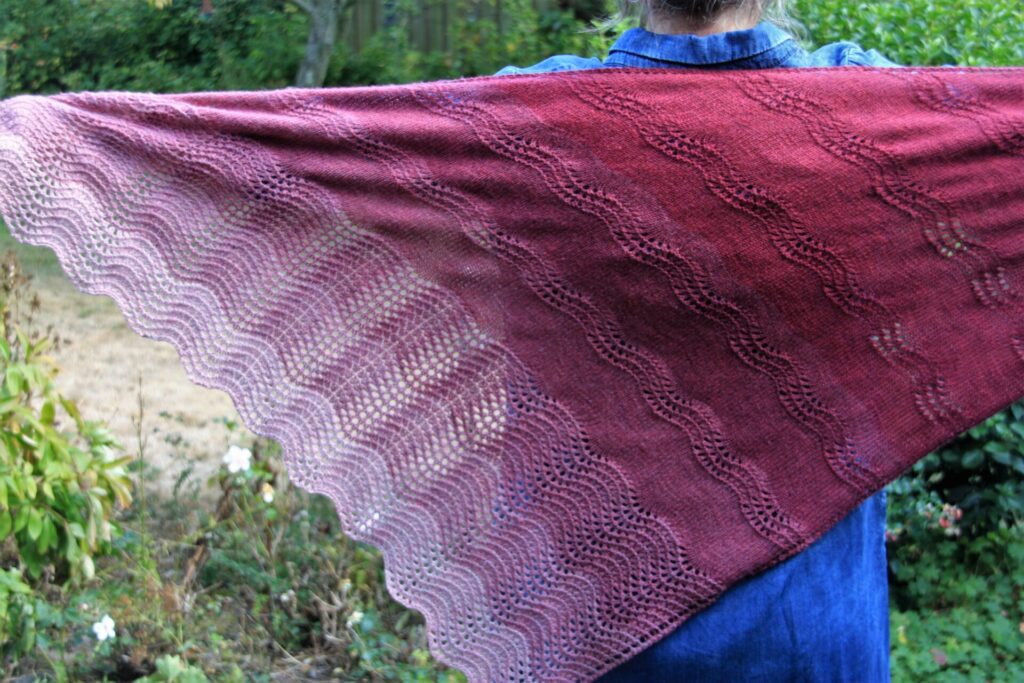
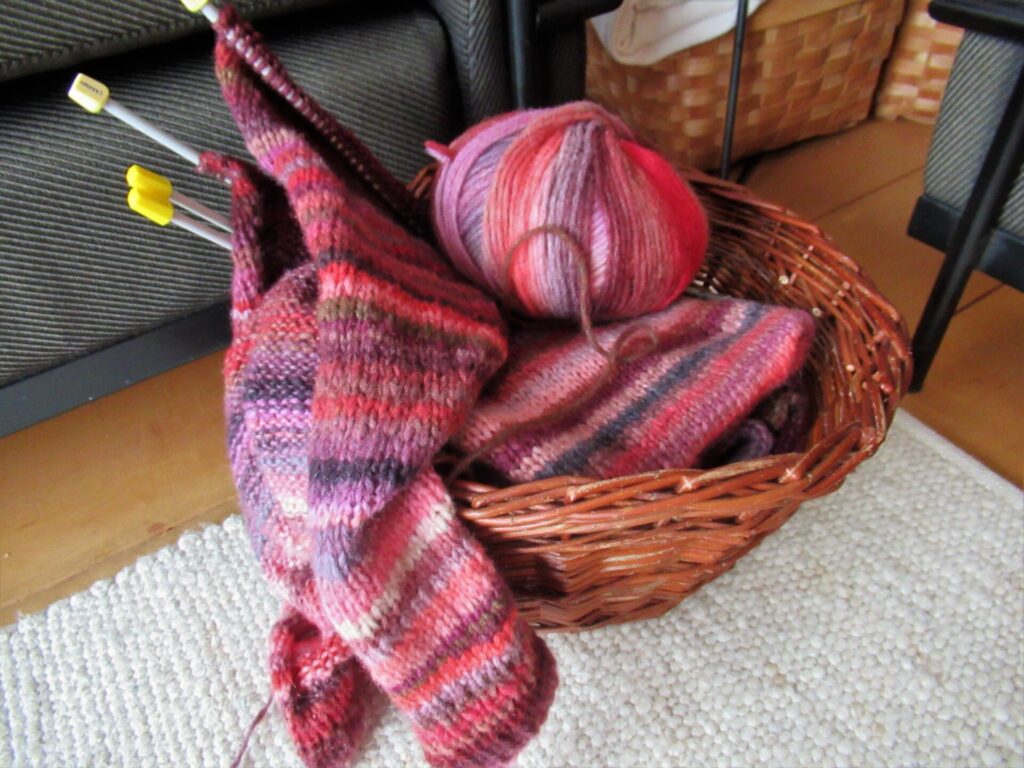
First of all, here is a shawl I finished knitting quite some time ago and have finally blocked. The shawl pattern is called Morbihan, but I’m calling this version Raspberry Ripple.
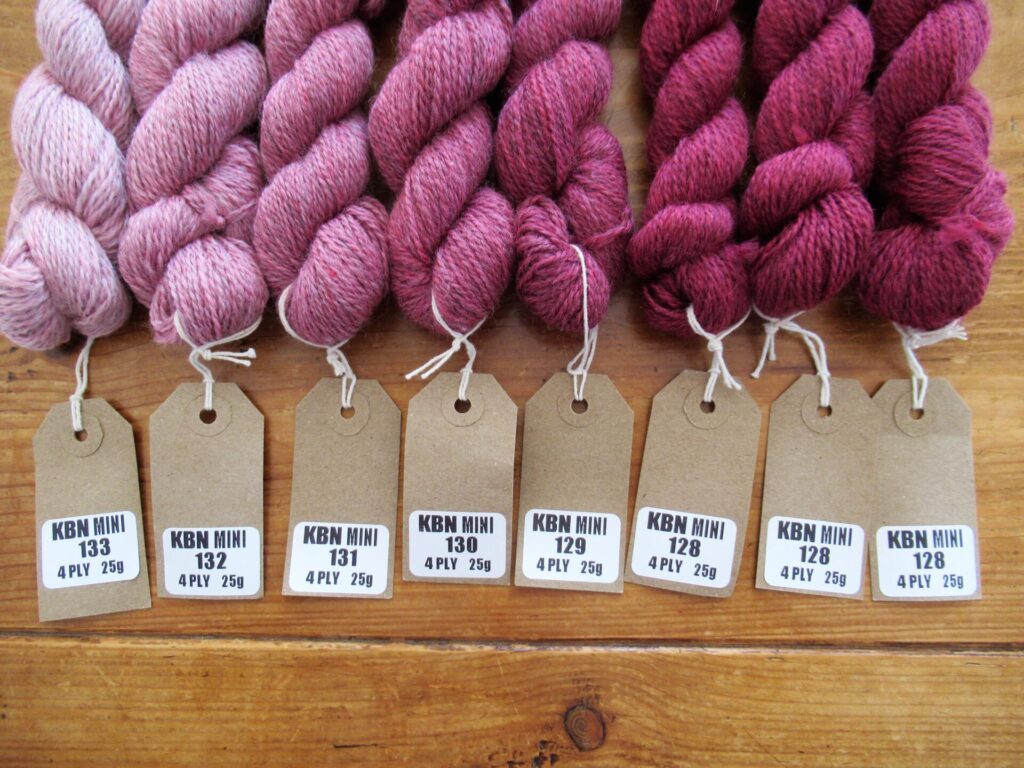
The yarn I’ve used for it is John Arbon’s Knit by Numbers 4-ply. It’s a 100% organically farmed Falklands merino, and each colour is available in a gradient of 6 shades. The colour shown here is called Raspberry (what else?), and in total I’ve used eight 25-gram mini skeins – 3 of the darkest shade and 1 each of the other 5 shades.
This is what my Raspberry Ripple Shawl looks like spread out:
I like wearing triangular shawls scrunched up and wrapped around my neck like this:
Morbihan was first published in English only, but now I’ve also translated into Dutch. The pattern can be found here on Ravelry in both languages.
Morbihan was eerst alleen in het Engels beschikbaar, maar ik heb het patroon nu ook in het Nederlands vertaald. Het is hier op Ravelry te vinden.
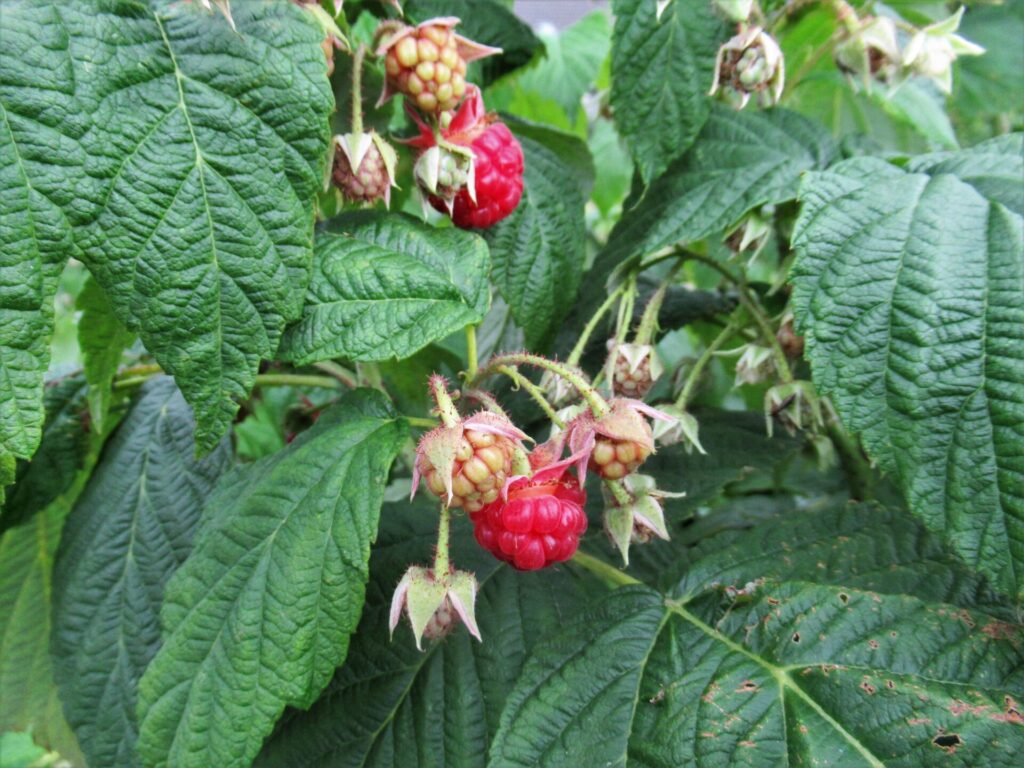
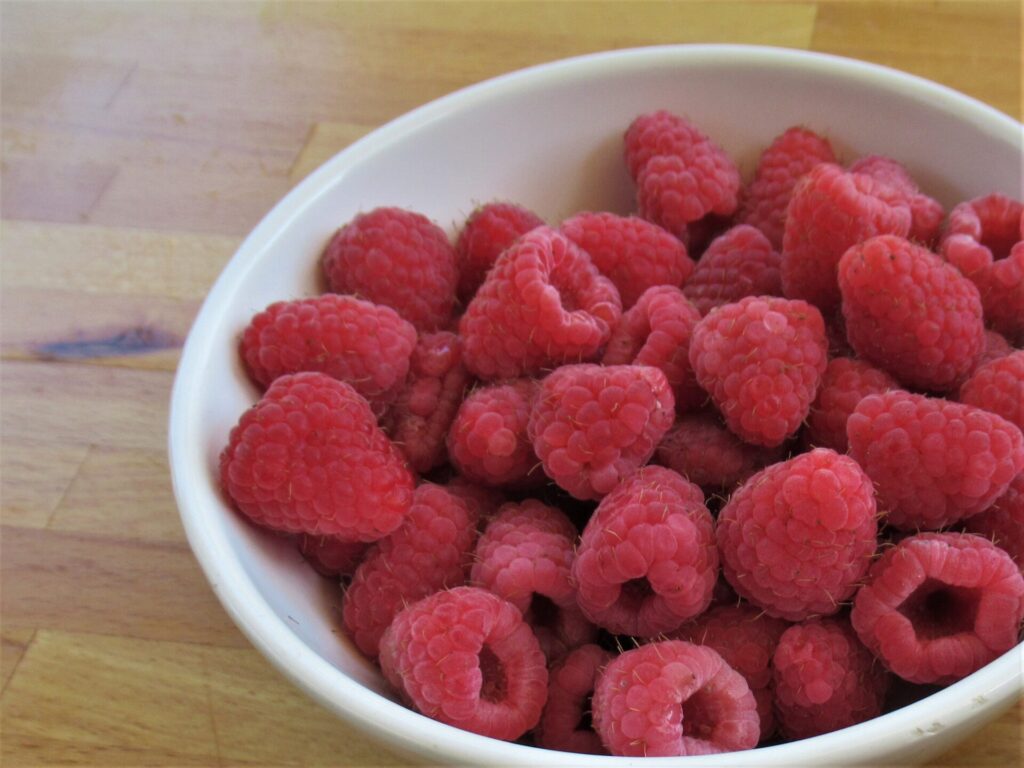
Raspberries, how I love them. Not just their colour, but their taste, too. If I want some for a dessert, I need to make a trip to the supermarket. We do have wild raspberries around here, but they are rare.
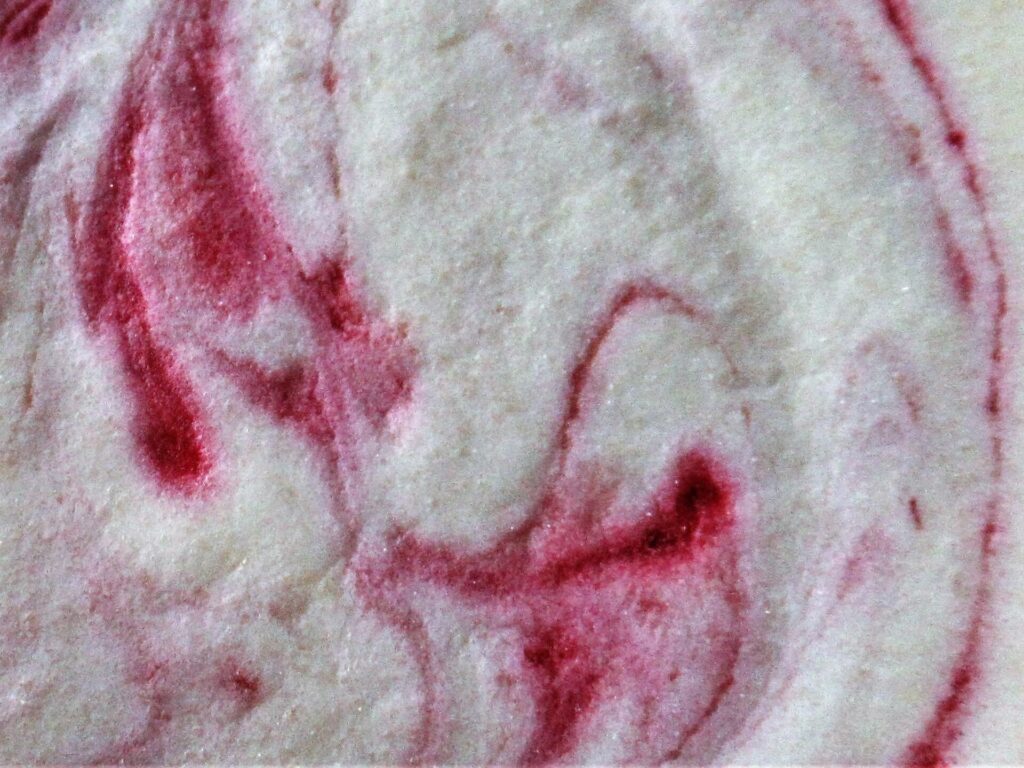
It’ll soon be woolly-shawl-weather again, but at the moment it’s still warm enough to be ice-cream-weather. So here is my simple (no ice cream maker needed) recipe for Raspberry Ripple Ice Cream.
Raspberry Ripple Ice Cream
(makes approx. 1 litre)
Ingredients:
250 g raspberries
130 g caster sugar
3 egg yolks
250 ml milk
250 ml double cream
1) Place the raspberries in a small saucepan with 30 g of the sugar. Cook on medium heat, stirring from time to time and squashing the raspberries with a wooden spoon. Simmer for about 5 mins without the lid on. Push through a sieve with your wooden spoon. Discard the seeds and the last bit of pulp left in the sieve. Leave to cool.
2) Whisk the egg yolks and the remaining sugar together. Pour the milk in a pan and bring to boiling point. Pour the hot milk on the egg-and-sugar mixture, whisking all the time. Return the eggy milk to the pan and heat slowly, stirring until it has thickened slightly (make sure it doesn’t boil!). Leave this to cool as well.
3) When the raspberry sauce and the custard have cooled completely, whip the double cream until it forms soft peaks. Gently fold the cream into the custard. Pour the creamy custard into a container (holding at least 1 litre).
4) Pour in the raspberry sauce and make swirls and ripples using the handle of a wooden spoon. Cover, place in the freezer, and freeze overnight.
First of all, Happy New Year! It’s a bit late, I know, but I still want to wish you all the best for 2022.
We’ve had an uneventful but nice and relaxing week, and I hope you’ve had a good time, too. My Christmas Break knitting project is almost finished. I’ll share that with you next week when it’s all done (I hope).
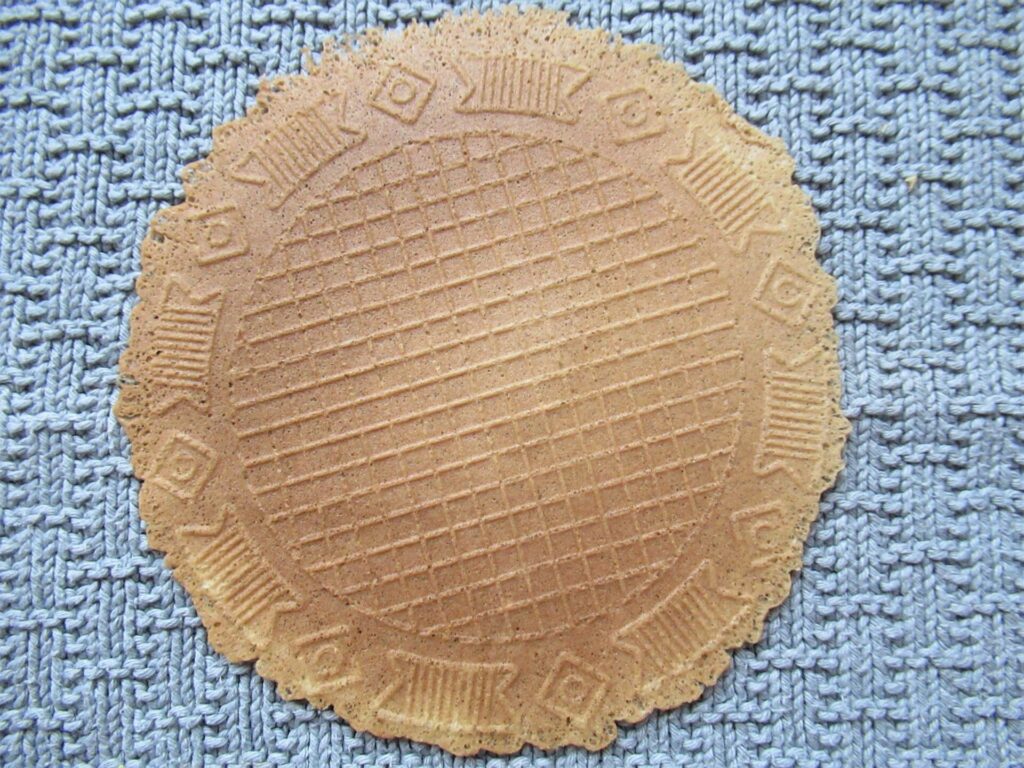
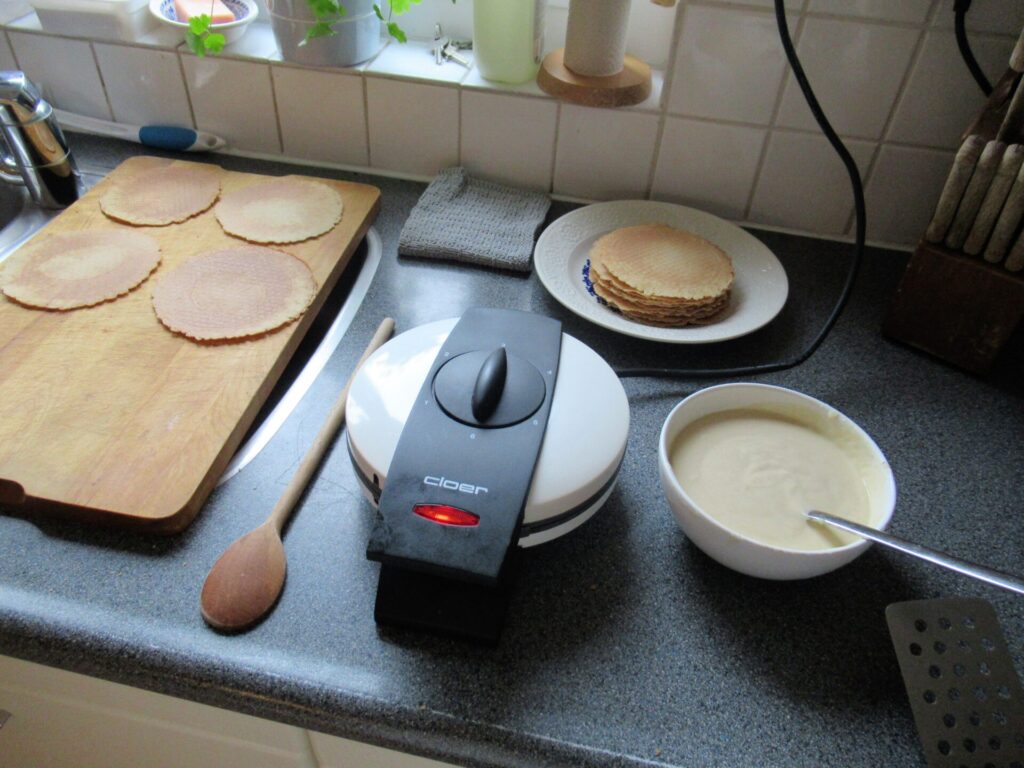
What I’d like to share with you today is the recipe for knieperties, paper-thin waffles that are traditionally served on New Year’s Eve and Day in this part of the Netherlands. They can be eaten flat or rolled up. Similar ones are also baked in Germany, which isn’t all that far away from here.
Baking knieperties (pronounced something like kneepertees, with an audible k and stress on the first syllable) is a tradition passed on to me by a neighbour across the street. She baked stacks of them on New Year’s Eve for her extensive family and always brought us and other neighbours some, too. After she died about a decade ago, I decided to continue the tradition.
Traditionally knieperties were baked using a cast-iron waffle iron held over a fire, but nowadays everyone I know uses an electrical waffle iron. Mine is from German manufacturer Cloer.
INGREDIENTS: (makes about 100)
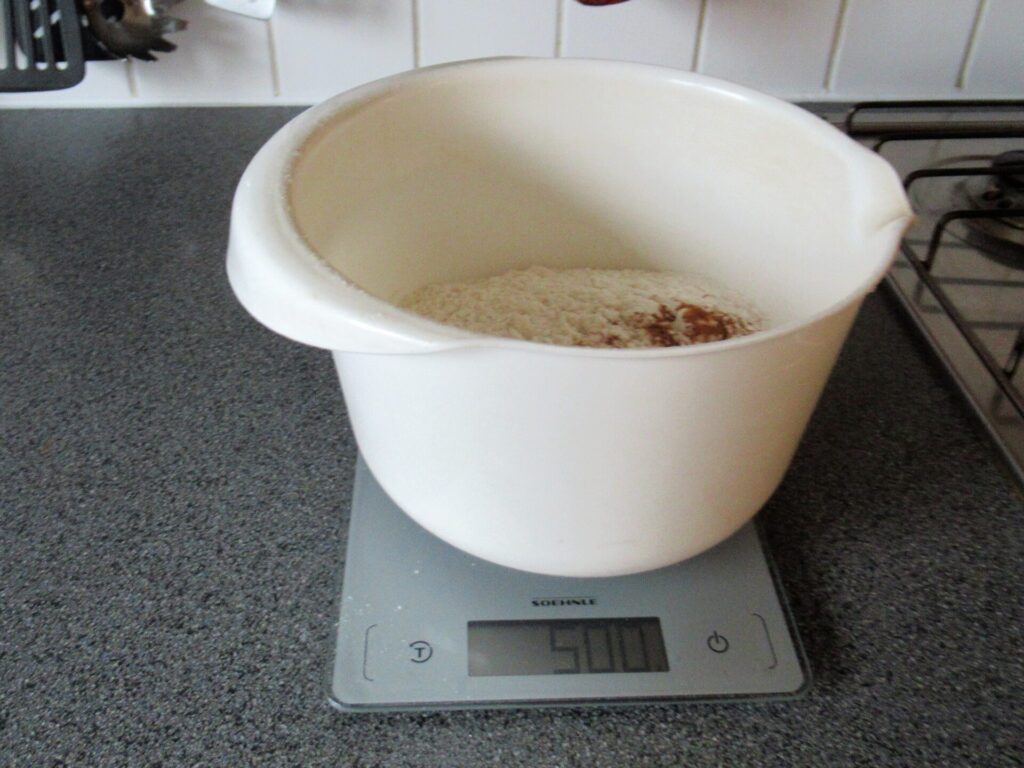
150 butter at room temperature
325 g fine caster sugar
2 eggs
500 g flour
A pinch of cinnamon
600 ml lukewarm water
METHOD:
Cream the butter together with the sugar and the eggs.
Stir the cinnamon through the flour.
Add small quantities of flour and water alternately to the butter-sugar-egg mixture until everything is stirred in (the batter should be quite thin).
Preheat the iron for about 10 minutes until the little light switches off – heat setting 3 (middle top) works best for me.
Place one tablespoon of batter on the waffle iron. Close it and keep it firmly closed with your fingers. Hot steam will come out – take care not to burn your fingers!
Open the iron when steam stops coming out. The waffle should now be a pale golden brown. Quickly transfer it to a chopping board.
Leave to cool flat or roll up very quickly using the handle of a wooden spoon.
From start to finish, baking this quantity will take about 90 minutes to 2 hours.
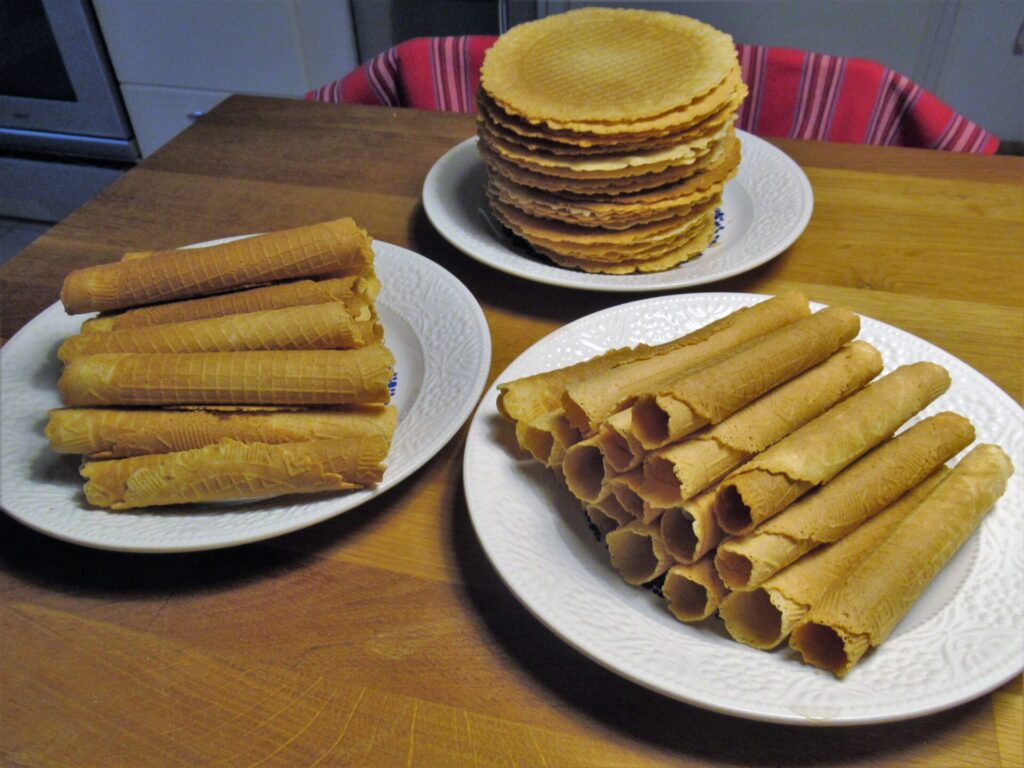
Knieperties are deliciously crunchy and so thin that they are almost translucent.
This is my set-up, with from left to right: chopping board for cooling knieperties, wooden spoon for rolling them, waffle iron, plate for stacking cooled knieperties, small bowl of batter (works easier than big mixing bowl; refill from time to time), pancake turner (bottom right-hand corner) for flipping knieperties from iron to board.
And this is the whole batch, excluding the ones that got eaten during the process. Rolled-up knieperties can be filled with whipped cream if you like.
In the pouring rain (we’ve had quite a bit of that here lately) I took them around to several neighbours. A great opportunity for catching up on the latest news.
Knieperties are not just served around New Year’s, but also on other special occasions.
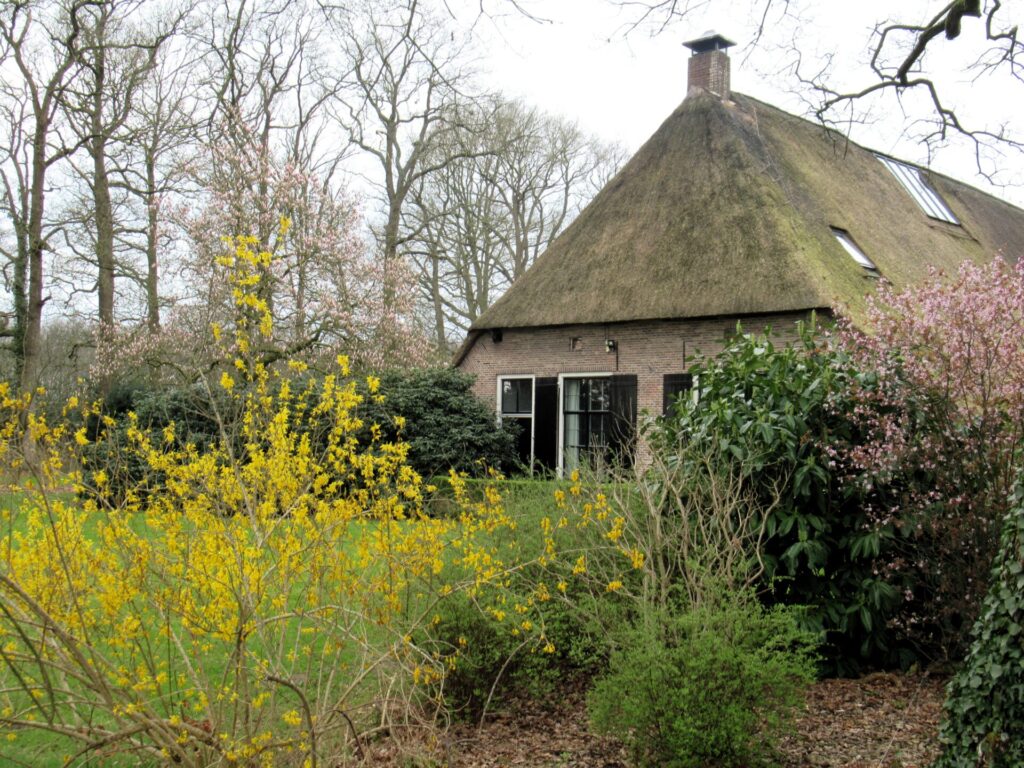
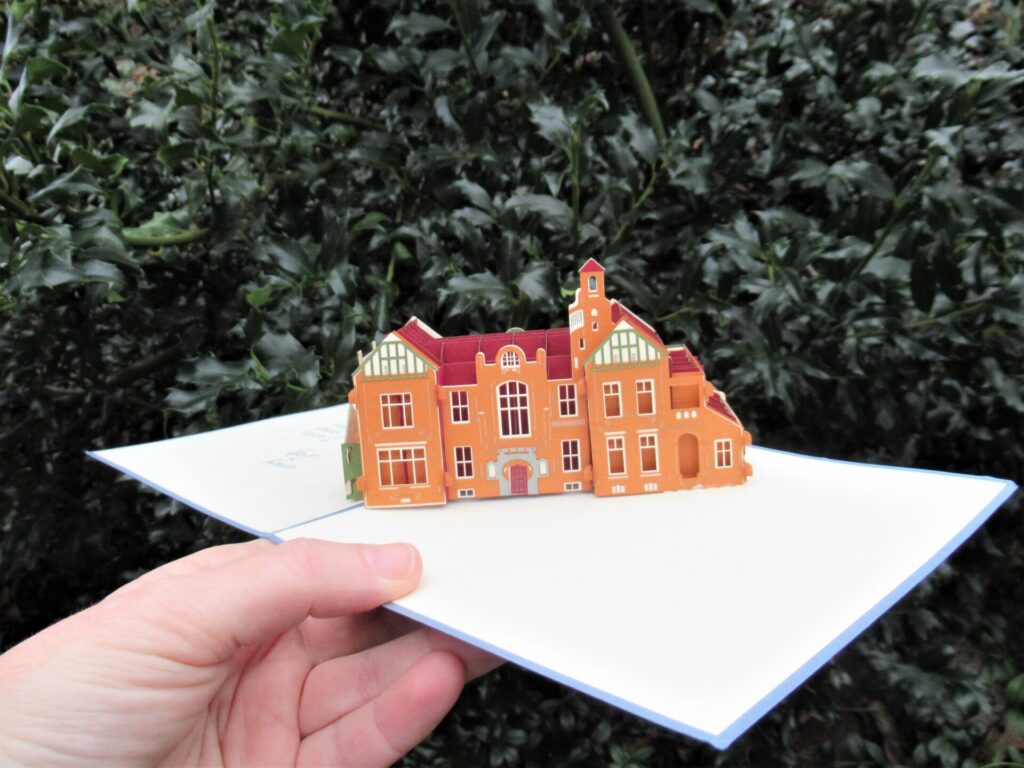
Instead of an ordinary Christmas card, dear friends sent us this:
A wonderful pop-up card of Villa Rams Woerthe, a historic house in a nearby town. The last time we visited it, we were served tea and knieperties in the drawing room. ‘Must enjoy baking knieperties’ is high on the list of requirements for anyone who wants to work there as a volunteer.
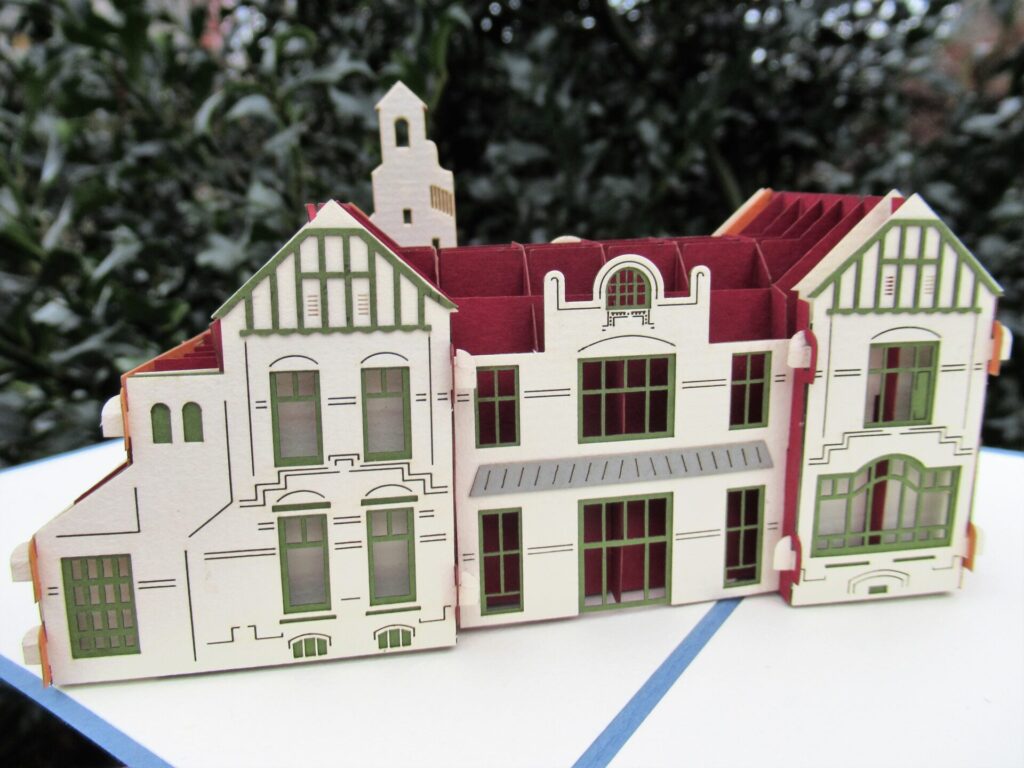
This is what it looks like from the back:
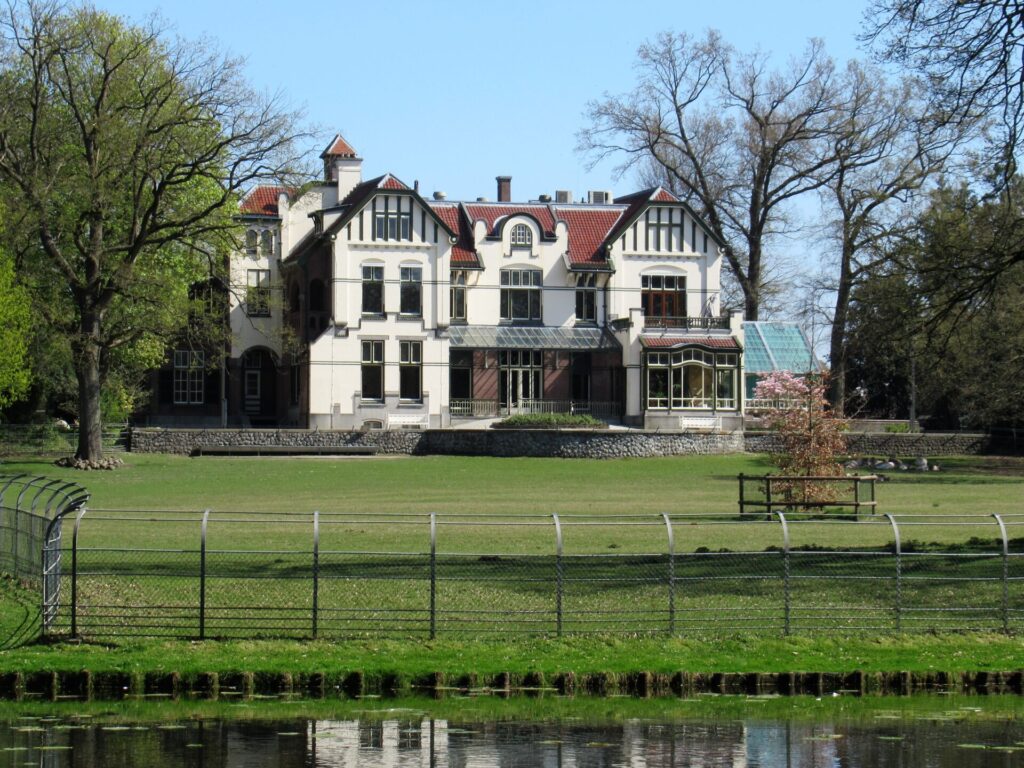
And this is what it looks like in real life (photo taken in spring):
I’d love to visit it again someday soon. Ah, so many plans and ideas for the New Year! I’ll try to share anything I think may be of interest and hope to ‘see’ you here often.
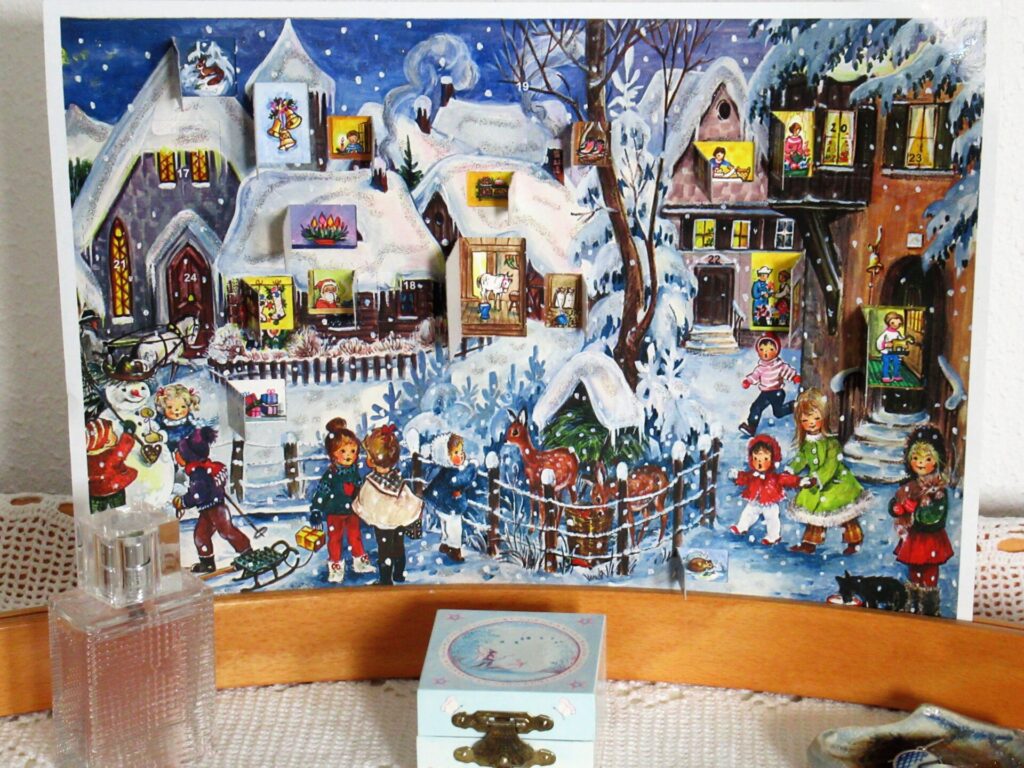
Hello! Do you have an Advent calendar? A home made one? A new one, or one you use year after year? A paper one, or one with ‘real’ gifts?
Advent calendars are not a tradition I grew up with. My Dad did not believe in Christmas. My Mum’s belief in Christmas was very strong, but of a kind that did not approve of such things. This year, however, there are no less than three Advent calendars in our home. It seems like I have some catching up to do.
The first one is the one you see at the top – a fir tree that is gradually filled with birds, nest boxes and animals. It was a gift from our daughter last year and can be used again and again. It is a small treat to hunt for that day’s ornament in their box every morning and add it to the tree.
The second Advent calendar is a traditional paper one with a door to open every day. It is next to my bed and the first thing I see in the morning when I turn on the light.
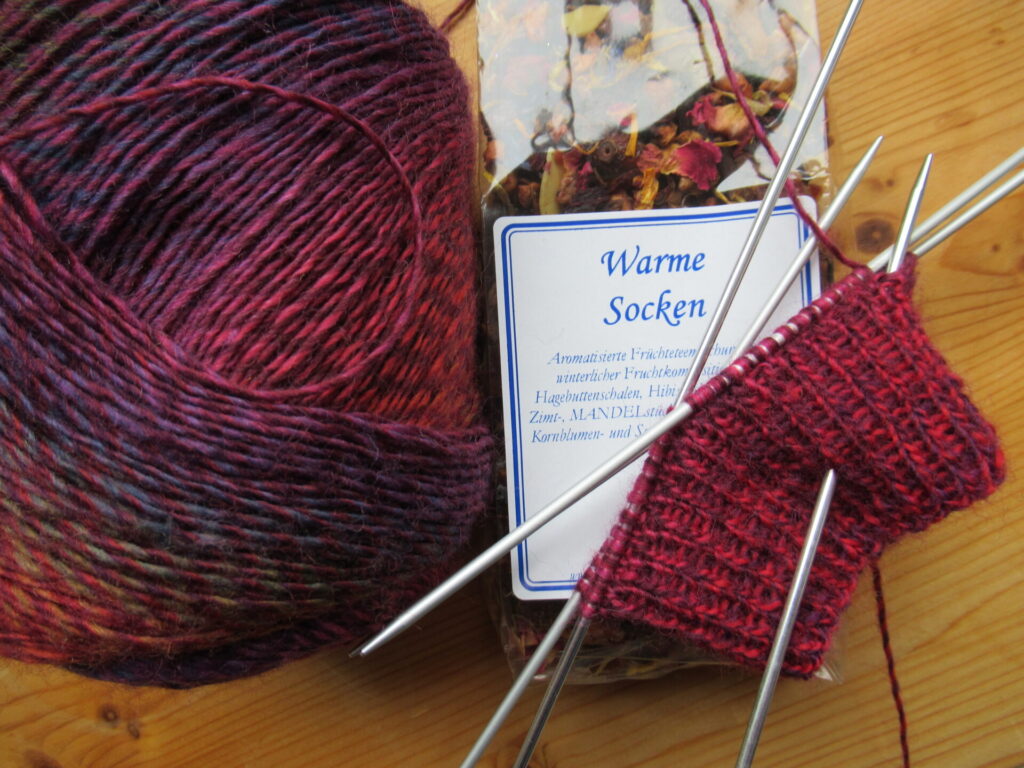
It was a gift from a dear friend. I found it in our letterbox on December 5th (our traditional gift-giving day), in a large envelope that also contained a pair of beautiful ‘pre-loved’ earrings and a bag of tea from Germany with the brilliant name Warme Socken (I don’t think I need to translate that).
It is a delicious seasonal blend of rose hips, apples, almonds, cinnamon, cloves and more.
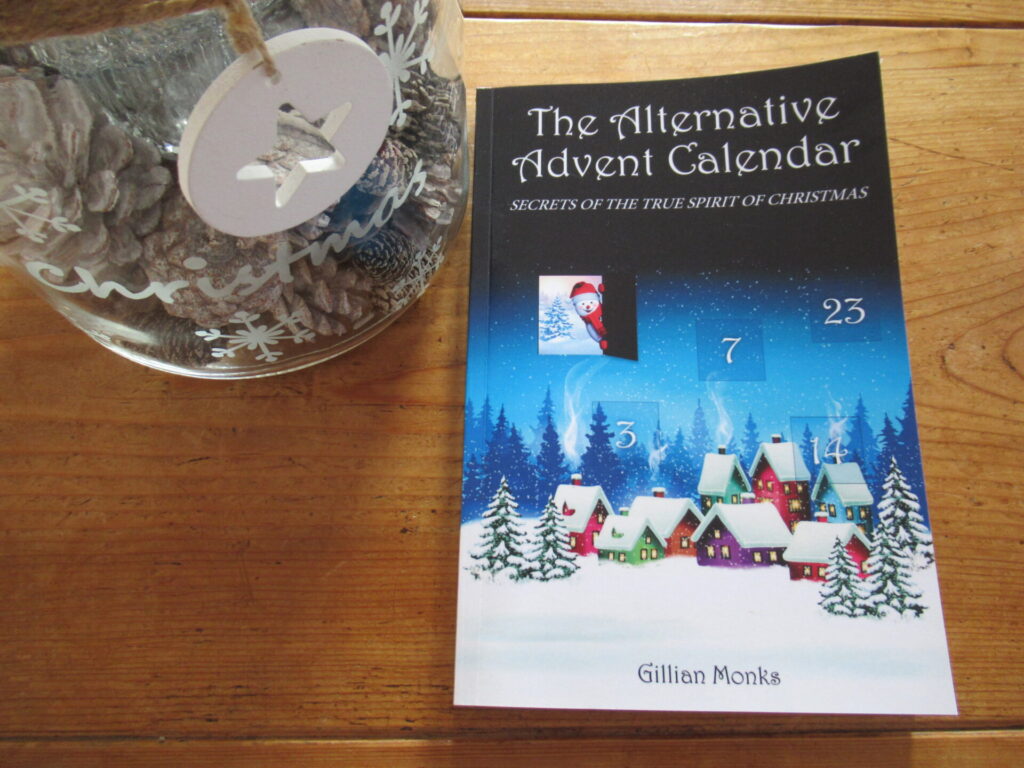
The third Advent calendar was, in a way, also a gift from the same friend, because she recommended it to me. This one is in the shape of a book, The Alternative Advent Calendar: Secrets of the True Spirit of Christmas by Gillian Monks.
The book gives ideas for things to do for every day of the Advent period that are, in the words of the author, ‘universally relevant, regardless of geographical and genetic origins, social, academic or professional status, cultural background, religion or belief.’
All of the ideas in it are small and enjoyable ways to offer of yourself to the world. Most of them can easily be done even during the strict lockdown we are now finding ourselves in, in the Netherlands. Some require a little creativity under these special circumstances, but so far I have only found one that seems well-nigh impossible: ‘Open your door to all. Invite all your neighbours to supper – and I mean ALL your neighbours… as many as you can sensibly fit inside your house.’
Although the book was only published in 2019, this now sounds like a bizarre idea from a very distant past or for a far-off future, almost like an indecent proposal. But with a bit of creativity… a Zoom supper, perhaps?
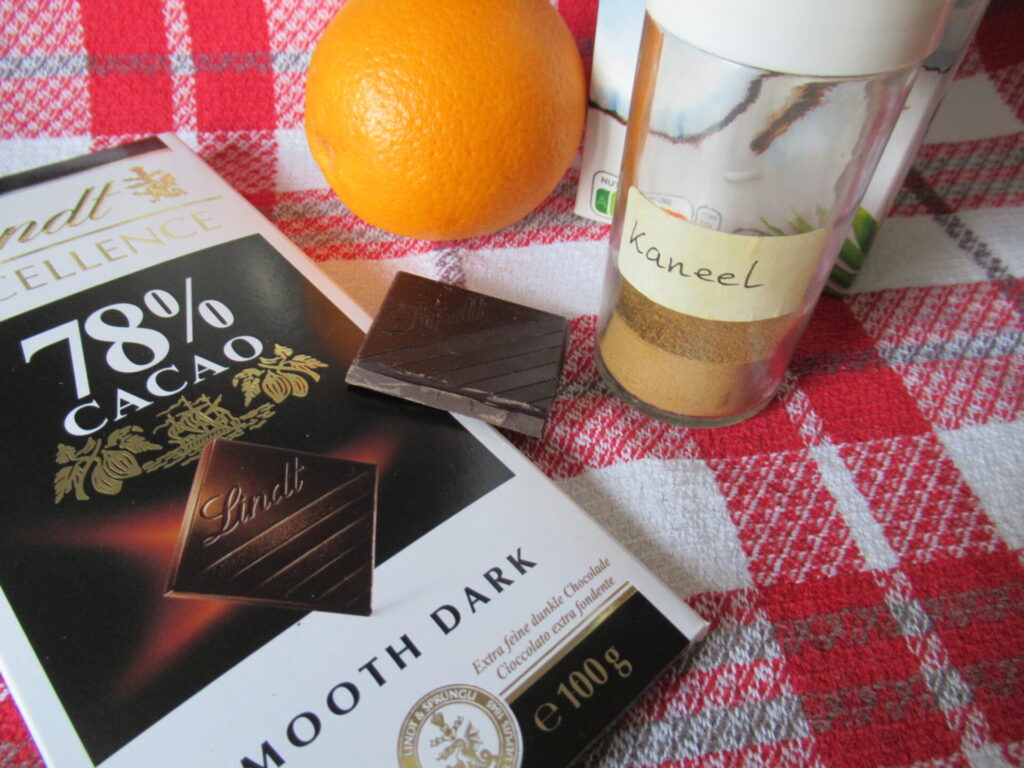
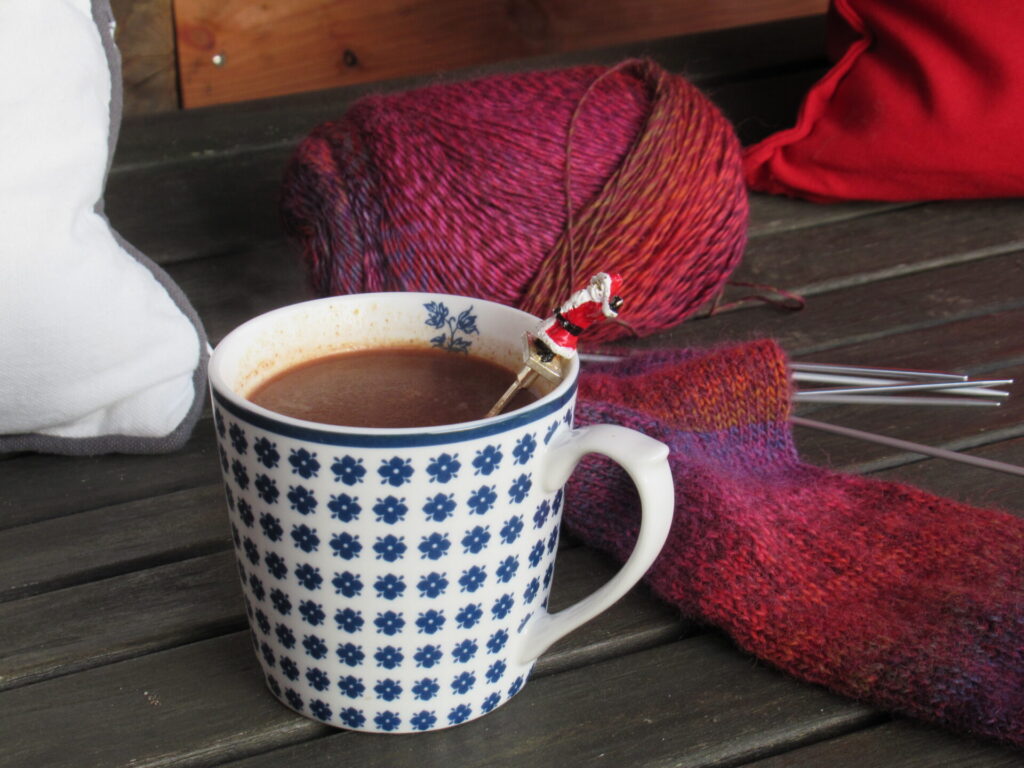
Behind another ‘door’ there is a more doable suggestion: ‘Make someone a hot or cold drink’. My friend did that from a distance by sending me Warme-Socken-tea. In my turn, I am offering you a virtual hot drink.
Cinnamon-and-Orange Cocoa
For one small mug, you’ll need:
10 grams of chocolate (I use a very dark chocolate, but think any kind will work)
Finely grated zest of half an orange
A pinch of cinnamon
200 ml milk (I’m allergic to cow’s milk and use plant-based ‘milk’ – the rice-and-coconut variety is my favourite for this recipe)
Sugar or honey to taste
To make the cocoa:
Break the chocolate into chunks and put them in a small saucepan, together with the orange zest, the cinnamon and a little of the milk
Heat, stirring until the chocolate has melted
Add the rest of the milk and bring to the boil
Pour into a mug, add some sugar or honey if you like, and enjoy!
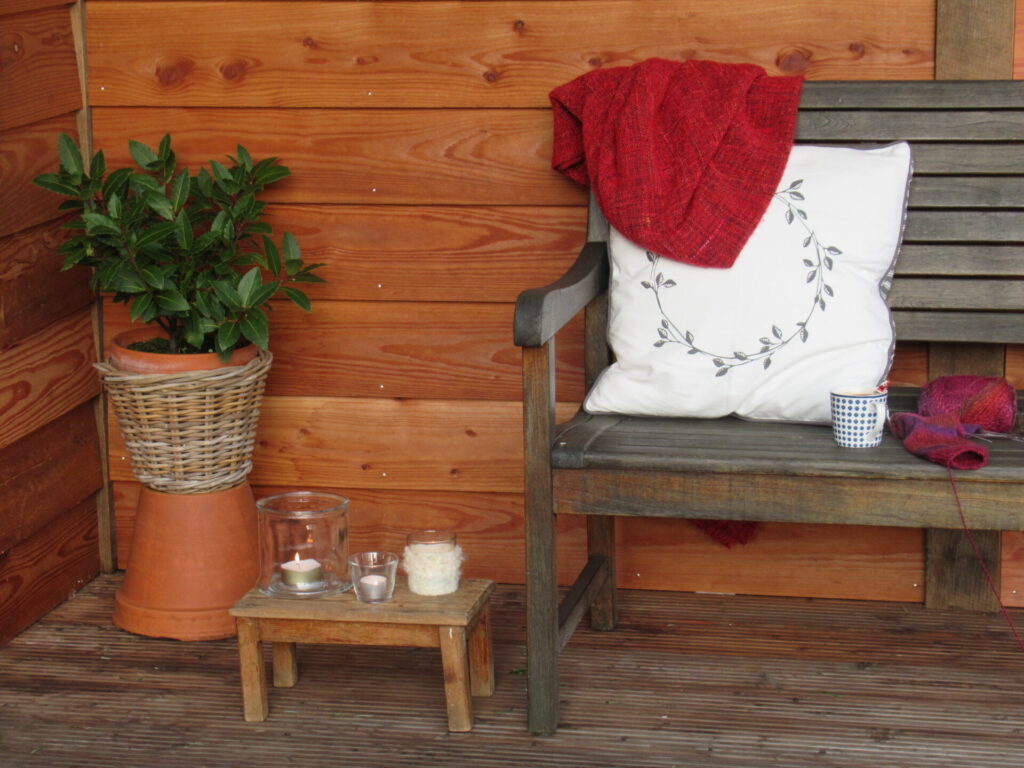
You’re welcome to virtually join me on the veranda in front of our garden shed. I don’t usually go to the trouble of outdoor decorating in winter, but in this special year I’ve made it into a cozy corner.
Our garden bench is overwintering there. It should of course have a beautiful hand knit blanket hanging over the back instead of this Ikea one, but nobody’s perfect. Maybe next year.
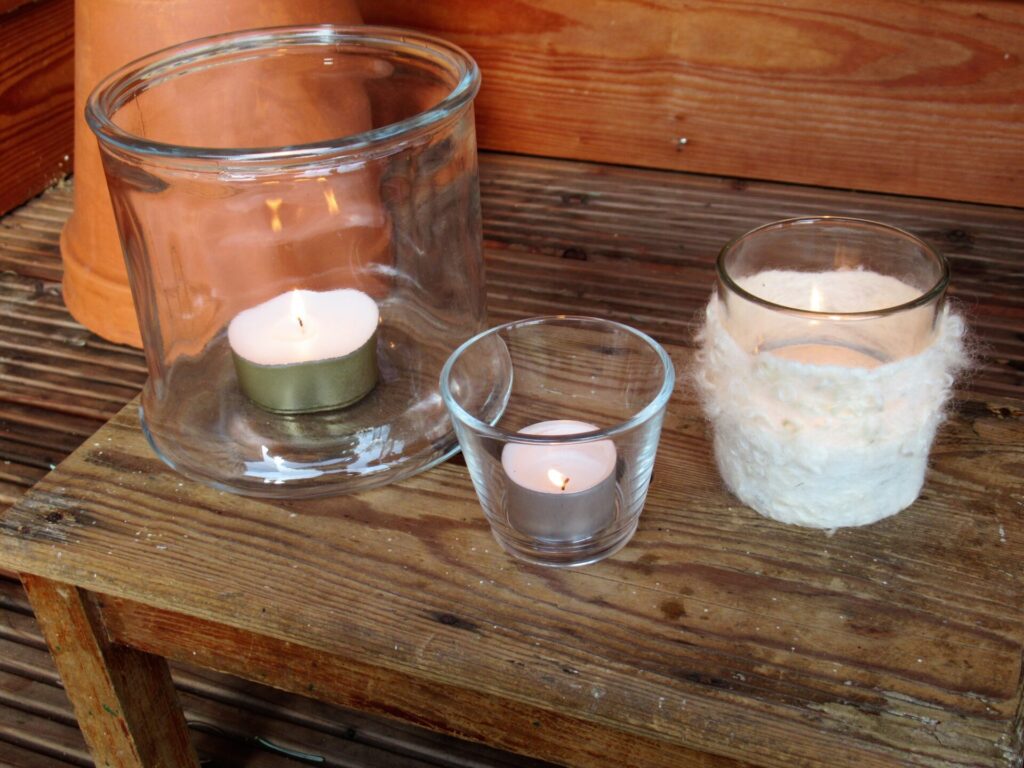
I’ve placed a few candles next to it on a rickety old footstool. One of the glasses has a felted sheep’s wool jacket, bought at a fair a few years back.
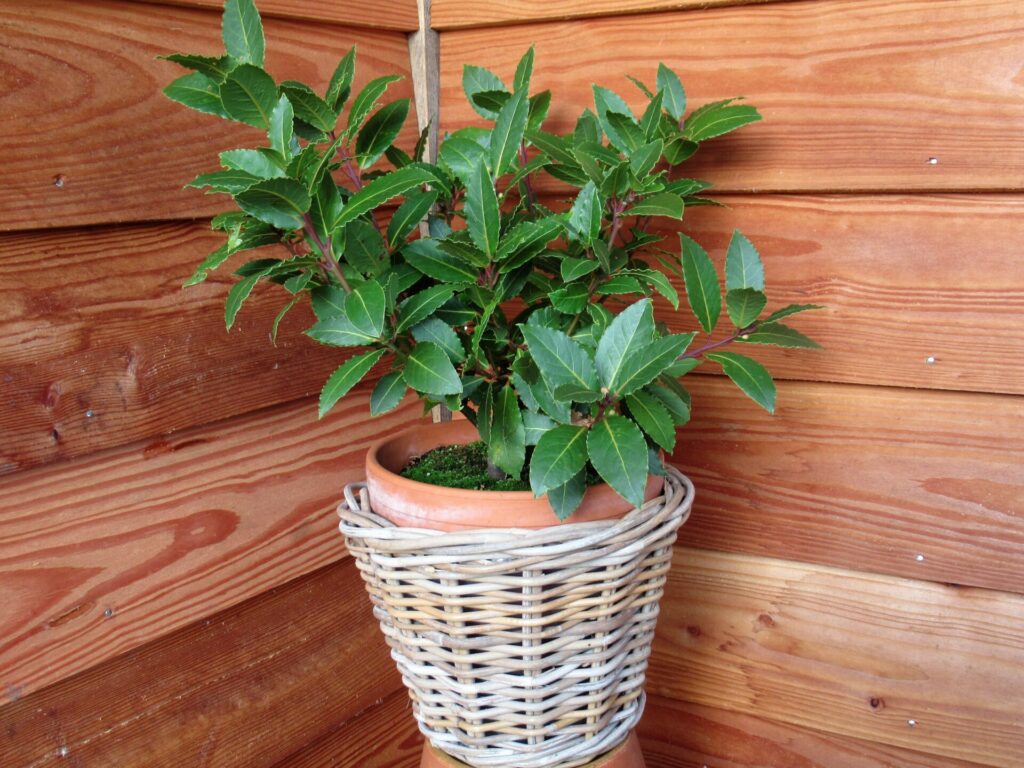
And in the back our little laurel tree is protected from the elements.
It looks happy there, and for the first time ever has flower buds.
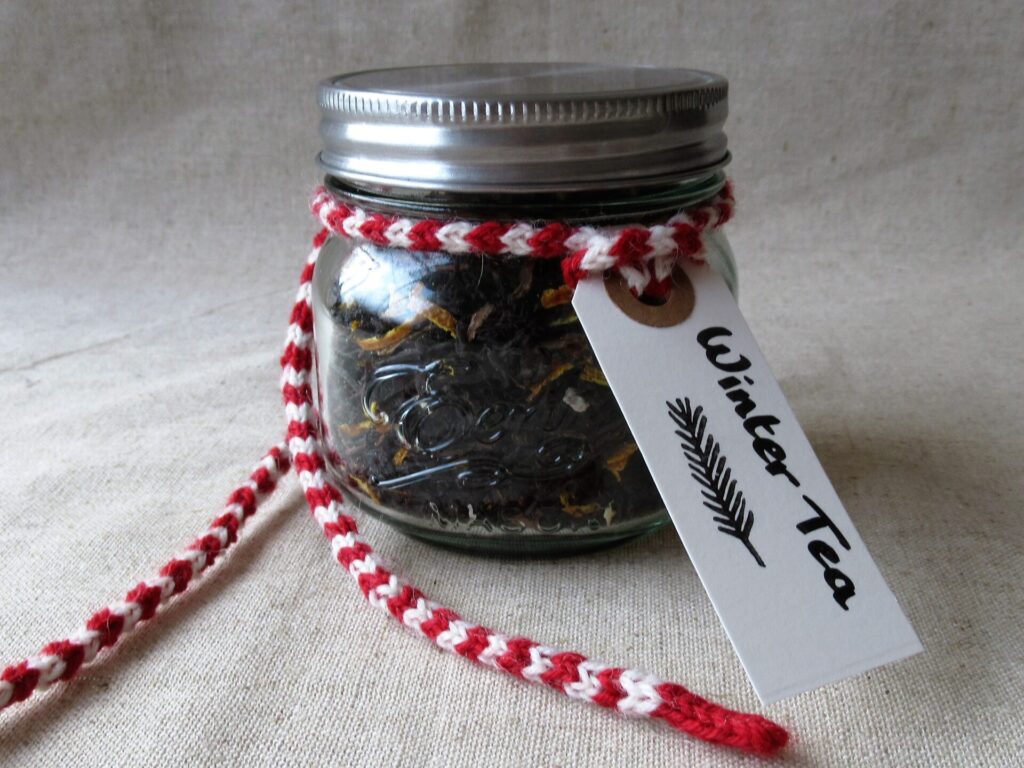
According to the Alternative Advent Calendar, I should have asked you what you’d like to drink first. I didn’t know how to do that here, so I’ve chosen cocoa. For our friends in the southern hemisphere – please pour yourselves a cold drink from us! And for anyone who doesn’t like hot cocoa – maybe you’d prefer some Winter Tea instead? You can find my recipe for that here.
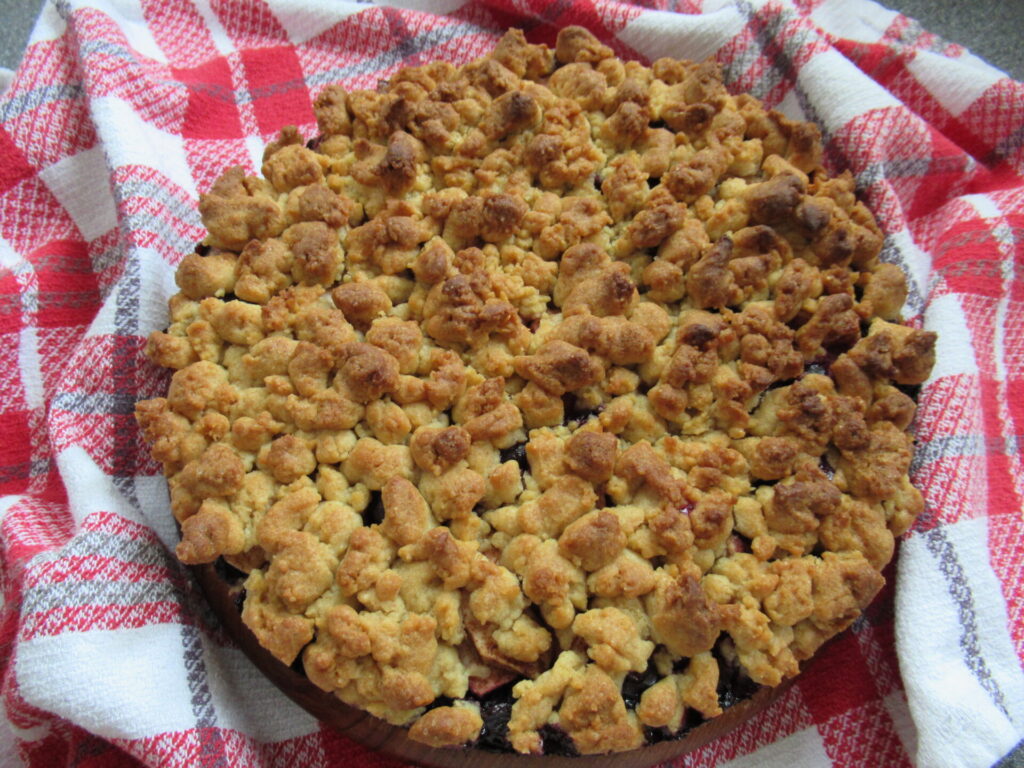
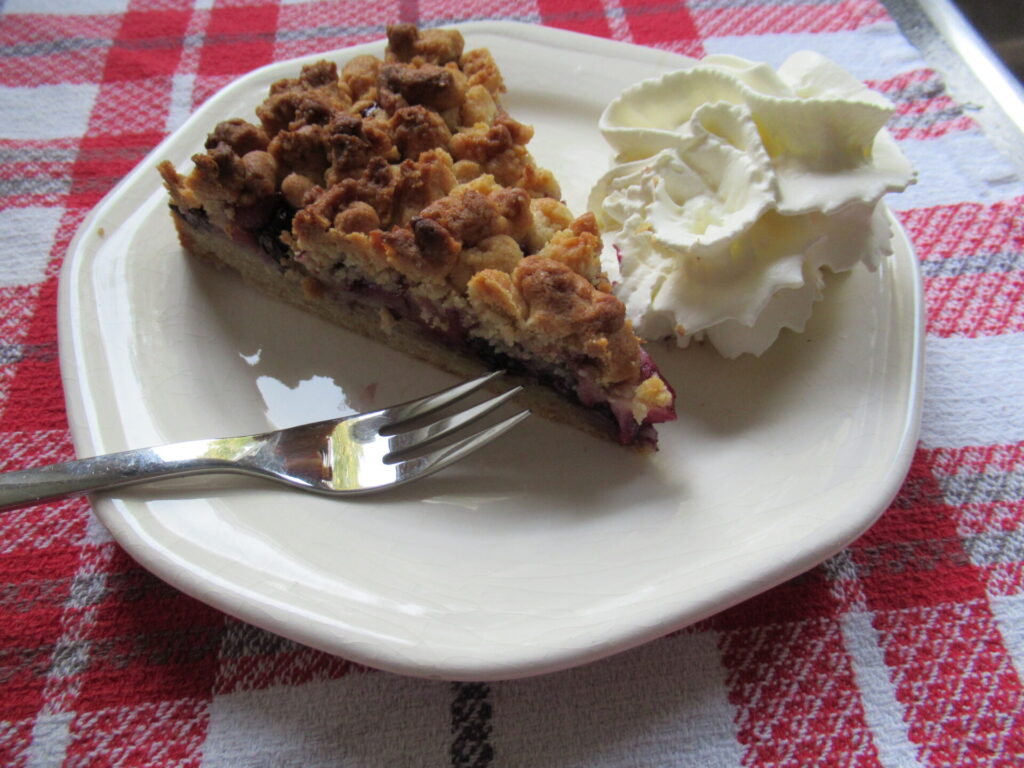
Several of you have asked me for the recipe of the apple-and-blueberry pie I baked at the start of our autumn break. Your wish is my command (sometimes), so here it is. (For those of you not interested in recipes, just scroll on for a ramble and a tiny bit of knitting.)
Apple-and-Blueberry Pie
For a 24 cm/9½” ø spring form cake tin Makes 8-12 slices
Ingredients
200 g unsalted butter
200 g sugar
1 medium egg
½ tsp vanilla extract
200 g plain flour
200 g wholewheat pastry flour
12 g baking powder*
A pinch of salt
2-3 apples (depending on size)
150 g blueberries**
1 level tsp cinnamon
* I like making my own half-and-half mixture. Instead of the two types of flour and baking powder you can use 400 g of ordinary or wholewheat self-raising flour. (Voor mijn Nederlandse lezers: ik gebruik een mengsel van gewone bloem, gebuild tarwemeel en wijnsteenbakpoeder i.p.v. zelfrijzend bakmeel) ** When using frozen blueberries, the pie may take a little longer to bake
Method
Preheat the oven to 200 ˚C/400 ˚F (180 ˚C/350 ˚F fan oven) and grease the cake tin
Cream the butter with 175 g of sugar
Mix in the egg and the vanilla extract
In a separate bowl mix the flours, salt and baking powder. Sieve these dry ingredients and gradually mix them into the butter, sugar and egg mixture to a slightly crumbly dough
Peel, core and slice the apples. Mix the apple slices with the blueberries, cinnamon and remaining sugar
Cover the base of the tin with two-thirds of the dough, pressing it in evenly
Pour in the apples and blueberries
Cover with the rest of the dough, crumbled coarsely
Bake the pie for about 40 minutes
Leave to cool completely before removing from the tin
Enjoy!
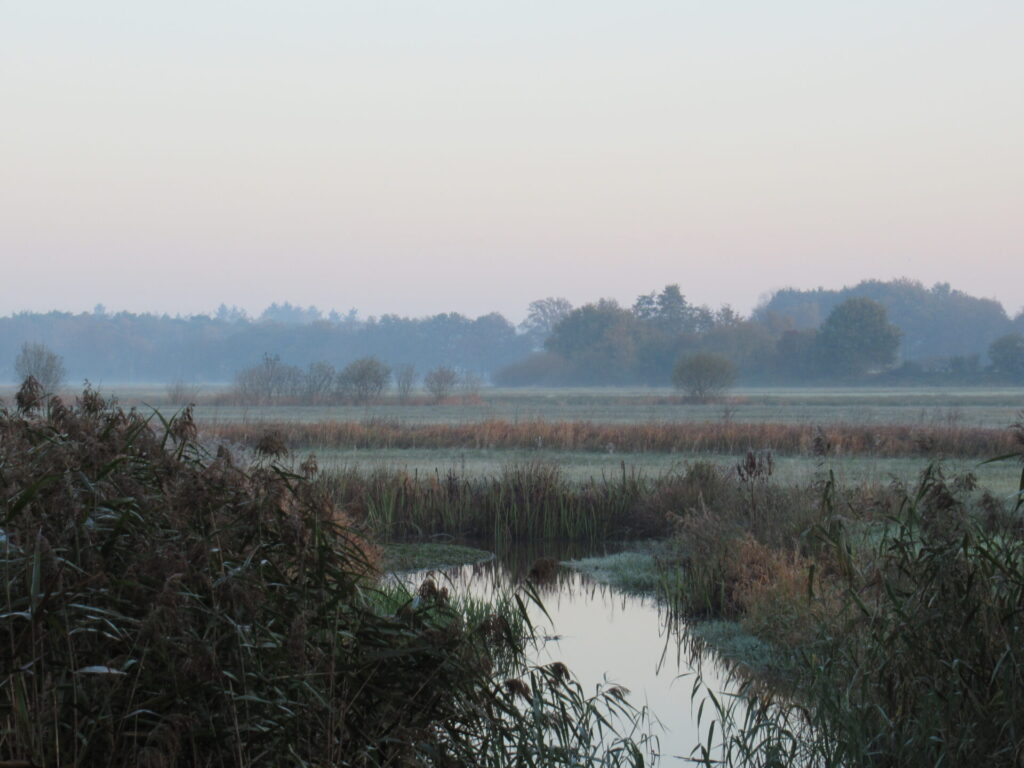
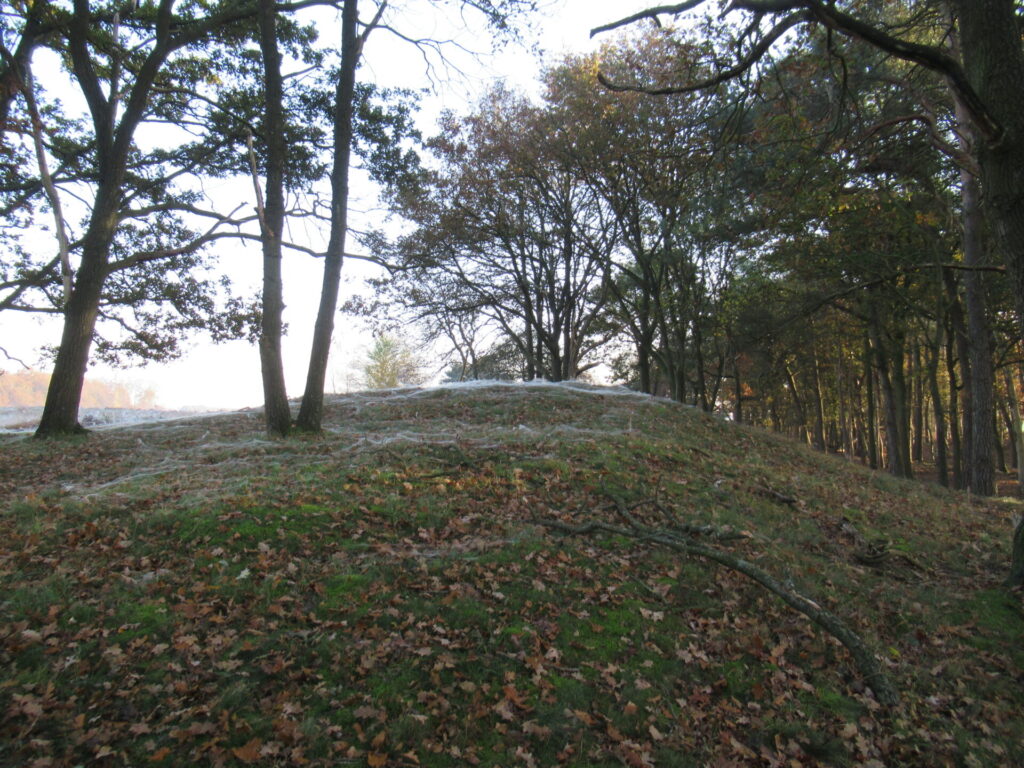
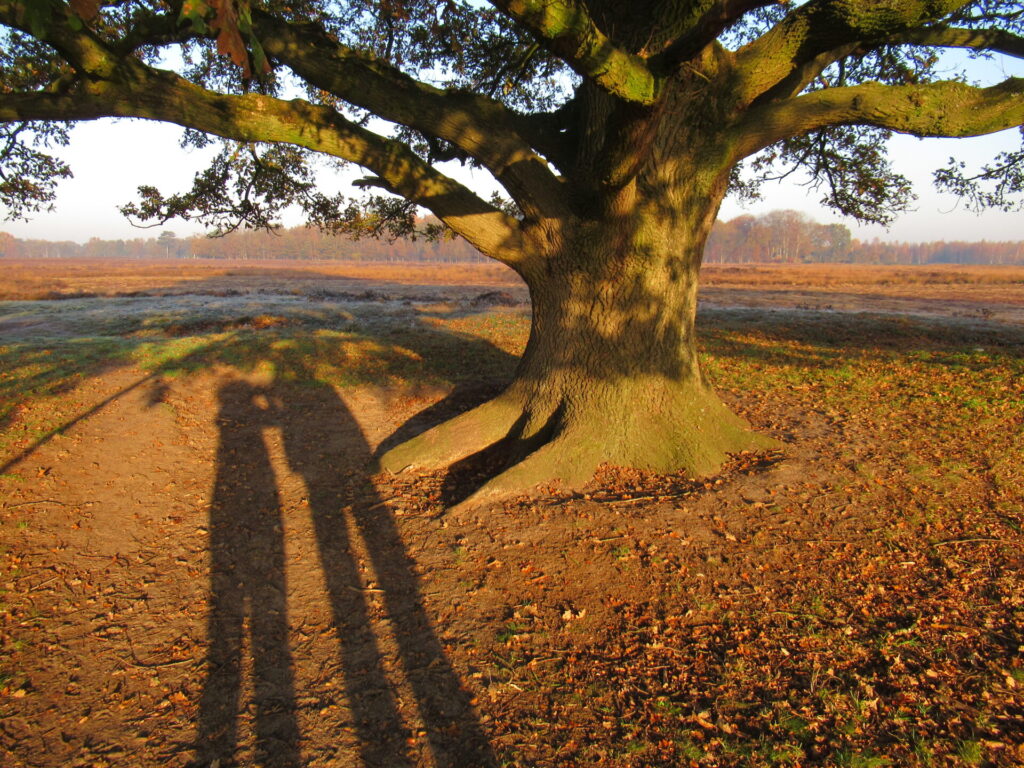
Now, let’s go for a ramble. It’s early Sunday morning in one of our favourite places. There has been a slight ground frost and the light is hazy.
This is a small-scale landscape with a meandering brook, some open marsh and farmland, and some woodland.
When it is getting a little lighter, the sun slants across a hillock, showing a strange sort of white veil on the top. What is it?
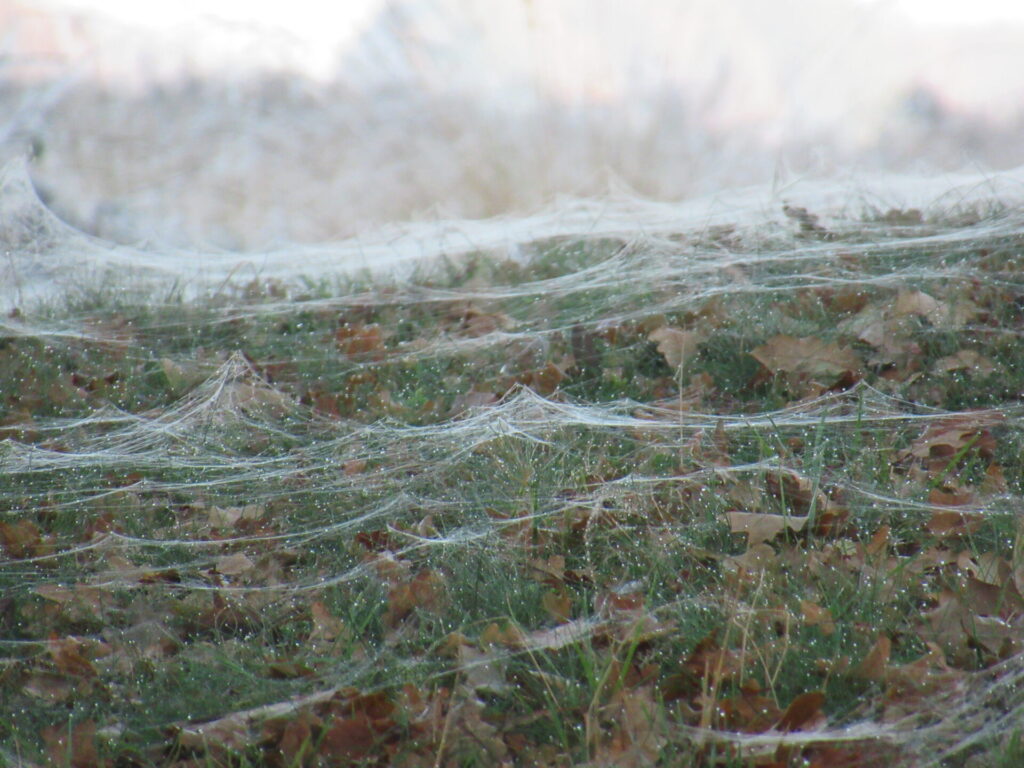
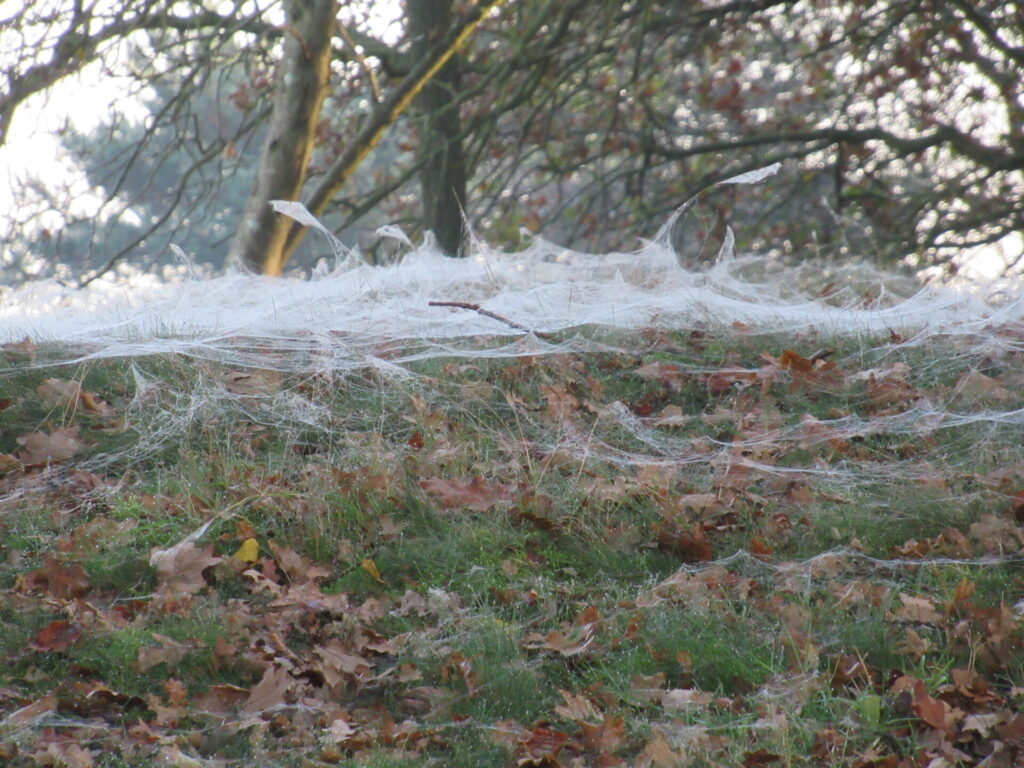
Zooming in it becomes clear that the grass and fallen oak leaves are covered in spiders’ webs.
A slightly eerie but beautiful blanket of spiders’ webs.
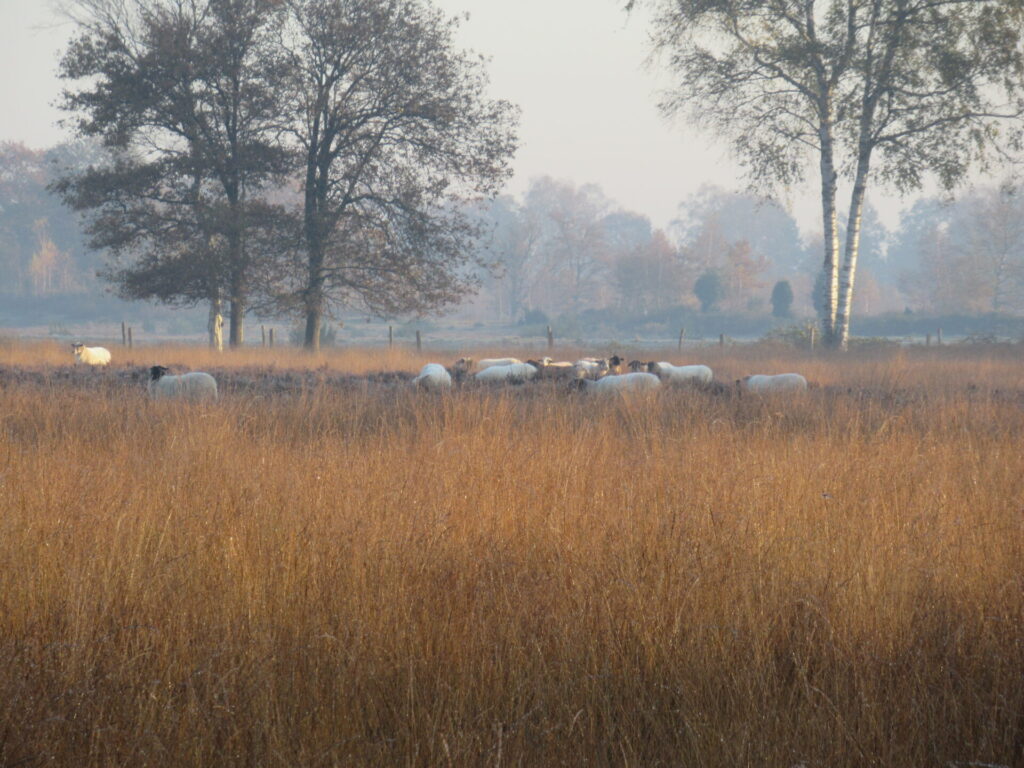
There is some heather as well, although it is partly overgrown with purple moor grass. A small group of sheep is grazing quietly. Not a sound to be heard. The highland cattle that also help keep the heathland open are nowhere to be seen today.
It is getting lighter, but the sun is still low, casting elongated shadows.
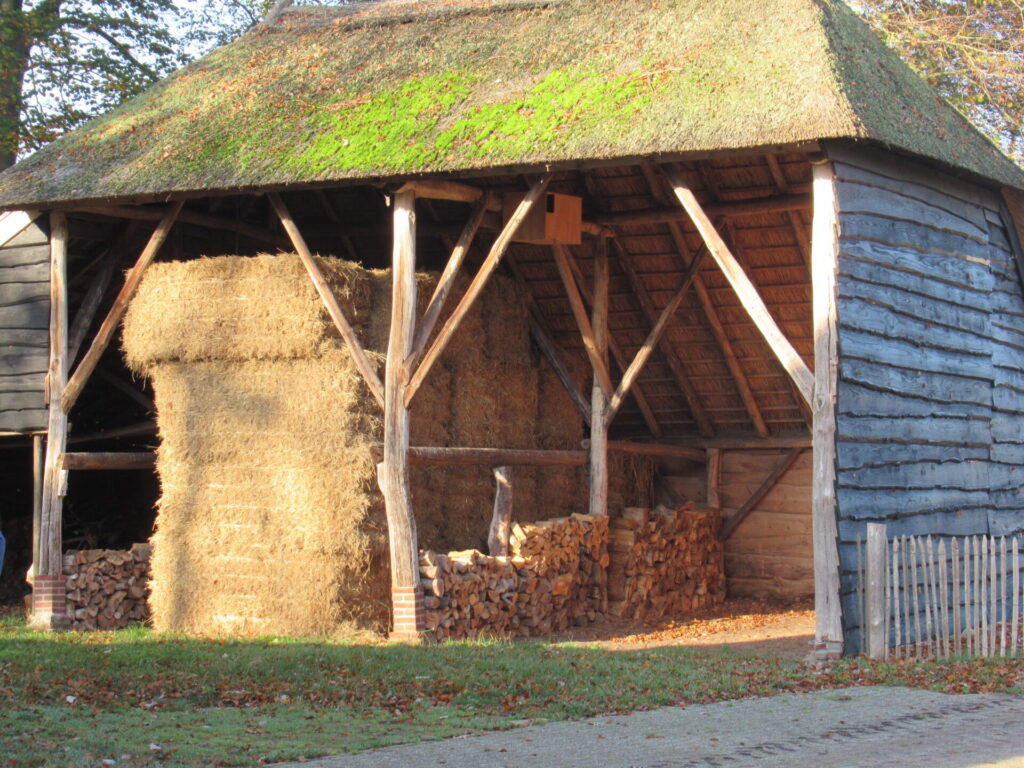
Towards the end of our ramble, the sun is fully out, giving the hay and wood in a barn a golden glow.
Time seems to stand still here.
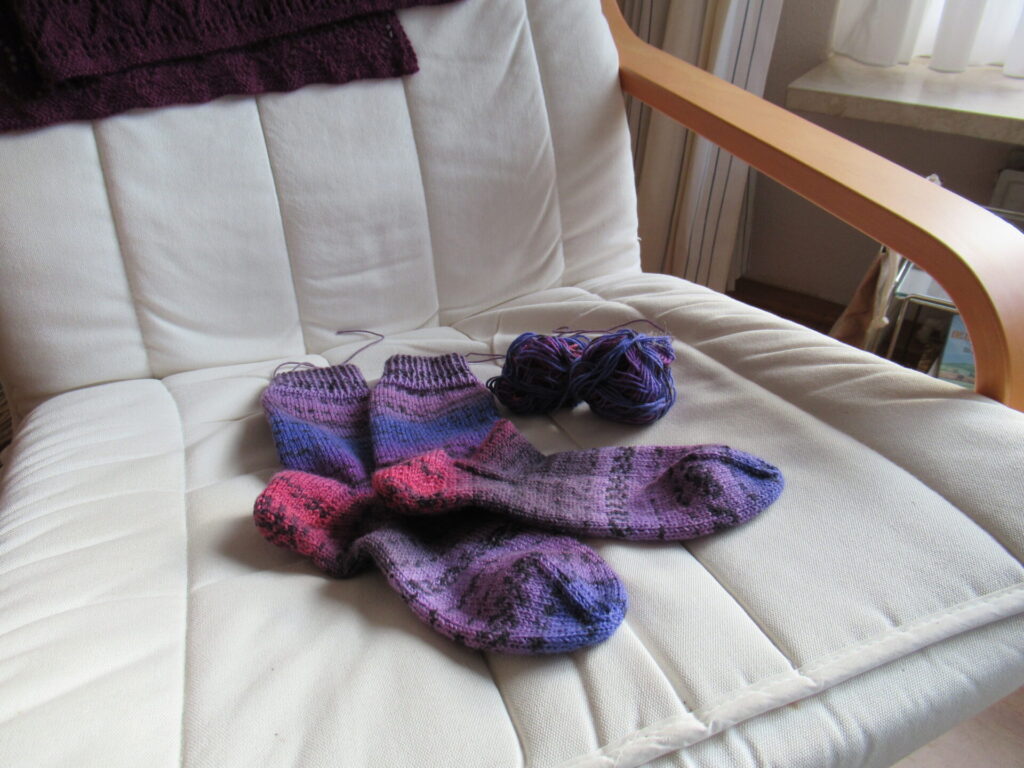
Not so at home. On the knitting front, I’m in the finishing stage of all kinds of things. I’ve just finished another pair of socks. Now there’s only the ends to weave in and then I can try out my new sock blockers.
And what’s that hanging over the back of my knitting chair…………?
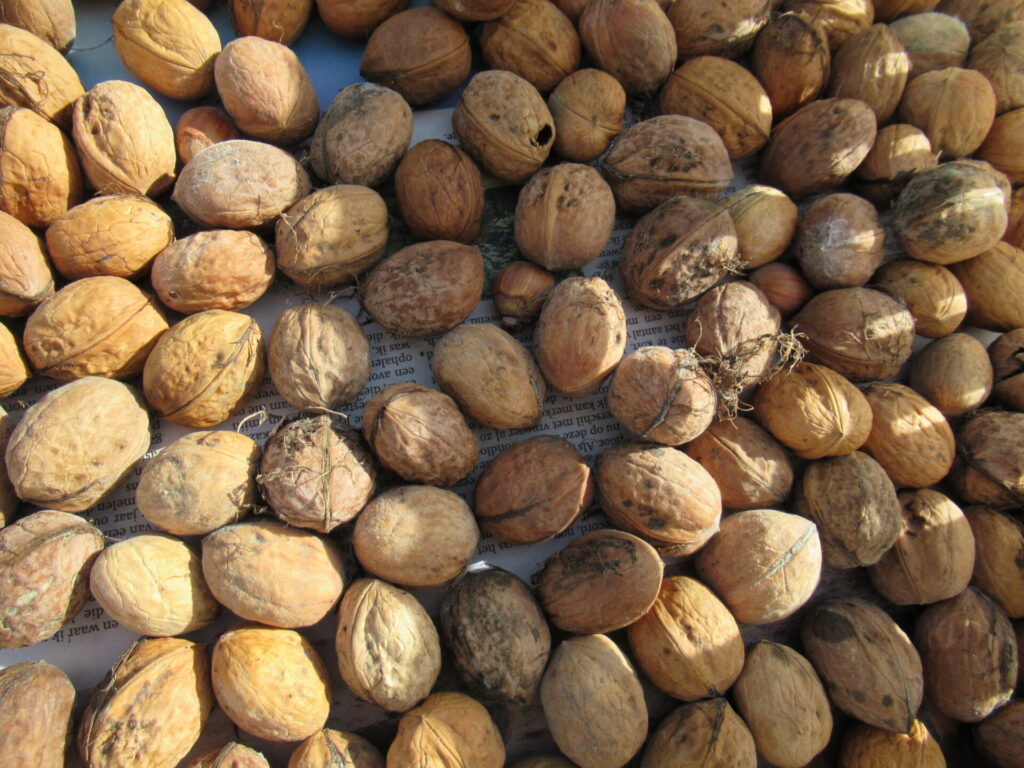
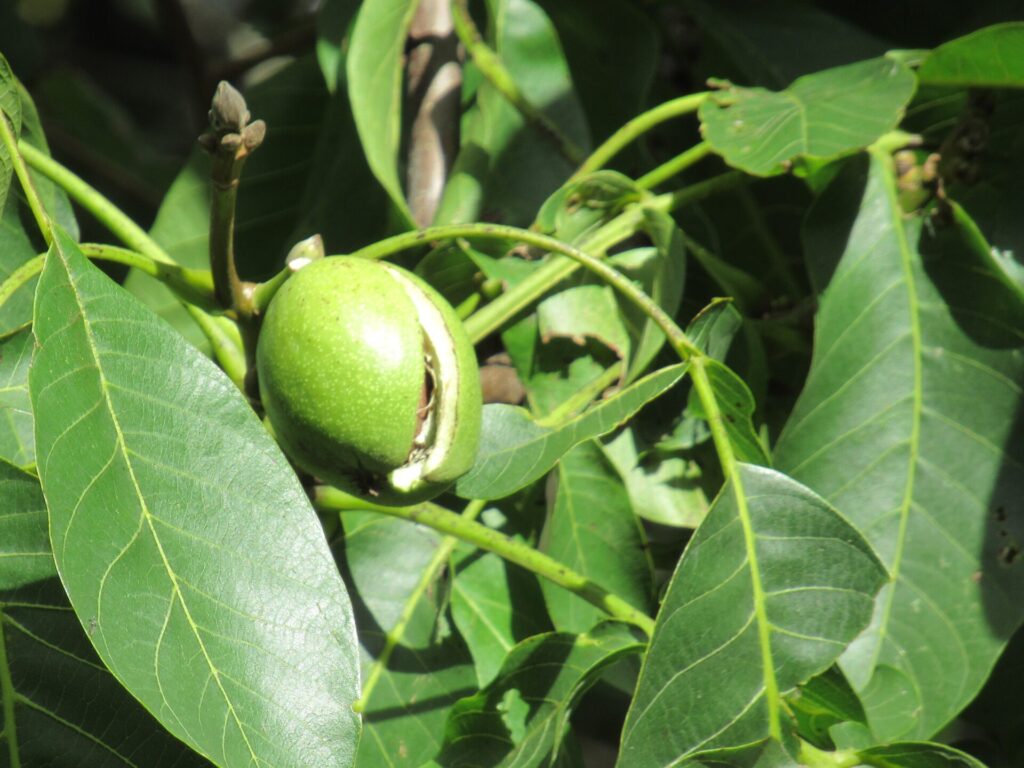
When we moved here 18 years ago, friends gave us a walnut tree. Or rather a tiny sapling that had sprung up in their garden. It has grown, and grown, and grown, and now provides a shady spot for lilies of the valley, ferns and wood anemones.
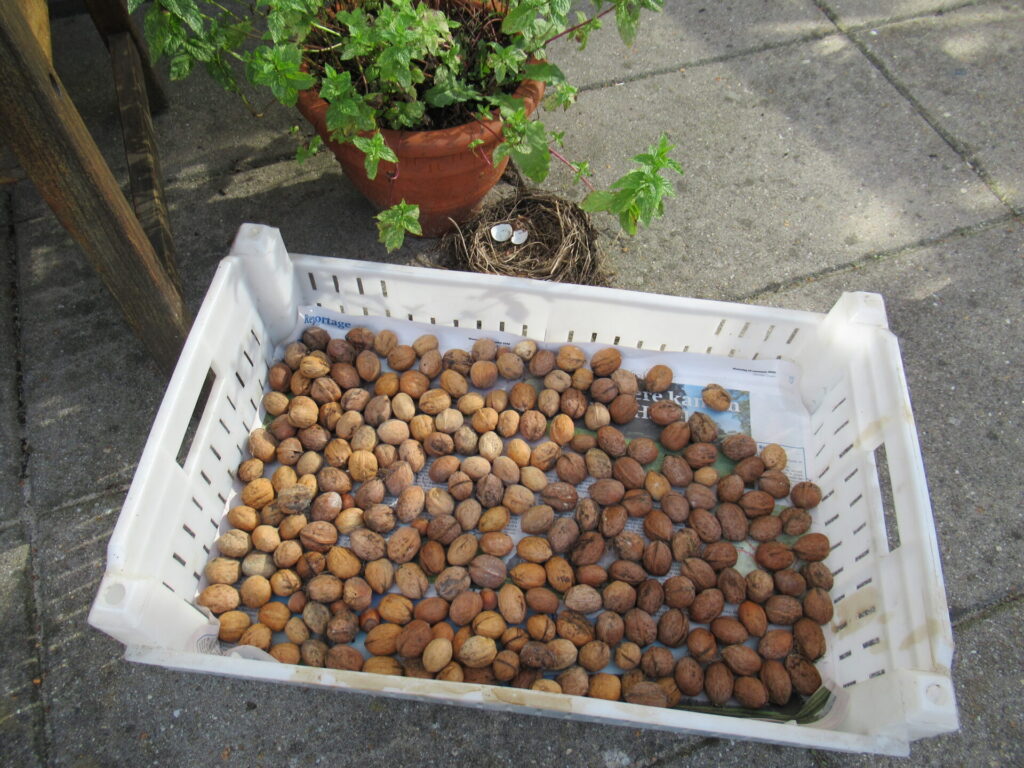
It also provides us with nuts. Last year, many were shrivelled up inside their shells. 2020 is a much better walnut year. Still, our harvest isn’t huge. It’s the magpies, you see. They love walnuts, and this year there is a large magpie family to feed. Fortunately they are generous enough to leave us a few, too.
This is our share of the walnut harvest this year.
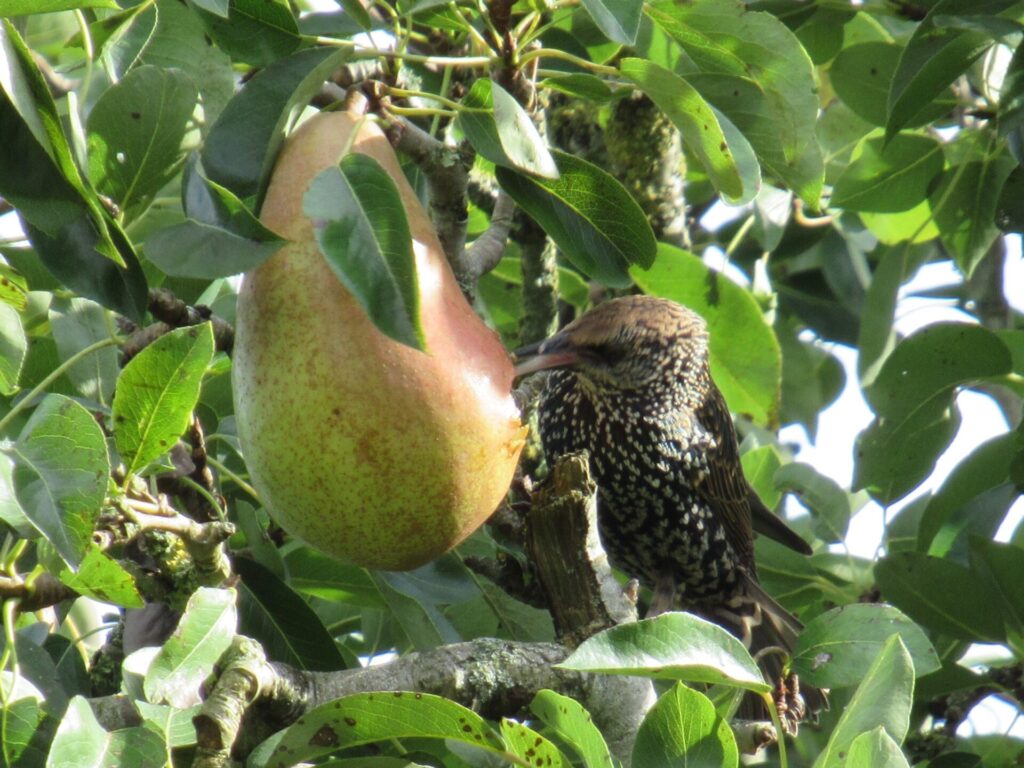
Our big old pear tree has also done very well. Last year, it didn’t give us a single pear, but this year it produced masses. So many, that we couldn’t possibly eat even a tenth of them. So one evening, I loaded wheelbarrow after wheelbarrow with pears to share with everybody in the neighbourhood who wanted some. A great opportunity to catch up on all the local news, too!
And then there were still many left on the tree to share with a big and noisy travelling band of starlings.
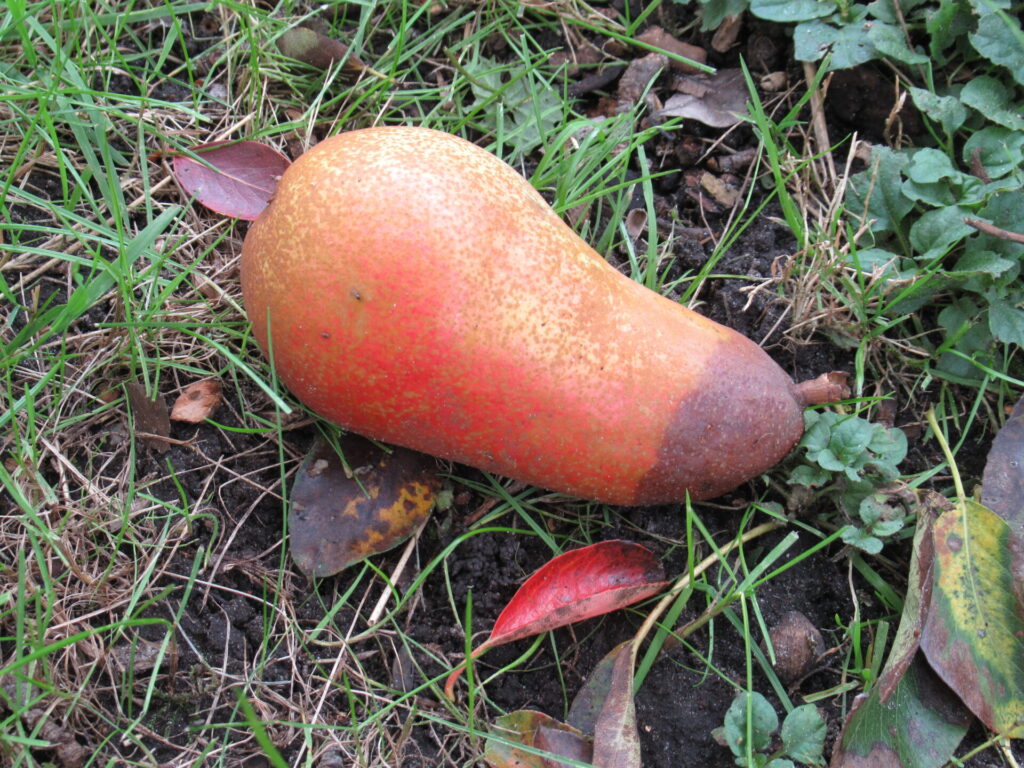
Now, the tree is dropping its last few pears…
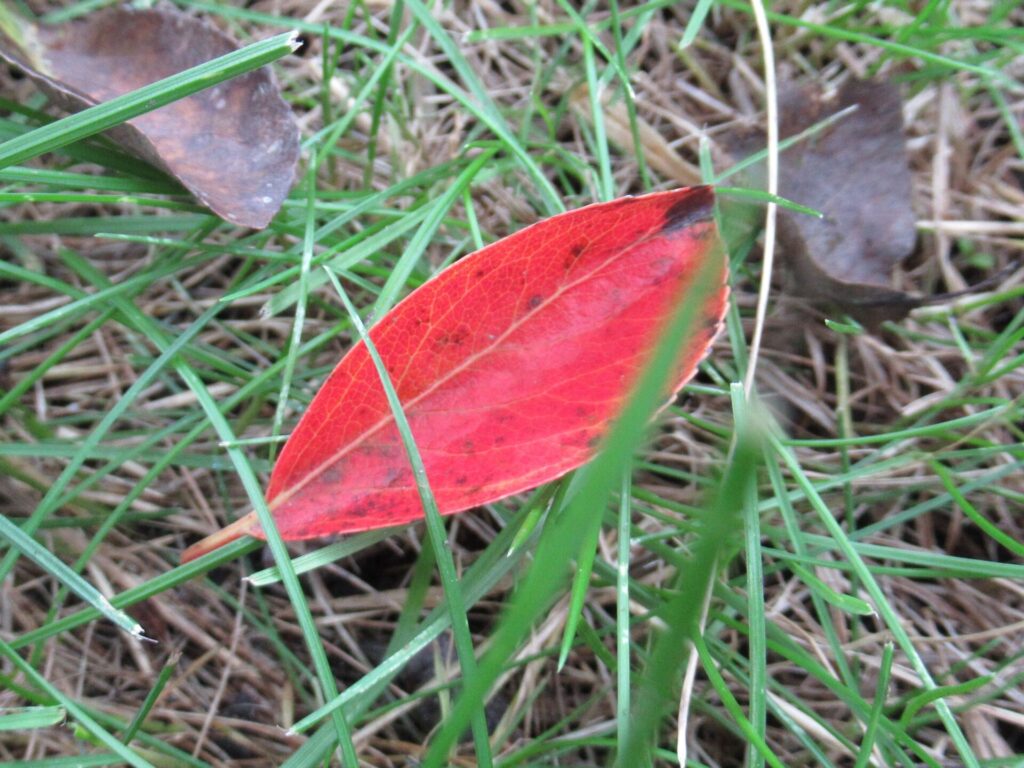
… and also starting to shed its leaves, now a dull brown. Among the pear leaves, there are some fiery red ones blown over from the Amelanchier, like chili peppers in the grass.
It is really starting to feel like autumn. The temperature is dropping, and it is getting dark soon after our evening meal. Although I knit all year round, for me this time of year always feels like the start of the ‘real’ knitting season.
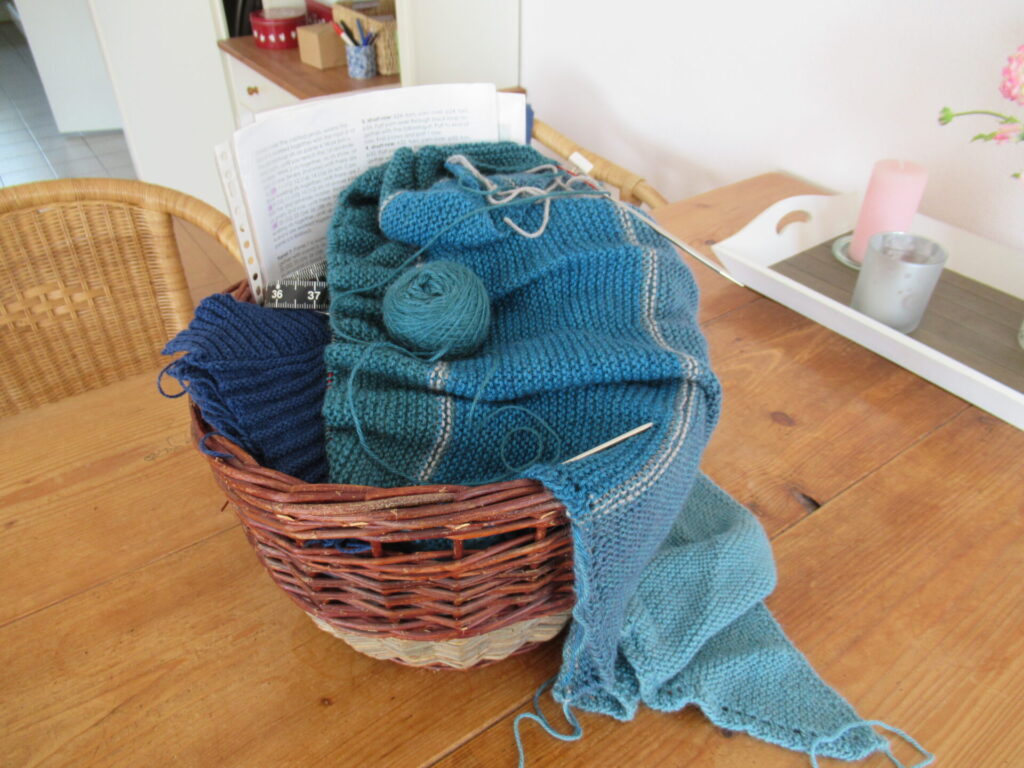
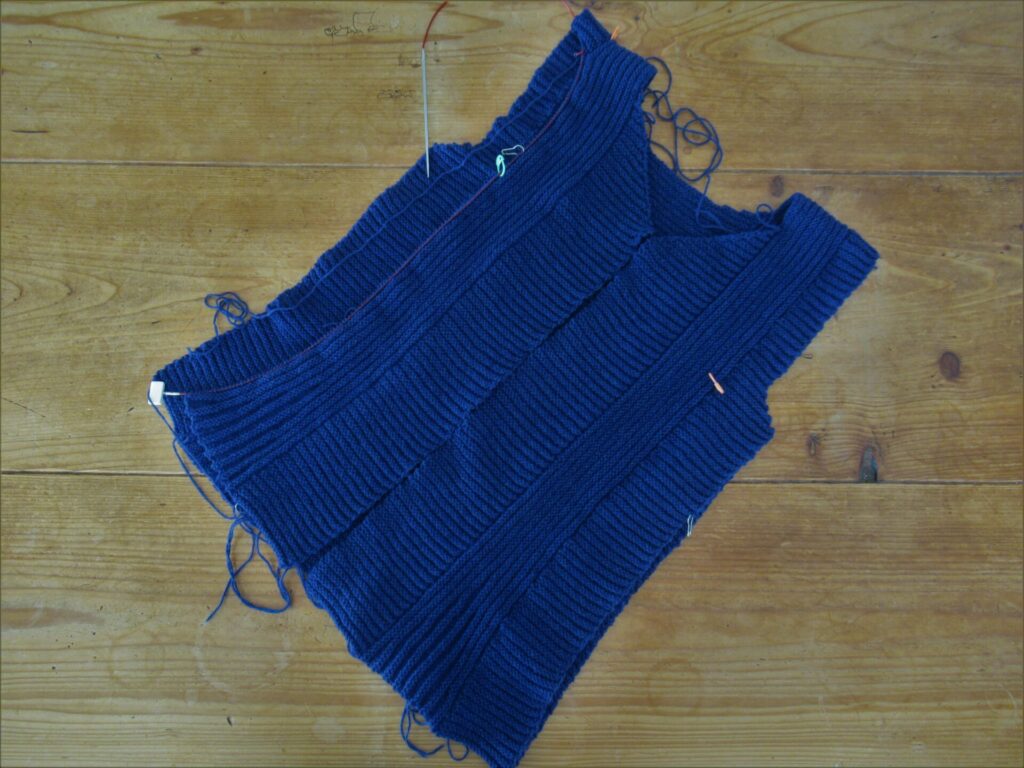
I realize that I tend to write about my knitting projects mostly when starting and finishing them – the most interesting moments. Now, for a change, here are two of my knitting projects in progress.
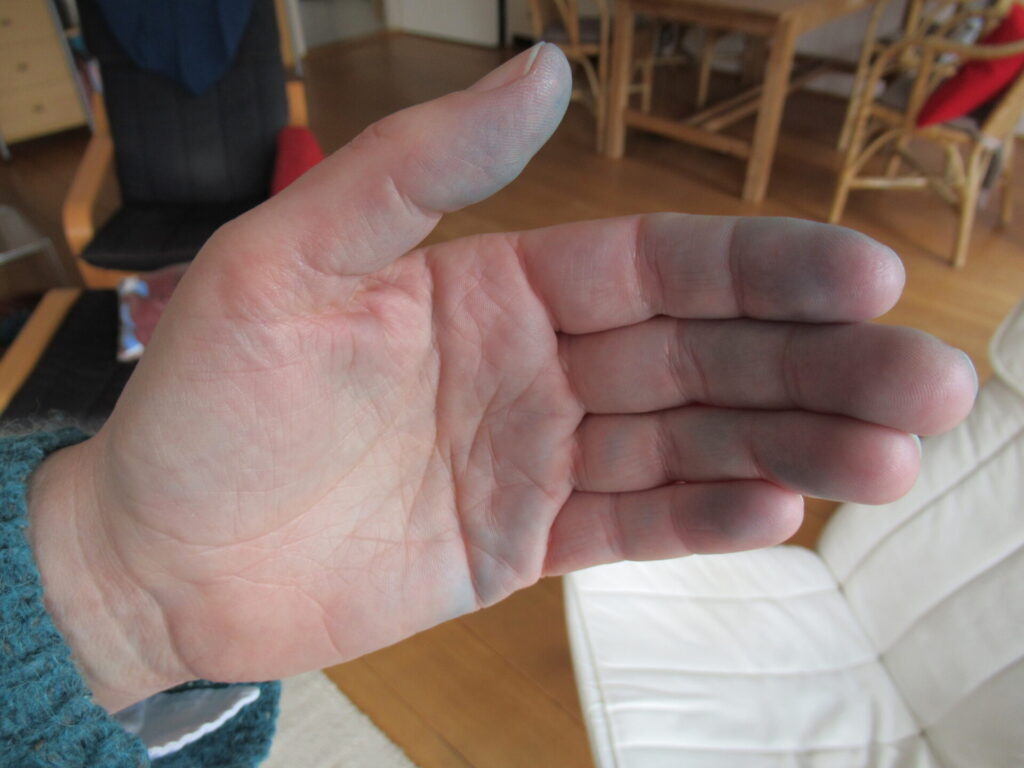
Here is my Indigo Sea Shawl on the needles.
I’ve thrown it into a corner taken a break from it, because one of the skeins was colouring my hands and the white blouse I was wearing blue. Aaaargh!
After a while I ripped the offending part out, washed the yarn, rinsed it, gave it a vinegar bath and rinsed it again and again, until it (almost) stopped bleeding.
Now I’ve picked up the needles again and have almost finished it. I’m thinking of a slightly more interesting edge than just an ordinary bind-off.
I’m also still knitting on my Panel Debate cardigan. Progress is slow. For one thing, yarn and needles are very fine. For another, I’ve been knitting socks and other small items in between.
I’m now determined to speed the process up because I want to wear it. And also because I feel like starting something new – something warm, cosy and woolly.
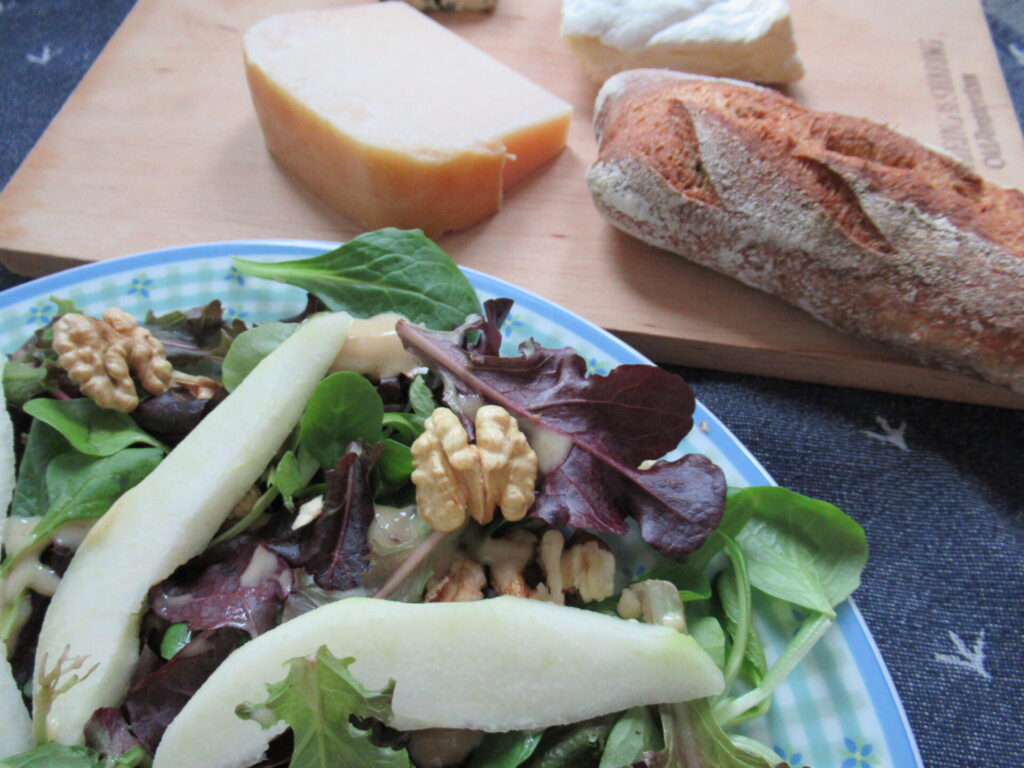
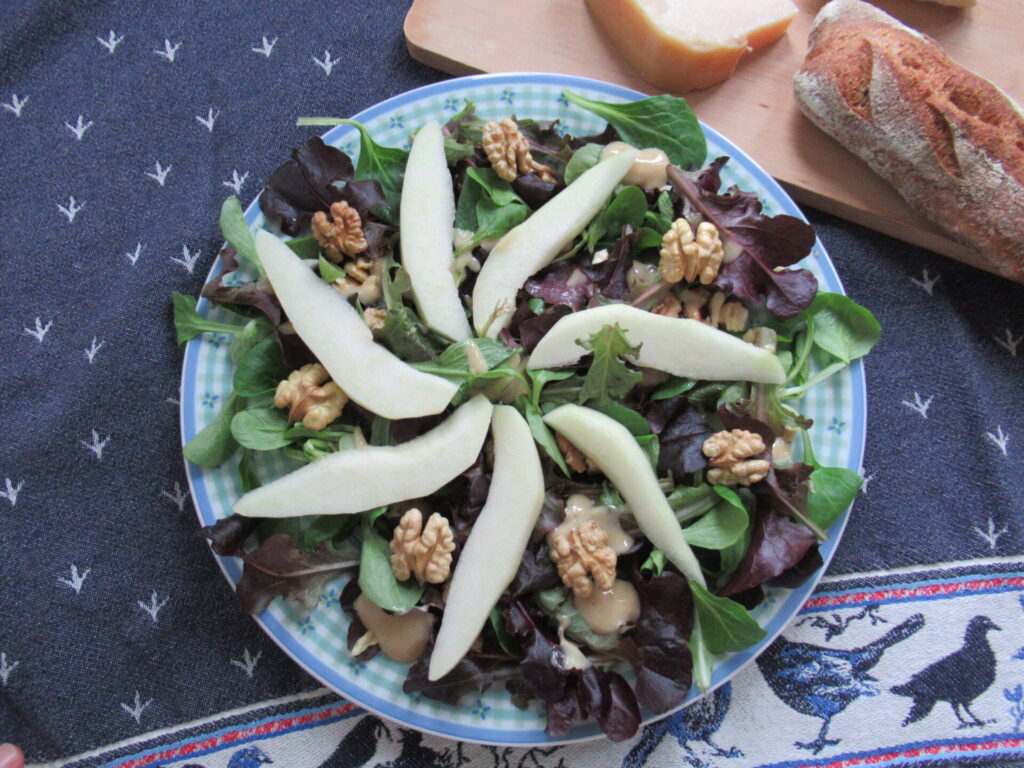
Unfortunately, I can’t literally share our nuts and pears with you here. But I can share a recipe using them. Here is my simple Pear & Walnut Salad recipe.
Pear & Walnut Salad
Serves 2 as a side dish or starter
Ingredients
50 g mixed salad leaves
8 walnuts
½ pear
For the dressing:
1½ tbsp (olive)oil
½ tbsp good white wine vinegar
¾ tbsp honey mustard
A pinch of sea salt
Some freshly milled black pepper
Method
Roast the walnuts in a dry frying pan and leave to cool
Rinse the salad leaves and gently pat dry with a clean tea towel
Halve the walnuts. Leave some halves whole and chop the rest coarsely
Whisk all the dressing ingredients together until they form a thick and smooth sauce
Mix the salad leaves with the chopped walnuts and arrange them on a plate. Distribute blobs of dressing over it
Peel and core the pear. Cut into thick slices and arrange on top of the salad leaves
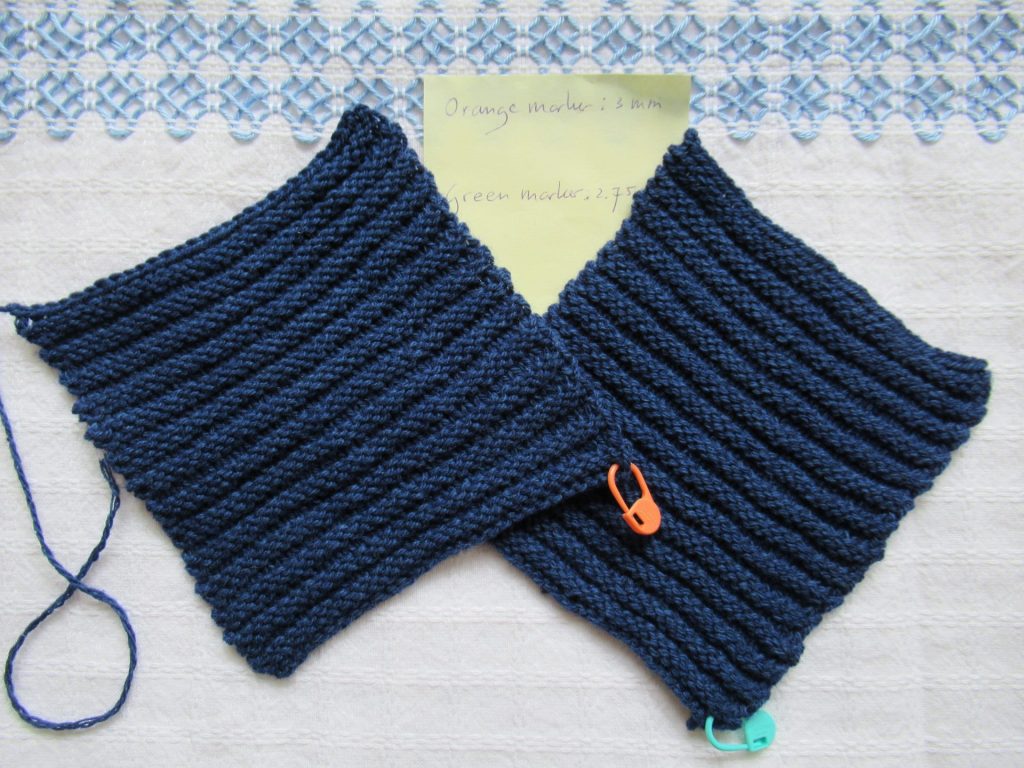
These two simple swatches are all there is to show you of my knitting at the moment. I have plenty of knitting plans and ideas, but it’ll take a while for them to transform into something bloggable. So I thought, Why not take a break? A nice, long summer break! I can certainly do with one. How about you?
Now, before you think that my blog will come to a standstill, that’s not what I mean. What I mean is that I’d like to take a break from talking about my knitting. I’d like to take us on a few outings and write about some other summery things. Mainly knitting-or-other-crafts-related, of course.
I don’t know exactly what it’s all going to look like, and I can’t guarantee that my knitting won’t sneak in here and there, but I hope that it’s going to be fun and something to look forward to every week.
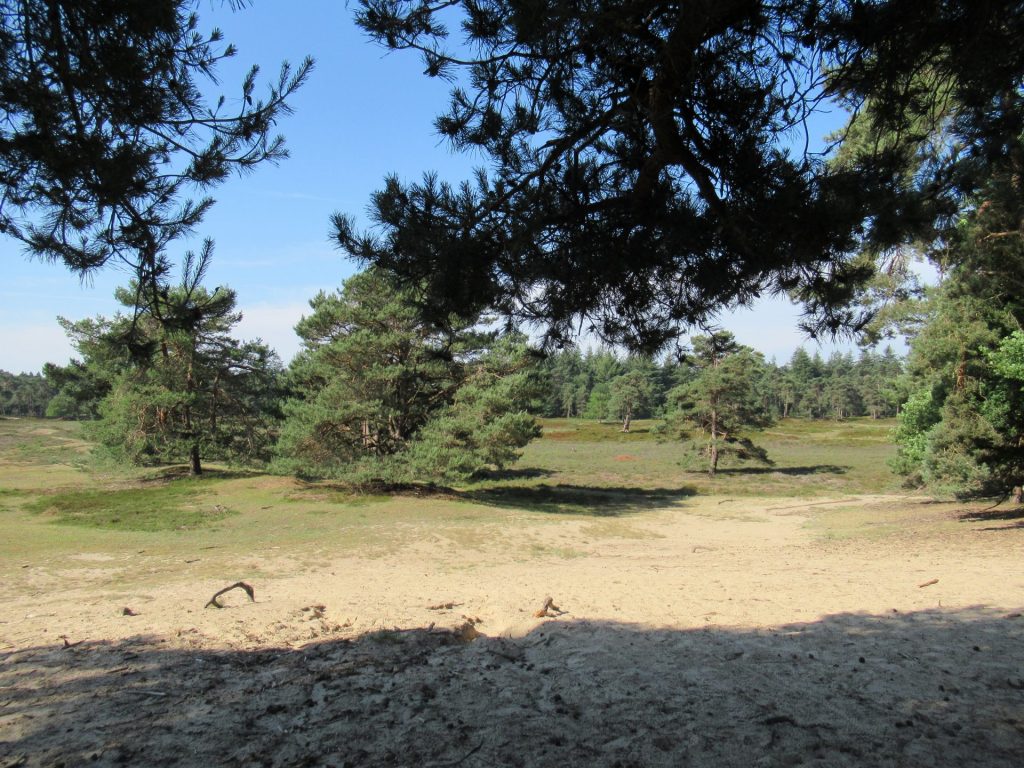
To start with, I’d like to take you on an early morning walk and share a recipe.
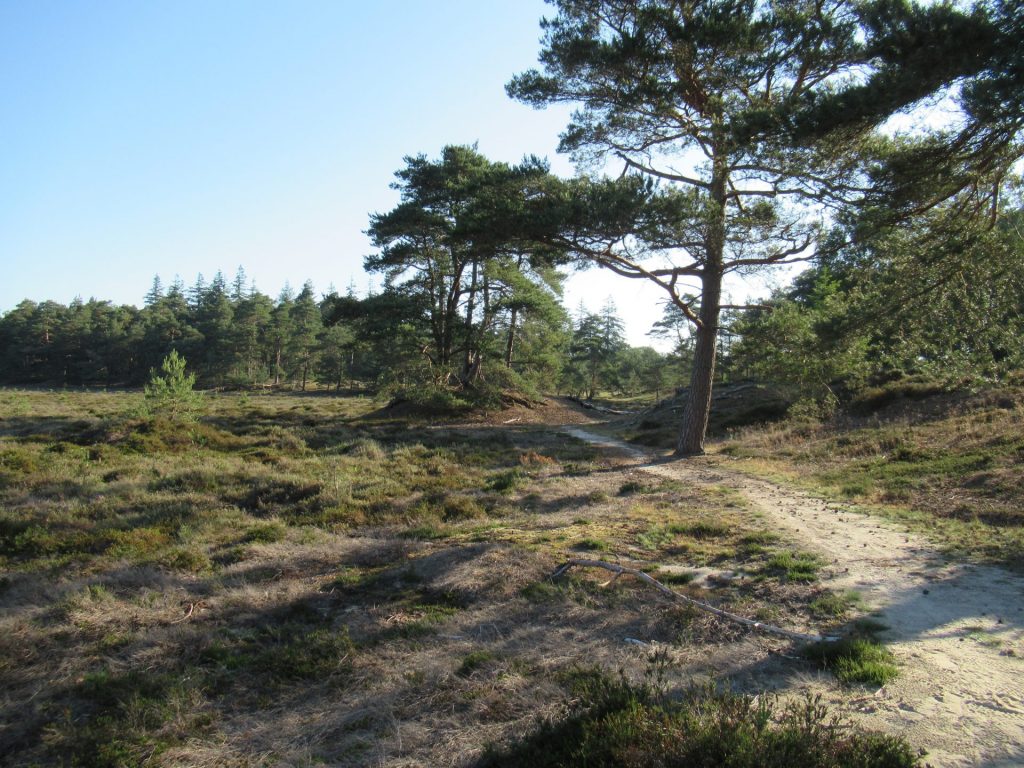
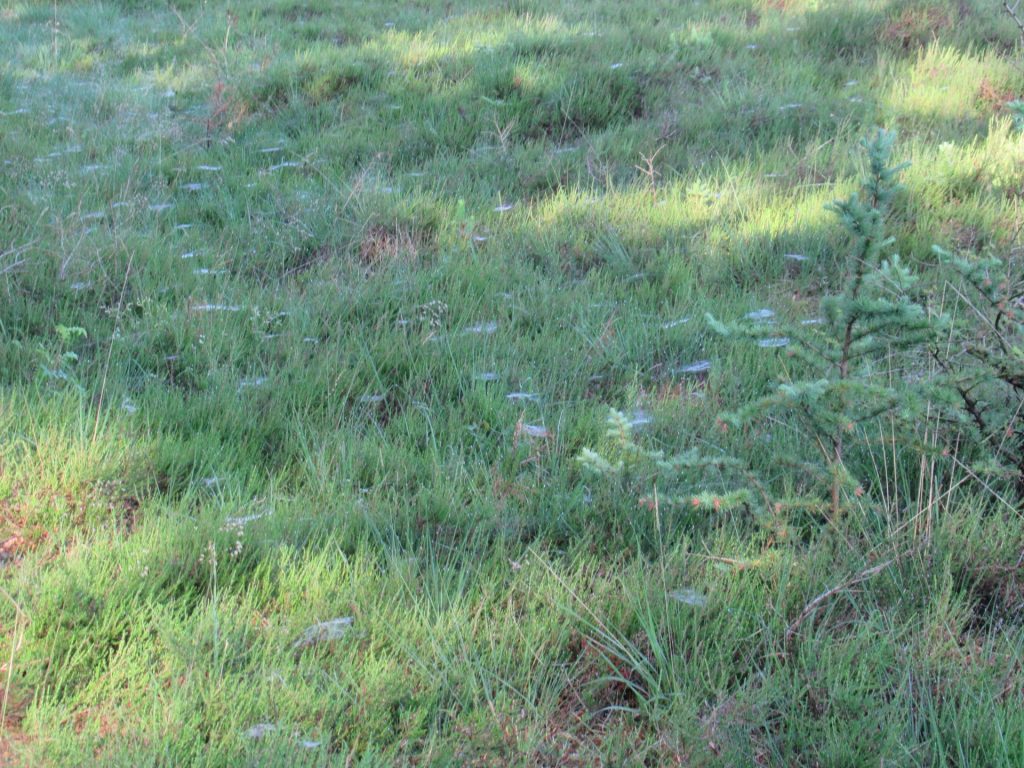
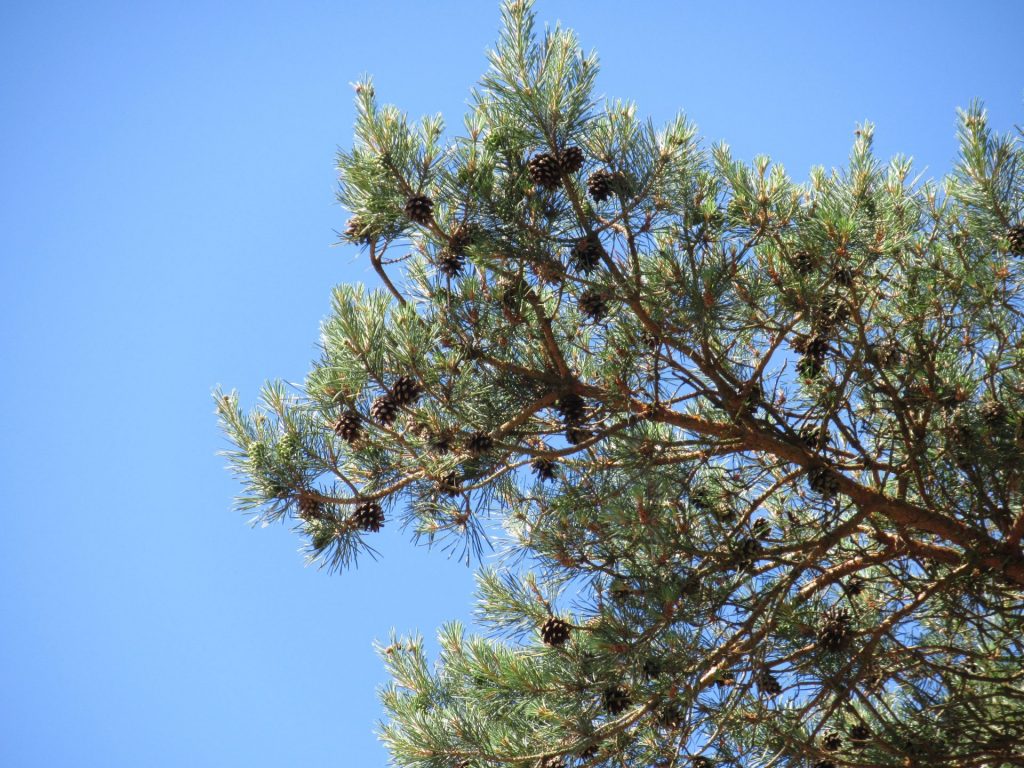
Imagine that it’s 7 a.m. We’ve just had a quick breakfast and are still slightly groggy and grumpy, feeling like, ‘Do we really need to get up this early on our day off?’ Then, seeing the sun slanting through the trees, and breathing in the fresh air and the mixed smell of pine trees, sand and heather, all the grumpiness is gone. Aaaaah, it’s so good to be here!
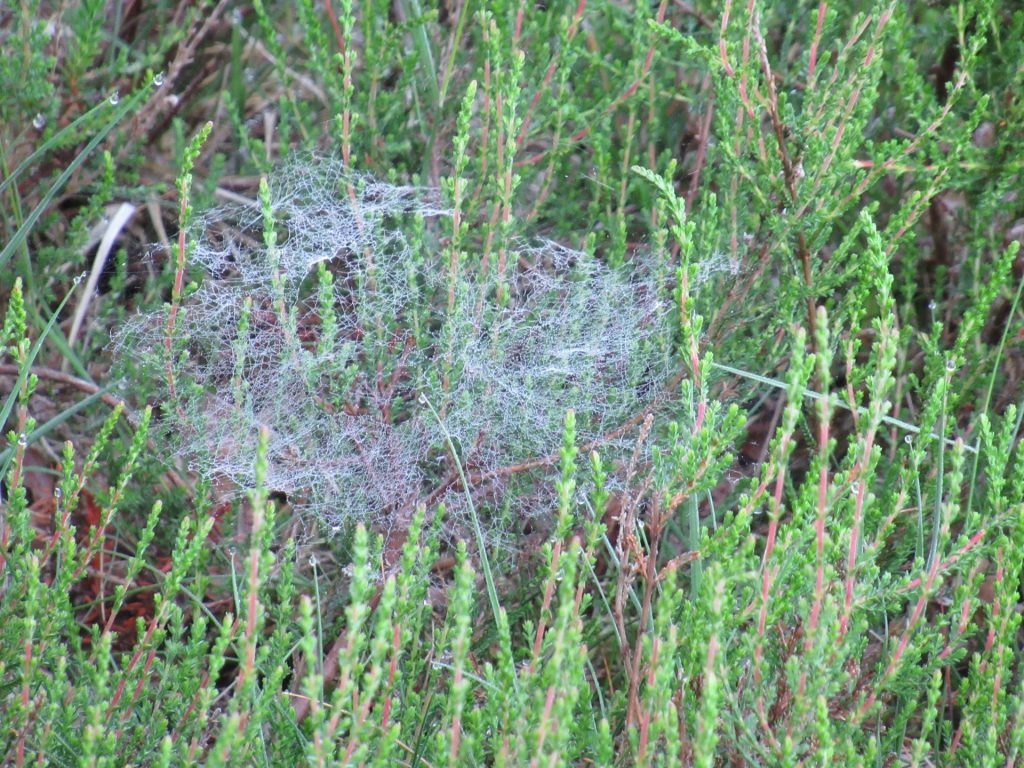
In some places, the ground is carpeted with crowberries dotted with many, many small dewy spider’s webs.
Can you see them? Here is one from close up.
There will be small black berries on the plants later in the season, very bitter when eaten raw. The plants also give off a slightly bitter, but really nice and tangy smell.
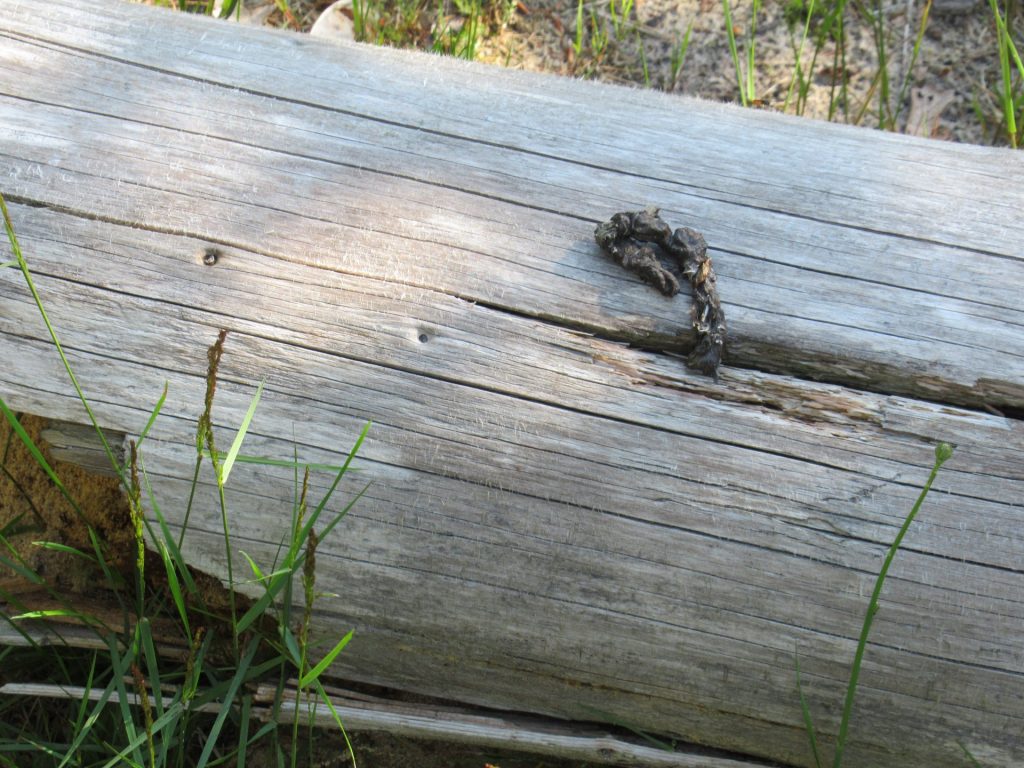
And here, on a dead tree trunk, is something giving off a not-so-nice smell:
It’s fox’s spraint. (Forgive me for being so weird to photograph fox poo, but I think it’s really interesting that they deposit it in such a prominent spot.)
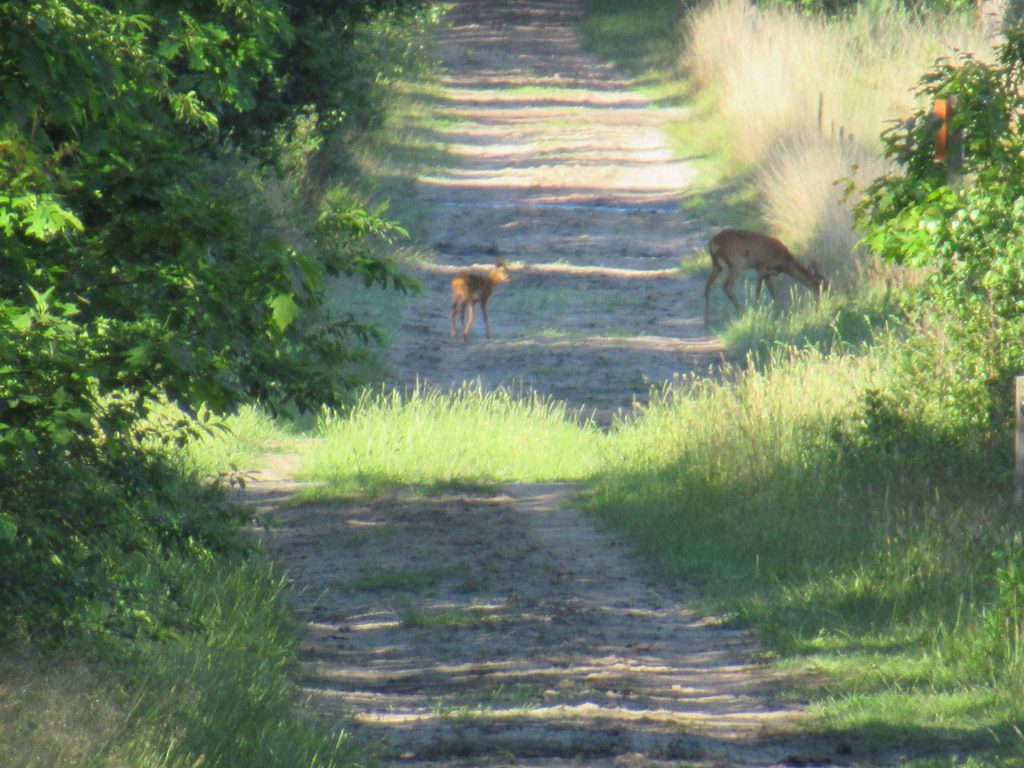
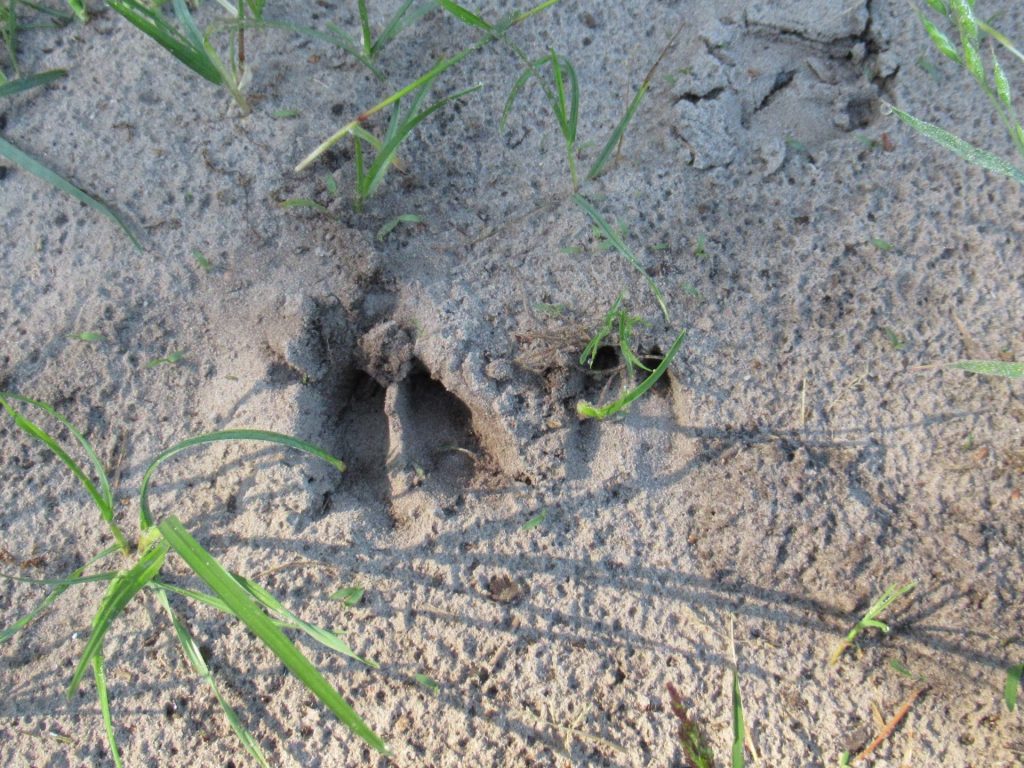
Oh, and look, aren’t we lucky today? There, in the distance is a roe deer mum with her kid…
… strolling and grazing along the path. I don’t think they’ve spotted us yet, but we won’t be able to get much closer without being noticed.
And here are their hoof prints, one big and one small:
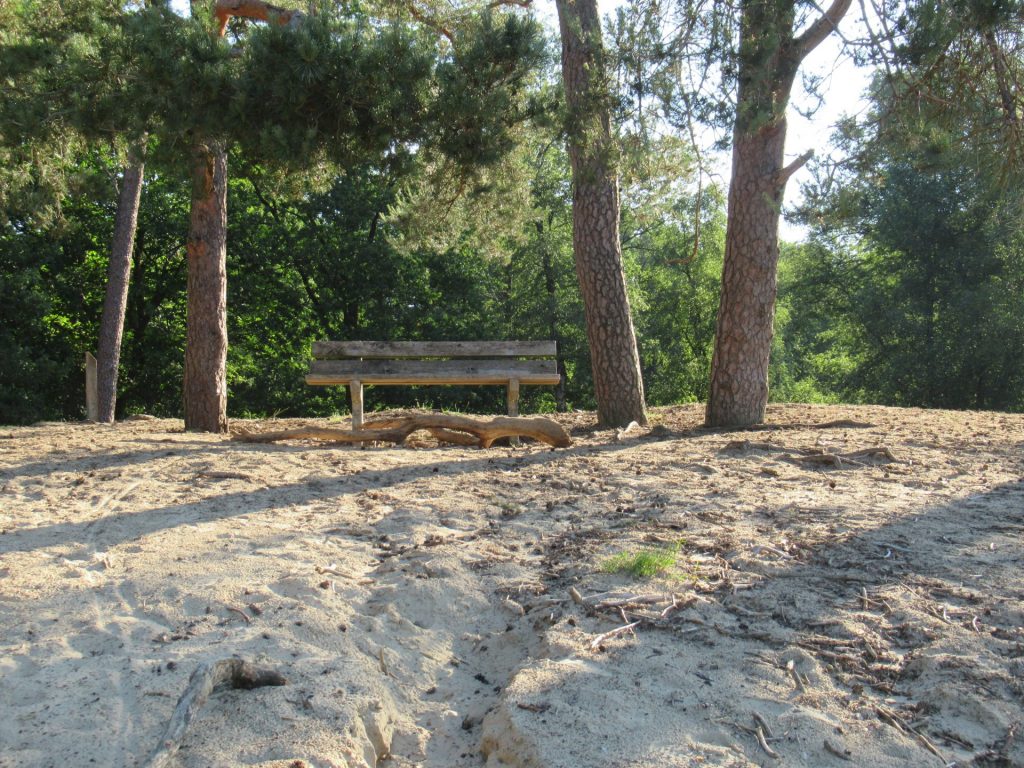
Aww, that was so sweet. Now, before we head back, let’s just enjoy the peace and quiet for a while on this lovely bench with a dead branch for a footstool.
The wind is soughing softly through the pine branches above us.
The sun is rising in the sky, but our bench is in the shade of the big old pines, so we won’t get too hot. I could sit here all day, enjoying the peaceful view…
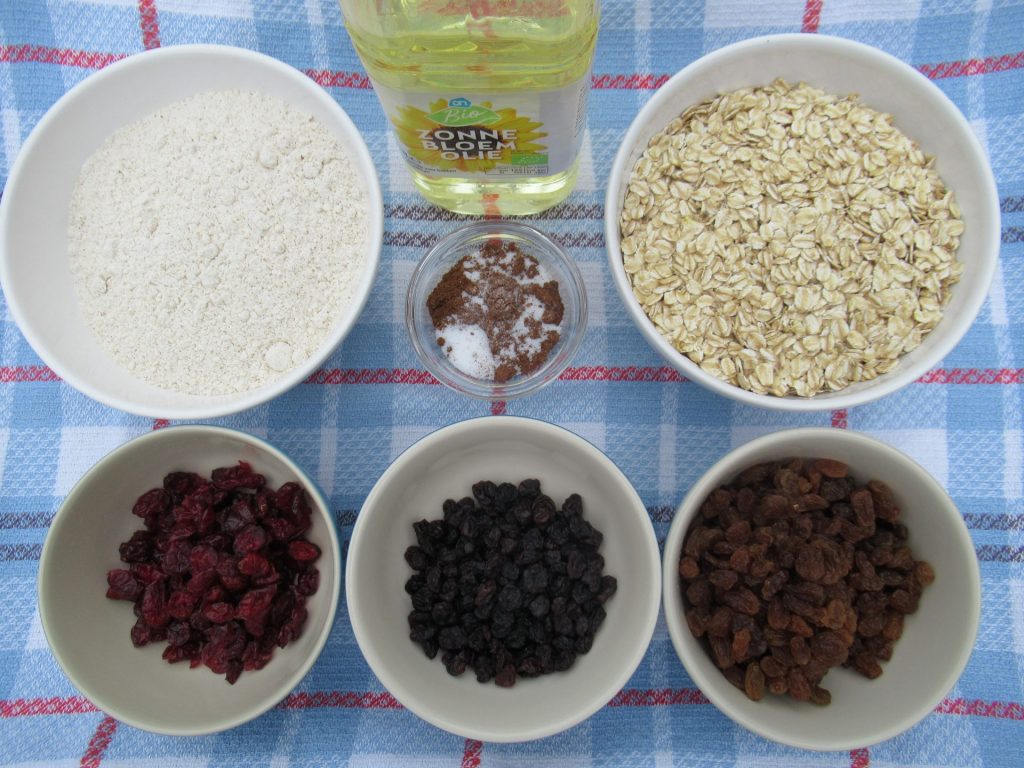
… but I shan’t, because I promised to share a recipe with you, too. It’s my recipe for Very Healthy Oat Squares. I make these every other week. They keep very well and are ideal snacks to take on walks and other days out. Why not bake a batch of these (or of something else if you have a sweeter tooth) in preparation for next week’s outing?
Here are the ingredients all set out.
Very Healthy Oat Squares
For a 27 by 27 cm baking tray, makes 16.
Ingredients
200 g thick-rolled oats (not the finer porridge oats)
200 g wholewheat pastry flour*
100 g sultana raisins
50 g currants
50 g dried cranberries
8 g speculaaskruiden**
3 g salt
2 tbsp sunflower oil + a little extra for greasing
250 ml cold water or a little less
* Wholewheat pastry flour is more finely ground than ordinary wholewheat flour and is available from most healthfood stores. ** This is a typically Dutch spice blend available online here and there. Gingerbread spice mix is not entirely the same but a good substitute.
Method
Preheat the oven to 180 ˚C (fan oven 160 ˚C)
Put all dry ingredients in a mixing bowl
Stir in 2 tablespoons of sunflower oil and grease the baking tray with the rest of the oil
Gradually stir in the water. Try using a little less than the 250 ml at first. The mixture should just stick together and should not be soggy at all. If it is too wet, the oat squares won’t keep as well
Knead through (by hand or using a mixer) for a minute or two
Drop the mixture onto the baking tray and, using wet hands, distribute it evenly and flatten it
Tidy the edges (ragged edges will become brittle and burn)
Cut into 16 squares and bake for 35 minutes
Remove the baking tray from the oven, transfer the squares to a wire rack and leave to cool before storing
In an airtight container, kept in a cool and dry place, the oat squares will keep up to two weeks.