Hello! I hope this finds you all well. Today, I’m diving deep into a knitting technique – one way of finishing a steek, with button bands with knitted-on facings. Perhaps you’re already familiar with steeking. If not, let me explain.
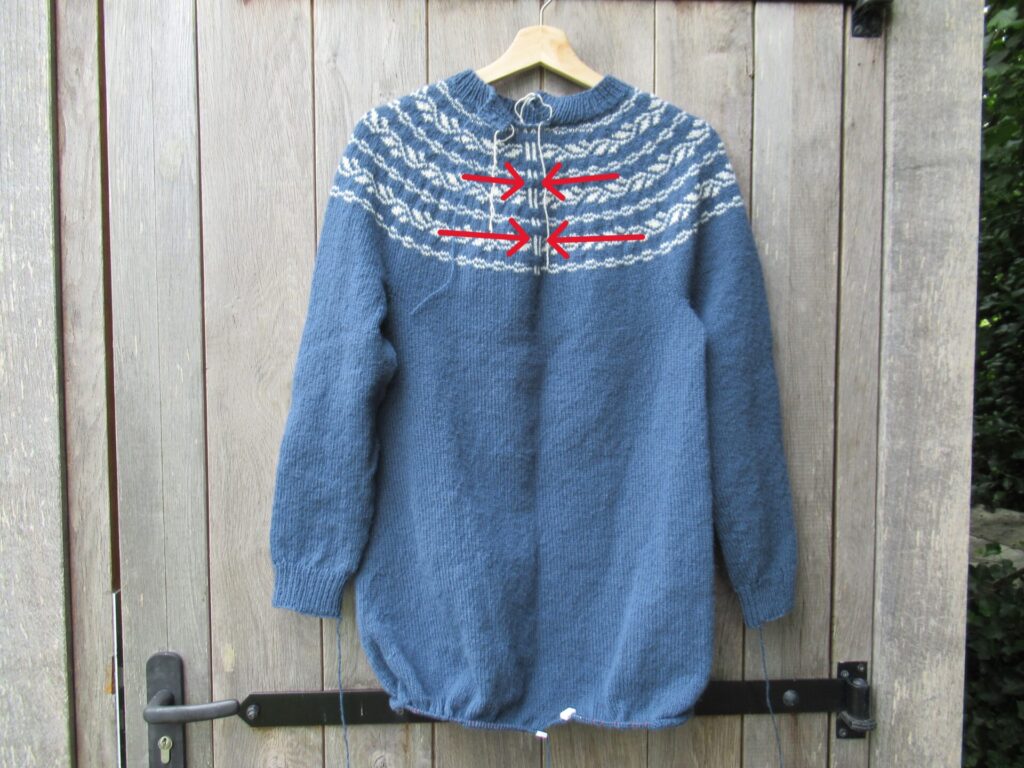
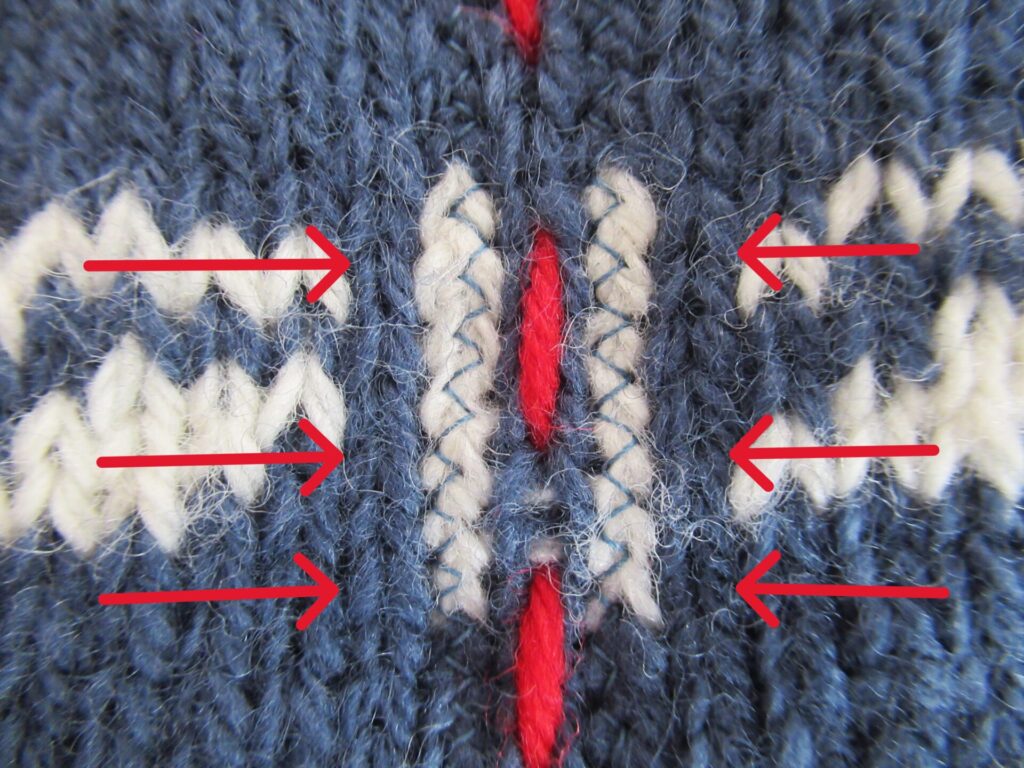
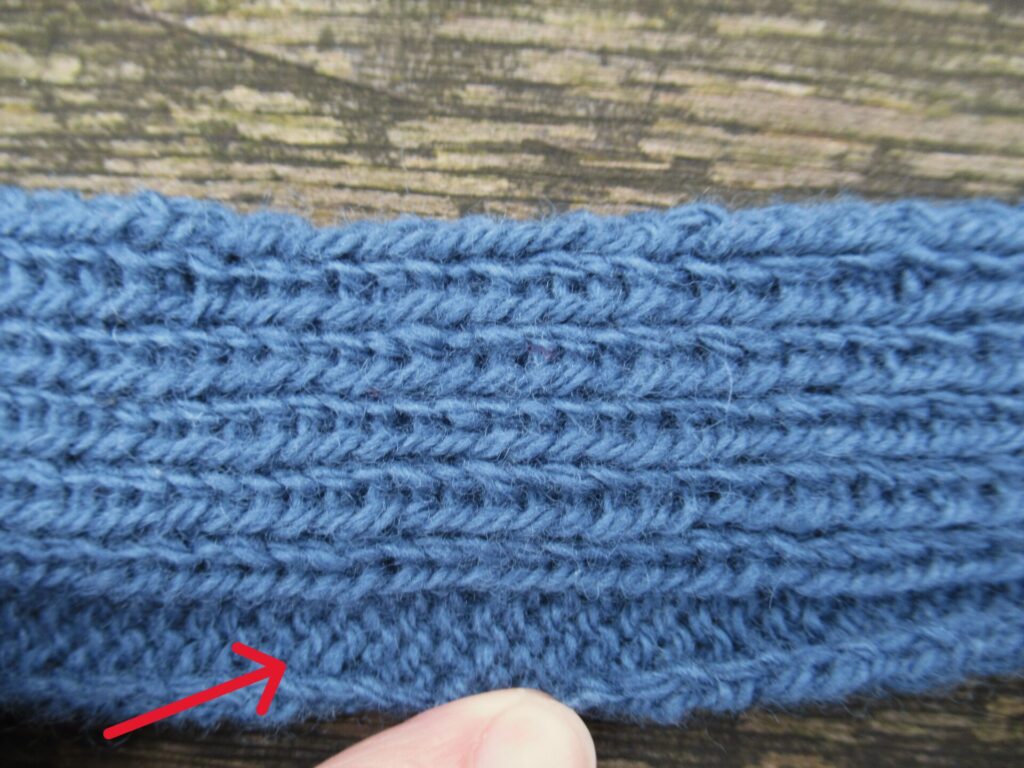
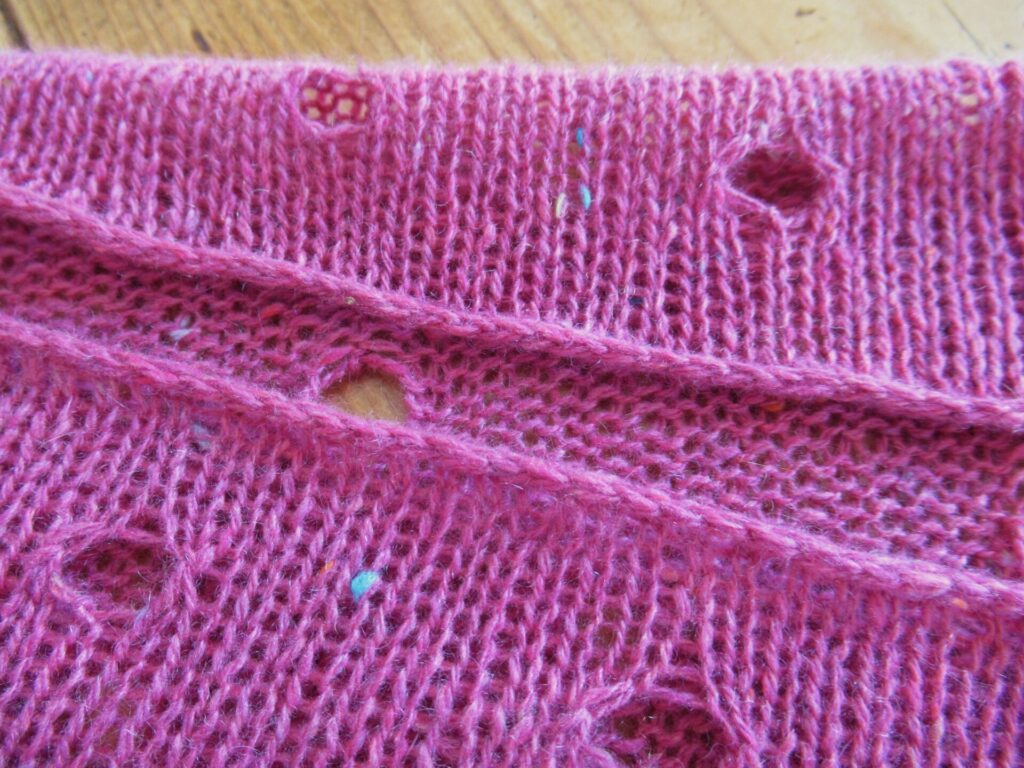
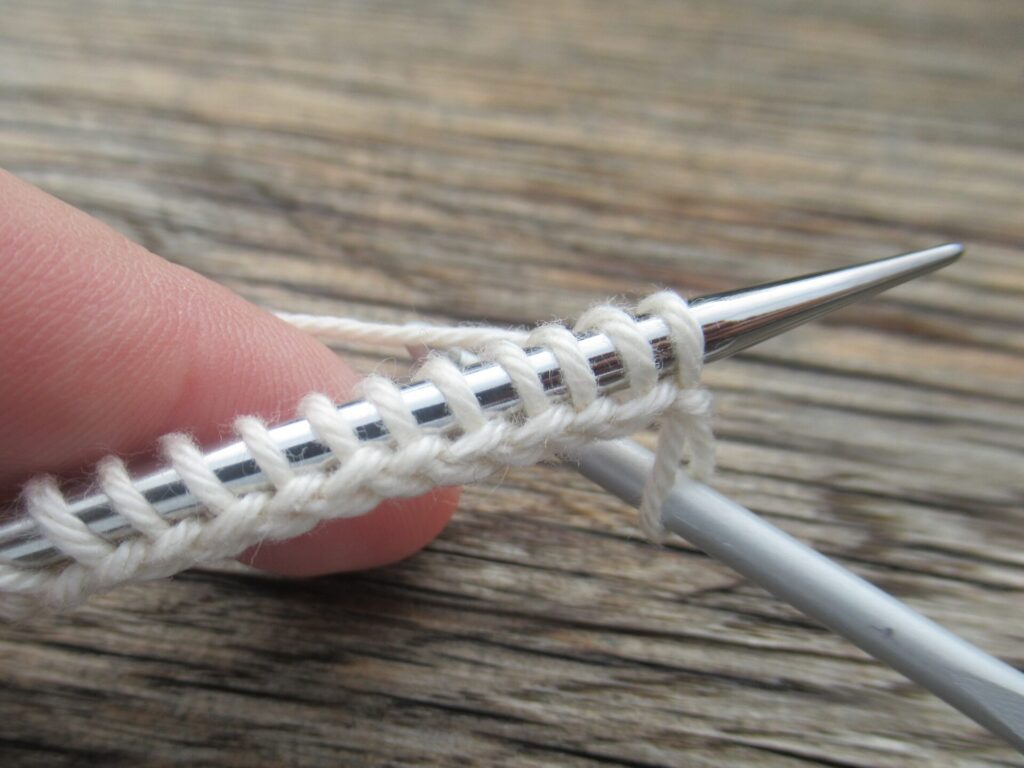
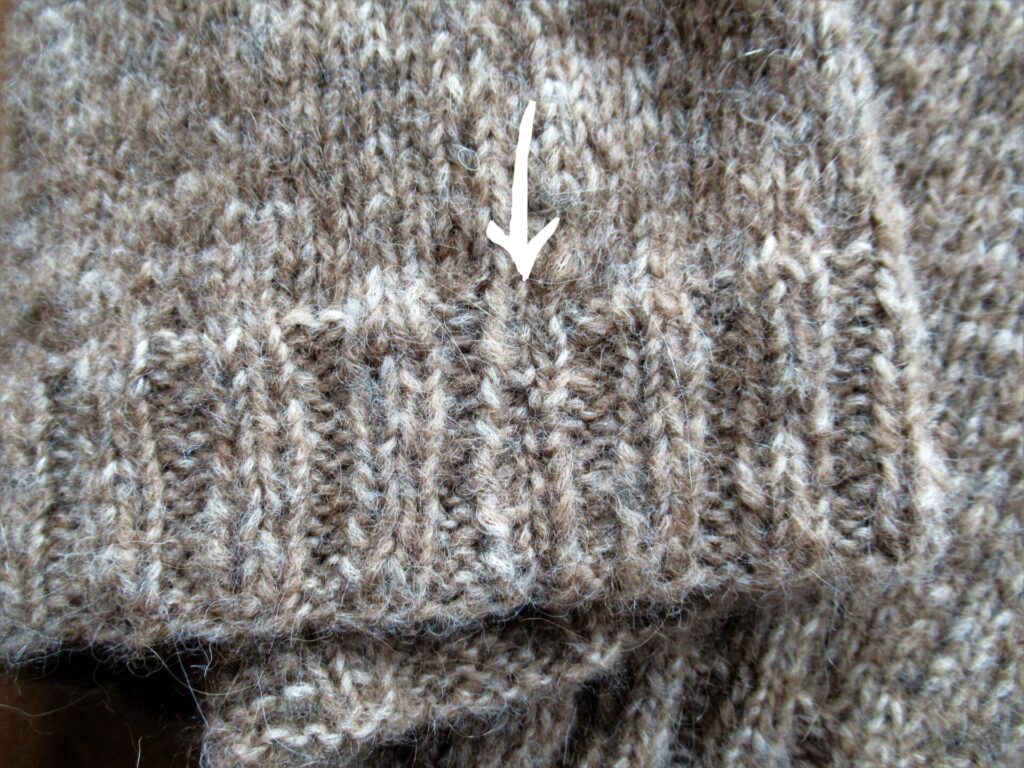
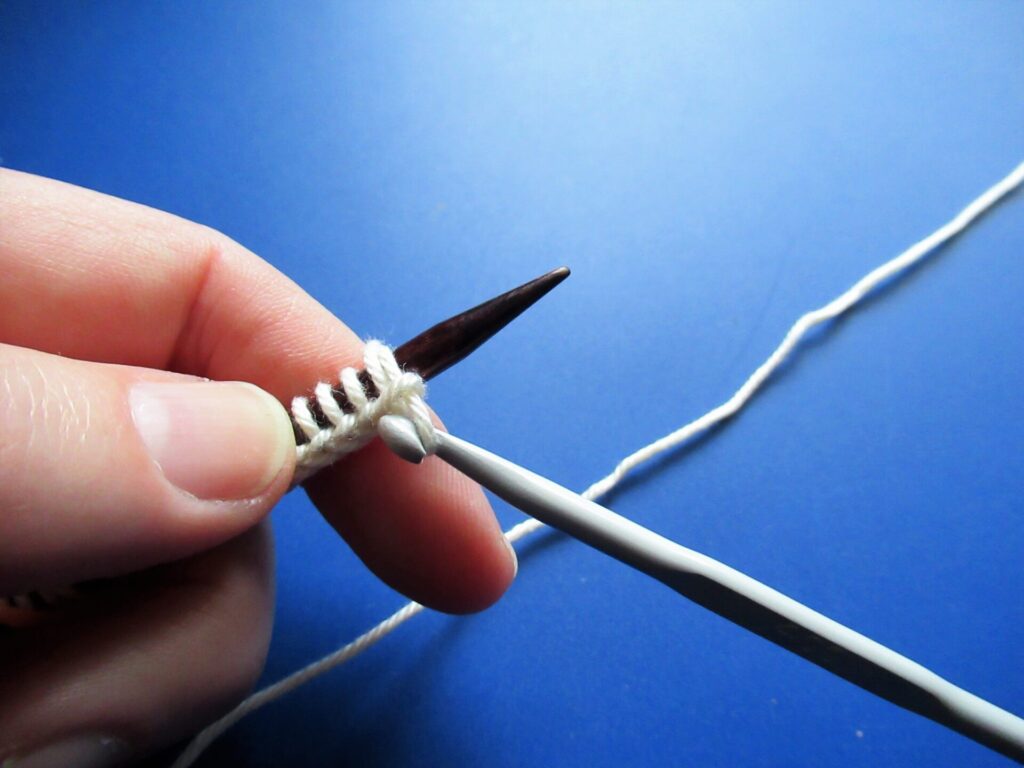
I have been knitting a long Norwegian cardigan top-down and in the round, with a stranded colourwork yoke. At first it looks like a long sweater or mini-dress. To become a cardigan, it must be cut open. And to that end, a ‘panel’ of several extra stitches (in this case five) is knit in the centre front. Together these stitches form the steek. In the yoke the steek is clearly visible (between arrows), in the body it is just five stitches like all the rest.
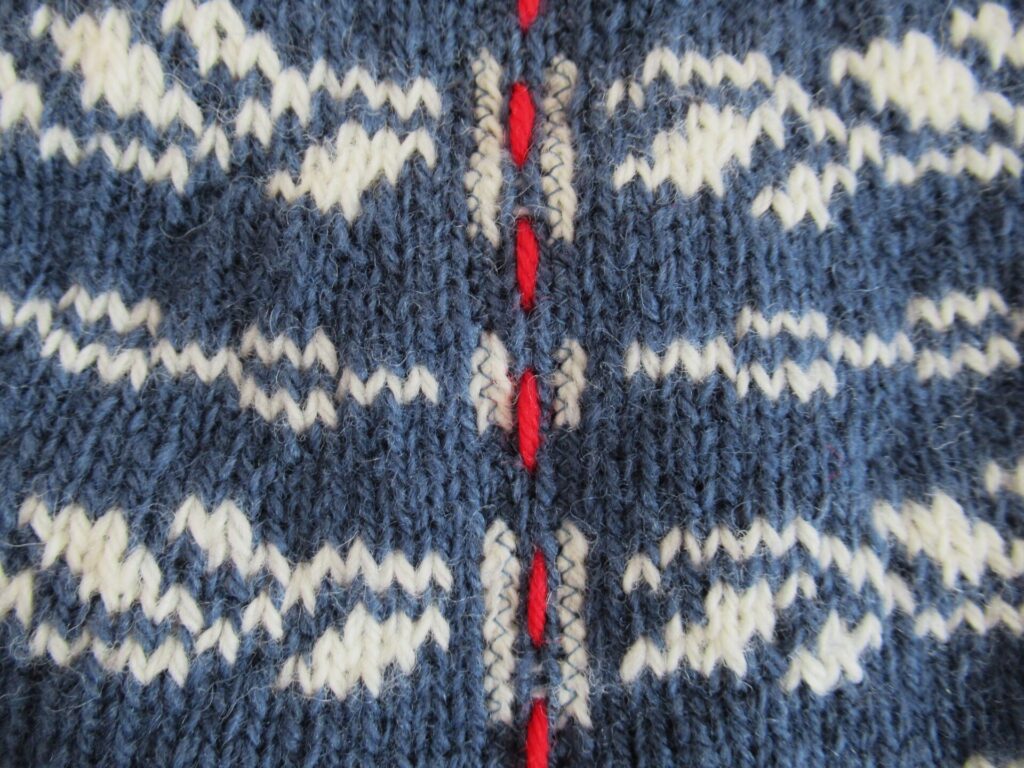
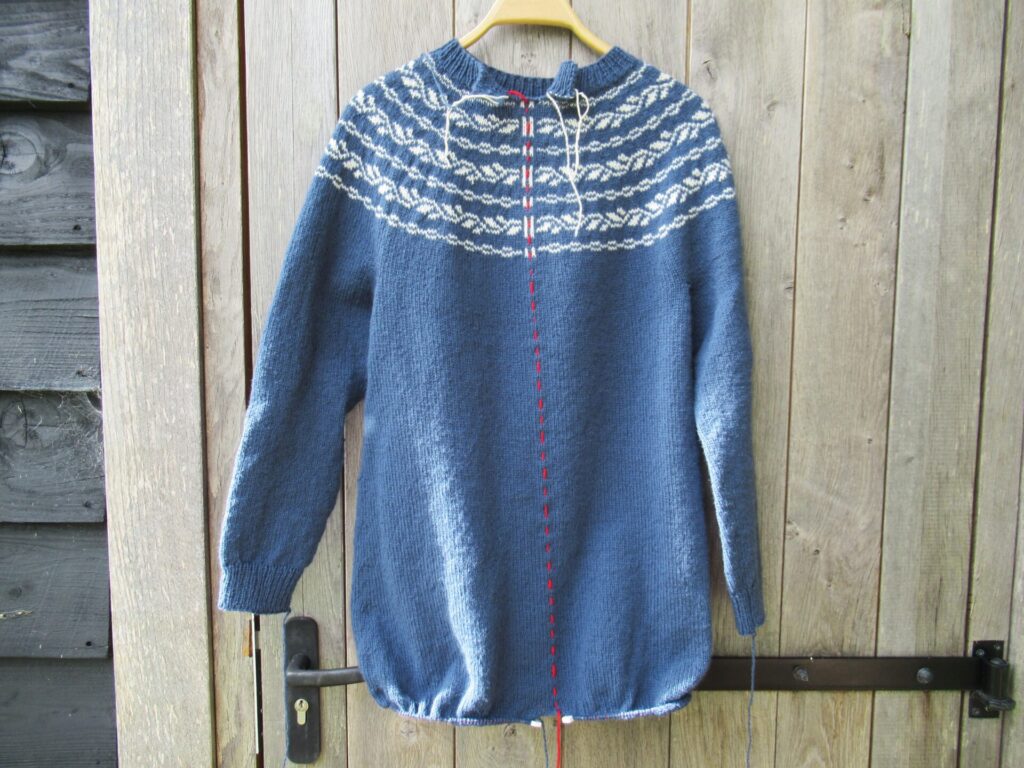
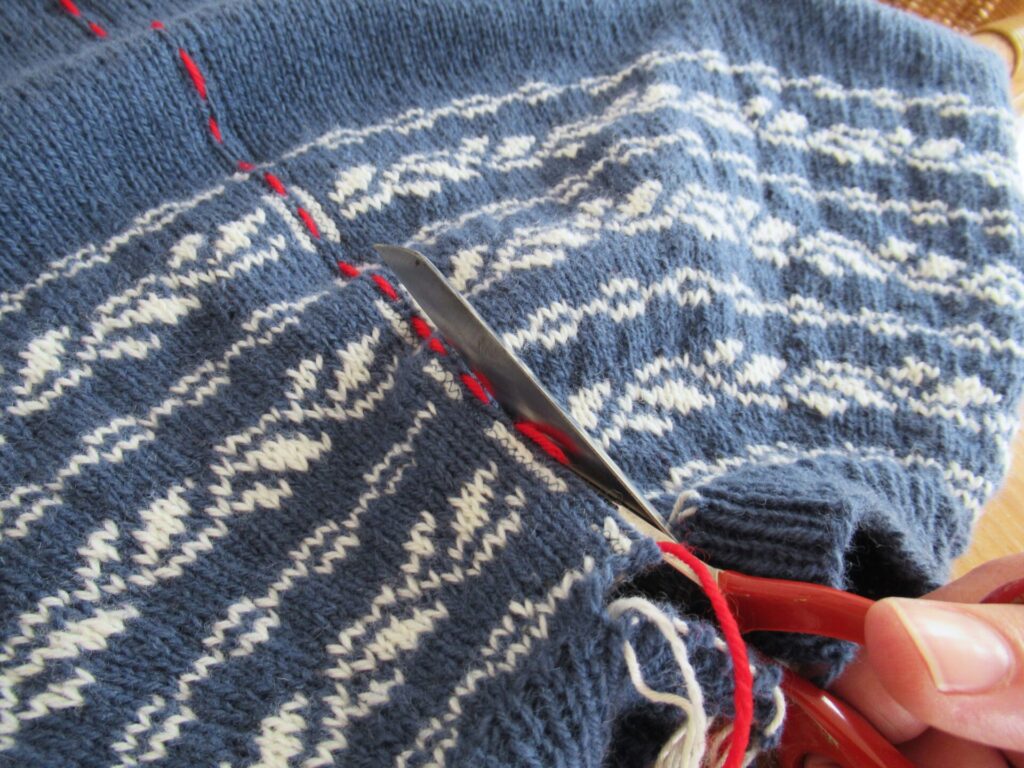
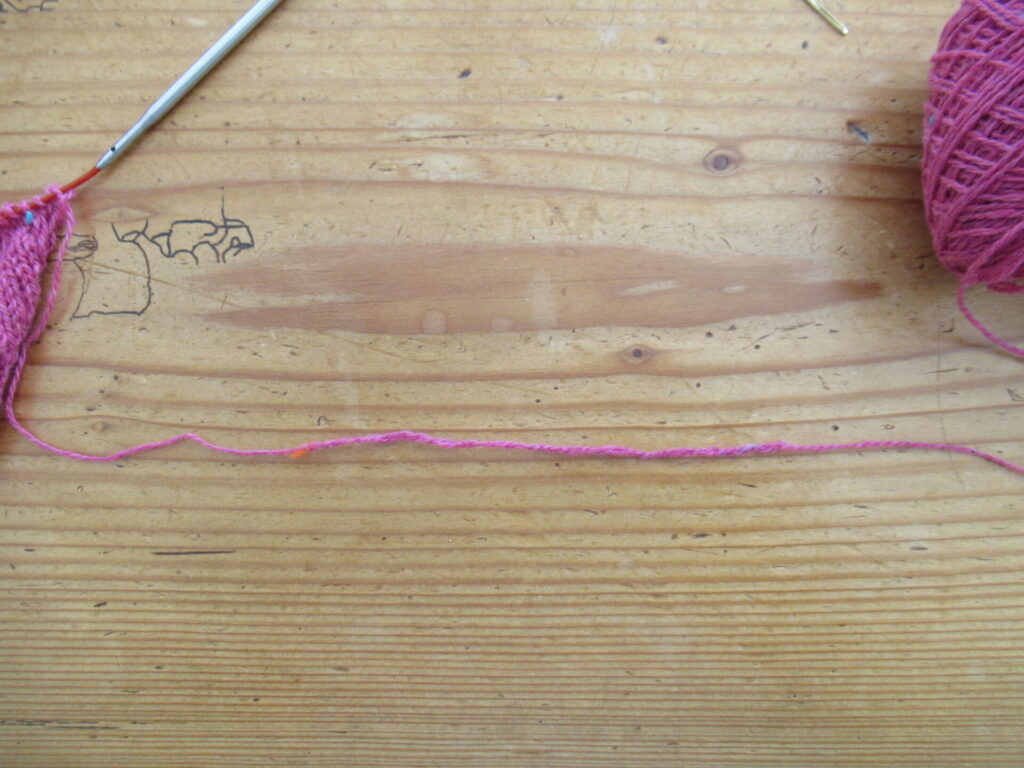
I marked the centre of the steek with basting stitch in red yarn.
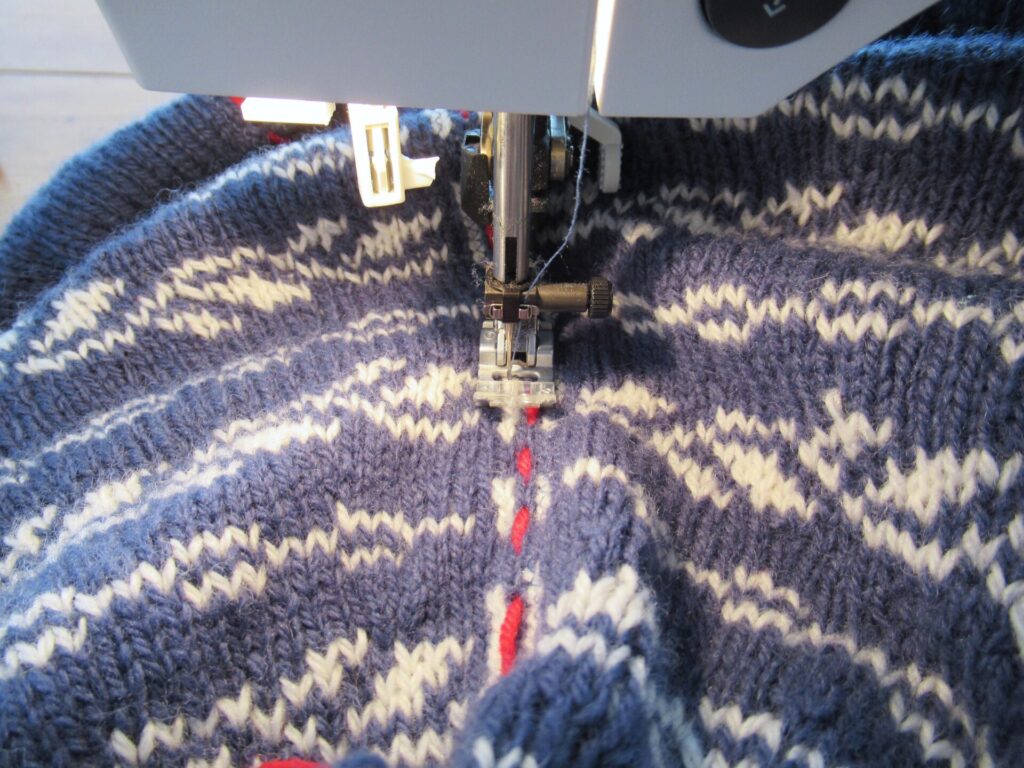
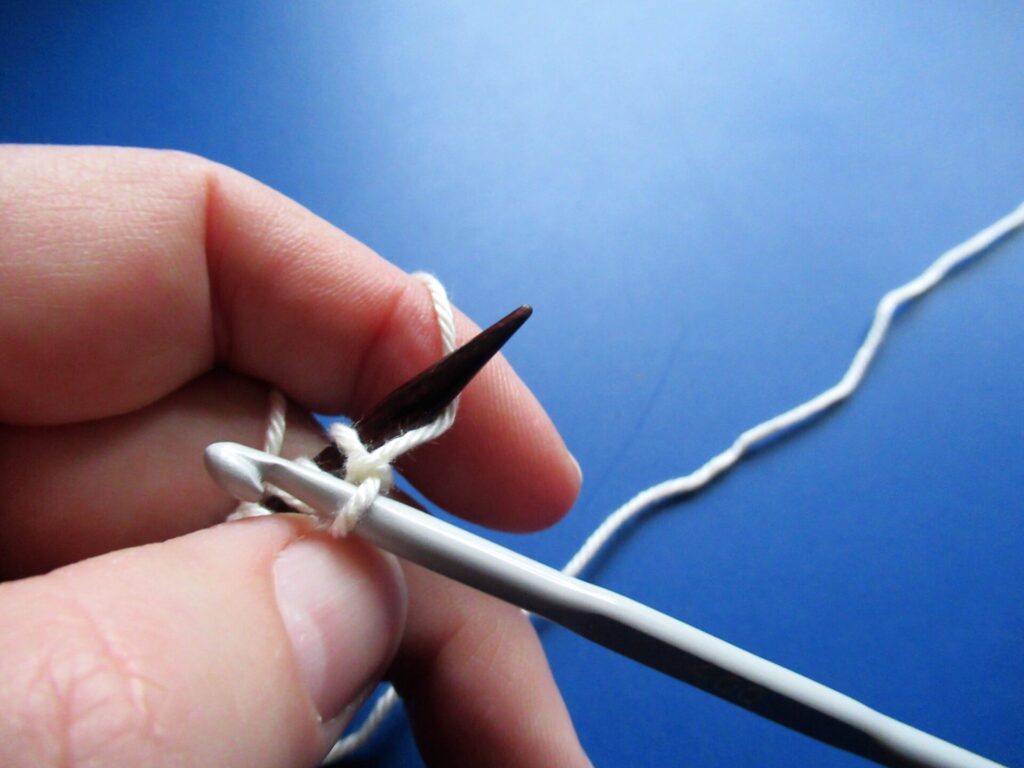
With my sewing machine, I zigzagged through the stitches on either side of the centre stitch, to prevent them from unravelling.
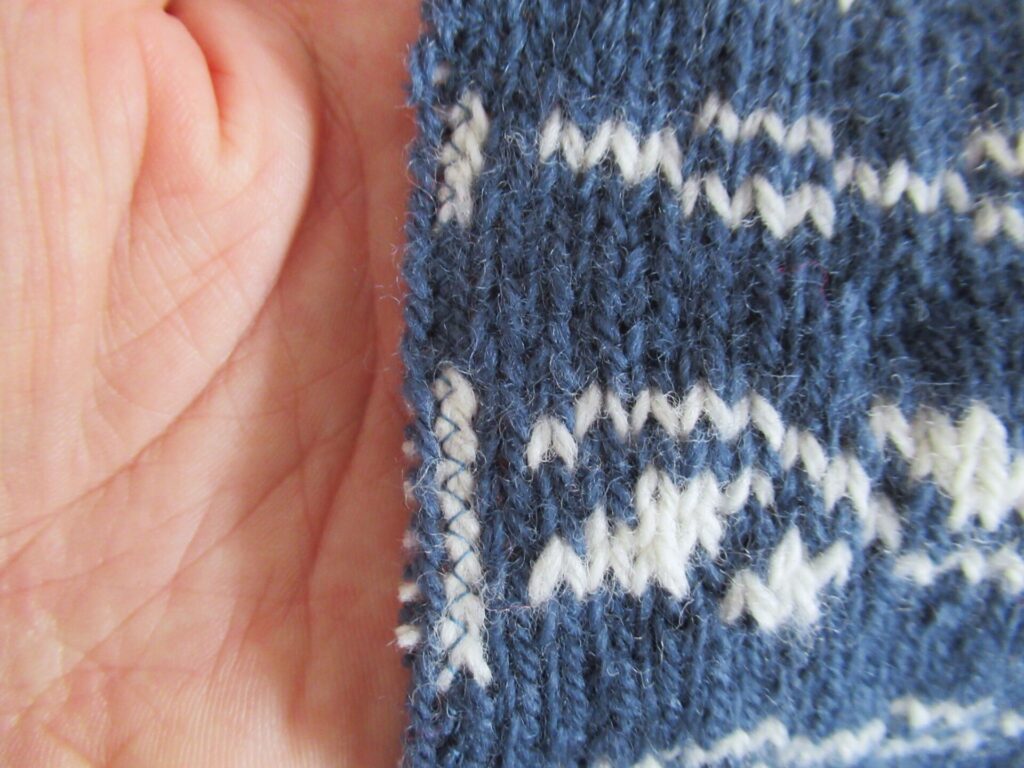
This is what it looks like after zigzagging.
The five stitches between the red arrows form the steek: the centre stitch with the red basting stiches down the middle, one stitch with zigzags on either side, and one more stitch on either side of that.
Then I took a deep breath and cut!
The zigzags keep the knitting from falling apart.
Now the button bands are knit. A little shorter than the fronts – they will be stretched out when they are sewn on.
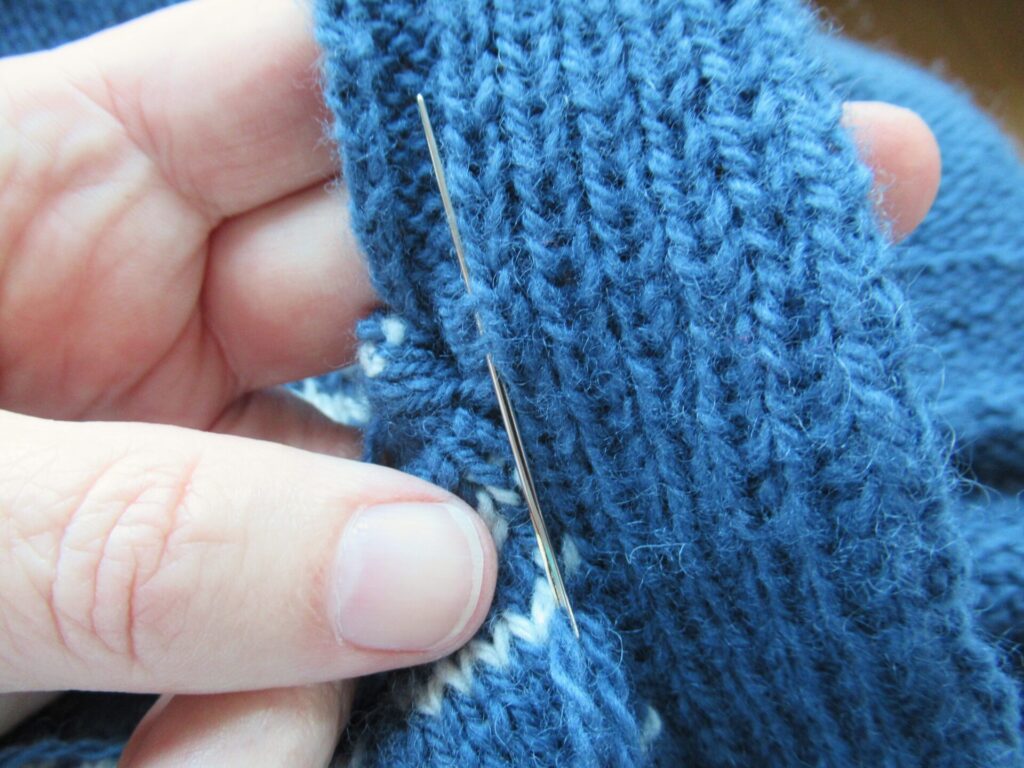
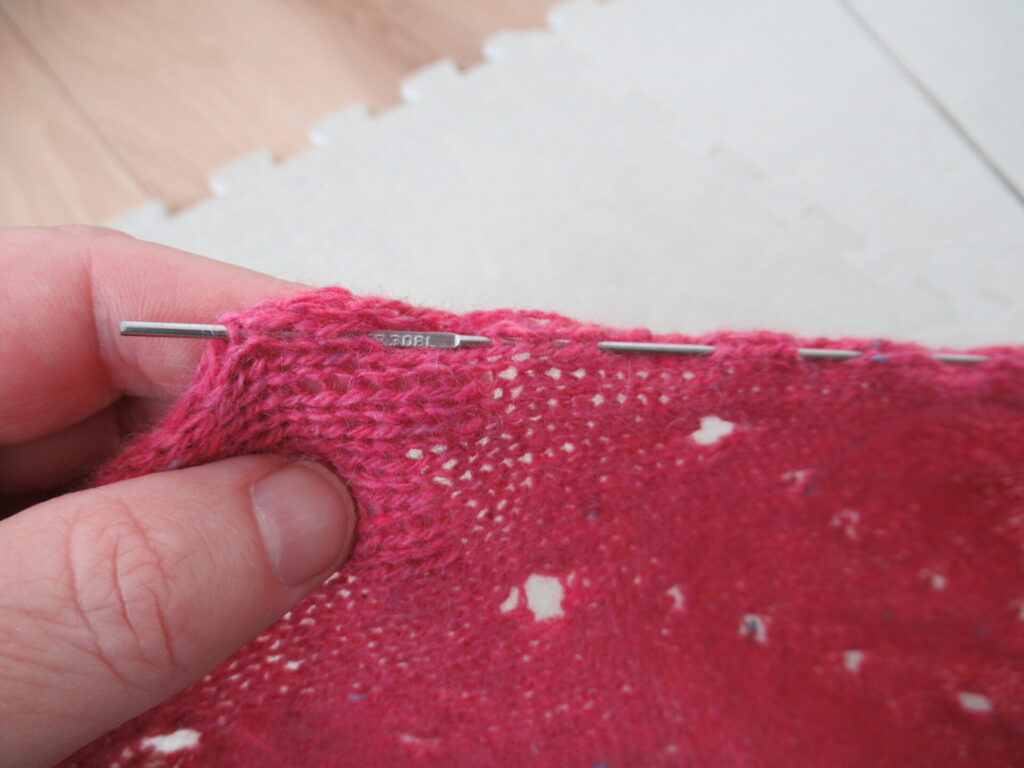
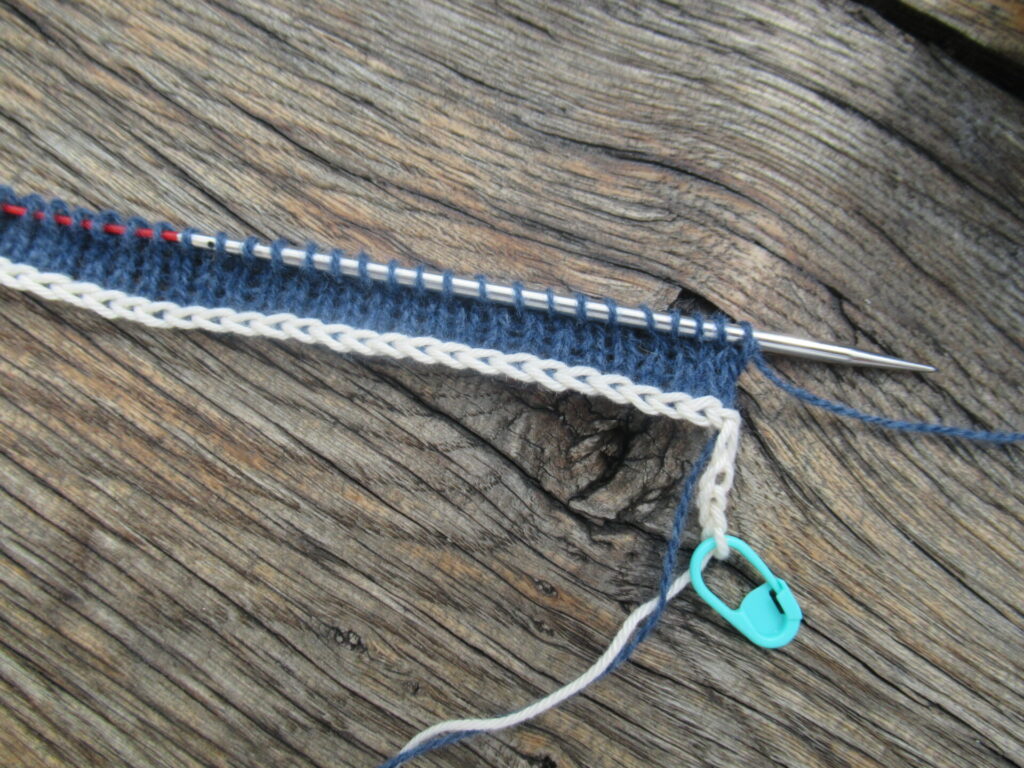
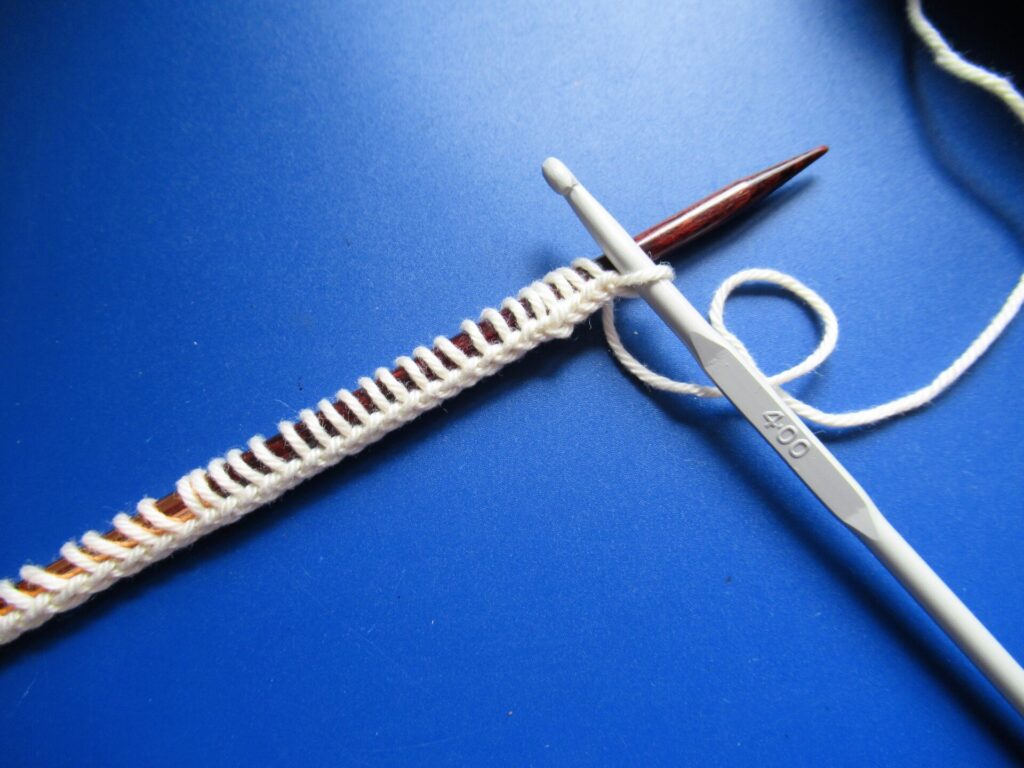
The steek stitches are folded to the inside when the button band is sewn on. For a tidy look, they need to be covered somehow. In this case they will be covered by a facing. The facing is knit on to the button band – four stitches in stocking stitch next to the ribbing (arrow below):
I pinned the button bands in place and sewed them on to the fronts with mattress stitch from the right side of the fabric, just like you would seam separate pieces of a sweater together.
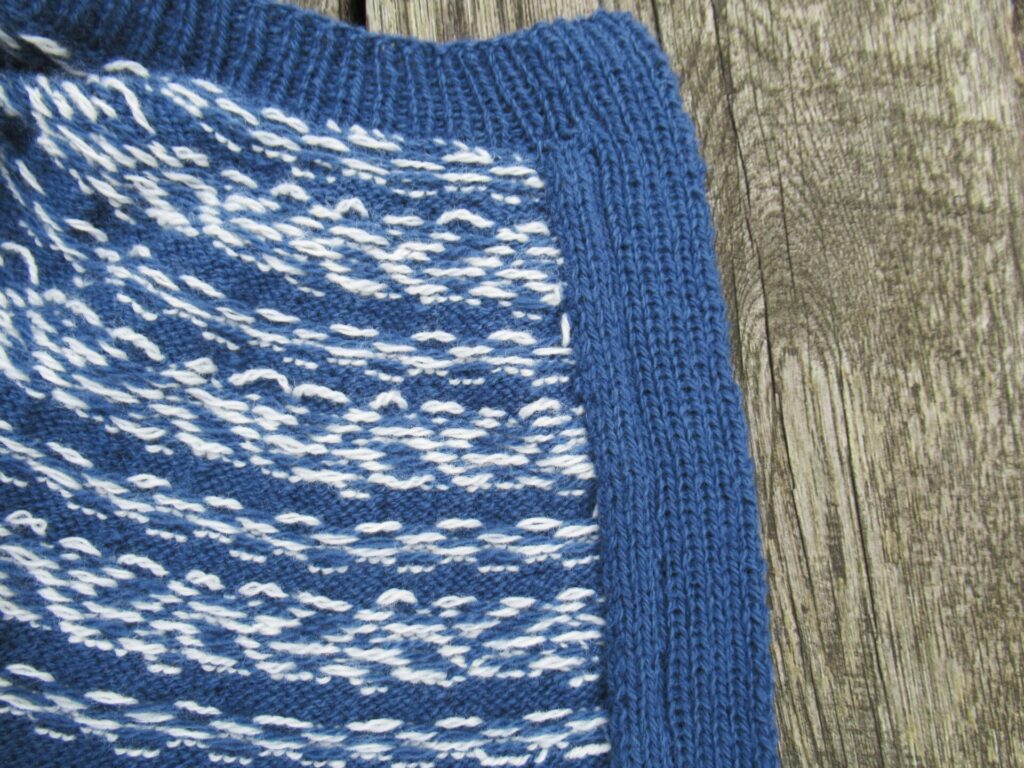
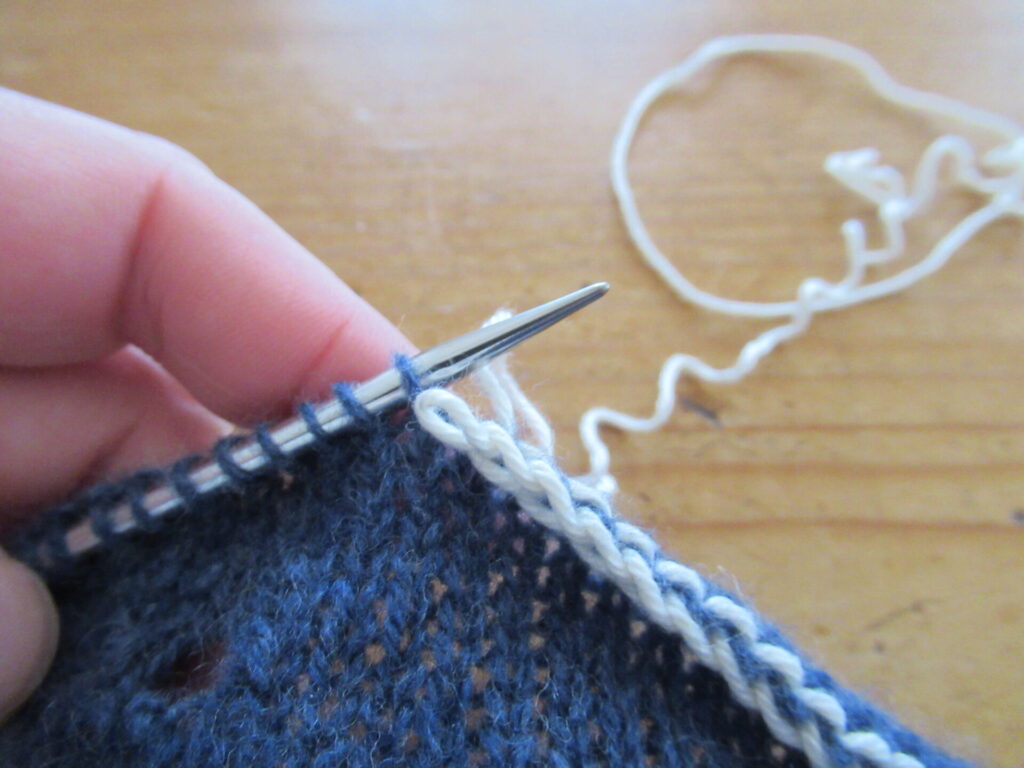
After that, the facings need to be fastened to the fronts on the wrong side of the fabric with invisible stitches to cover the cut stitches of the steek. This takes time and patience. I did it in instalments. All in all, sewing on the button bands and sewing the facings in place took me at least two hours. And I have to say, it looks very neat! Can you see it? The button band to the right, with the 4-stitch facing to the left of it:
Hardest parts of the steeking:
Plucking up the courage to do it.
Not accidentally zigzagging the back of the cardigan to the front.
What I would do differently next time:
Weave in the ends before zigzagging the steek (loose yarn ends got caught between the zigzags).
Use a wider zigzag.
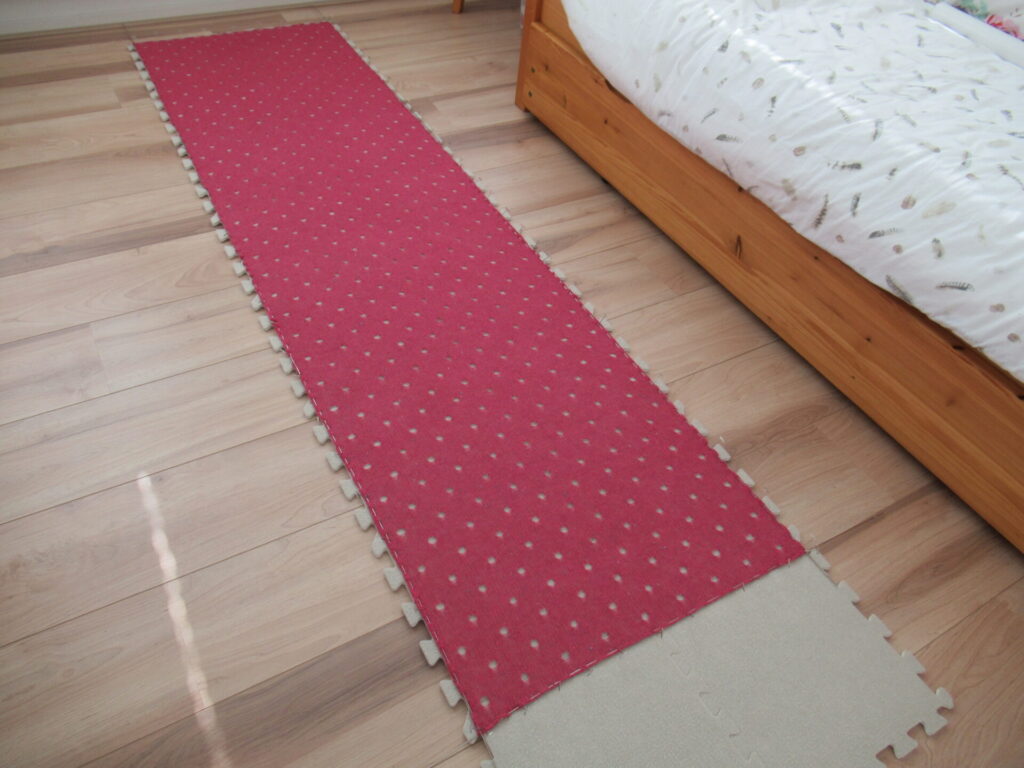
Finally, I knit on the lower ribbing. Now all the cardigan needs is a nice bubble bath and buttons. I hope I’ve shown and described the entire process clearly enough and given you the courage to maybe try steeking this way someday.
I’m off to the Handwerkbeurs now – THE knitting/crochet/embroidery/quilting event of the year around here. If I don’t forget to take photographs I’ll tell you about it next week. Hope to see you then. Bye!
Hello! Do you ever order yarn online? If so, how do you choose? Have you had any disappointments? I find it tricky and prefer to purchase my yarns at brick-and-mortar shops – a far nicer experience anyway. But what if you don’t have any shops nearby or they don’t have what you’re looking for? What if you’ve read about, say, a gorgeous lace-weight tweed yarn (a rarity) that would be perfect for the scarf you want to knit? How do you find out which shade would be right for you? Screen images can be so deceptive.
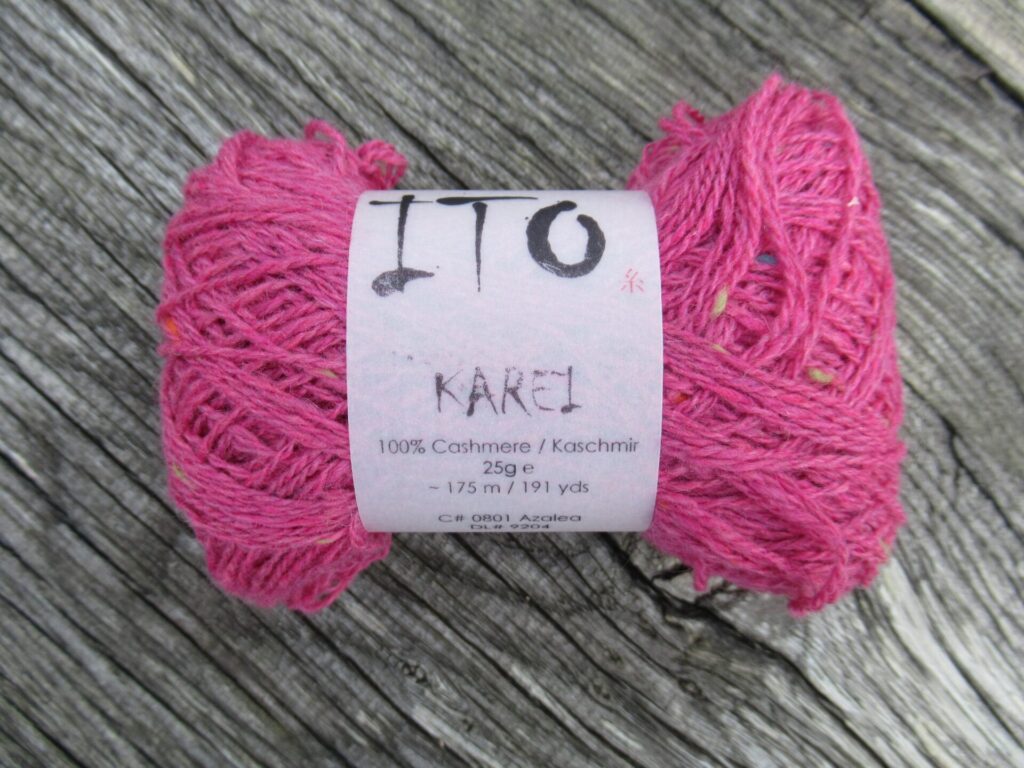
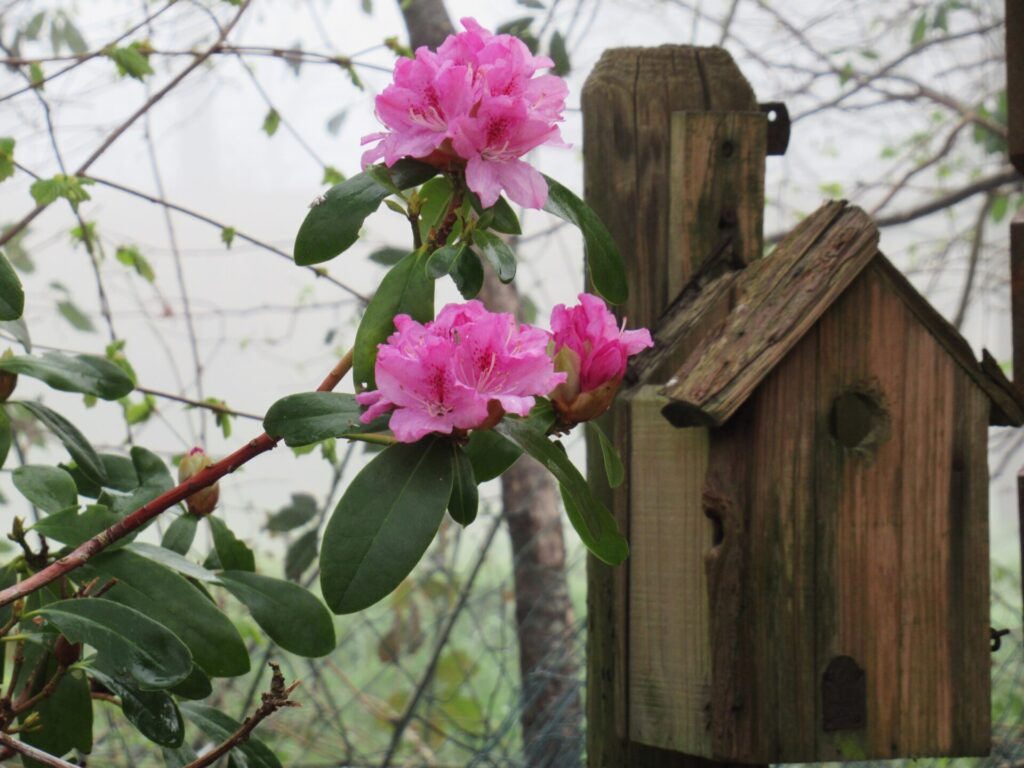
I was thinking of pink. The yarn I had in mind had only one shade of pink, called Azalea, that looked very different on different websites. Looking at pictures of azalea gardens online was lovely, but didn’t really help – so many shades of pink azaleas!
Nezu Shrine Azalea Garden in Tokyo | Photo by Susann Schuster via Unsplash
In the end I took the risk and – phew – it was a kind of pink I liked. (I later found out that I could have returned the yarn if I hadn’t been happy with it.) The pink looks different in many of my own photos, too. This one comes closest to the real colour (at least on my screen):
It is almost like the pink of the flowers on the straggly little azalea bush in our garden, but slightly warmer (plus it has turquoise, yellow and orange tweed flecks).
In my experience the photos on yarn manufacturers’ websites are often the most reliable.
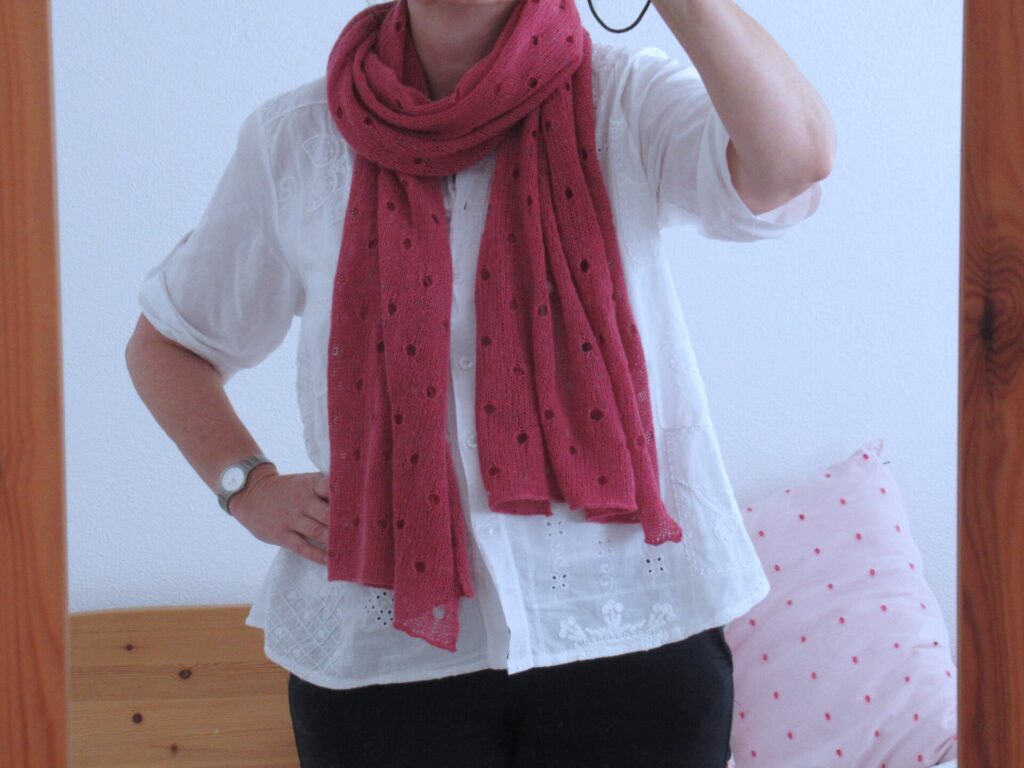
The scarf-in-progress accompanied me everywhere I went over the past five months or so and what a lovely, relaxing project it was. This is what it looks like finished (only the pink isn’t quite right):
It’s airy, floaty and very, very soft.
Project details: Pattern: Polka Dot Scarf Yarn: 6 x 25 g/175 m/191 yds Ito ‘Karei’, shade Azalea Finished size: 56 cm/22” wide x 2.05 m/80¾” long Needles: 3.75 mm/US 5 (and 4.5 mm/US 7 for bind-off)
I thought I’d briefly discuss several special techniques used for this scarf below. I realize not everyone will find the finer details of finishing as fascinating as I do. Or maybe these are things you already know as an experienced knitter. I quite understand that you may not feel like reading this to the end. So, before I move on to the techniques, I’m wishing you a lovely weekend, and hope to see you again next week!
Provisional cast-on with I-cord bind-off
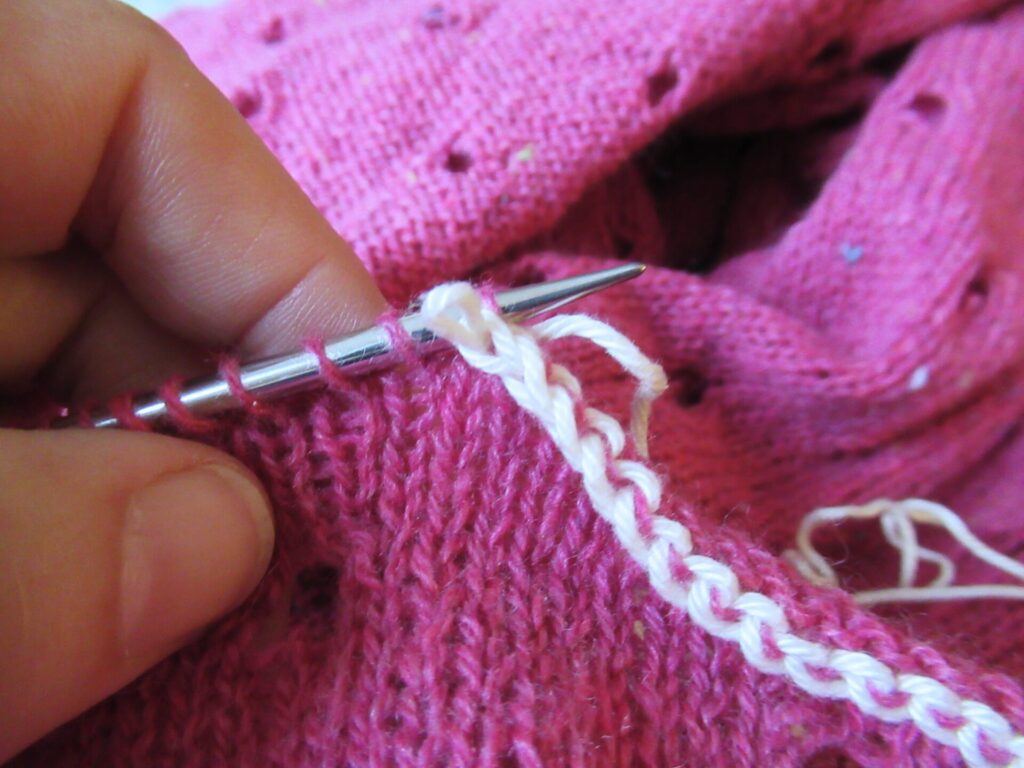
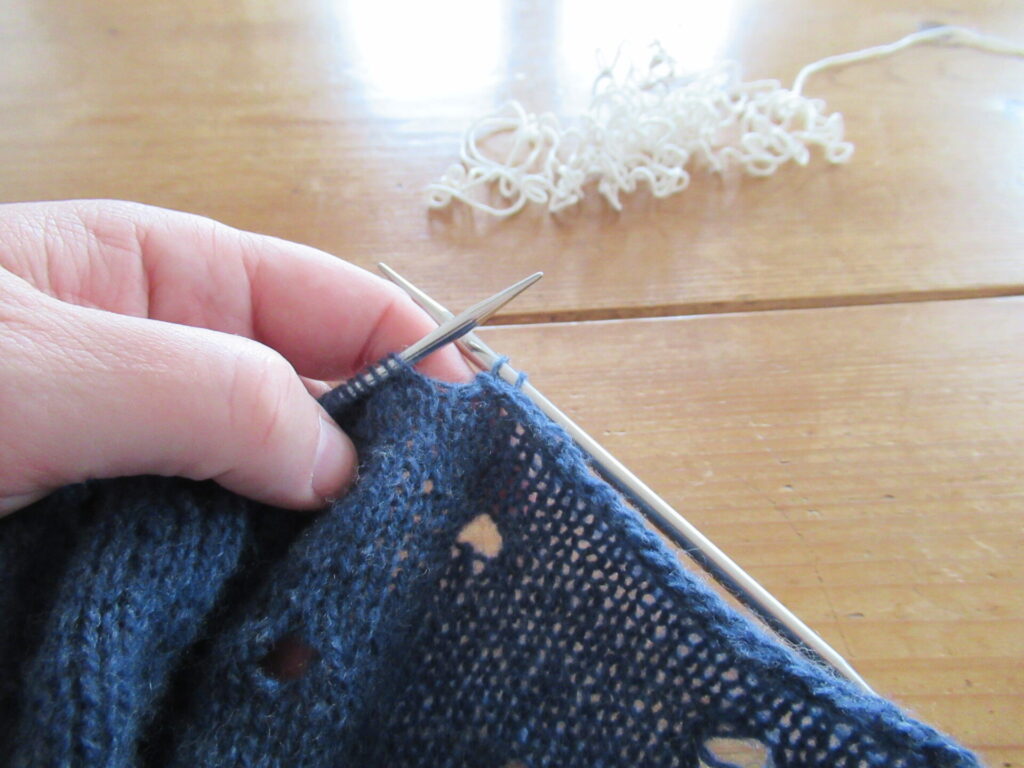
The Polka Dot Scarf starts with a needle-and-hook provisional cast-on. I have described this technique in detail here. When the scarf is finished, it is bound off with a narrow I-cord (described clearly in the pattern). Then the provisional cast-on is unravelled and the stitches are put back on the needle:
This end of the scarf is also bound off with an I-cord. This isn’t absolutely necessary. It would be totally okay to use an ordinary cast-on and bind-off. But it just looks so much nicer to have both ends of the scarf exactly the same with a lovely little I-cord. Below the scarf is folded over so that you can see both ends with their I-cords:
Sewn yarn join
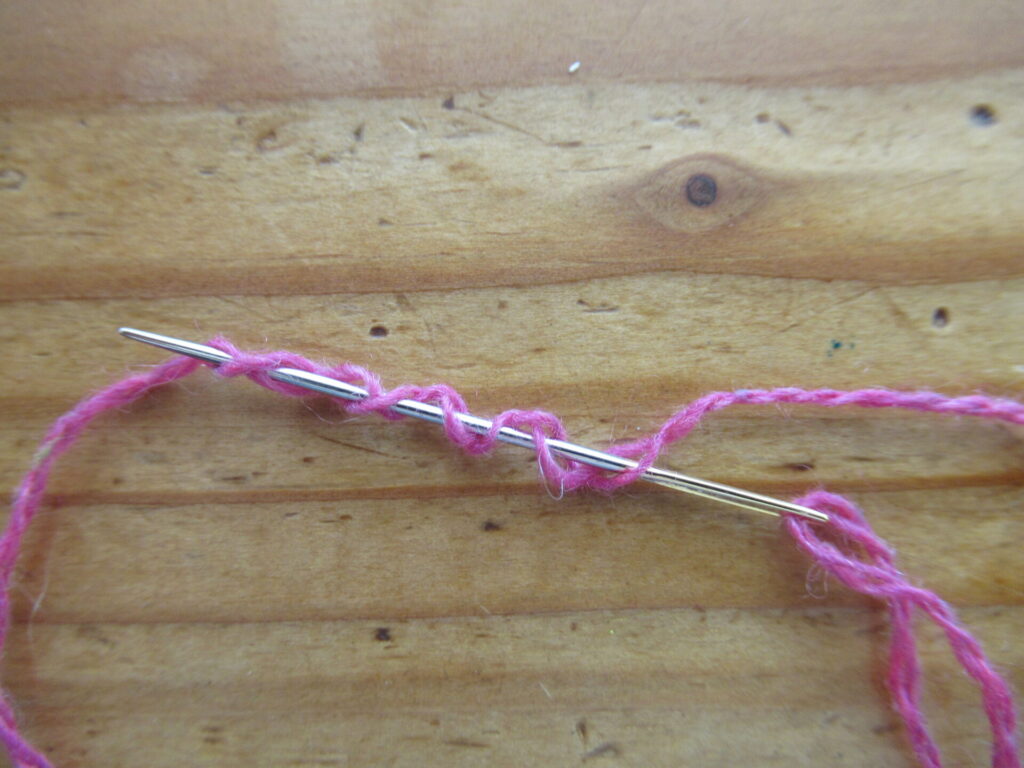
To start in a new skein, I’ve sewn the ends of the ‘old’ and the ‘new’ skein together like this. When you have about an arm’s length of the old yarn left, thread the tail through a darning needle. Now ‘sew’ the tail up and down back through the same yarn end for about 10 cm/4”:
Pull the needle and thread through, leaving a loop:
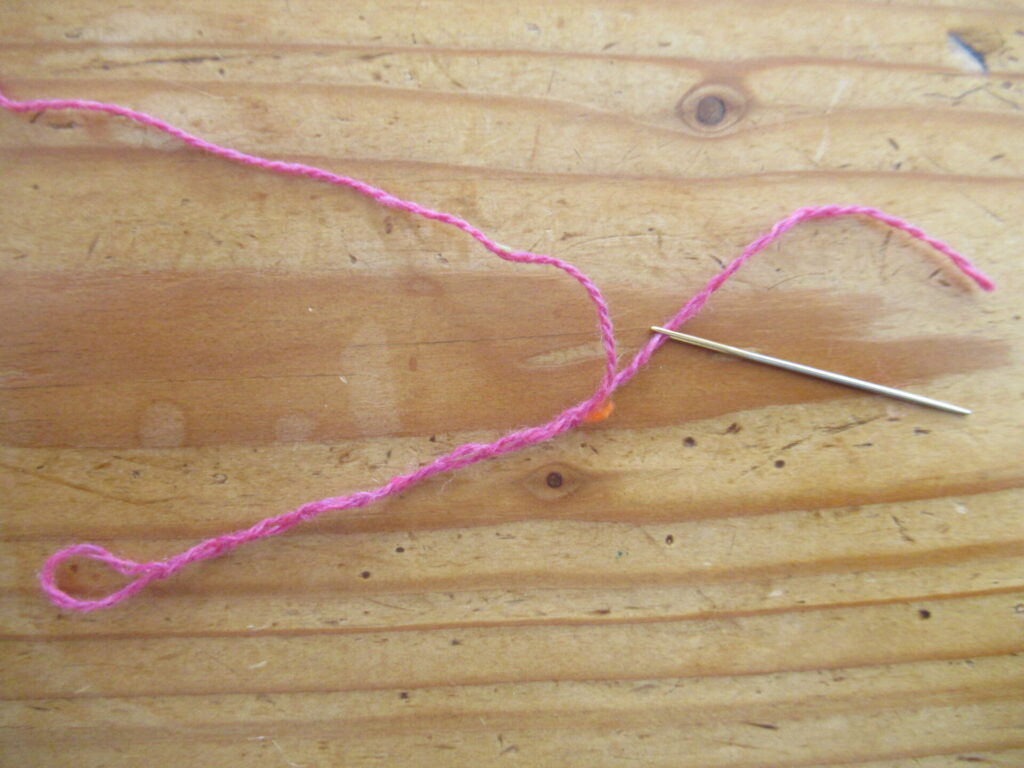
Now thread the beginning of the new yarn through the needle. Pass it through the loop of the old yarn and ‘sew’ the tail through the new yarn thread – you now have this:
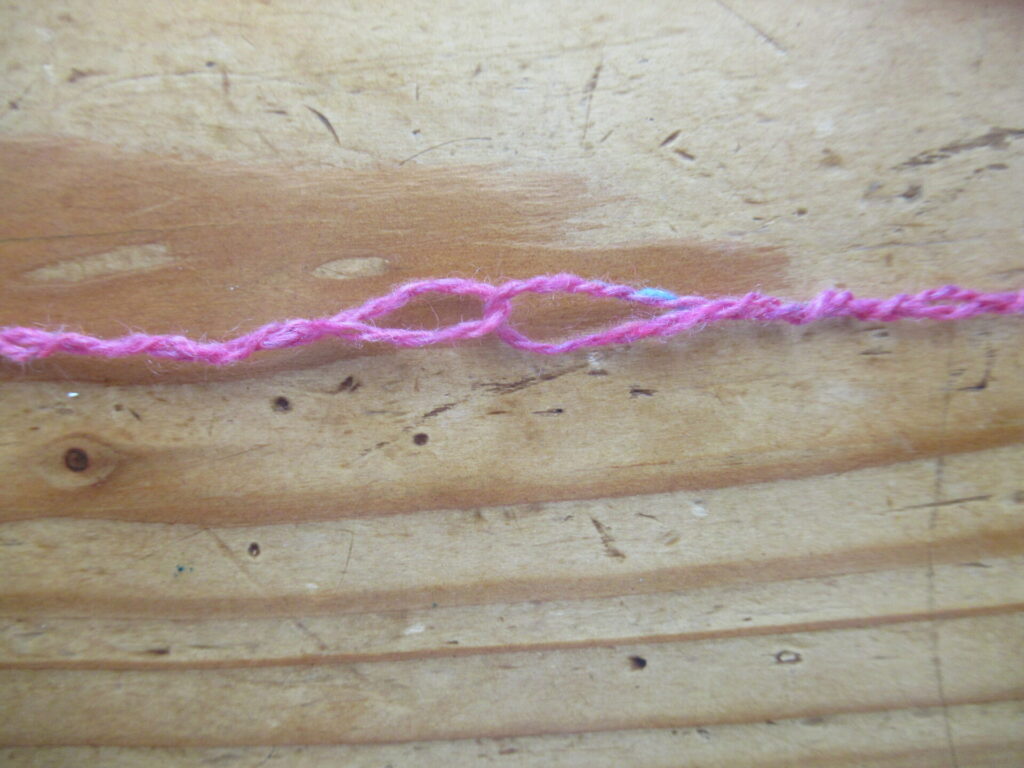
Finally, carefully pull on both ends so that the loops almost disappear, smooth out the yarn and cut off the extra yarn ends. Tadaa! Can you see the join? It’ll be as good as invisible in the knitted fabric.
Blocking
In my humble opinion, blocking is absolutely essential for lace scarves. It makes all the difference between frumpy and floaty. You’ll need: no-rinse wool wash, blocking wires and (rustproof) T-pins. Blocking mats are nice, too, but you can also block on a (spare) bed.
Soak your scarf/shawl in the wool wash for about 20 minutes. Remove from water and squeeze out most moisture. Roll in a towel and squeeze to remove more moisture. (I have a separate spin dryer, put my scarf in a lingerie bag and spun it very briefly instead of using a towel.) Next, thread the blocking wires through your knitting along the edges, as if you are sewing a running stitch.
Stretch out your scarf and pin in place with T-pins.
Leave to dry (lace scarves will usually be dry within 12 hours), unpin and remove blocking wires. Blocking is soooo worth the effort!
Before blocking
After blocking
I hope this all makes sense and is useful. If you ever have any questions, do let me know!
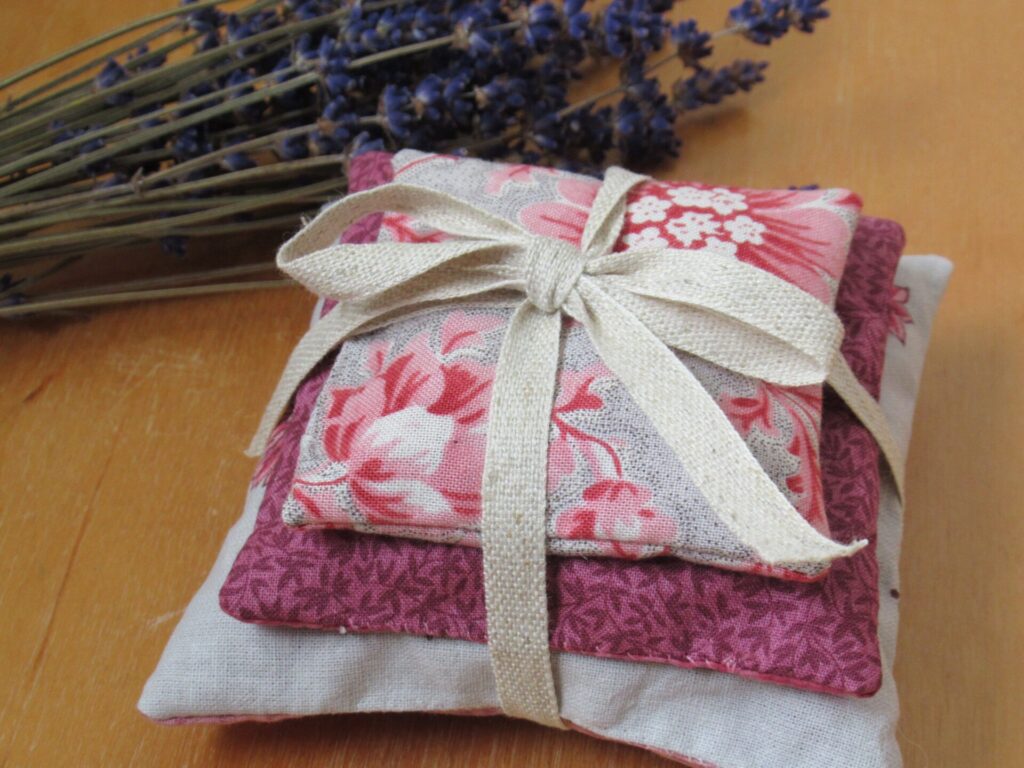
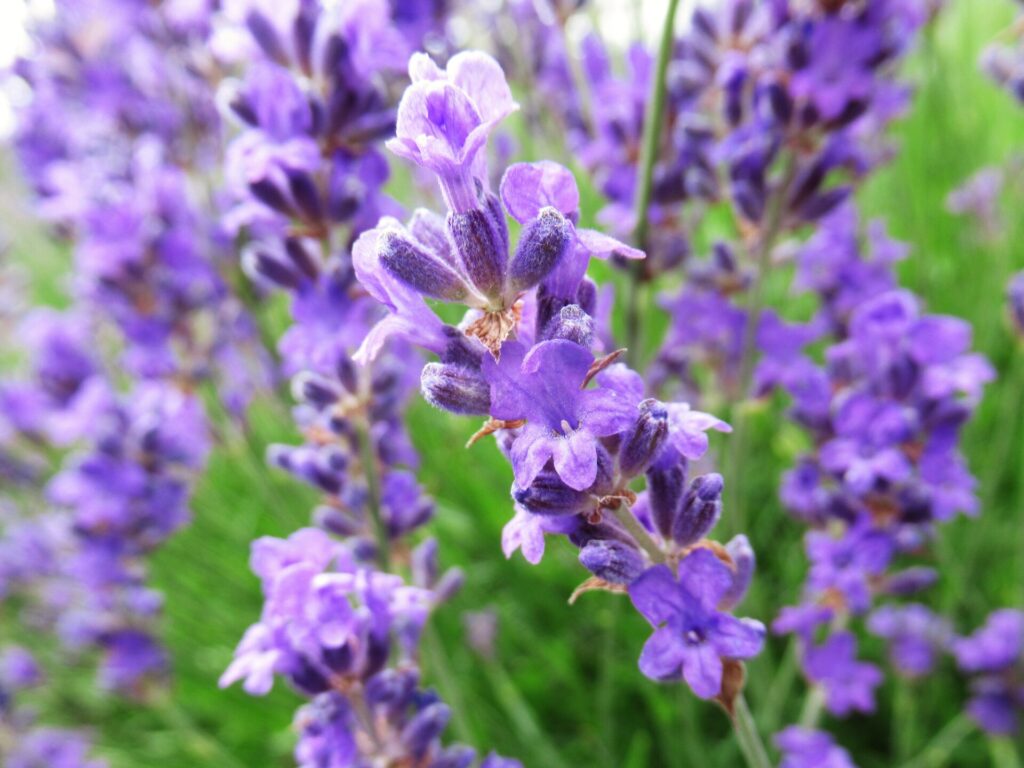
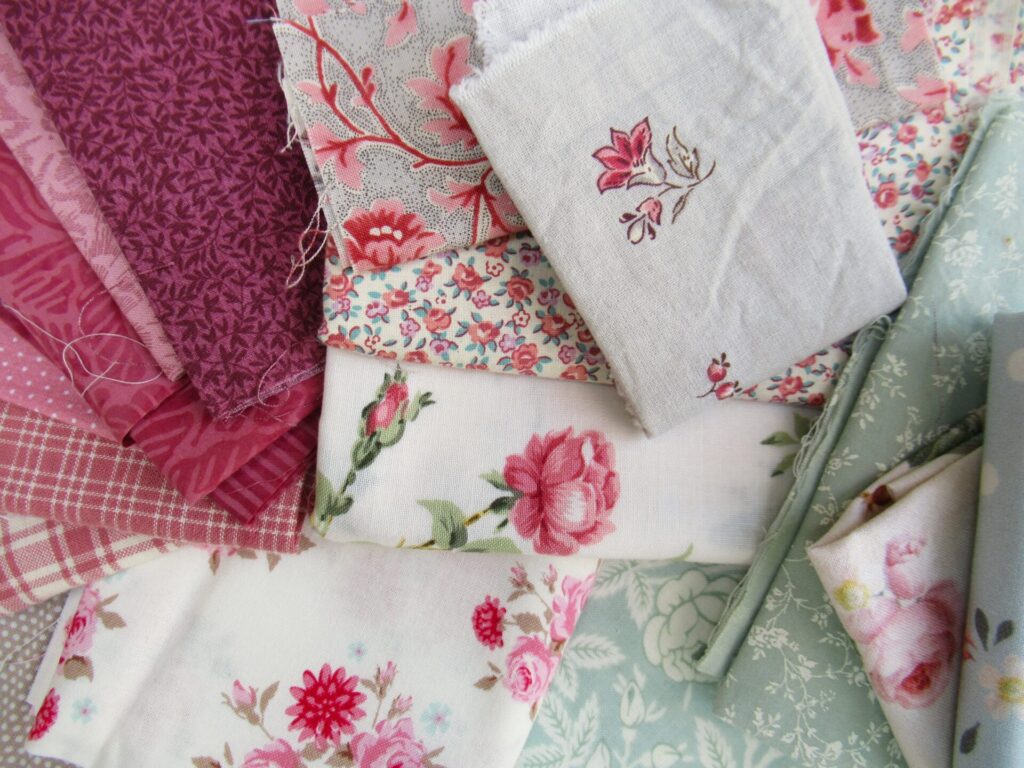
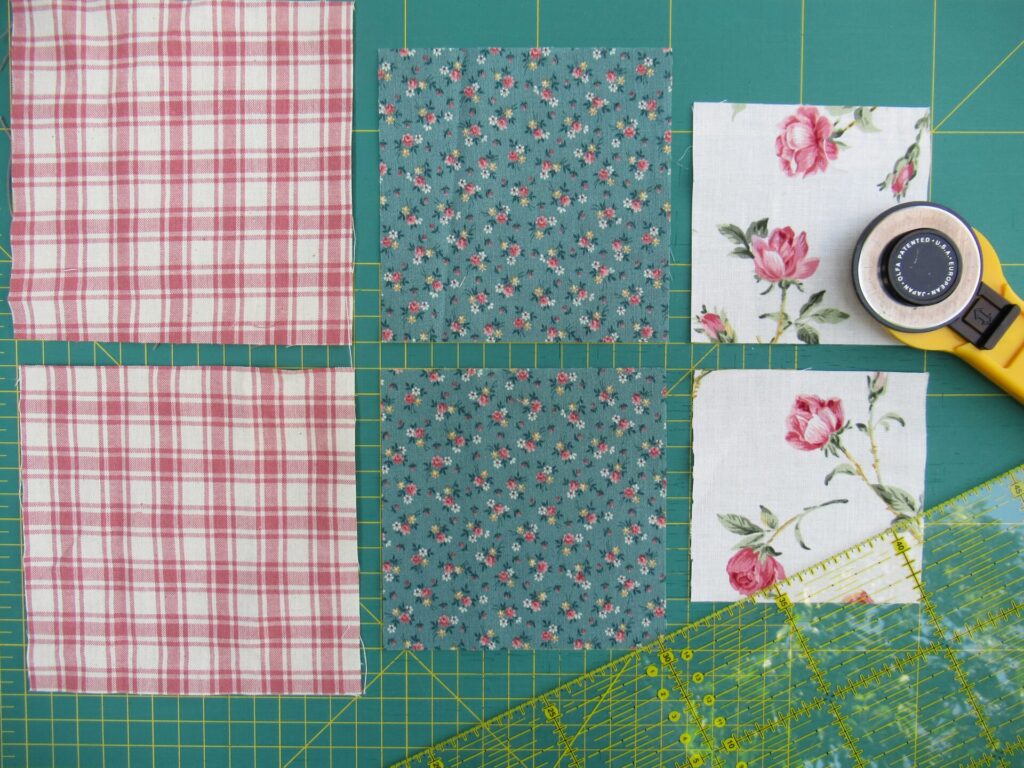
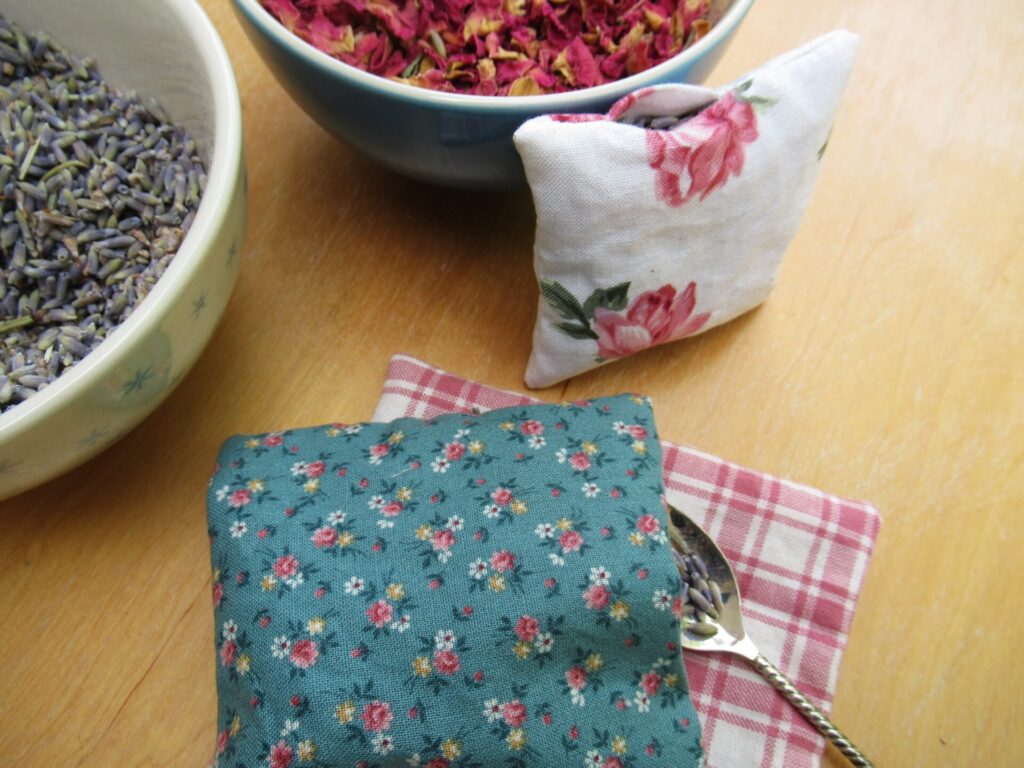
Hello! I hope you’re well and enjoying this month of August. Last week, some days were too hot and muggy here for knitting and I sewed some lavender sachets instead. They are more like little cushions in three different sizes tied together with ribbon. If you’d like to make something similar, here is what you’ll need and how to make them.
For a set of three sachets you’ll need:
Small pieces of cotton (quilting) fabric
85 cm (33½”) ribbon, 6 mm – 1 cm (¼ – ½”) wide
Approx. 35 g dried lavender
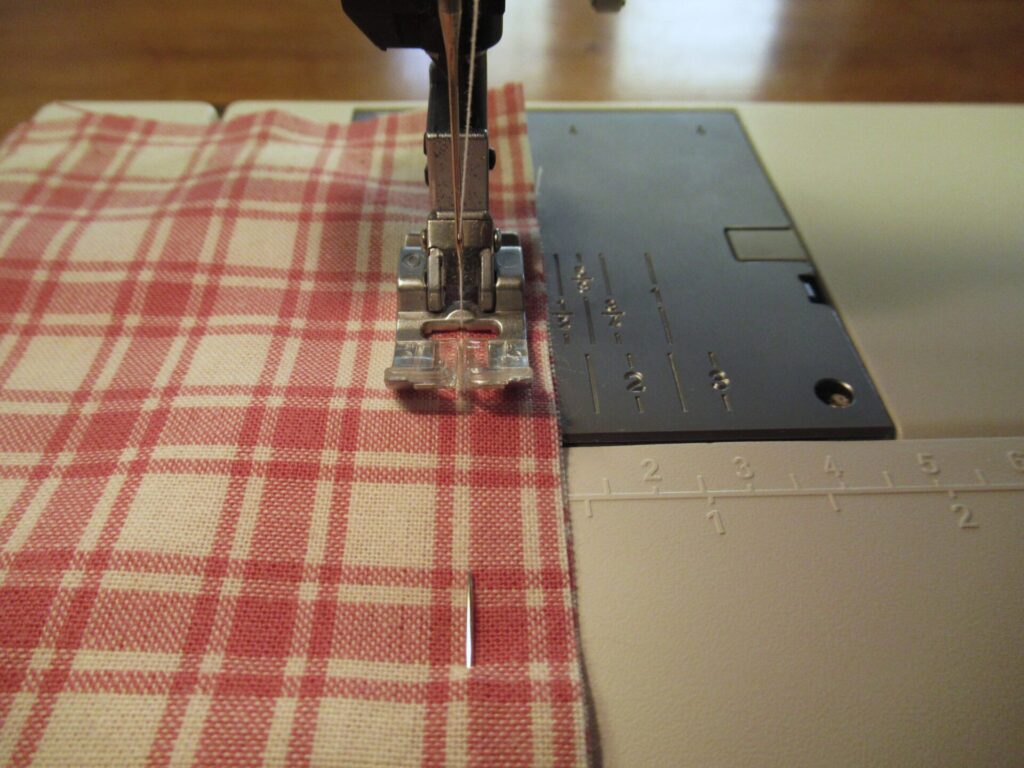
Sewing machine (or you could hand sew them)
Scissors
Teaspoon
Sewing thread in colours of fabrics
Sewing needle
Pins
Step-by-step instructions:
1) Cut 6 fabric squares, 2 each measuring 13 x 13 cm, 11 x 11 cm and 9 x 9 cm (5 x 5”, 4¼ x 4¼” and 3½ x 3½”).
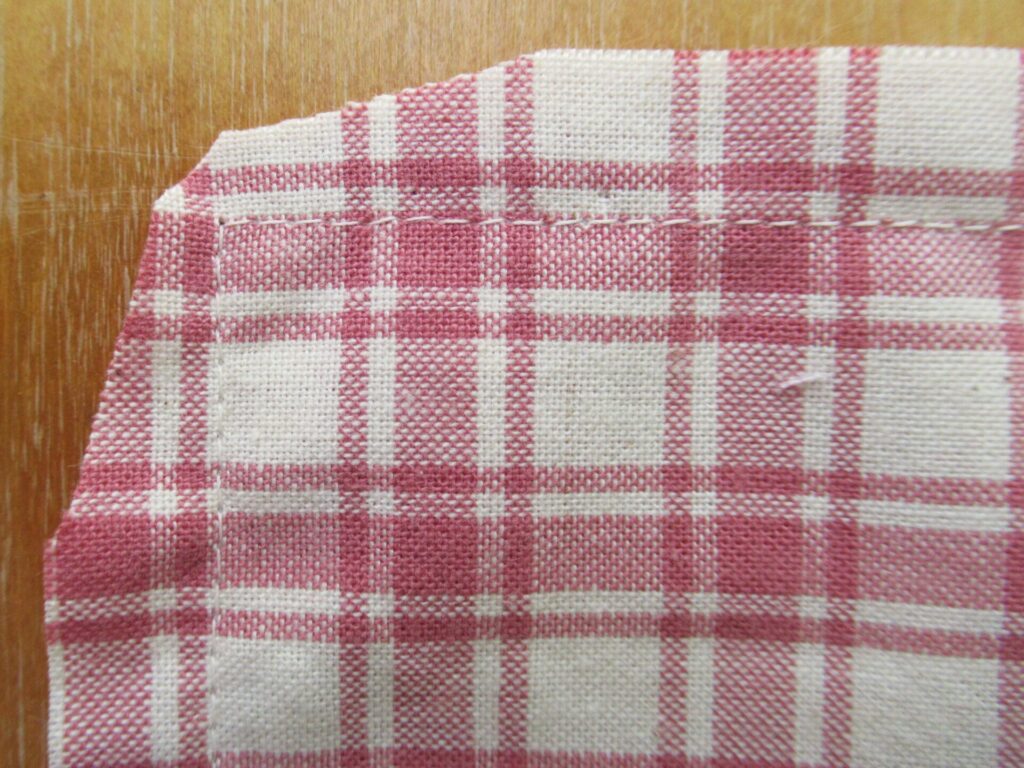
2) Sew with right sides together, leaving a 4 – 5 cm (1½ – 2”) turning-and-filling gap.
3) Trim corners.
4) Turn outside out and carefully push out corners.
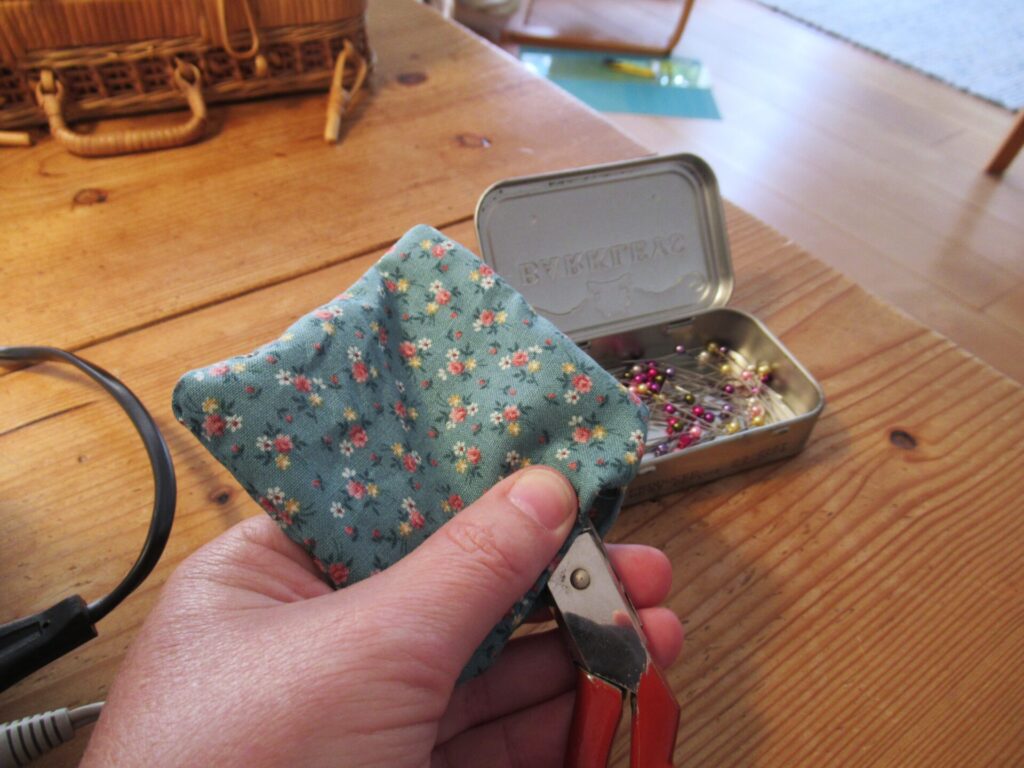
5) Fill with lavender. (Or for someone who doesn’t like lavender, use rose petals. You’ll only need 25 g, as rose petals are more voluminous. Lavender is moth-repellent, rose petals are not.)
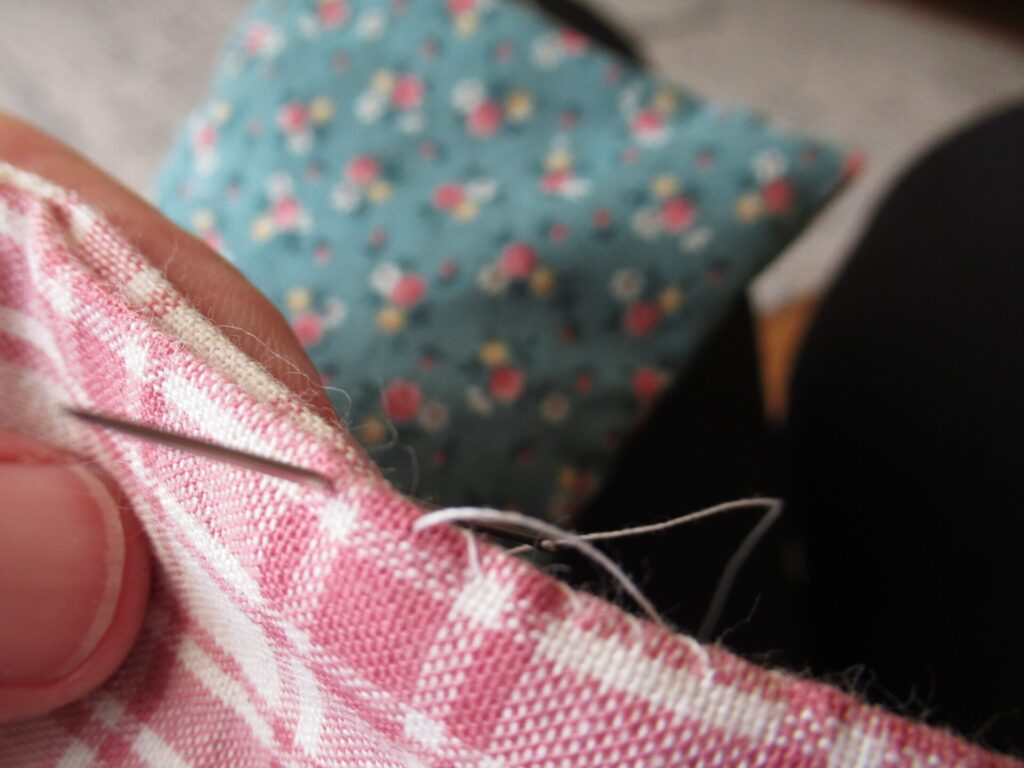
6) Close gap using invisible stitches, or (as I did) a visible whip stitch, so that the sachets can easily be opened and refilled later.
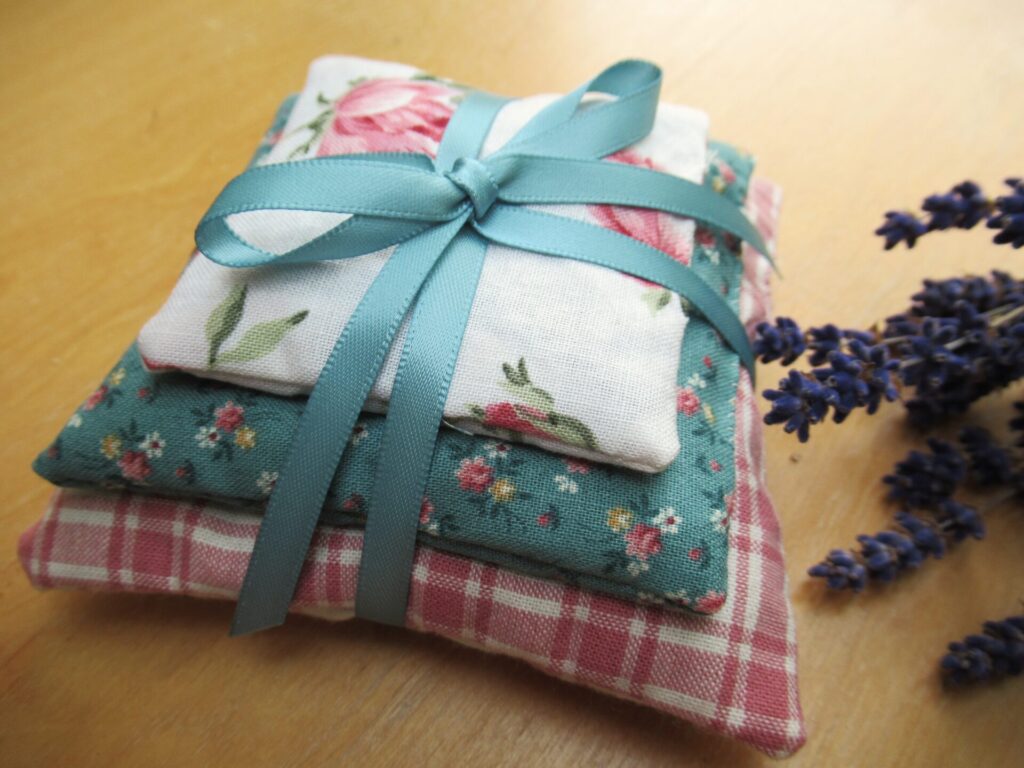
7) Place on top of each other and tie together with ribbon. And voilà!
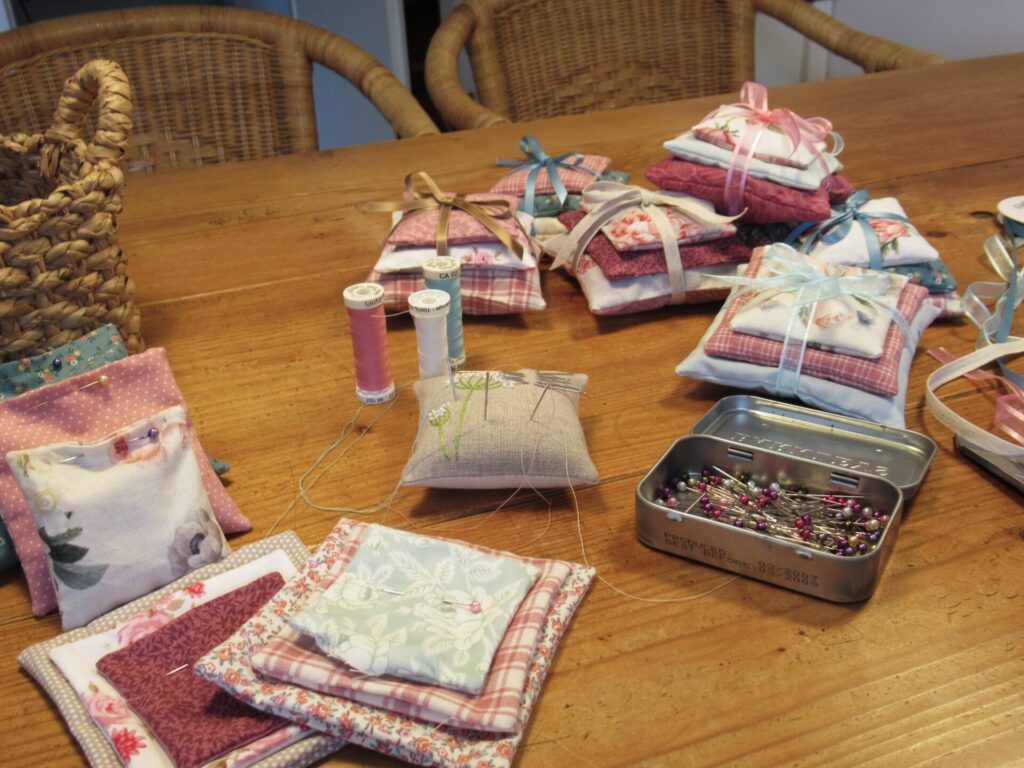
Repeat steps 1 – 7 until you have enough sachets to keep the moths away from your woolly sweaters and shawls, and to scent your underwear and bed linen. And then make some more to give away to your daughter, grandchild, (grand)mother, sister, friend, colleague, neighbour, cousin, knitting-group host, another friend…
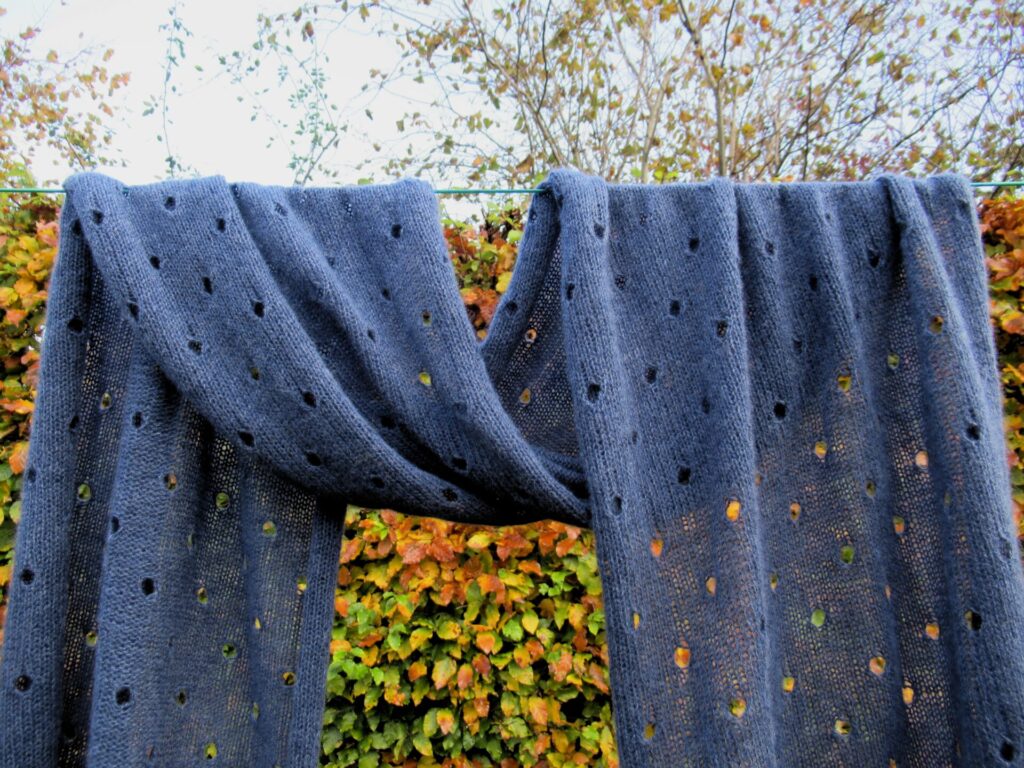
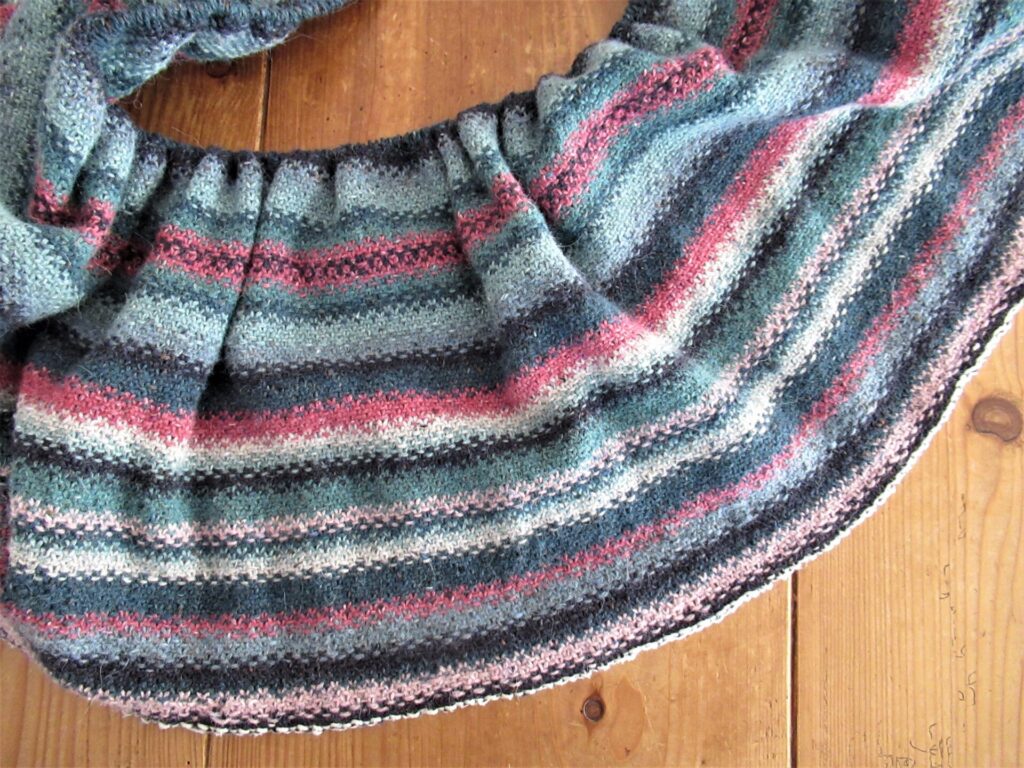
Hello! Draped over the washing line along our beech hedge in its autumn finery is a scarf I’ve just finished. It has an interesting cast-on I’ll tell you about further on, but first a few photos and a bit about the scarf (and about something I found!).
The Polka Dot Scarf, as the design is called, has holes for ‘dots’. A knitting friend sighed, ‘Oh, so much work in such a thin yarn!’ But it wasn’t like that for me at all. For me, it represents many hours of peaceful meditation.
The Polka Dot Scarf pattern can be found here on Ravelry. It is described in two widths and I’ve made the wider version. Knit on 3.75 mm (US 5) needles, mine measures 56 cm by 1.90 m (20 by 74¾ inches) and weighs 150 g. Lightweight, yet warm and cosy.
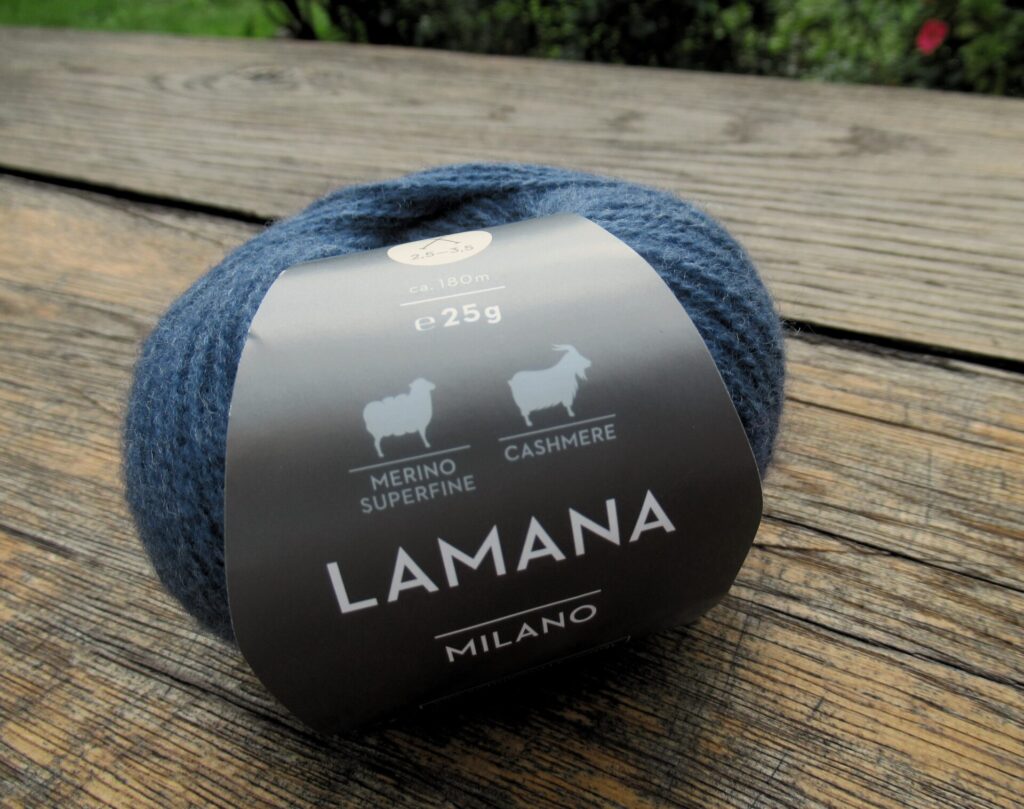
The yarn I’ve used is Lamana ‘Milano’ (90% wool/10% cashmere; 25 g/180 m), a heavy lace-weight in a dark denim shade. The yarn manufacturer has high standards with regard to animal welfare and sustainability, which is a big plus for me.
This is a scarf that really benefits from some severe blocking. (Sorry, forgot to take pictures of the blocking process.) When it was finished I decided that it would be perfect for my grandson’s other grandmother. What do you call someone like that? A fellow nan? A co-granny? Anyway, she wears stylish, unfussy clothes in navy and grey, and I hope she’ll like it.
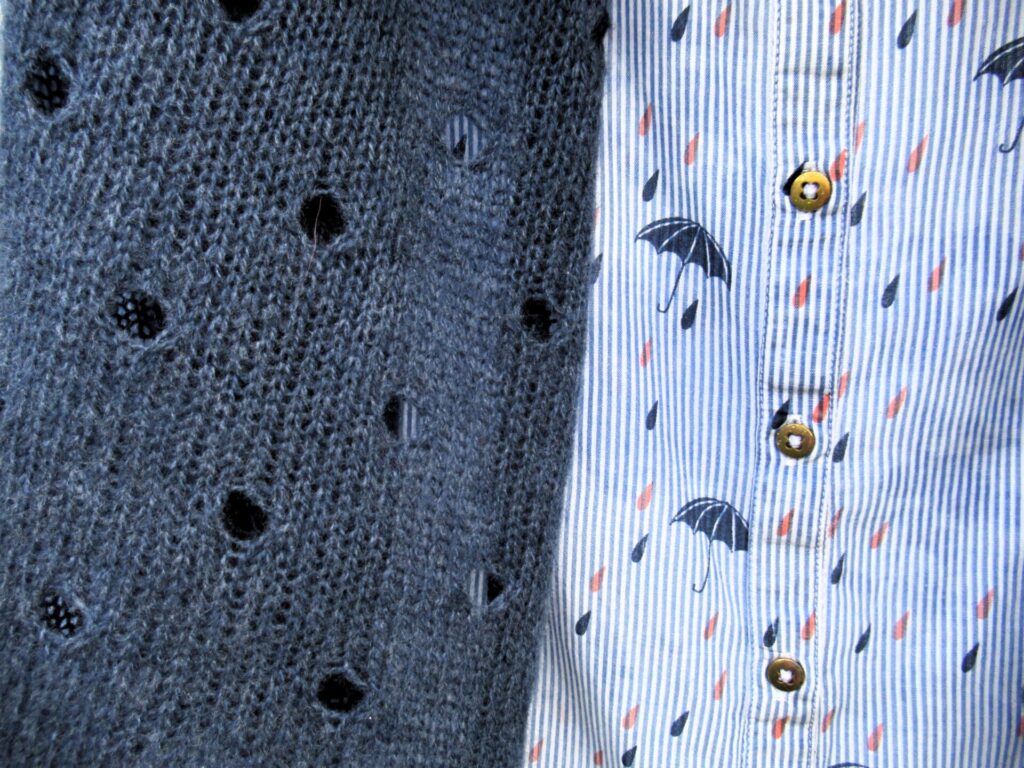
I photographed the Polka Dot Scarf on a blouse with raindrops and umbrellas…
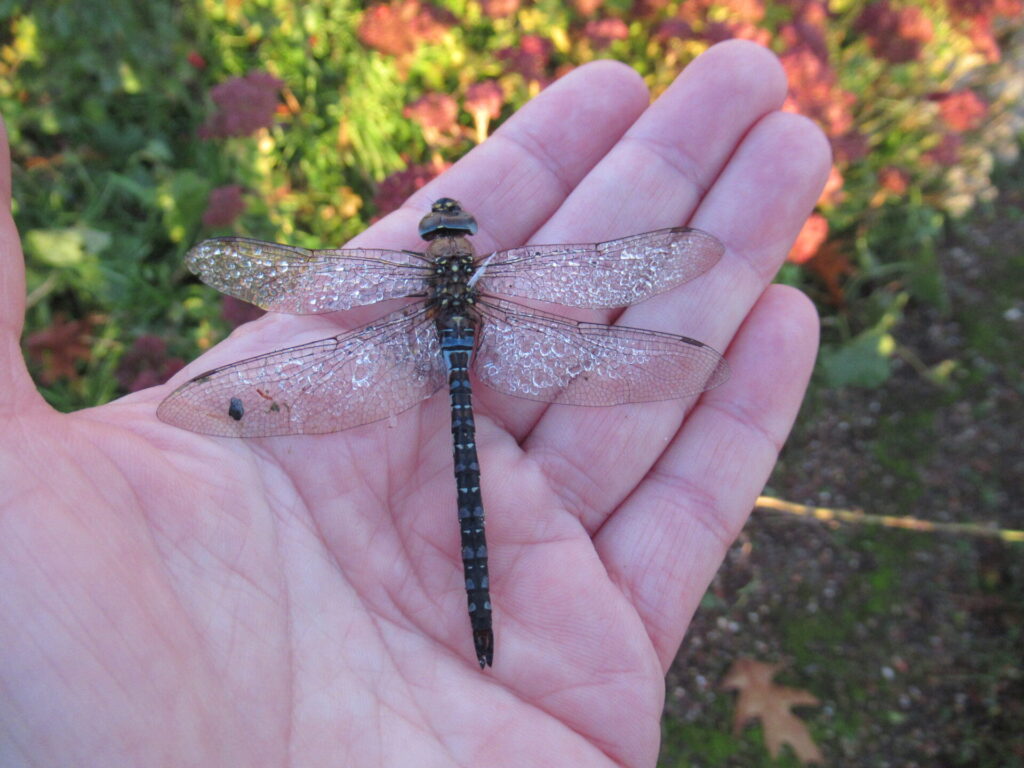
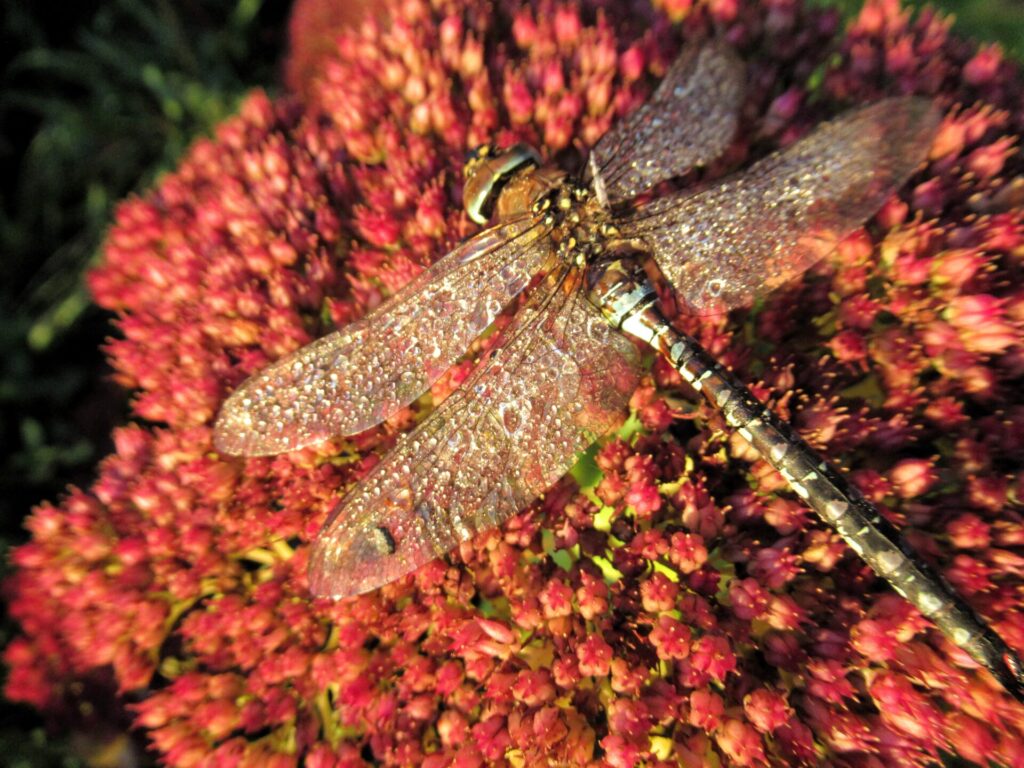
… not just because they looked nice together, but also because the blouse symbolizes the very wet autumn we’re having this year. During a sunny spell on a rainy day, I found a dragonfly in front of our house. A sadly bedraggled but still beautiful creature, with blue markings on its body and head.
It is a migrant hawker, called paardenbijter (horse biter) in Dutch. Does it really bite horses?, I wondered. Will it bite me? And more important: is it alive or dead? The best policy seemed to place it in a sunny spot to dry its raindrop spangled wings and fly away if it was alive or be picked up by a bird if not.
It’s gone now, and I’ll never know whether it’s flown away of its own accord or in a bird’s stomach.
To close off, here is a step-by-step guide to the
Needle-and-Hook provisional cast-on
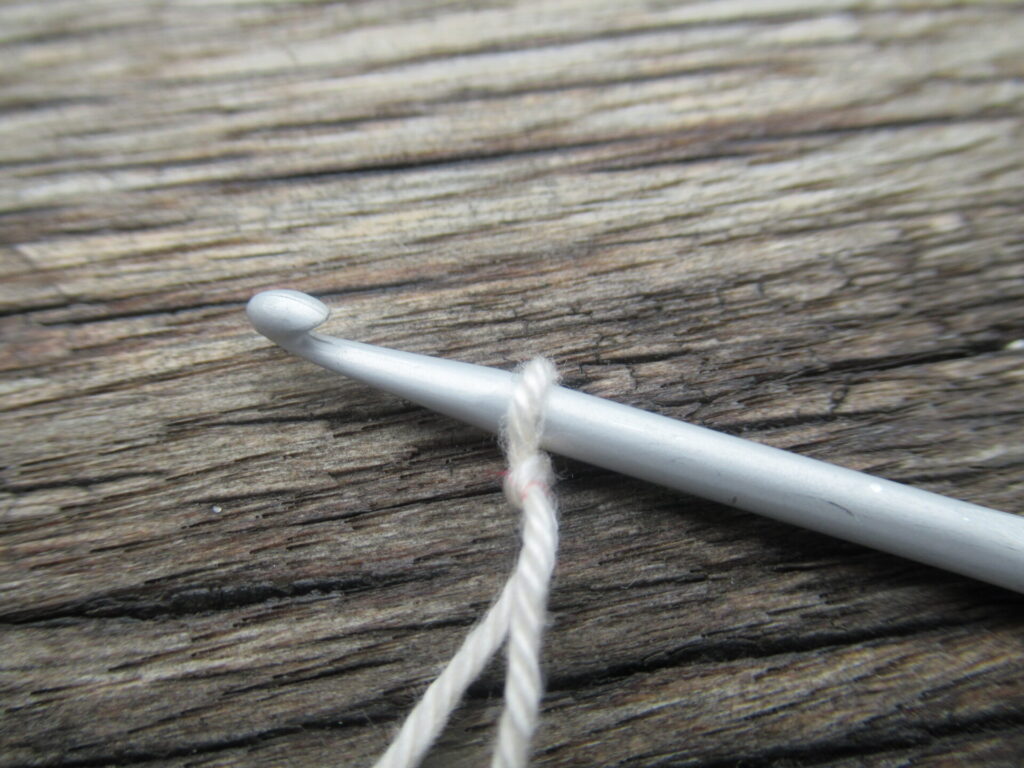
1 – With a length of smooth waste yarn, make a slip-knot and place it on a crochet hook.
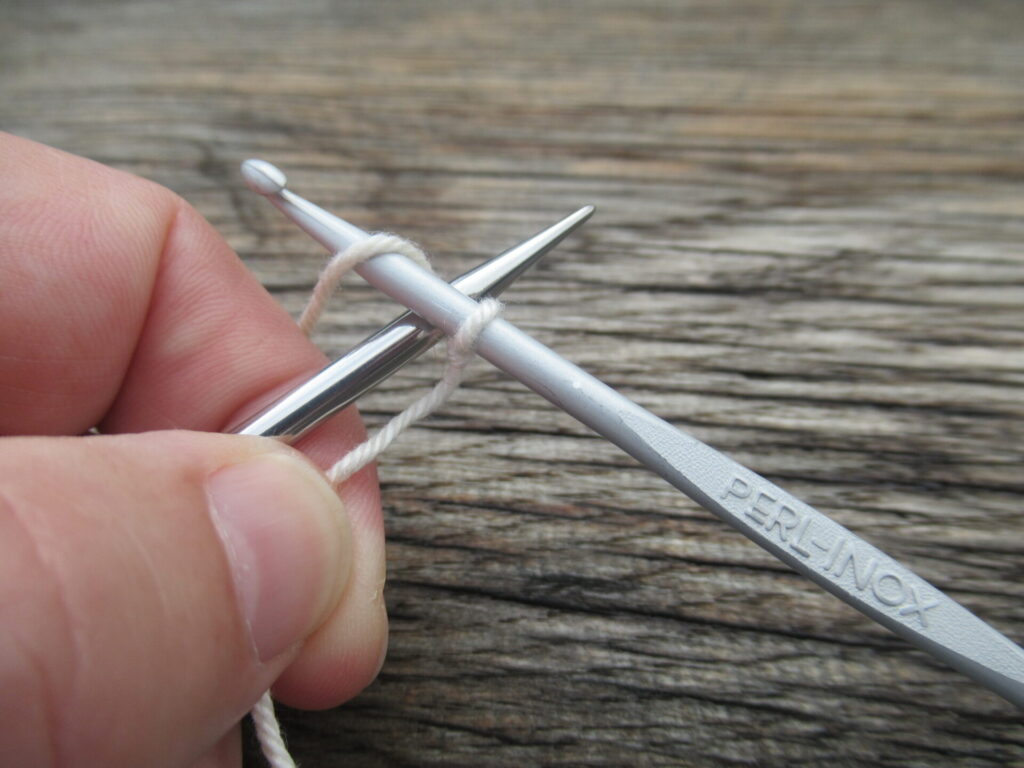
2 – With the hook in your right hand and the knitting needle in your left, form an X. The hook should be on top. Holding the thread behind the knitting needle, wrap the yarn around the hook…
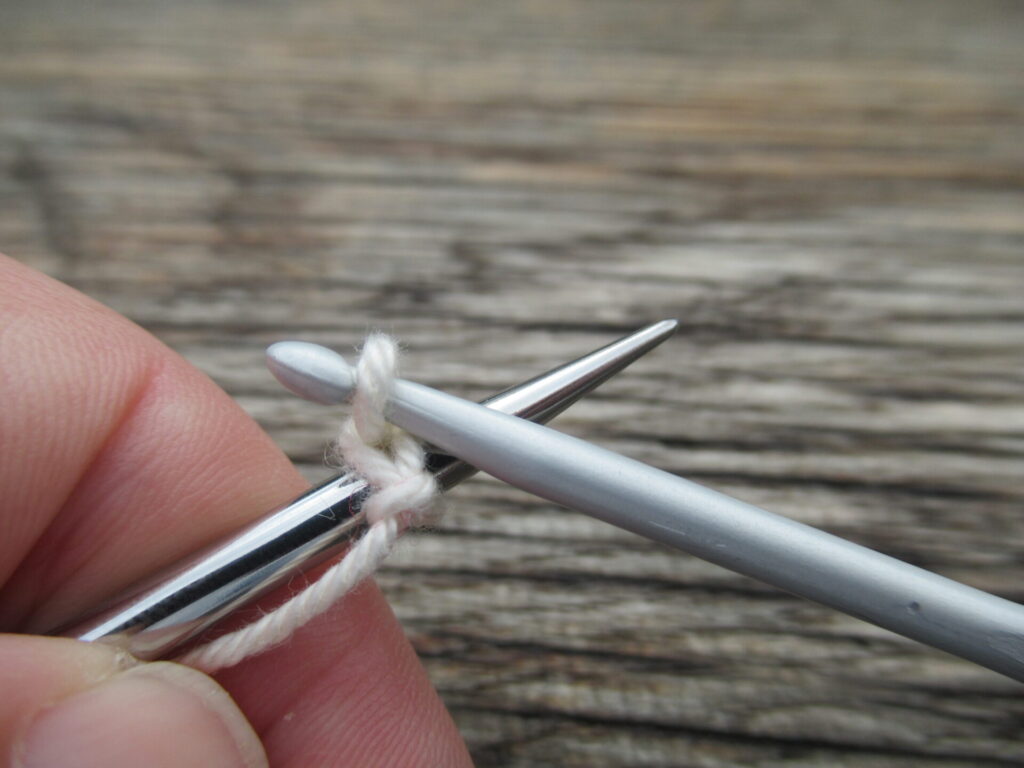
… and pull it through the loop. Now the first stitch is on your needle.
3 – Passing the yarn between the knitting needle and the hook, bring it back behind the needle and repeat step 2 until you have the required number of stitches on your needle.
4 – Crochet a few chain stitches at the end. Hang a stitch marker from the last stitch to remember where to start unravelling later on. Now, start knitting with the yarn chosen for your project.
5 – Ready to remove the cast-on? Starting at the tail with the stitch marker, carefully unravel the crochet chain and pick up the live stitches one by one. Don’t forget the half stitch at the end!
This is a really useful technique for e.g. scarves knit from the middle out to the sides. In the case of the Polka Dot Scarf, it’s used for knitting on a nice I-cord edge.
I hope I’ve explained it clearly. If all goes according to plan, I’ll take you out for walk again next week. See you then! xxx
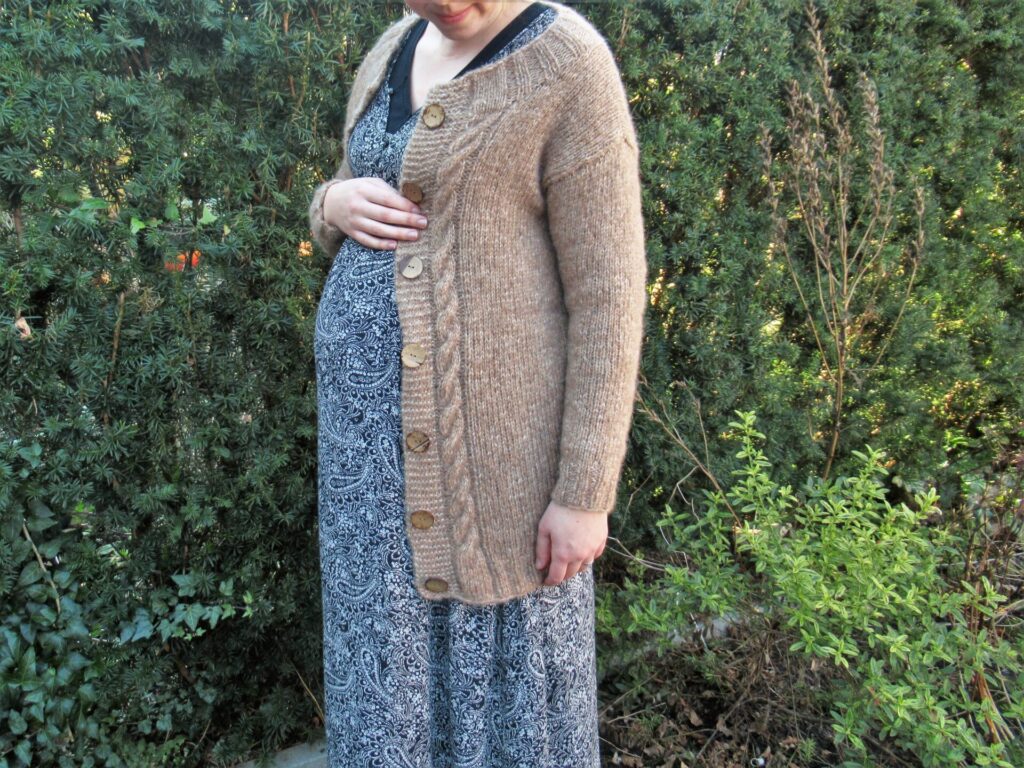
Instead of just showing you the cardigan I’ve designed and knit for our daughter, I thought it might be more interesting to tell you how I did it.
There are many approaches to designing things, of course. This is merely my simple, practical way for designing a sweater knit from the bottom-up in pieces sewn together later. I’ve developed this method over the years and have tried to summarize it in 10 (hopefully easy to follow) steps. So, here we go.
How to Design Your Own Sweater in 10 Steps:
1 – Decide what you’re going to make For whom would you like to knit a sweater: For yourself? A loved one? What type of sweater would you like to make: A pullover? A cardigan? A summer top?
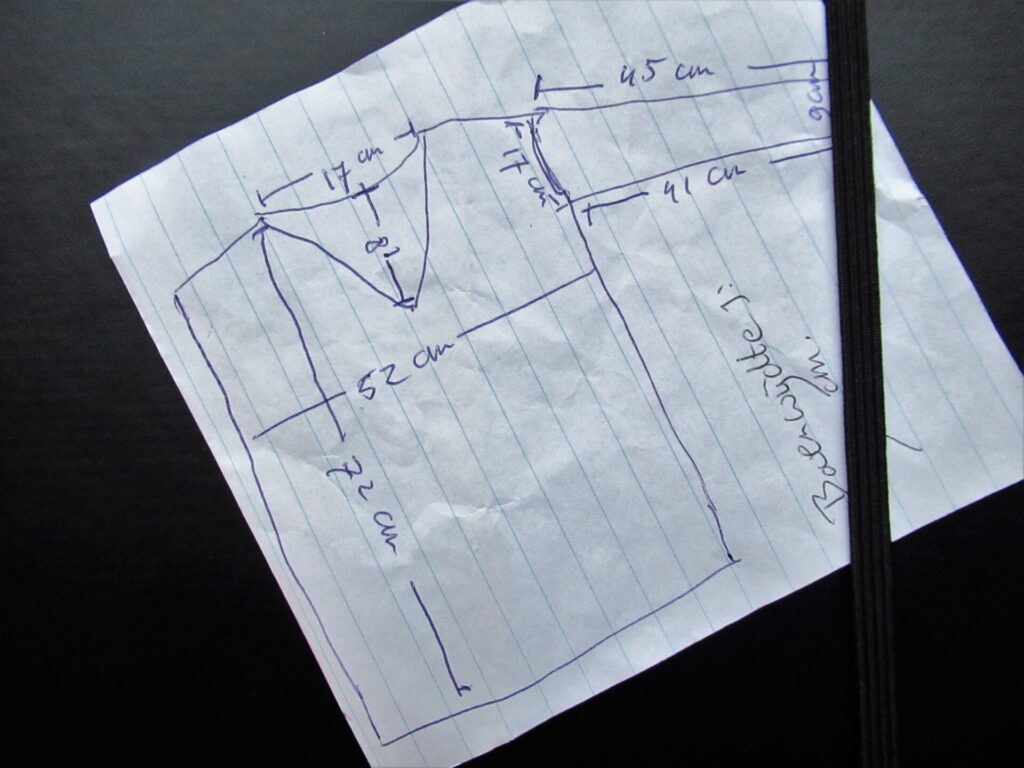
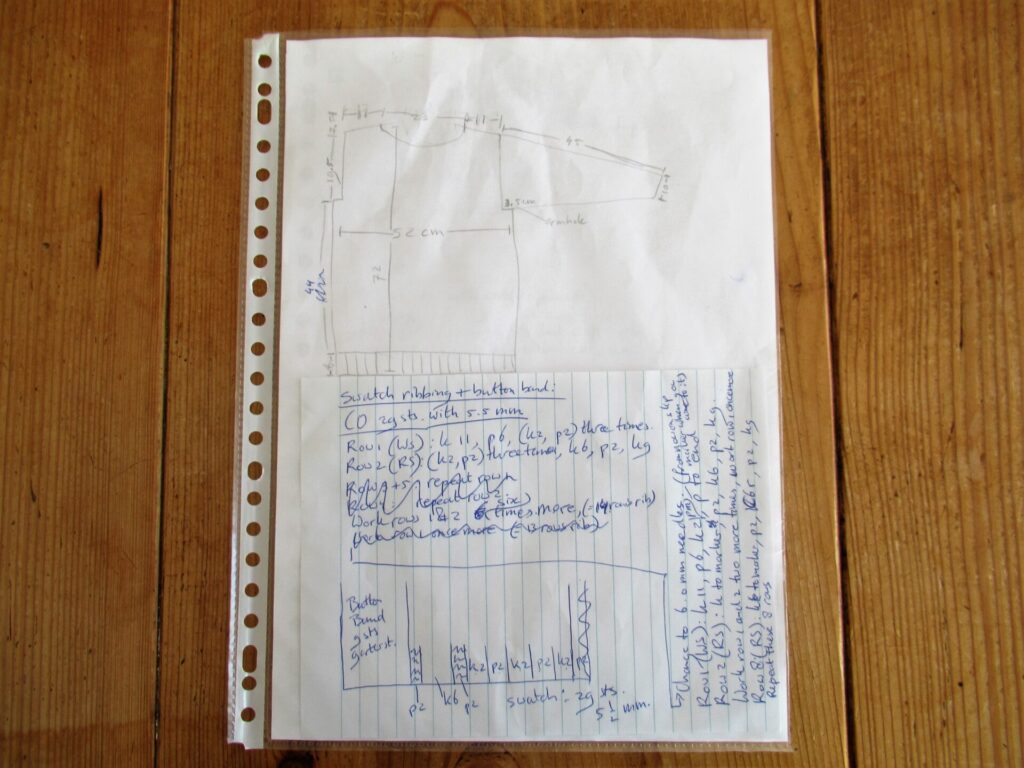
2 – Take measurements and draw a diagram Find a garment with approximately the fit you’re looking for and measure:
Chest width
Length
Armhole
Neck width and depth
Width at shoulders
Sleeve length
Sleeve circumference at wrist
Any other things you think may be useful
The chest/shoulder/armhole part is the most important. The rest is easy to adapt. Draw a diagram incorporating these measurements. It doesn’t need to be to scale, it’s just for your own reference. This is mine:
3 – Think about what you want and draw another diagram Things to consider are:
Details: buttons, pockets, stitch pattern, ribbing or no ribbing…
Add any relevant measurements to your new diagram.
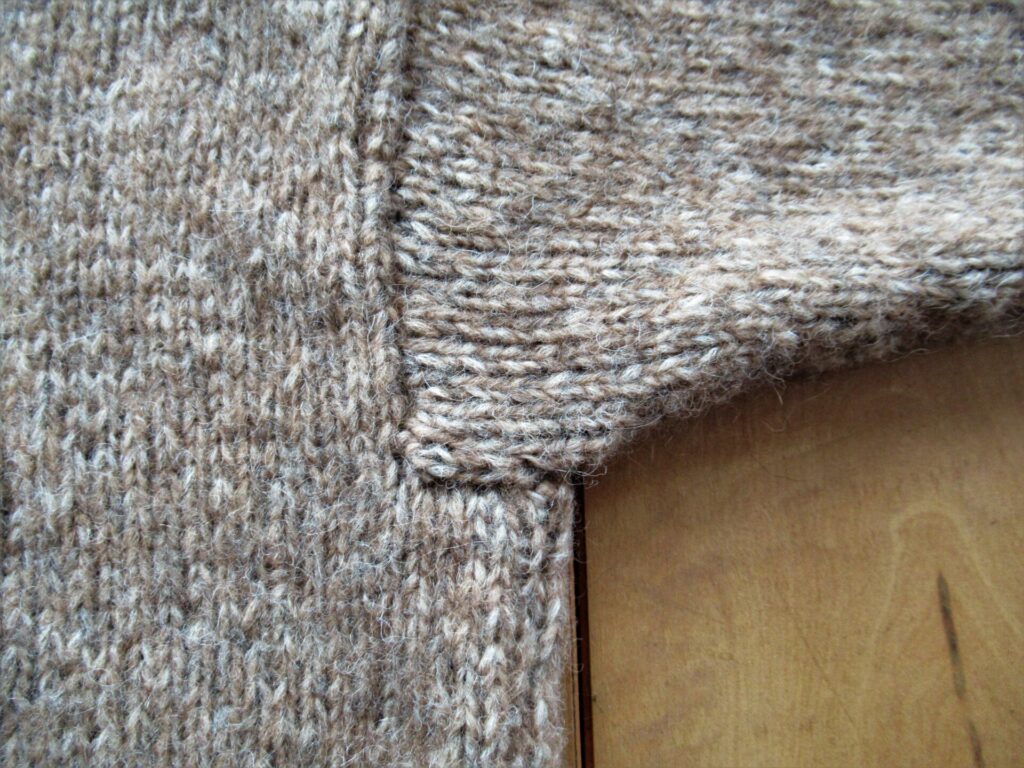
Tip: If you have never designed anything before, keep it simple. If you have a little experience, you could set yourself a challenge. I used a very simple armhole and sleeve cap:
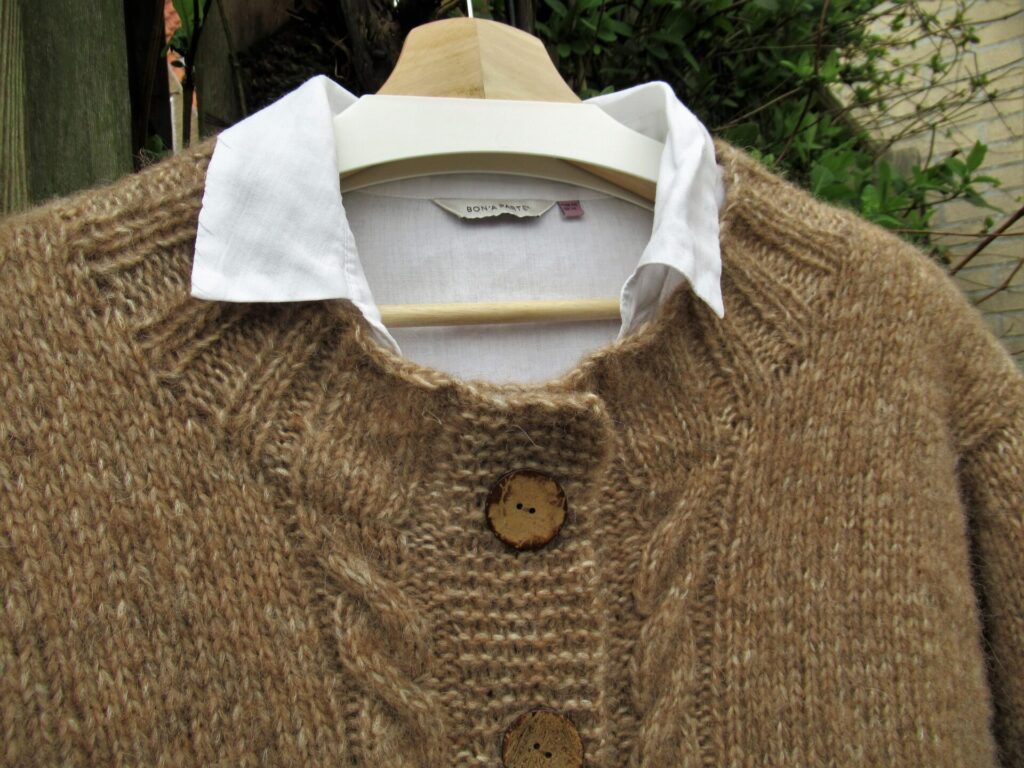
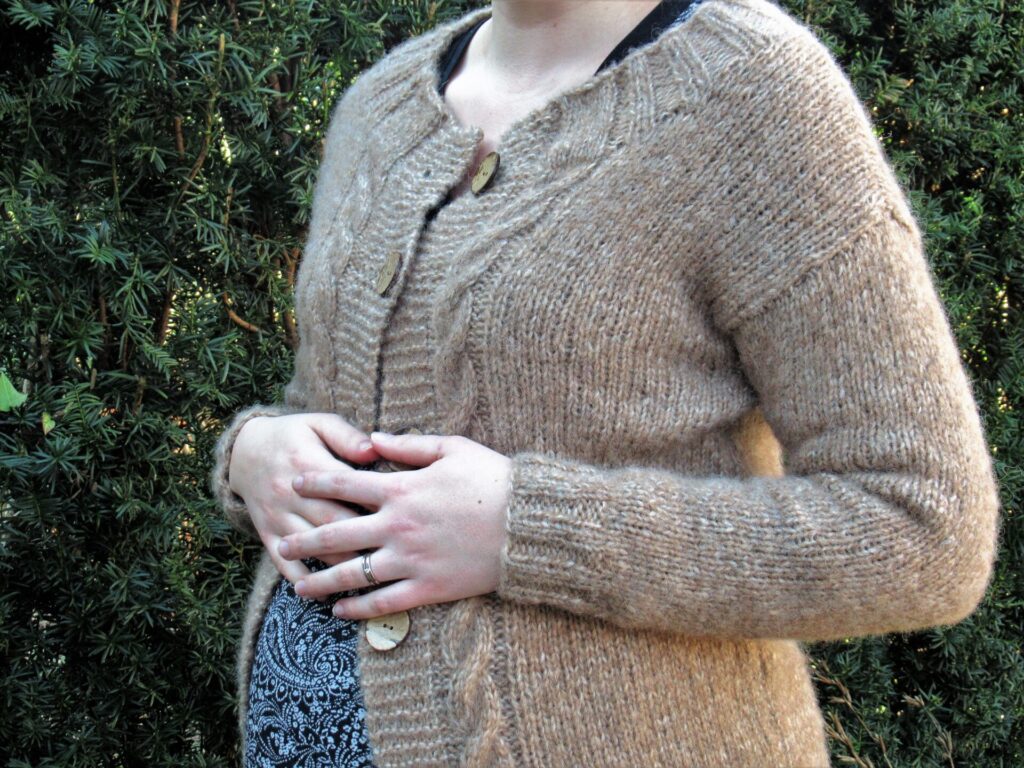
And gave myself the challenge of adding a cable, flowing from the ribbing at the bottom and into the neckband.
Another challenge I set myself was matching the ribbing of front and back so that the seam would be near invisible.
4 – Choose your yarn and work out approximately how much you’ll need If you’re an experienced knitter you’ll probably have some idea. It also helps to look at other people’s projects from the same yarn on Ravelry. Find a few similar garments in a similar size and check how much they took. Then add some extra for swatches and to be on the safe side.
Note: I did it the other way around: Fell in love with the yarn first and bought a generous quantity. Far too generous as it turns out. Never mind – it only means that I have enough left for a hat and a scarf.
5 – Swatch a – First swatch to decide what needle size you’re going to use: how open, drapey or dense do you prefer your knitted fabric for this project? Knit generous swatches – aim for at least 12 x 12 cm/5 x 5”. Wash your swatches and leave them to dry flat, or block and/or press them, just like you intend to treat your finished sweater. b – Then knit more swatches. This time in different stitch patterns and ribbings you might want to use. Again wash/block/press them.
6 – Decision time Decide what needle size(s) and pattern stitch(es) you’re going to use, how wide your ribbings and button bands (if any) will be, exactly what your neckline is going to look like, where any pockets will be placed etc. Add details to your diagram if you think that will be helpful.
7 – Start knitting the back Using your swatches, calculate how many stitches you need to cast on. Do you need to increase or decrease for, say, an A-line or waist shaping? Write down everything you do and keep your notes together. It isn’t necessary to work everything out beforehand. You can think about the armhole, neck and shoulders while knitting.
8 – Do the maths for the front(s) If you’re designing a cardigan with button bands, make sure they overlap. Work any buttonholes in the second front. Think deep about your neckline, and work out how to get what you want.
9 – Work out the sleeves How long? How many rows to armhole? How many stitches do you start with? How many do you need at the armhole? Spread the increases out over the length.
10 – Work out and knit the final details Now all you need to do is wash, block and/or press your pieces and seam everything together. Add button bands (if not incorporated), patch pockets, neckband etc.
There, all done!
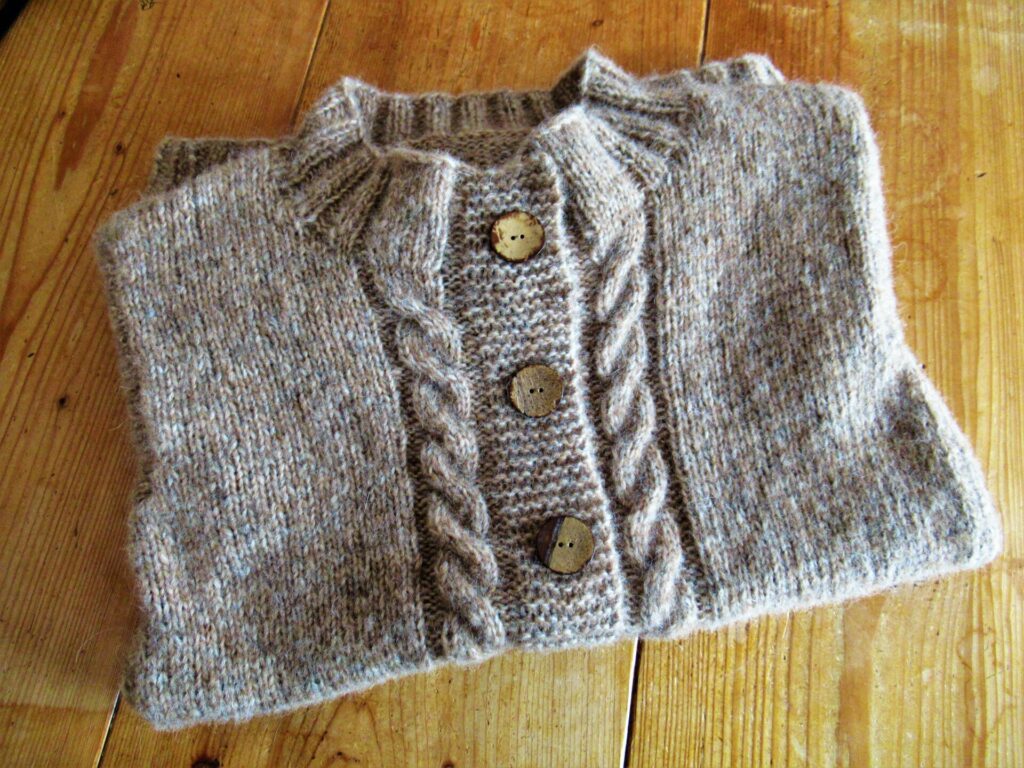
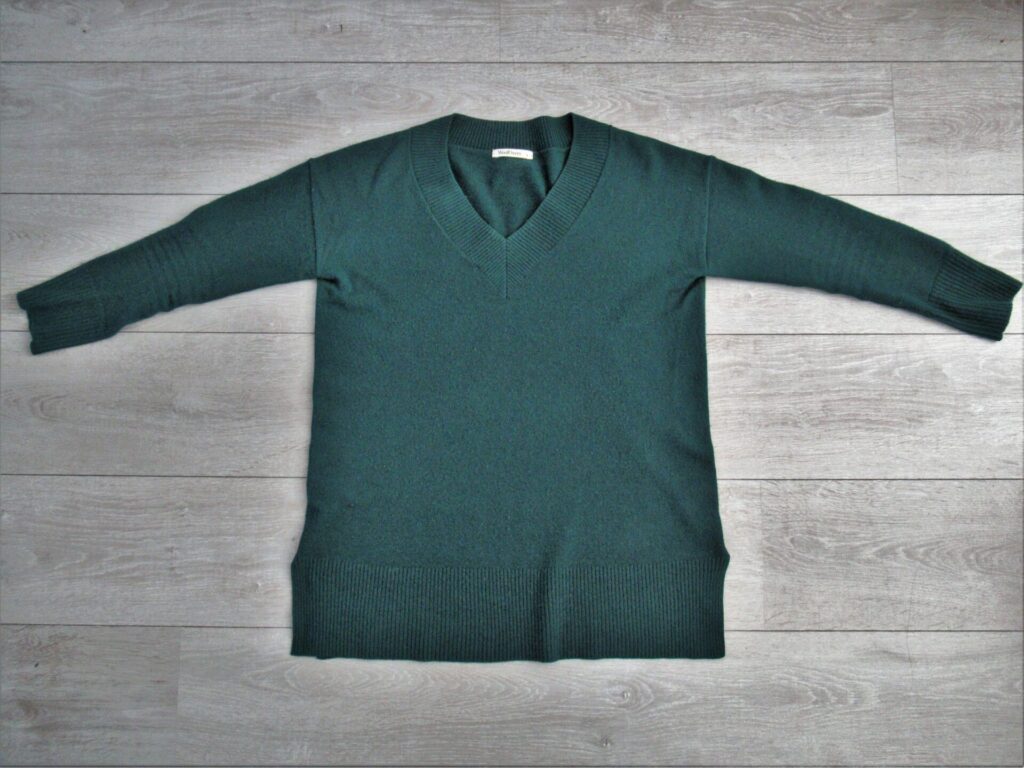
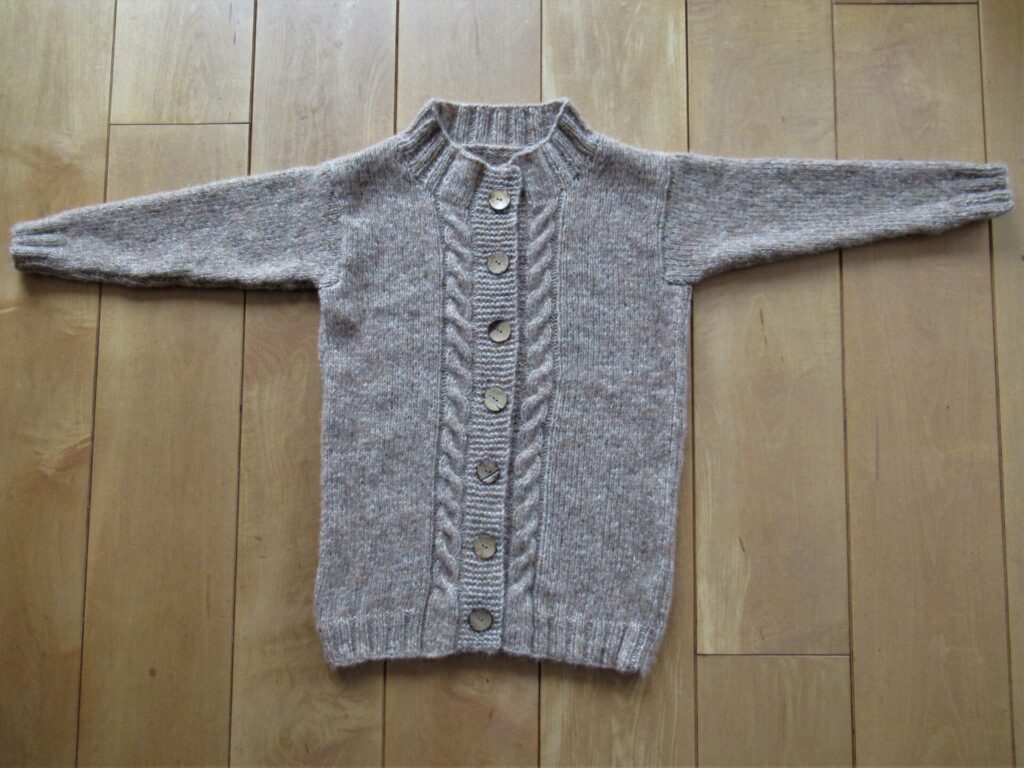
Starting from a deep green, finely knit, shop-bought V-neck pullover, I arrived at a fawn, chunky, hand-knit cardigan with a round neck and cables along the fronts.
It does not fit over our daughter’s already impressive bump, but will keep her back and shoulders warm.
With quite a few weeks to go, how much more will that belly grow?
Well, I hope this all makes sense. Do you sometimes design your own sweaters, too? Is your method very different from mine? If you’ve never designed anything yet, why not give it a try? Your sweater may not turn out perfect or exactly how you envisioned it, but it will be uniquely yours.
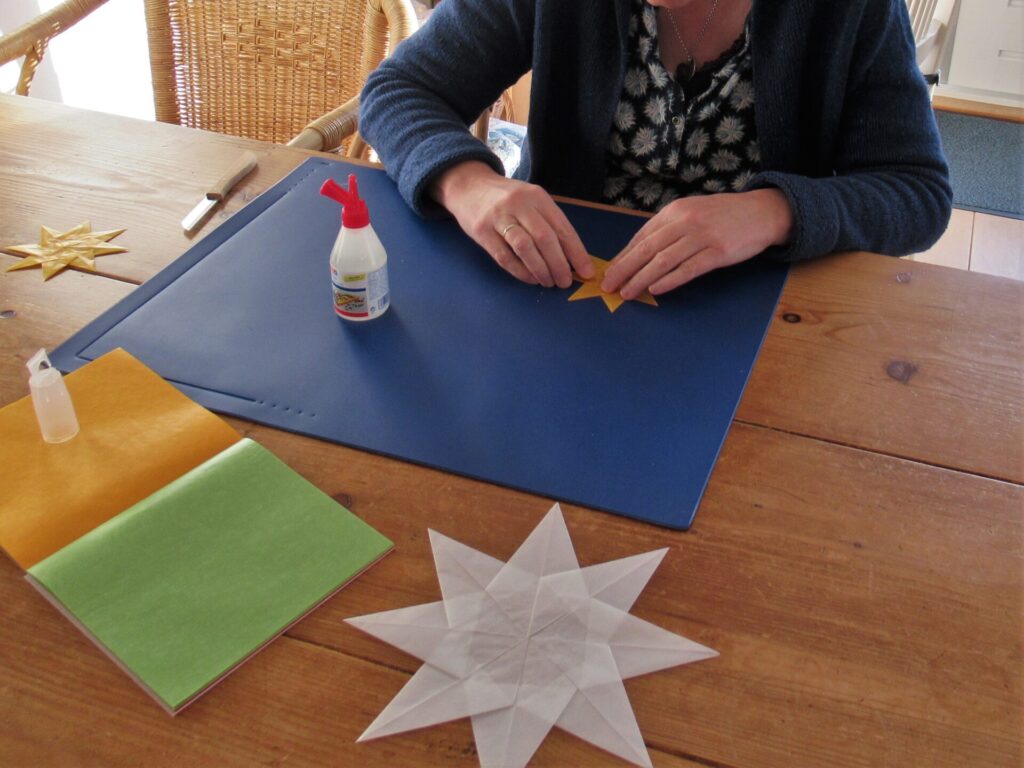
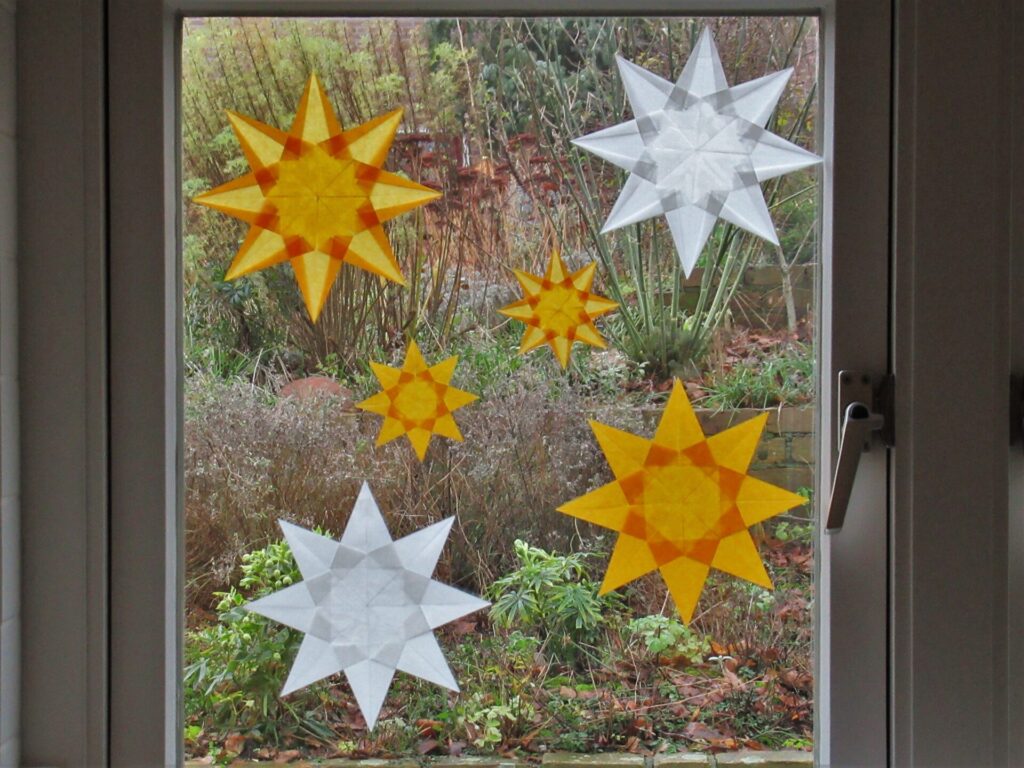
A long time ago a friend taught me to fold stars. Made from transparent paper, they showed lovely patterns when the light shone through them. Because this friend is going through a difficult time at the moment, I folded a small star and sent it to her tucked between a postcard with a personal message – a reminder of good times and a symbol of hope.
Then I folded some more to give away. Then I folded a few for our own kitchen window. And then I thought, ‘Why not share them with you here?’
What you’ll need:
Sharp paring knife
Clear glue
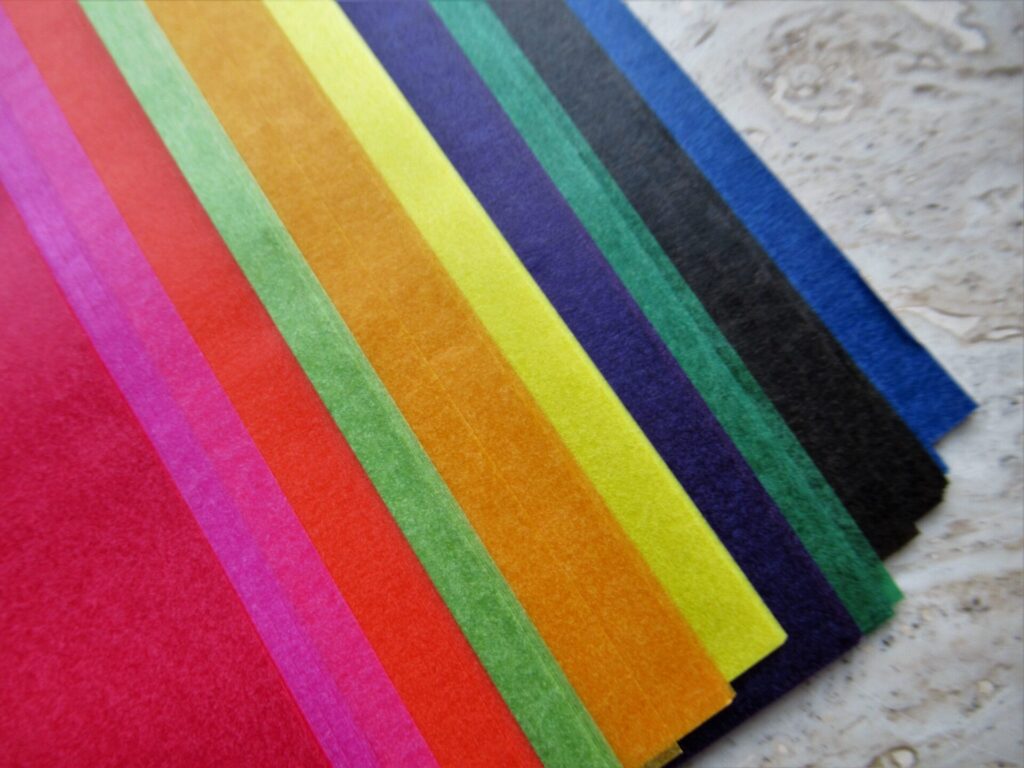
Transparent kite paper (available as larger sheets and as blocks of squares in a rainbow of colours)
Tissue paper can be used as well, but tears and fades more quickly. (For the tutorial steps below I used ordinary printer paper for the sake of clarity only.)
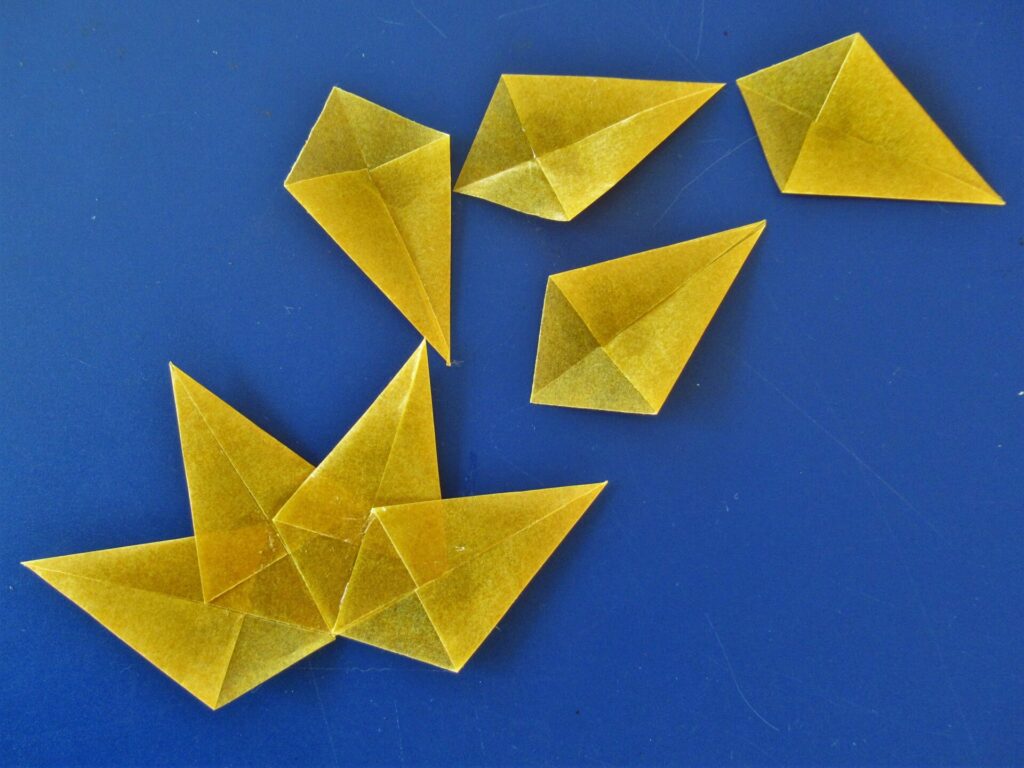
1) For each star, cut eight squares using the paring knife.
The paper in my block measured 16 x 16 cm (6.25 x 6.25”). For a large star I cut two sheets into four squares each (eight 8 x 8 cm squares in total). For a small star I cut half a sheet into eight 4 x 4 cm squares. The size does not really matter, as long as you end up with eight square pieces of paper. Start with a larger star – the smaller ones take a little practice.
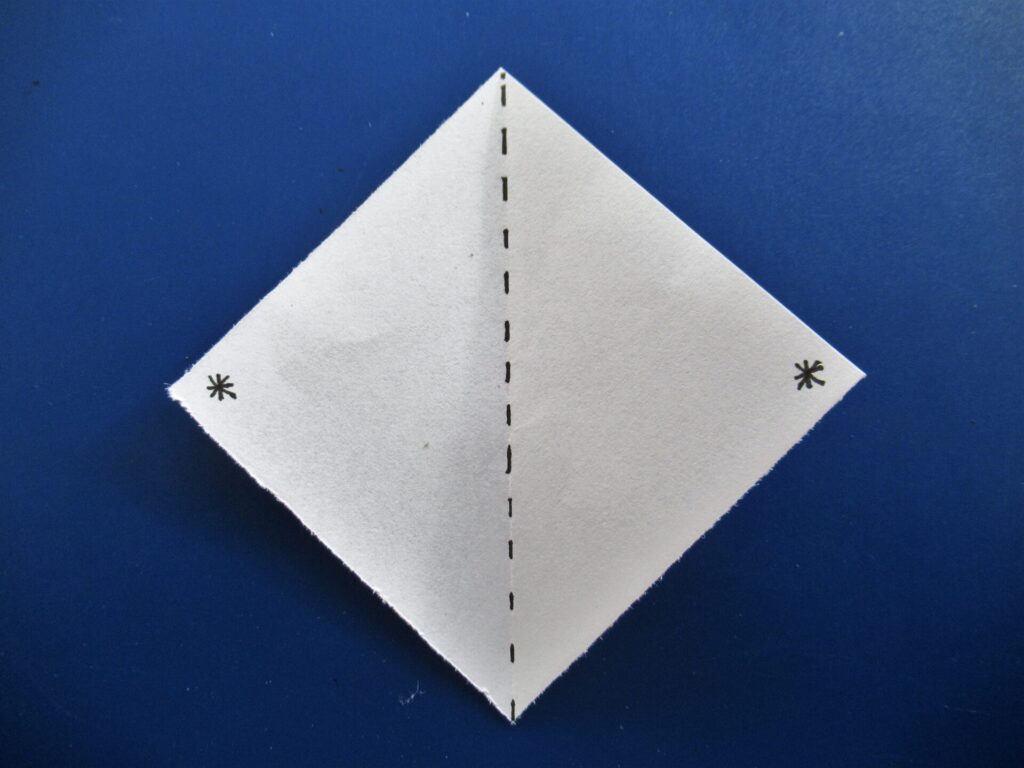
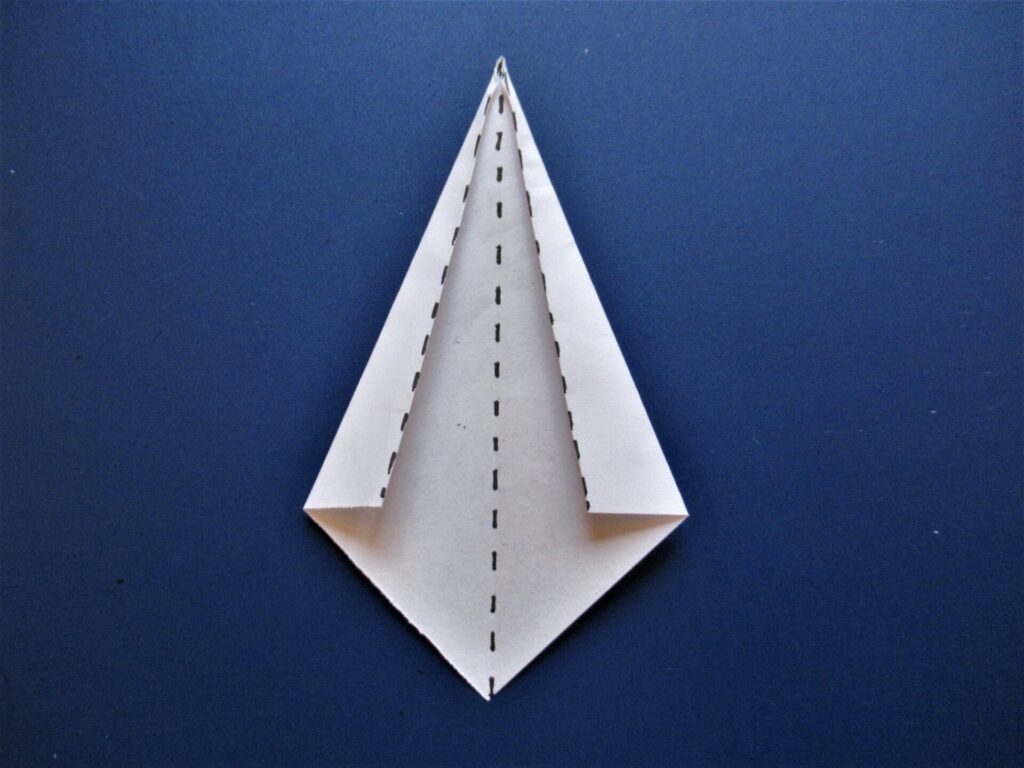
2) Fold the paper in half diagonally, so that the points marked with asterisks in the example lie on top of each other. Then open again.
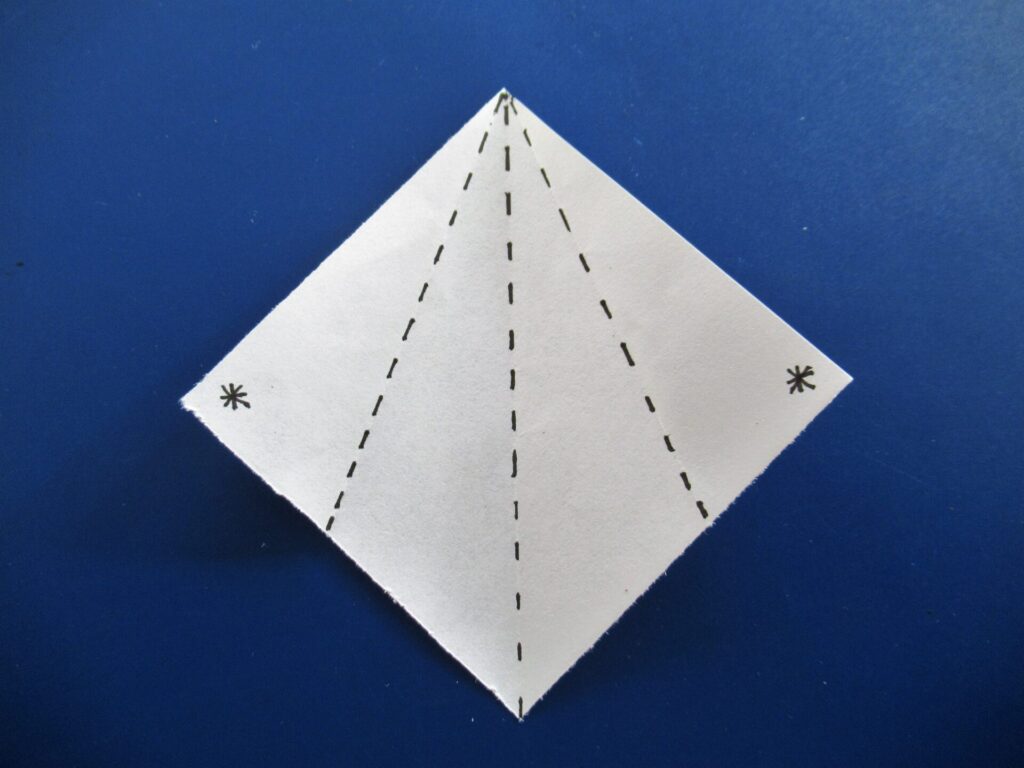
3) Next fold the asterisks toward the line in the middle, along the dashed lines:
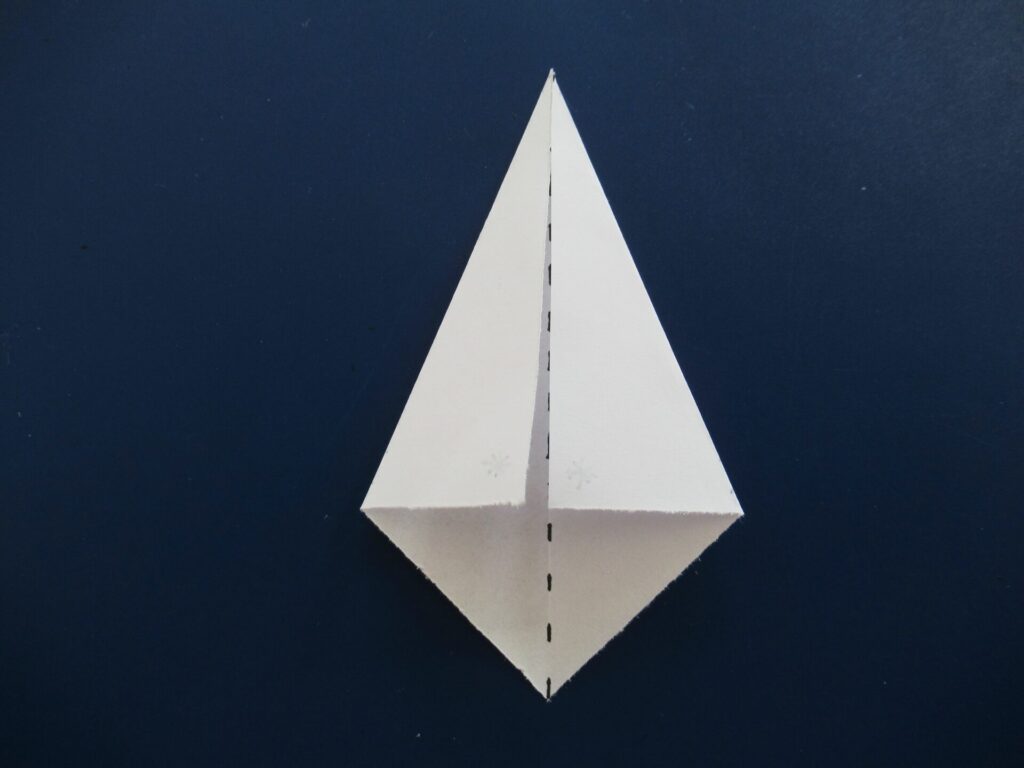
You’ll end up with a shape like this:
Make eight of these.
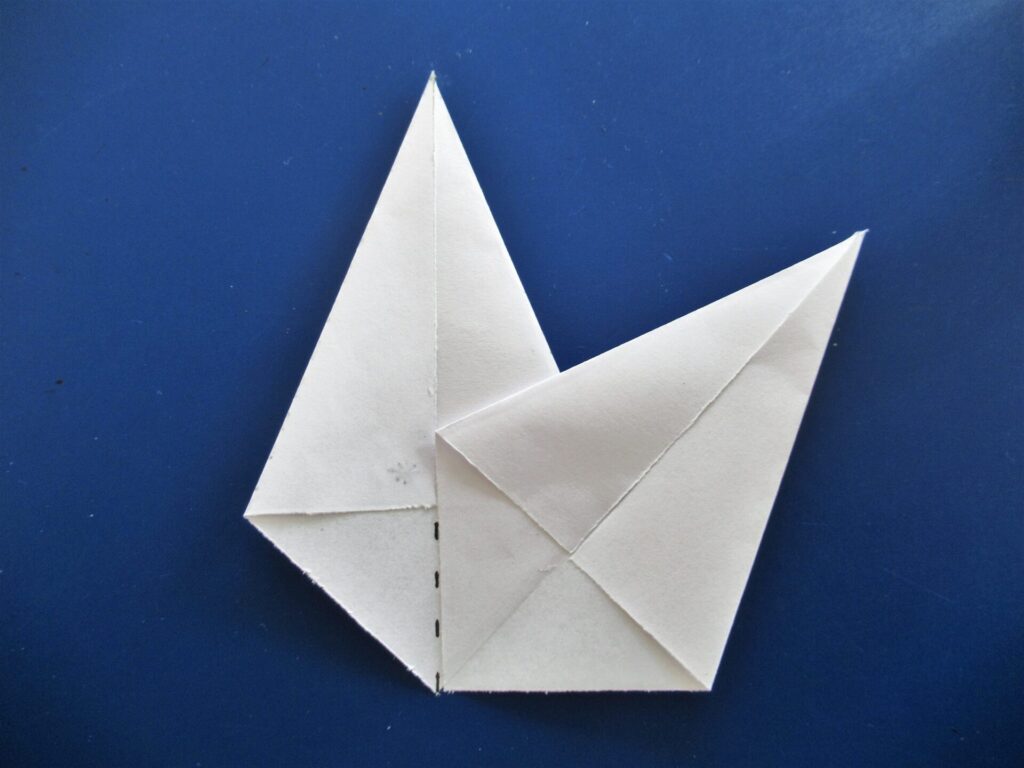
4) Using a small drop of glue, stick the points where the asterisks are in the example in place.
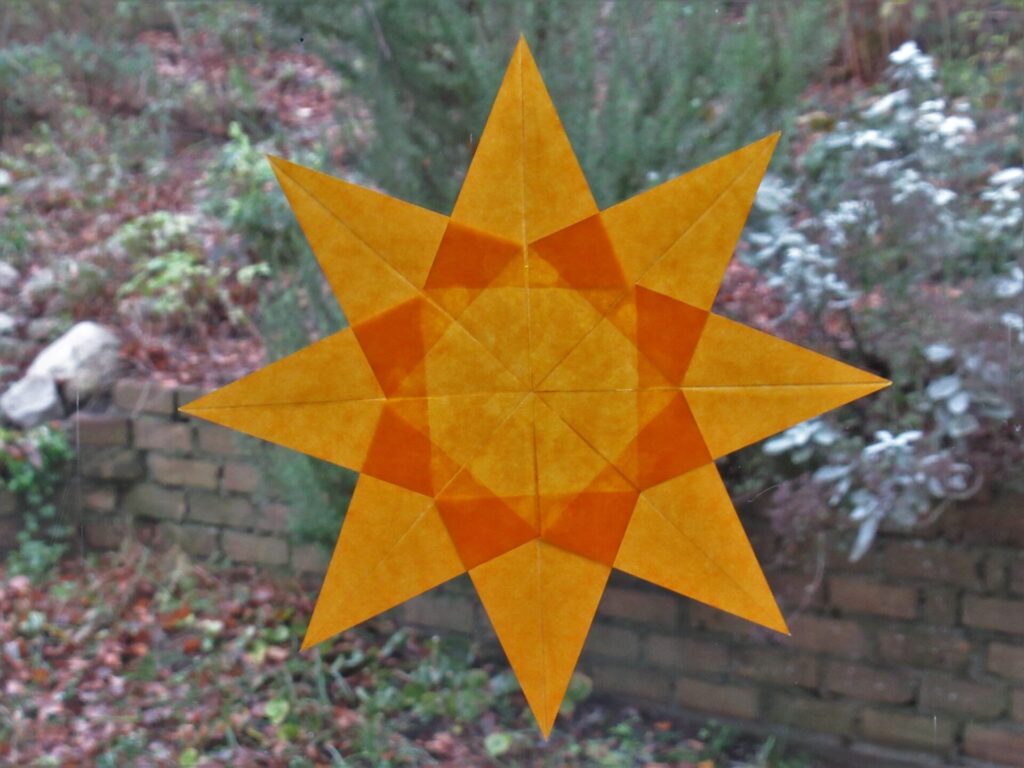
5) Finally assemble the eight points into a star as shown in the picture below, using a little bit of glue where the points overlap.
It’s important to use clear glue or it will show when the light shines through.
Tadaaah – one transparent paper star!
For a different variation, open the flaps last folded again and then fold them inward, with the imaginary asterisks tucked away inside.
Glue the points together to make a star as before. This simple adaptation immediately gives a much more intricate look:
Finished, my larger stars measure approx. 23 cm (9”) from tip to tip, and my smaller ones 11.5 cm (4.5”). Use a small piece of clear tape folded double (or double-sided tape if you have it) to stick stars to a window pane.
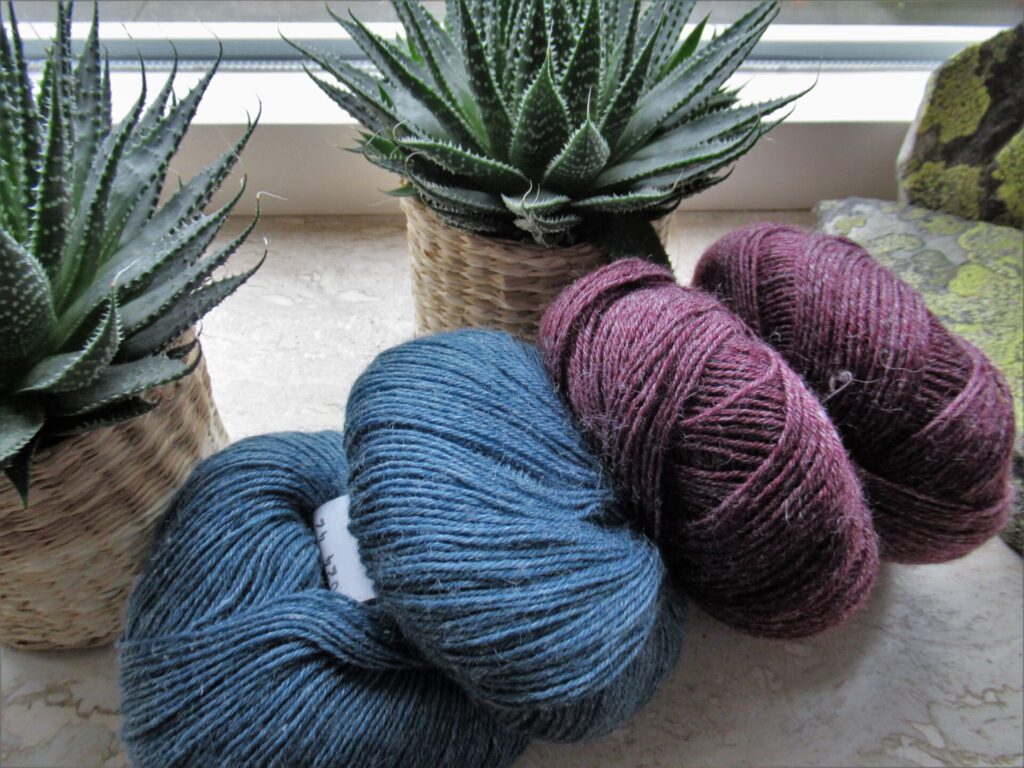
The same friend who taught me to fold stars, recently gave me some sock yarn. She had planned to knit socks with it herself, but realized she would never get round to it. It is a yarn with nettle fibres for strength and durability instead of the usual nylon.
This yarn has been around for a while, but I haven’t used it before. I’m looking forward to giving it a try. And what am I going to use it for? Two pairs of socks for my friend, of course!
Star light, star bright, First star I see tonight, I wish I may, I wish I might, Have the wish I wish tonight.
My wish for you today is that you may have some time to yourself over the coming week, to fold a star, knit a sock, or simply spend some time outside at night stargazing.
We’ve had a lot of rather gloomy days here lately. I don’t mean gloomy because of the current coronavirus situation, although there is that too, but literally so gloomy that we need to keep the lights on all day.
We haven’t actually had a lot of rain. It’s just that on many days it’s been cloudy and grey.
I don’t really mind, and even enjoy the quiet atmosphere of some of these days. For me, the problem is that there often isn’t enough light to take pictures indoors, while the table on the patio is too wet to spread my knitting out on.
But last Sunday suddenly the sun came out.
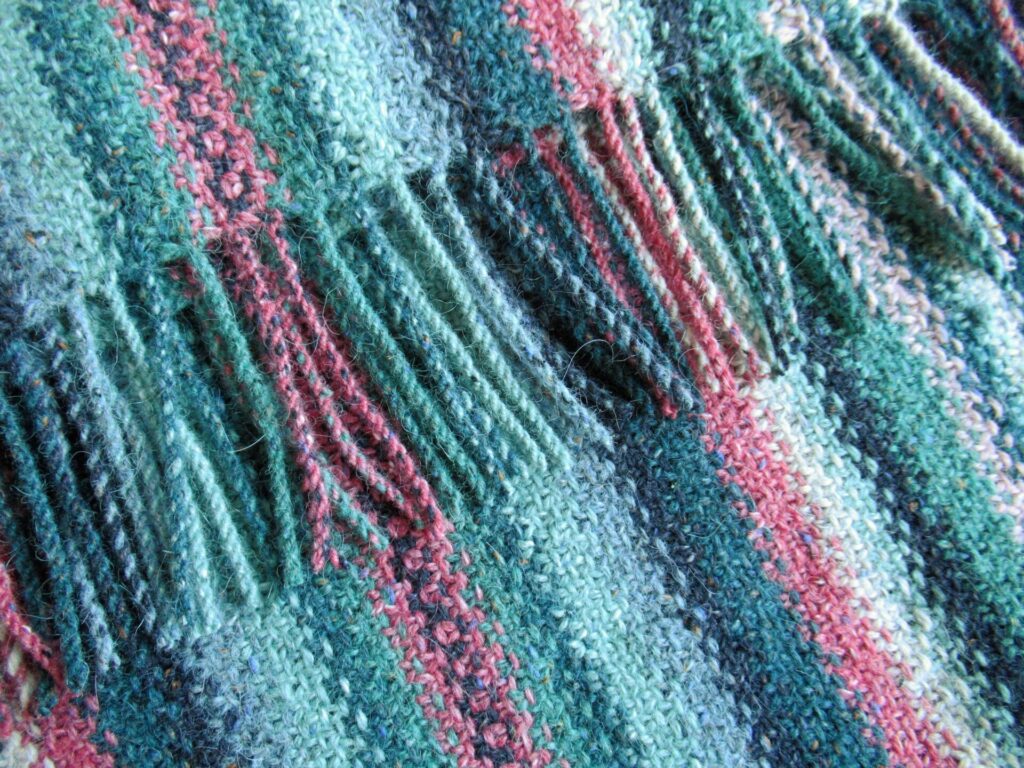
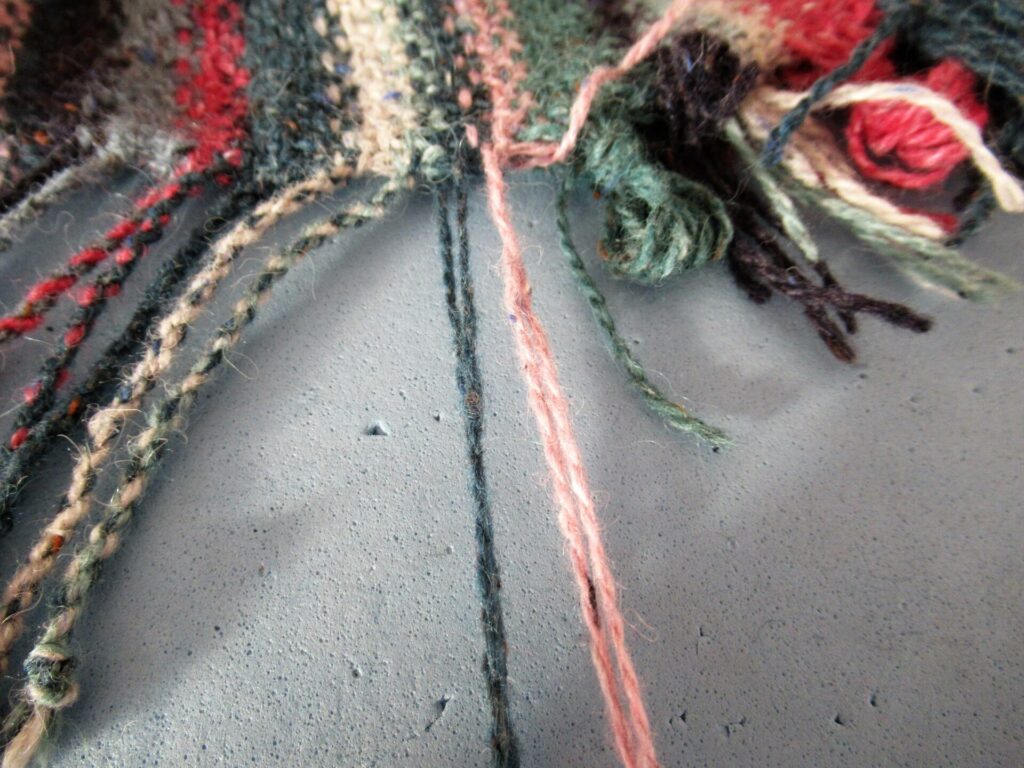
I quickly set to work, because I wanted to show you how to make a twisted fringe. I’d finished knitting my Striped Linen Stitch Wrap. In this project, every row starts and ends with a yarn tail. In the basic pattern these are knotted into a fringe, but a later adaptation has a twisted fringe and that was what I wanted to try.
The yarn I used was Rowan’s Felted Tweed, a blend of lightly felted wool, viscose and alpaca. Because I wasn’t sure if the technique would work for this combination of fibres, I tried it out on a swatch first, and yes, it worked! This is how it’s done step by step.
1) Pin the end of the wrap to blocking mats.
The yarn ends were tied into bundles during the knitting. These are now undone one by one.
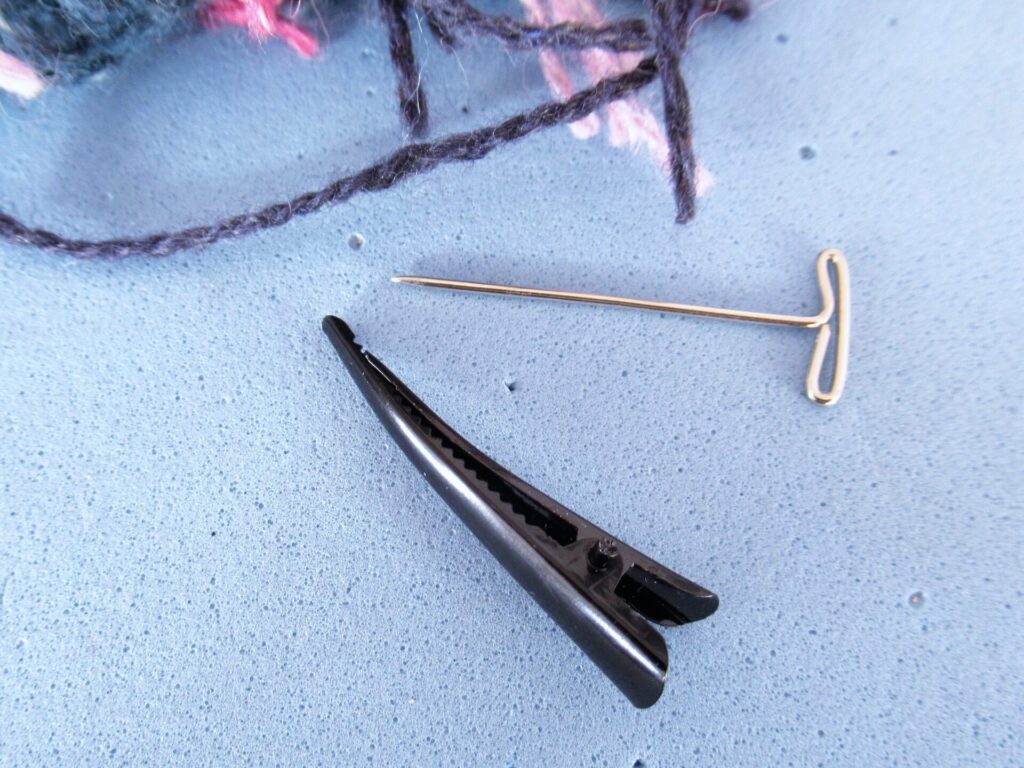
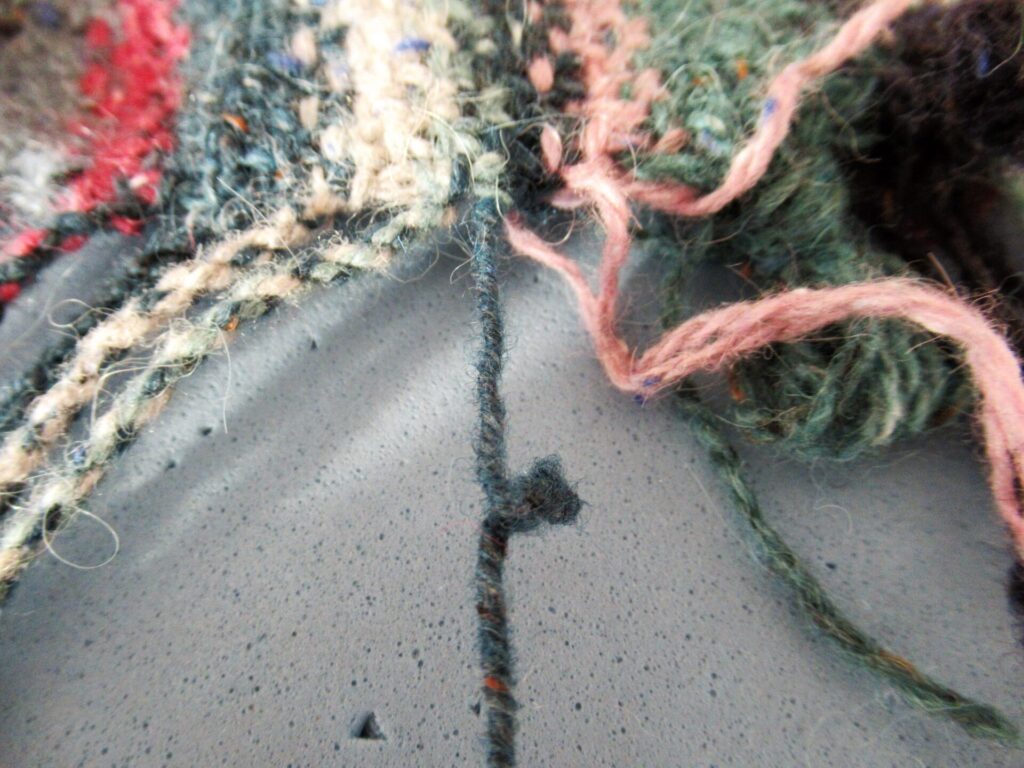
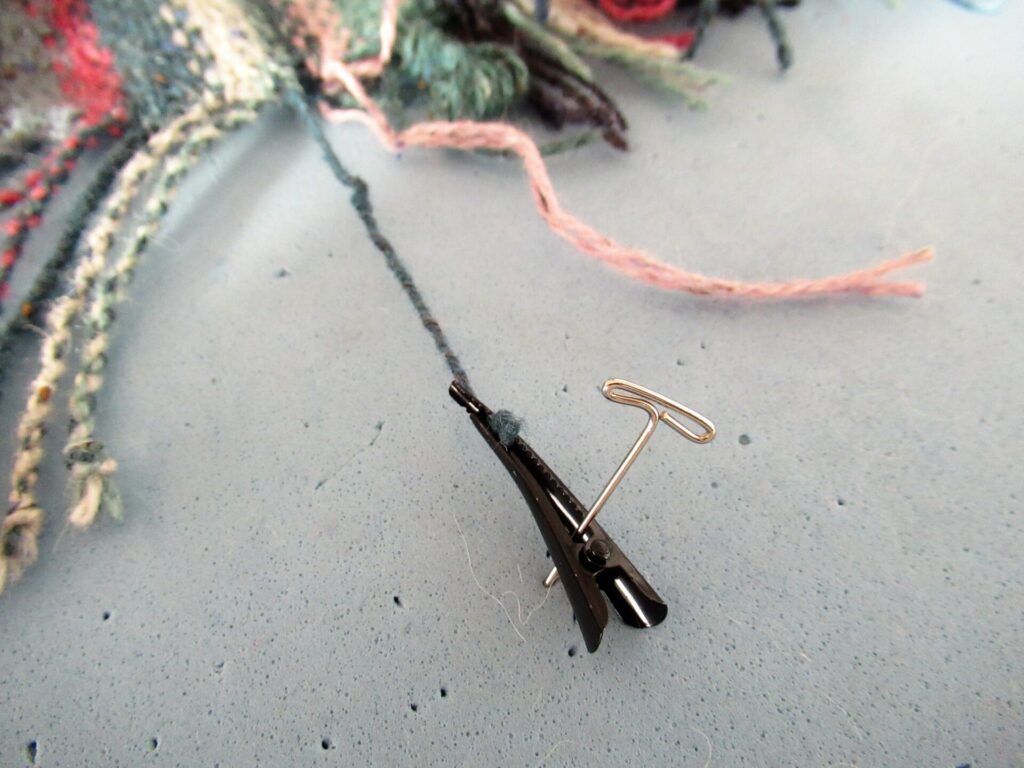
While twisting the ends, they need to be kept in place. The pattern uses a binder clip for this, but as I didn’t have any of those, I used a hair clip and a T-pin.
2) Undo a fringe bundle. Find the next 4 tails (they should be twisted in the order they were knitted).
3) Twist the first 2 tails together in the same direction as the twist of the yarn (i.e. to the right). Continue until they are slightly overtwisted.
4) Secure with a clip and pin onto the blocking mat with a T-pin.
5) Twist the next 2 tails in the same way and hold. Unclip the first 2 twisted tails. Tie both sets of tails together with an overhand knot as close to the ends as possible and let go. They will now twist together. Smooth this twist by passing it between thumb and forefinger several times.
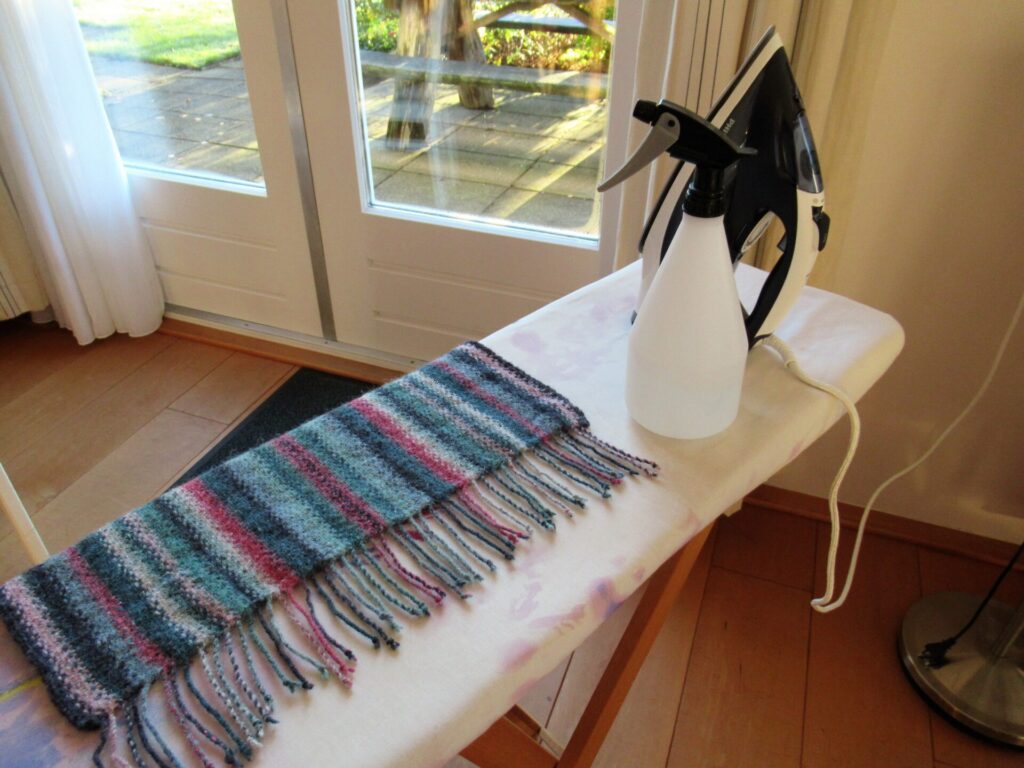
Continue like this until all yarn tails have been twisted. Then repeat steps 1-5 for the other end of the wrap. Remove the wrap from the blocking mats and place it on an ironing board. Comb out the ends so that they are straight and not crossing each other.
6) Spray the fringe with a plant mister.
7) Cover it with a clean, moist tea towel. (Make sure it’s an old one that won’t give off any colour.)
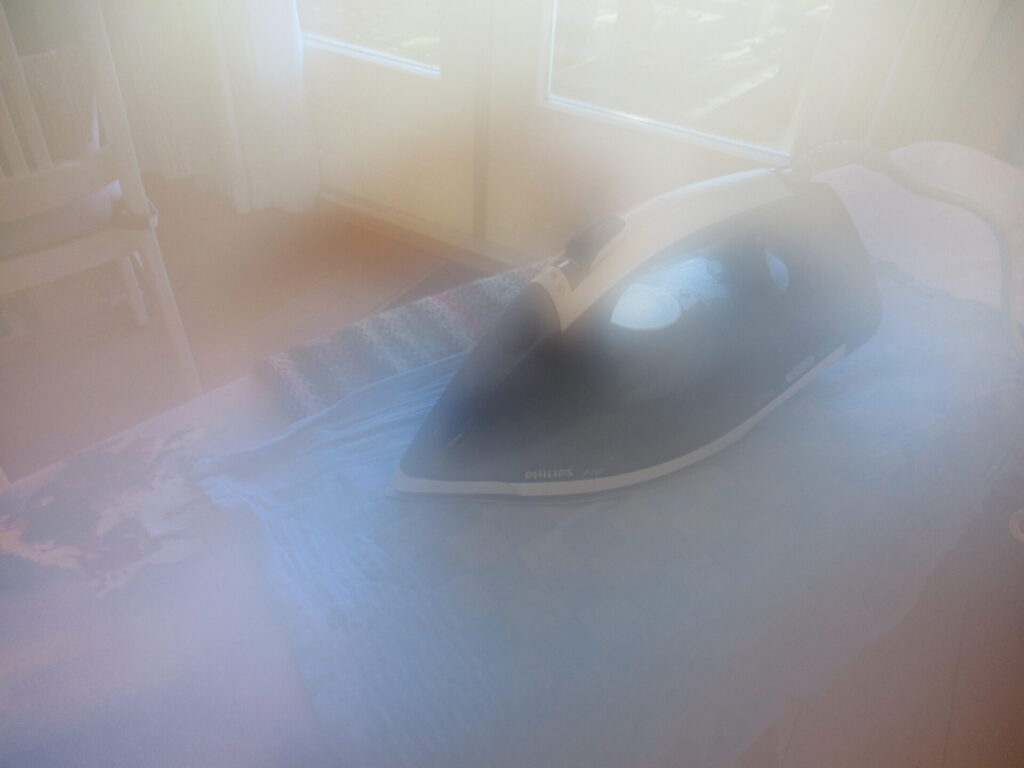
8) Then, with the iron on the wool and steam setting, press the fringe with lots of STEAM.
Repeat for the other end of the wrap and leave to dry thoroughly. The tails should now be slightly felted, preventing them from untwisting.
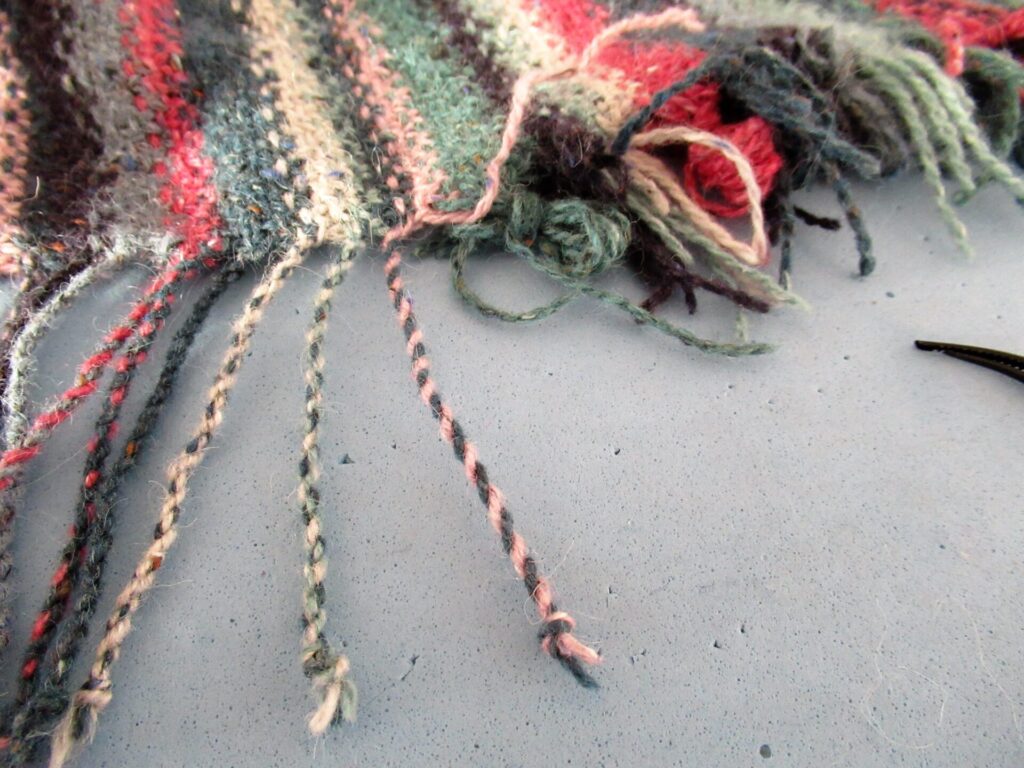
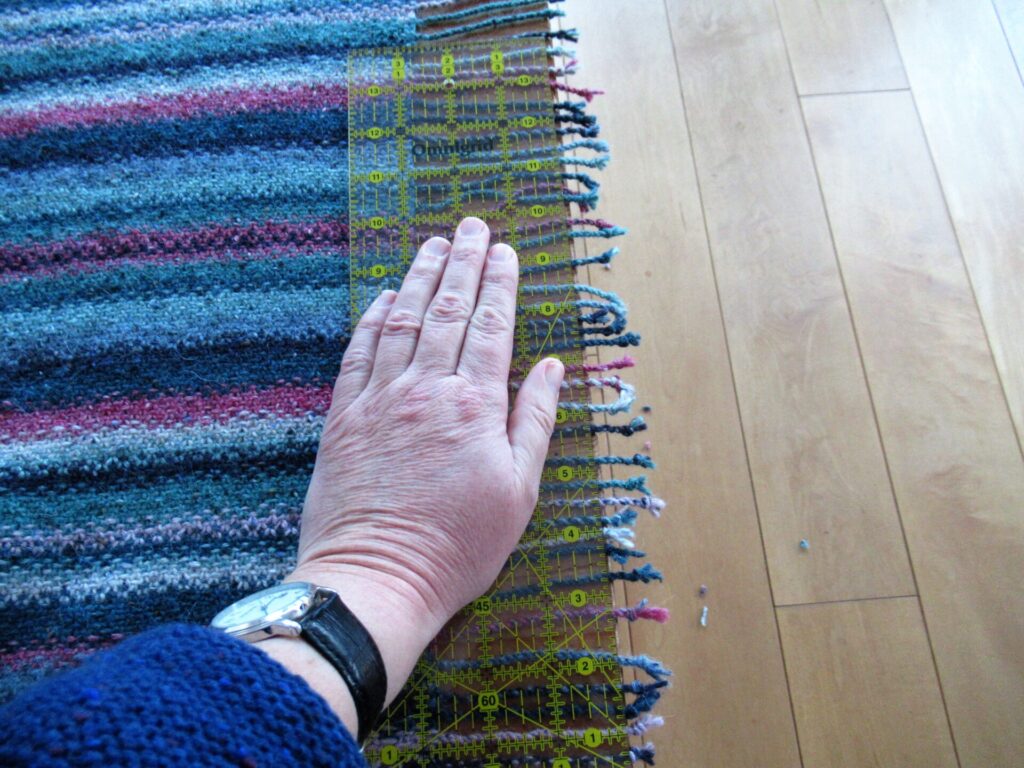
9) Place the wrap with one fringe on the end of a table top. Make sure that the wrap is placed straight and straighten out the tails. Then cut off the knots at the length of the shortest tail.
I used a quilting ruler to make sure I cut the tails off straight.
There, all done! This is a great finish for a scarf or wrap. It’s really lovely to see the colours combined differently in each tiny barber-pole tail.
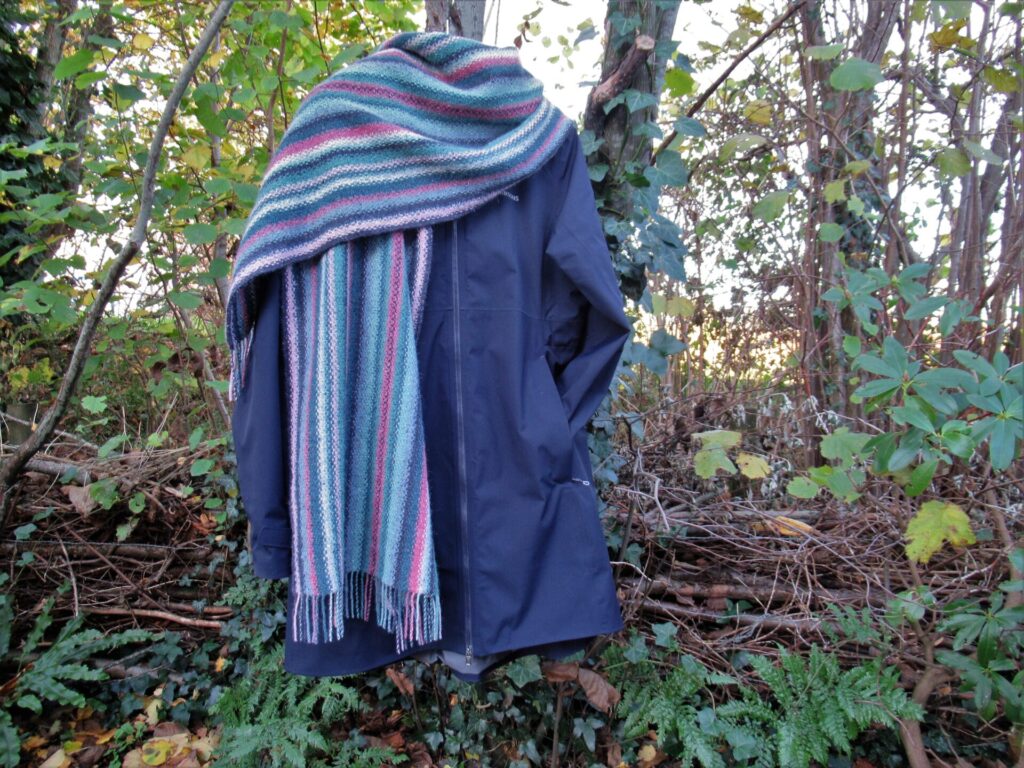
I’m really happy with this wrap and at the same time slightly sad that it’s finished. Many of the things I knit are for others, but I’m keeping this one. I’ve loved working on it and will miss the soothing rhythm of slipping and knitting, slipping and knitting many, many stitches.
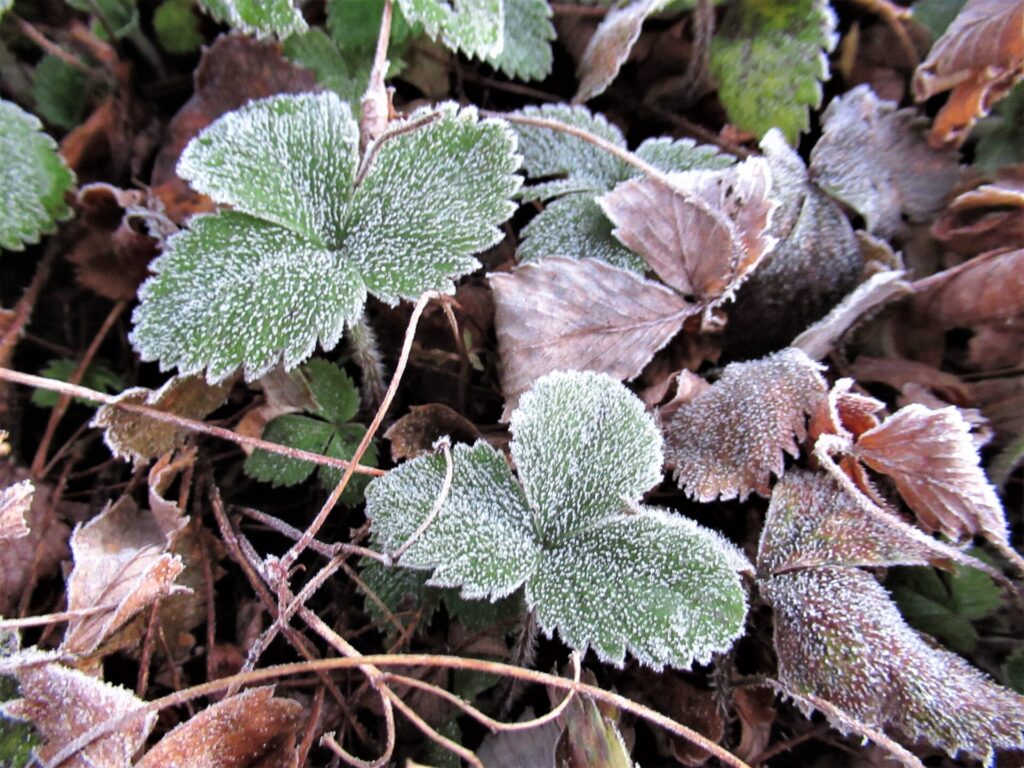
Now I’m hoping for colder weather so that I can wear it. It’s a strange autumn. The pelargoniums and lobelias in our outdoor pots are still flowering and it’s the end of November! Still, we’ve had some night frost…
… and more wintry weather is expected for this weekend.
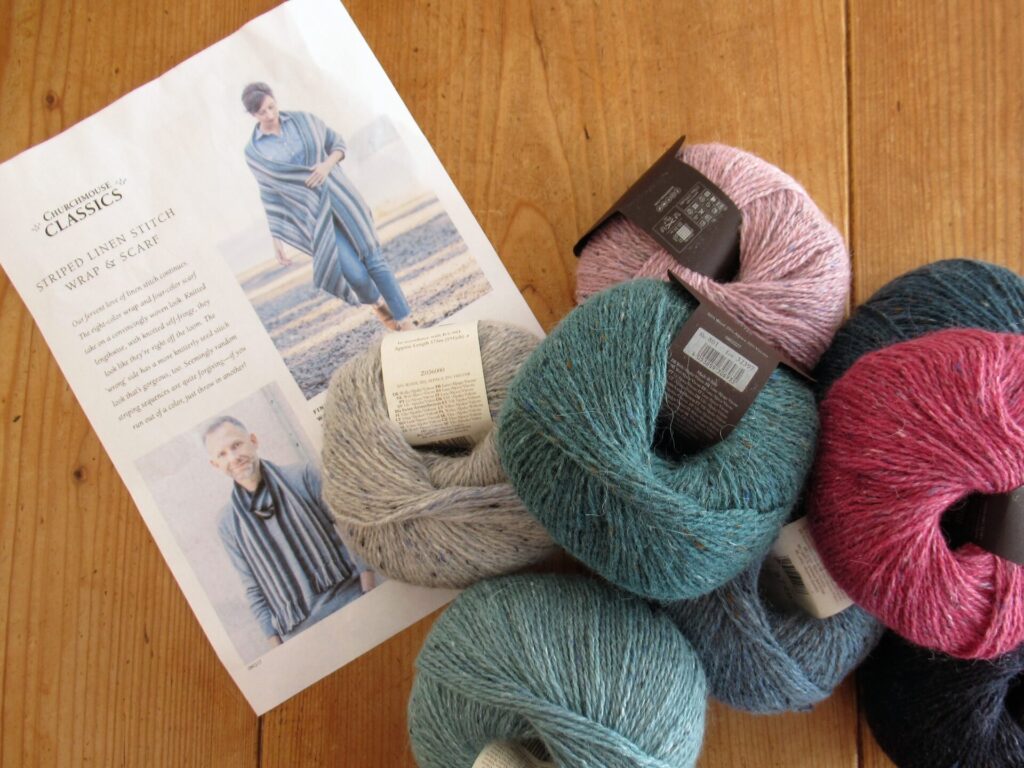
In case you’d like to knit a wrap like this, the pattern is called Striped Linen Stitch Wrap & Scarf (there is also a smaller scarf version) and can be found here on the designer’s website and here on Ravelry. The free adaptation for the twisted fringe can be found here.
Well, I hope that just looking at this warm wrap with its colourful fringe has warmed and lifted your heart a little. Take care! xxx
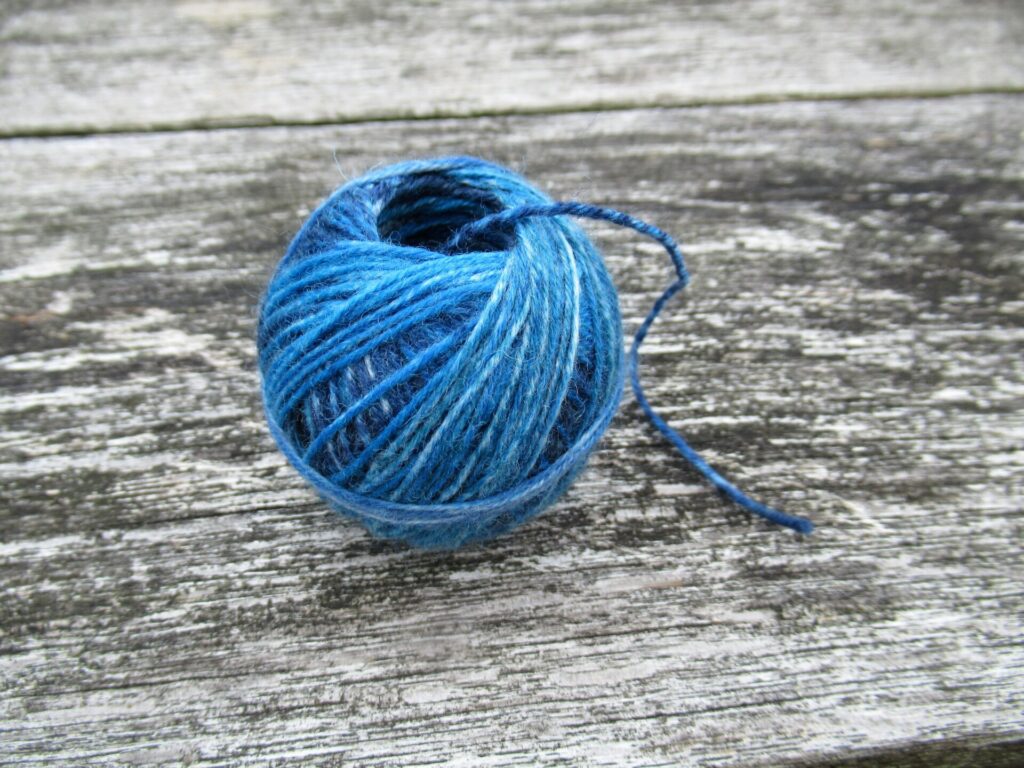
I have no idea how many people own and use a nøstepinne. Maybe you have owned and used one for years and what I’m writing today is nothing new. It’s for those of you who do not have one and maybe have never even heard of it that I’m writing about the What, Why and How of using and choosing a nøstepinne.
What is a nøstepinne?
Nøstepinne is a Scandinavian word that can also be spelled as nöstepinne, nystepinne or nøstepinde, depending on whether you are in Norway, Sweden or Denmark. It is often translated as ‘nest stick’, but that is just silly. As far as I know, nöste or nøste means ball of yarn. And my Swedish-English dictionary tells me that ‘nysta’ means ‘to wind’, or ‘make up into balls or a ball’. Pinne means pin or stick. So nystepinne (or however it’s spelled) simply means ‘ball winding stick’. And that is what it is, a stick for winding yarn balls on.
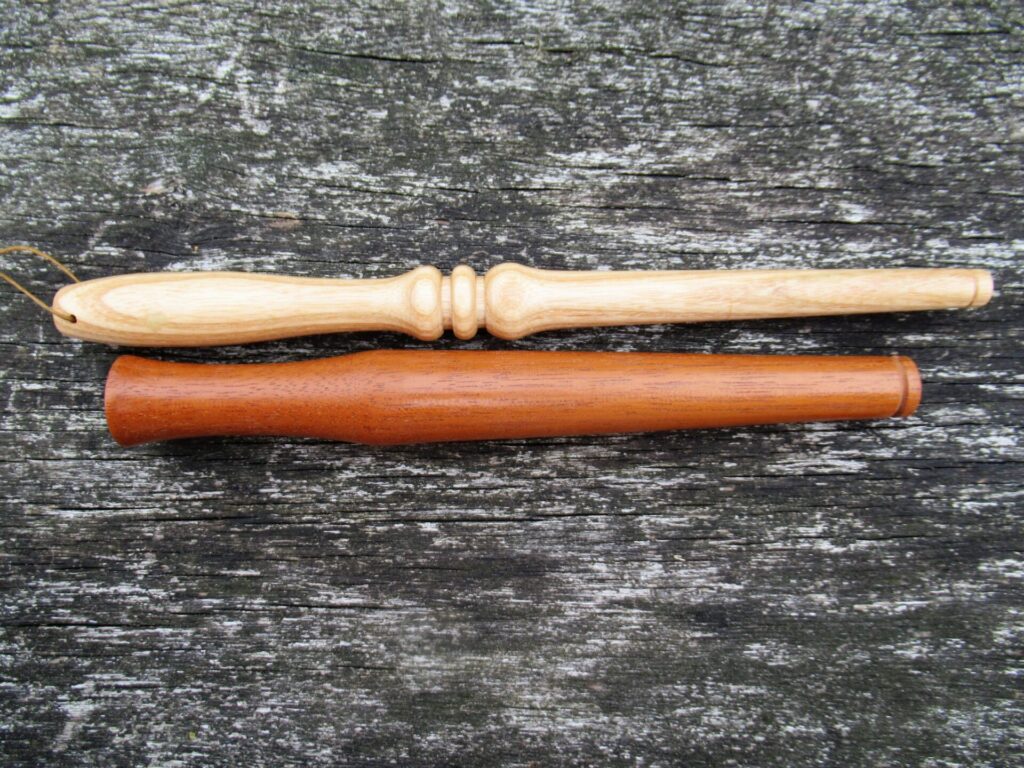
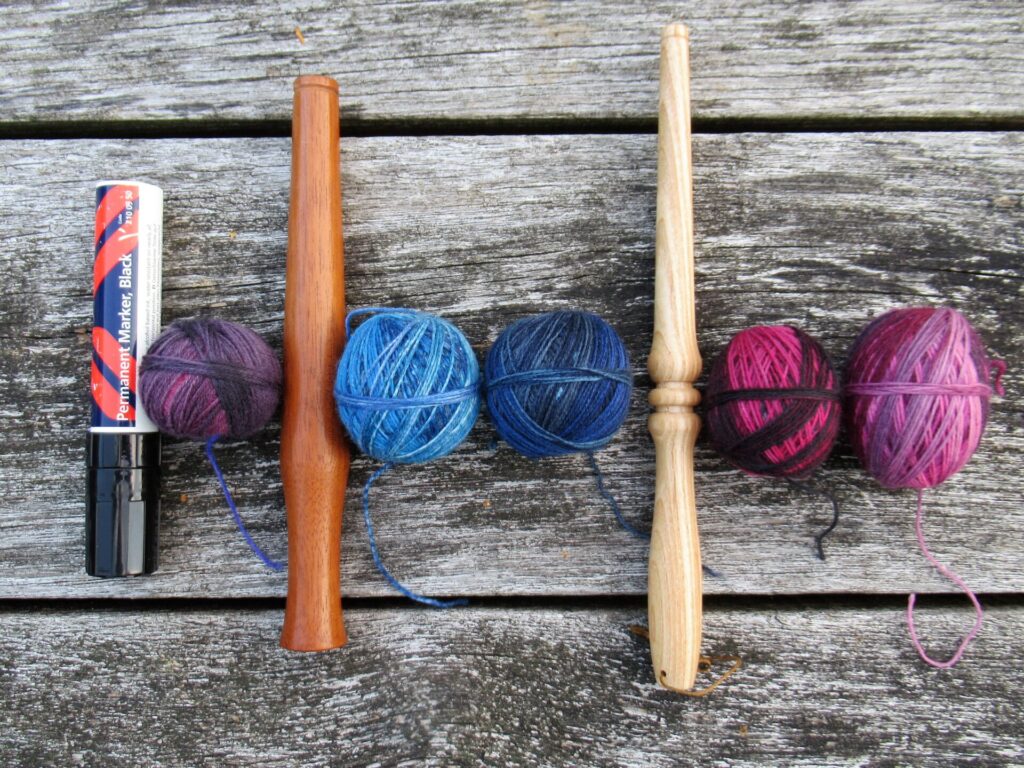
I am the proud owner of two nøstepinner:
The darker coloured one is a souvenir from Shetland that I’ve had for almost a decade. I think it was hand-made by a Shetland woodworker, but it didn’t come with any information about the name of the maker or the type of wood used. The lighter coloured one is from ChiaoGoo and is a recent acquisition.
KnitPro also has nøstepinner and there are many lovely handmade ones to be found on Etsy.
Why use a nøstepinne?
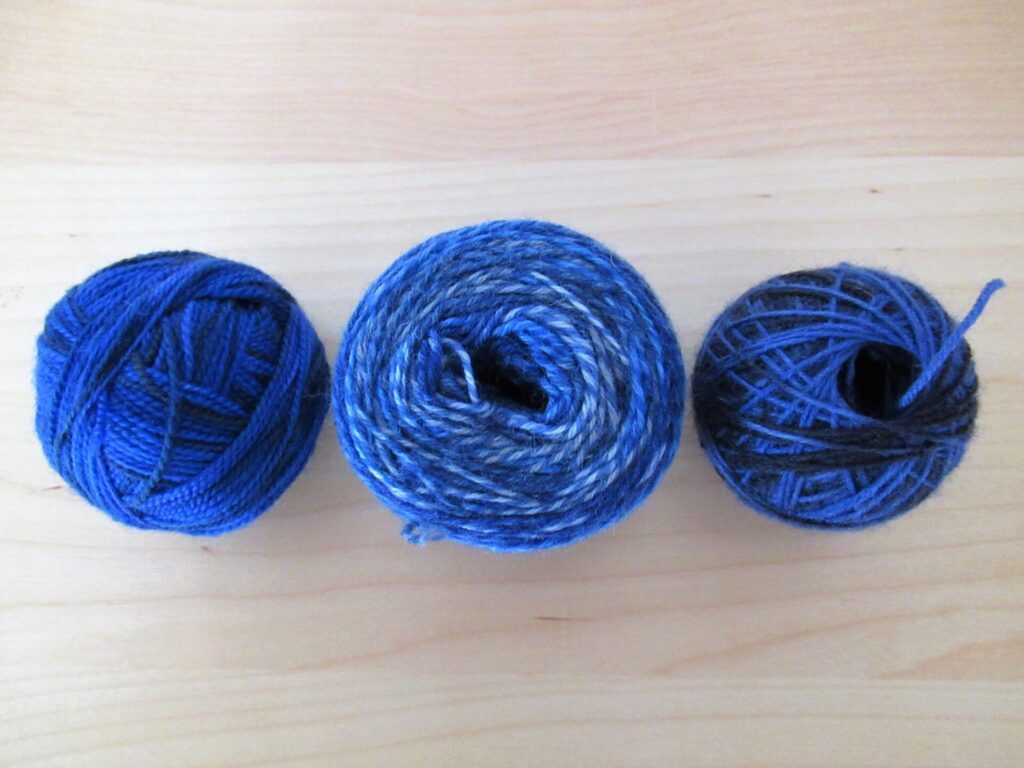
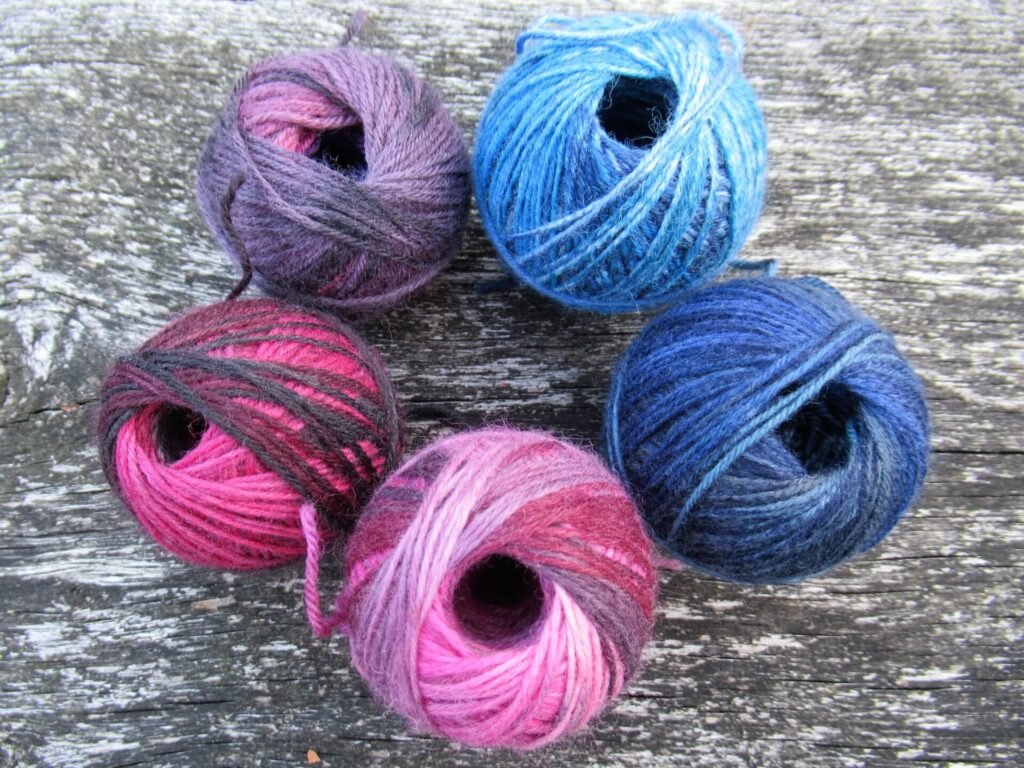
Before answering that question, here is a picture of 3 balls of yarn wound in different ways viewed from above:
From left to right: an ordinary hand-wound ball, a yarn ‘cake’ wound on a cranked ball winder, and a ball wound on a nøstepinne. Each method has it’s pros and cons. So why use a nøstepinne?
It makes centre-pull balls. This can be useful for various reasons; to name a few:
The ball doesn’t roll away if you use the thread from the inside.
It is possible to knit with two threads held together, one from the inside and one from the outside of the ball
In spinning, a 2-ply yarn can be made by plying the thread from the inside with the thread from the outside. A cranked yarn winder also makes centre-pull balls, winding yarn by hand without a nøstepinne does not.
It is slow. Much, much slower that using a cranked yarn winder and also slower than winding a ball in the ordinary way. Is that an advantage? If you ask me, absolutely! Winding yarn into a ball with a nøstepinne is a meditative, peaceful thing to do. It is good for the soul.
It is easy to take along and can be used anywhere.
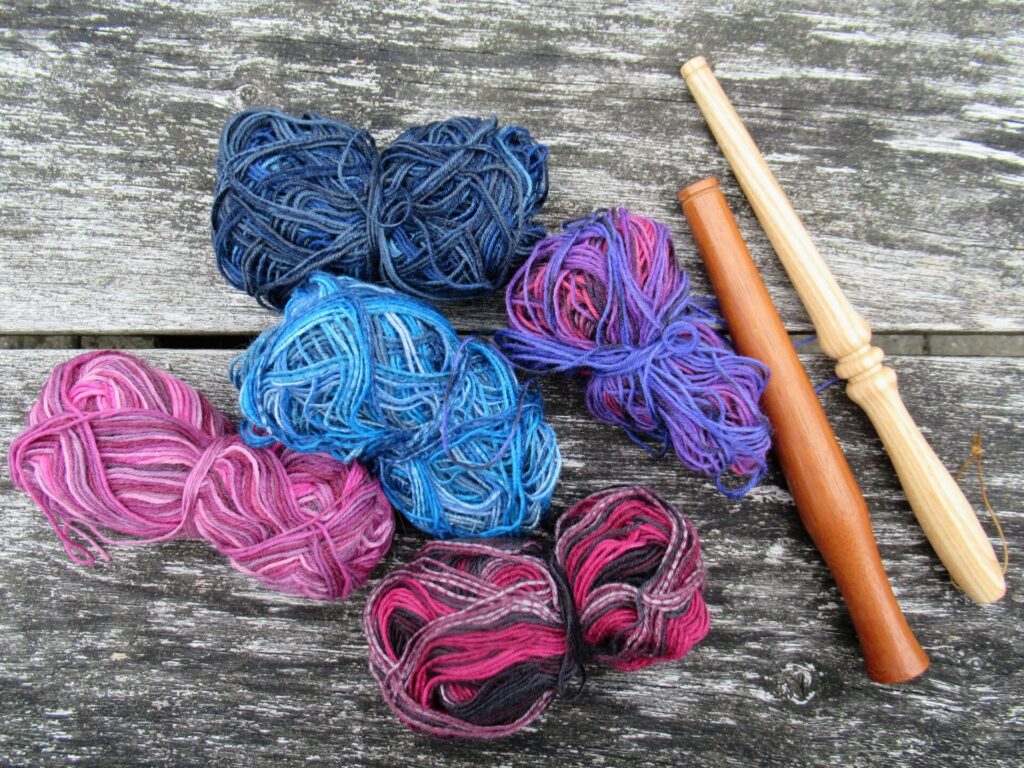
It makes wonderfully aesthetically pleasing balls of yarn. Again, good for the soul. Just look at the before and after pictures of some sock yarn remnants below and I think you know what I mean.
Before
After
How to use a nøstepinne
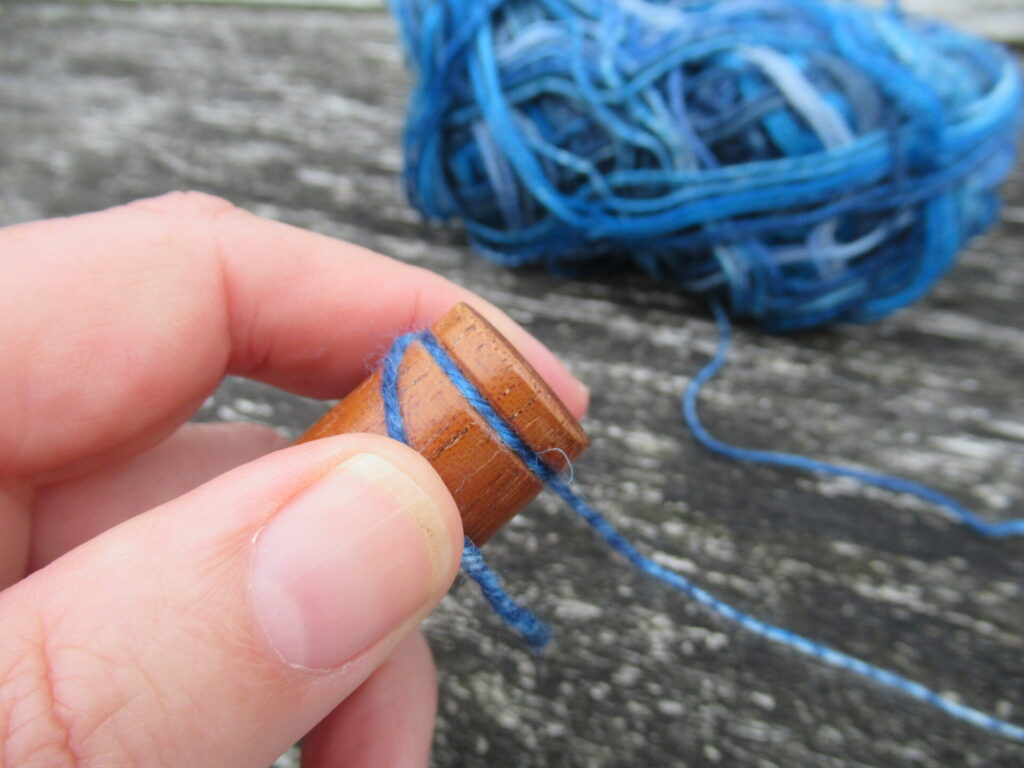
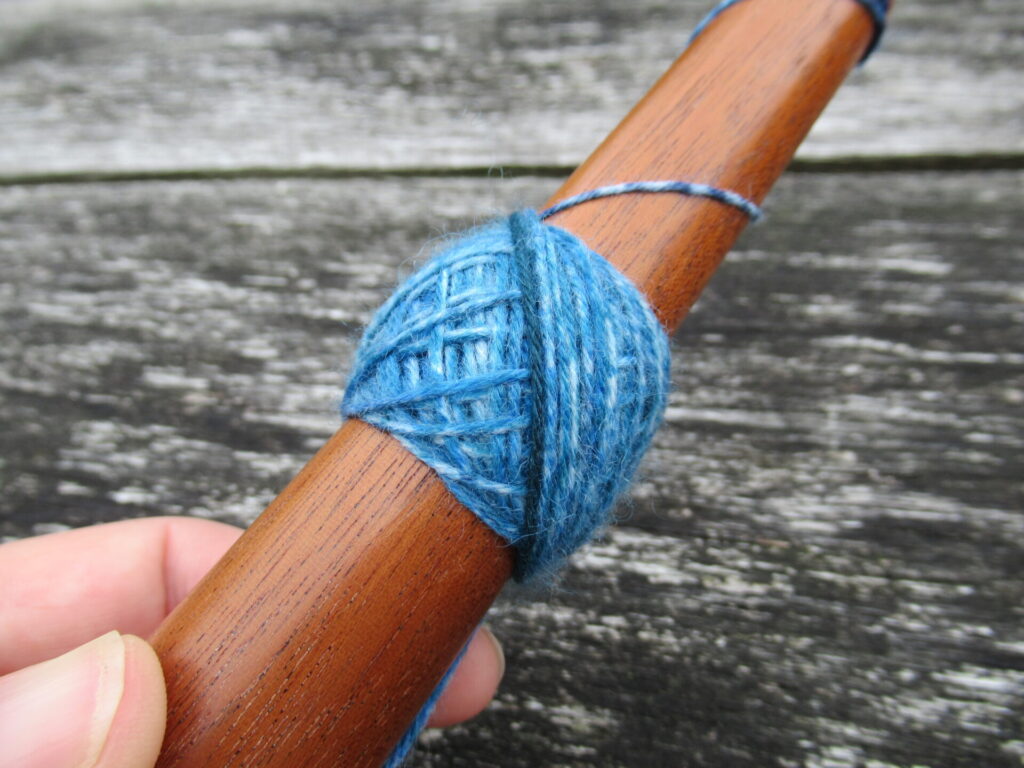
First wrap the yarn several times around the thin notch at the top of the nøstepinne. (If it doesn’t have a notch, make a loop at the top, or hold the yarn in place with your thumb near the other end of the nøstepinne.)
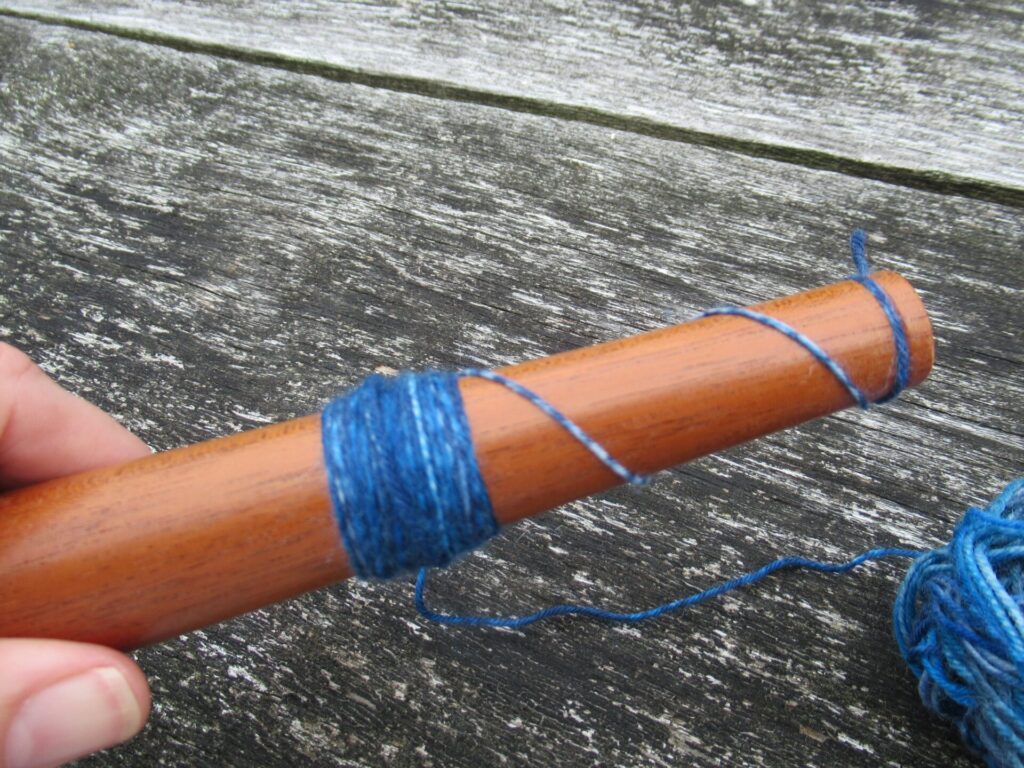
Then wrap the yarn around the shaft of the nøstepinne as shown below. Wrap 4 or 5 layers of yarn around a width of about 2.5 cm (1 inch).
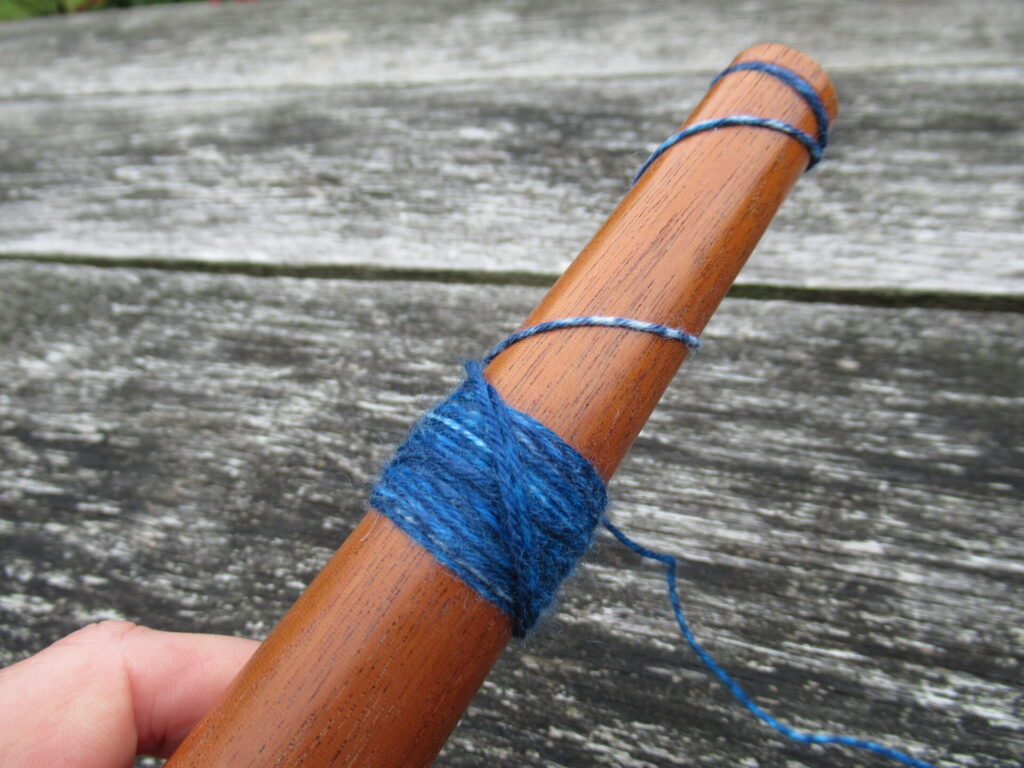
Now start winding the yarn around this beginning diagonally, from bottom right to top left. Keep winding in the same direction all the time, while slowly turning the nøstepinne towards you.
A brief video by Ann Kingstone showing the process very clearly can be viewed here. Her method is slightly different from mine. That’s fine – everybody develops their own technique over time.
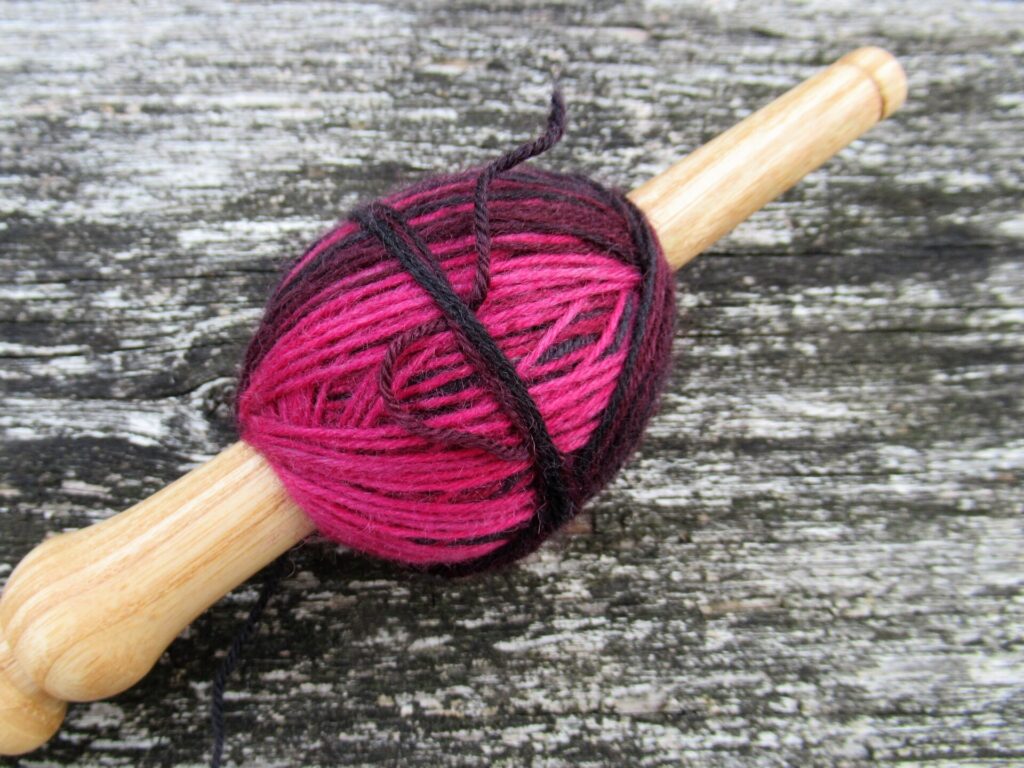
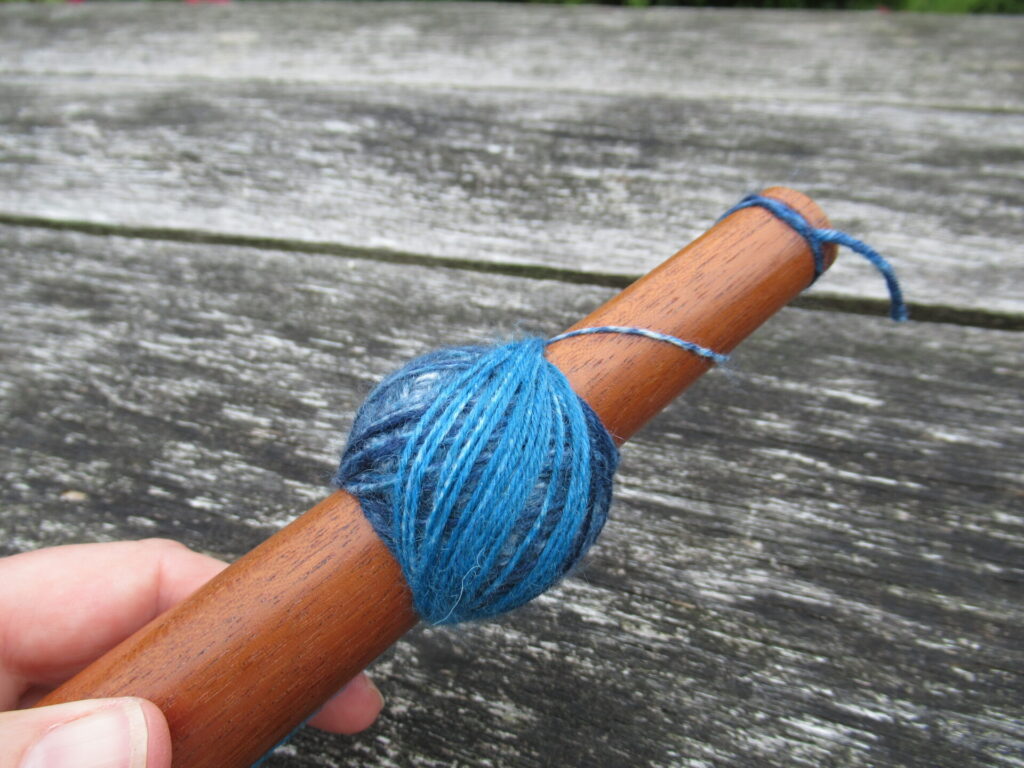
Watch your little ball grow…
… and grow.
Especially with self-striping yarn it is very satisfying to see layer upon layer of yarn build up on your nøstepinne.
Finally, when you’re almost at the end of your yarn, wrap the yarn around horizontally several times, tuck the end in under the horizontal strands, and remove the ball from the nøstepinne.
Nice, no?
How to choose a nøstepinne
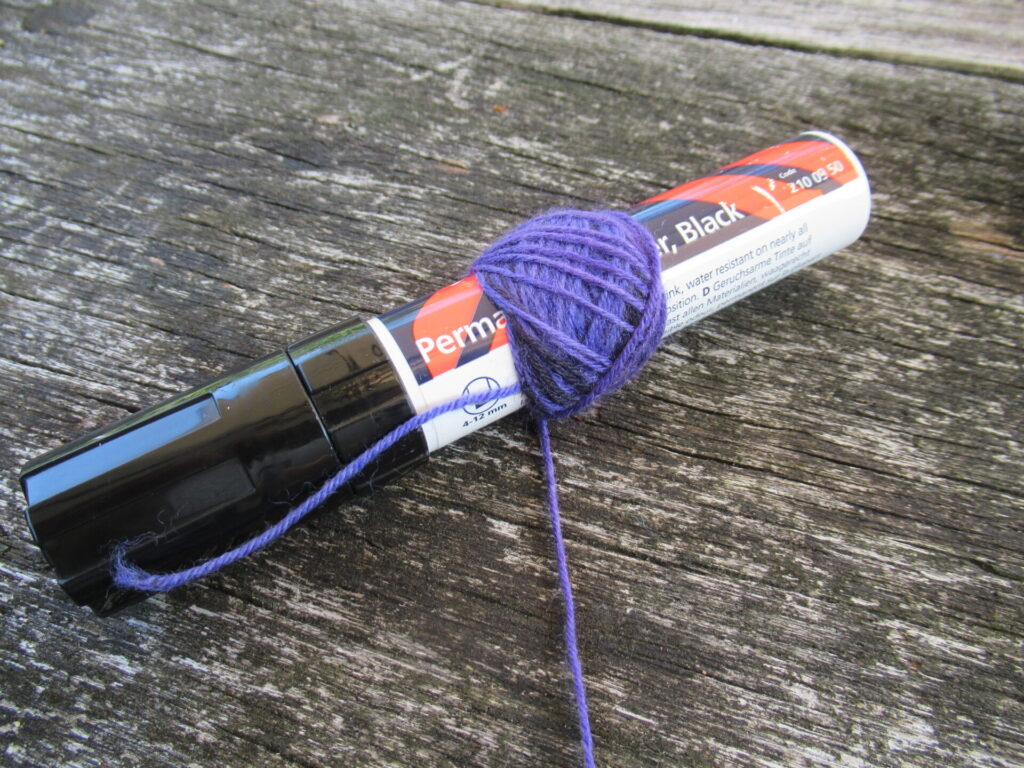
You don’t really need a ‘real’ nøstepinne to begin with. To try out whether you like making yarn balls in this way, other things that can be found in any home can be used, like the inner tube from a roll of cling film or aluminium foil, or a thick marker:
A real wooden nøstepinne is much nicer to the touch, of course. So if you like winding balls in this way and decide to go looking for a wooden one, here are some things to consider:
The smoothness of the wood
The colour – do you prefer lighter or darker wood?
The style – simple or more elaborately turned
The size – in my experience a thicker nøstepinne is easier for a beginner; when starting a ball, it is harder to make the yarn catch behind the horizontal beginning on a thin nøstepinne
The ball shape – the thicker the nøstepinne, the rounder the ball, and the thinner the nøstepinne the more egg-shaped the ball tends to become:
Well, that’s all I can tell you about nøstepinner. If you’d like to try making yarn balls in this way, too, please take your time. It is really simple, but it takes a little practice for it to become a natural, flowing movement. I hope you’ll enjoy making these neat balls of yarn as much as I do.
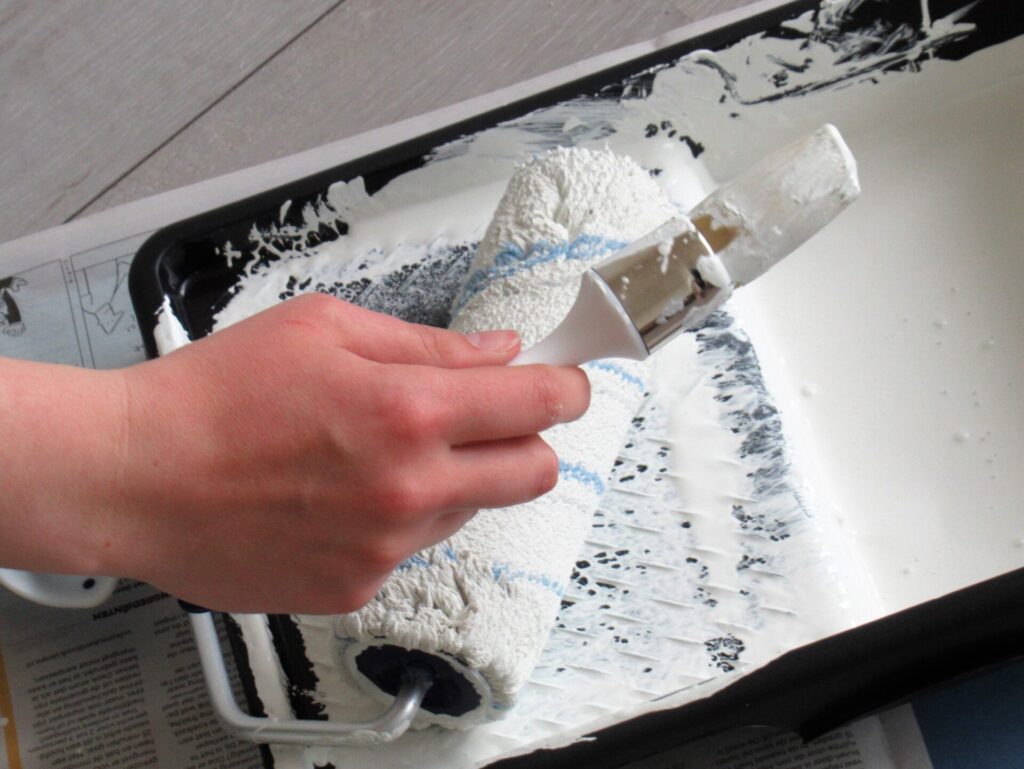
It’s good to be back here after a busy and bumpy couple of weeks. What with several ups and downs, keeping up with everyday life, and helping our daughter and her boyfriend husband paint their new home…
…there hasn’t been much progress on the knitting front. All I’ve done is knit row after comforting row on my Striped Linen Stitch Wrap.
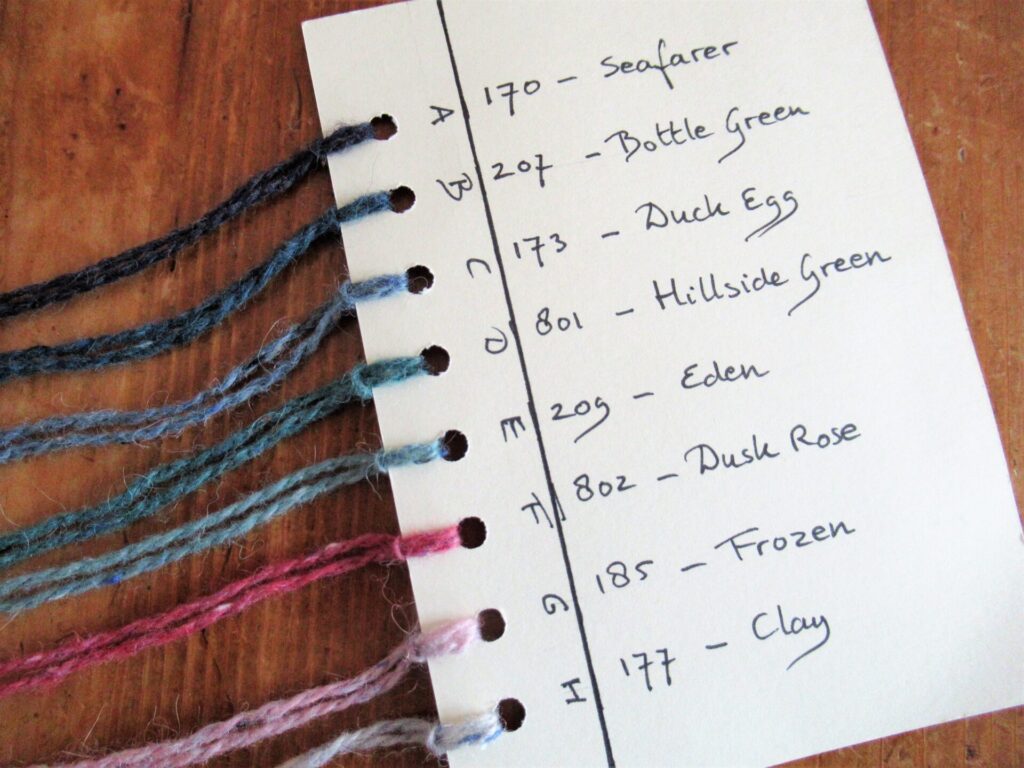
So, I thought I’d write about that a bit. I’m knitting it in 8 colours of Rowan Felted Tweed. Different colours from the ones used in the pattern, but I’ve tried to find the same balance between darker and lighter shades. I chose 5 blues/greens, 2 pinks and 1 grey.
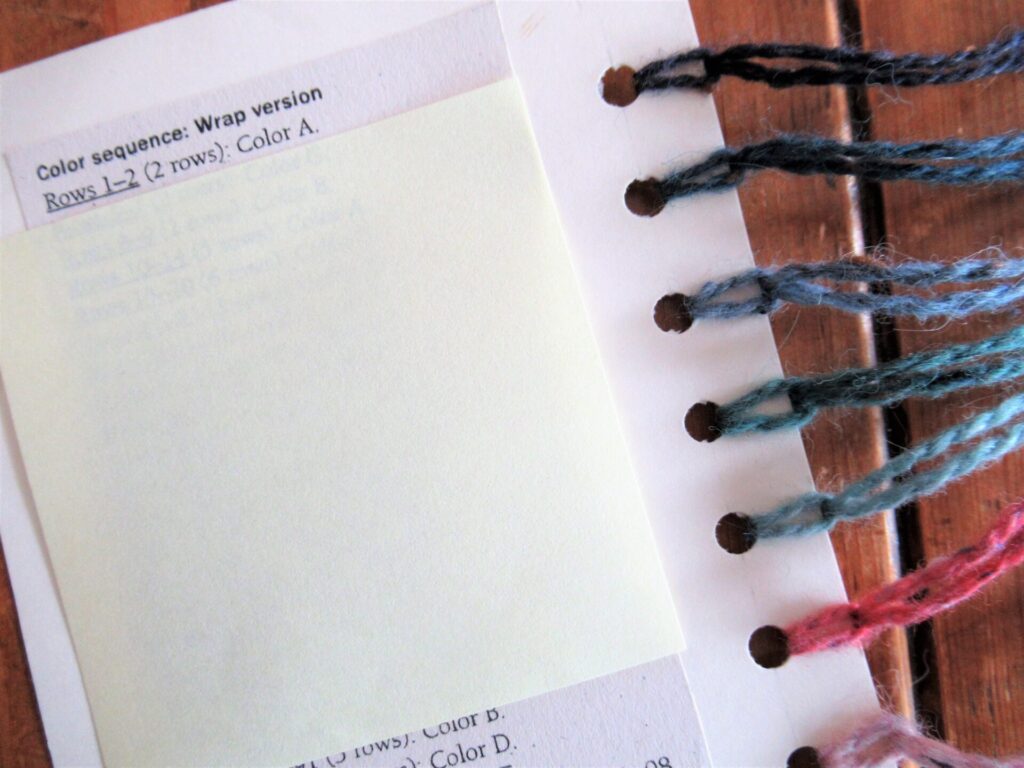
Because some of the blues and greens are hard to distinguish in the evenings, I decided to make a colour card, similar to embroidery floss organizer cards. With the colours from A-H with their names on the front…
… and the description of the stripe sequence cut out from the pattern glued to the back. I’m using a sticky note to keep track of where I am in the pattern.
Making the card was a fun little project, and it turned out to be a handy tool. A great idea for multi-colour knitting, if I say so myself. I used a standard blank 10.5 x 5 cm (5¾ x 4¼”) correspondence card, measured out the places for the holes with a ruler and pencil, and punched the holes with an ordinary 2-hole punch held at an angle to make one hole at a time.
This linen stitch wrap starts with a provisional cast-on, which will be unravelled later to knit an I-cord along the entire length. I think the best-know type of provisional cast-on is picking up stitches from a crocheted chain – the method I used for my Thús loop.
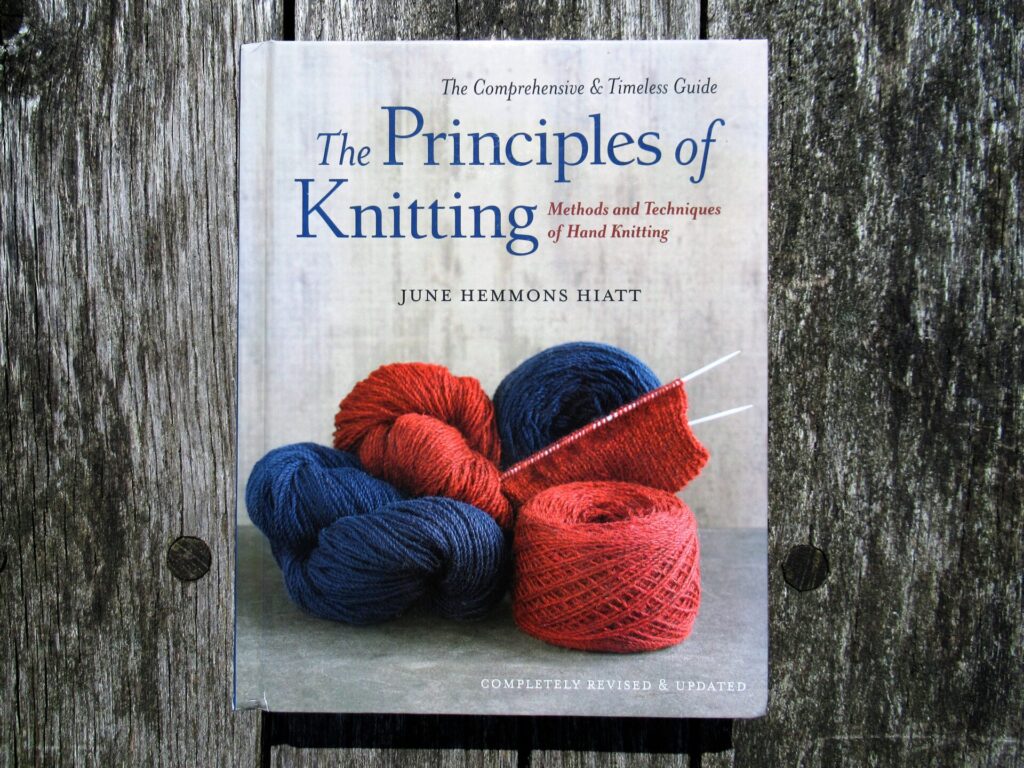
The method used for this wrap, just called ‘provisional cast-on’ in the pattern, is a little more sophisticated. In June Hemmons Hiatt’s 2 kg/712 page tome The Principles of Knitting it is called ‘Hook and Needle Chained Cast-On’.
If you’re like me and are interested in all kinds of cast-ons and bind-offs, edge stitches, increases and decreases, etc. etc. this is definitely a book for your Birthday or Christmas wish list.
I’ve taken pictures of the Hook and Needle Chained Cast-On as I went along, hoping it might be helpful and interesting to other knitters. The method uses a knitting needle, a crochet hook and a piece of smooth waste yarn. This is how it’s done step by step.
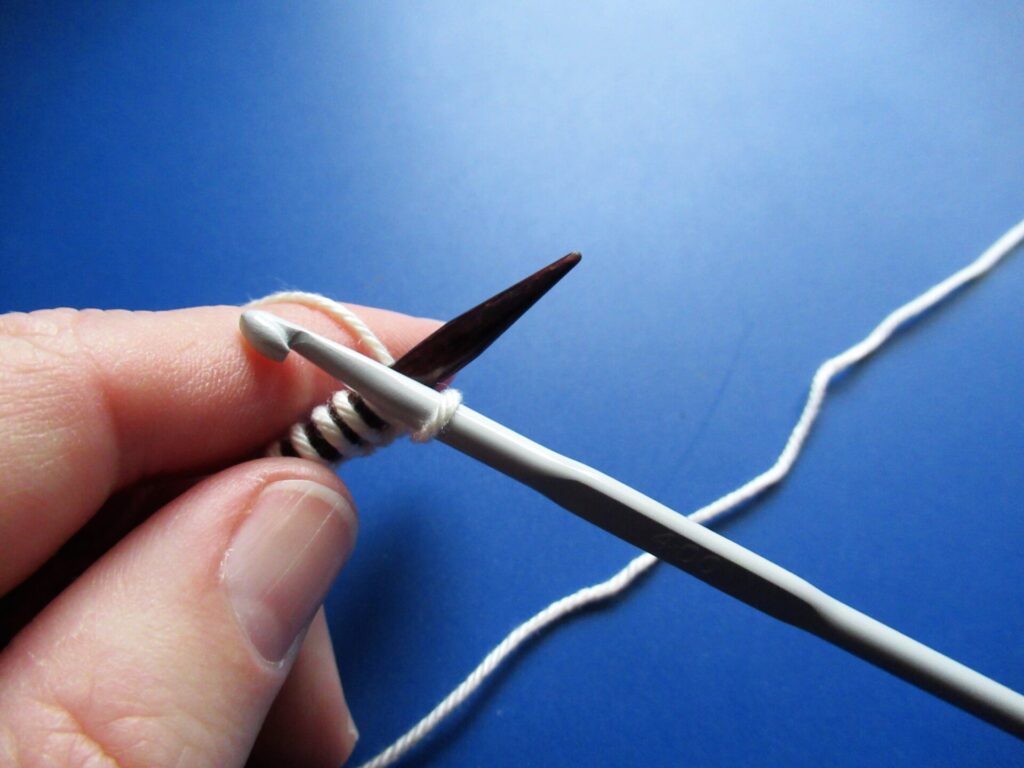
First of all, make a slip knot in the waste yarn and place it on the crochet hook. (I took my pictures after I already had a few stitches on my needle.)
Hold the knitting needle in your left hand, crochet hook in your right hand, and waste yarn over your left index finger. Knitting needle and hook form an X. The crochet hook is in front and the yarn runs behind the knitting needle.
Wrap the yarn around the crochet hook…
… and pull the yarn through the loop.
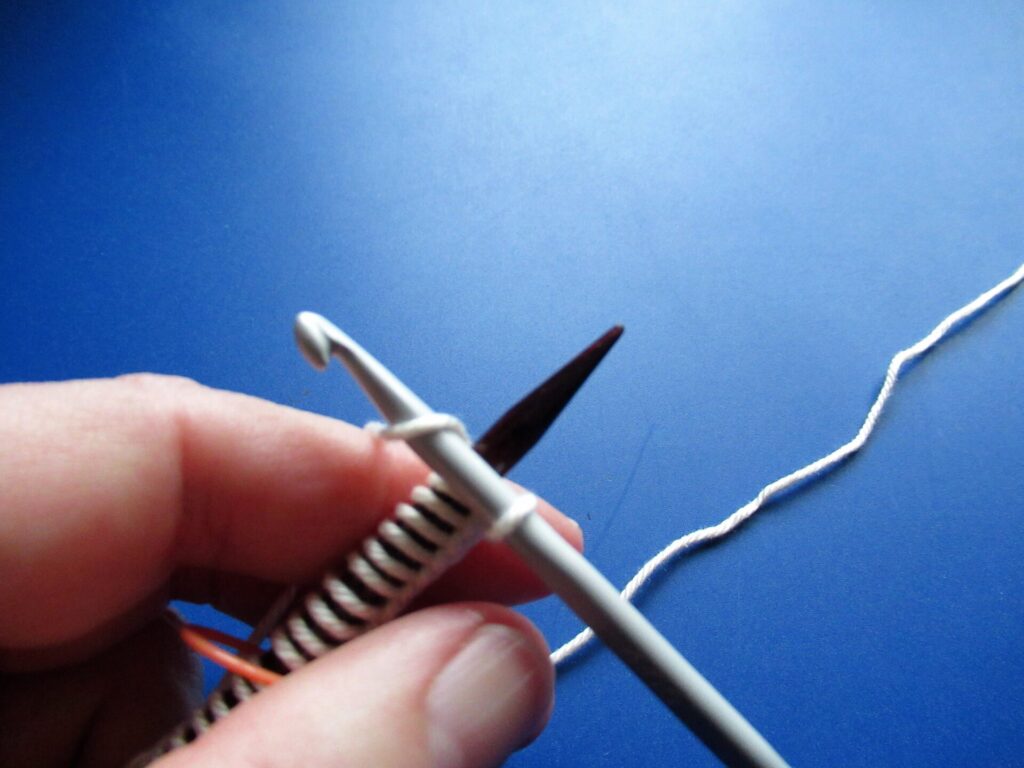
With your finger, or with the help of your hook, return the yarn under the needle and to the back. Now it is in the same position as in step 1.
Repeat steps 1-4 until the required number of stitches is on the needle. The stitches end up on the needle like any knitting stitches, with a neat row of chains running along the length of the knitting needle. This is very easy to unravel later on.
For my wrap, I needed to cast on 400+ stitches. I didn’t time myself, but I think it took me about two hours. Phew! But I know it’s worth the time and effort.
The stitch markers (picture below) are there to make counting this large number of stitches easier. I removed them as soon as I started knitting.
This was meant to be a project I would only work on in between projects requiring more attention. But the long rows of linen stitch are so addictive that I’m over halfway already. The white stitches along the bottom are the provisional cast-on.
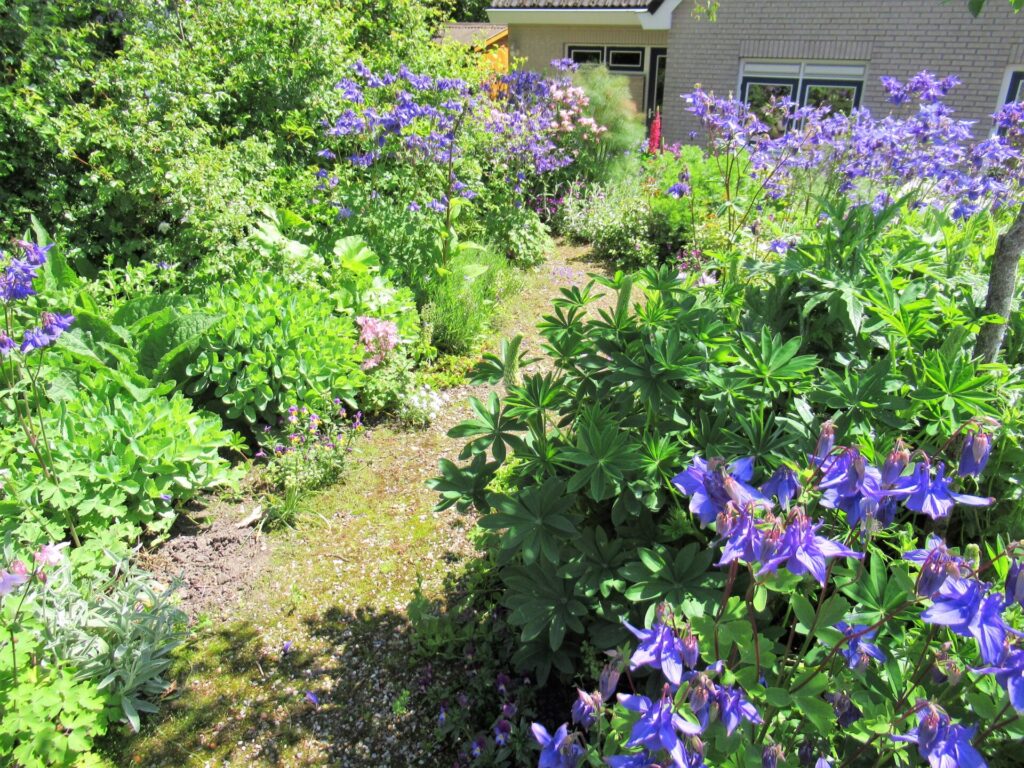
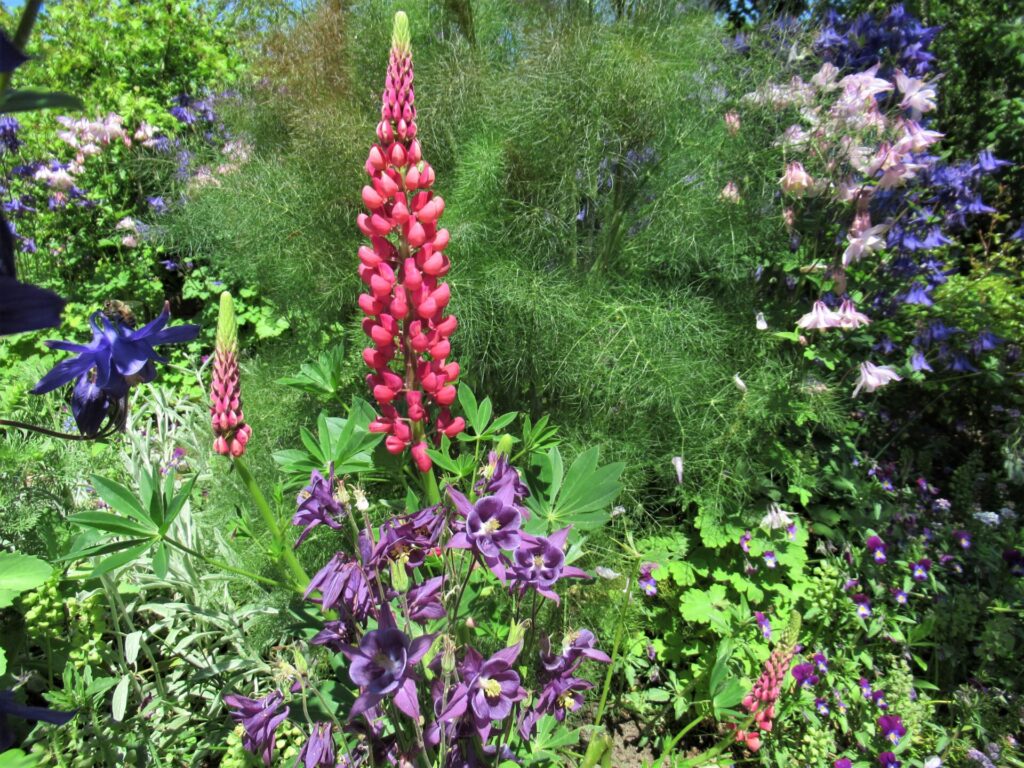
I’m going to put it aside for a while now, though, because after a rainy and cold spring, it suddenly feels like summer! Thanks to all of the rain, our front garden is a sea of lush greenery, with white, pink and purple aquilegias…
… and here and there a lupin.
It’s far too hot to have a large woolly wrap on my lap now. My mind is already bubbling with ideas for projects for summery temperatures, but I also think I should finish a few things before I start anything new. Last week, I thought I had run out of ideas and things to write about, and now I don’t know what to do first or last. I’m so glad it was only a temporary slump.
I hope your life is moving along without too many bumps in the road. See you again next week (if I don’t get held up or sidetracked again)!
Well, it’s been quite an eventful week on a national and global level, what with the resignation of our government, the inauguration of a new POTUS, and the introduction of a curfew and other stricter measures here. I frequently needed to remind myself to keep breathing.
On a personal level, one uneventful week follows another. And that’s a good thing in a way – it means that we’re OK.
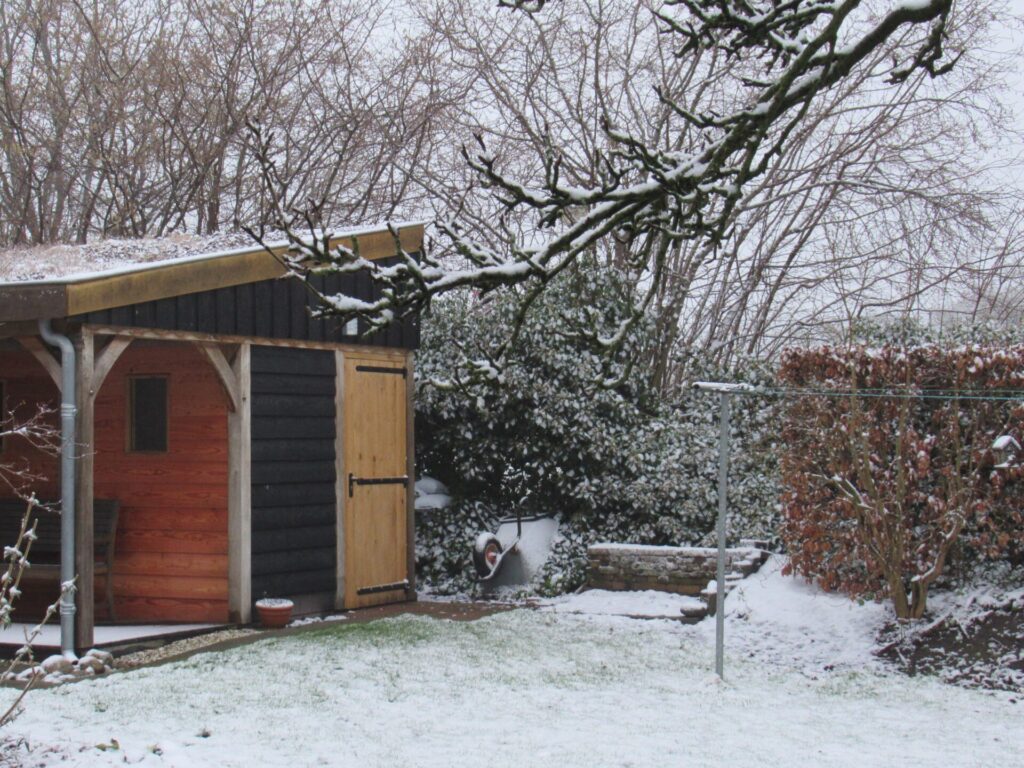
THE event of our past week was SNOW! Last Saturday it started snowing in the evening, when it was already dark. On Sunday morning, I could hear rain drops pattering on the roof, but the garden still looked lovely with its thin white blanket.
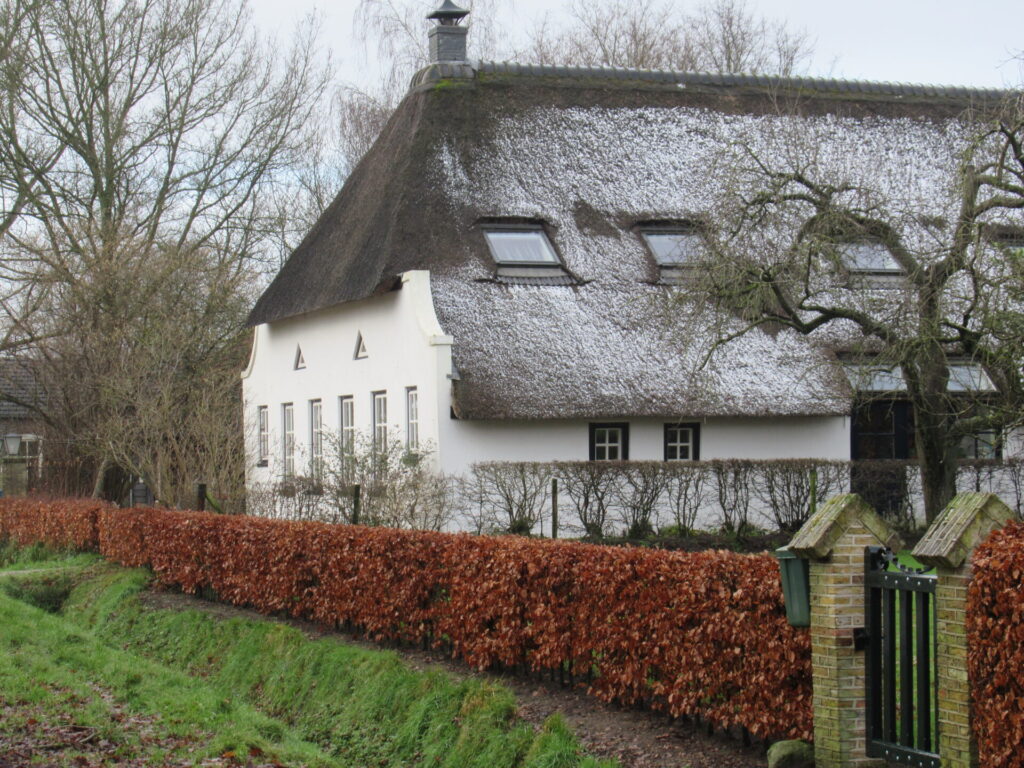
When I went for a bicycle ride after lunch, there were just a few patches of snow left. It stayed longest on the thatched roofs of some farmhouses.
An hour or two later all of the snow had gone.
Ah, well, it was lovely while it lasted. Snow days are a rare pleasure.
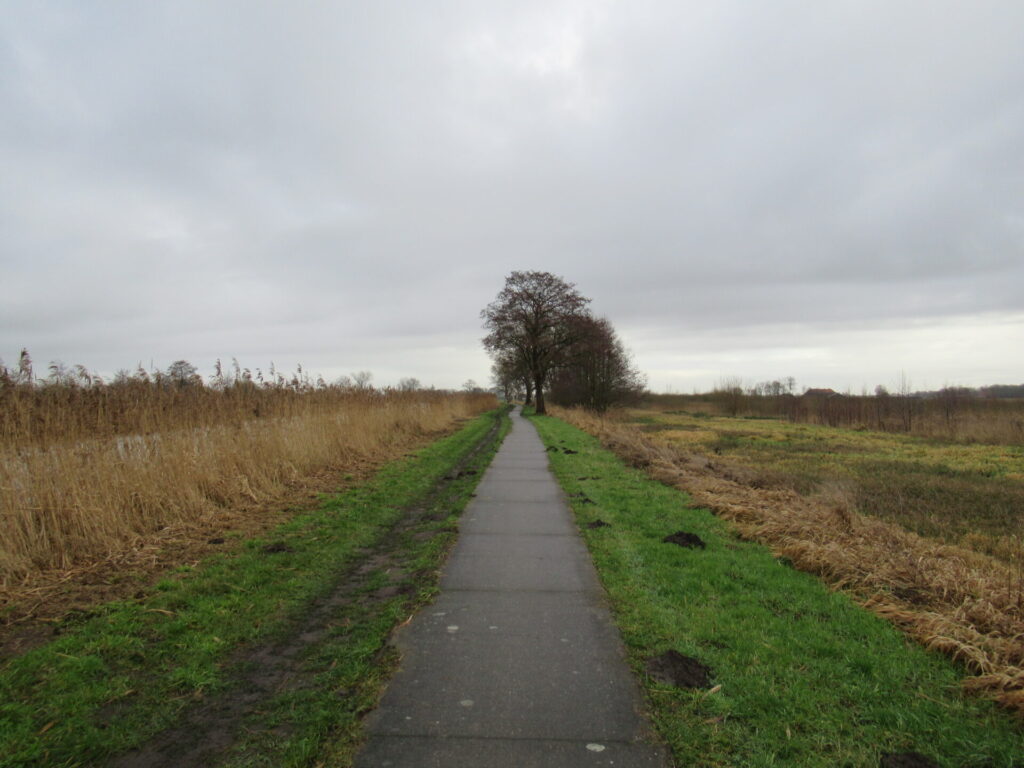
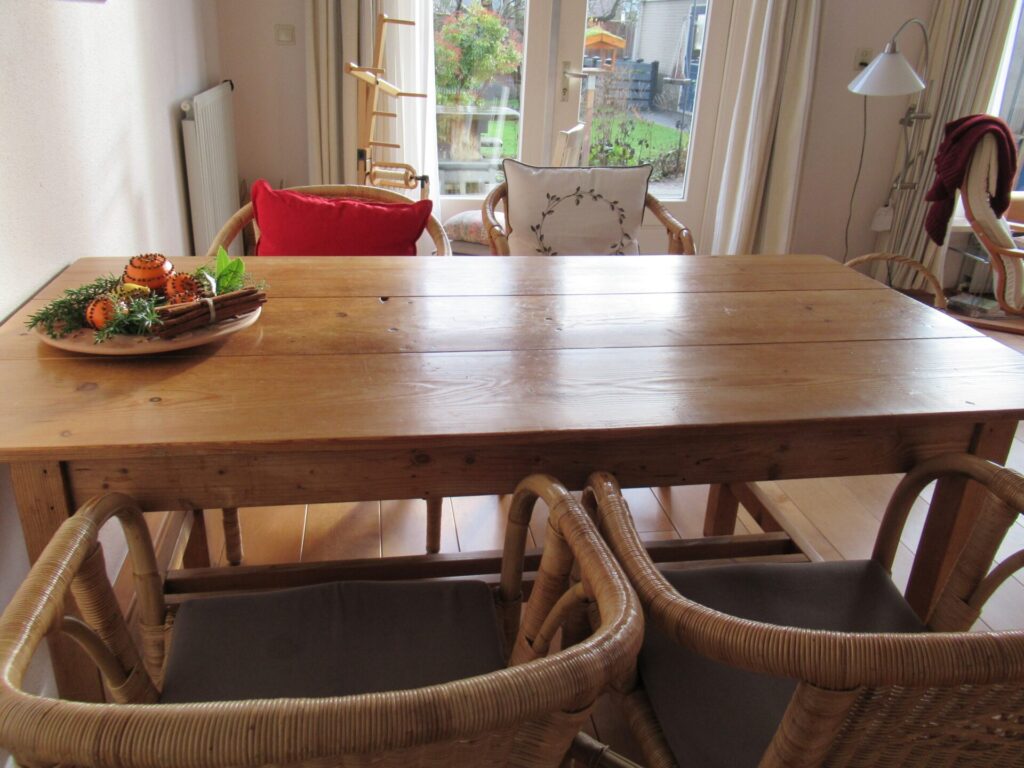
Now we’re back to more ordinary January days – dark, windy and rainy. A good time to bring some sunshine inside.
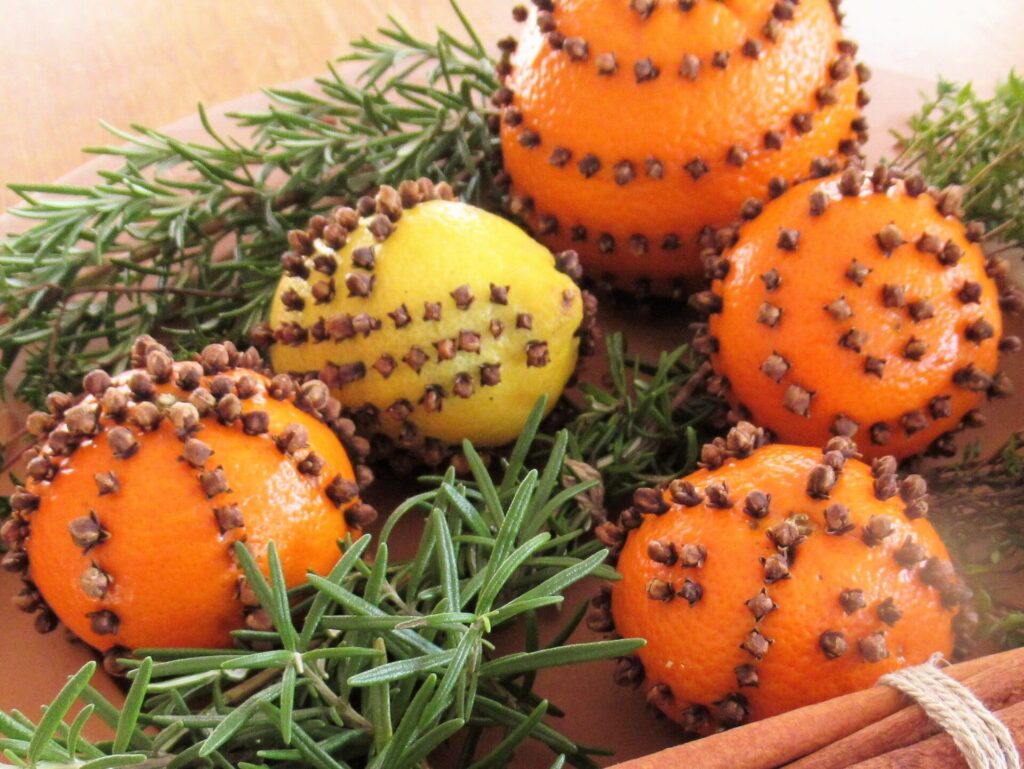
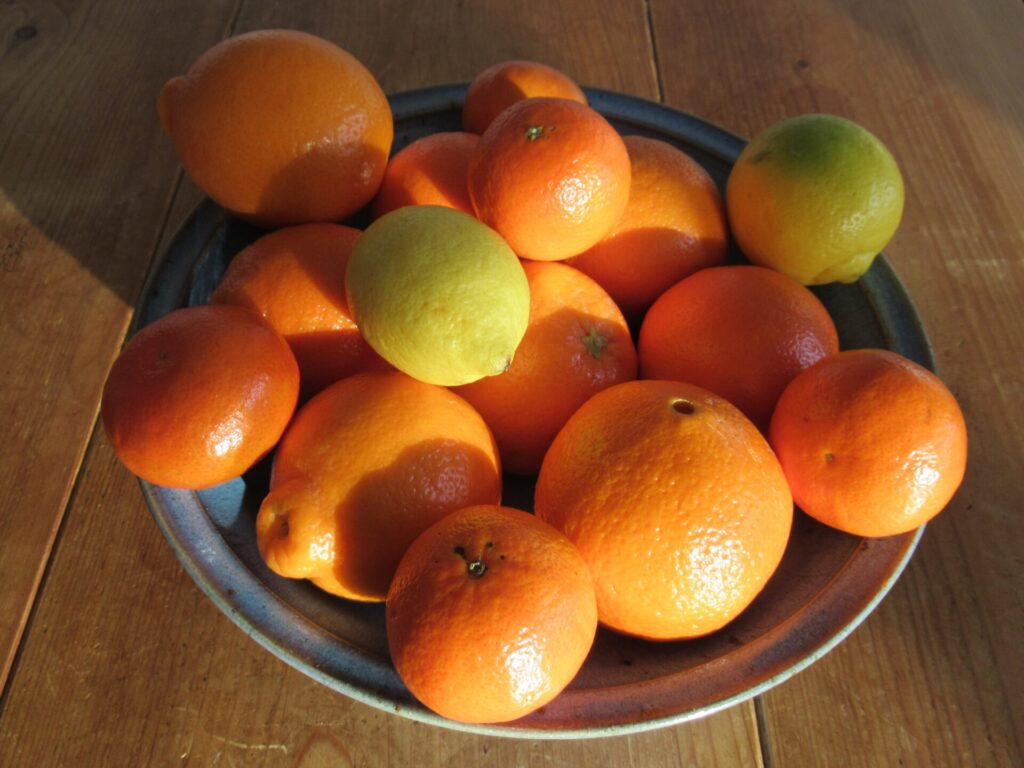
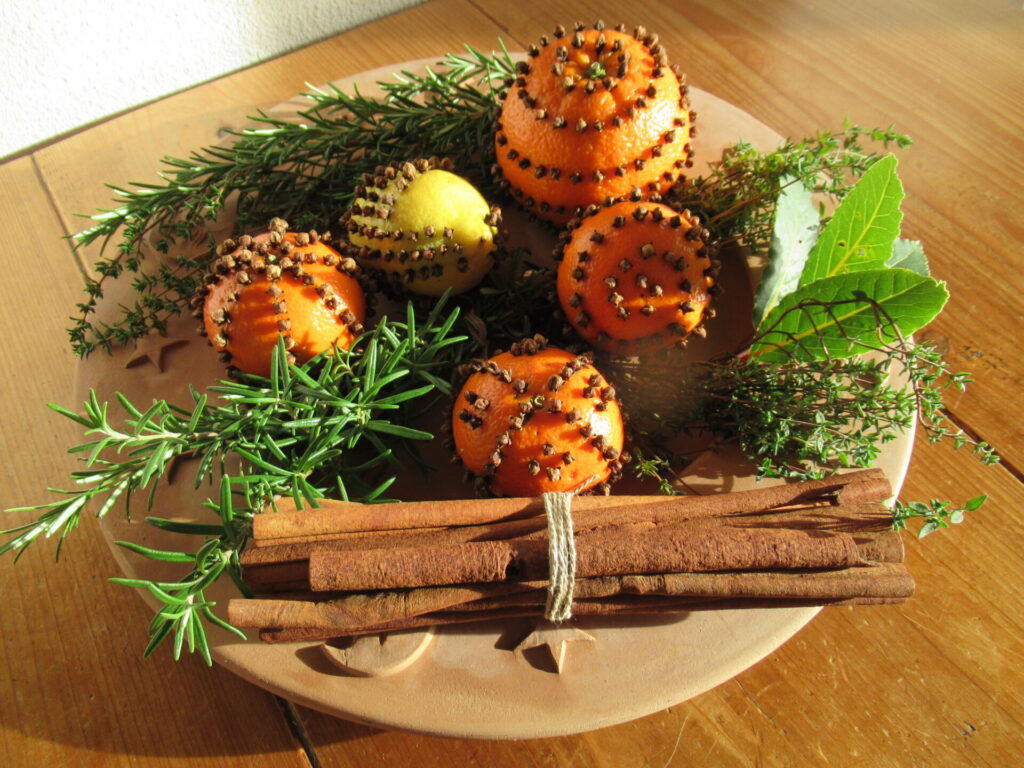
To do that, I filled a large platter with decorated citrus fruit, taking pictures during the process to share here. (I was lucky that the sun peeked out from behind the clouds now and then, giving the fruit a cheerful glow.)
It all starts with gathering everything that is needed. First of all, different kinds of citrus fruit.
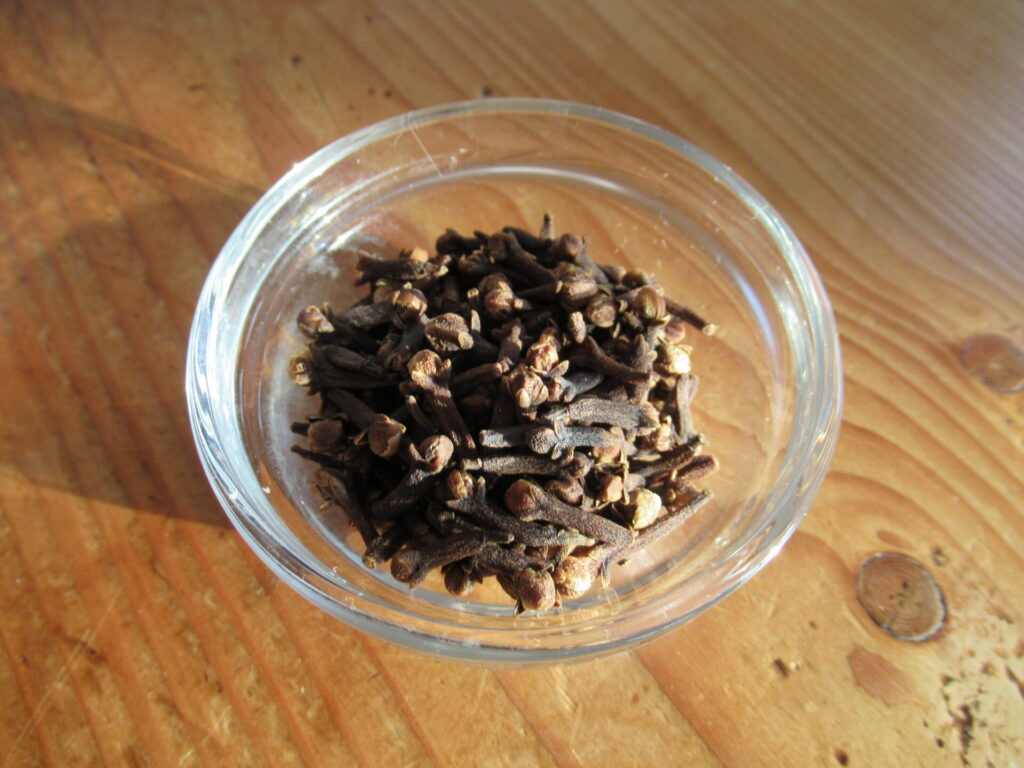
Lots and lots of cloves. (For 1 orange, 1 lemon and 3 tangerines I used 45 grams of cloves.)
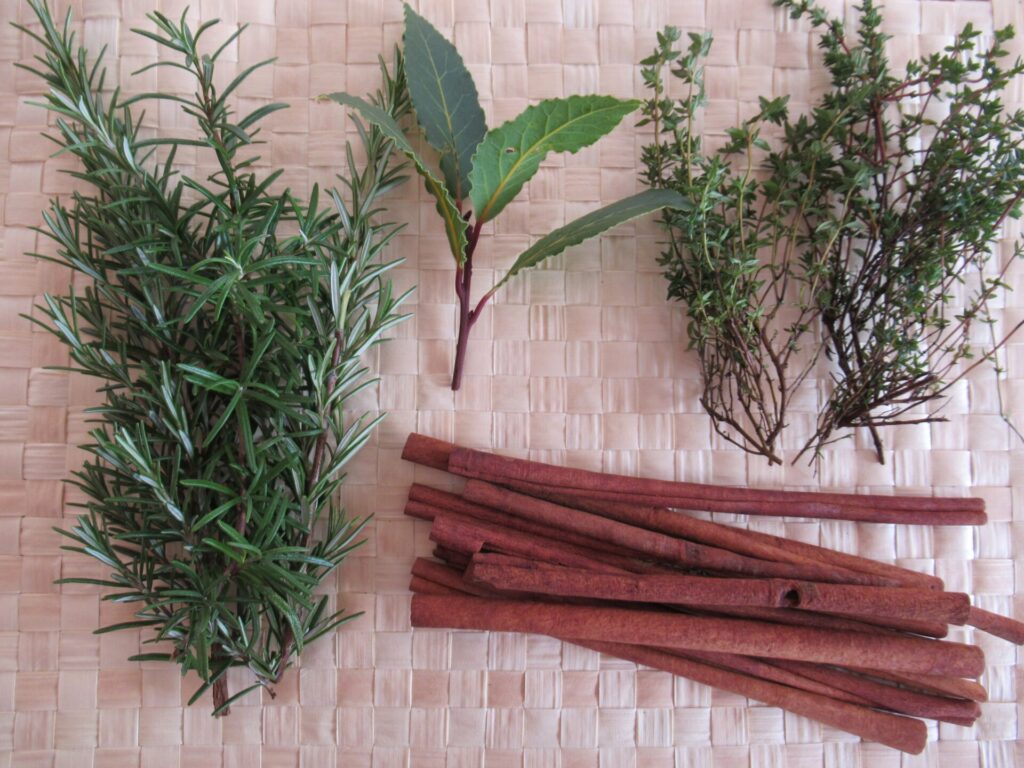
A large platter, and winter greenery and other ingredients to decorate it. I picked some rosemary, thyme and bay leaves from the garden, but conifer sprigs or other evergreen twigs or leaves would be fine, too.
I also had some jumbo cinnamon sticks I once bought at the garden centre. Not terribly fragrant, but still a nice addition to the spicy scent of the cloves. Star anise would be nice as well, if you have some.
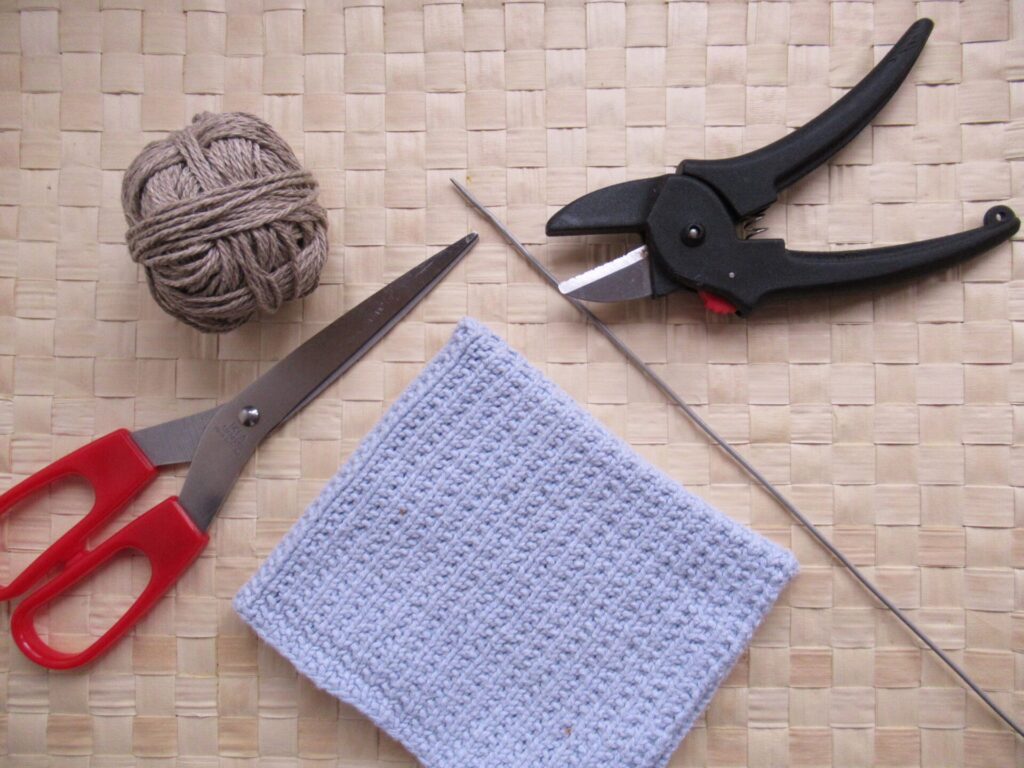
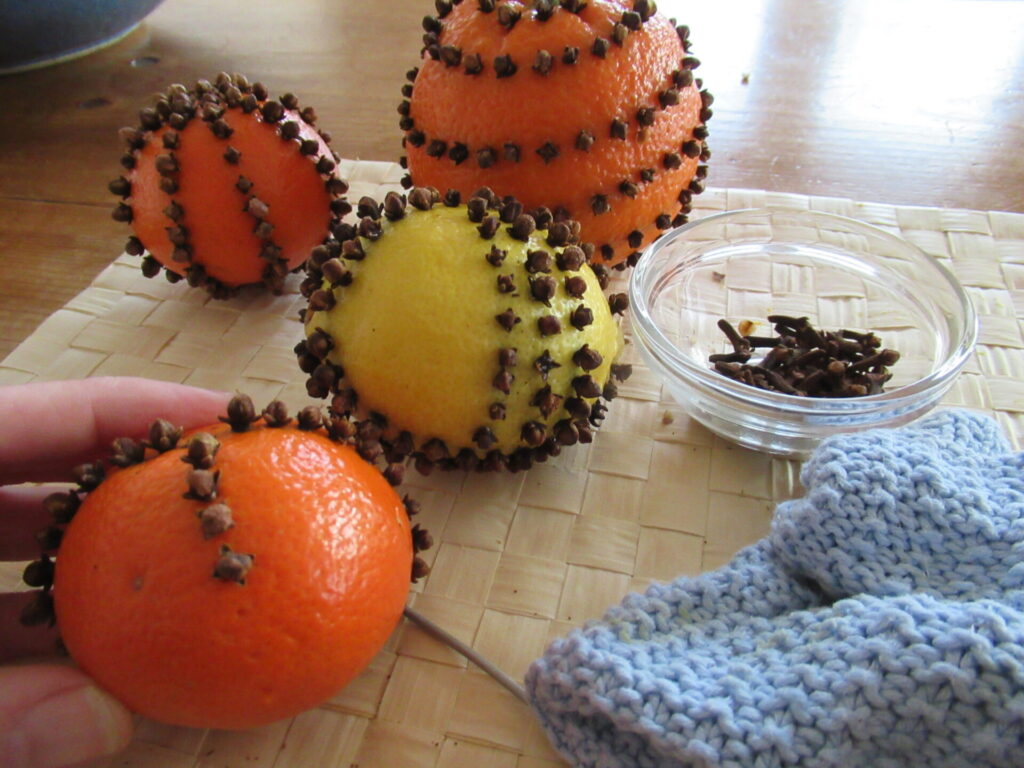
And finally a few tools and other bits and bobs. Scissors and secateurs, twine for tying the cinnamon sticks together and the twigs into bunches, a thin knitting needle (I used a size 2.0 mm/US 0) or a skewer, and a cloth to mop up the juice and dry your hands from time to time.
Oh, and if you’re working at a wooden table like ours, don’t forget to cover it with a whipeable table cloth or place mat, because juice will drip out of the fruit.
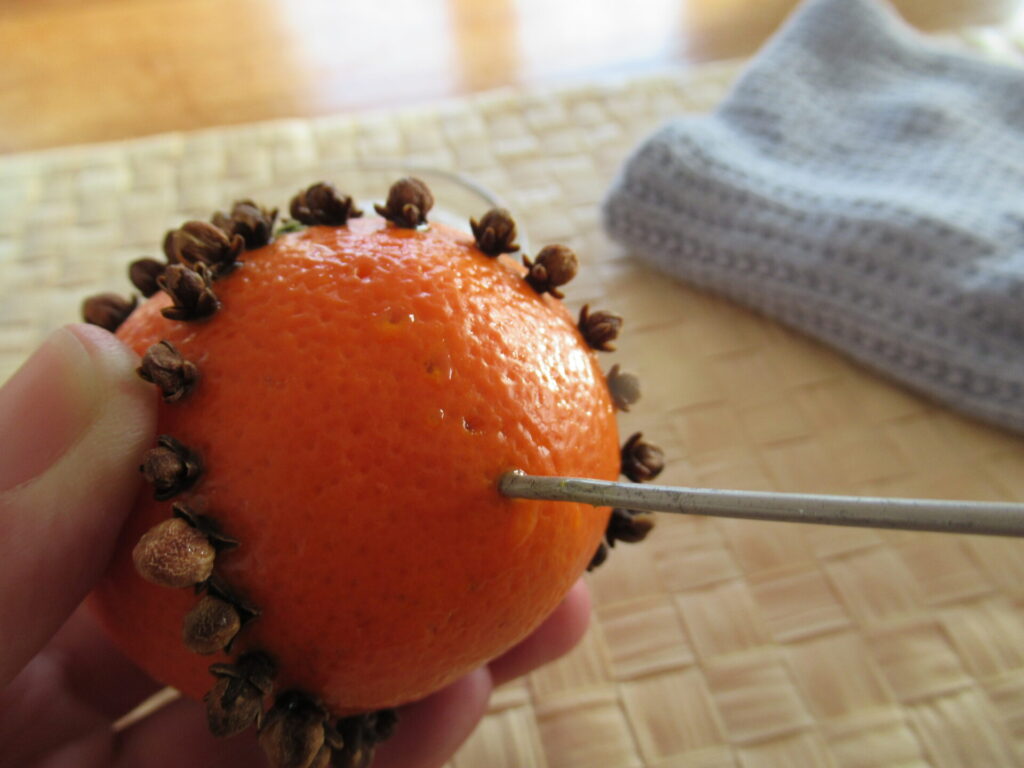
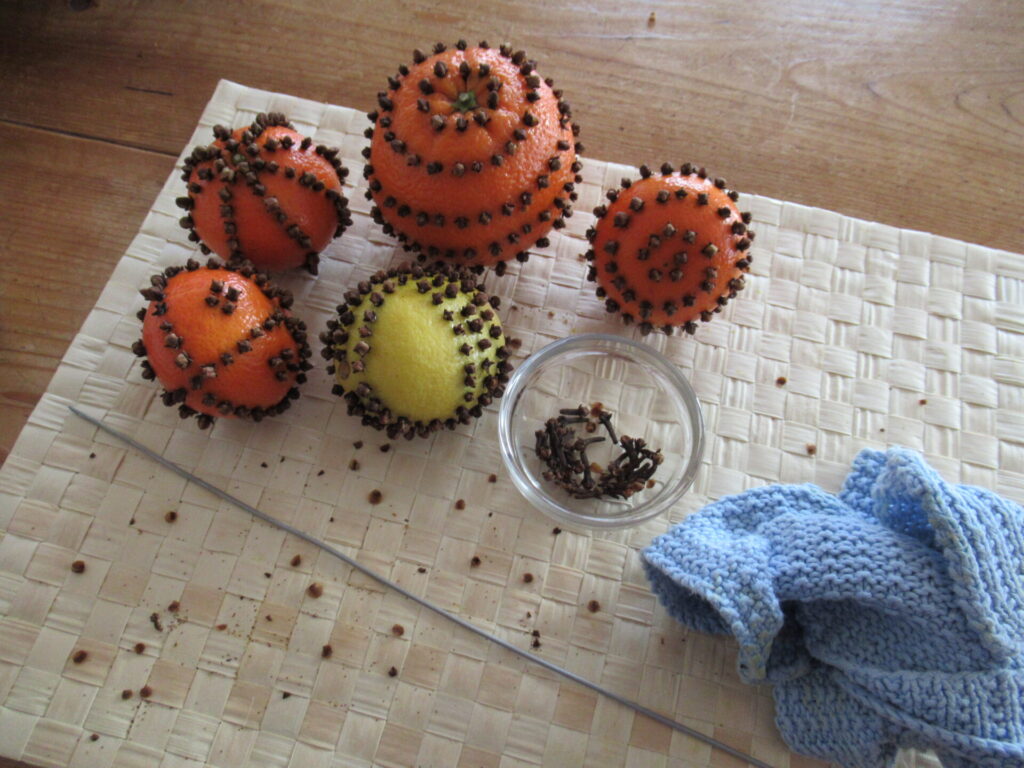
Now the fun starts. Prick holes in the fruit before inserting the cloves.
Make lines, circles, spirals, crosses, diamonds or other patterns.
There! It’ll give you sticky hands, but doesn’t make too much mess. And it’s an uplifting project that is also lovely to do with children.
Now it’s time to arrange everything nicely on a platter, together with the greenery and other spices. Tadaah!
I can’t guarantee that the fruit will keep for months. Sometimes it dries out nicely and will keep for a long time, and sometimes it gets mouldy. In the past, I’ve tried dusting it with a mixture of orris root and cinnamon powder. In theory, that should preserve it better, but it didn’t. I’ve also wrapped the fruit in tissue paper and stored it in a dark cupboard to dry, but that didn’t always work either.
My experience is that it is largely a matter of luck whether the fruit keeps well or not. But no matter how long the fruit lasts, the sunny colours are a feast for the eyes and the lovely wintry scents are a delight for the nose!