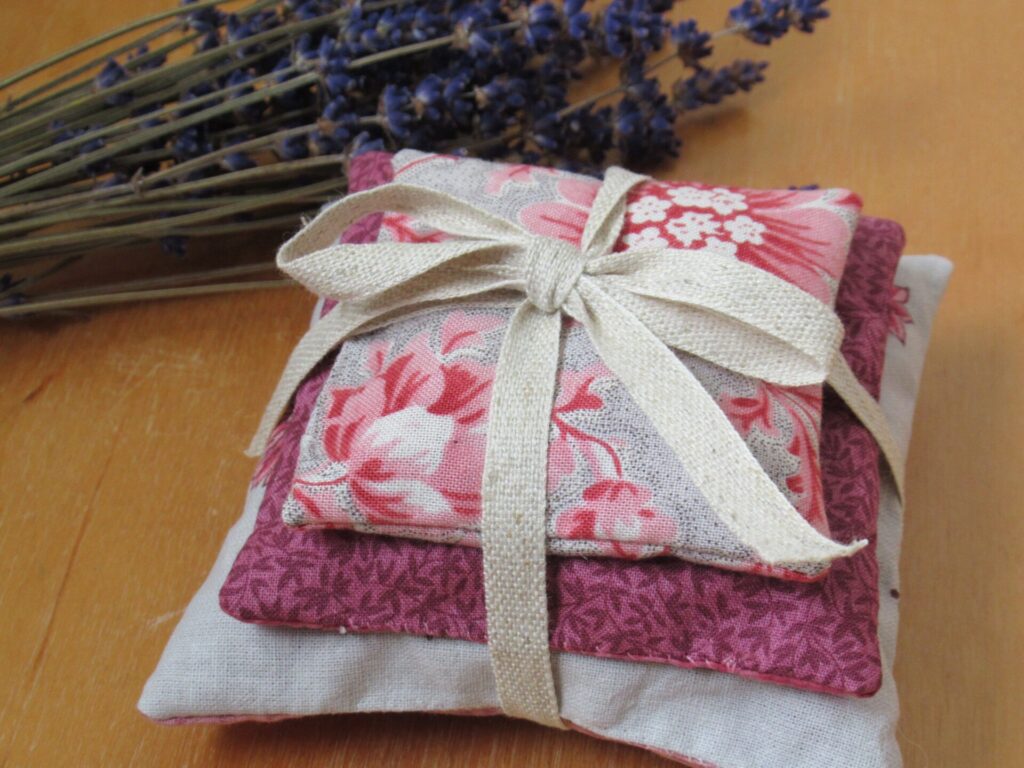
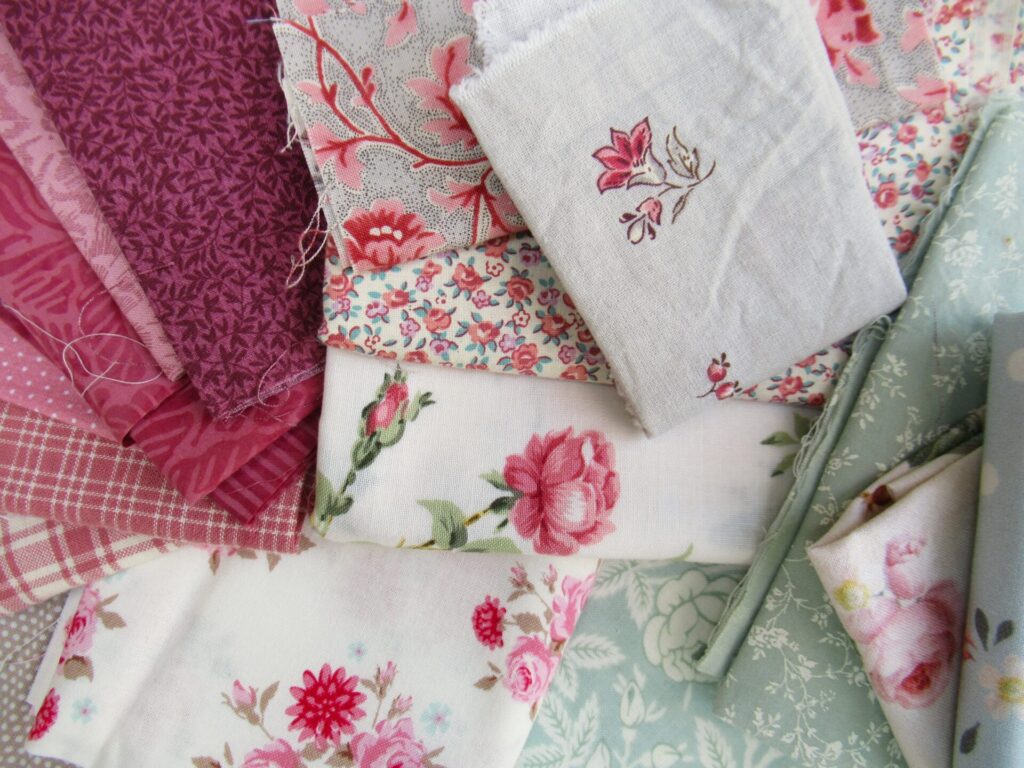
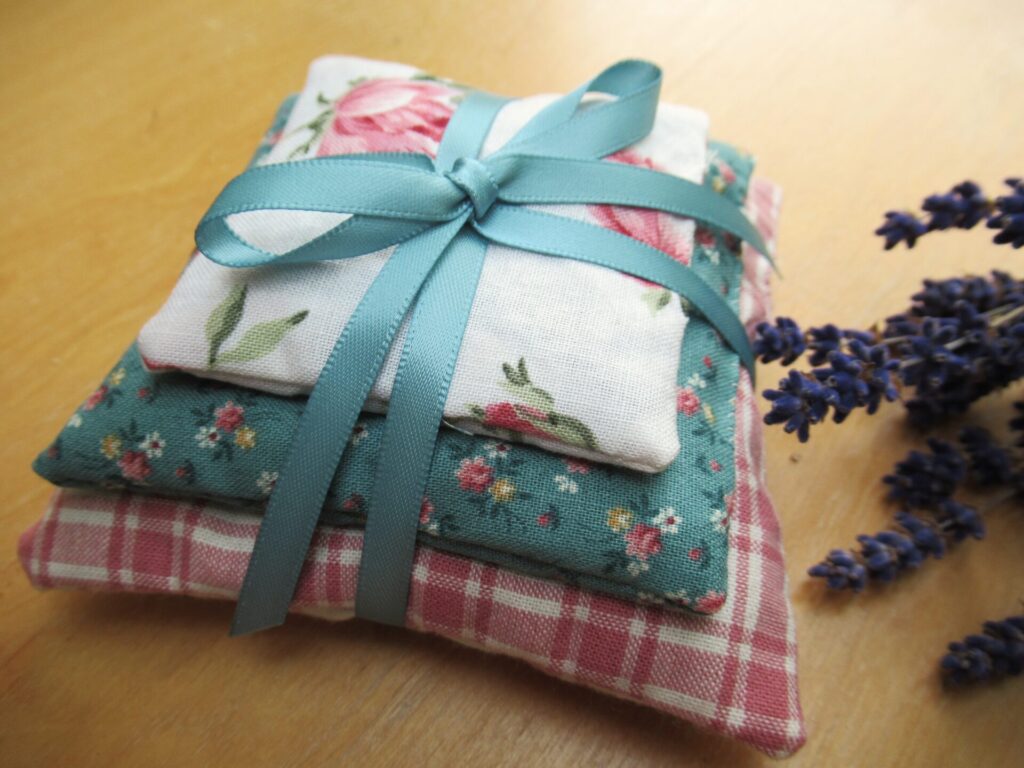
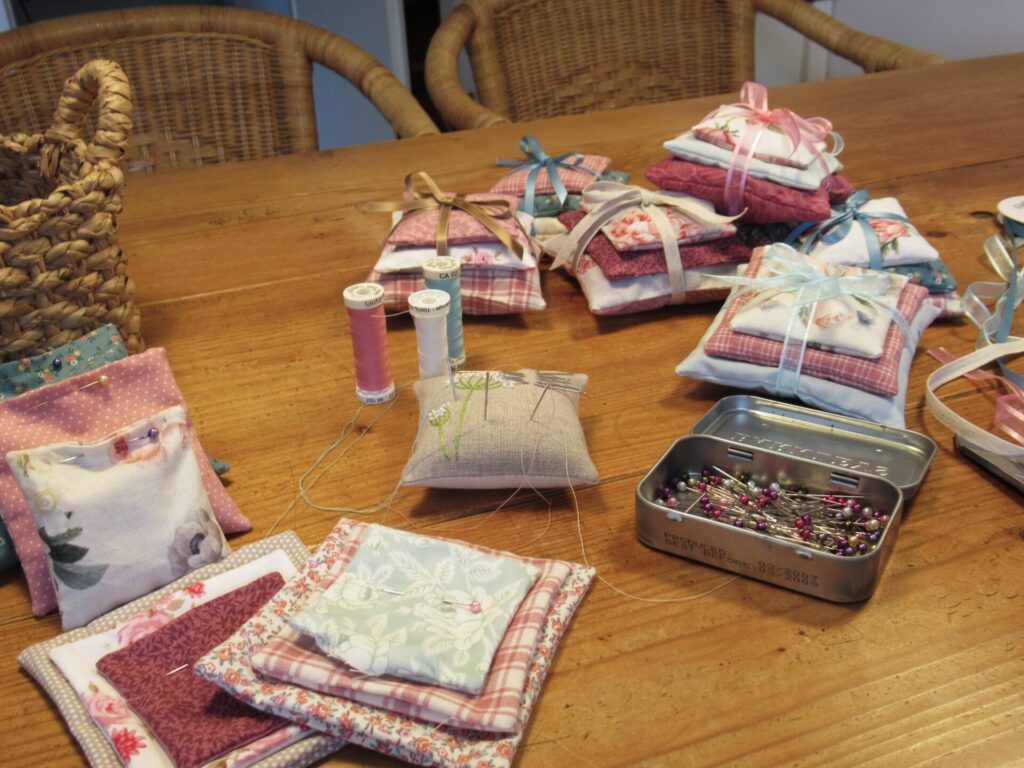
Hello! I hope you’re well and enjoying this month of August. Last week, some days were too hot and muggy here for knitting and I sewed some lavender sachets instead. They are more like little cushions in three different sizes tied together with ribbon. If you’d like to make something similar, here is what you’ll need and how to make them.
For a set of three sachets you’ll need:
Small pieces of cotton (quilting) fabric
85 cm (33½”) ribbon, 6 mm – 1 cm (¼ – ½”) wide
Approx. 35 g dried lavender
Sewing machine (or you could hand sew them)
Scissors
Teaspoon
Sewing thread in colours of fabrics
Sewing needle
Pins
Step-by-step instructions:
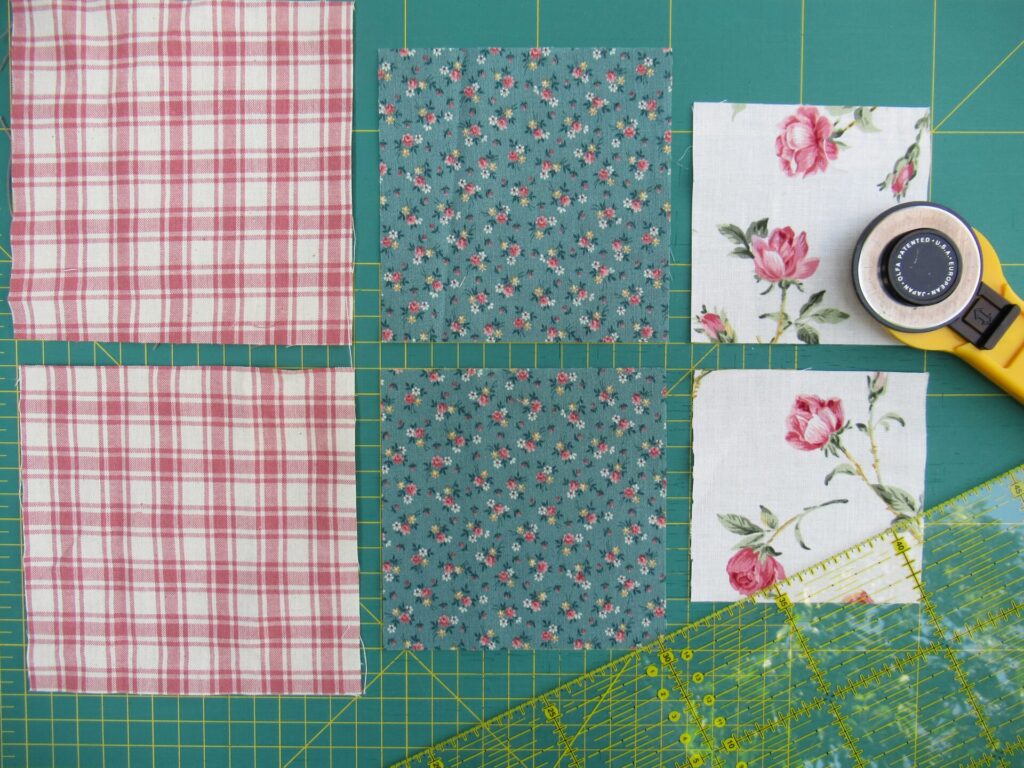
1) Cut 6 fabric squares, 2 each measuring 13 x 13 cm, 11 x 11 cm and 9 x 9 cm (5 x 5”, 4¼ x 4¼” and 3½ x 3½”).
2) Sew with right sides together, leaving a 4 – 5 cm (1½ – 2”) turning-and-filling gap.
3) Trim corners.
4) Turn outside out and carefully push out corners.
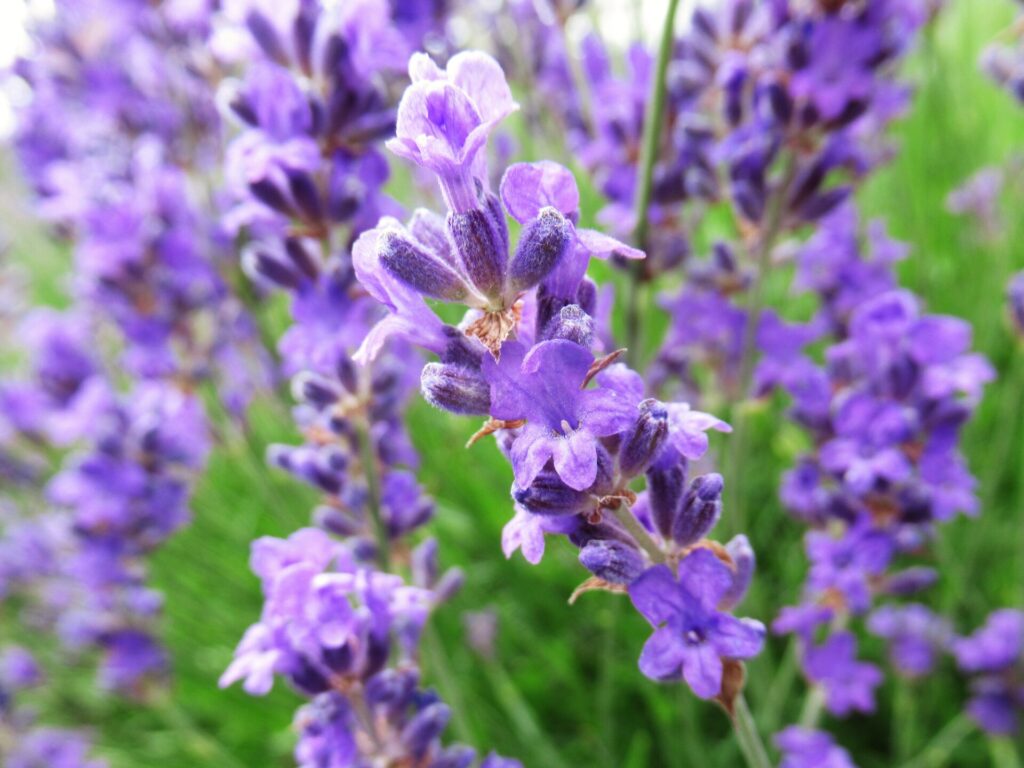
5) Fill with lavender. (Or for someone who doesn’t like lavender, use rose petals. You’ll only need 25 g, as rose petals are more voluminous. Lavender is moth-repellent, rose petals are not.)
6) Close gap using invisible stitches, or (as I did) a visible whip stitch, so that the sachets can easily be opened and refilled later.
7) Place on top of each other and tie together with ribbon. And voilà!
Repeat steps 1 – 7 until you have enough sachets to keep the moths away from your woolly sweaters and shawls, and to scent your underwear and bed linen. And then make some more to give away to your daughter, grandchild, (grand)mother, sister, friend, colleague, neighbour, cousin, knitting-group host, another friend…
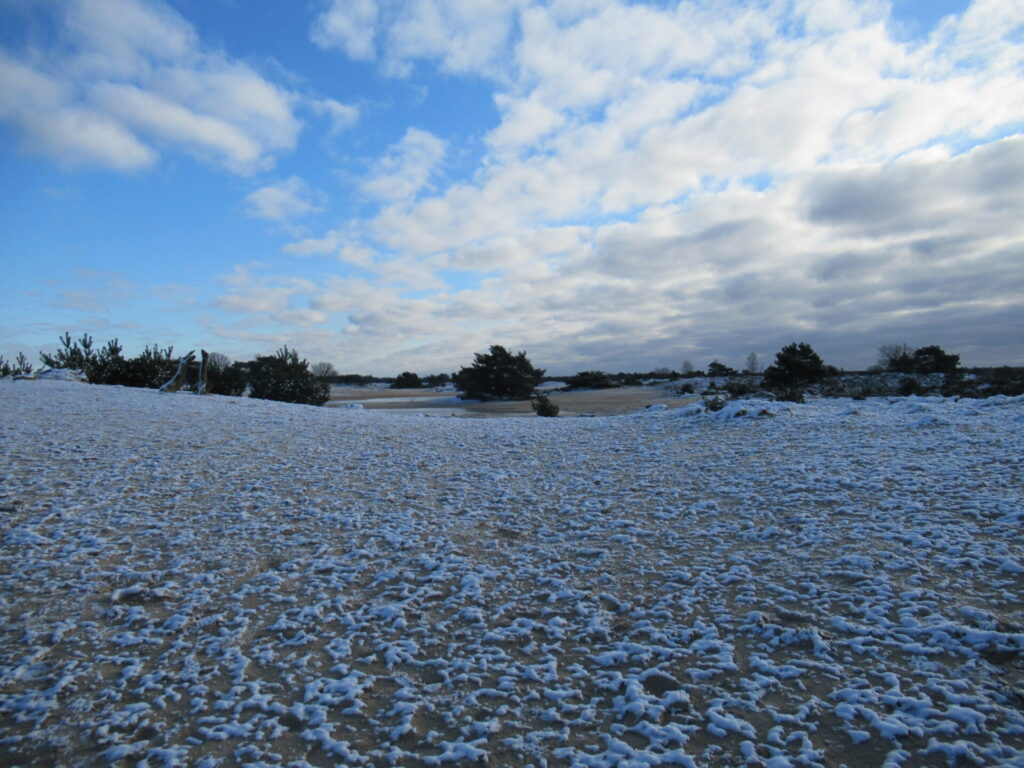
This week we’re having a wintry spell with sunshine, blue skies and even a sprinkling of snow. Such a relief after all the rain we’ve had. On the whole I’m fine with rainy days, but three months of them is a bit much even for me.
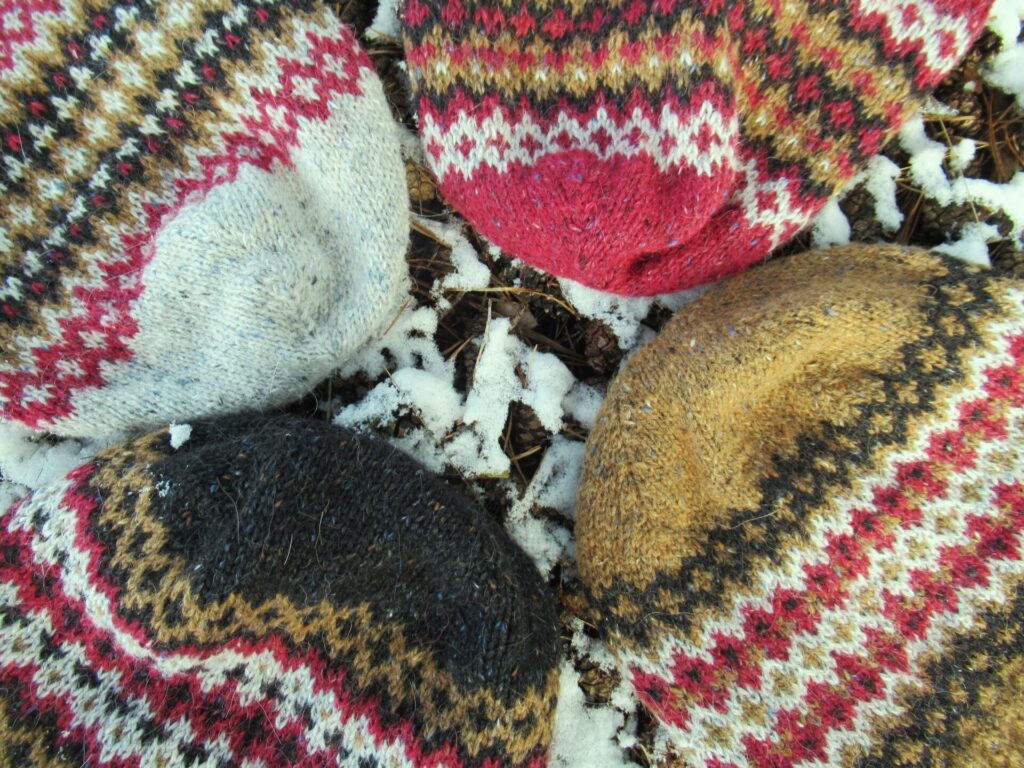
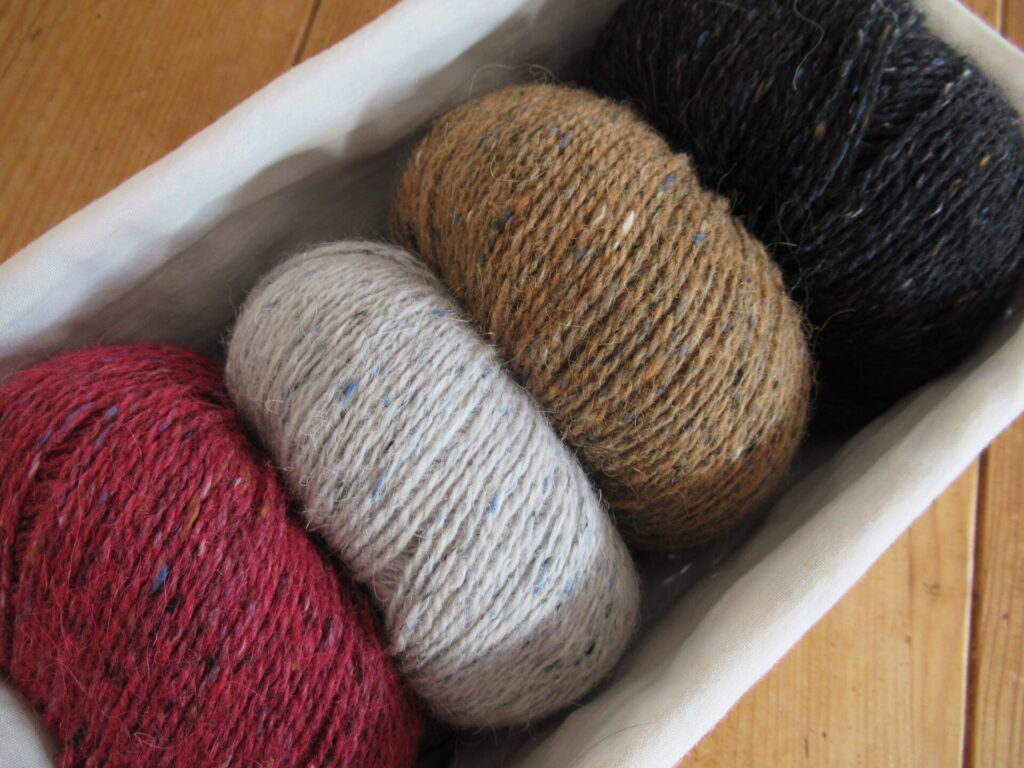
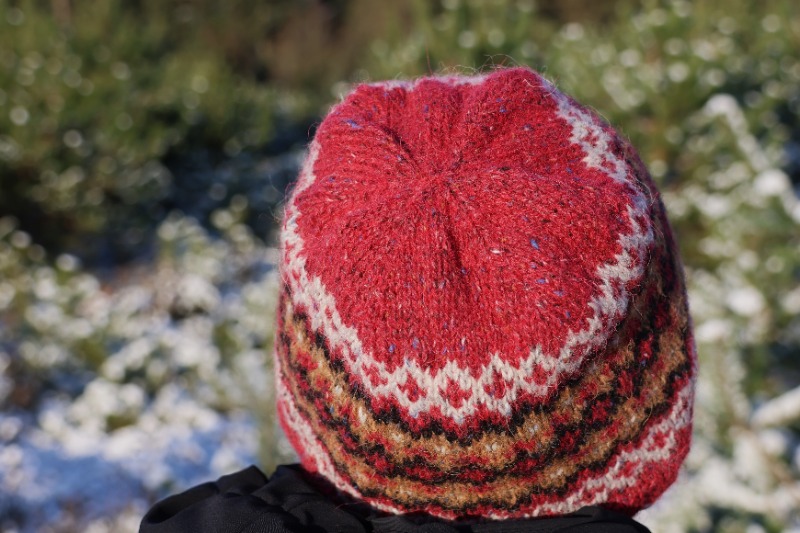
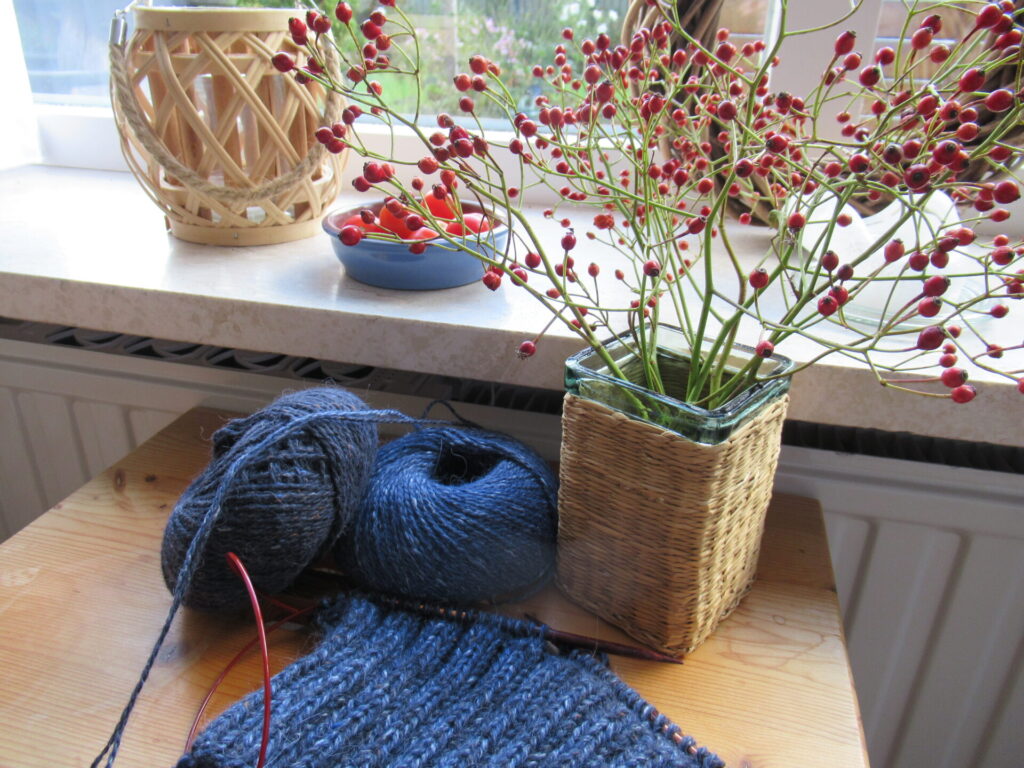
On a glorious frosty morning, before we set off for a walk, I popped the four colourwork hats I’d just finished into my backpack for a photo shoot. Before going into the actual hats, this is the yarn I used:
Four skeins of Rowan’s Felted Tweed in the shades Rage, Clay, Cinnamon and Black (from left to right). I like it when manufacturers give their shades names instead of just numbers. The pattern I used is the Colorwork Cap (here on Ravelry). Four skeins make four of these hats when a different shade is used as the main colour for each of them – very economical.
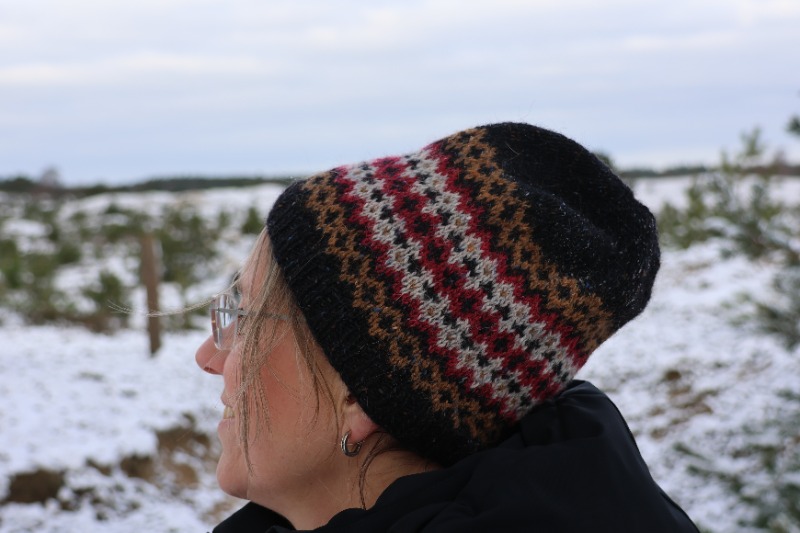
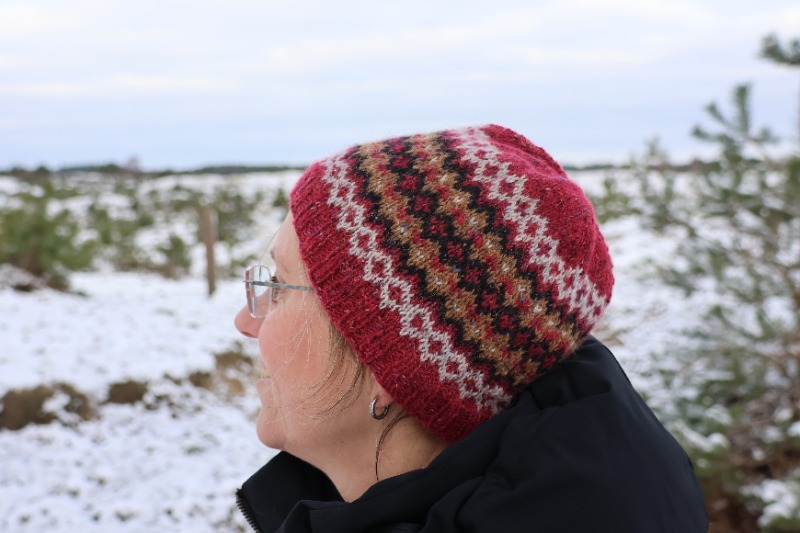
Three of the hats were knit as per pattern. For someone with a smaller head who likes her hats to be closer fitting I made the fourth one (with red as the main colour) shorter. Here they all are in a row in the snow.
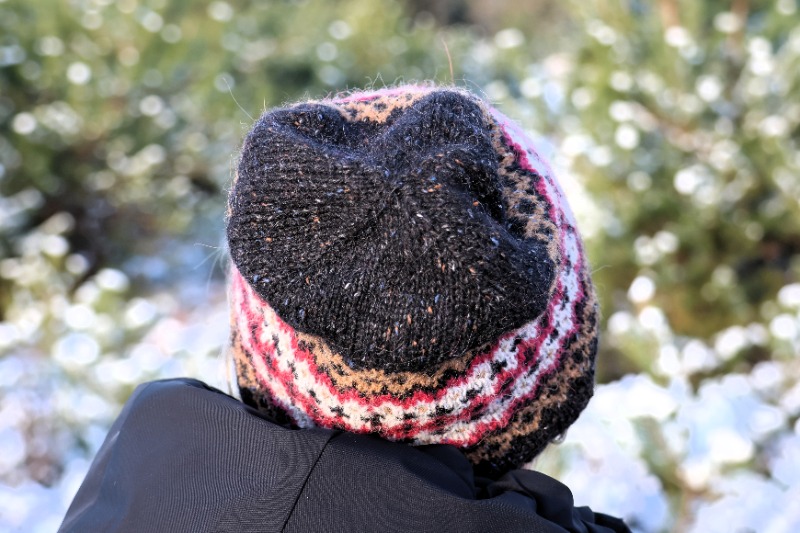
The difference will become clearer when you see me wearing them. The original hat is fairly tall. It has a wide colourwork section and a crown with decreases in four places.
The smaller hat has the same ribbing and colourwork band, but decreases in six places and consequently fewer decrease rows.
Here are the two versions side by side – the black hat with decreases in four places and the red one with decreases in six (click on images to enlarge and take a closer look at the decreases). The red hat would have fitted more smoothly over the head if I’d left off part of the colourwork and spaced the decreases out over more rows, but I didn’t want to do that and am happy with the way it turned out.
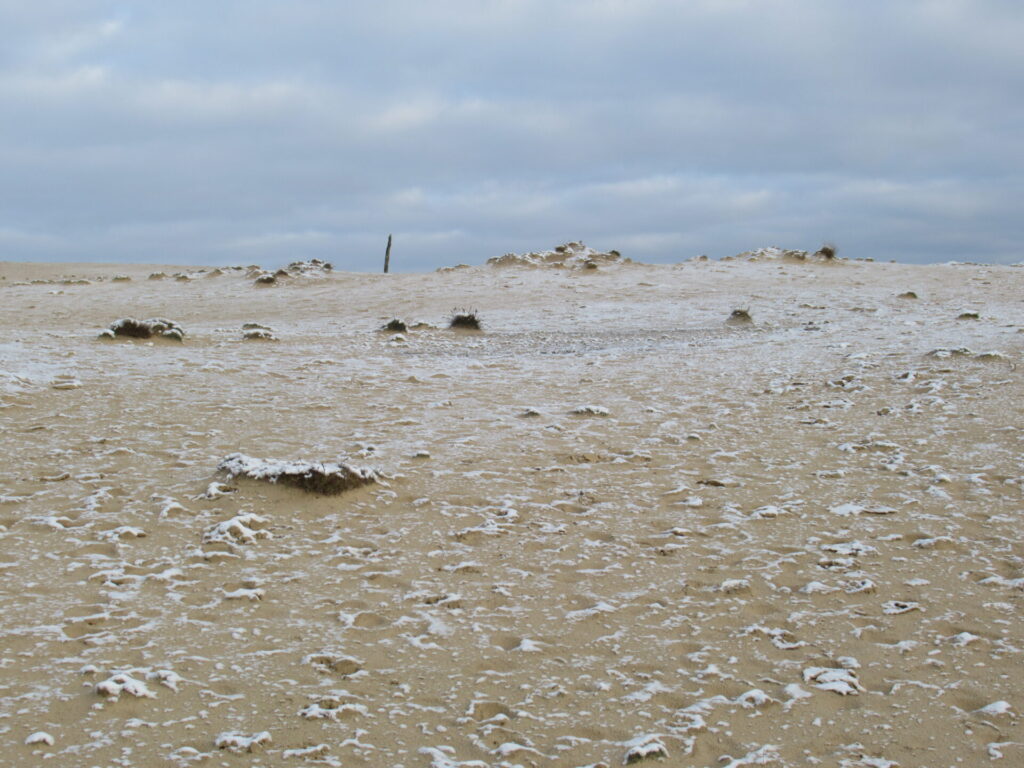
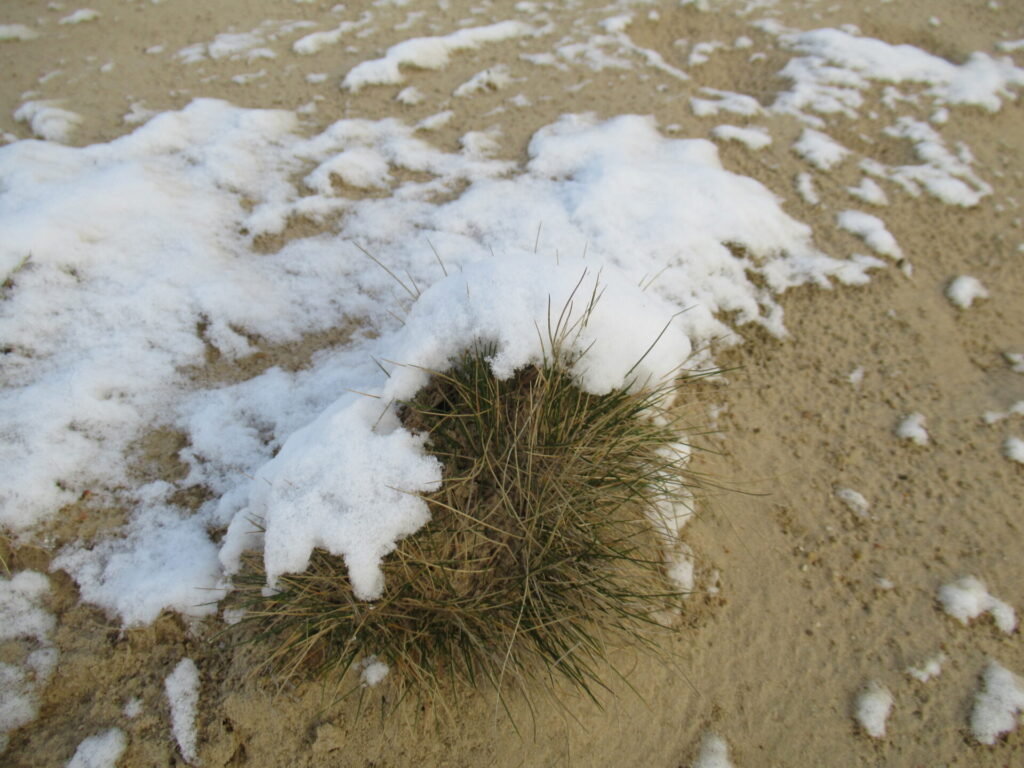
The photographs were taken in an area with shifting sands that is officially called Aekingerzand, but we call de Kale Duinen (the Bare Dunes). As children this is where we went on our annual school outing, to play ball games and sunbathe on our beach towels. It was like a day on the coast minus the sea. Here is an impression of what it looks like on a winter’s day.
I hope you are keeping well and warm (or cool, for those of you in the Southern Hemisphere) and have had a good start to the new year. The four hats will soon be on their way to their new owners. One more project to finish and then it’s time for something new. I’m bursting with ideas and am looking forward to sharing them with you again this year.
Last week I was too busy to write. This week, my planner is still not exactly empty but it has enough space for a nice long chat here. So, hello! It’s good to see you!
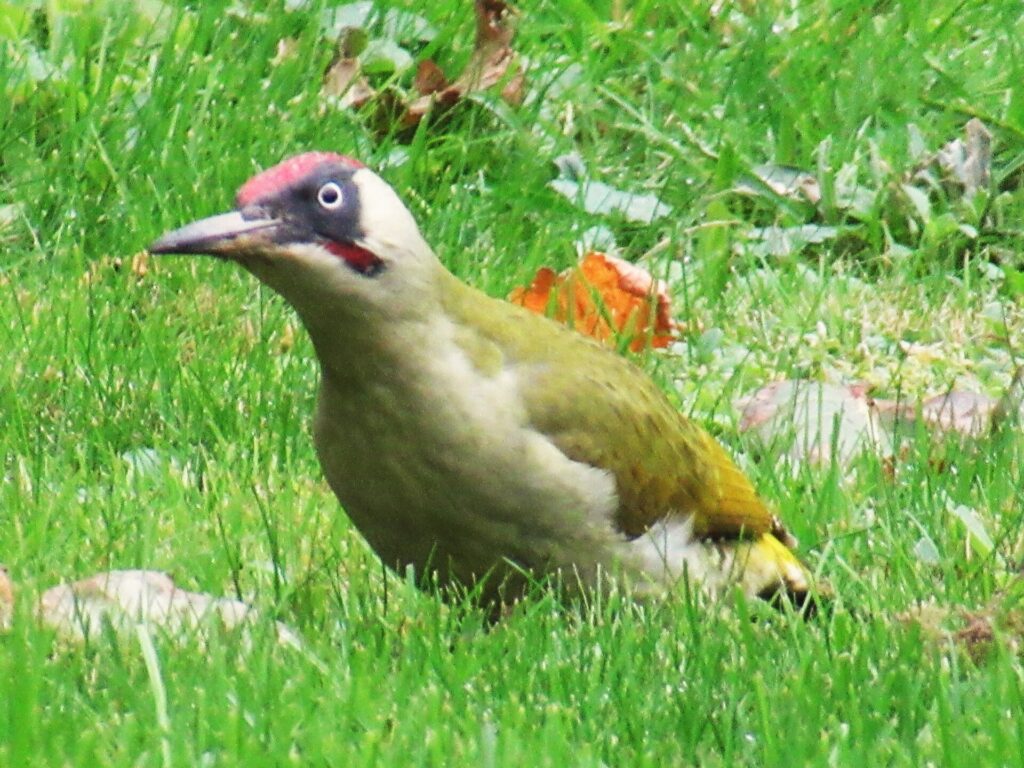
I’d like to tell you a bit about the visitors we’ve had. The first one was non-human. We had been wondering for a while who was responsible for the holes in the grass in our back garden. Now we know – a green woodpecker digging for worms and insects with its long, strong bill.
It’s the first time we’ve seen this beautiful bird in our garden. I hope it’ll come back to visit us often.
The first human visitor was a dear friend coming on a much belated birthday visit. She is a prolific knitter and one of those invaluable friends who give honest feedback on my knitting projects. I really appreciate that, and after her visit rrrrrip went a cowl I was knitting for another friend. Knowing what I love, she gave me some of her own hand dyed yarn in 3 shades of blue and one of the latest knitting books. I’ll tell you about the yarn once I have some idea of what I’ll make with it. The book is Softly – Timeless Knits by Sari Nordlund.
It’s smaller than most knitting books, but packed with patterns: 7 pullovers, 2 vest tops, 3 hats, 3 cardigans, 3 scarves/shawls, 3 pairs of socks, and 1 pair of mitts. A few of the patterns are suitable for beginners, but most have intricate stitch patterns that experienced knitters will love.
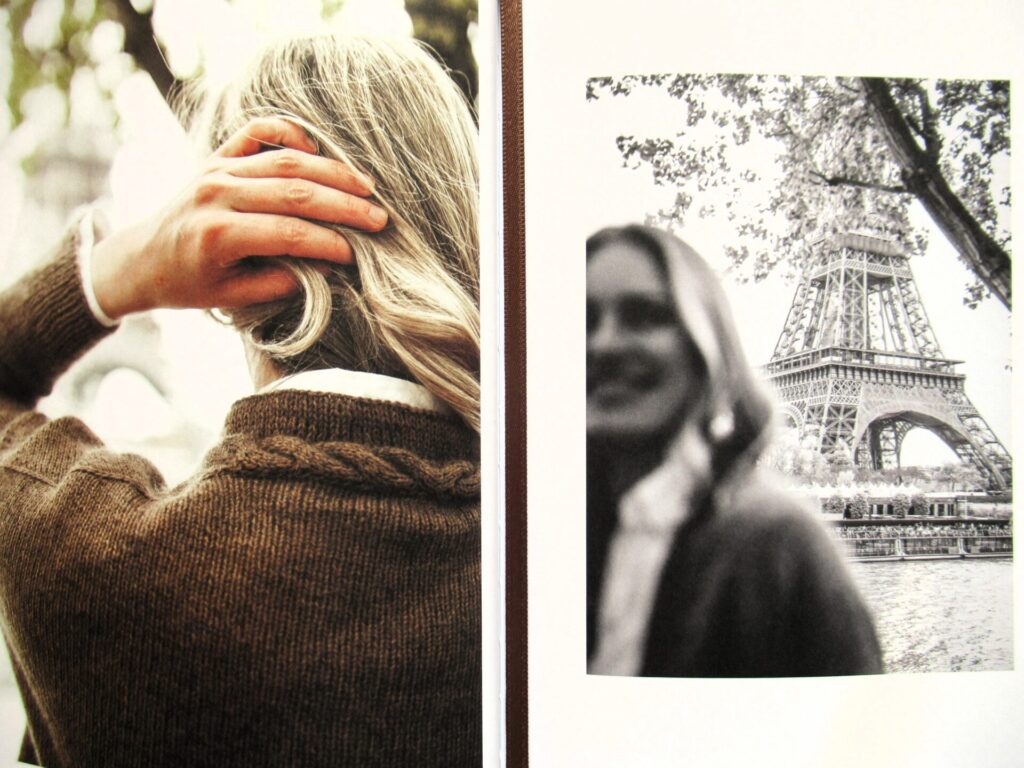
The styling and photography are stunning. All of the designs have been photographed in neutrals with grey and cream-coloured buildings and other architectural elements in the background. Some of the photographs are in black and white. In the foreword Sari said something about Helsinki and I just assumed that the photographs were taken there, until I thought, ‘hang on, do they have an Eiffel Tower replica in Helsinki?’
Looking more closely, I noticed that there were also other familiar landmarks in the background, a Rue de Rivoli sign, and a café called La Comète. Ah, Paris! Beautiful knits, artful photography – what a gorgeous book! The first thing I’ll make from it is a pair of socks with a variety of twisted stitch cables.
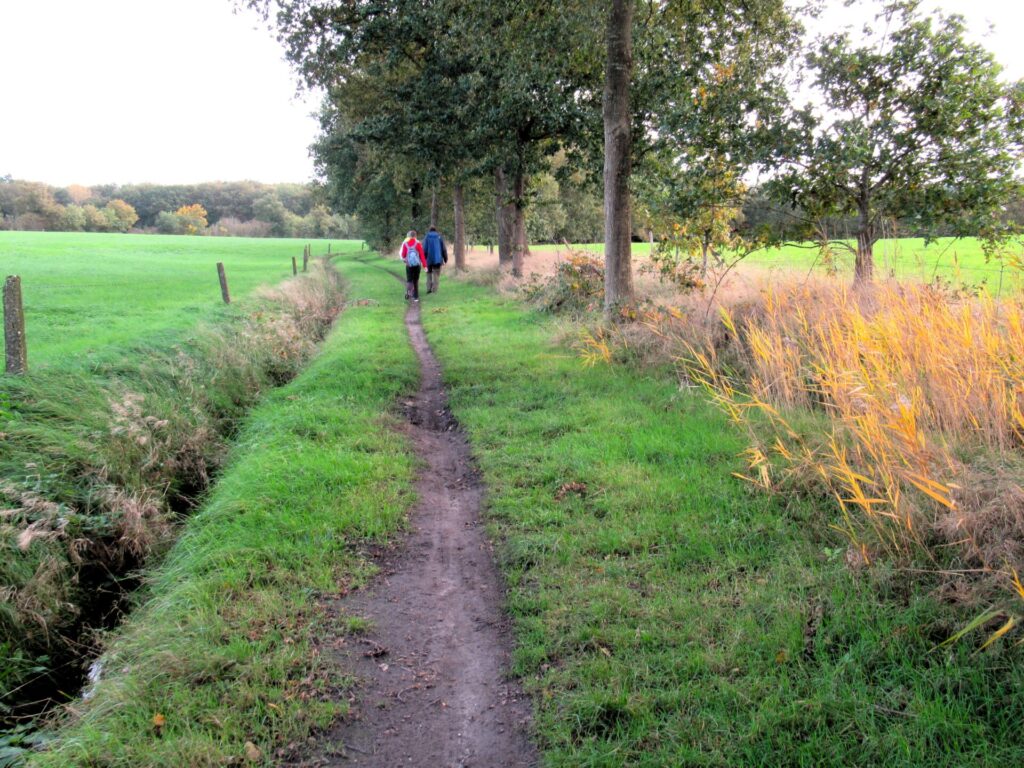
Our next visitors were friends we hadn’t seen for ages. Years ago they gave up their jobs and their house to go and live on a boat and sail around the world. They had planned to come back for a visit sooner, but then Covid happened and they got stuck in New Zealand. Well, they were here now, and we were very glad that they had time in their busy schedule to come and stay with us for a while, too.
We’ve had a lot of rain lately, but were very lucky with the weather during their stay. On a day without rain we went for a long walk, enjoying each other’s company, the exercise, and the autumn colours.
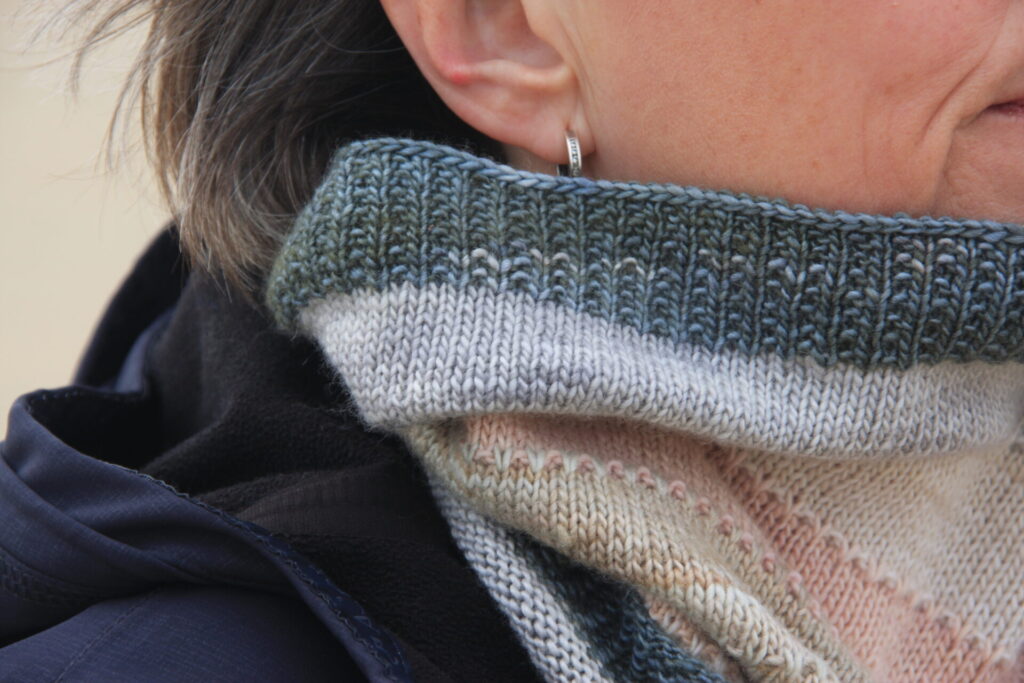
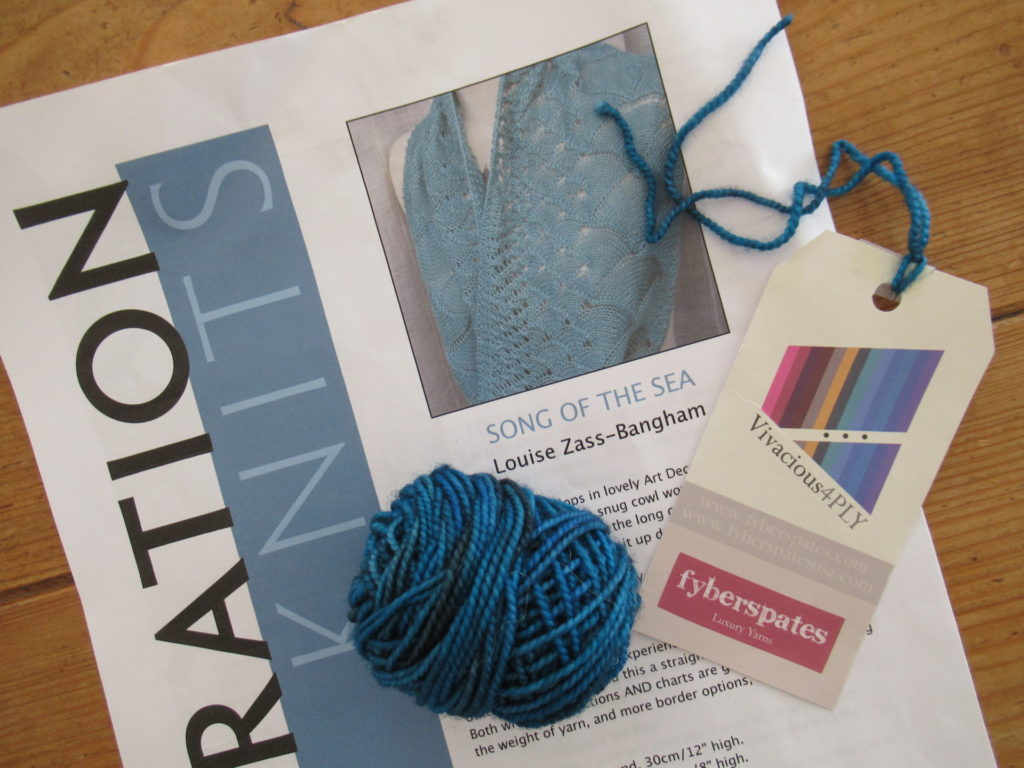
Wanting to give them something personal, useful and not cumbersome, I’d knit her a cowl quite a while ago that was patiently waiting for their visit. It’s Song of the Sea designed by Louise Zass-Bangham.
Knit from Fyberspates Vivacious 4-ply in shade Deep Aqua, it is covered in waves, from wee wavelets to big breakers.
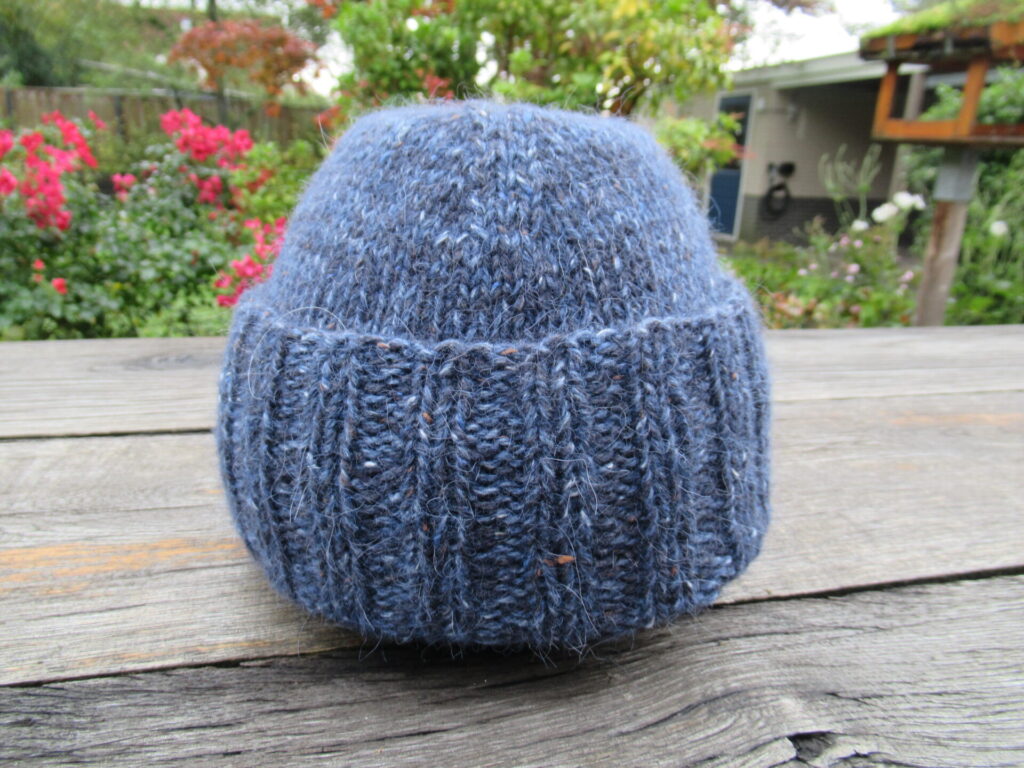
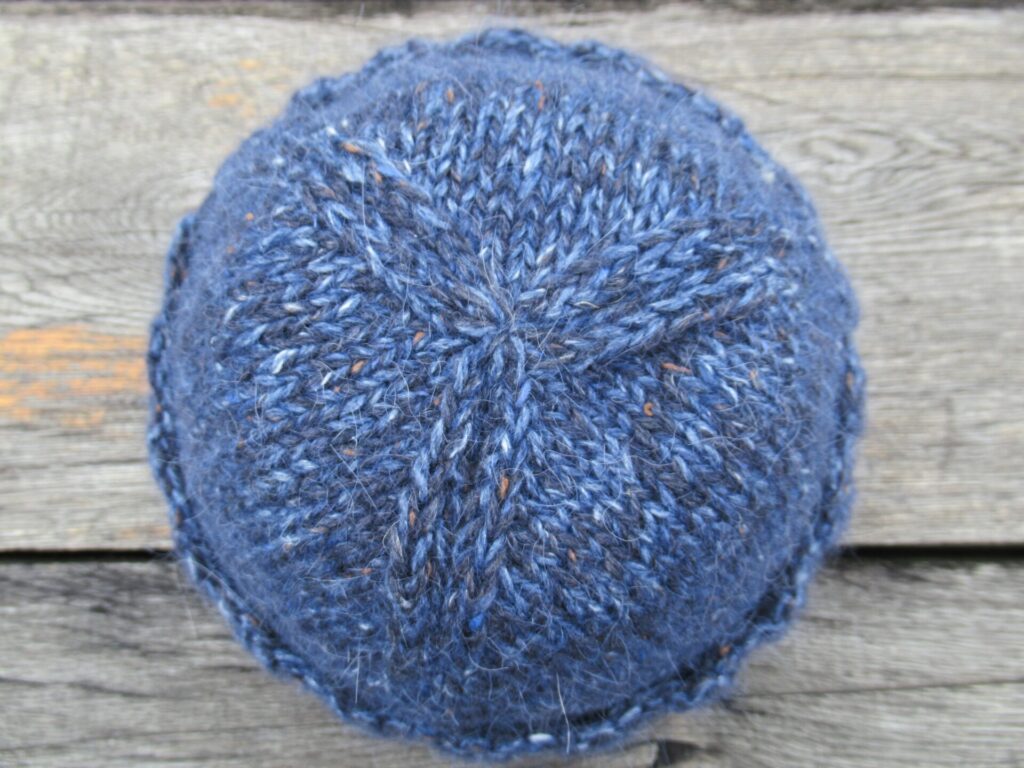
For him, I knit a Boyfriend Watch Cap from two threads of Rowan Felted Tweed held together, in the shades Seafarer and Seasalter.
Because the two shades are not too far apart the effect is not really marled, but a beautiful deep shade of blue with tweedy flecks.
The crown is shaped by decreases in three places.
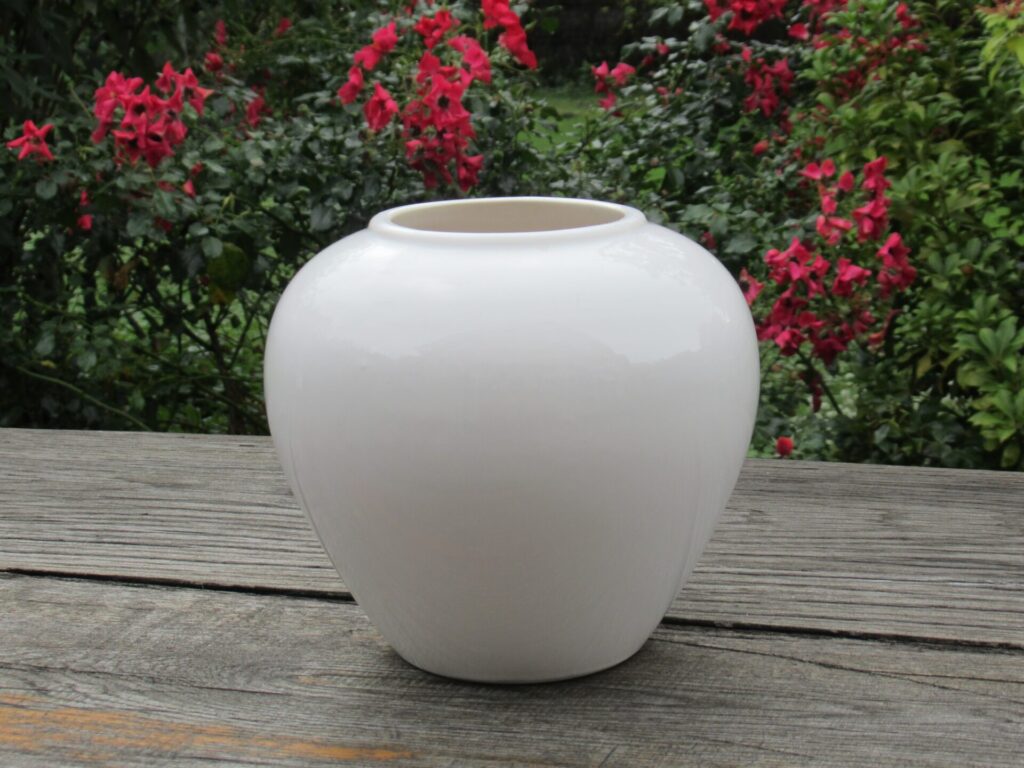
The pattern said to soak the hat and leave it to dry flat, but I happened to have the perfect hat blocker – a flower vase turned upside-down.
Finally, another dear friend came for a visit bringing her 11-year-old daughter. While my friend and I were making music together, her daughter learnt to bake pull-apart rolls from my husband.
A lovely end to a wonderful visitor-filled week! With the warm and comforting smell of freshly baked bread I’m leaving you for now. (Well, I can’t really send you the smell over the internet, more’s the pity, but I hope you can imagine it.) Thank you for visiting. Bye!
Hello! No big projects or FOs today, but 7 small things that have made me happy over the past week.
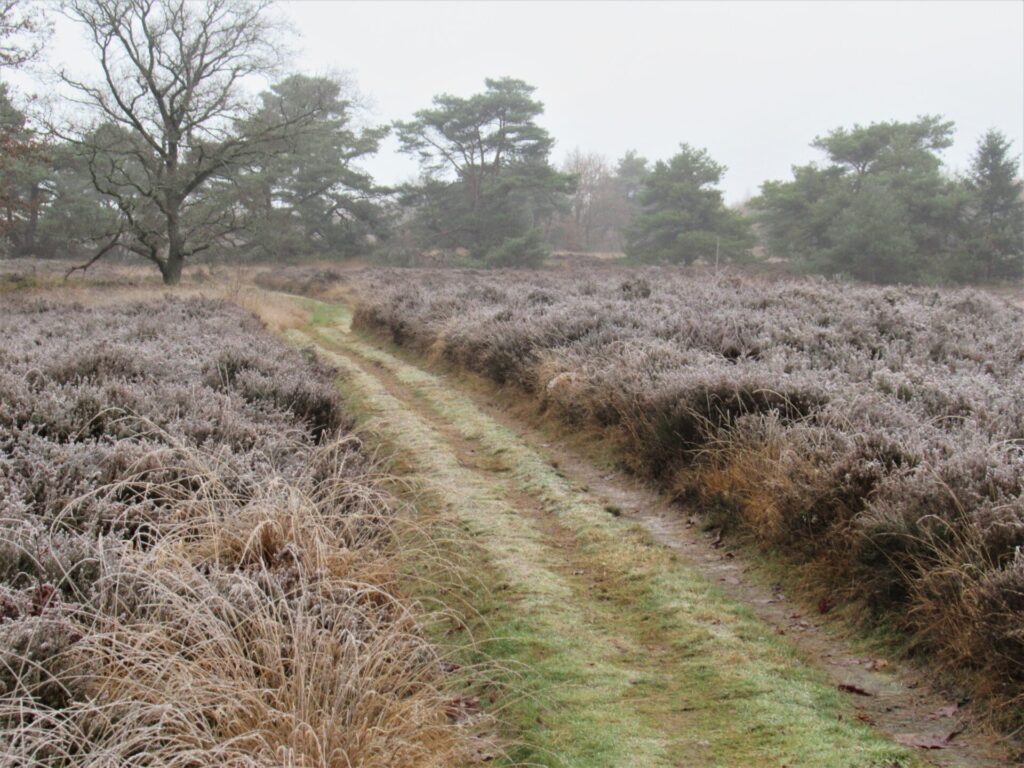
1. A walk The nights have been frosty this week, with temperatures just above zero during the daytime. On Sunday morning it was dark, cold and foggy, and I didn’t feel much like going for a walk. We went anyway. The heather and grasses were still white and frozen.
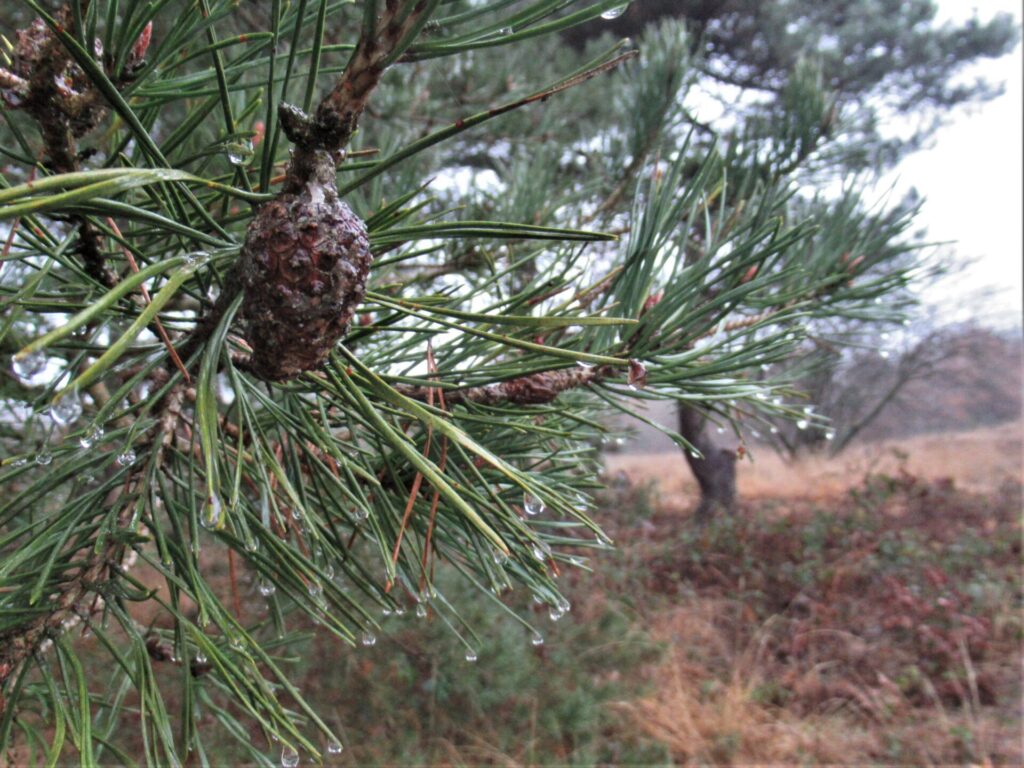
But the trees were already dripping.
It was cold, it was wet, it was gloomy. And it was lovely.
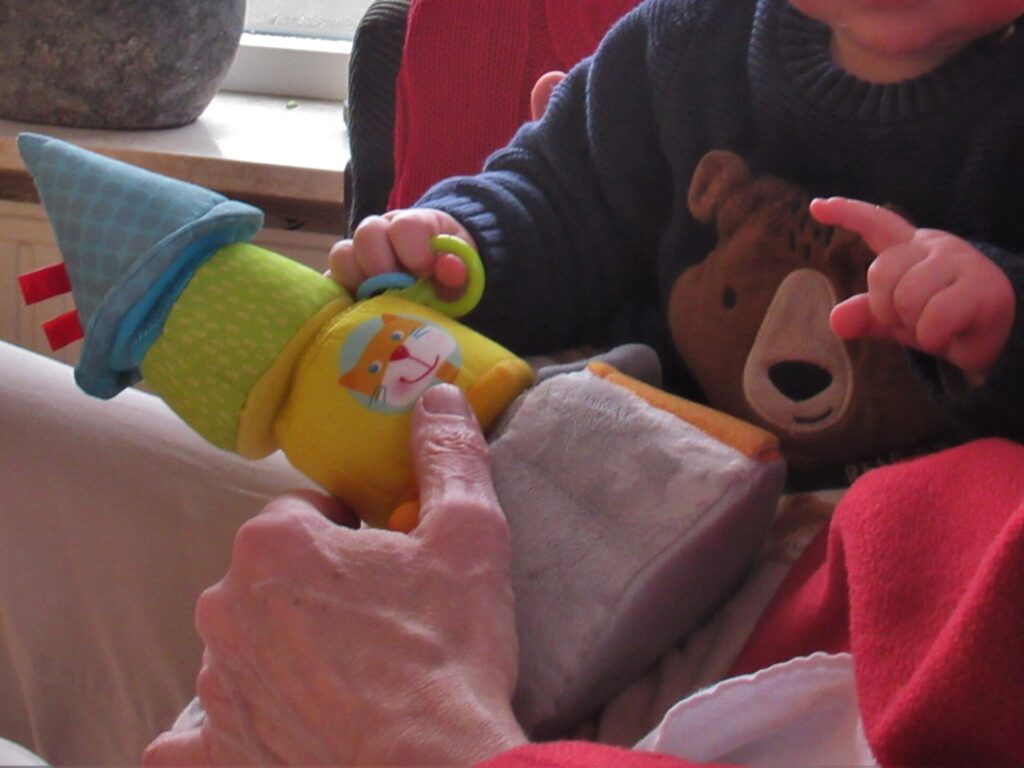
2. Small hands, big hands Our grandson and his parents came to celebrate Sinterklaas last Saturday. At 8 months, he was more interested in the wrapping paper than in the gifts inside them. His small hands next to my husband’s big ones made me sigh a sigh of happiness.
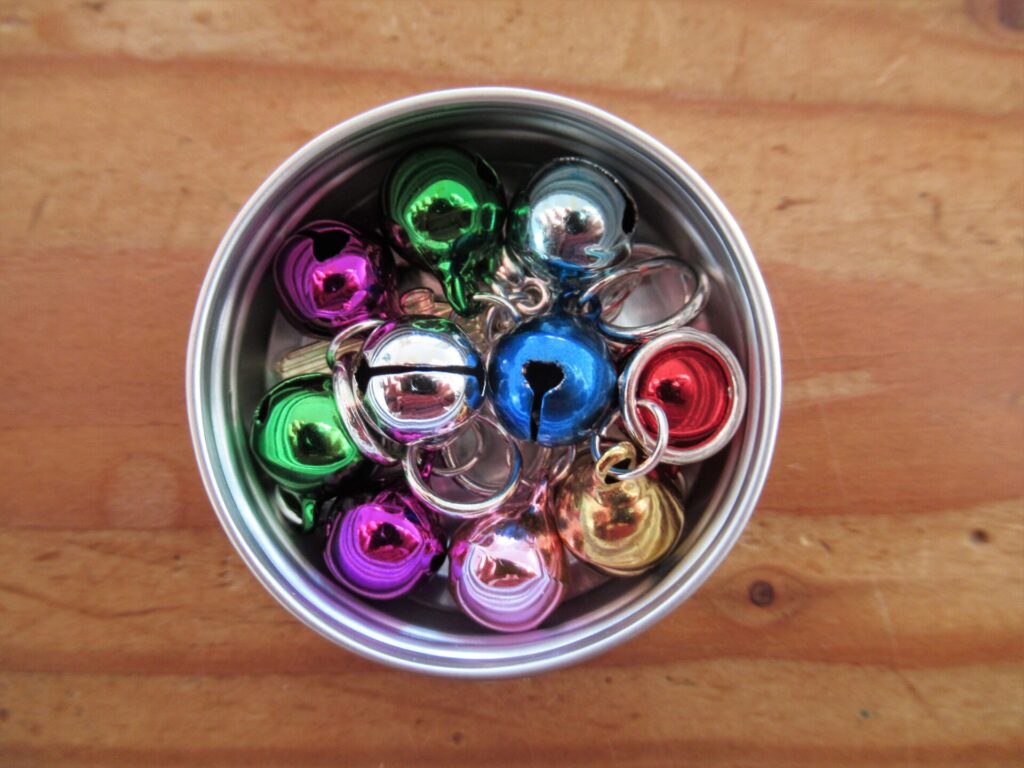
3. Jingle bells Sinterklaas brought me a few gifts, too. One of them was a small tin filled with jingle bell stitch markers.
4. Small bird feeder A dear friend came on a very belated birthday visit bearing gifts. One of them was a new bird feeder, hand-made from willow. Too small for woodpeckers and too difficult to hold on to for house sparrows and finches, it is specifically for great and blue tits. I asked them if I could post a picture of them eating pieces of peanut from it on my blog, but they said: uh-uh, we value our privacy! So here is just the feeder.
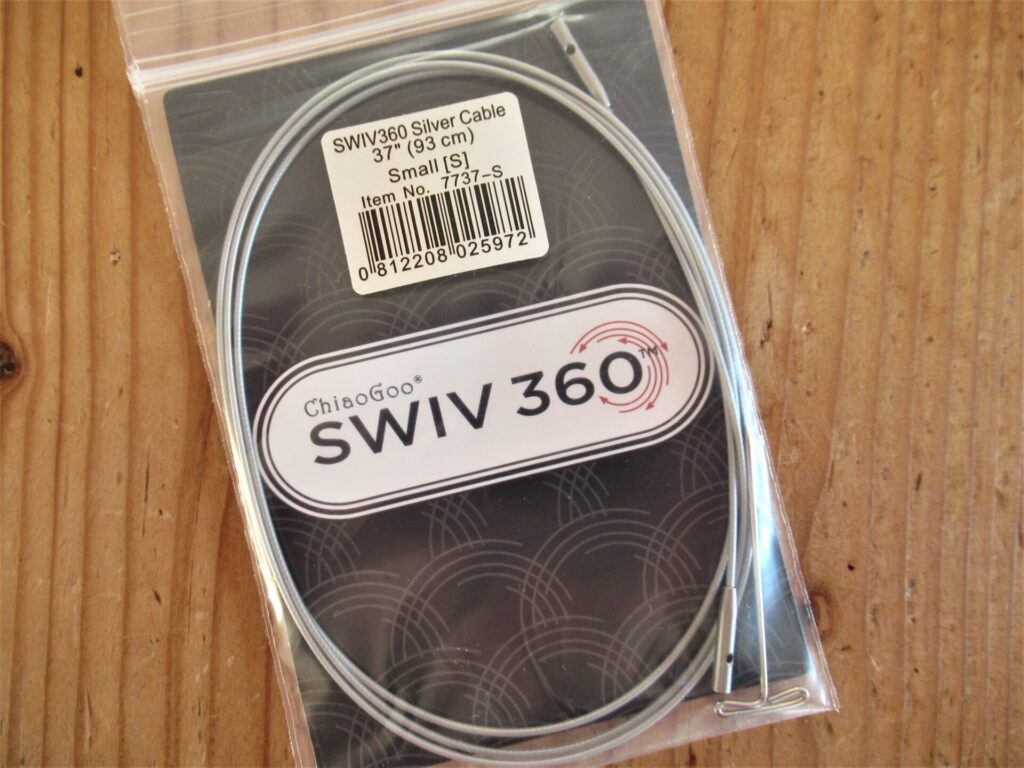
5. Small cable The same friend also gave me this:
Only a fellow-knitter would know how happy that would make me. It’s a new type of cable for my Chiaogoo circular knitting needles. I am trying it out on the small Advent mittens I’m knitting with the magic loop technique.
What can I tell you about it? Well, the Swiv 360 cable is quite a bit thinner than the original red cables, and it is also a lot more flexible – very nice! These cables are attached to the ends that screw onto the needle tips in such a way that they can rotate freely – a tremendous improvement.
The only downside of these new cords is that there is a slight hitch where the cable is attached to the ends, which makes sliding the stitches from left to right over them towards the tip (when moving from one needle to the next with the magic loop method) a little more difficult. But, all in all, I’m very happy with it!
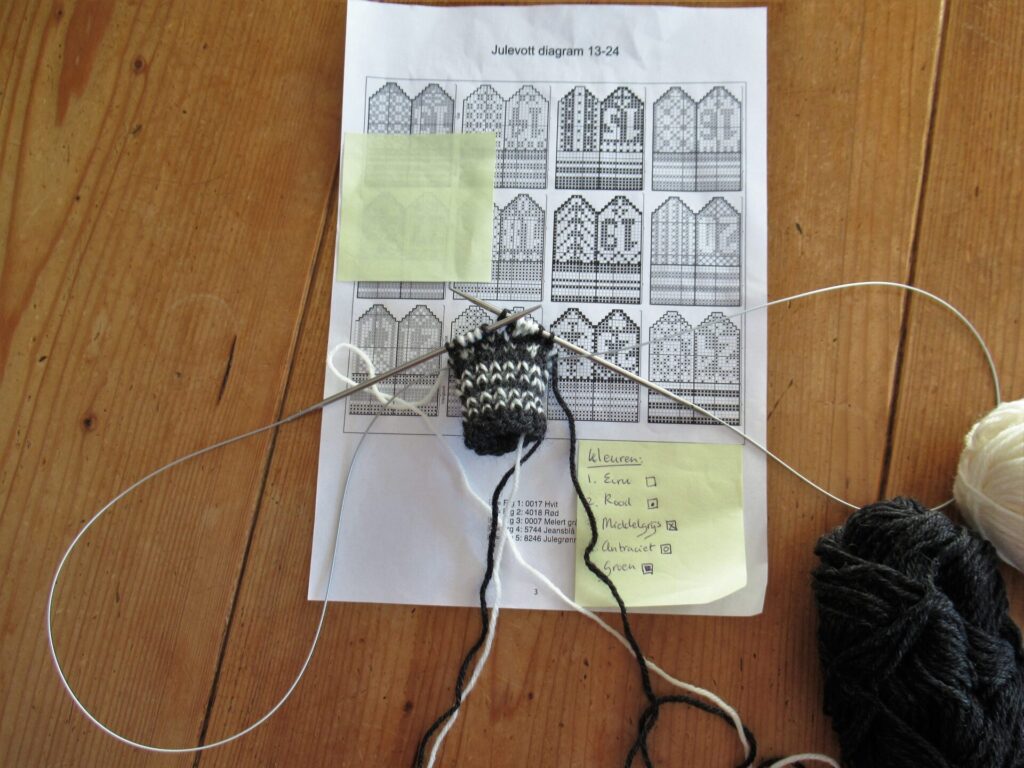
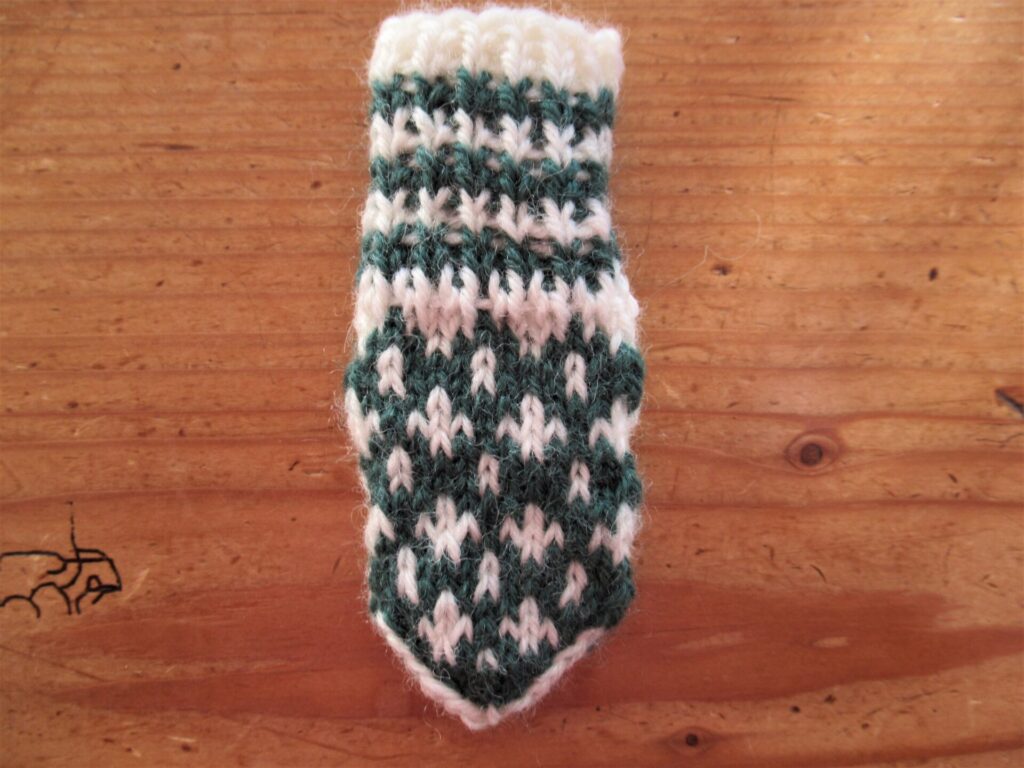
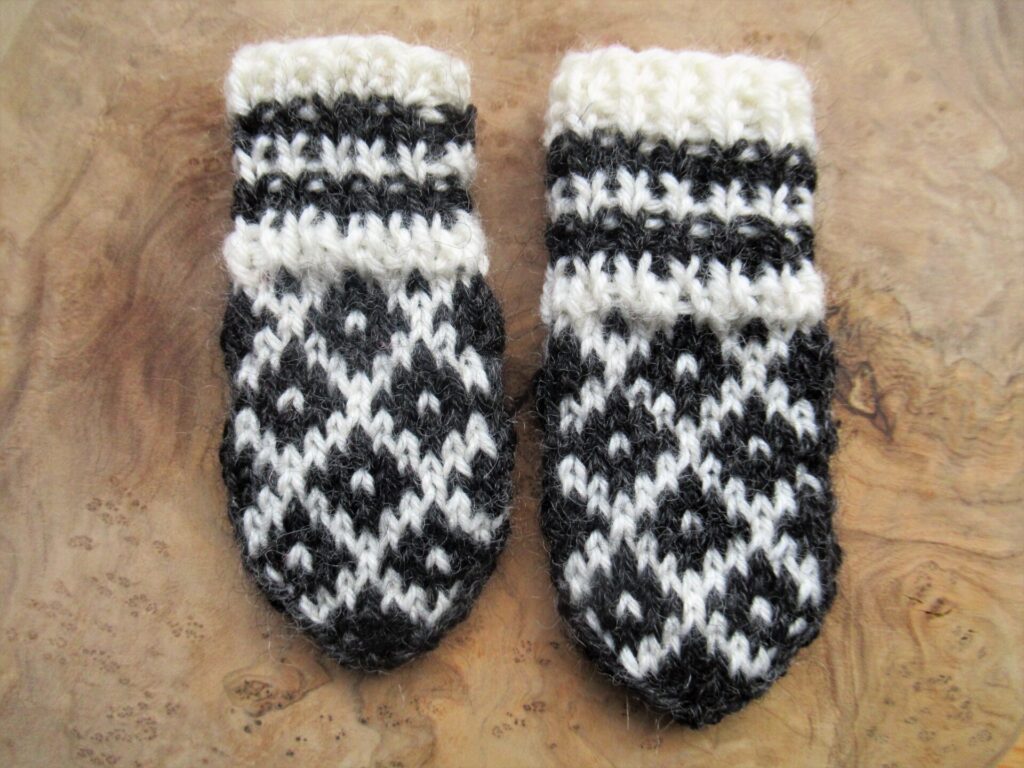
6. Mini-mittens I’m not quite but almost on schedule with the Norwegian mini-mittens I’m knitting for an Advent calendar to gift next year. Number 13 has just slid off my needles.
It’s great fun, knitting these. My idea was to spend some quiet, contemplative time burning a candle and listening to music while knitting one of these every day. In real life it’s more like 15 minutes here, 20 minutes there, sometimes with, sometimes without music, often forgetting to light a candle or to be quiet and contemplative.
Still, I’m getting there and enjoying these knitting moments. The only thing I’m not quite happy with is the bumpiness of the sides of some of the mittens and the irregularity of some of the stitches. But let’s look at it from a positive side: I still have things to learn – yay!
7. Mini-sock The first Christmas card arrived accompanied by a small gift – a mini-sock. No, actually it wasn’t a Christmas card but a New Year’s card. The friend who sent it explains why on her wonderful blog about her life, knitting, walks with her dog and music. It is in Dutch, but Google does a fairly decent job of translating it. You can read about and see all of the mini-socks she knit here.
I’m happy and honoured to be the recipient of one of these sweet little socks. I’ve attached it to the zipper of my babysitting bag, so that it will travel with me every time I’m looking after our grandson.
May your weeks be filled with small things that make you happy, too.
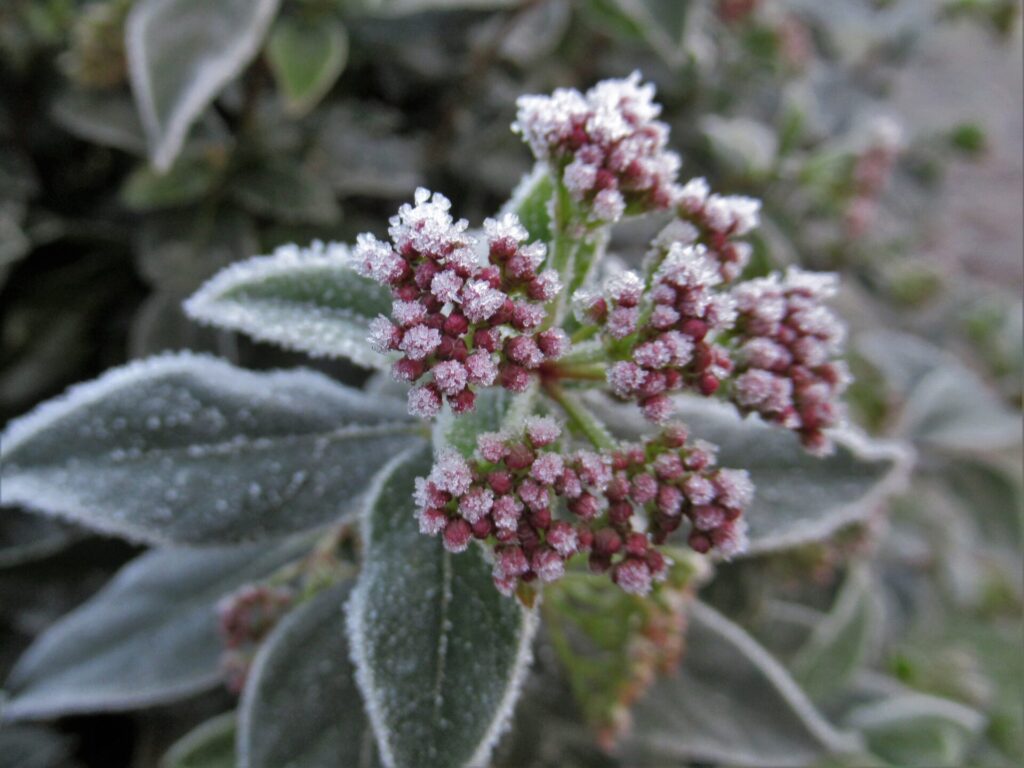
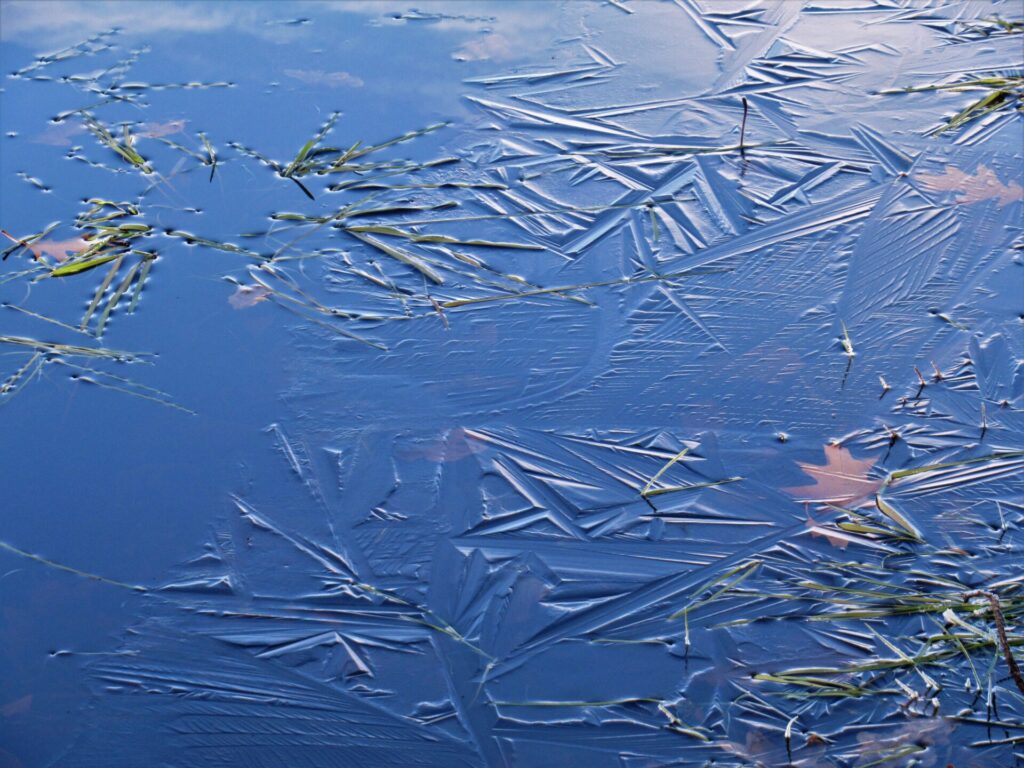
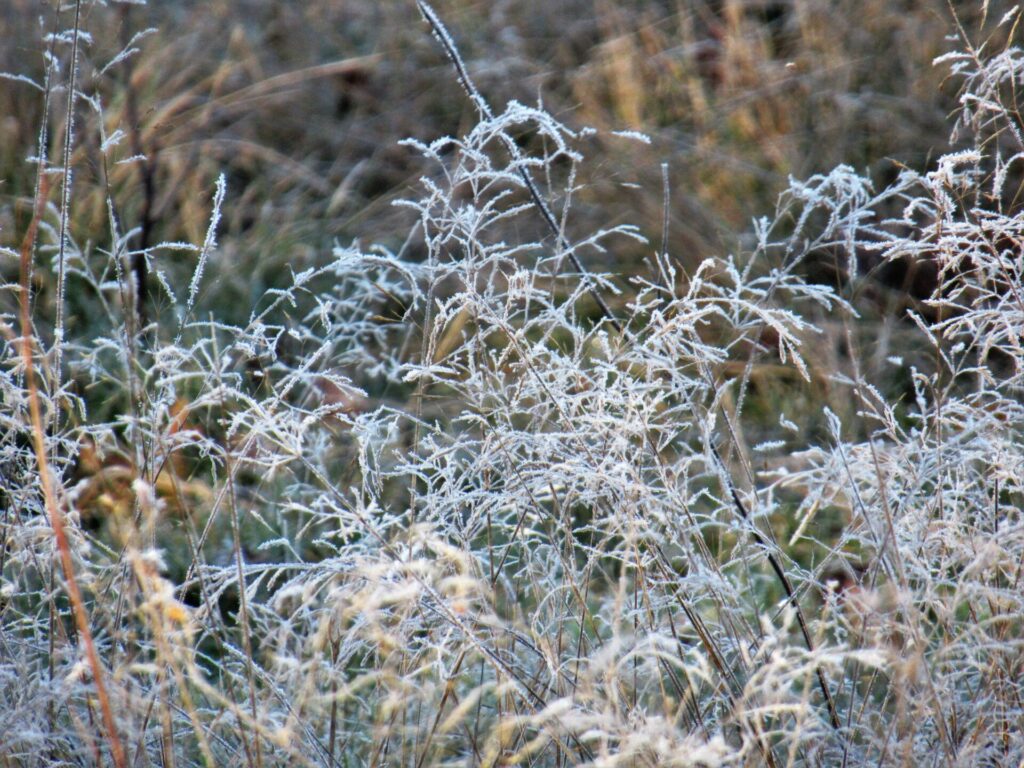
For two nights and a day-and-a-half it was wintry here, with starry nights, bright sunshine during the day and frost in the air. We’re back to higher temperatures and overcast skies now, but it was lovely as long as it lasted, with the thinnest layer of ice on ponds and lakes…
… and hoarfrost on the brittle yellowed grasses.
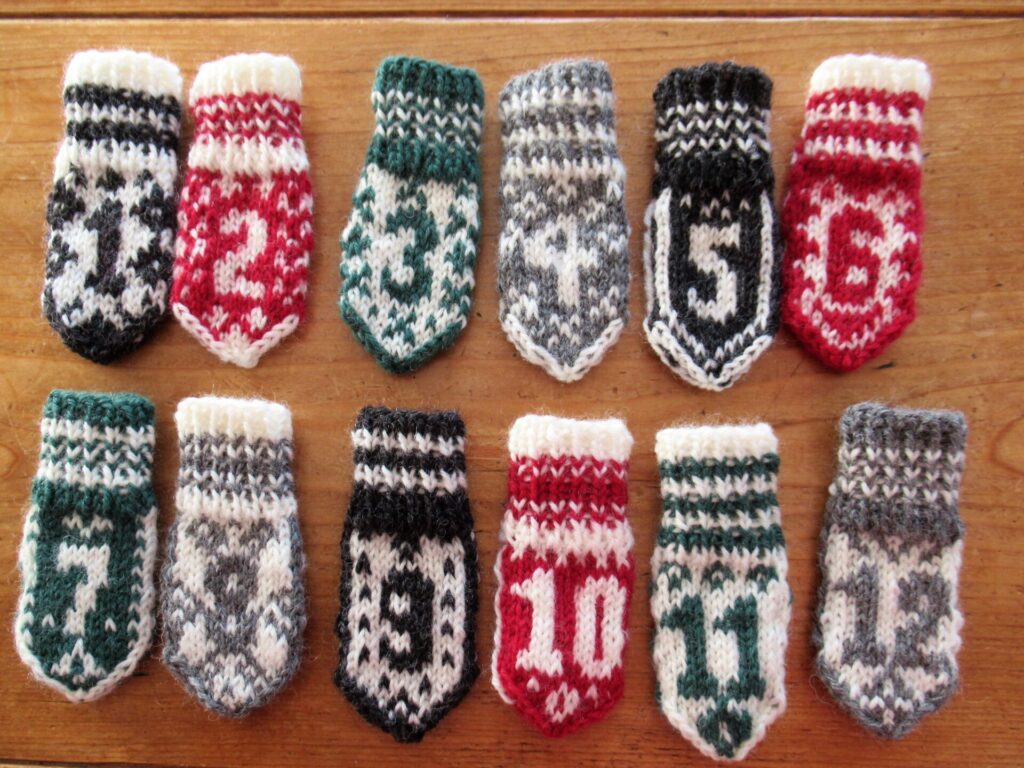
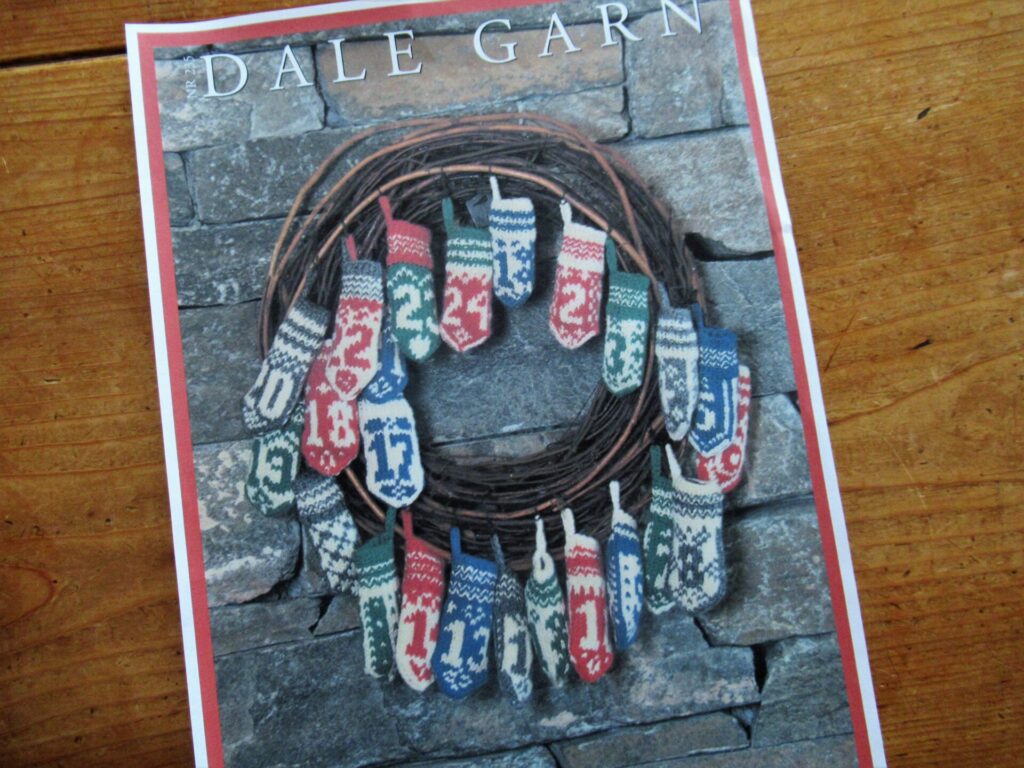
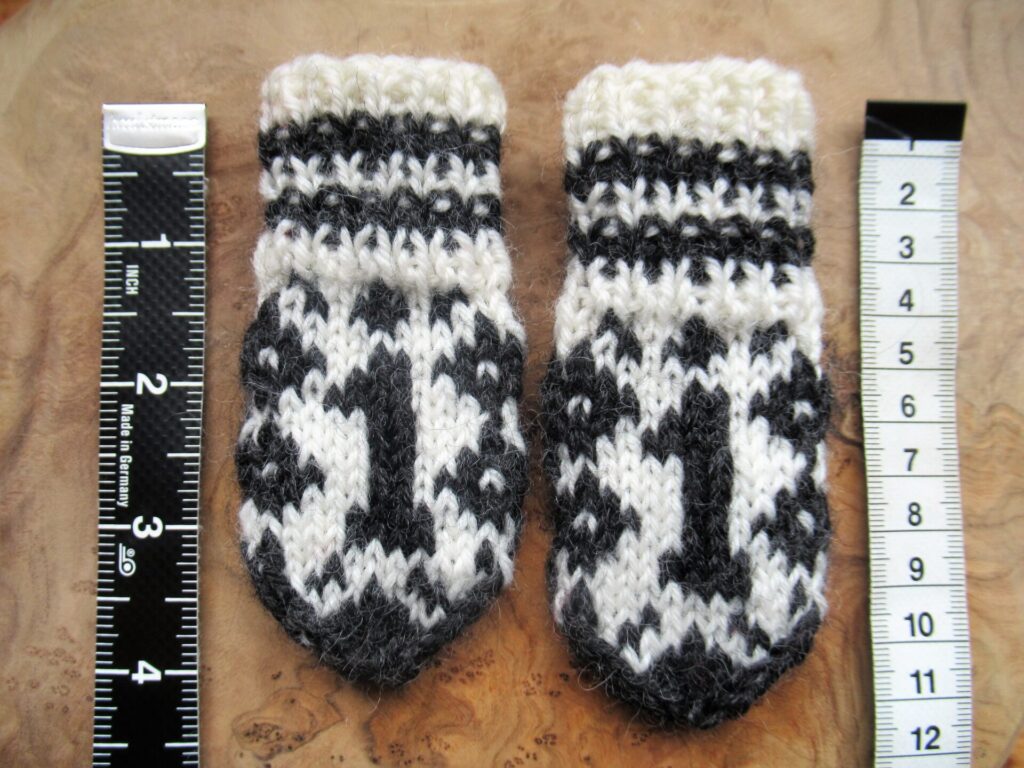
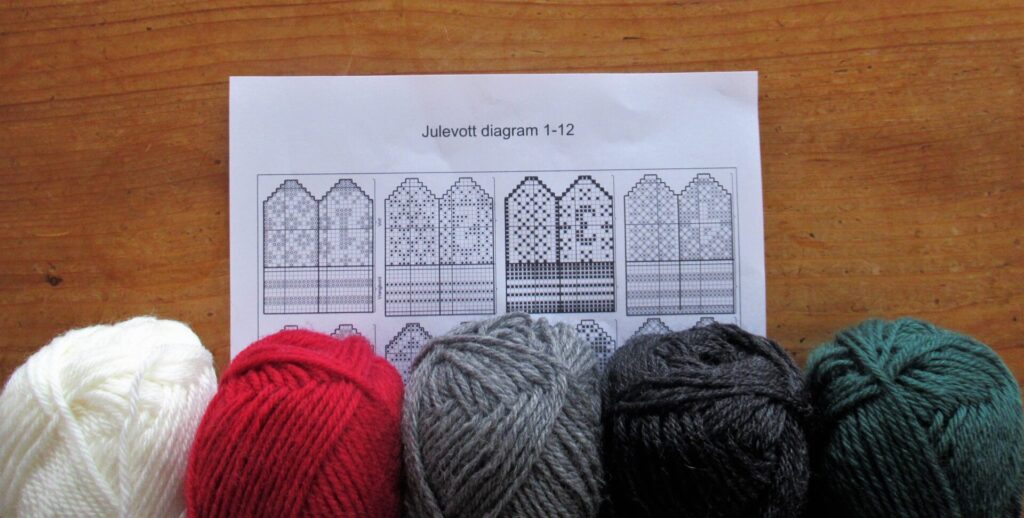
It was on one of these days that I decided to start a new, wintry knitting project: an Advent calendar with 24 small Norwegian Christmas mittens or Julevotter. A few days earlier a newsletter in my in-box mentioned it. As soon as I saw it, I loved it.
I didn’t plan on making one, though, until the wintry weather made me change my mind. It made me crave warm, woolly yarn and things. And, thinking about it, didn’t I have exactly the yarn called for in my stash?
The next minute I was running up the stairs, rummaging through boxes, and Yes! Found it! Some Dale Garn ‘Heilo’ and some Drops ‘Karisma’ in just the right colours.
This advent calendar is going to be a double gift. This year it’s a gift to myself – the gift of some peaceful knitting time every day during the Advent period. And next year it’ll be a gift for someone else – filled with small gifts.
I’ve already knit mitten number 1 to try the pattern out, at first using the indicated 3.0 mm/US 2½ needles. This made a very stiff mitten, so small that it would be almost impossible to wriggle a tiny gift into it. I tried another one on 3.25 mm/US 3 needles and that was better. Still small, but less tight.
Using knitting needles just a quarter of a millimetre thicker made a visible difference.
The pattern is in Norwegian, but that’s not really a problem even if you don’t speak a word of the language. Legg opp 26 m means: cast on 26 sts. The ribbing is k1, p1. And there are charts for the colourwork patterns and the decreases at the top.
The 24 tiny thumbless mittens are all going to be different, with a number on one side and lovely Norwegian patterns on the other.
I’m not sure it’s doable, knitting a mini-mitten every day during the run-up to Christmas, but we’ll see. I’m really looking forward to spending quality time with them and am not going to hurry. If they’re not finished ‘in time’ I’ll just keep knitting on in the New Year.
I read about this Advent Calendar in an e-mail from Rosy Green Wool, a German producer of organic yarns. I’ve subscribed to their newsletters because they are not too frequent and there is usually something interesting in them. Their post about this project can be read here on their website.
Sabine, the author of this ‘Knitting Letter’ as they call it, has knit one for each of her two children, and it’s fun to see them in the un-Christmassy colours she’s chosen, very different from my traditional ones.
The free pattern for the mini-mittens was published by Dale Garn and can be found here on Ravelry. Rosy Green Wool’s knitting letter says that it is no longer available for downloading, but it is. It is no longer available from Dale Garn, but can now be found on the Wayback Machine. Here is how to find it:
If on Ravelry you click on ‘This pattern is available for free’ or on the link under ‘For more information, see:’ you’re sent on to the Wayback machine (on my computer it takes a while). It looks a bit iffy, but the Wayback Machine is a bona fide internet archive.
When there, click on ‘Last ned katalog’. Then you’ll get a pdf of a lovely booklet with lots of patterns for knitted and crocheted Christmas projects.
For the mitten Advent calendar pattern scroll down past all the cosy pictures and you’ll find it on pages 1-3 of the instructions.
Well, I won’t keep you any longer. I know this is a busy time of year for many, but I hope you can find some quiet time in between all the jobs on your list to just sit and knit, or read, or listen to music, or do whatever else feels peaceful to you. xxx
Do you do it too – Google anything and everything? Although I was tremendously looking forward to the birth of our first grandchild, I also felt slightly uncertain about my new role as a grandmother, having grown up without grandparents. So I Googled on ‘How to be a grandmother.’
Terribly silly, I know. Still, I found quite a few helpful tips. But also this one: ‘Whatever you do, DO NOT KNIT!’ That really had me in stitches. I’ve been knitting since I was five years old, and now I should stop?! Well, you can imagine that I disregarded that piece of ‘wisdom’.
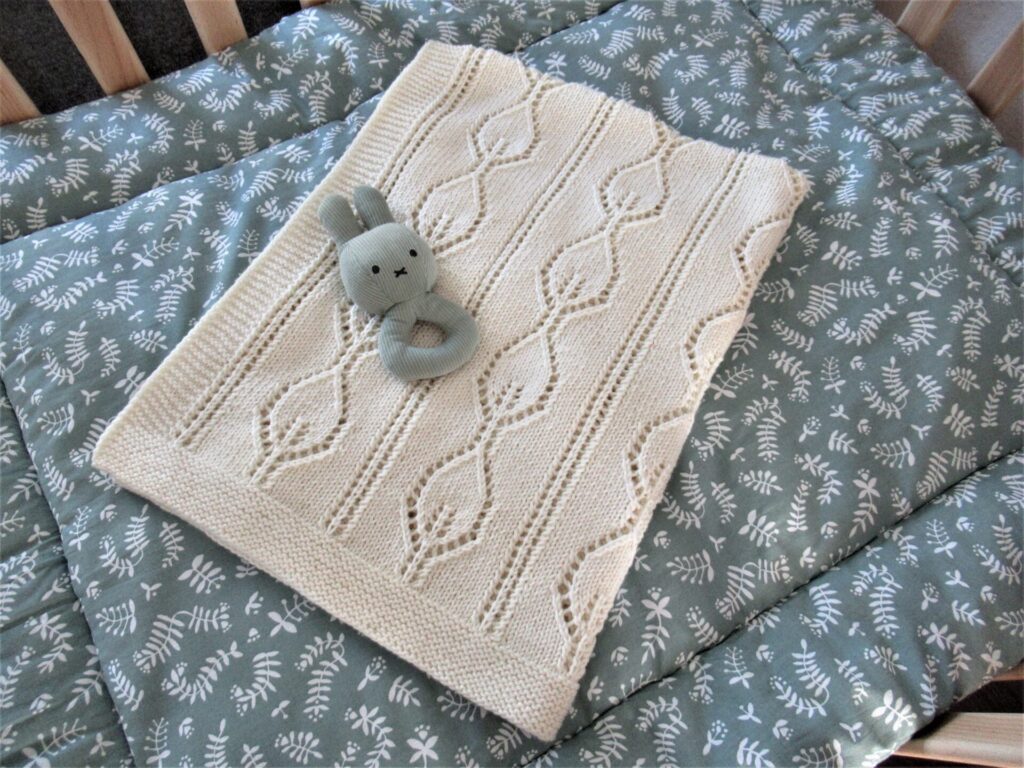
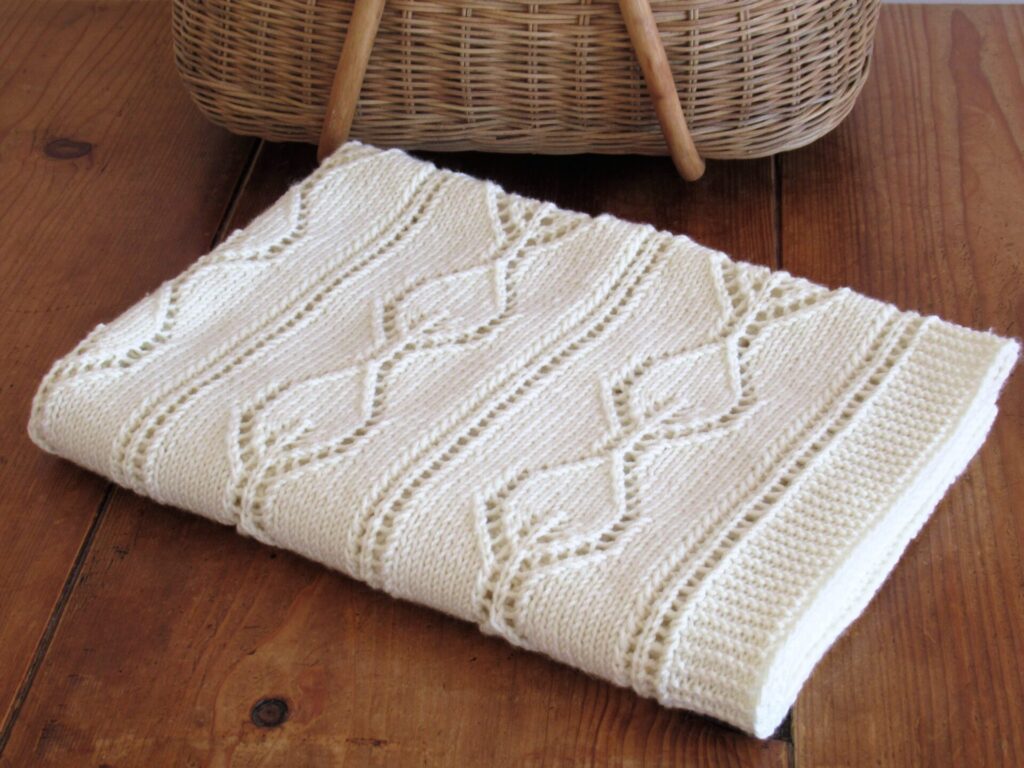
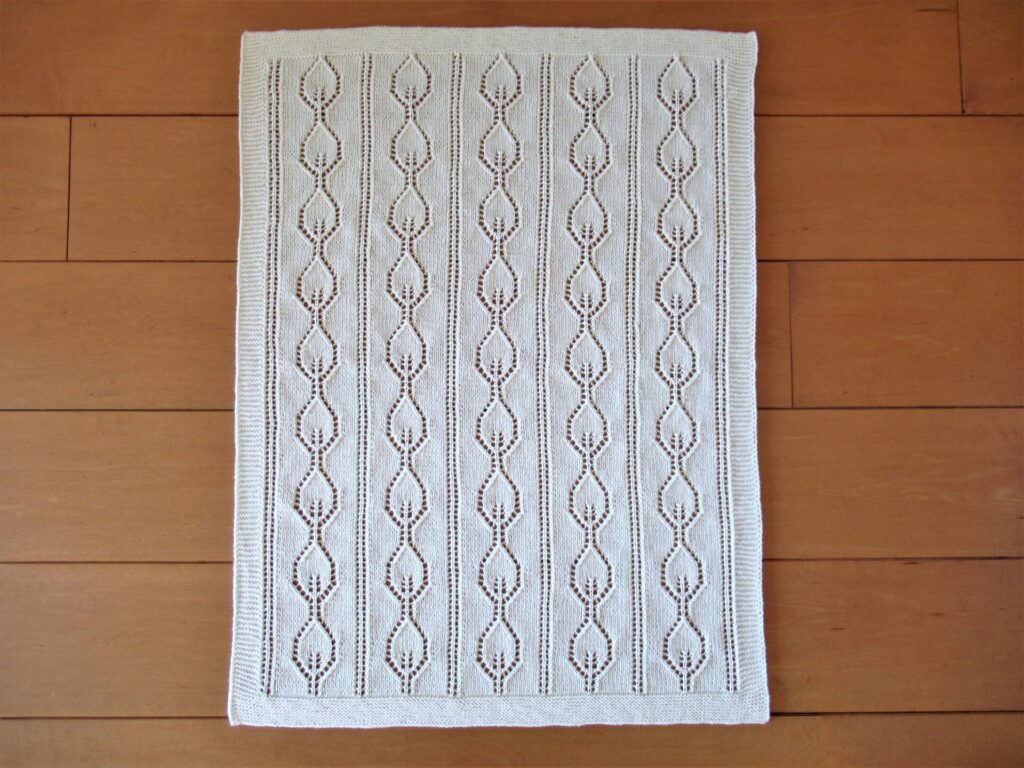
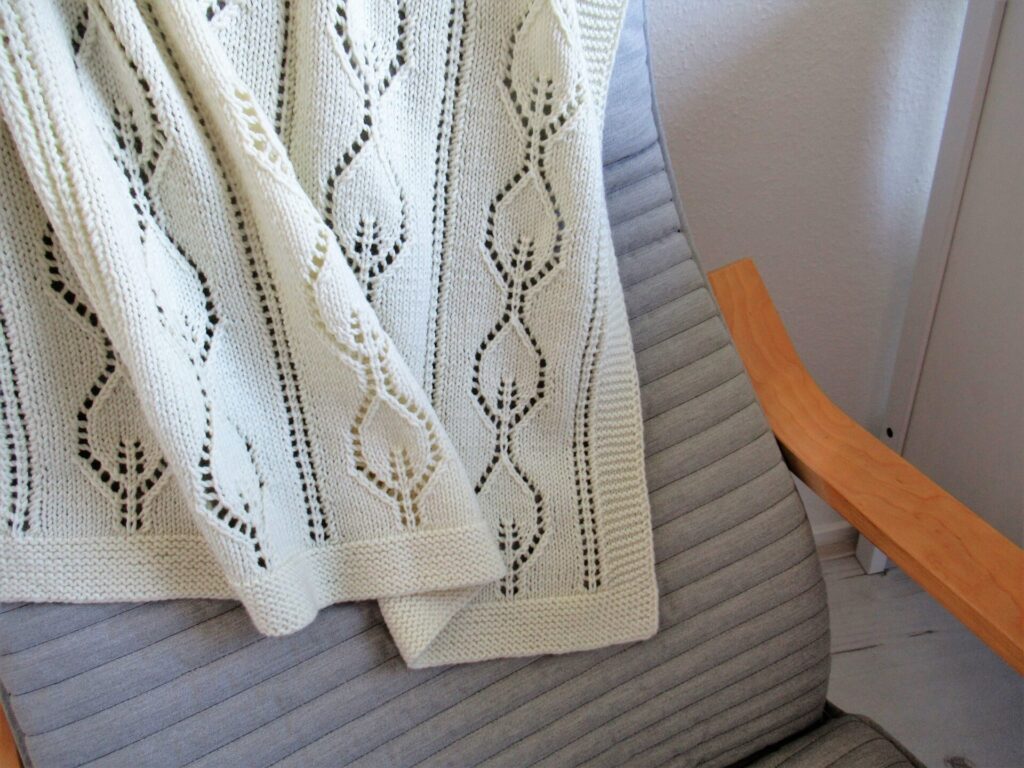
For most of the things I knit to welcome our grandson I used existing patterns, but I also wanted to design something myself. And after much pondering, sketching and swatching, I came up with the blanket you’ve already seen at the top. Here is another photo of it folded:
And here it is spread out on the floor:
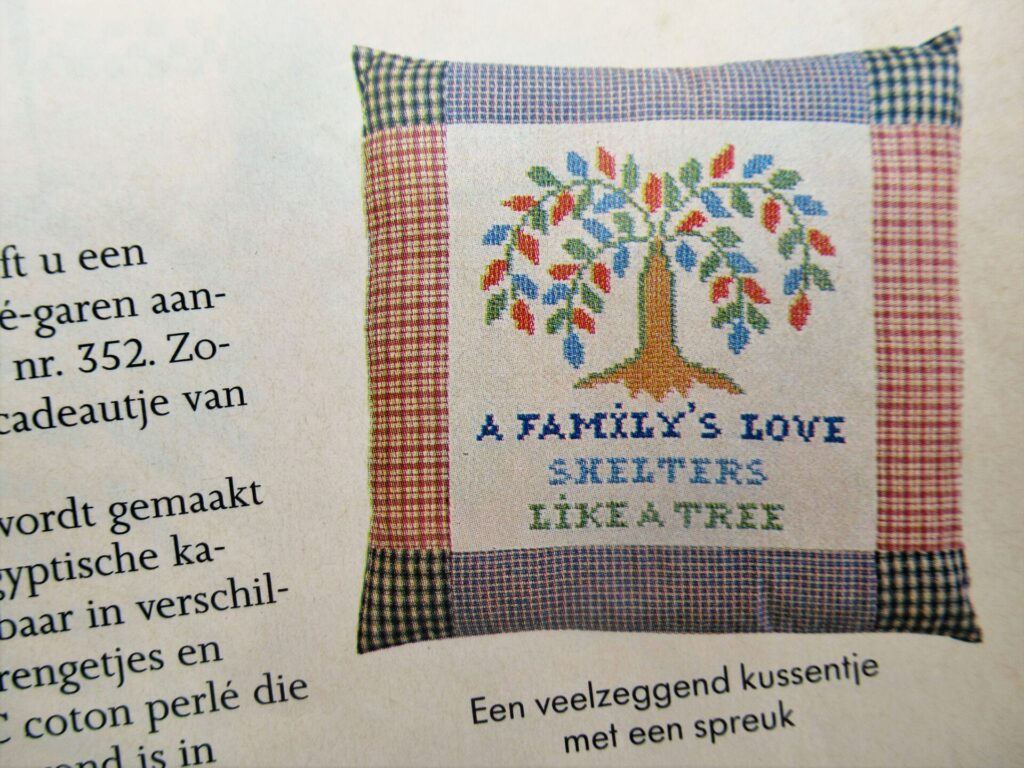
Our daughter’s becoming a mum inevitably made me think back to the time she was a baby herself. From the time she was just a few months old until the age of seven, another mum in our street with a daughter about the same age looked after her when I was working. She had a wonderful time with that family.
When we moved away to where we live now, I made them a patchwork cushion for a farewell present, embroidered with a tree and the words: ‘A family’s love shelters like a tree.’ Obviously I can’t show you the actual cushion, but here is a (slightly grainy) photo from the pattern magazine (Ariadne, June 1991).
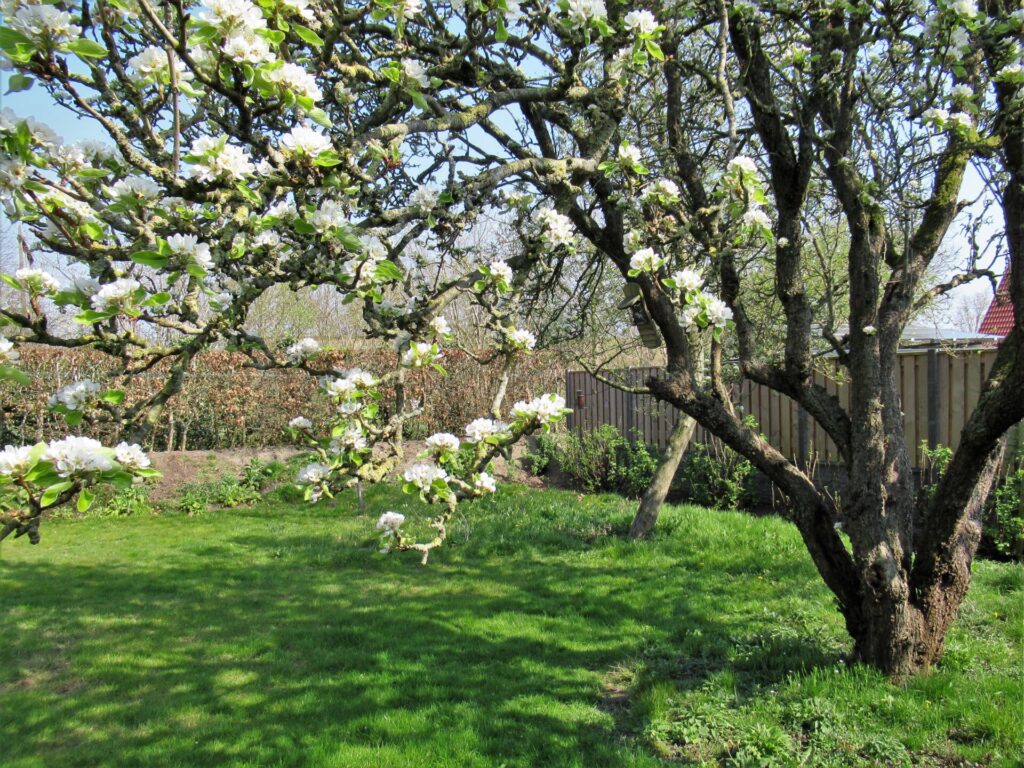
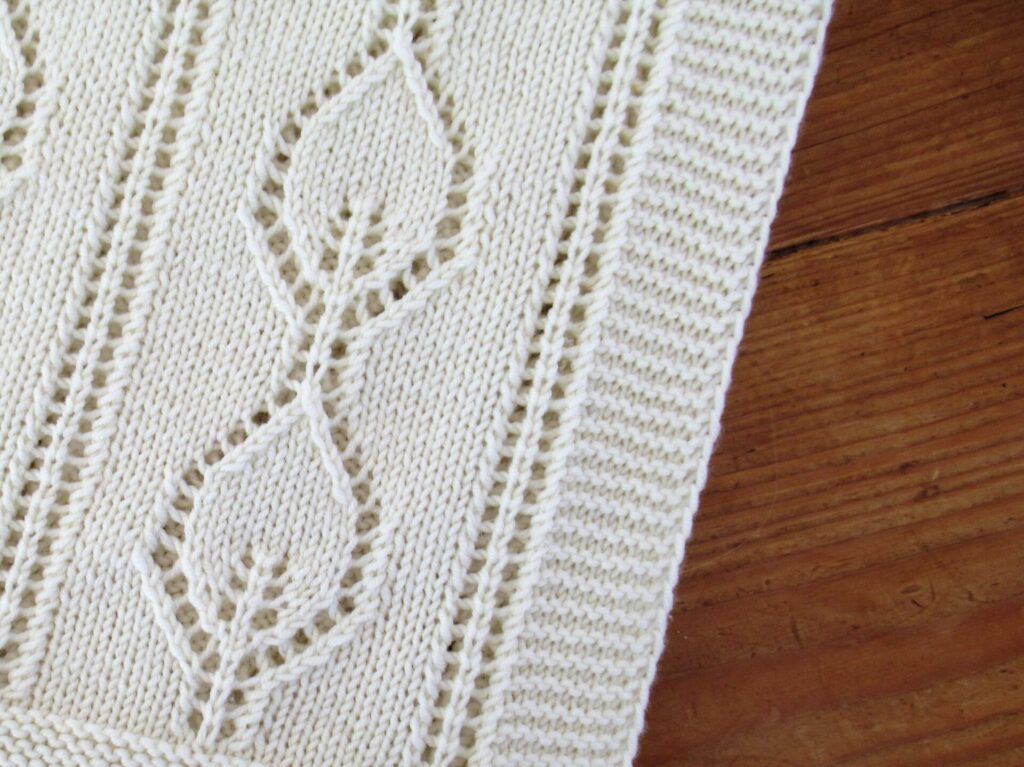
I am well aware that not all families provide loving shelter, and also that some have only very few branches. But still, I love the sentiment, and it was what I was thinking of when I knit our grandson’s blanket. I called it Pyrus Blanket for the big old pear tree in our garden – a truly sheltering presence. (Pyrus is Latin for pear.)
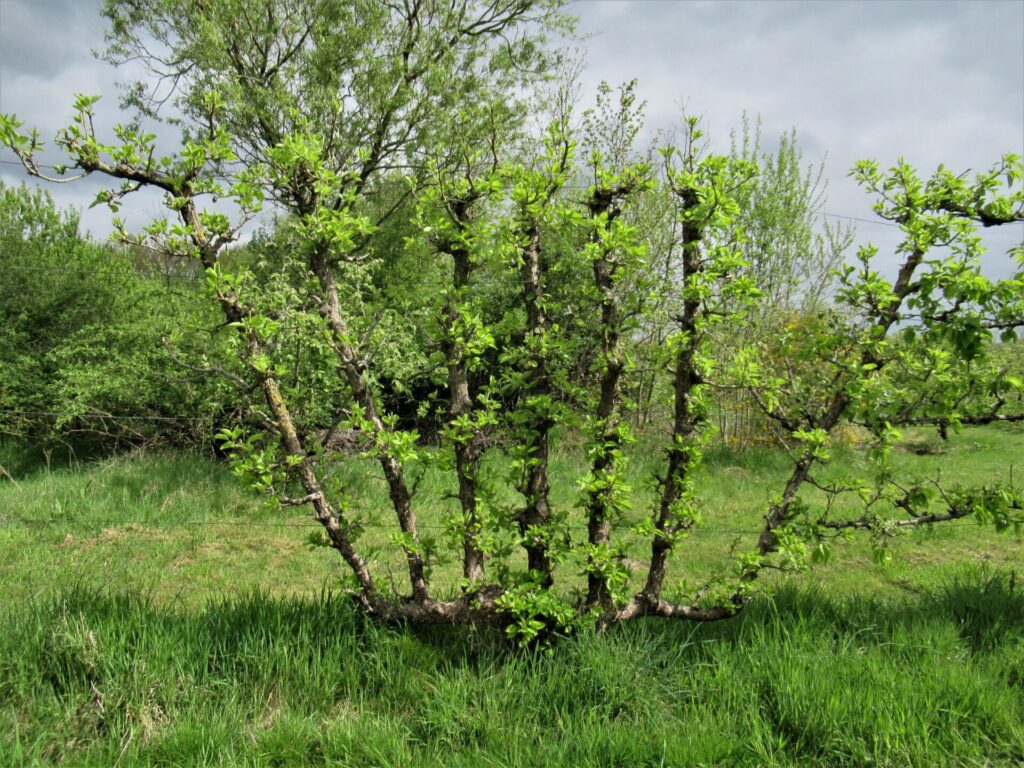
The Pyrus Blanket is covered in the pear tree’s oval, sharp-tipped leaves. The branches of our pear tree spread out like a many-armed candelabra – nothing like the straight lace ladders in the blanket.
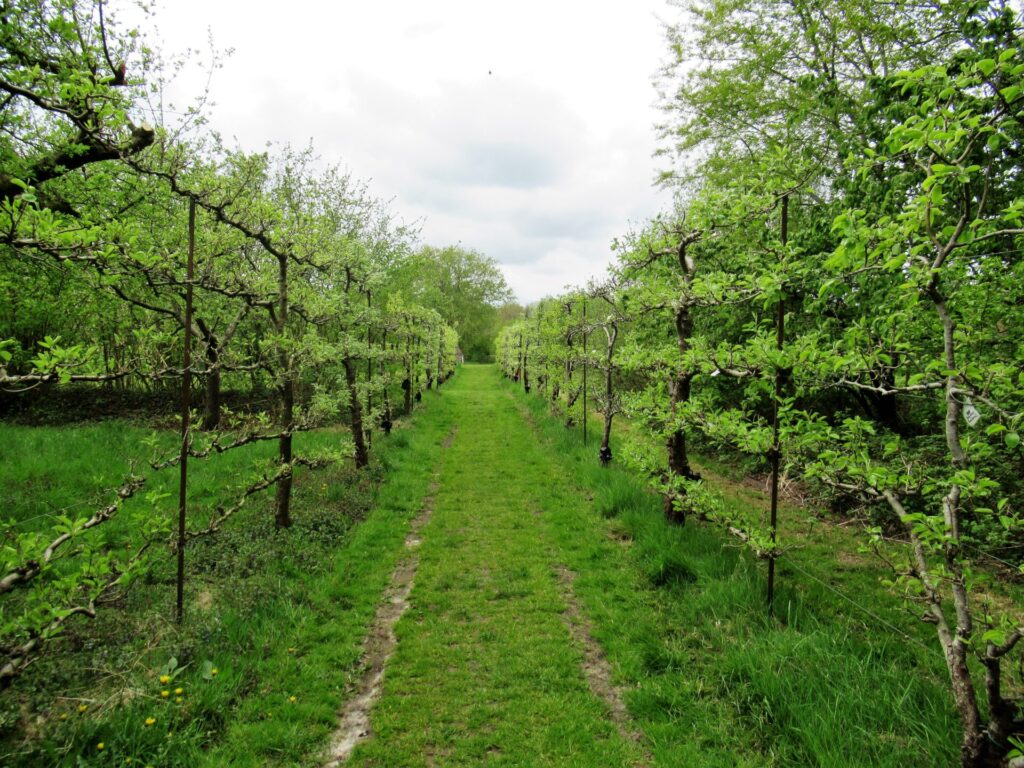
Those were inspired by an espaliered pear tree with vertical branches in De Fruithof.
De Fruithof is an orchard about 30 minutes cycling from our home with some 800 different historical fruit trees. It also has a 750 metre long espalier pear tree avenue.
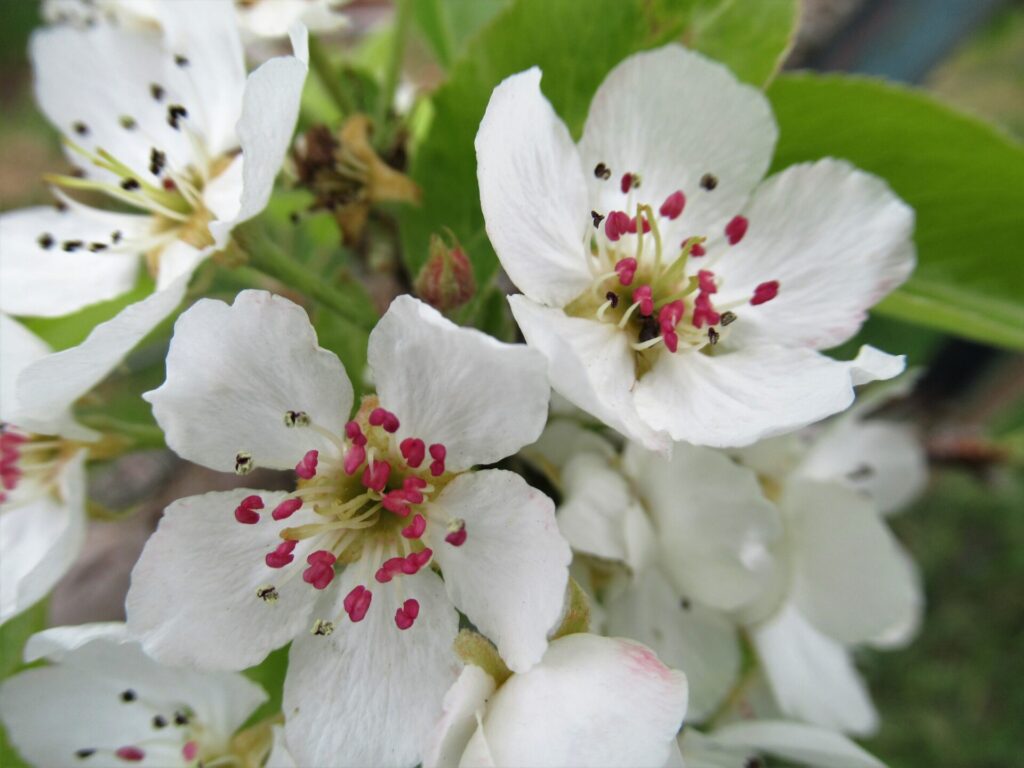
I should, perhaps, have knit the blanket in pure white, to represent the pear tree’s blossoms.
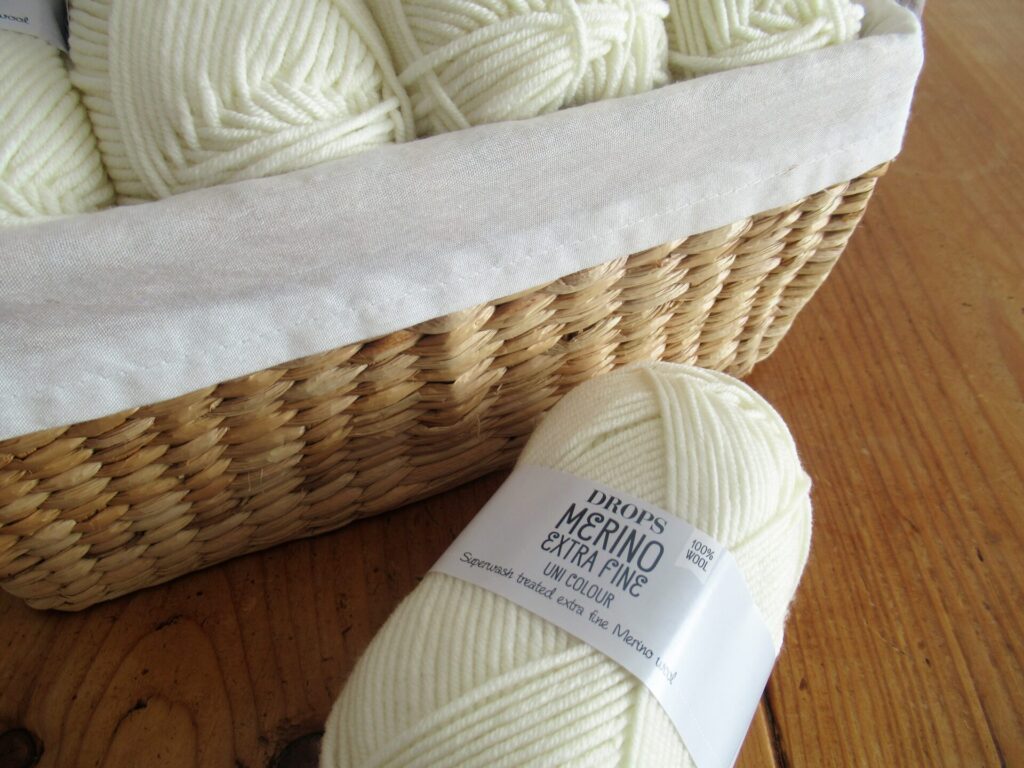
But I’ve taken the artistic license to knit it in creamy, undyed wool, because that was what our grandson’s parents preferred.
The yarn I’ve chosen is Drops ‘Merino Extra Fine’ – a 100% wool DK-weight yarn that won’t break the bank, is machine-washable, super soft and shows up the stitch pattern beautifully. It also has the Oeko-Tex 100 Class 1 classification, a very strict standard that guarantees that the yarn is free of harmful substances and safe for babies and infants.
The Pyrus Blanket measures 75 x 100 cm (approx. 30 x 40”). All patterning is done in the right side rows, with relaxing purl rows on the wrong side. The garter stitch borders have a special edge stitch that I learnt from a girl in the hospital where we were both staying as young teenagers. Among the less pleasant memories, I have very happy ones of us knitting long colourful garter stitch scarves.
(For anyone who doesn’t know this edge stitch yet, I’m explaining it in the pattern.)
I don’t know if I would enjoy being called a tree hugger, but as a family, we do have a thing for trees. Our daughter has also painted a tree on the wall of her little son’s bedroom. When it’s not in use, his Pyrus Blanket often hangs on the back of the chair under that sheltering tree (not always so neatly folded, of course).
Well, that’s the story of my Pyrus Blanket. I have written up the pattern in both English and Dutch, and it can be found
As always, thank you for reading. And should you decide to knit a Pyrus Blanket for a new arrival in your life, or as a gift to someone else: happy knitting!
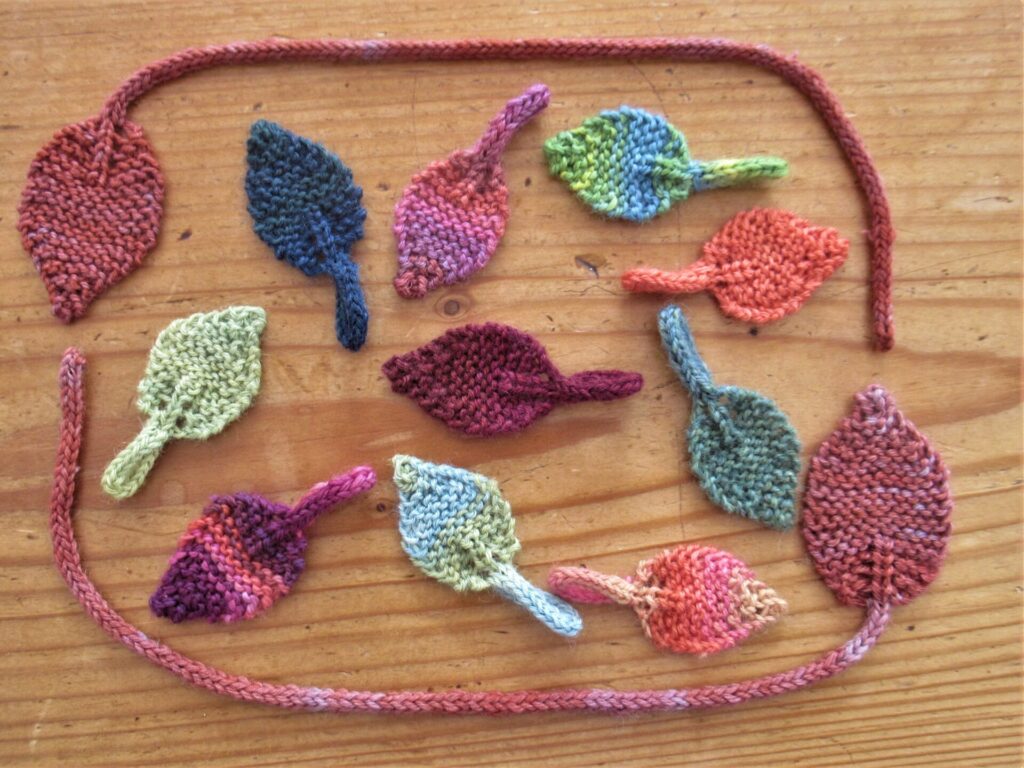
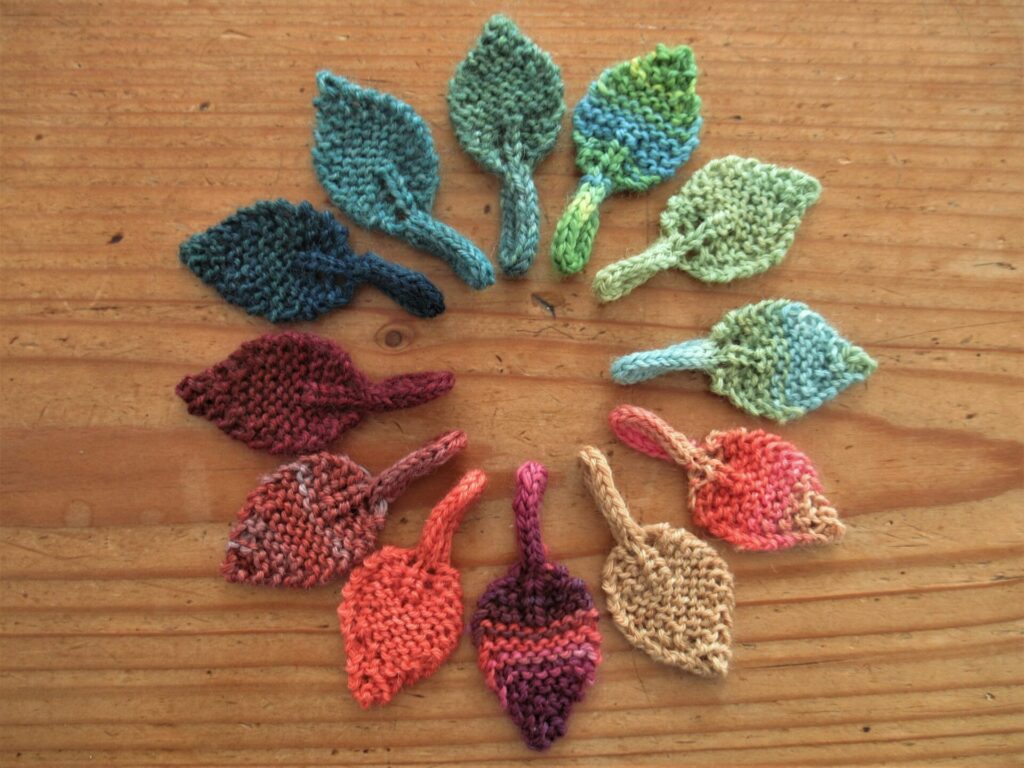
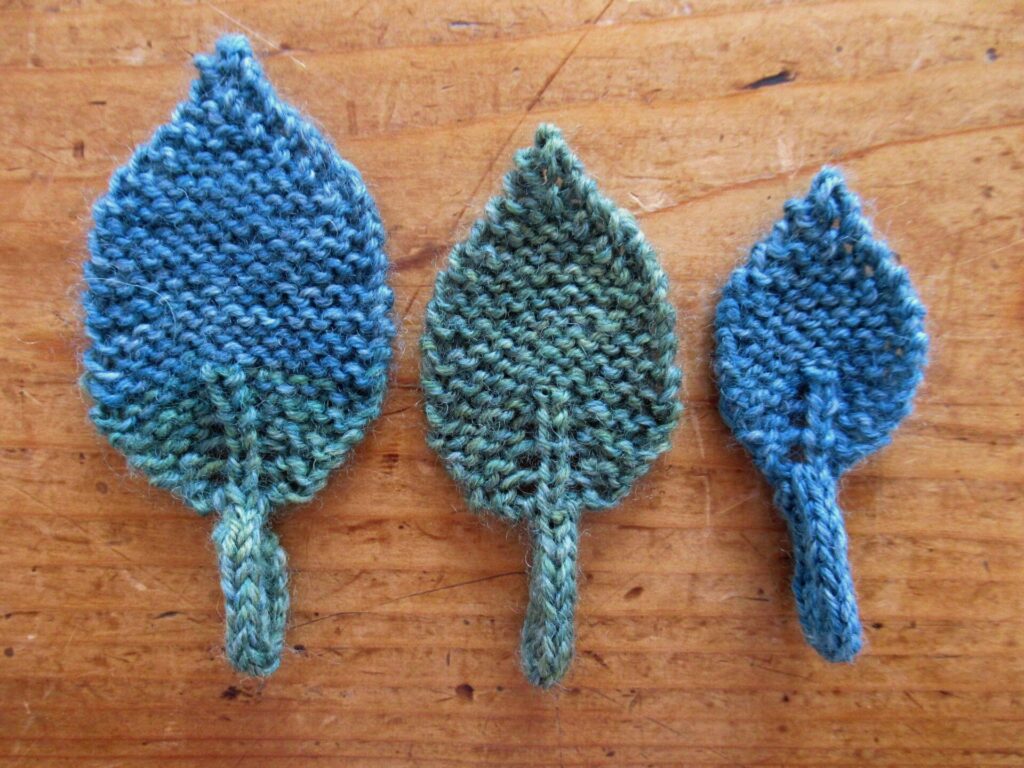
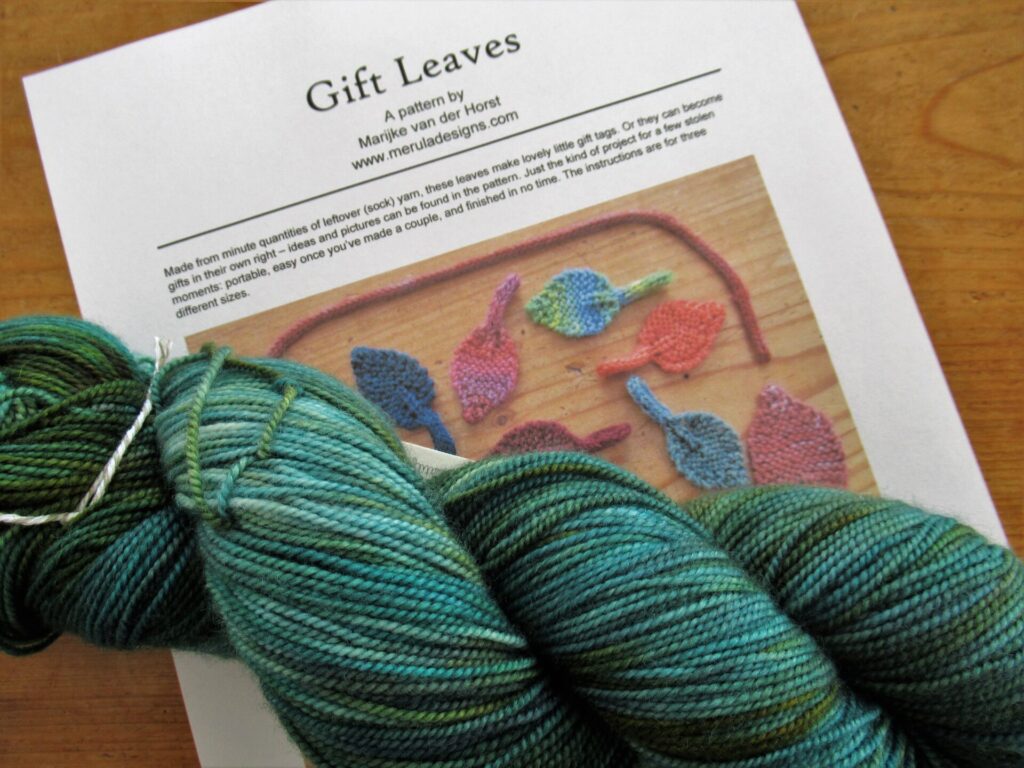
Do you remember my plan to knit all kinds of things from small bits of leftover sock yarn? My plans often take a long time to grow into something tangible, but after the Soothing Sachets here is the second project: Gift Leaves.
I’m calling them Gift Leaves for several reasons:
Because I’ve given myself the gift of time to play around with something not exactly useful.
Because I’ve written up the pattern as a gift to you.
Because the leaves themselves can be given away as gifts.
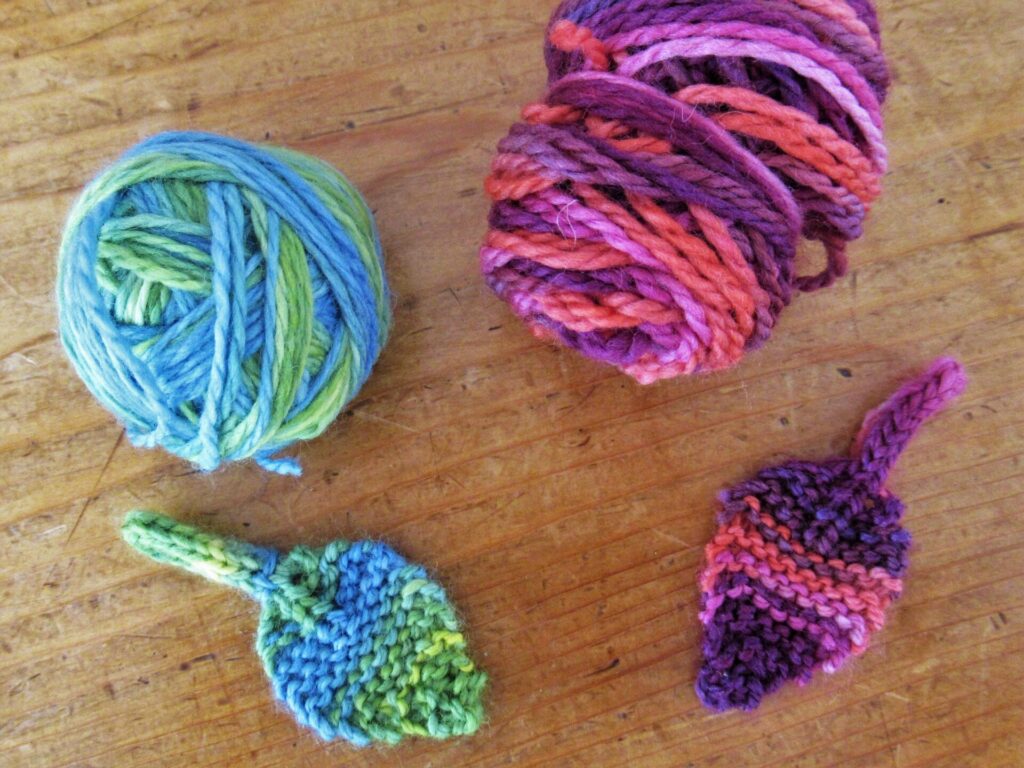
I’ve made them in three sizes: Small, Medium and Large:
With a length of approximately 6.5 cm/2.6” (excluding the stalk) the large leaves are still fairly small, but quite a bit larger than the small ones of only 4 cm/1.6”.
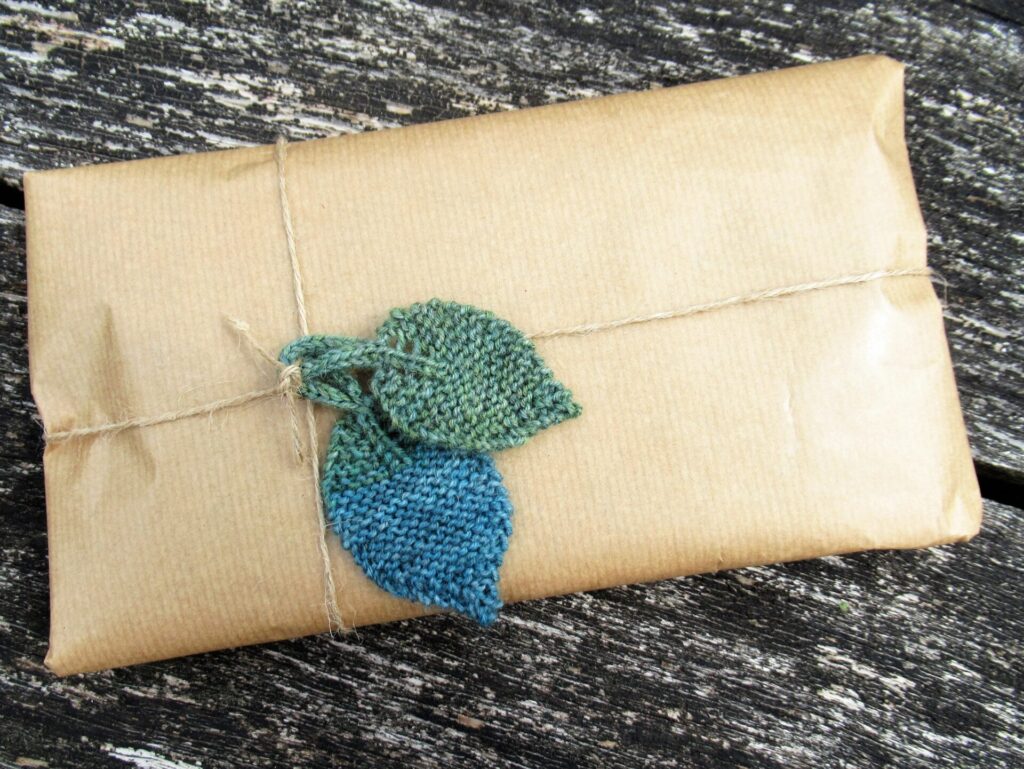
Fastening the beginning of the stalk to the base of the leaf to form a loop, the leaves can be used as gift tags.
Perhaps knit from the same yarn as the gift inside.
They can be fastened onto a zipper.
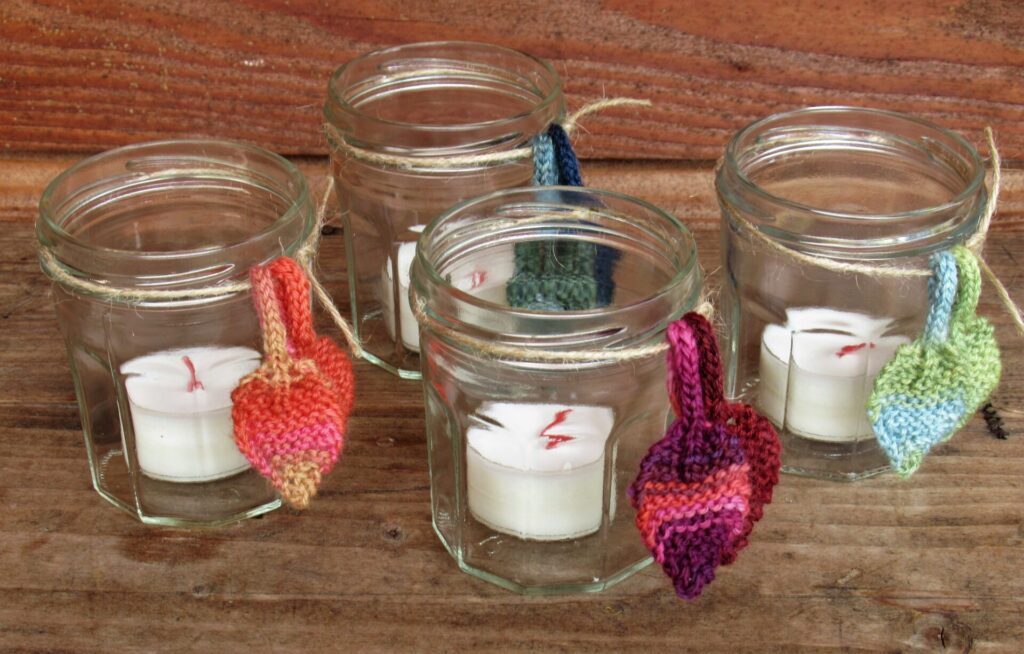
Or used to decorate jam jars with tealights inside for a quick, simple, inexpensive little gift.
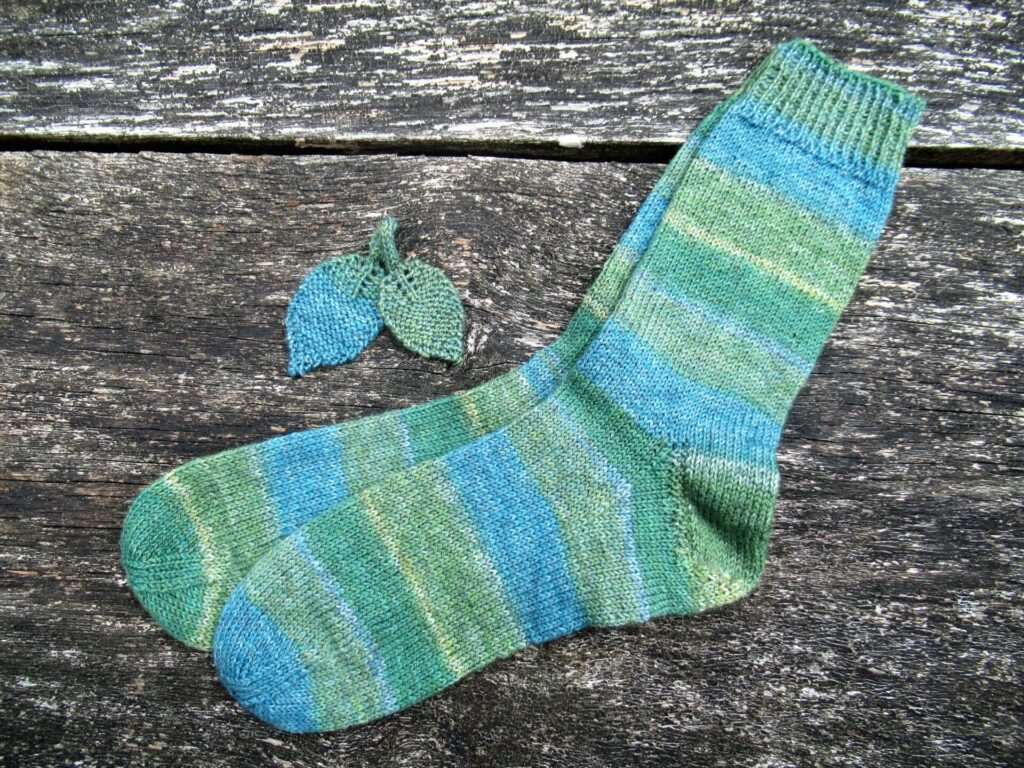
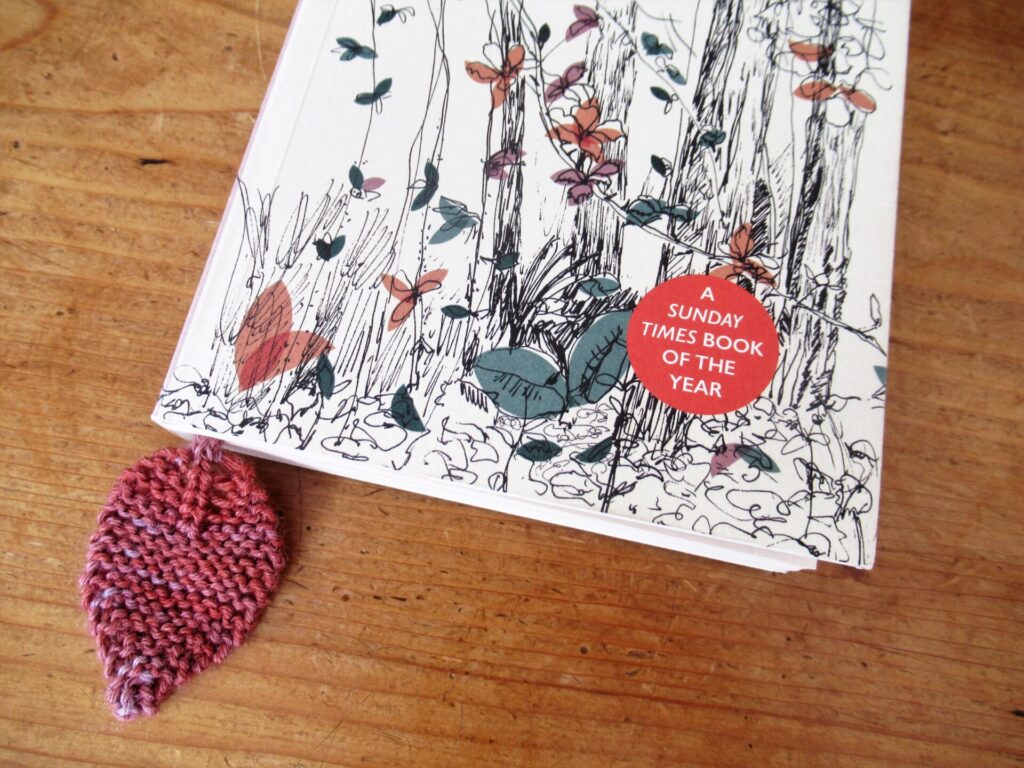
And a medium-sized leaf with a looooong stalk can become a bookmark. Extra special given together with a book, with the leaf colours matching the book cover.
(The book is A Wood of One’s Own by Ruth Pavey, by the way. A gift I received from a friend.)
Solid colours look good. Self-striping yarn works, too, if the stripes are not too wide and the yarn sections used are chosen well. And I think especially some of those ‘busy’ hand-painted yarns are fun for Gift Leaves.
A free download of the pattern with plenty of colourful photos (in English en ook in het Nederlands) can be found
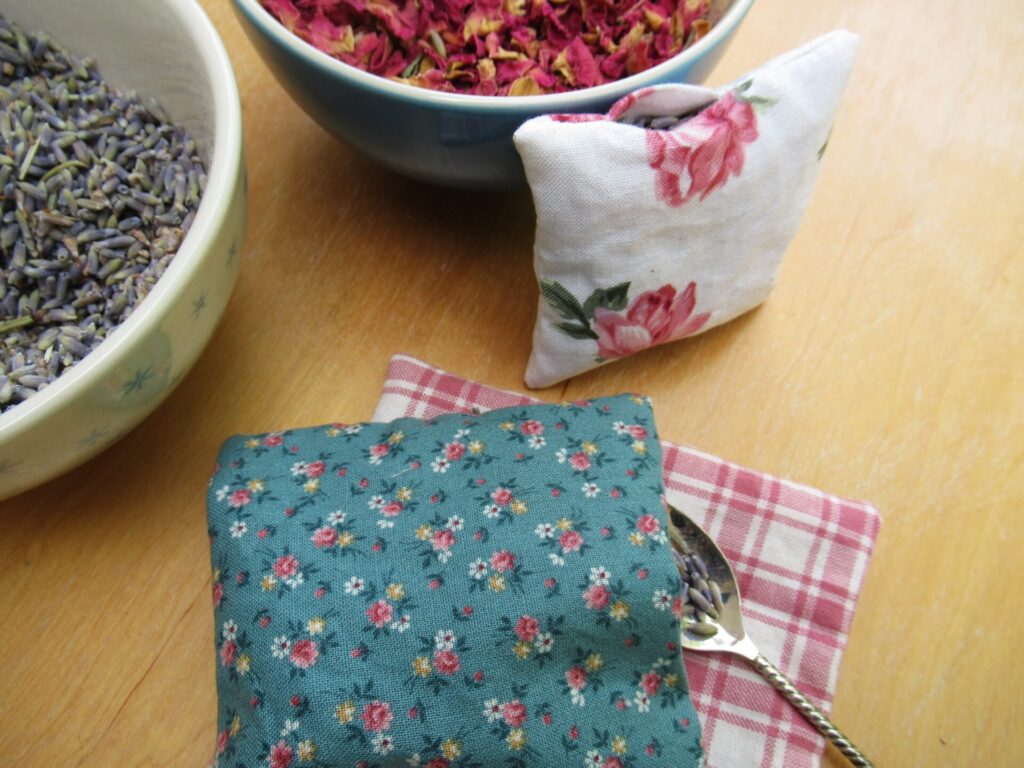
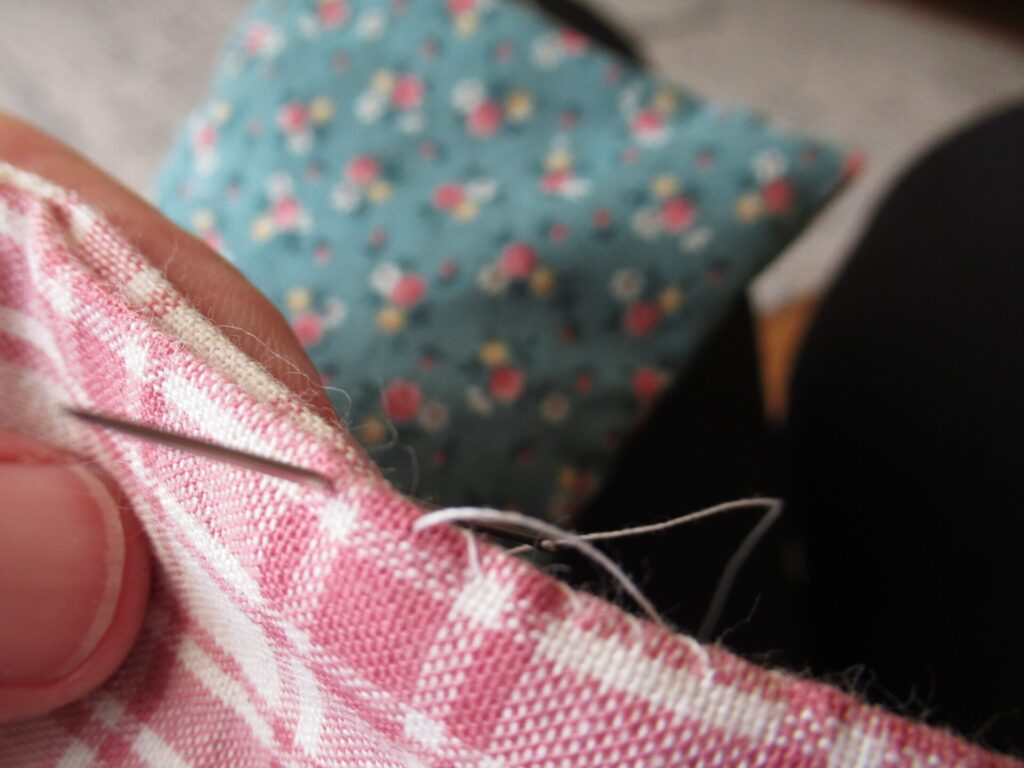
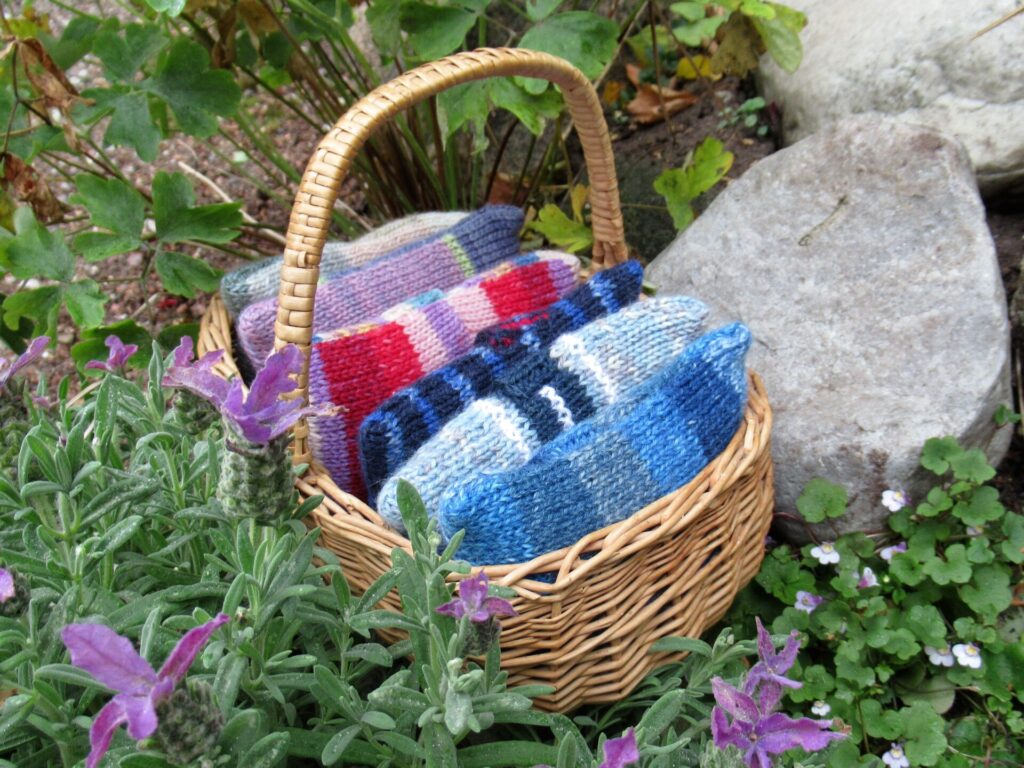
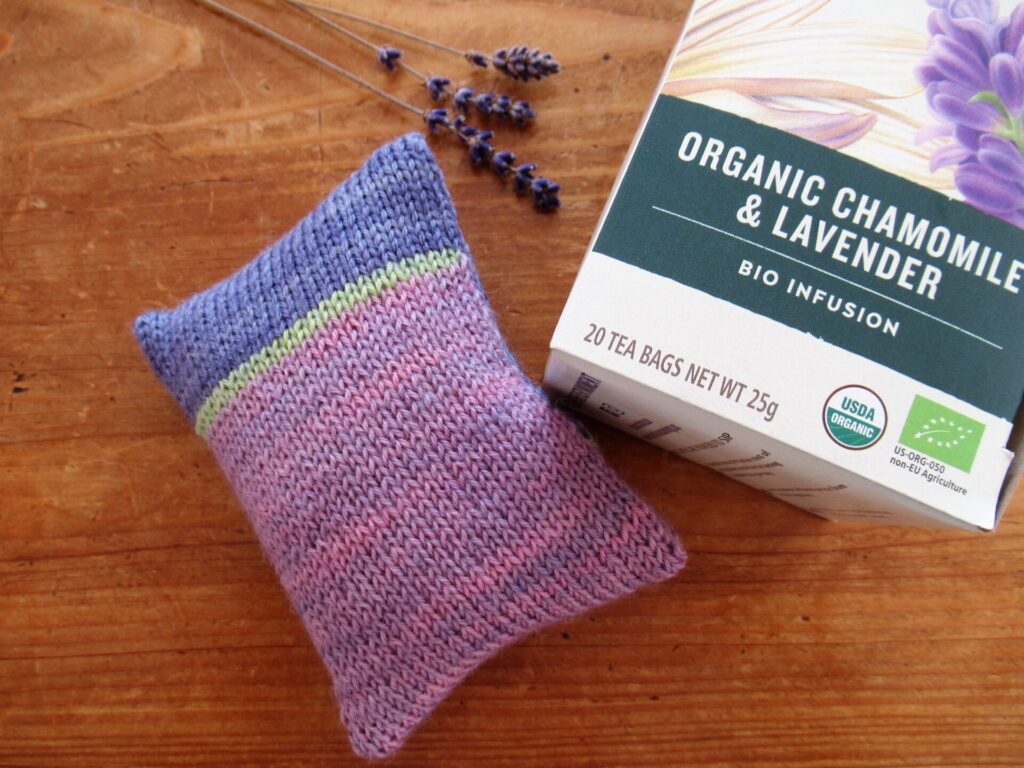
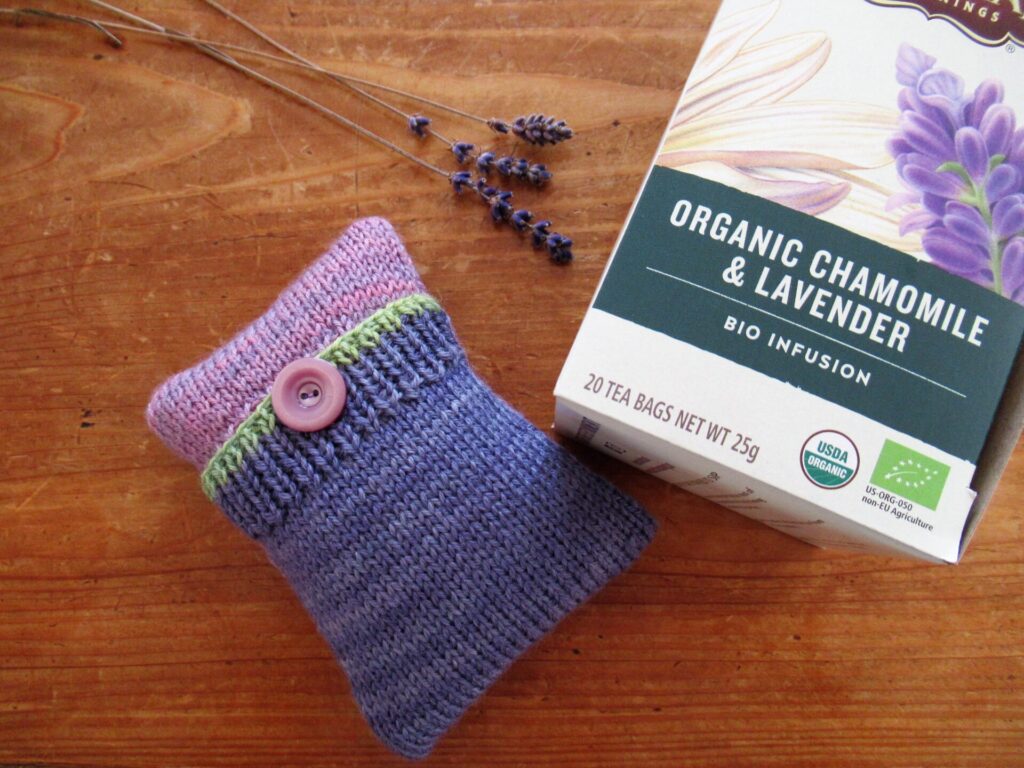
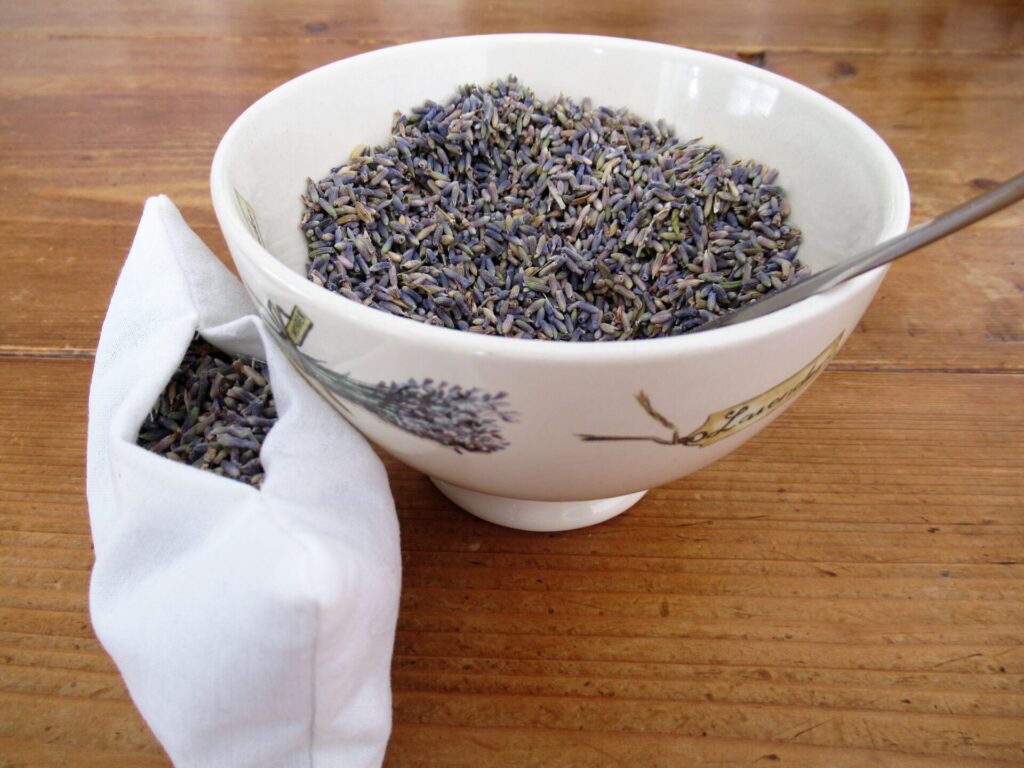
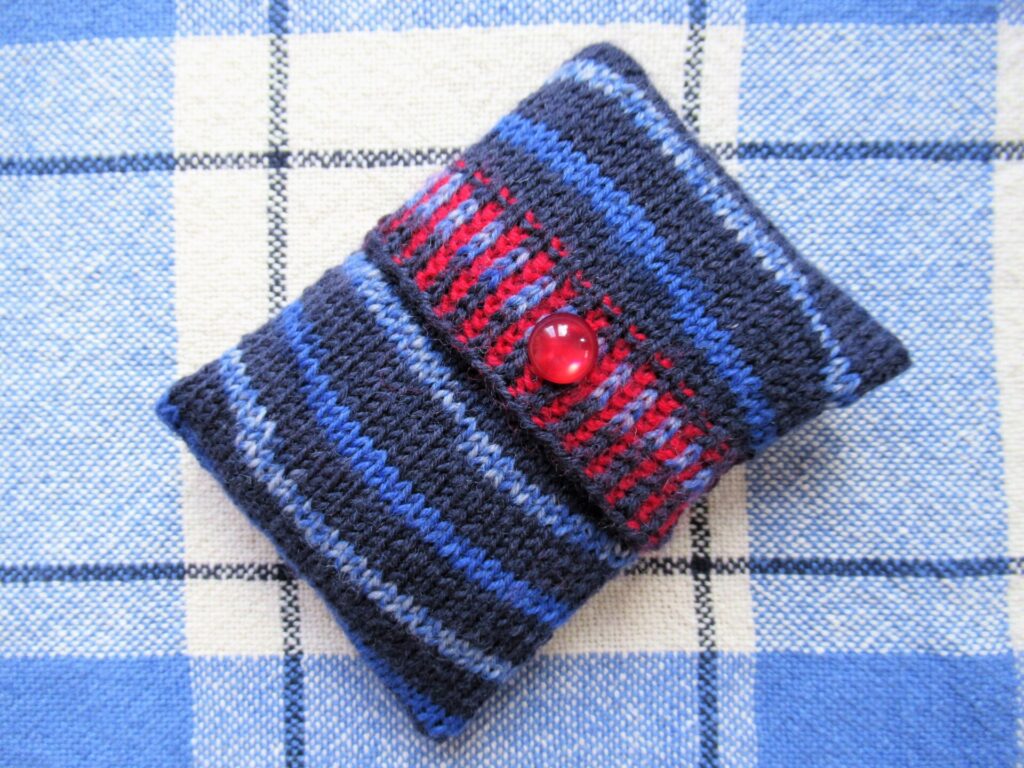
Hello! Well, everything went more or less according to plan this week, so here are the lavender sachets I promised you last week. I call them Soothing Sachets, because lavender is not just known for its moth repellent qualities, but also for its soothing scent.
The ones in the basket above are still scenting our home. But they won’t be doing so for much longer, because they are meant for gifts. Let me show them one by one.
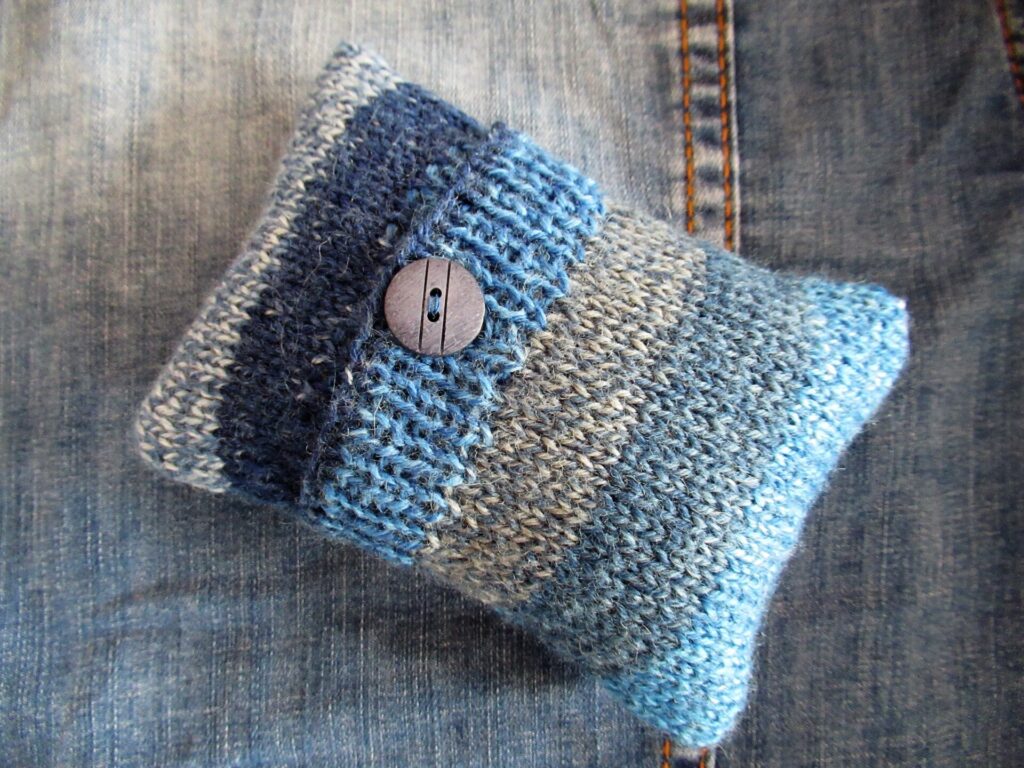
This is the first one I made, after several discarded attempts. It is very simple, from self-striping sock yarn.
It closes with a button. Because of the way the sachet is constructed, the stripes are twice as wide compared to a sock.
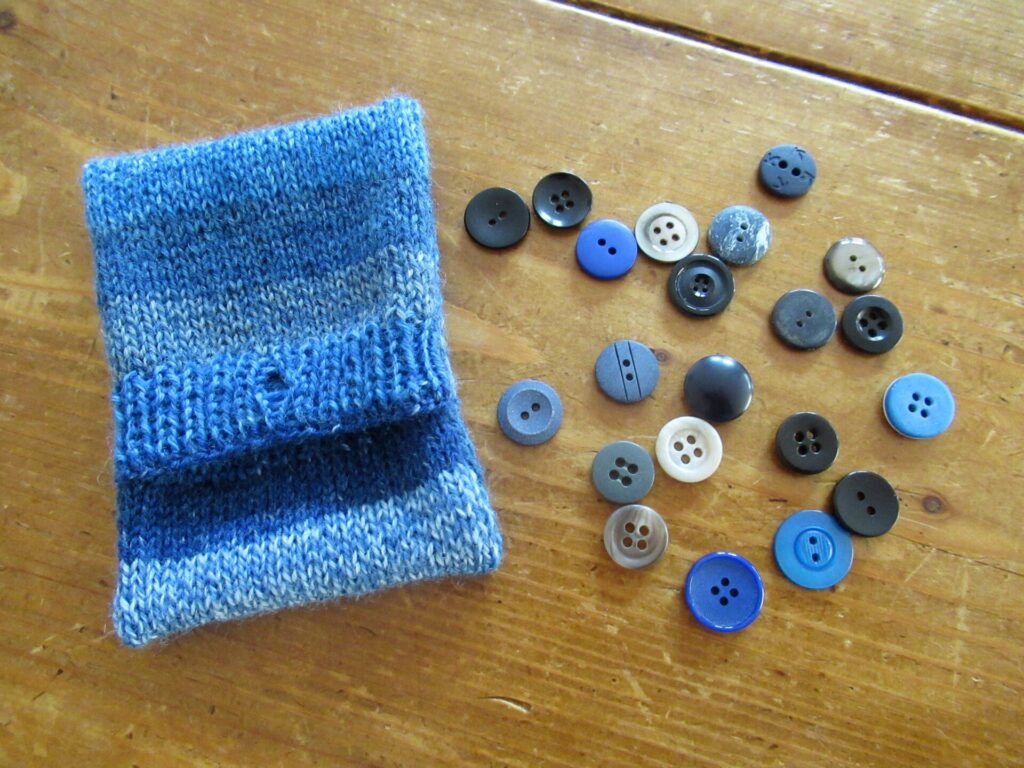
It was fun rummaging through my button box for just the right button.
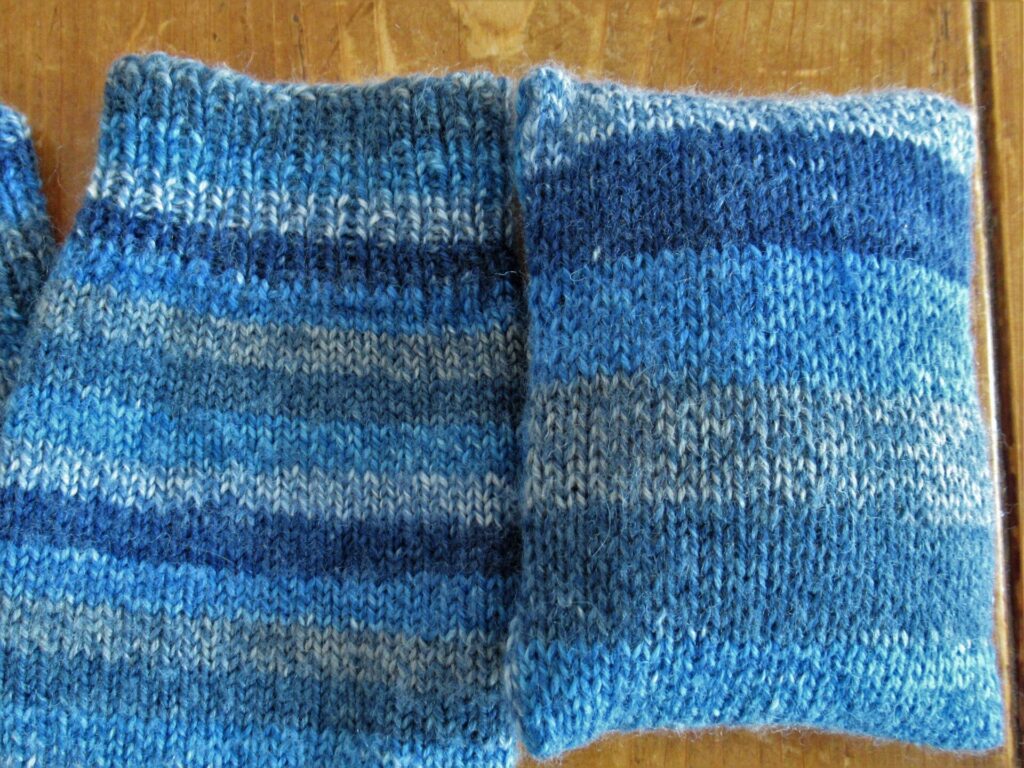
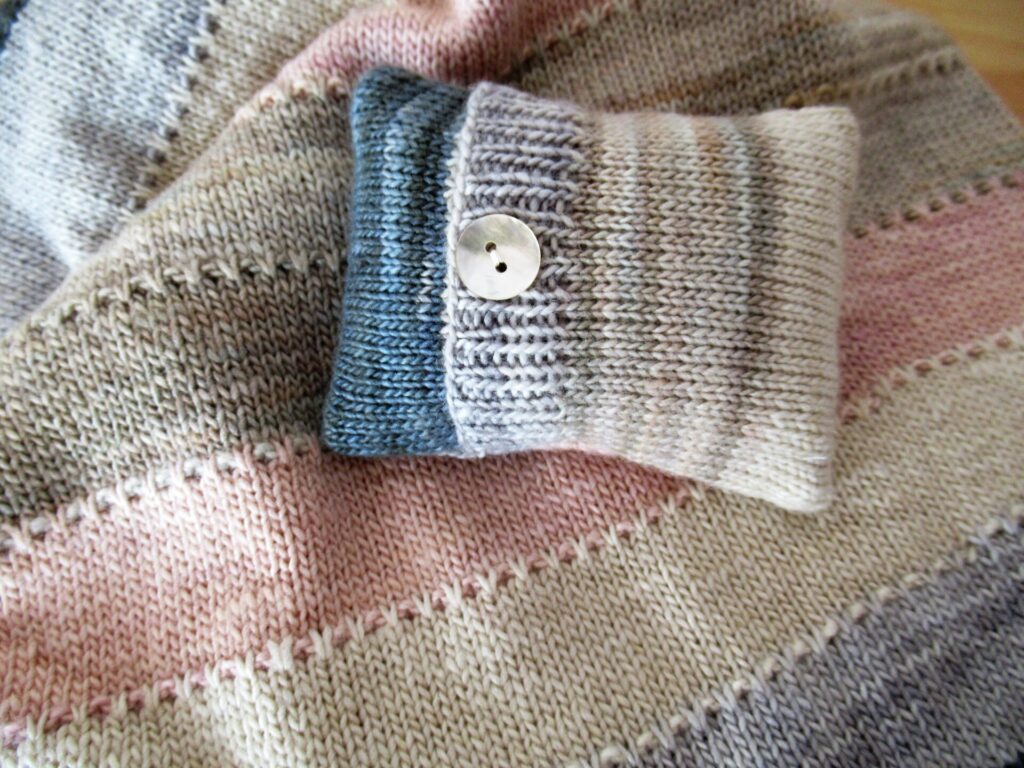
All of the sachets use the same basic pattern. The next one is also very simple – colour blocks with a thin asymmetrically placed contrasting stripe.
The stripe is repeated in the button band.
Together with a box of calming herb tea, it’ll make a nice gift for a friend going through a stressful time. It is made from a combination of beautiful plant-dyed mini skeins.
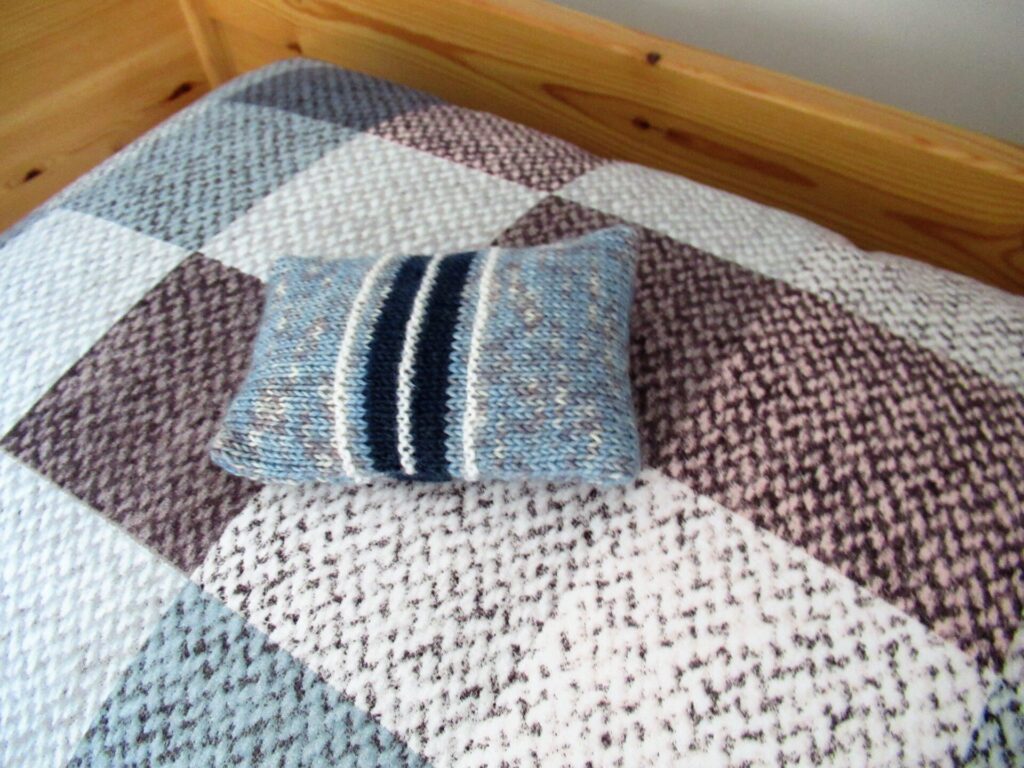
The one below was made from some ordinary mottled sock yarn. A few stripes and garter ridges make it perfect for tucking under a sporty person’s pillow.
In this way even the smallest yarn scraps can be used.
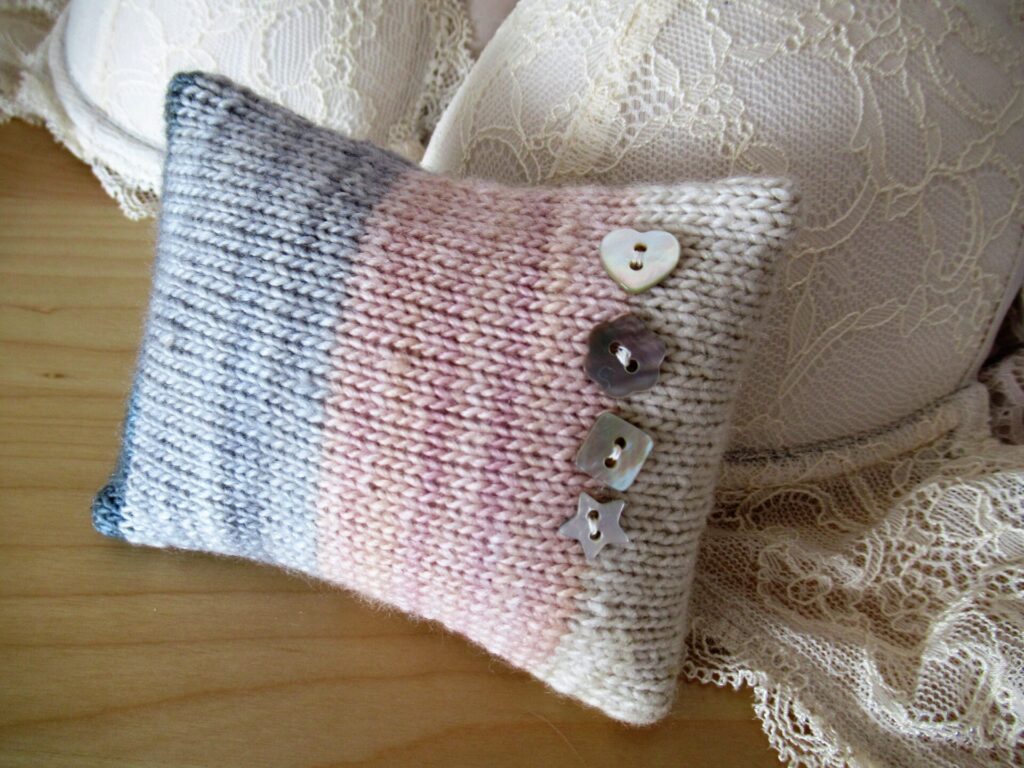
For the next one, I again used colour blocks – this time embellished with a few tiny buttons…
… to match the mother-of-pearl button on the back.
Just the thing for someone’s lingerie drawer, I think. I made it from some of the tiny balls of yarn left over from my first ever published pattern – Tellina.
The Tellina cowl itself would also be a great project for using up some yarn remnants or mini skeins. It can be found here on Ravelry.
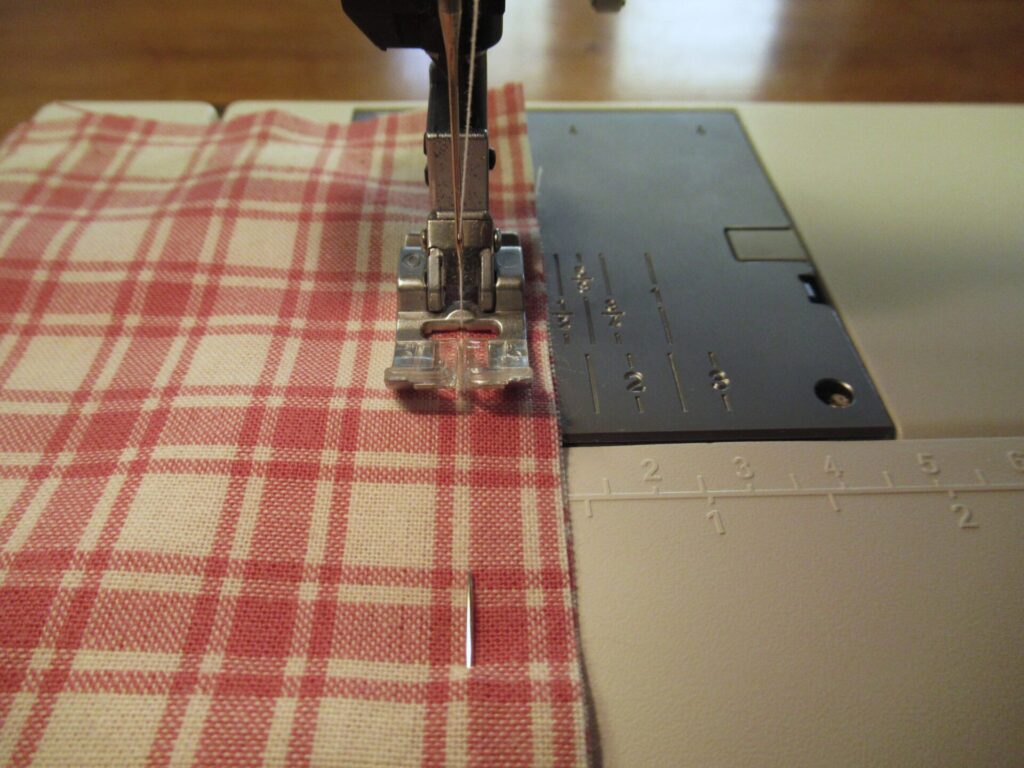
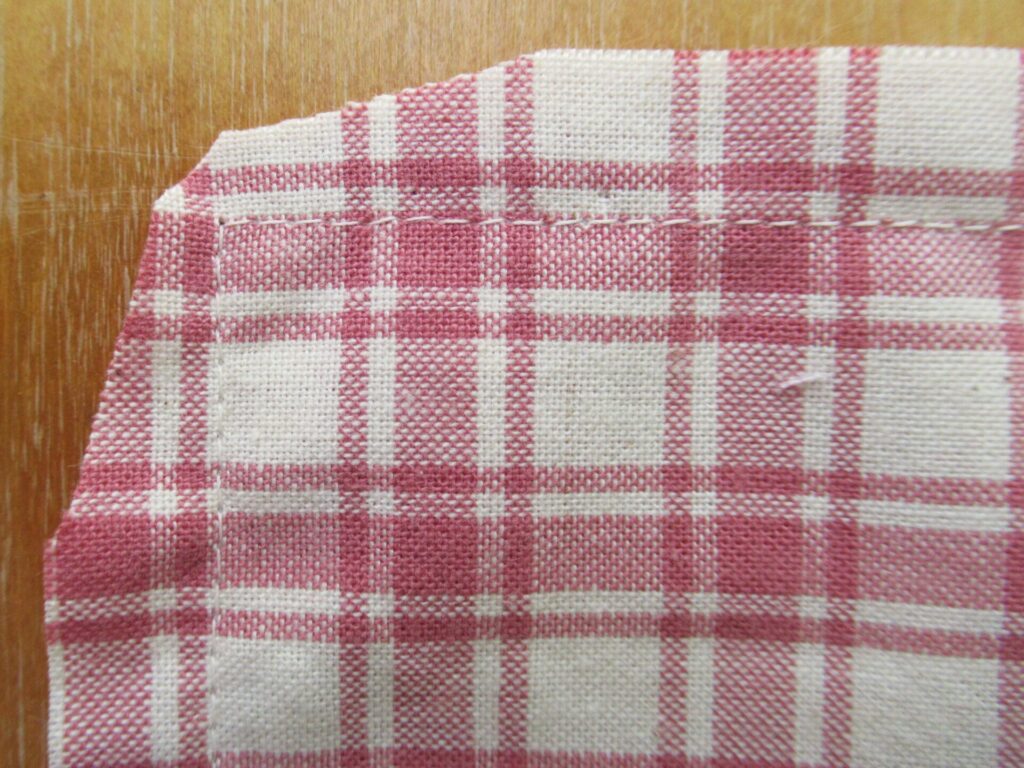
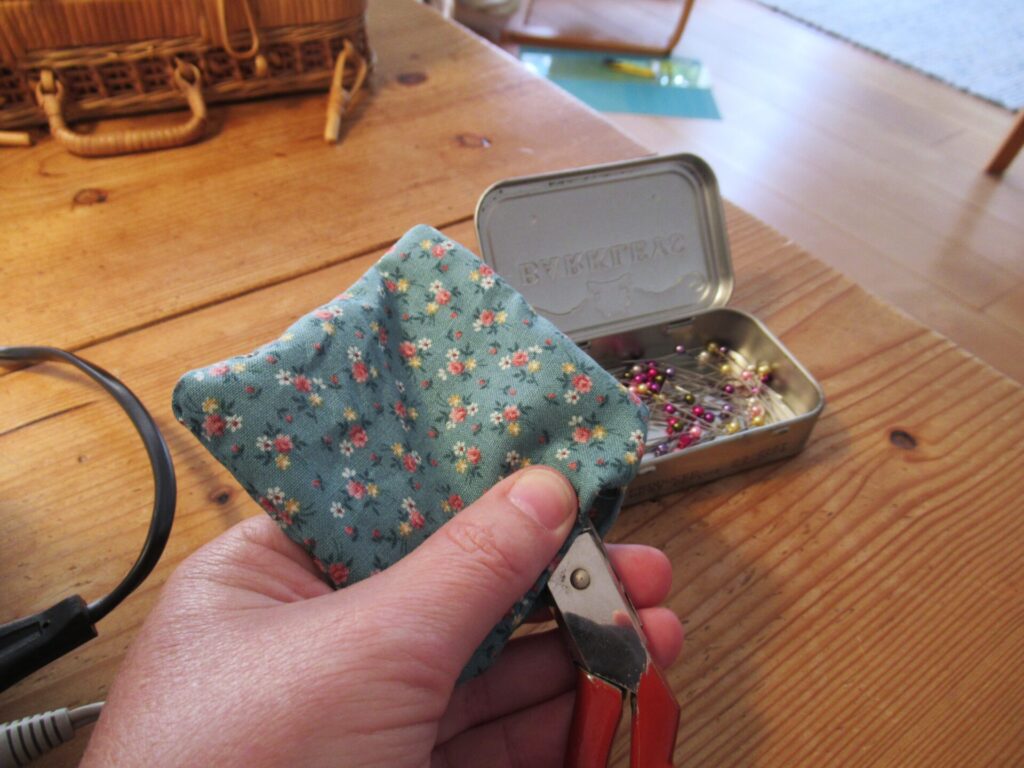
The Soothing Sachets have a fabric lining, sewn from small pieces of cotton fabric. No need to buy anything specially – any thin cotton will do, as long as it’s a colour that doesn’t show through the knitting. I used bits of an old pillowcase.
Making a lining sachet may be a bit of a pain for some, I thought, so I tried leaving it out and stuffing a knitted sachet with unspun wool with some lavender in the middle.
It is an option, but I don’t like the result as much as the lined version – its shape is less crisp and its scent is too faint to my liking.
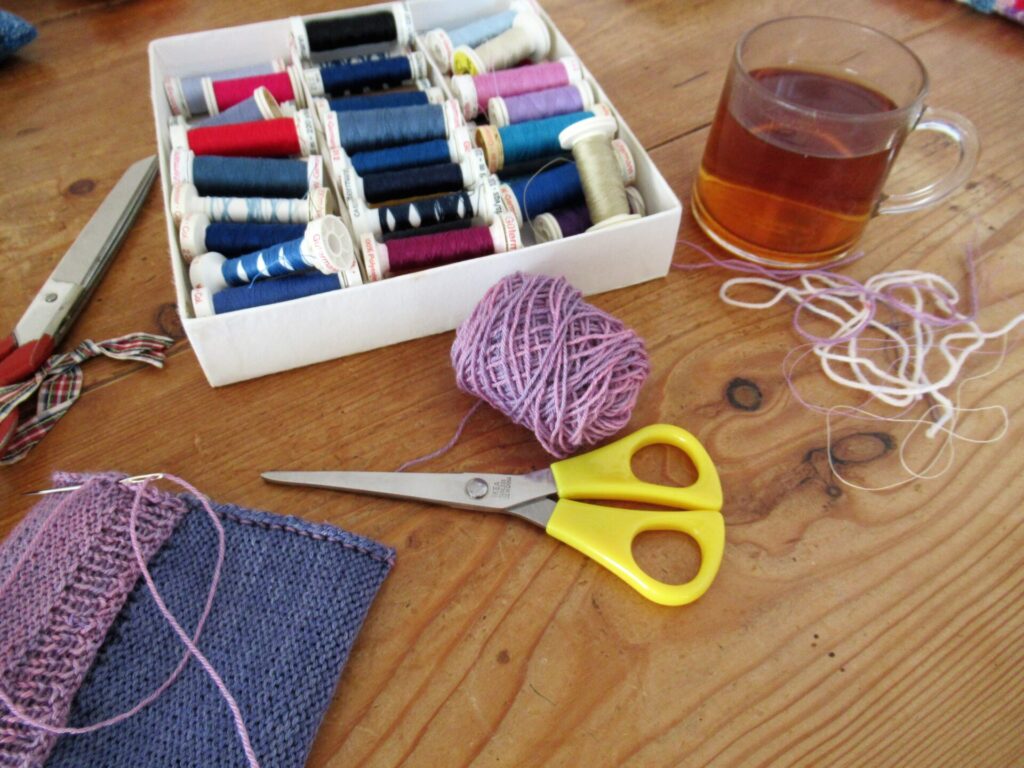
So, why not knit a few first and then spend a cosy afternoon with the sewing machine on the dining table, and all other tools and notions needed at hand, to finish them all in one go?
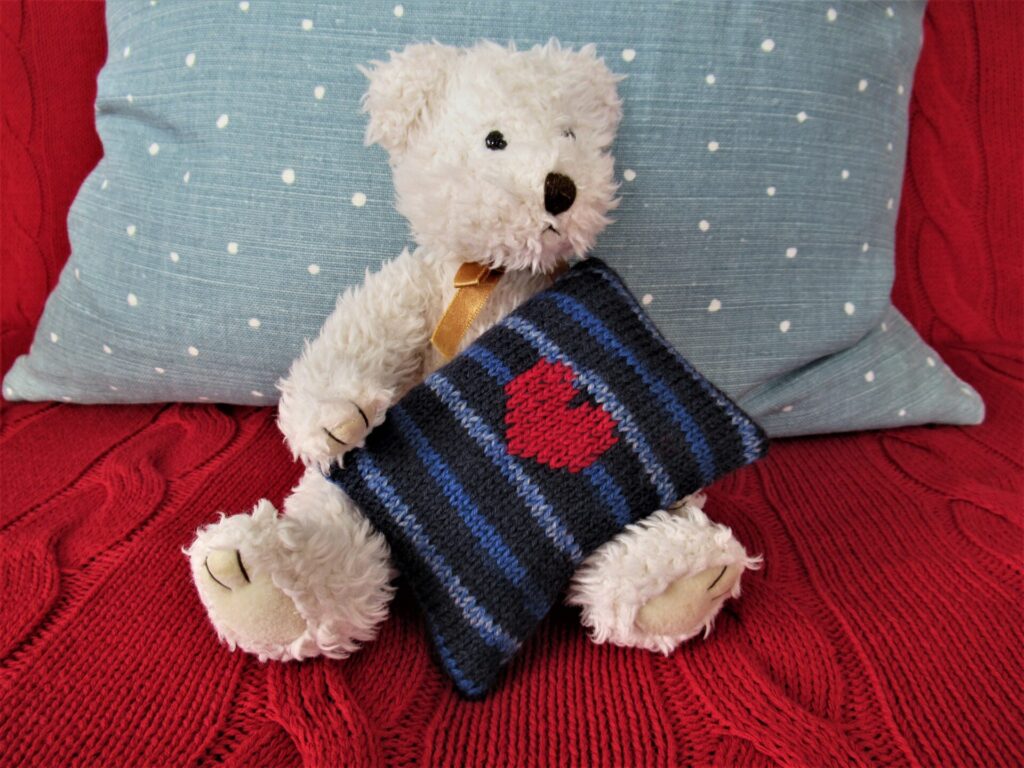
Finally, here is my Pièce de Résistance 😉. Again made from self-striping sock yarn, but this time with a duplicate stitch heart on the front…
… and corrugated ribbing for the buttonhole band.
Won’t that make a nice gift for a beloved child? (Caution: Sew the button on very securely, or for small children leave it off and close the entire opening.)
Some of you reading this will be receiving one of these small scented gifts in the near future. My gift to the rest of you is the pattern (in English and Dutch). It contains instructions for knitting (including the corrugated ribbing) and finishing the sachet as well as a heart chart.
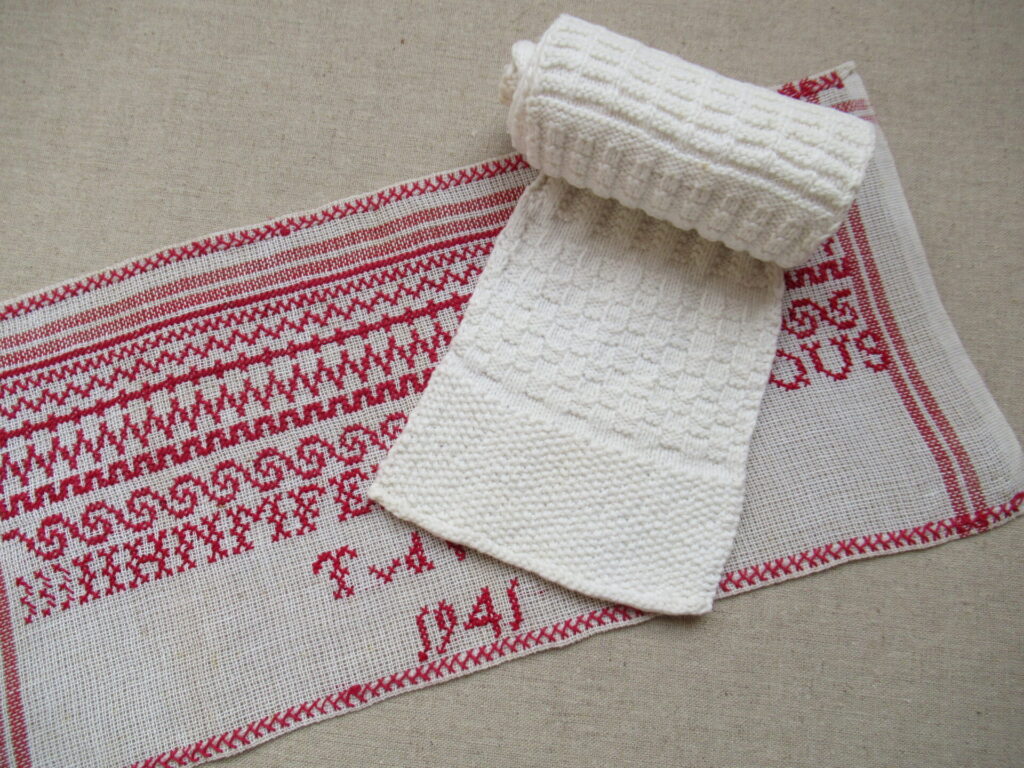
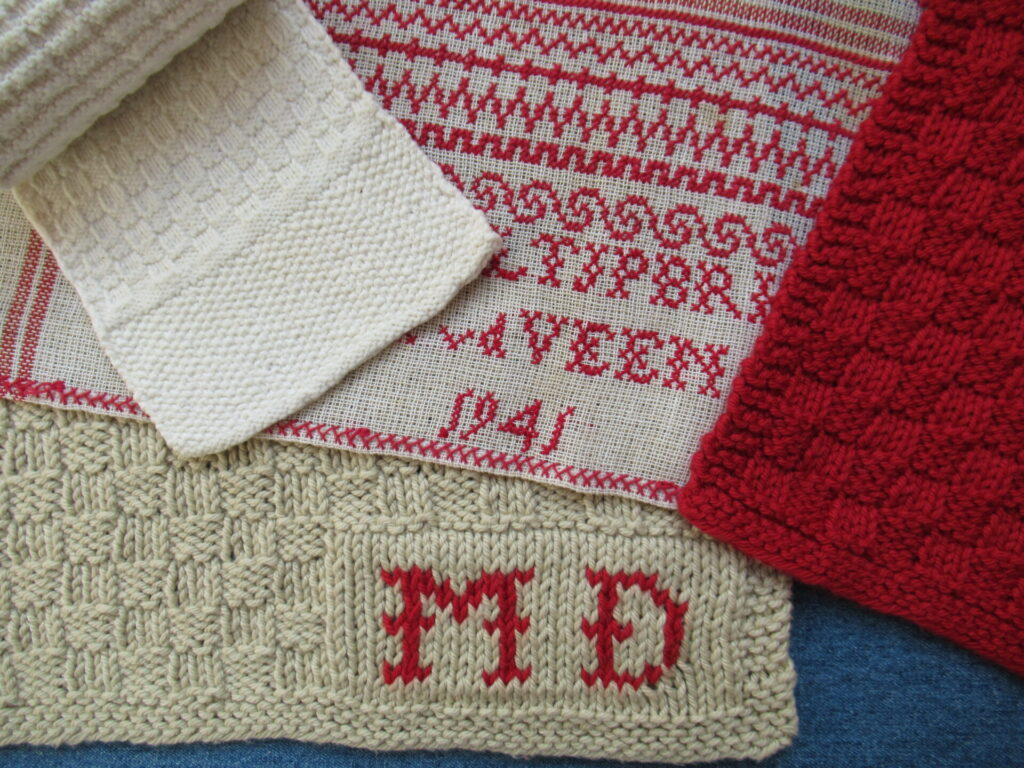
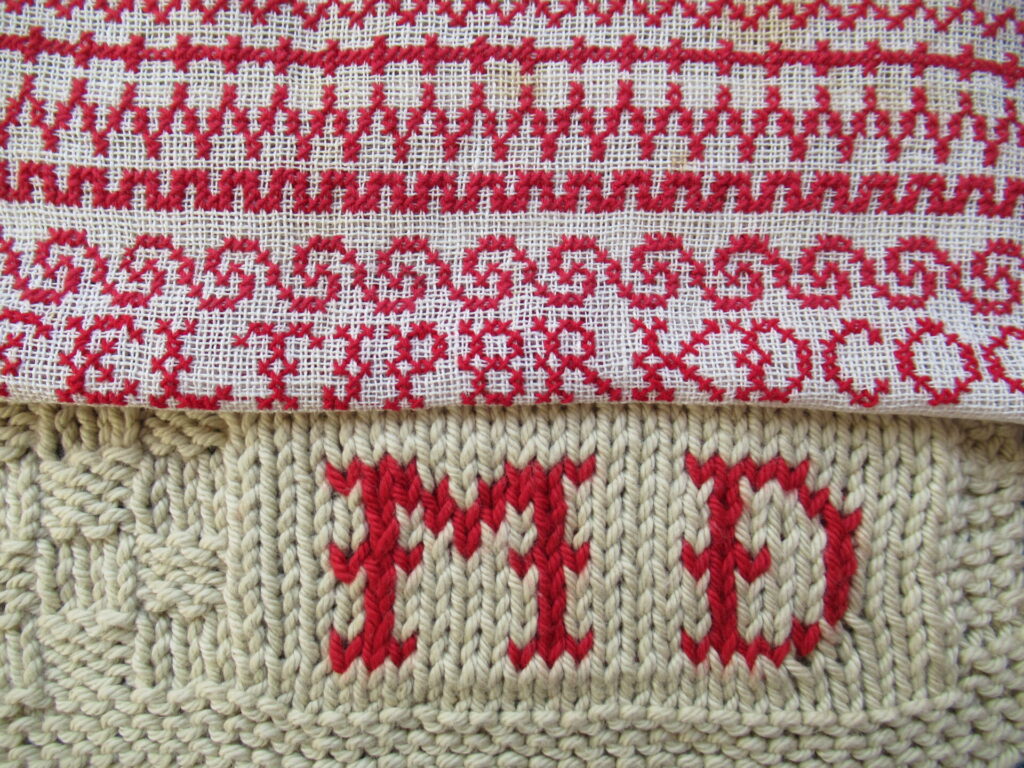
If you’ve been reading my blog for a while, you may remember that I’ve inherited two samplers – an embroidery sampler and a knitting sampler. The embroidery sampler was made by my Mum, aged 8, in 1941. I don’t know anything about the date or the maker of the knitting sampler.
The samplers spent decades in my parents’ attic, and after that, over twenty years in a deep dark cupboard in my home. High time to give them the attention they deserve. I’ve been studying them closely and thinking about the people who made them, and I’d love to find out more about the knitting sampler. But first and foremost, my hands were itching to DO something with them.
The word ‘sampler’ is related to ‘example’, and that is exactly what samplers like these were meant for. To provide the girls who made them with examples to be used later in life, for useful and beautiful textiles for their families and homes.
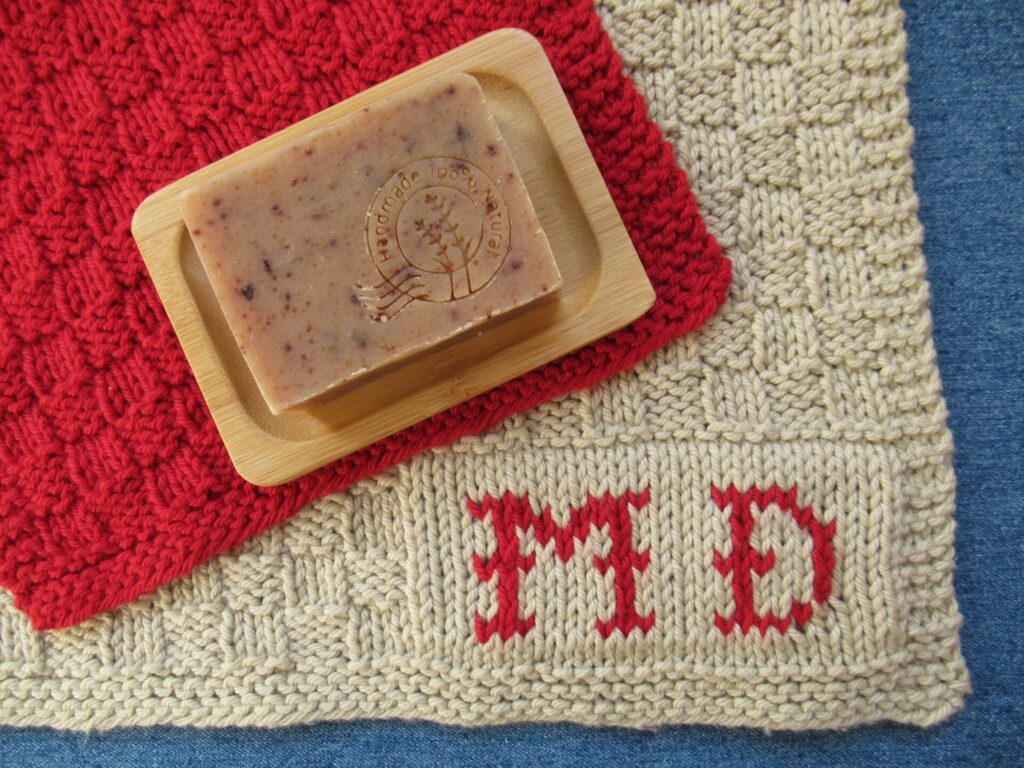
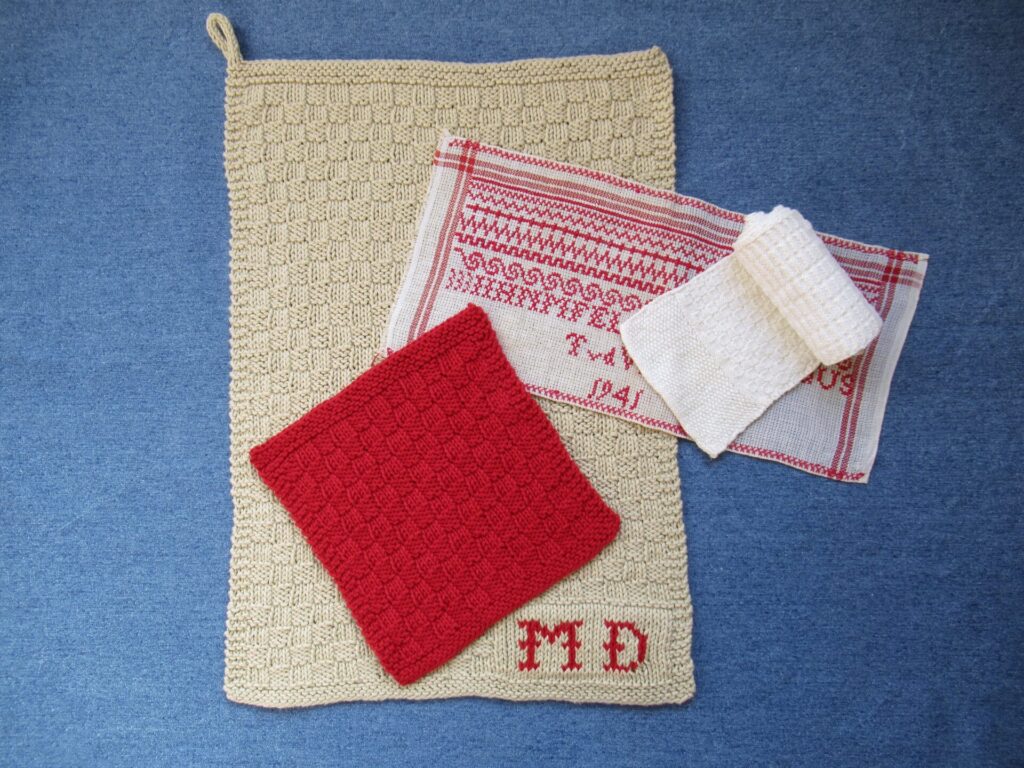
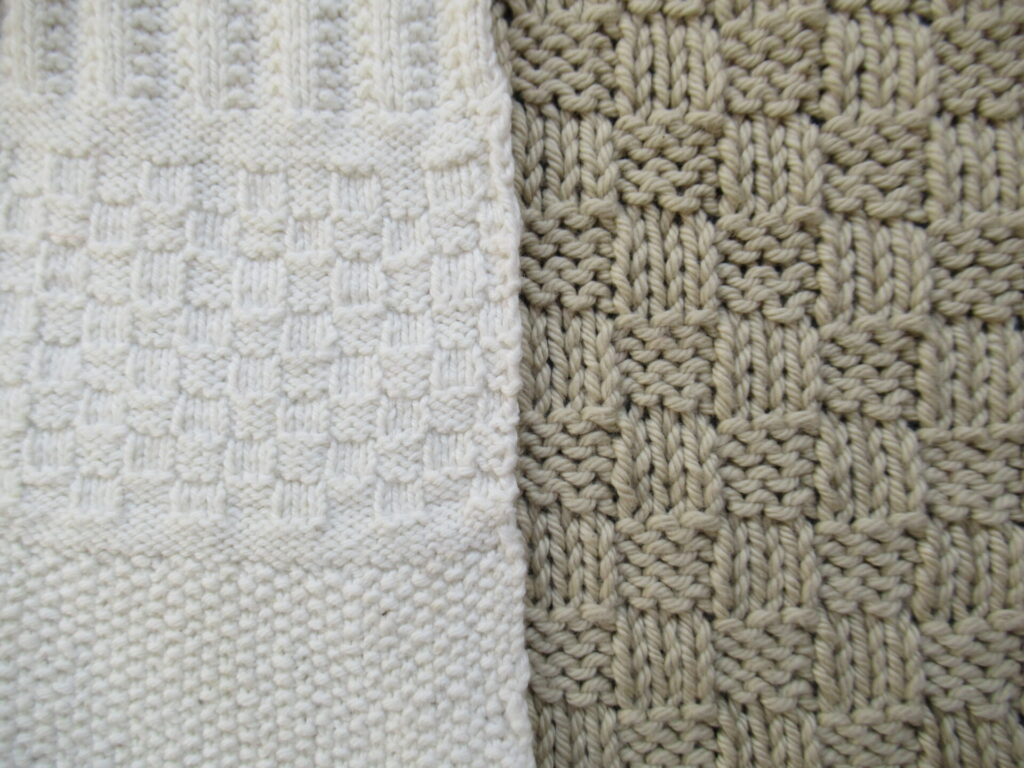
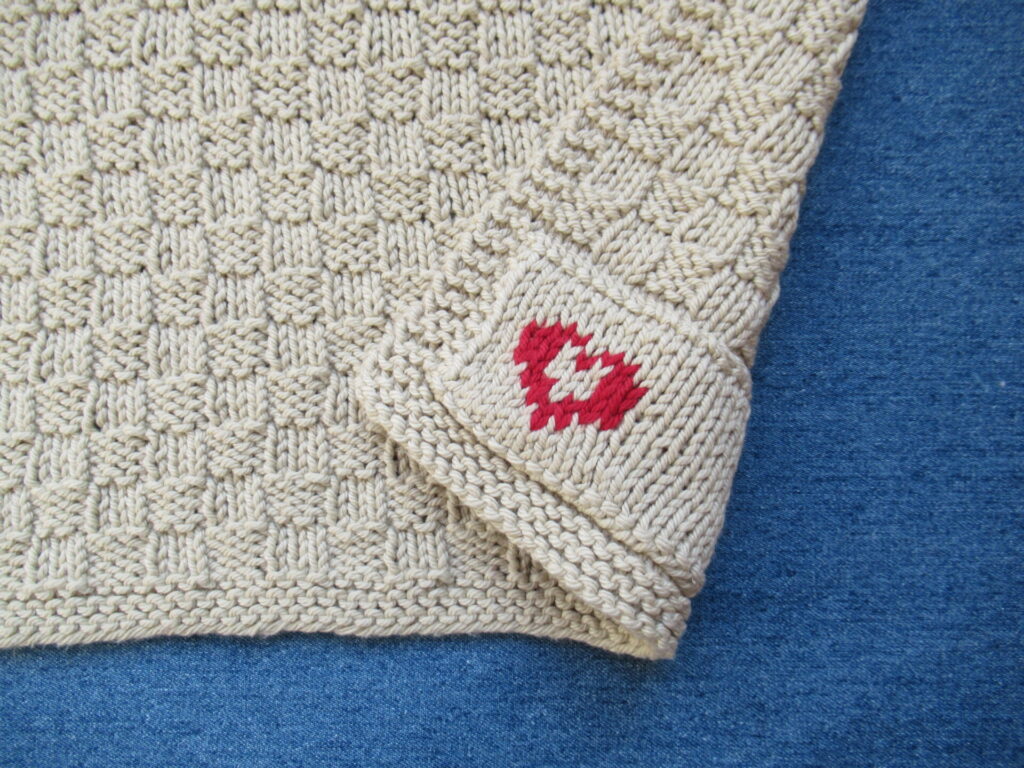
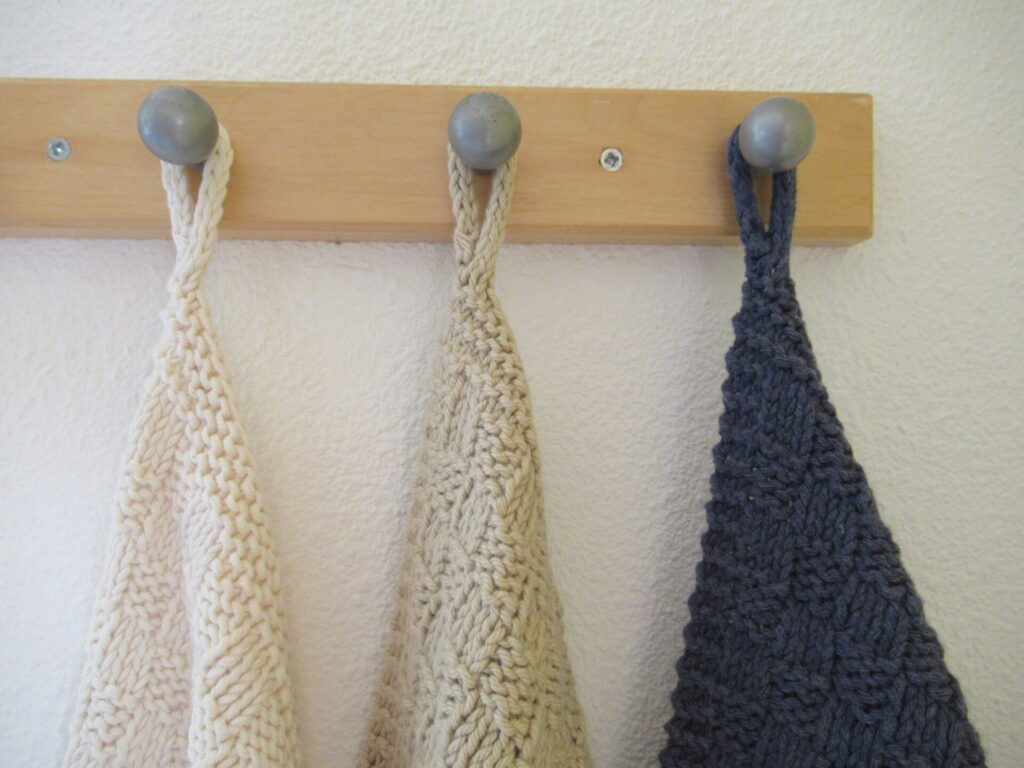
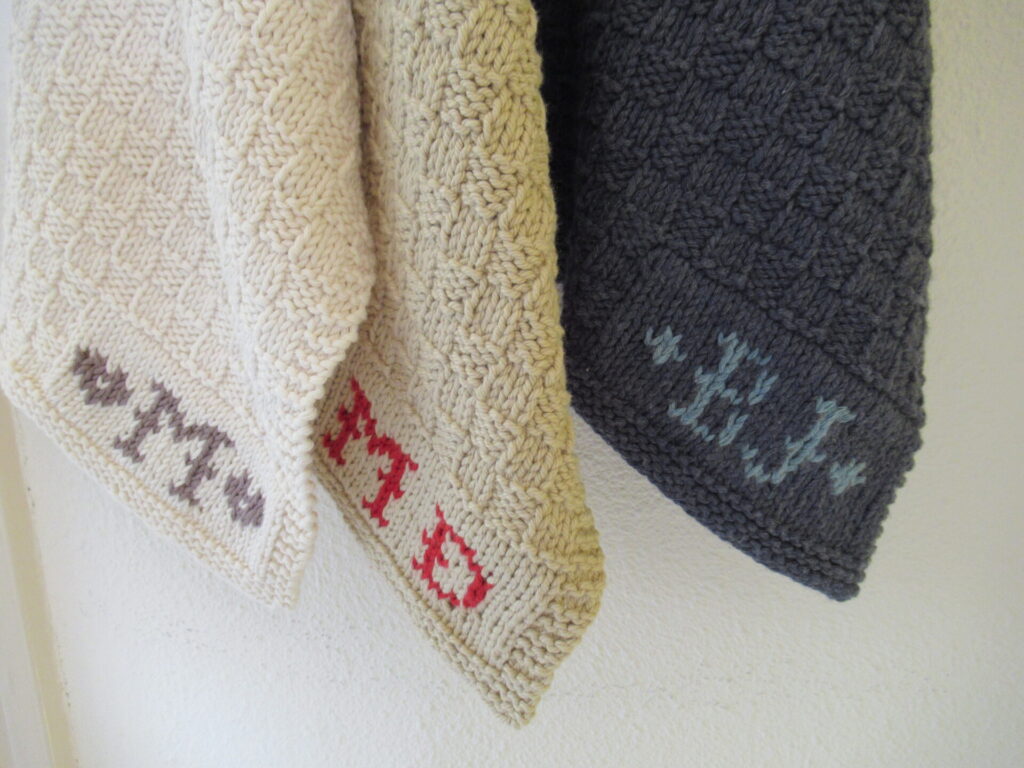
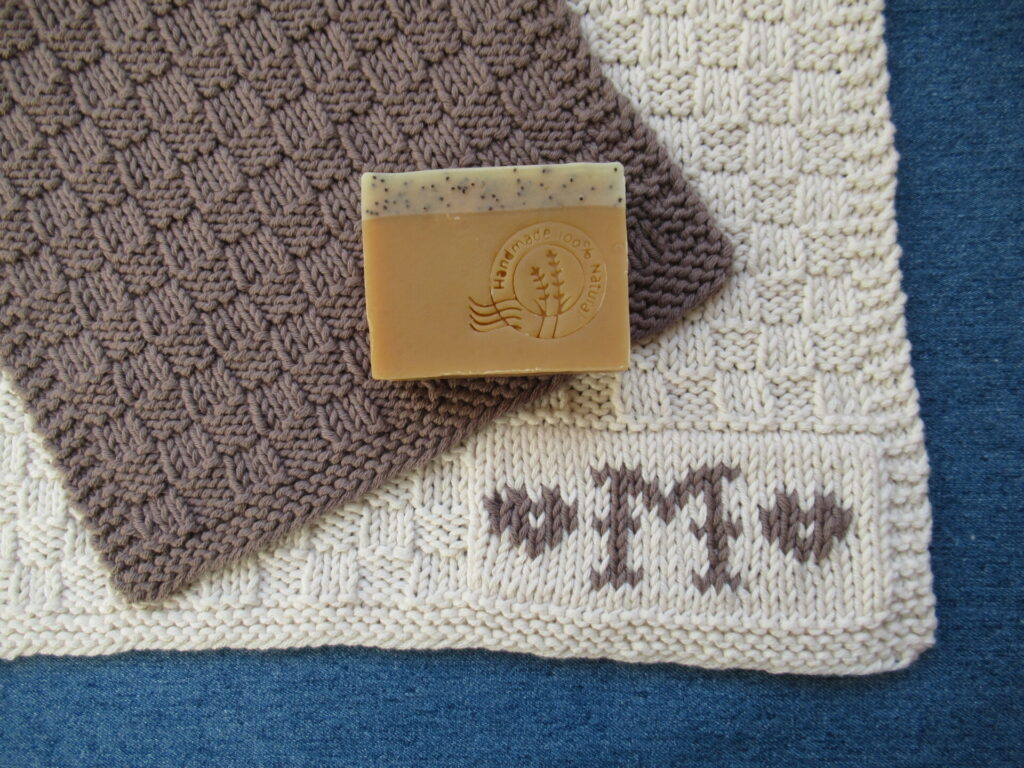
For my first sampler-based project, I’ve stayed close to that idea. Combining and adapting elements from both samplers, I’ve designed and knit a monogrammed guest towel, using the yarn left over from the monogram for a small face cloth.
For the first version that I made, I also stayed close to the original colours.
From the knitting sampler, I borrowed the second stitch pattern from the bottom – mini-blocks. That was simple.
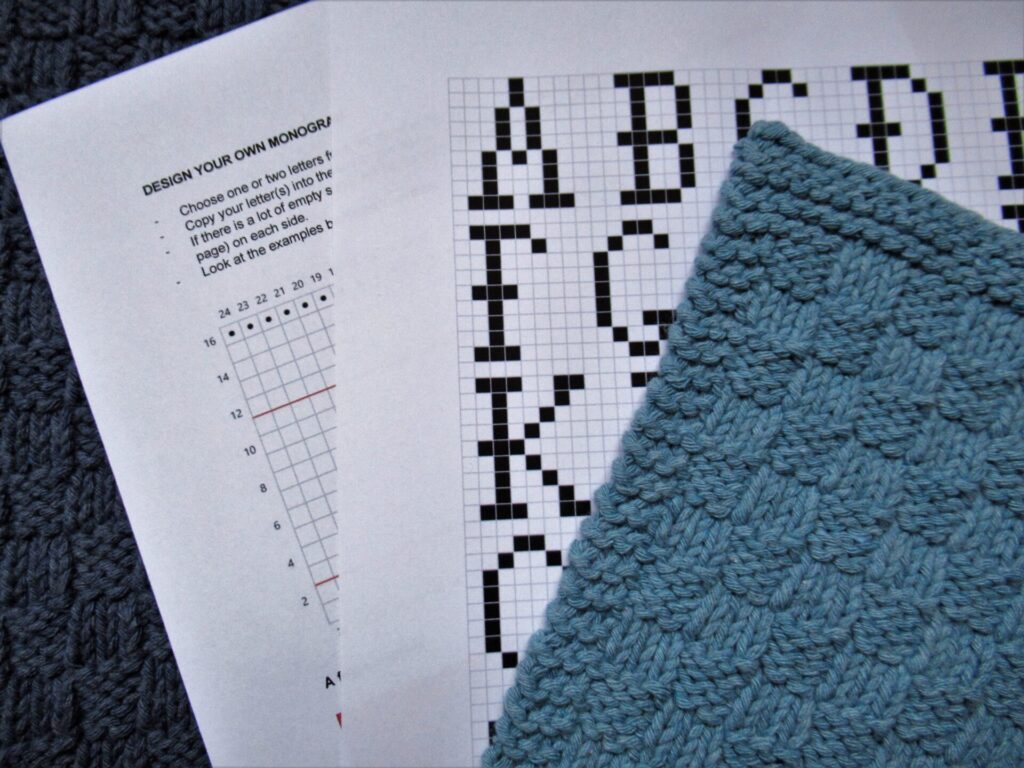
Translating the embroidered letters into knitted ones was less straightforward, because a cross stitch is square while a knit stitch is a flat rectangle. You know what it’s like when your tv screen has the wrong picture format and people’s faces get squashed? That’s what would happen if the letters were simply copied from the embroidered examples in knitting.
So, to begin with, I stretched the letters out. As a result some of the ‘legs’ looked wrong, and I had to alter those. When I tried knitting them, I found out that the letters still didn’t look quite right, and I tweaked a few other details until I was happy with them.
The second problem I ran up against, was that my Mum’s sampler didn’t have a complete alphabet – it had only 19 letters. It did have an M and a D (for Merula Designs), but it lacked several other essential letters. Looking at similar samplers, I finally pieced together a complete knittable alphabet. Phew, problems solved.
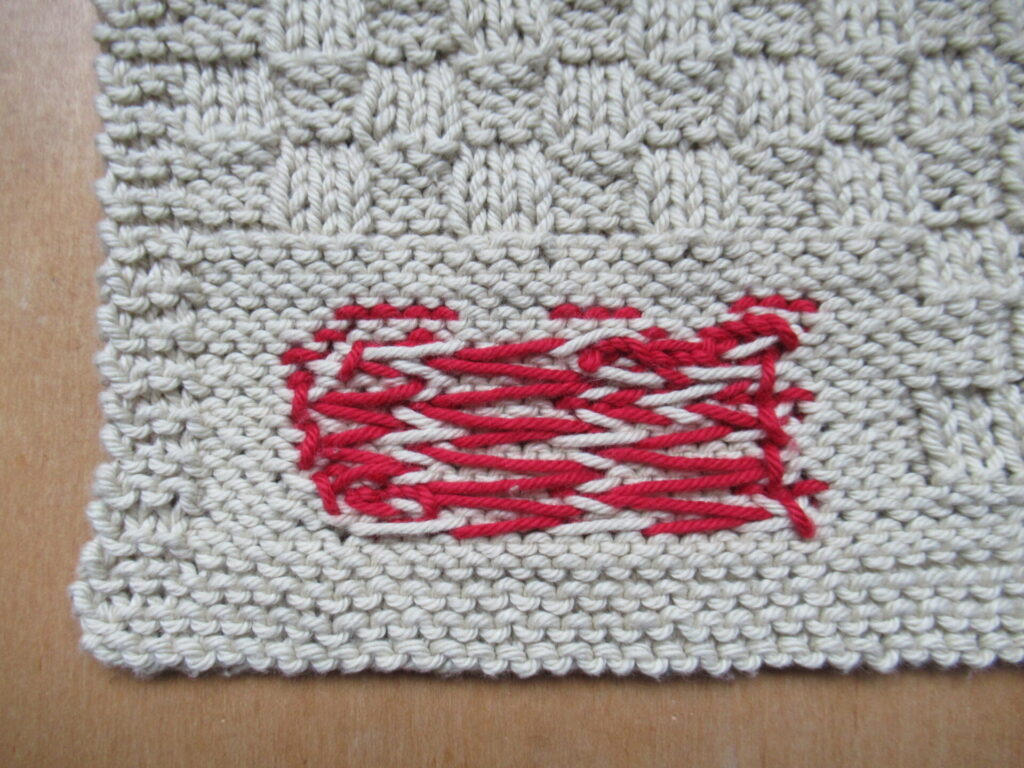
Or so I thought. Because when I started knitting more swatches, I soon realized that the back of the monogram wasn’t going to look very attractive. Uh-oh.
In the end, I solved that by adding a nice little surprise to the back.
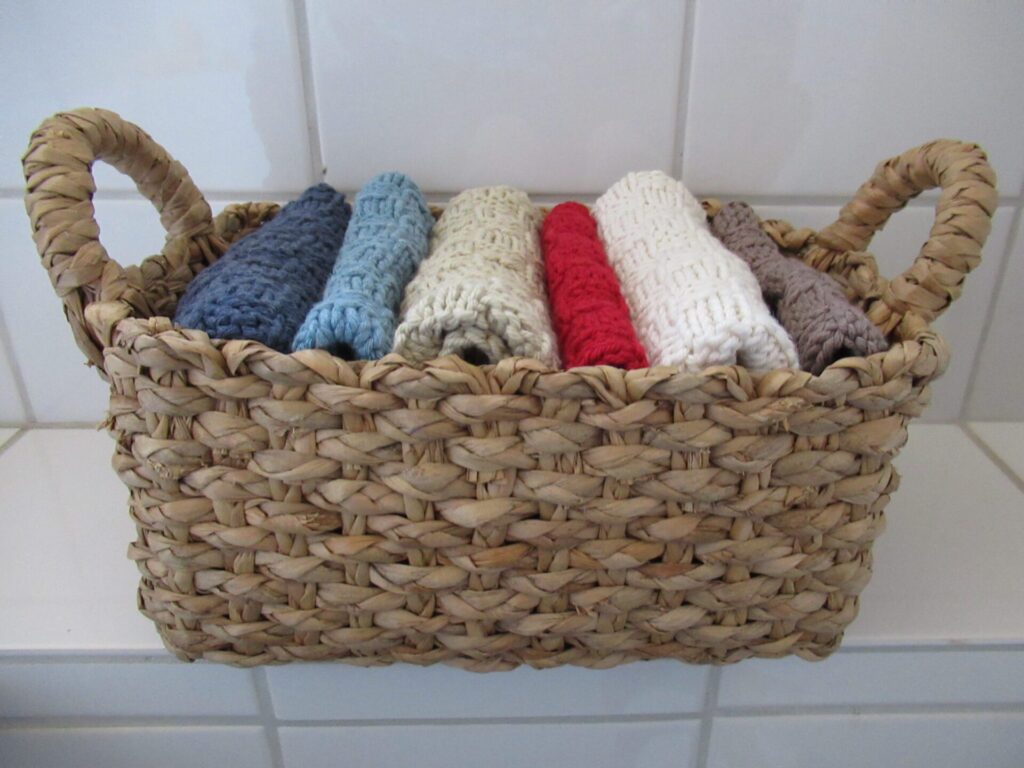
I tried out several loops and decided on a bit of I-cord. Then I knit another towel, and another one – each with a matching face cloth. Here is a close-up of the loops…
… and one of the monograms.
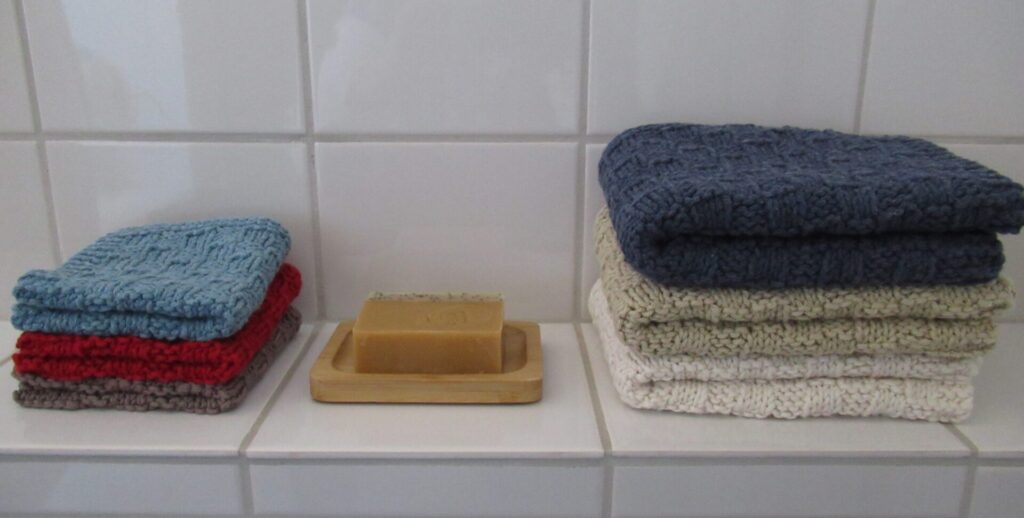
Each towel & face cloth set was knit in a different yarn.
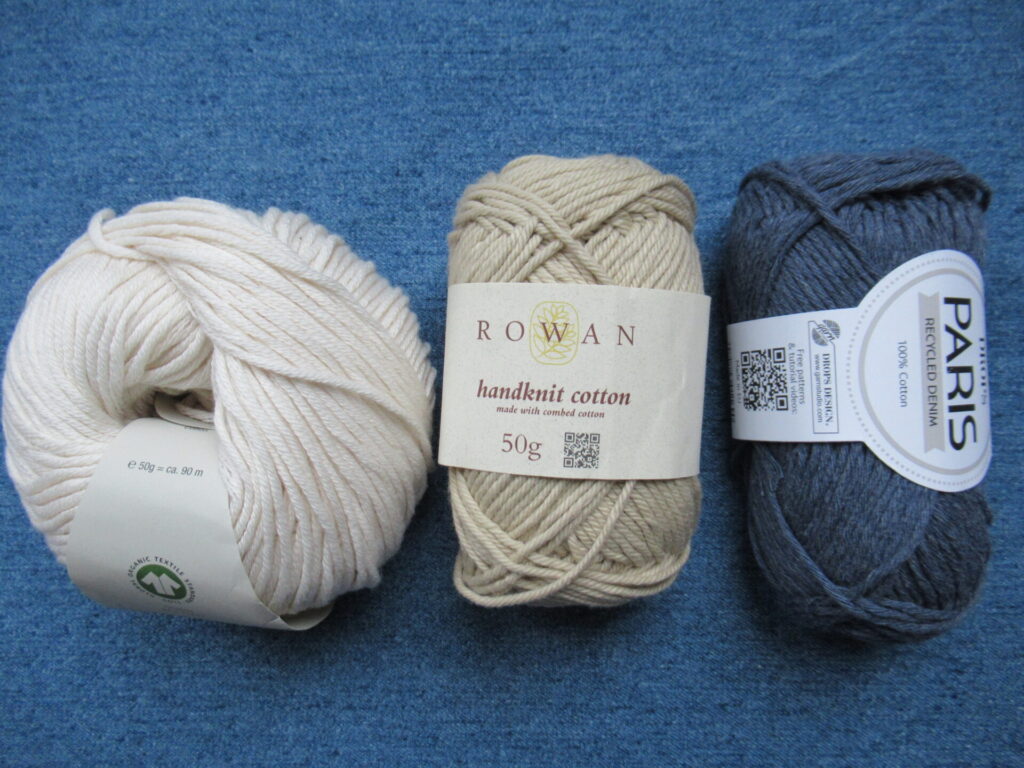
I’d like to go greener in my knitting, but that isn’t always easy. First, because there are some old yarn friends that I’m strongly attached to. Second, because the choice in organic yarns is still very limited. And third, because organic yarns can be rather expensive. In the end I came up with 3 options:
An old friend: Rowan ‘Handknit cotton’ (linen/red version)
An affordable organic yarn: Lana Grossa ‘Linea Pura Organico’ (cream/taupe version)
An inexpensive sustainable yarn: Drops ‘Paris Recycled Denim’ (blue version)
If I’m honest, the organic version is my favourite. It is very soft and supple.
But the other ones are really nice, too.
I’ve written out the pattern for anyone who would like to make a monogrammed guest towel of their own. Personalized with the recipient’s monogram, I think a guest towel & face cloth set would make a lovely Christmas, Birthday or Wedding Anniversary gift.
The pattern includes:
Clear knitting instructions and charts for towel & face cloth
A complete knittable alphabet
Instructions and an empty grid for designing your own monogram
Tips for knitting the monogram and the I-cord loop
The Monogrammed Guest Towel pattern can be found here on Ravelry (available in English & Dutch, also to non-Ravelry members)
Now, what else could I make based on my inherited samplers? Hmmmm……
As always, thank you for reading and take care! Xxx
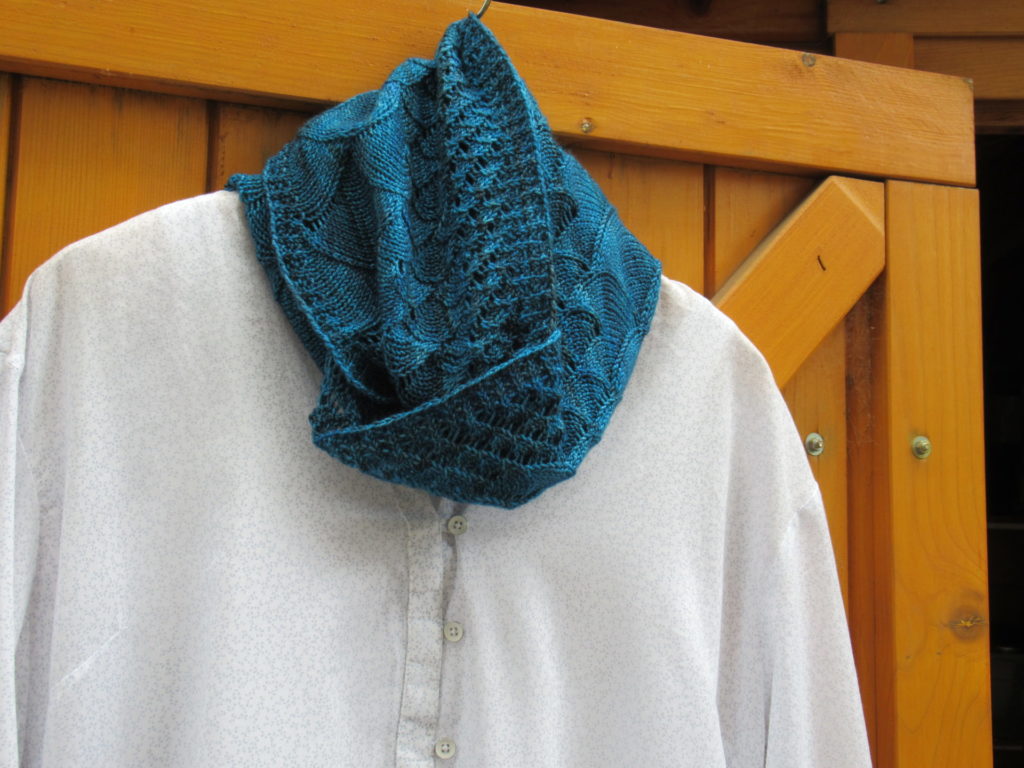
Today, I’d like to tell you about a UFO (UnFinished Object) that I’ve just finished. It’s a loop cowl from a pattern called Song of the Sea (Ravelry link), designed by Louise Zass-Bangham.
A lovely pattern and lovely yarn. So why did it become a UFO? Well, there’s a story behind it.
Several years ago, friends of ours gave up their jobs and house, and sold or gave away almost all of their belongings to sail the seas of the world indefinitely.
I was knitting this cowl as a farewell present for one of them. When it was nearly finished, it suddenly dawned on me that she would just be wearing shorts and bikinis where they were heading. They weren’t going to sail to colder climes.
It had taken our friends a lot of trouble to get rid of everything they didn’t need anymore, and I didn’t want to burden them with something they would never use. So that’s how my Song of the Sea ended up as a UFO.
Looking at it again earlier this year, I decided that it was far too nice to be left unfinished. Now I’ve knit the last few rounds and blocked it.
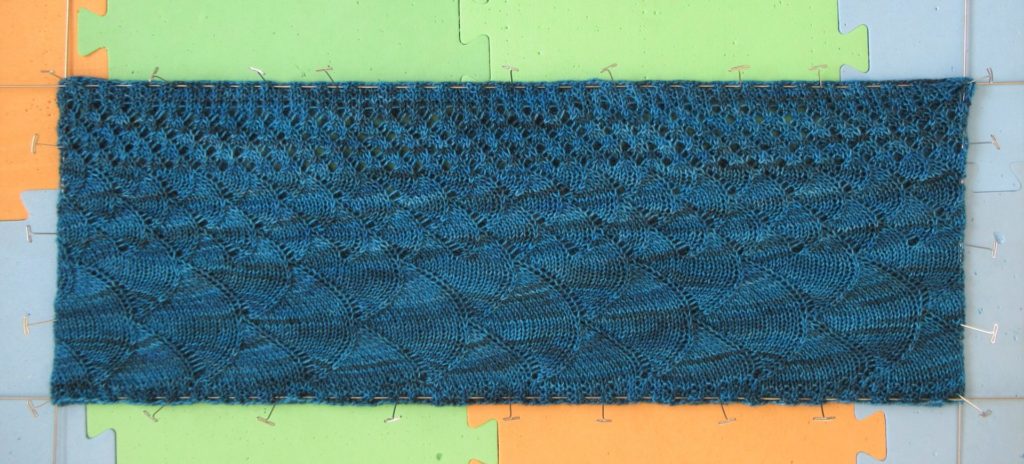
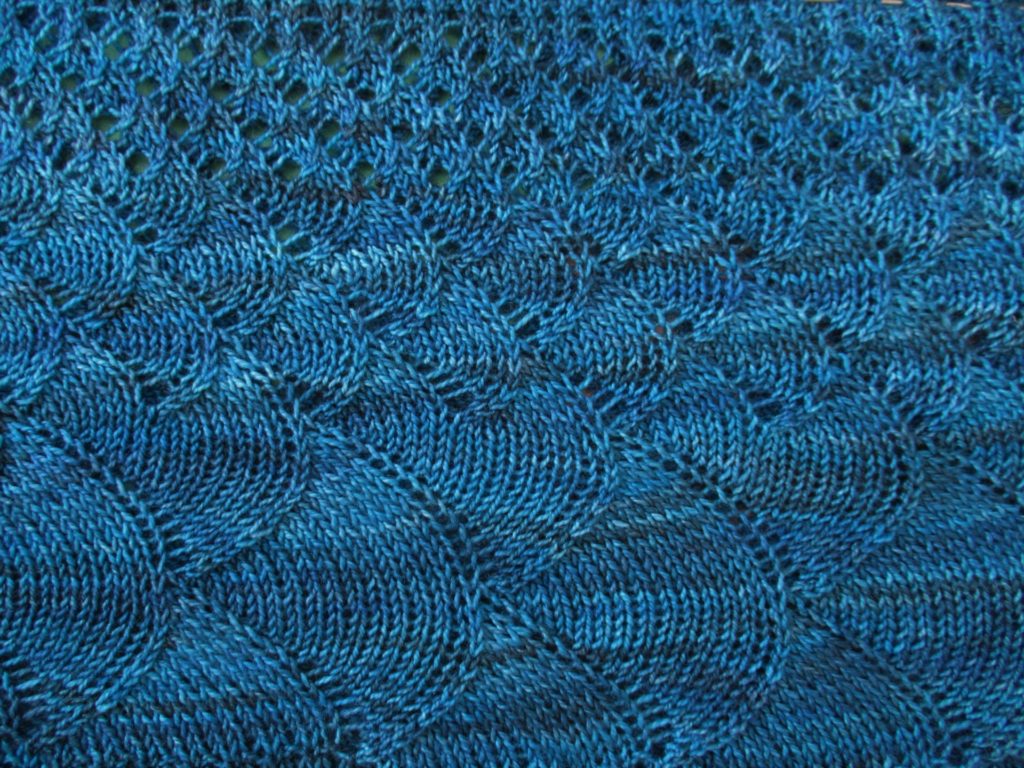
Song of the Sea is knit in the round and has three different stitch patterns, forming large breakers, medium-sized waves and tiny wavelets (in knitting order, from bottom to top). Here’s a close-up:
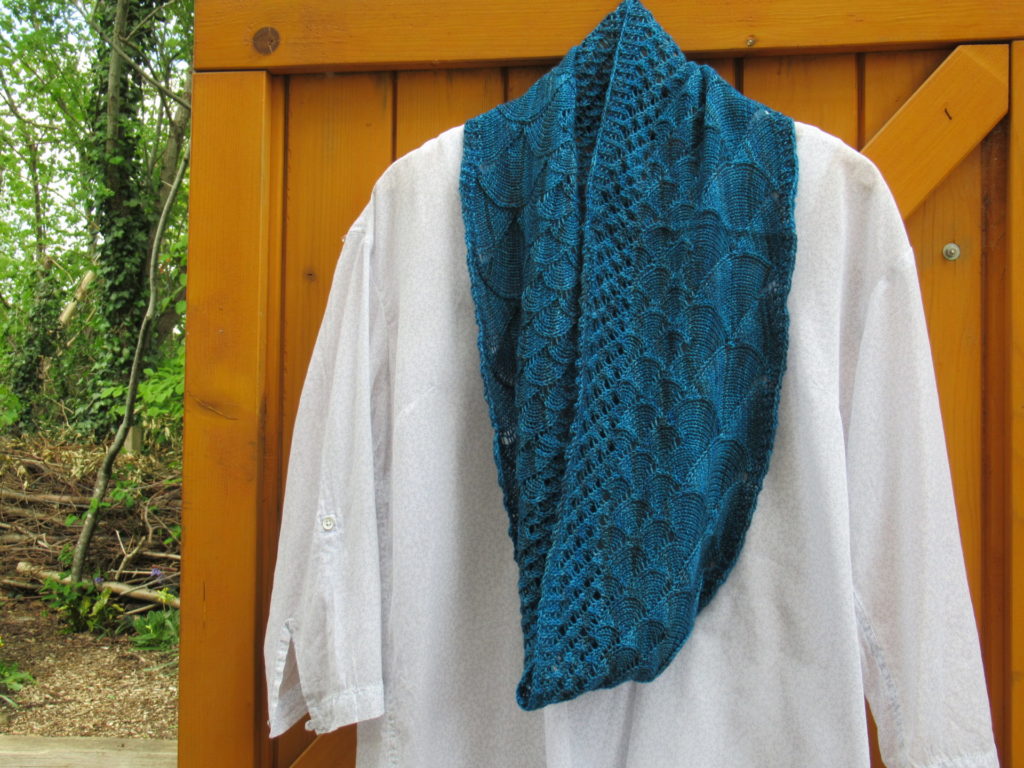
The pattern has a choice of two sizes – a long and a short version. I made the long one. It can be worn singly…
… or twisted double for more warmth.
It’s nice, isn’t it? So what am I going to do with it, now that it’s finished? Well, I’ve decided to keep it for if/when our friends come back, even if it is only for a short visit. I’ll gift-wrap it, stick a sticky note with her name on it, so that I won’t forget what’s inside, and put it away in the basket where I keep more gifts for later/someday.
I couldn’t find anything about the inspiration behind this design, but it made me think of the animated film Song of the Sea. Based on an Irish folk tale, the film tells the story of 10-year-old Ben and his mute sister Saoirse, who turns out to be a selkie (somebody who can turn into a seal and back again).
The drawings in this film are exquisite. To give you an impression in case you haven’t seen it, here is the official trailer:
From their latest newsletter, I know that our friends are safe and well ‘down under’. They frequently don’t have access to the internet, but when they do they sometimes read my blog. So, if you’re reading this, dear T and H, I wish you fair seas and following winds!
This is the second of the nine UFOs I intend to finish this year. I’d better get a move on!