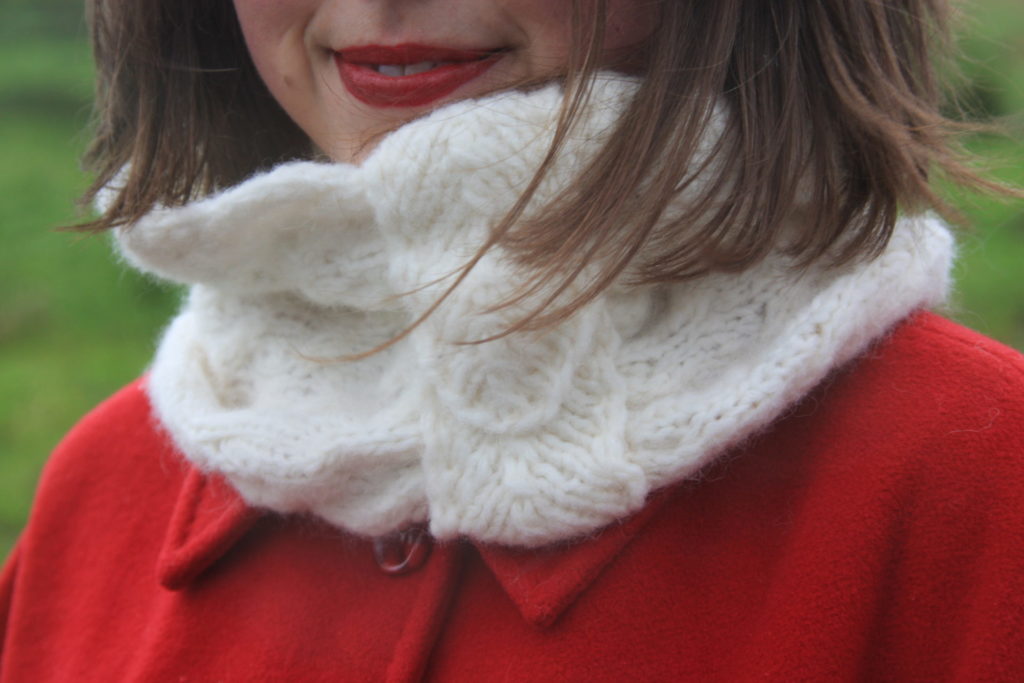
Thank you so much for all your kind and supportive words after last week’s post, here and through other channels. While I’m writing this, we’re waiting for the plaster on our walls to dry with as many doors and windows open as possible. I’m using this quiet interlude before the next stage (ceiling repairs) for some focused work, and I’ve finally finished my pattern for a pair of fingerless mitts. Or rather, two pairs.
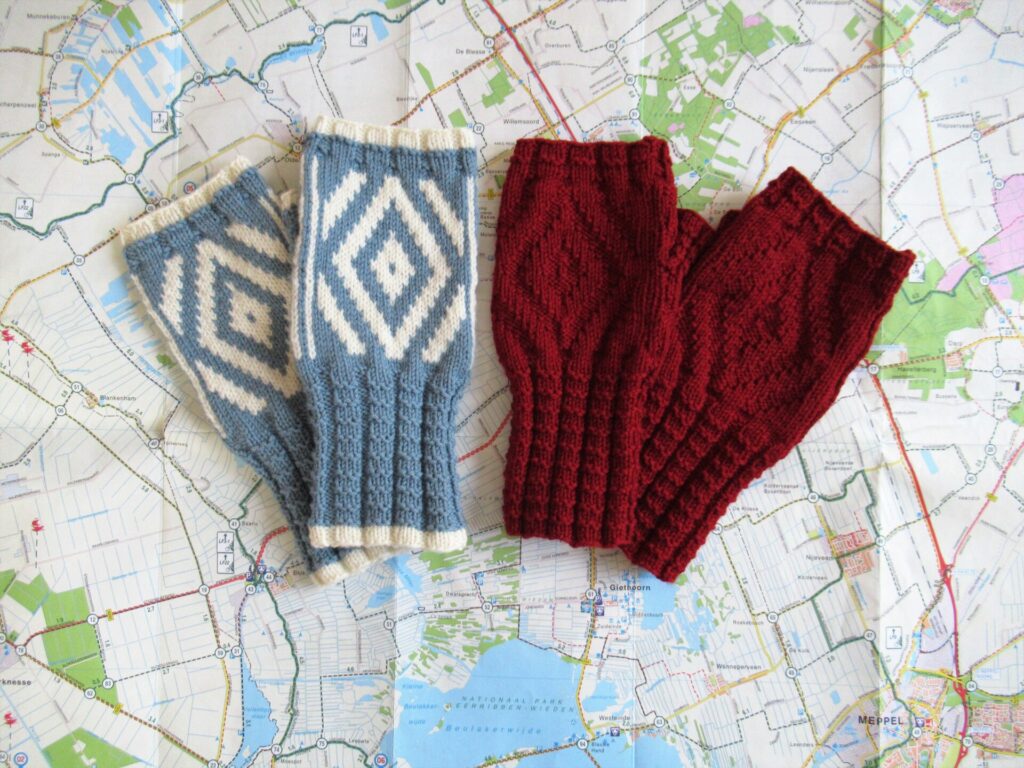
Meet the Gazelle Mitts!
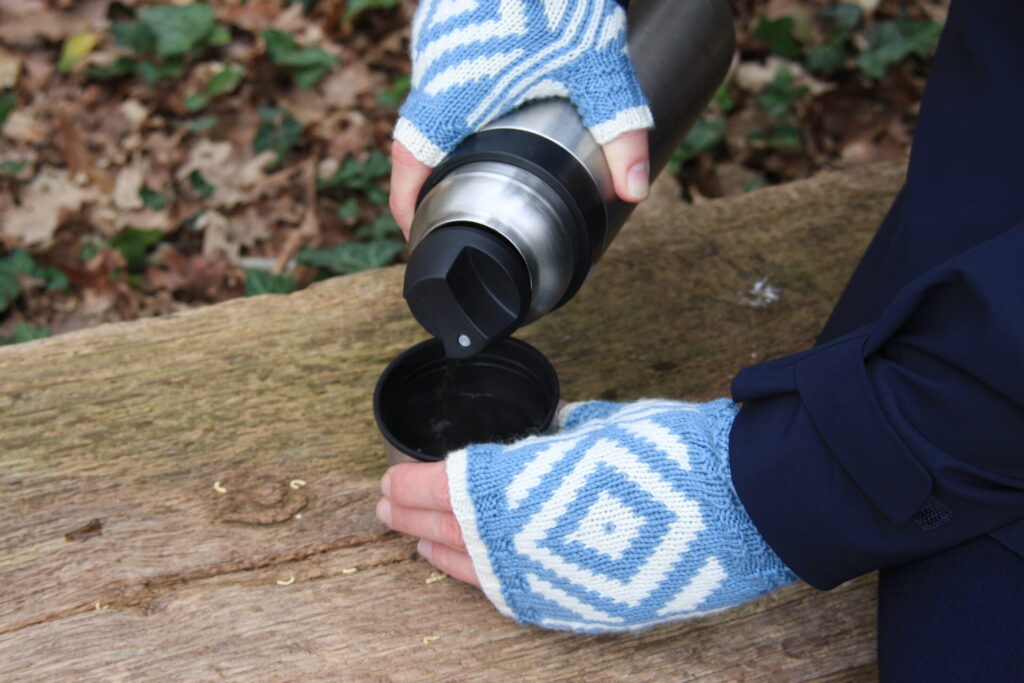
I’ll explain why I photographed them on a cycling map and with a thermos flask further on. First a little about the design.
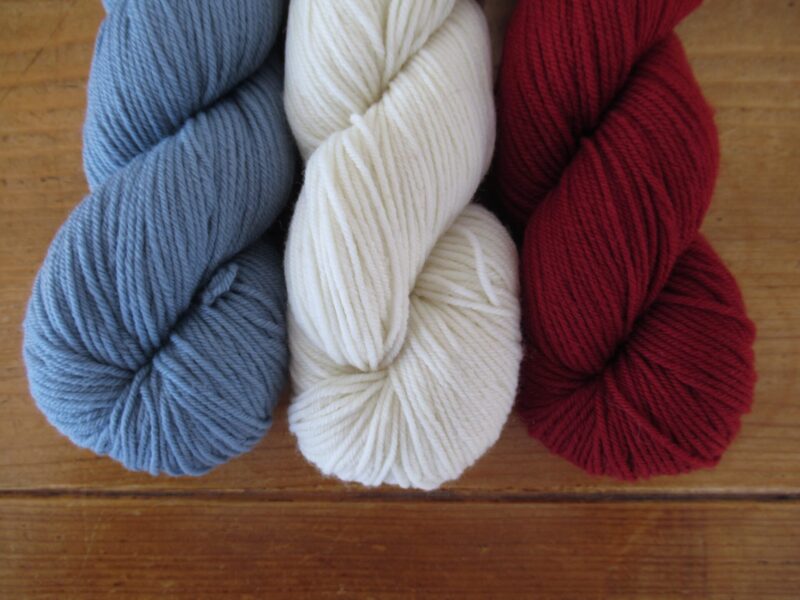
Taking the inherited knitting sampler I’ve written about before as a starting point, I began visualizing, drawing, thinking, calculating and swatching. After lots of swatches and prototypes I was ready to knit the final mitts in a single-coloured and a two-coloured version. I already had the yarn, but kept changing my mind about which colours to use for which version.
Red and cream together and blue on its own? Or blue and cream together and red on its own? In the end I asked your advice, and you were unanimous: Blue and cream for the two-colour version and red on its own.
So that is how I knit them.
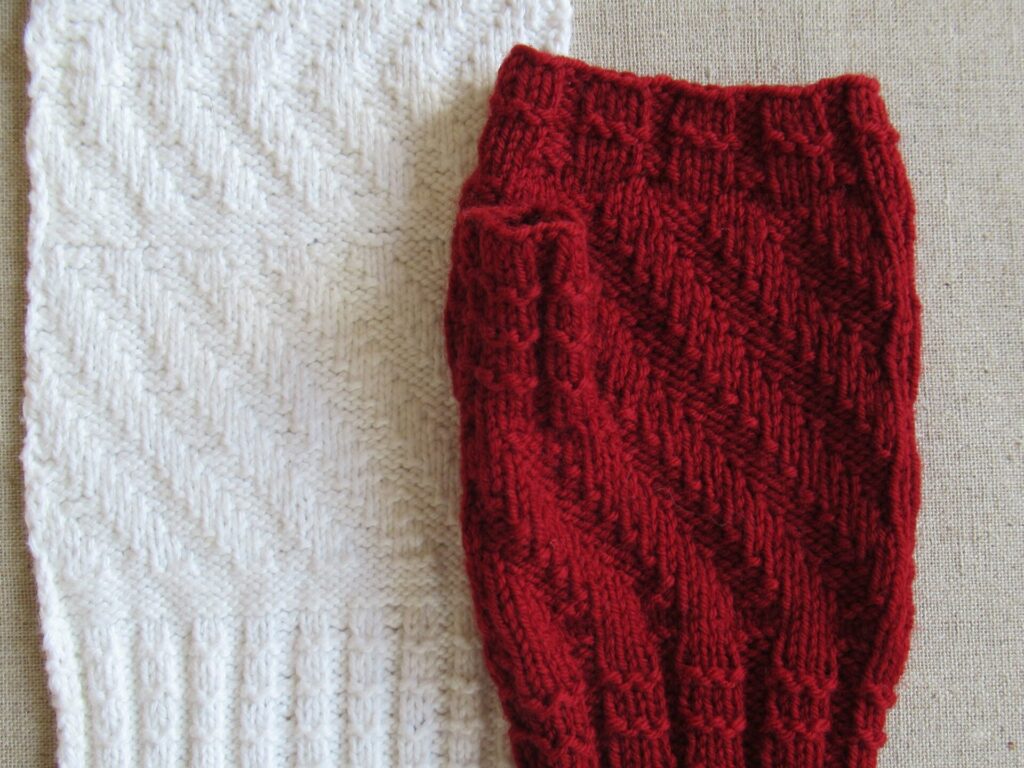
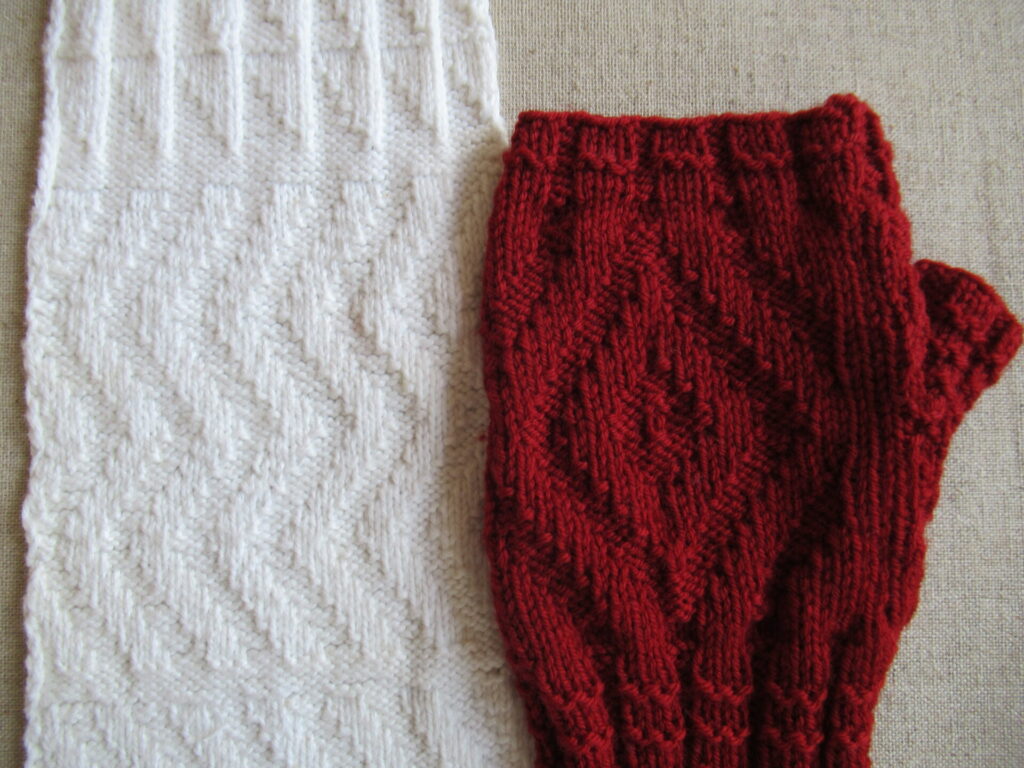
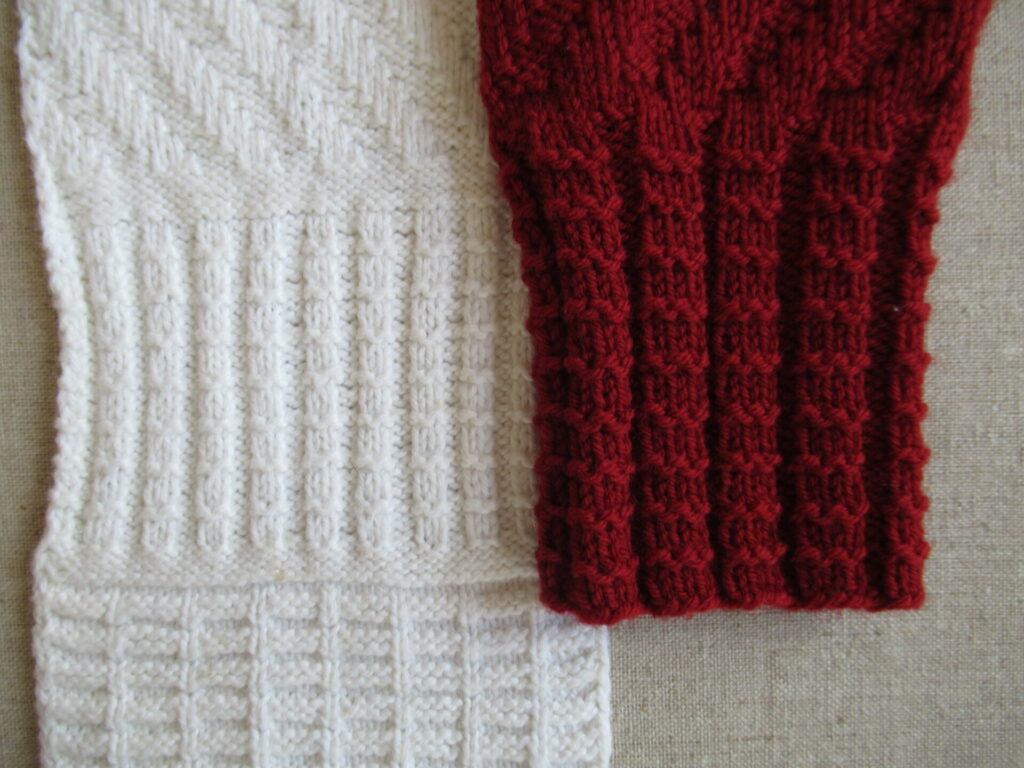
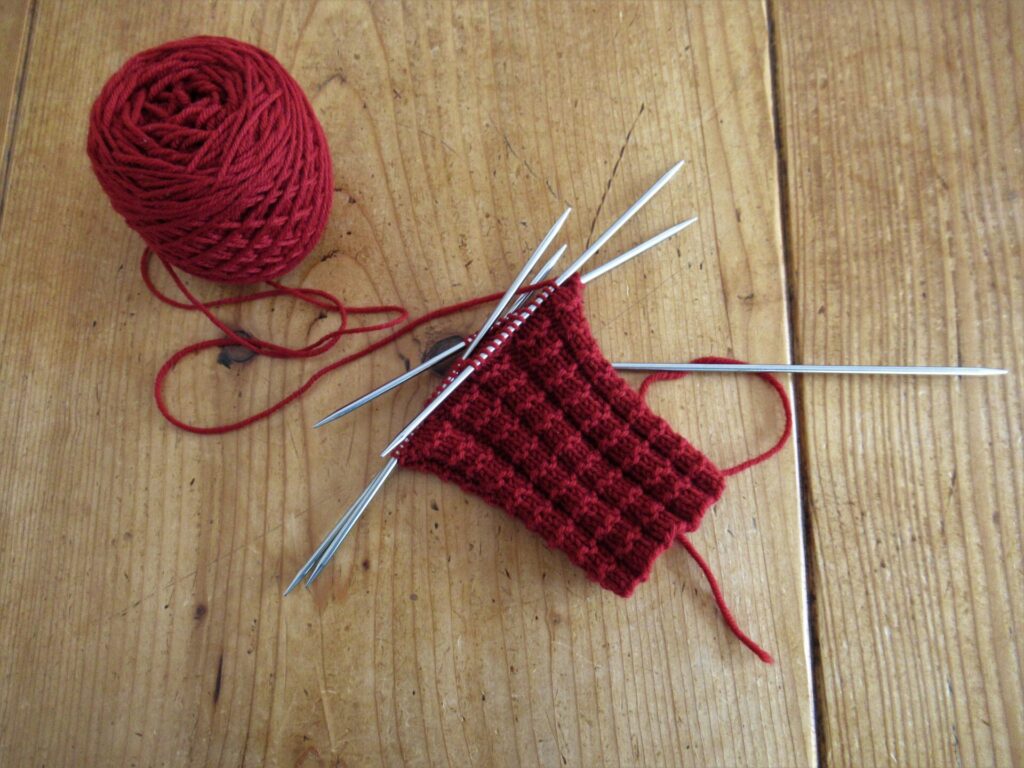
The red single-colour mitts combine three knit-and-purl stitch patterns from the sampler. For the palm of the hand, I used the sampler’s diagonals.
For the back of the hand, I took the zigzags and mirrored them to make diamonds.
And a two-by-two knit-and-purl rib with purl ridges was perfect for the cuffs and thumbs. Only I changed it into a three-by-two rib to link it up with the diagonals and diamonds.
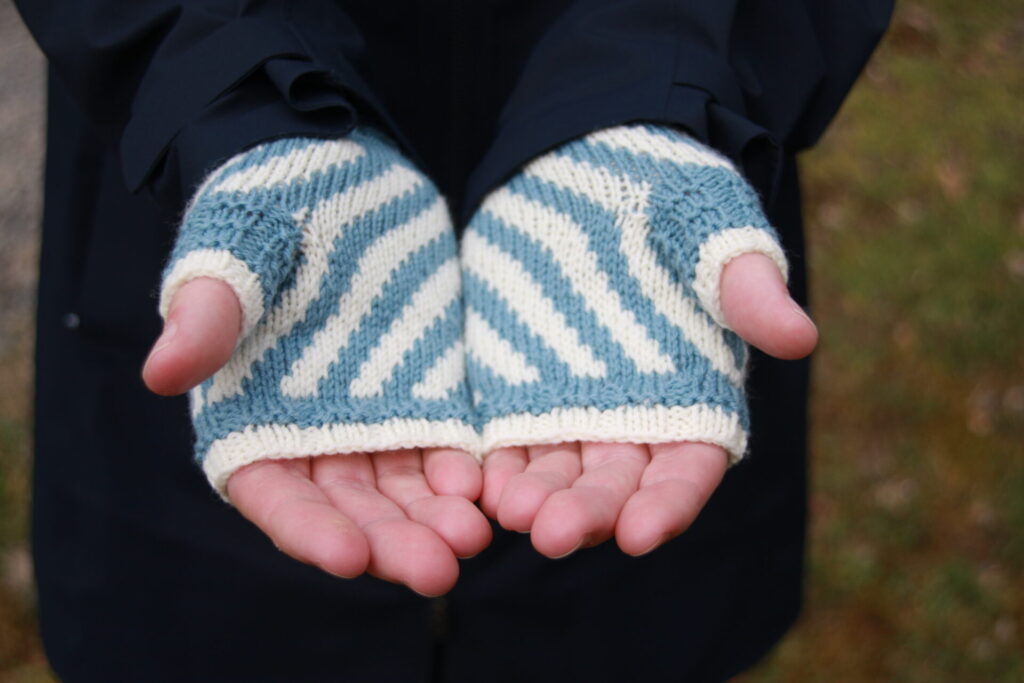
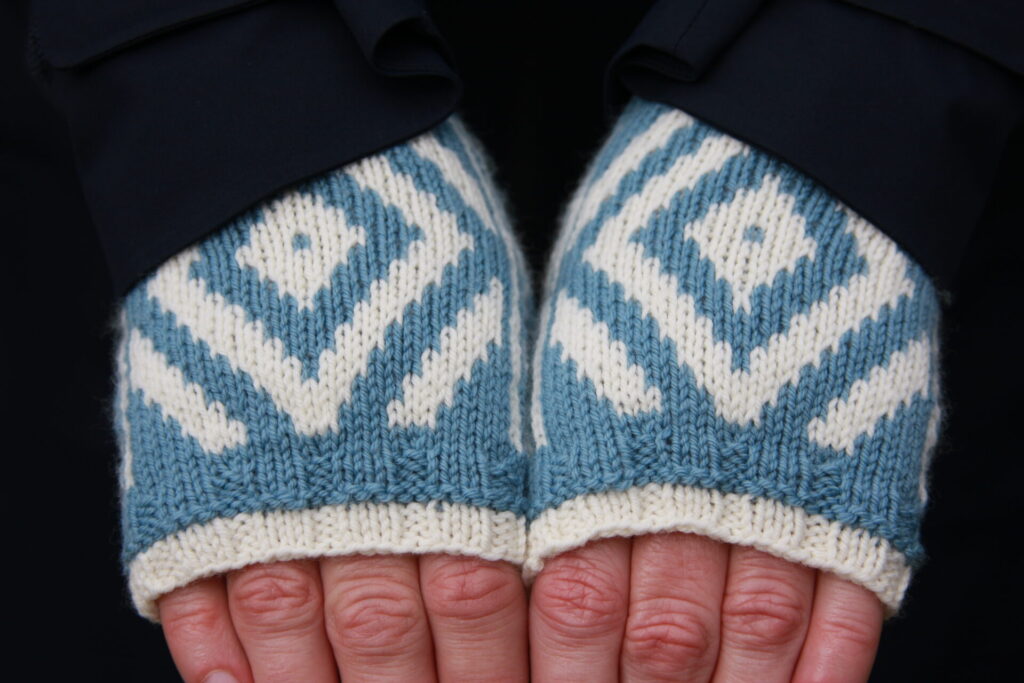
Although they look very different, the two-colour mitts are basically the same. They have the same diagonals and diamonds, and the same ribbing on cuffs and thumbs. Only this time instead of knit and purl stitches on the palm and back of the hands the patterns are knit entirely (no purling) and picked out in different colours.
Diagonals on the palms…
… and diamonds on the backs of the hands.
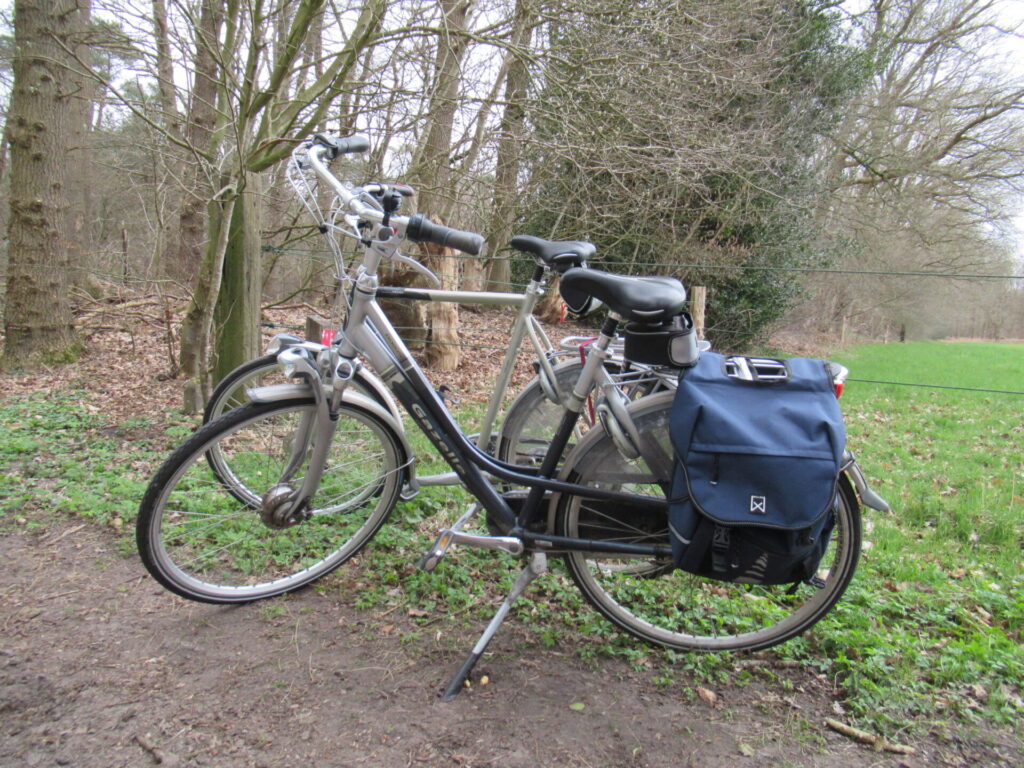
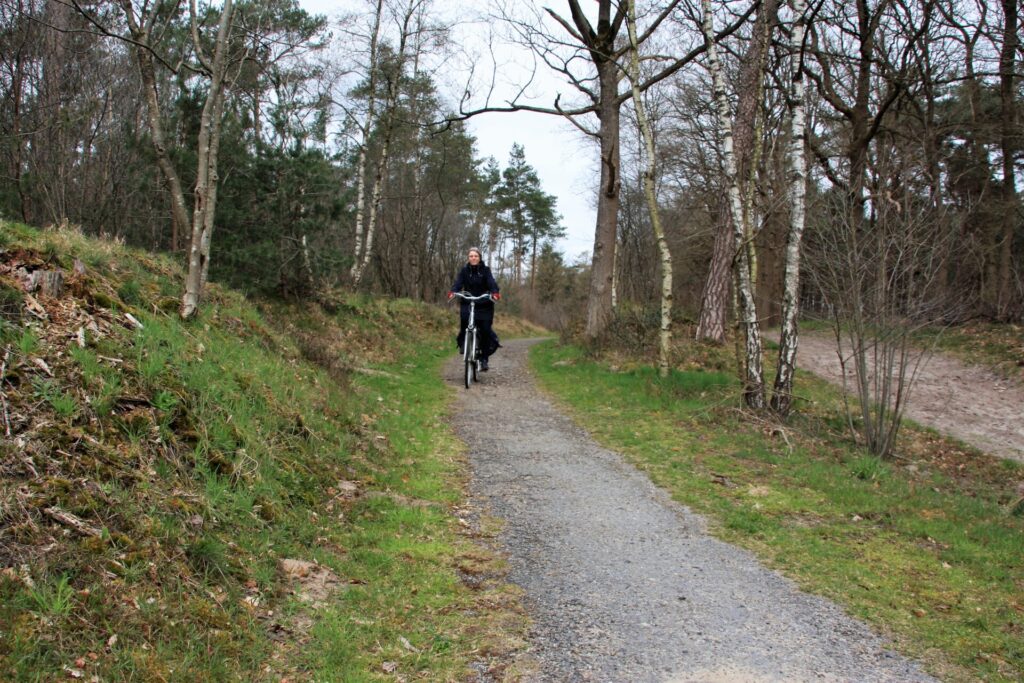
With bicycle rides on chilly days in mind, I named the mitts for my trusty Gazelle bicycle, my friend for over 15 years.
It gives me a sense of freedom and keeps me fit. I’m very much attached to it and not yet ready to trade it in for an e-bike like many people do nowadays.
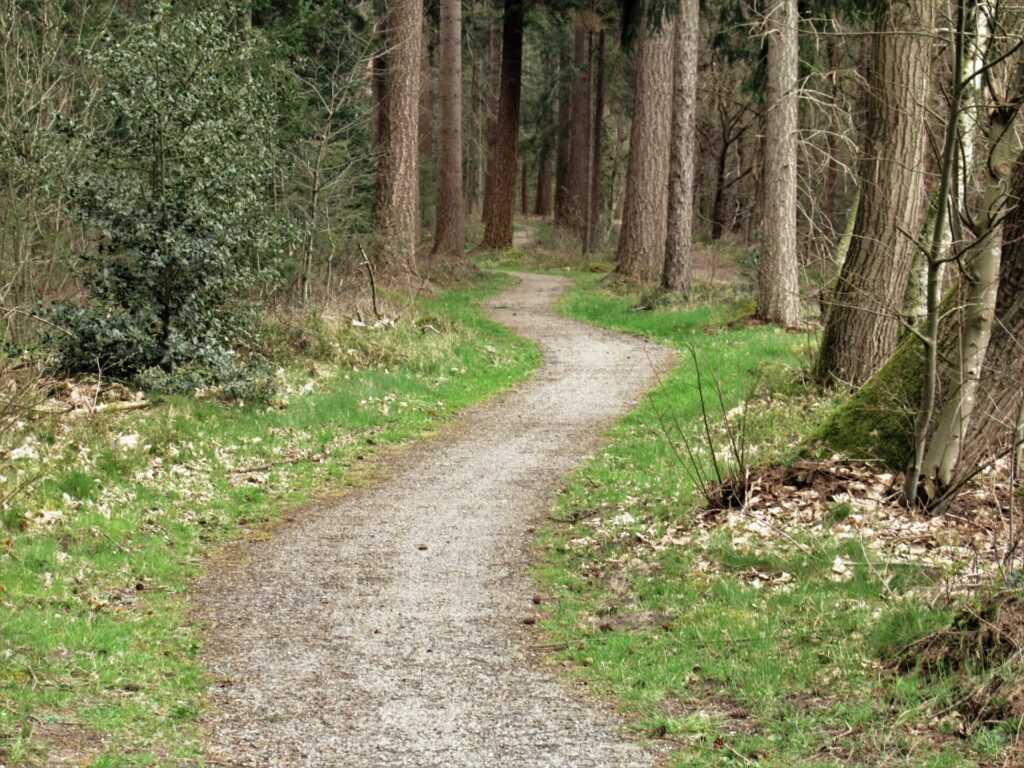
We (well, mainly my husband – thank you!) took most of the pictures for this post along one of my favourite stretches of bicycle track. It meanders through the wood just outside our village.
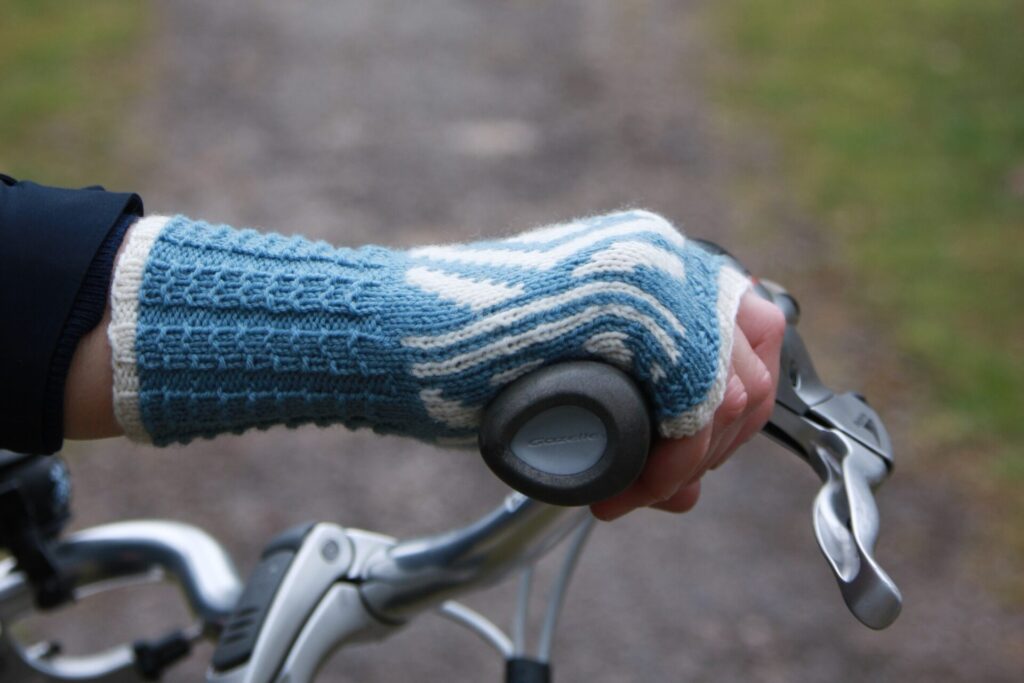
For the picture below, I’ve pulled up my coat sleeve to show you the nice and snug cuff.
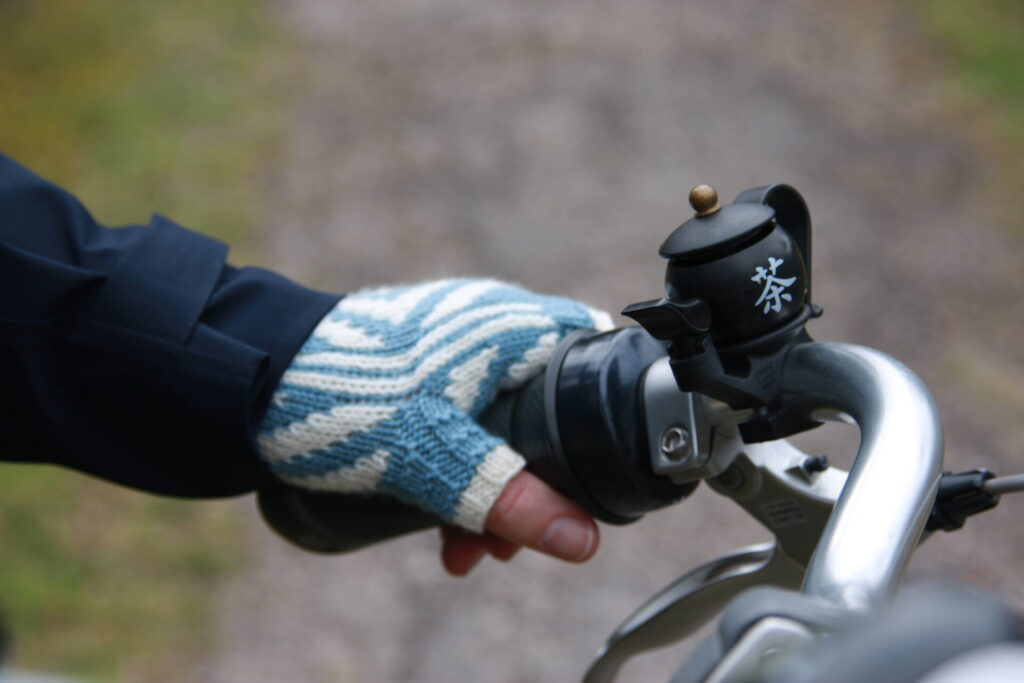
And here is a picture of my bicycle bell. It not only shows you the construction of the mitt’s thumb, but also tells you what my favourite beverage is. If I place my thumb on the teapot spout and release it, it gives off a sharp PING!
On longer bicycle rides, I often bring a thermos flask of tea. (Just for me – my husband prefers coffee.) Coffee-and-tea-to-go places have sprung up during the past year even around here, but they are still few and far between. And anyway I prefer my own.
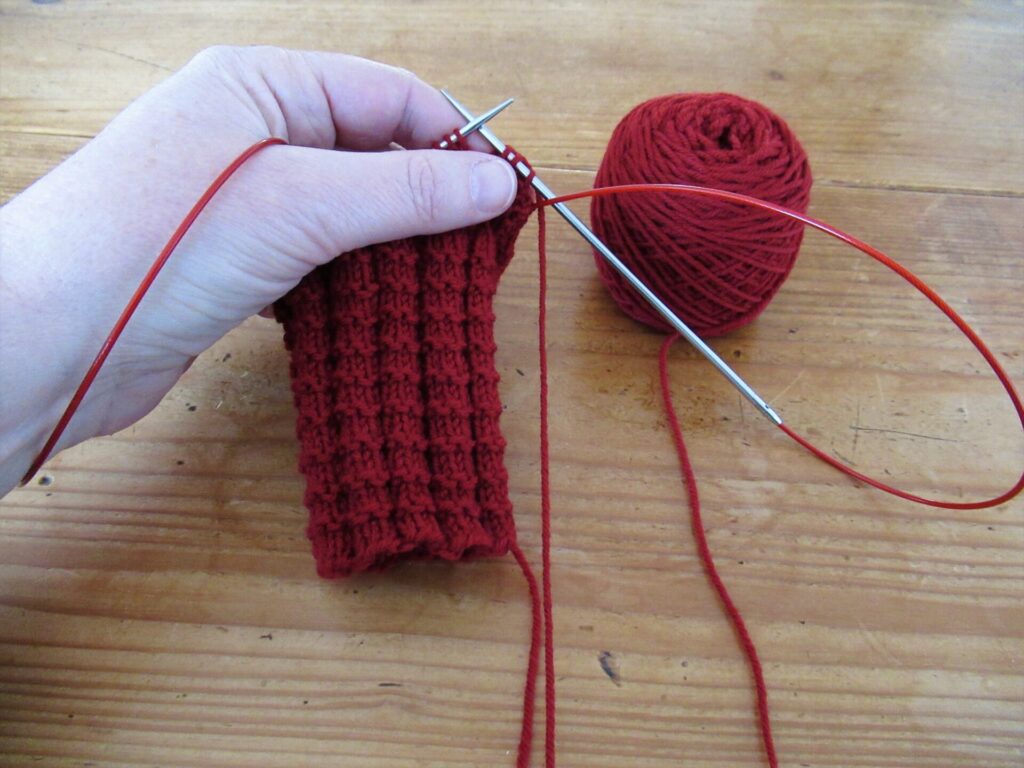
The Gazelle Mitts can be knit on a set of double-pointed needles or on long circulars using the Magic Loop method. Personally, I prefer double-pointed needles for the cuffs and thumbs…
… and the Magic Loop method for the hands.
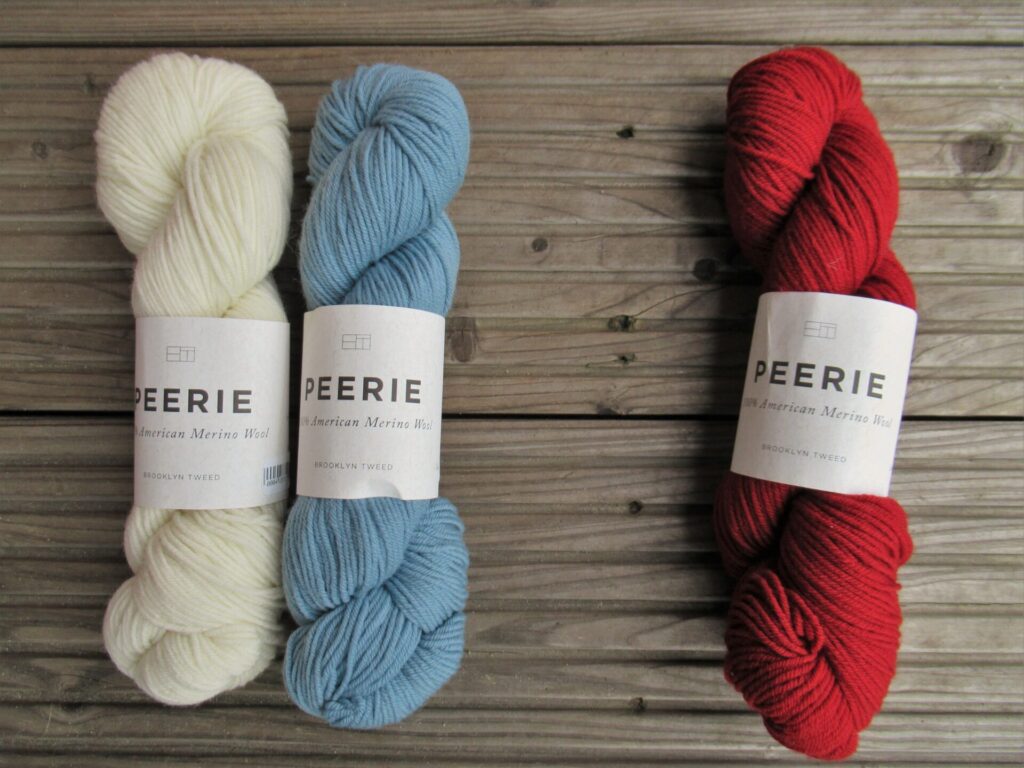
The yarn I’ve used is Brooklyn Tweed ‘Peerie’. One 50-gram skein for the single-colour mitts. And two 50-gram skeins in different colours for the two-colour version, with enough yarn left for a second pair with the colours reversed.
The Gazelle mitts can, of course, be knit in different yarns – I think that for instance many sock yarns are suitable. But should you decide to knit them, make sure your yarn is the same weight (fingering), and is smooth with a good stitch definition. And always check your gauge.
For those of you who’d like to make a pair,
The pattern for the Gazelle Mitts can be found here on Ravelry (available in English and Dutch, also to non-Ravelry members)
There is more information there on needles & notions, finished measurements etcetera. I’ve done my utmost to make the pattern as clear as possible. Apart from detailed instructions, photographs of the mitts, and charts for the diagonals and diamonds, I’ve also included a photo tutorial for the ‘afterthought’ thumb.
Well, that’s all about my Gazelle Mitts for now. If you have any questions, please leave a comment here or contact me through Ravelry (my Ravelry name is MerulaDesigns). As always, thank you for reading!
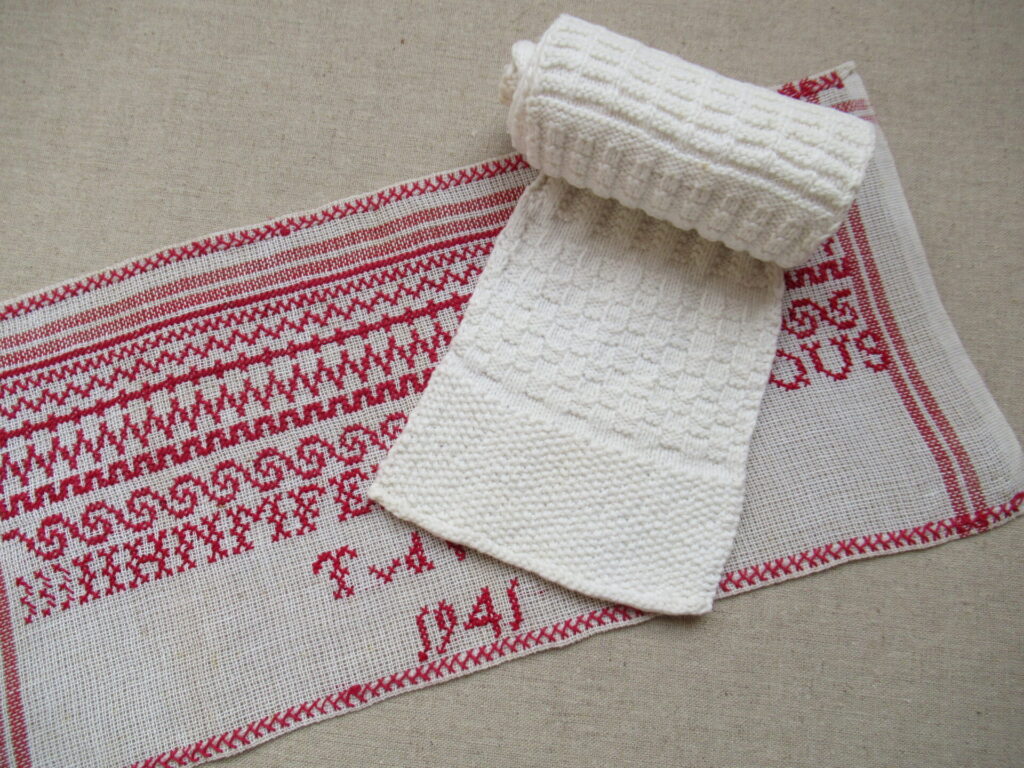
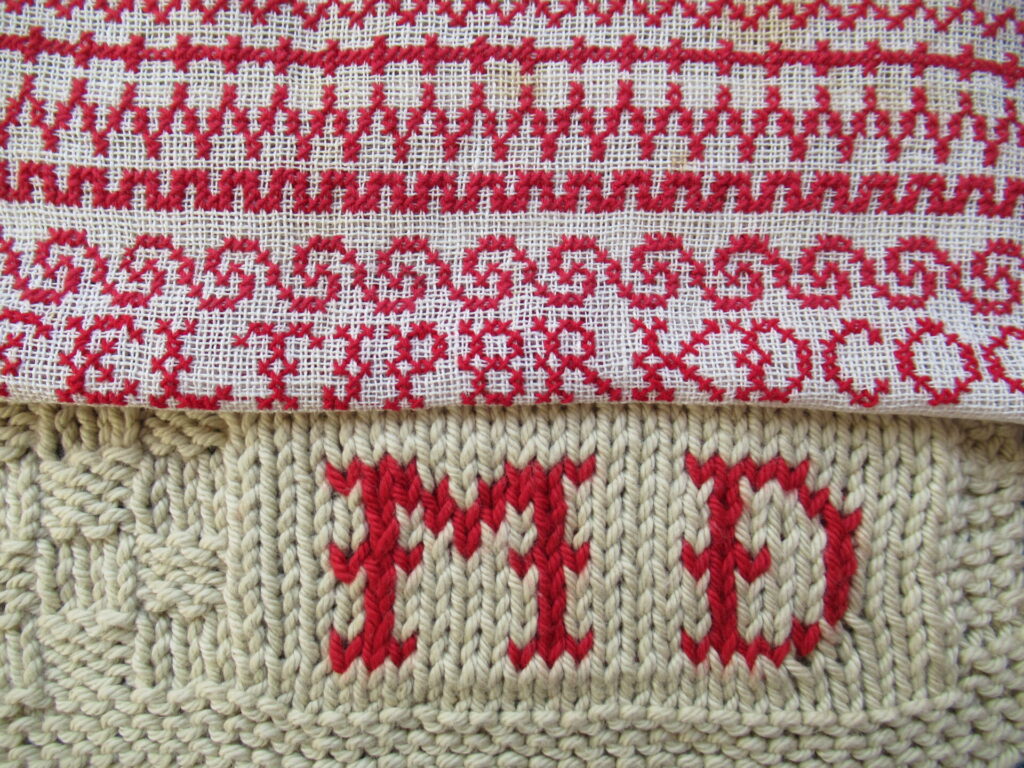
If you’ve been reading my blog for a while, you may remember that I’ve inherited two samplers – an embroidery sampler and a knitting sampler. The embroidery sampler was made by my Mum, aged 8, in 1941. I don’t know anything about the date or the maker of the knitting sampler.
The samplers spent decades in my parents’ attic, and after that, over twenty years in a deep dark cupboard in my home. High time to give them the attention they deserve. I’ve been studying them closely and thinking about the people who made them, and I’d love to find out more about the knitting sampler. But first and foremost, my hands were itching to DO something with them.
The word ‘sampler’ is related to ‘example’, and that is exactly what samplers like these were meant for. To provide the girls who made them with examples to be used later in life, for useful and beautiful textiles for their families and homes.
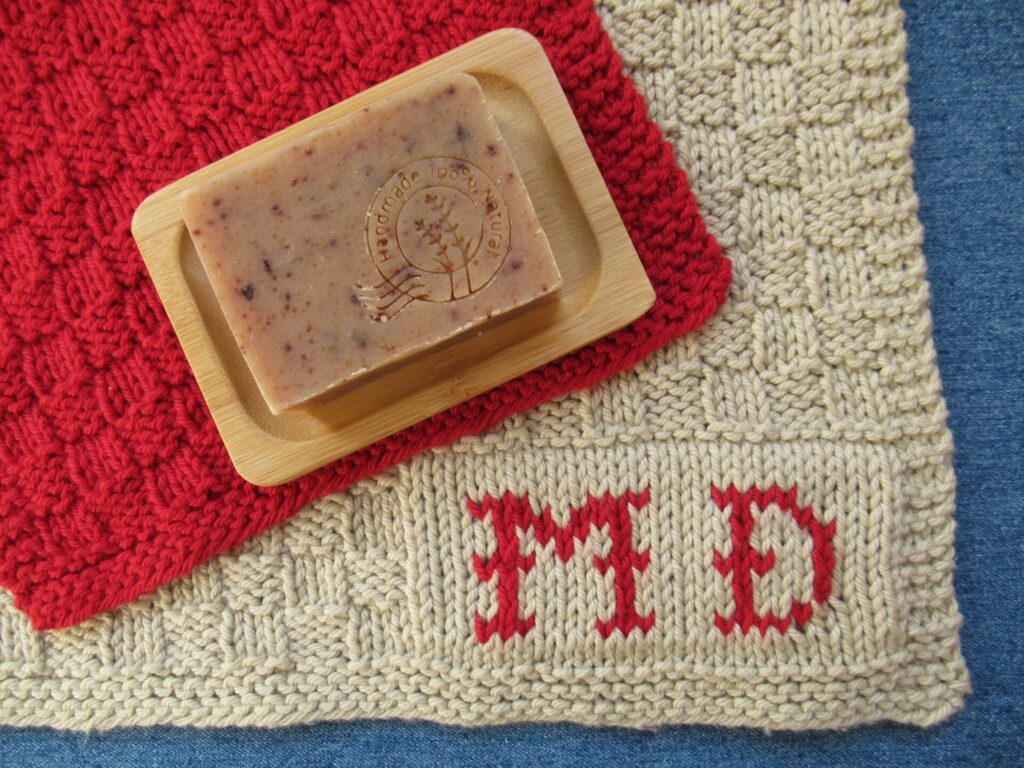
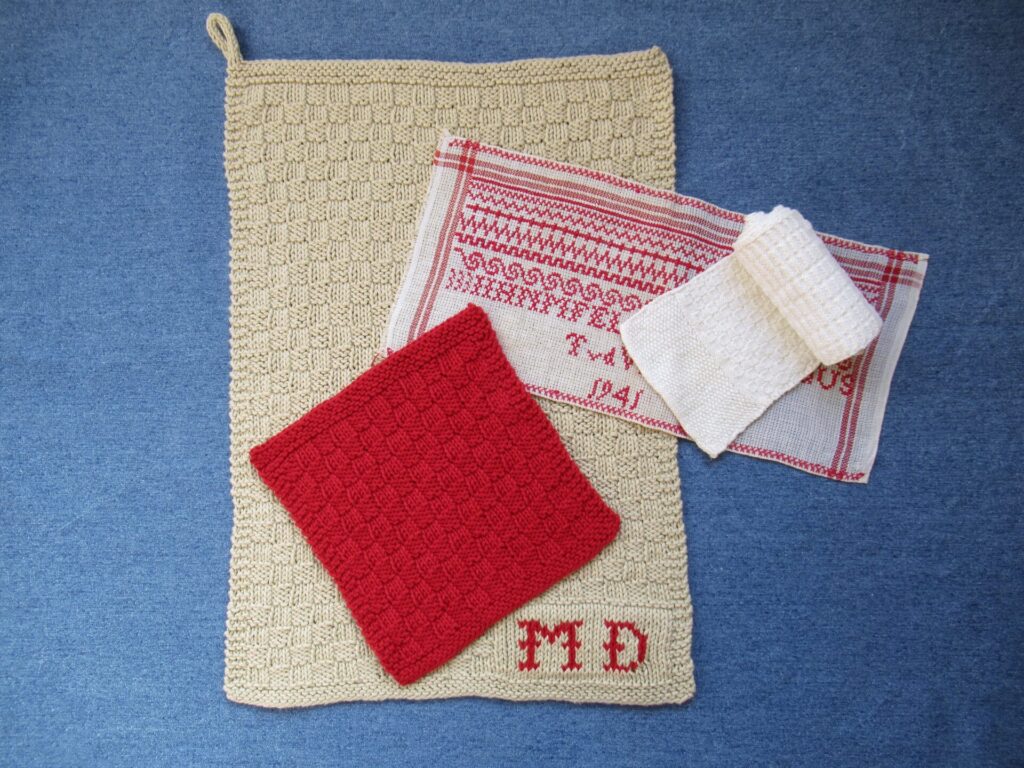
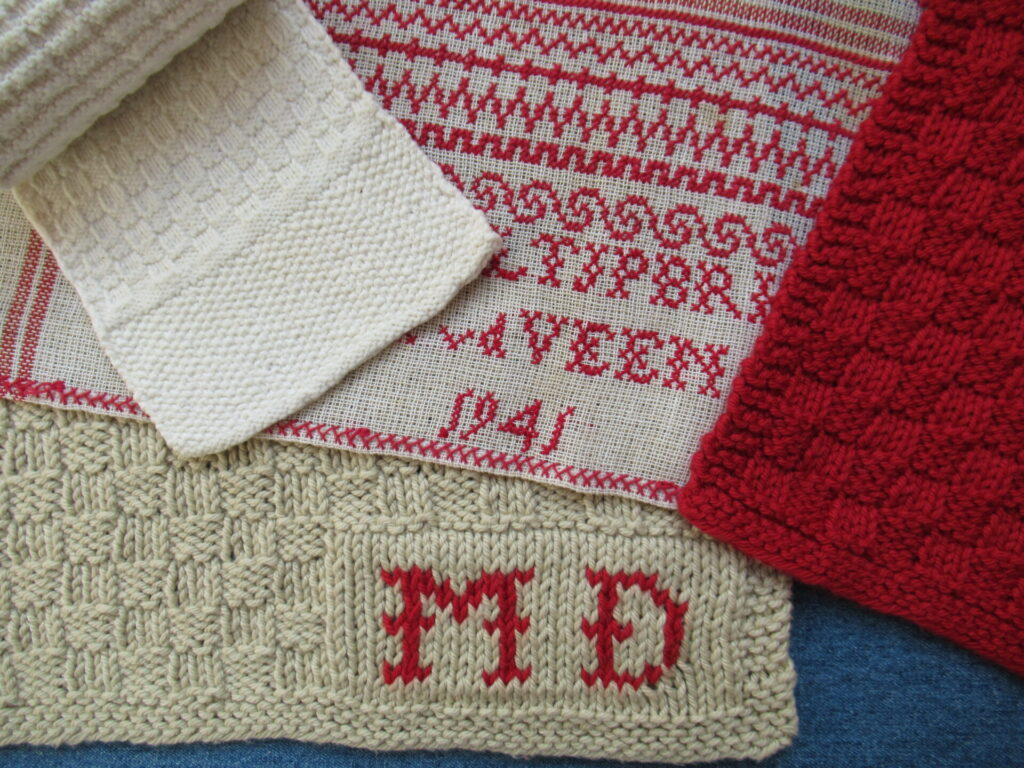
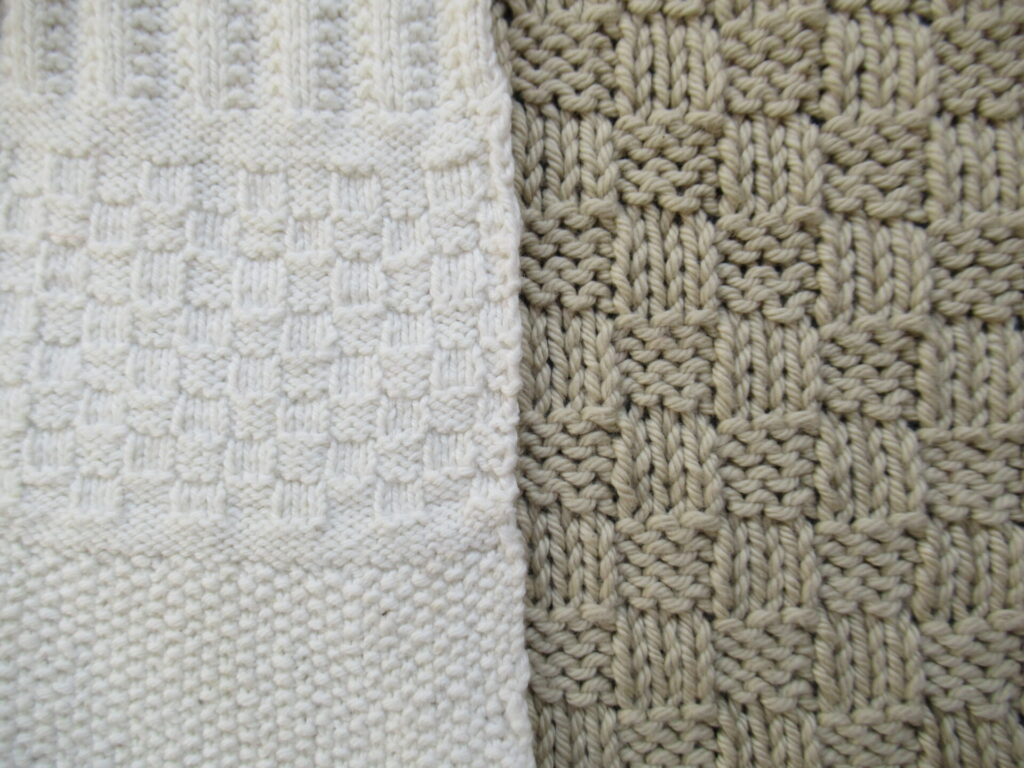
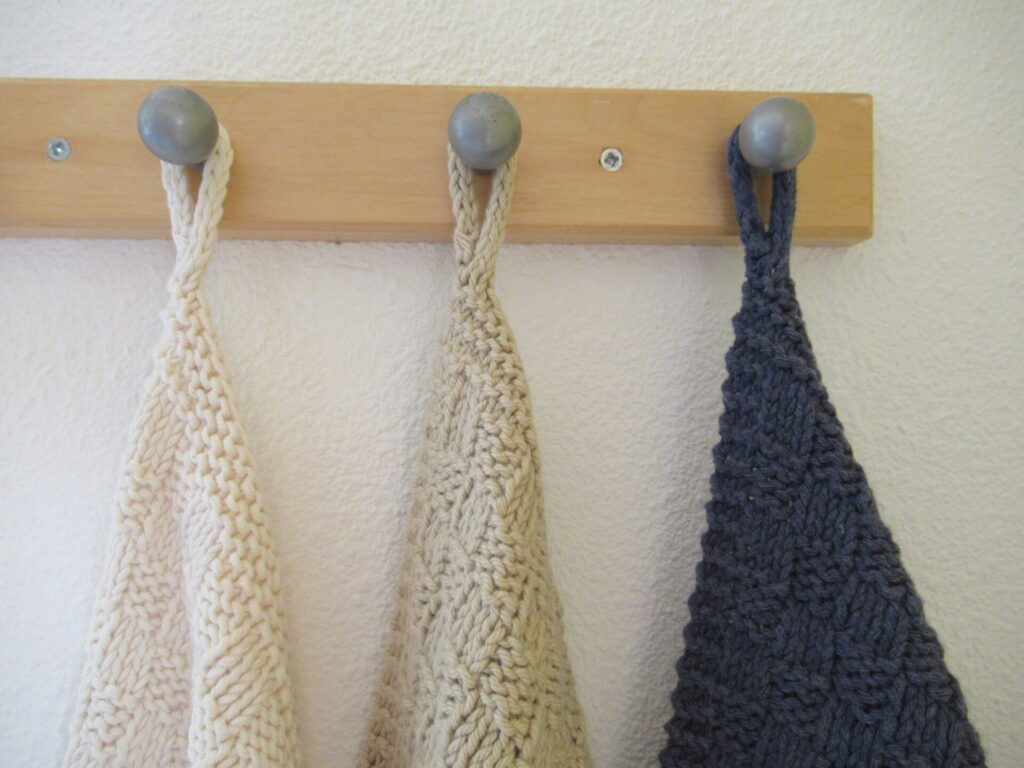
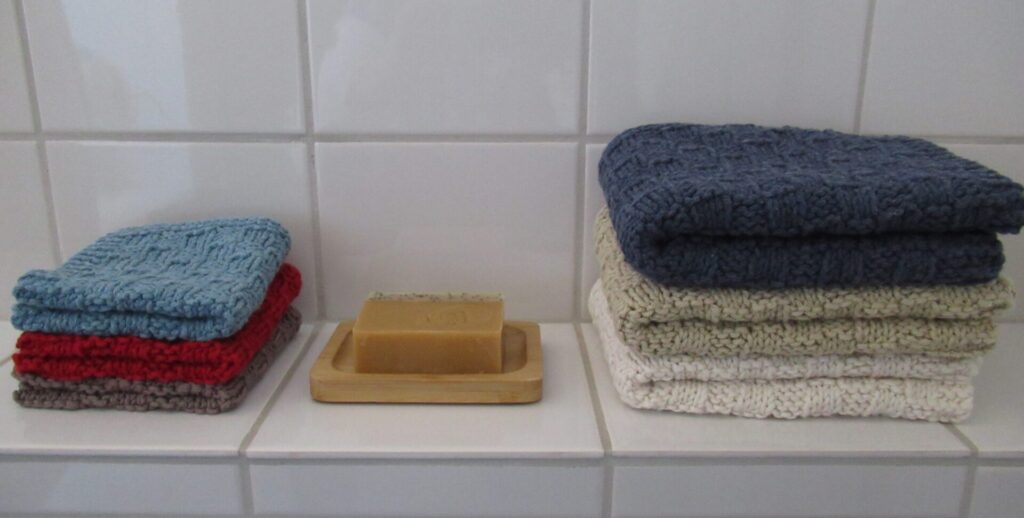
For my first sampler-based project, I’ve stayed close to that idea. Combining and adapting elements from both samplers, I’ve designed and knit a monogrammed guest towel, using the yarn left over from the monogram for a small face cloth.
For the first version that I made, I also stayed close to the original colours.
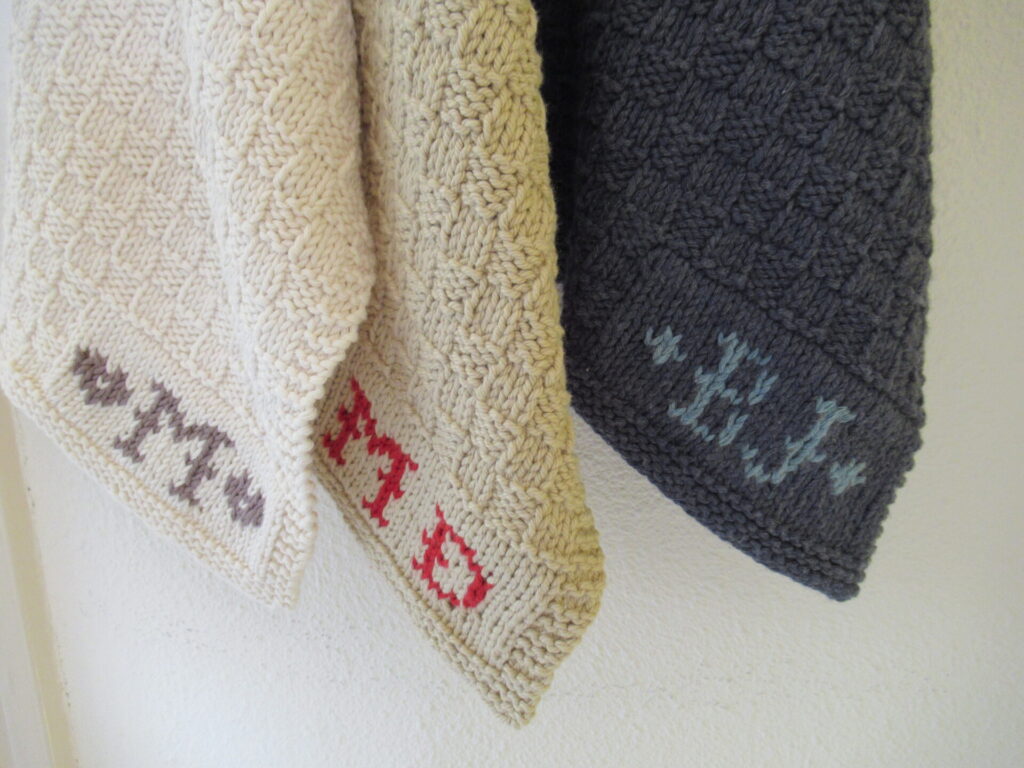
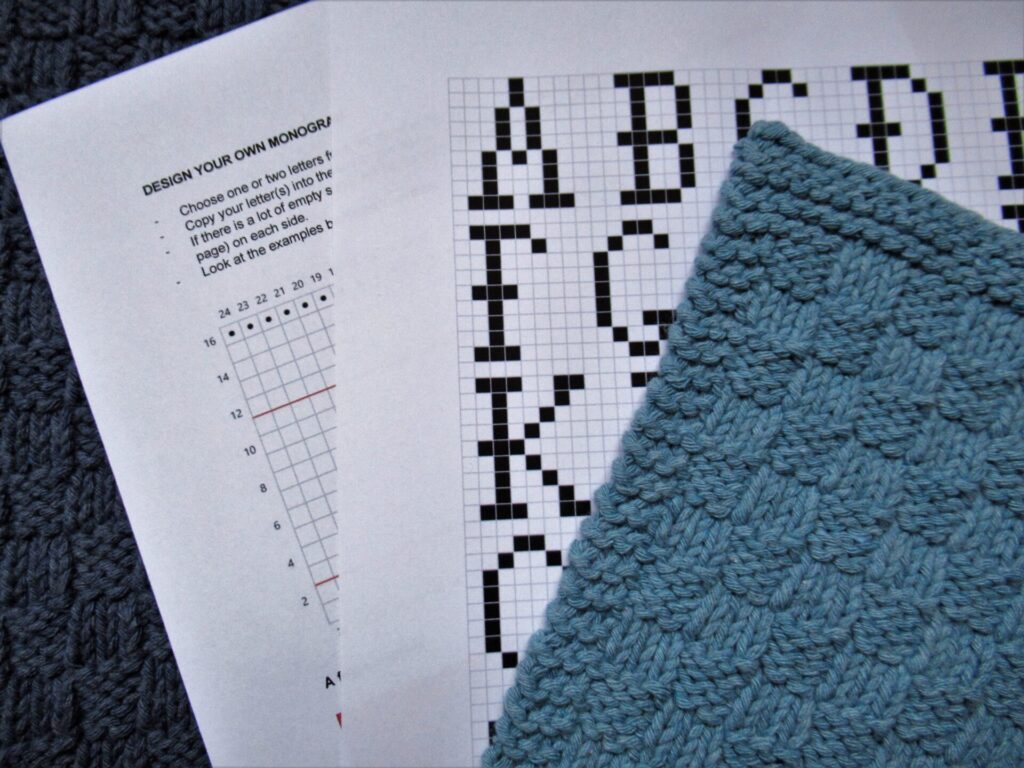
From the knitting sampler, I borrowed the second stitch pattern from the bottom – mini-blocks. That was simple.
Translating the embroidered letters into knitted ones was less straightforward, because a cross stitch is square while a knit stitch is a flat rectangle. You know what it’s like when your tv screen has the wrong picture format and people’s faces get squashed? That’s what would happen if the letters were simply copied from the embroidered examples in knitting.
So, to begin with, I stretched the letters out. As a result some of the ‘legs’ looked wrong, and I had to alter those. When I tried knitting them, I found out that the letters still didn’t look quite right, and I tweaked a few other details until I was happy with them.
The second problem I ran up against, was that my Mum’s sampler didn’t have a complete alphabet – it had only 19 letters. It did have an M and a D (for Merula Designs), but it lacked several other essential letters. Looking at similar samplers, I finally pieced together a complete knittable alphabet. Phew, problems solved.
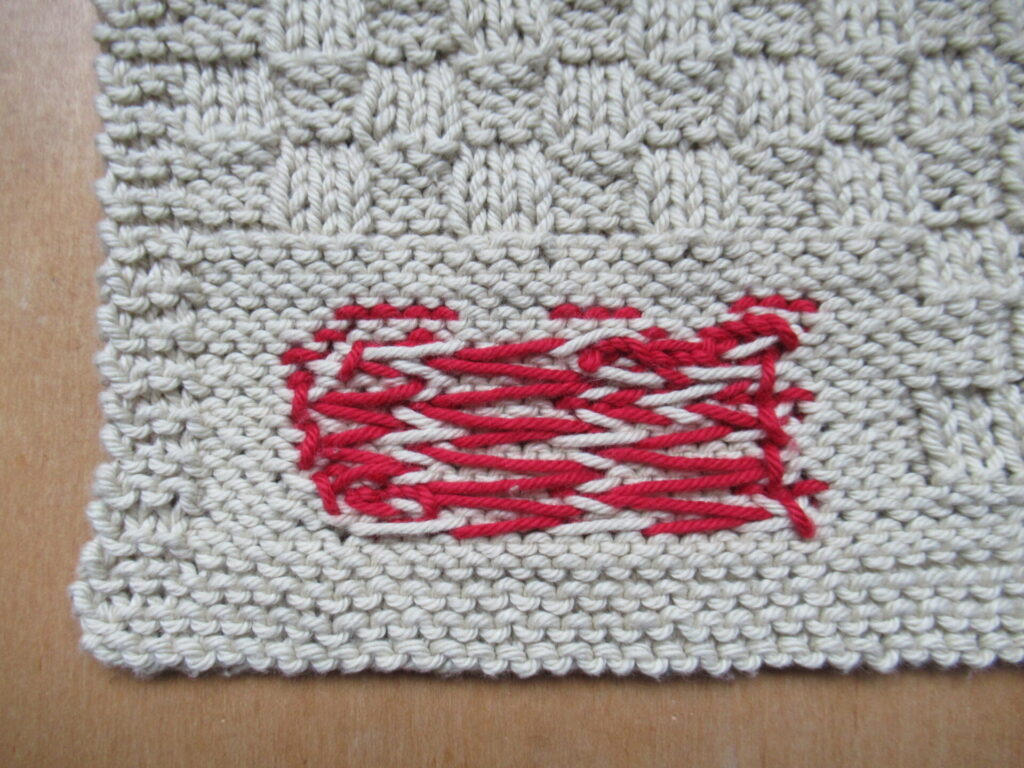
Or so I thought. Because when I started knitting more swatches, I soon realized that the back of the monogram wasn’t going to look very attractive. Uh-oh.
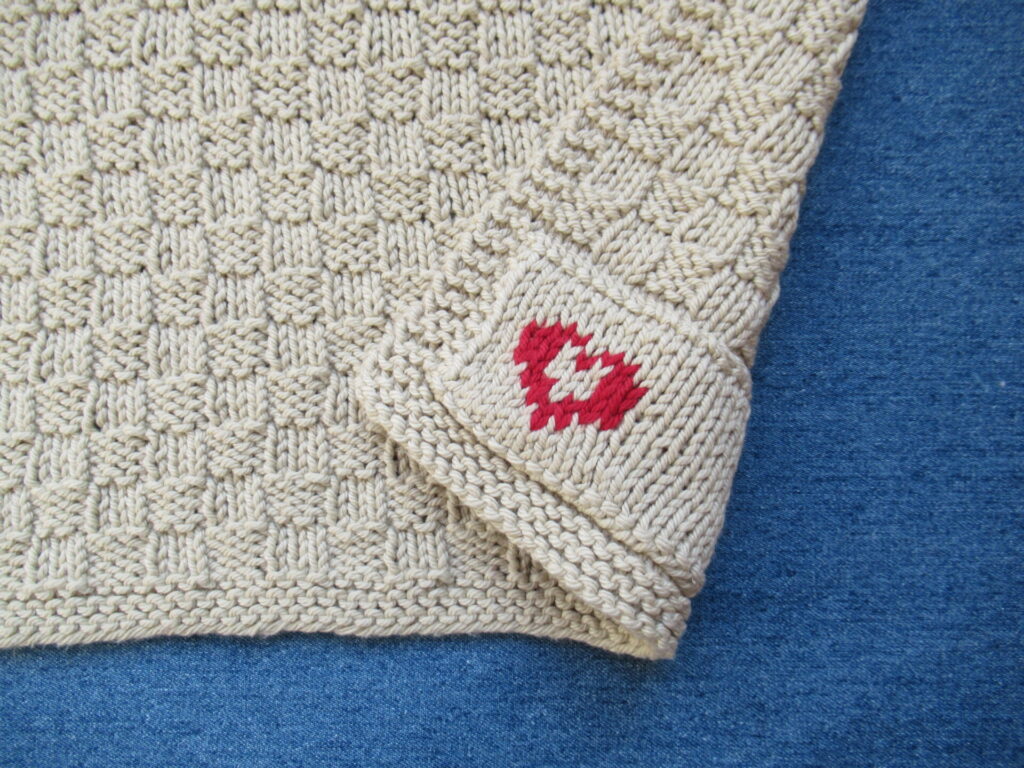
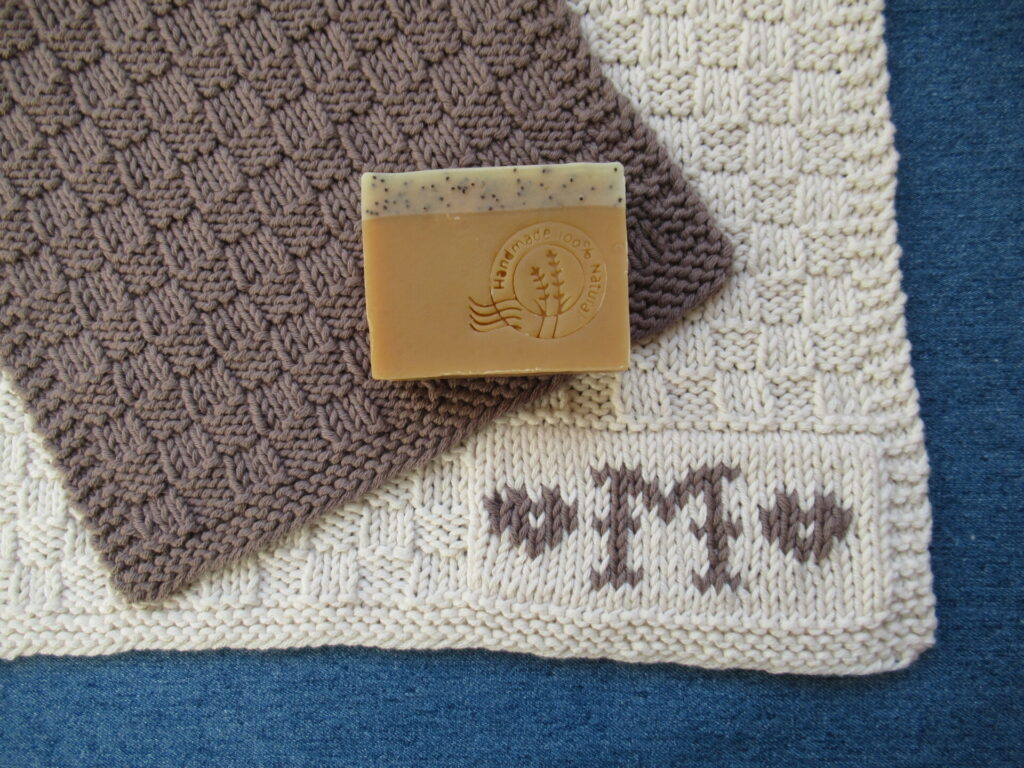
In the end, I solved that by adding a nice little surprise to the back.
I tried out several loops and decided on a bit of I-cord. Then I knit another towel, and another one – each with a matching face cloth. Here is a close-up of the loops…
… and one of the monograms.
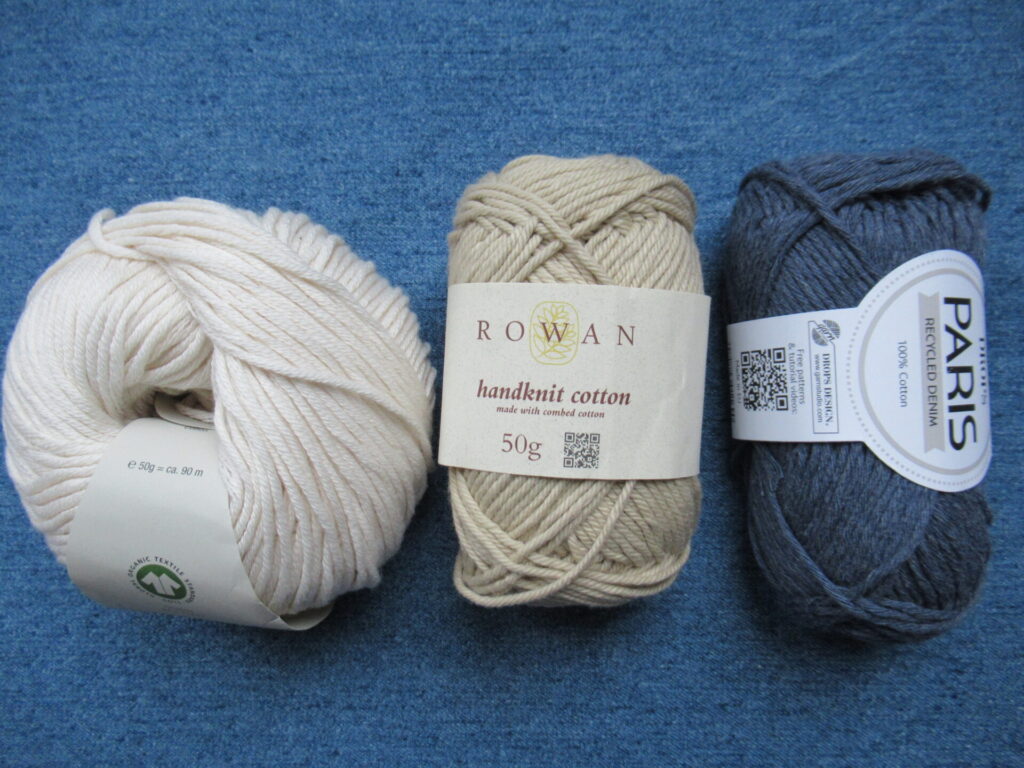
Each towel & face cloth set was knit in a different yarn.
I’d like to go greener in my knitting, but that isn’t always easy. First, because there are some old yarn friends that I’m strongly attached to. Second, because the choice in organic yarns is still very limited. And third, because organic yarns can be rather expensive. In the end I came up with 3 options:
An old friend: Rowan ‘Handknit cotton’ (linen/red version)
An affordable organic yarn: Lana Grossa ‘Linea Pura Organico’ (cream/taupe version)
An inexpensive sustainable yarn: Drops ‘Paris Recycled Denim’ (blue version)
If I’m honest, the organic version is my favourite. It is very soft and supple.
But the other ones are really nice, too.
I’ve written out the pattern for anyone who would like to make a monogrammed guest towel of their own. Personalized with the recipient’s monogram, I think a guest towel & face cloth set would make a lovely Christmas, Birthday or Wedding Anniversary gift.
The pattern includes:
Clear knitting instructions and charts for towel & face cloth
A complete knittable alphabet
Instructions and an empty grid for designing your own monogram
Tips for knitting the monogram and the I-cord loop
The Monogrammed Guest Towel pattern can be found here on Ravelry (available in English & Dutch, also to non-Ravelry members)
Now, what else could I make based on my inherited samplers? Hmmmm……
As always, thank you for reading and take care! Xxx
How are things going in your part of the world? I really hope that you are safe and well, and have enough to do to keep your hands occupied and your mind free from too many worries.
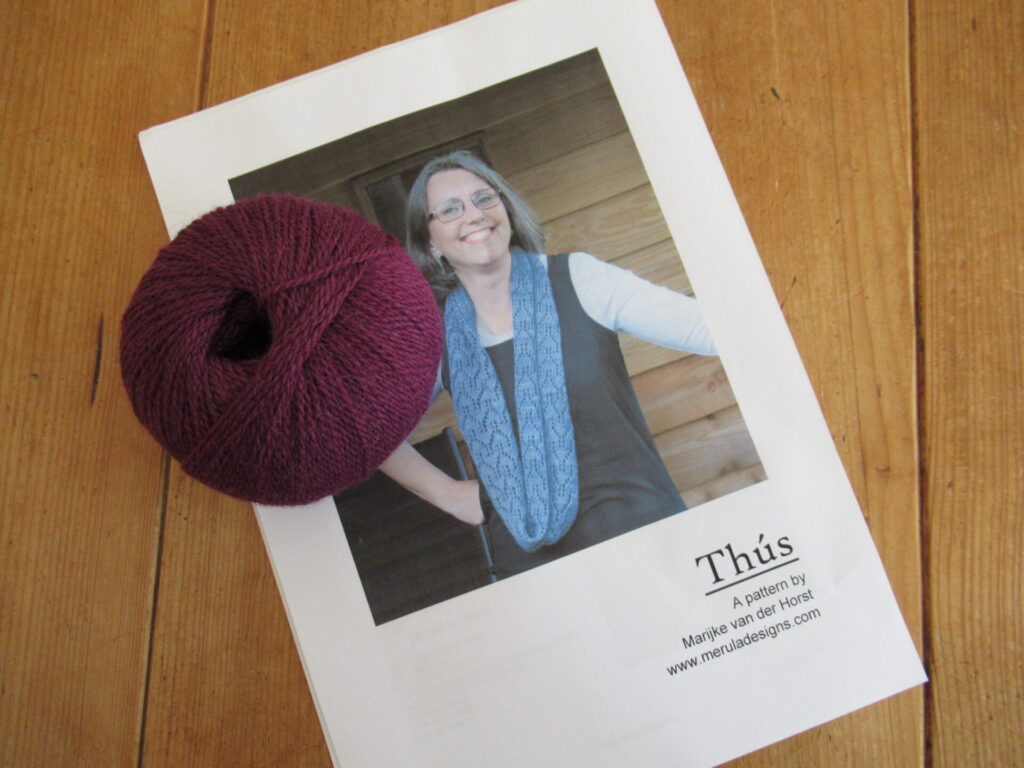
Here, in the Netherlands, we are still spending an inordinate amount of time at home, or thús, as the Frisians say. And what better thing to do at home than knit? It’s utterly comforting and relaxing. Plus you end up with something nice for yourself or someone else.
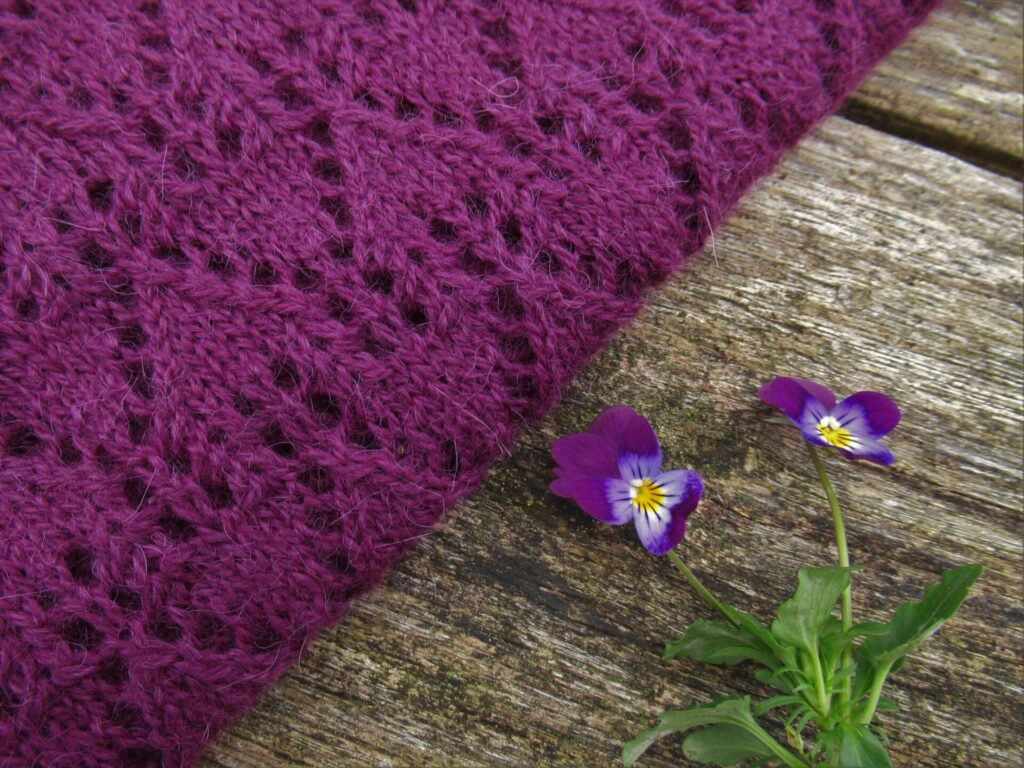
So, high time for a new version of Thús, a pattern I published earlier this year. Here it is – Thús 2!
The original version of Thús was a one-skein project, with an all-over stitch pattern of rows of interconnected houses.
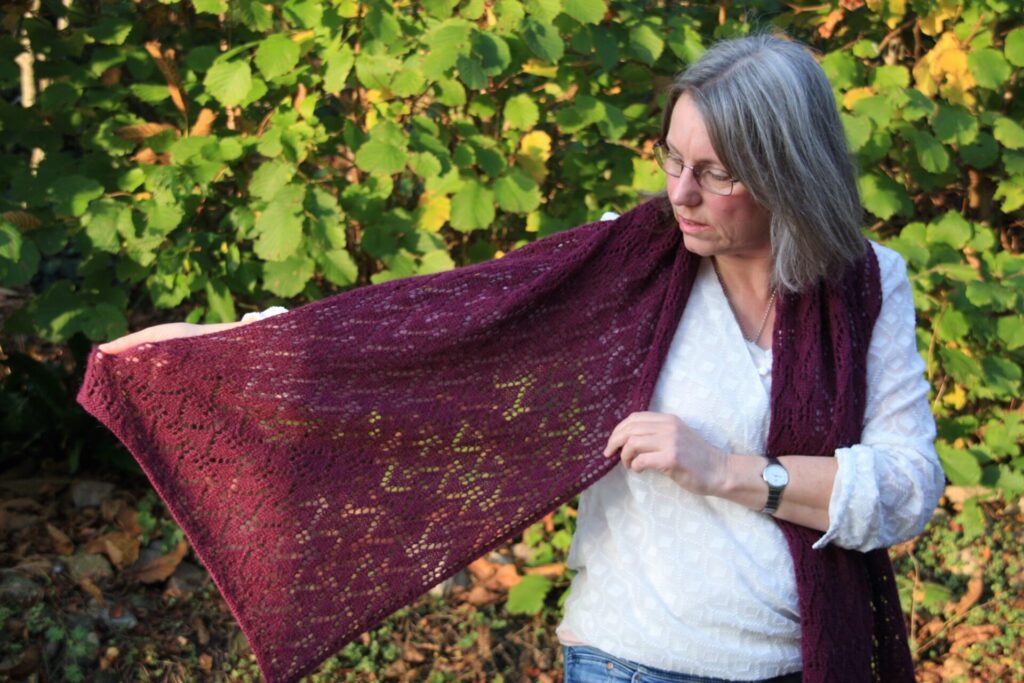
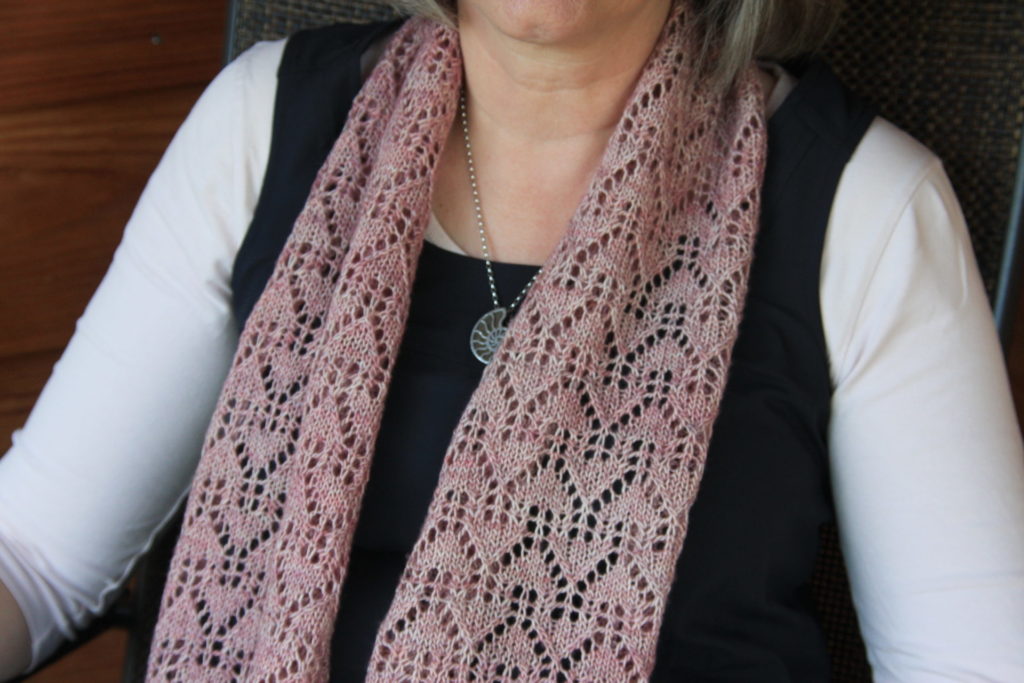
Thús 2 is covered in the same tiny houses, but is wider and longer. And it is a scarf instead of a loop – a bigger symbolic hug for yourself, a friend or a relative.
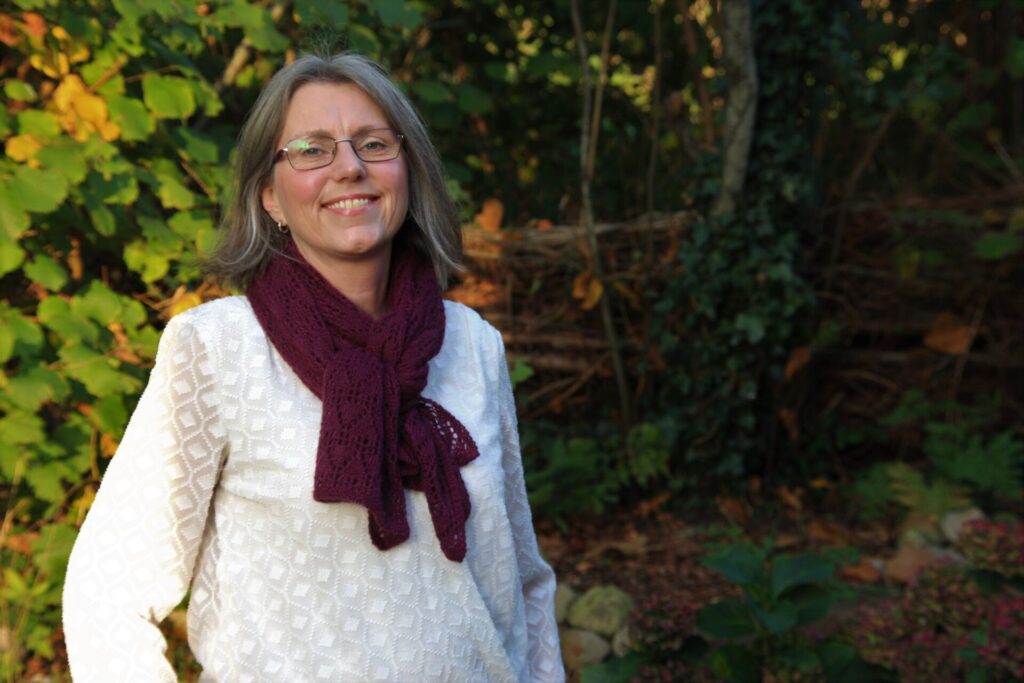
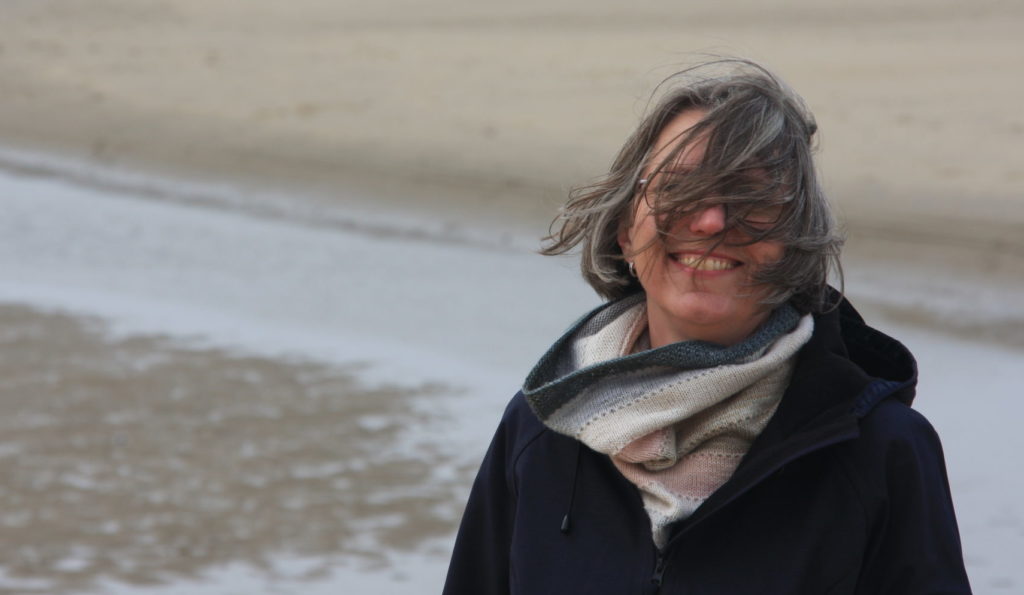
I hate having my pictures taken, but my beloved photographer was patient, I called upon my inner Doutzen Kroes (who also grew up in Friesland, by the way), and we actually ended up with a few in which my eyes aren’t closed.
Thús 2 is long enough to be worn wrapped around the neck.
Or folded in half with the ends pulled through the loop.
Thús 2 may look like a lot of knitting, but it isn’t really. It takes four 50-gram balls of fingering-weight yarn. That is the same quantity as two pairs of socks. I won’t say it is done in a jiffy, but on 3.5 mm (US 4) needles it is a fairly quick knit. And an enjoyable one, too, I think/hope.
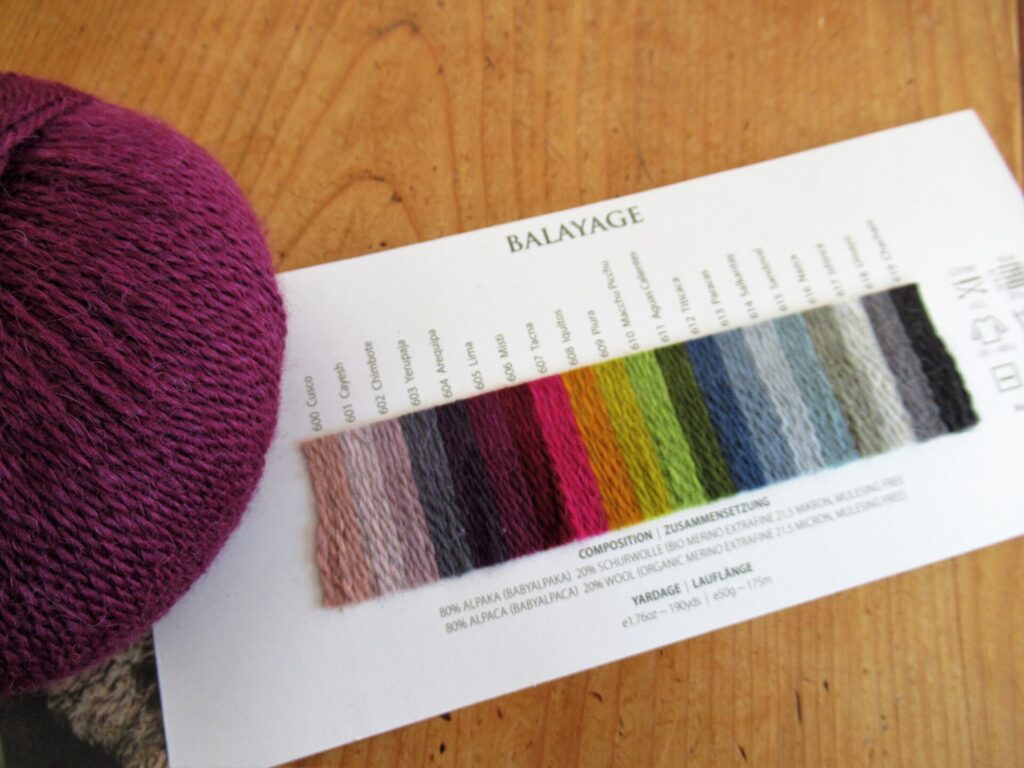
The yarn I used is Pascuali ‘Balayage’, a blend of 20% organic merino wool and 80% baby alpaca. The wool is certified organic. The alpaca isn’t certified, but is produced sustainably. Both fibres are produced in Peru, where the yarn is also spun and dyed.
This was a delicious yarn to knit with! (I’m not sponsored to say this – it is my own honest opinion.) It is very, very soft and smooth. To my mind, the yarn has the best of both worlds. It has the drape and smoothness of alpaca, but thanks to the wool content it isn’t as ‘limp’ as 100% alpaca can be. I think it is ideal for lace and will also show up other stitch patterns very well. I don’t agree with the yarn producer that it is suitable for Fair Isle knitting, though. Imho it is too slippery and not stretchy enough for that.
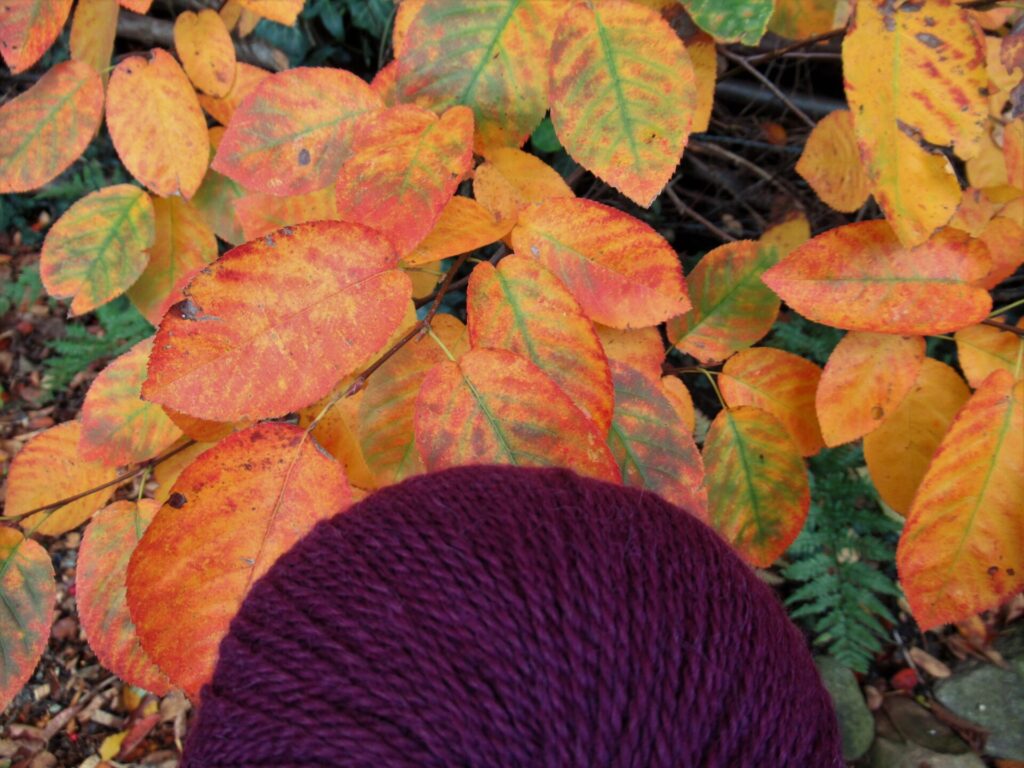
Something that doesn’t show in my dark plummy shade, is that part of the alpaca is grey, which gives the lighter shades a lovely heathered look.
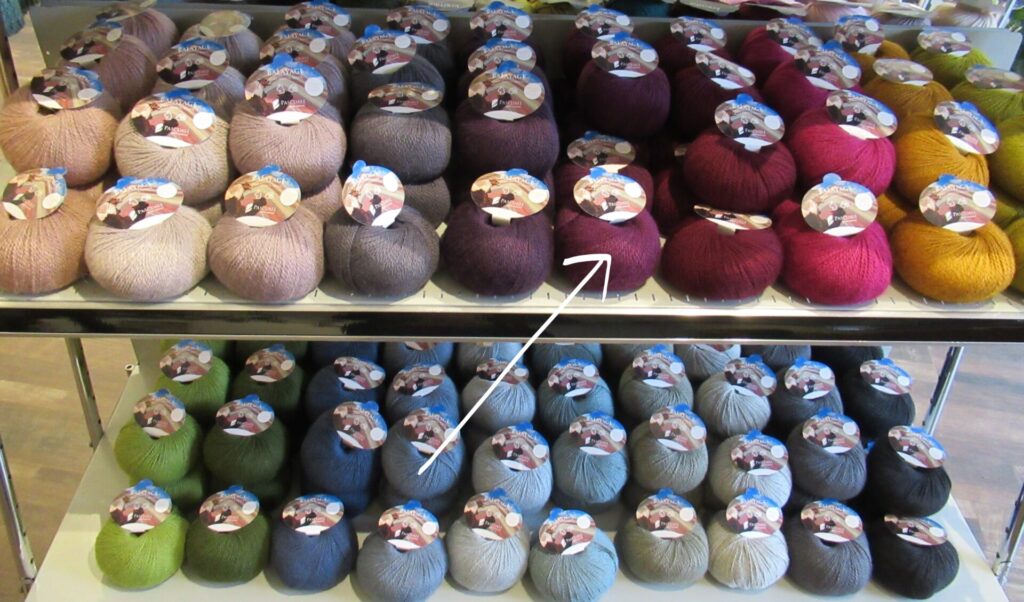
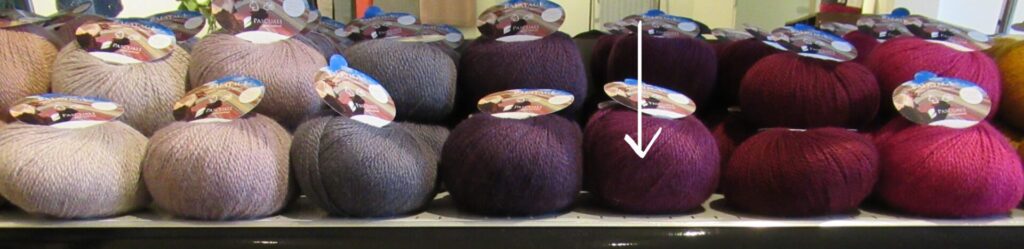
Although I have a shade card (I love shade cards!) it works best for me to choose colours in real life, in the skein or ball. From the rainbow of gorgeous colours at the not-so-tiny-anymore yarn shop I recently wrote about, I chose a shade called ‘Lima’ after the capital of Peru.
What always helps me choose, is seeing colours in relation to each other. Take the gradient of pinks and purples below. Lima is on the darker end of the spectrum. Compared to the burgundy to the right of it and the eggplant to the left, it isn’t really purple or red, but something in between.
I made this Thús 2 for a friend, in lieu of a real hug. She has a cardi in the same kind of red-purple that looks very good on her, and I am fairly confident that she’ll like it.
(That I wrote about the yarn I used in so much detail, is just because I’m a little obsessed with yarn. Please don’t feel that you have to use the exact same yarn if you’d like to make a scarf like mine – 200 grams of another, similar fingering-weight yarn will be fine, too.)
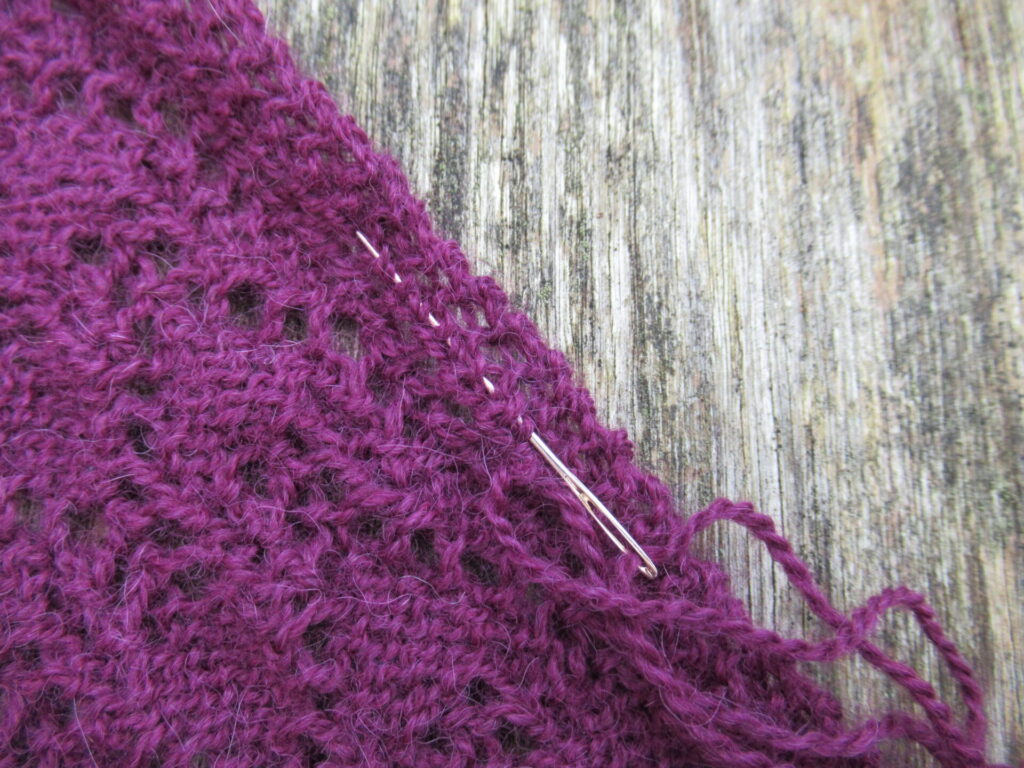
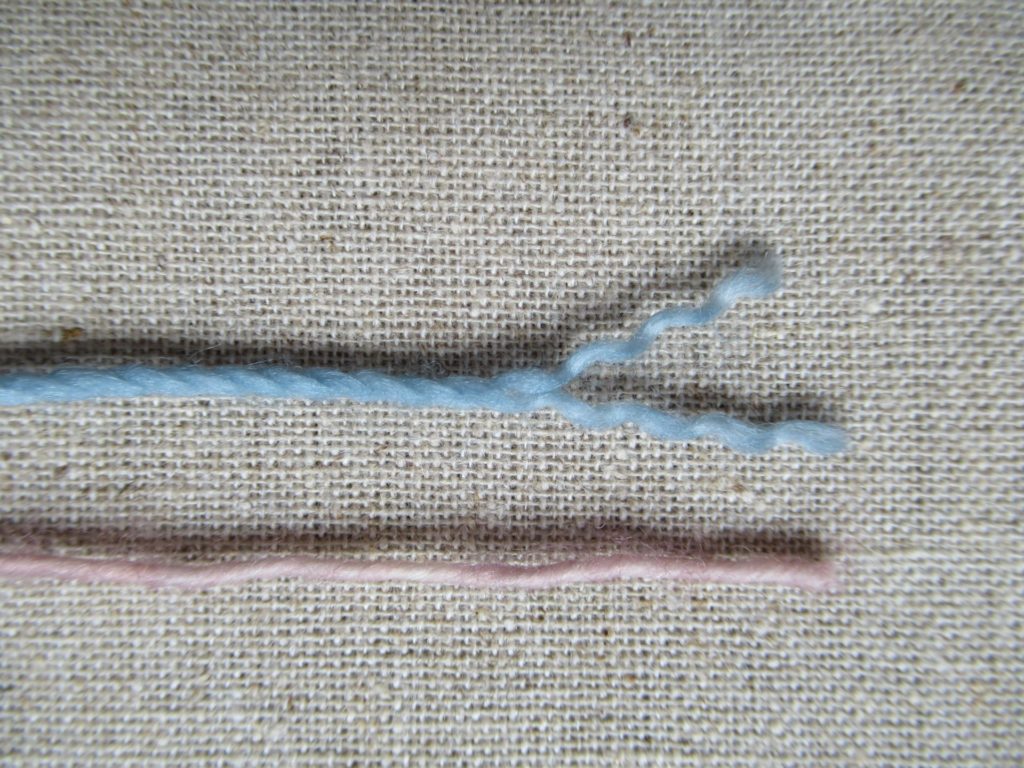
Here is a tip for starting a new ball and weaving in the ends invisibly. (This also applies to the original version, and any other shawl or scarf with garter stitch edgings.) In my experience the best place to do this is on the inside of the narrow bands of garter stitch along the long sides. This is what I mean on the wrong side:
And if that picture isn’t clear enough, this is the place indicated on the right side (the actual weaving-in is done on the wrong side).
Well, I think that is all I can tell you about it for now. After the original Thús, I hope you like Thús 2, too.
Oh, and like the original version, Thús 2 is a free pattern – a small positive gesture in this challenging time. If you’d like to take some positive action in return, please consider making a donation to an organisation supporting refugees, other homeless people, or children/adults in unsafe home situations.
Thús 2 can be downloaded here from Ravelry (available in English AND Dutch, also to non-Ravelry members)
Well, here is the new (free) pattern that I promised you last time. It’s a loop/cowl called Thús, which is the Frisian word for Home.
As a child growing up in Friesland, I had no idea what I wanted to be when I grew up. What I did know, was that I wanted a peaceful, cosy home.
My wish was granted.
But I don’t take it for granted. I’m grateful for my home every single day, now more than ever.
When we were first exhorted to ‘Stay Home, Stay Safe’, my initial reaction was, ‘……….??????’ (Read: Stunned – is this really happening?) Soon followed by thoughts like, ‘What can I do, other than just staying home?’ and also, ‘But what about people who don’t have a safe home?’
One of the ideas that popped into my mind for positive things to do was to design a knitting pattern. Something small and not too complicated, but just complicated enough to take a knitter’s mind off their worries for a while. Something that would be comforting to wear and suitable to send as a gift to a friend or relative when it’s impossible to visit them.
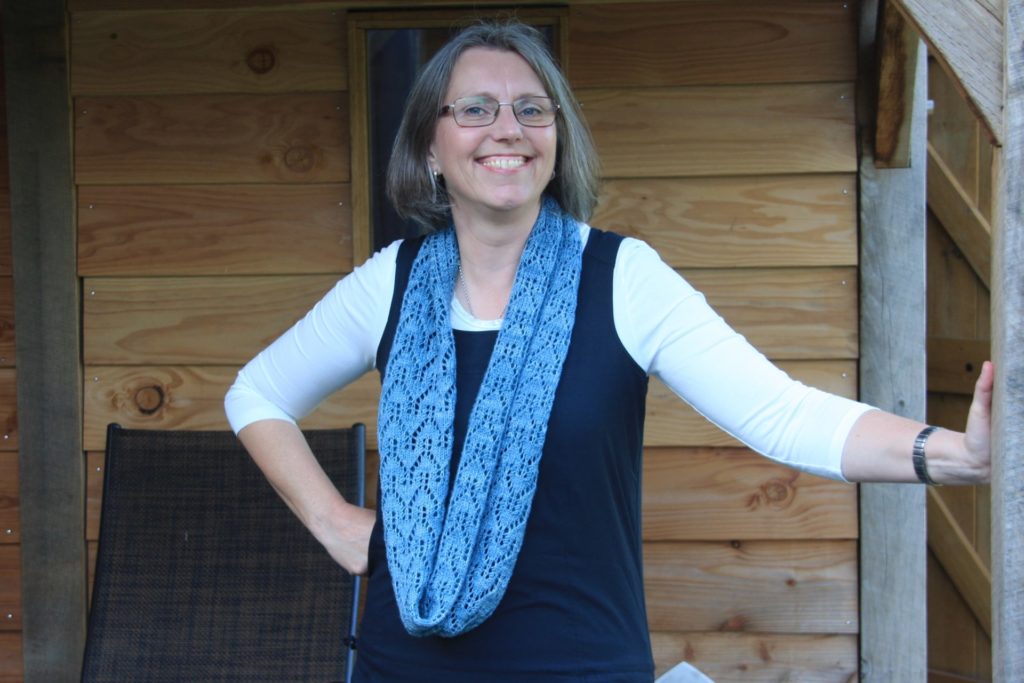
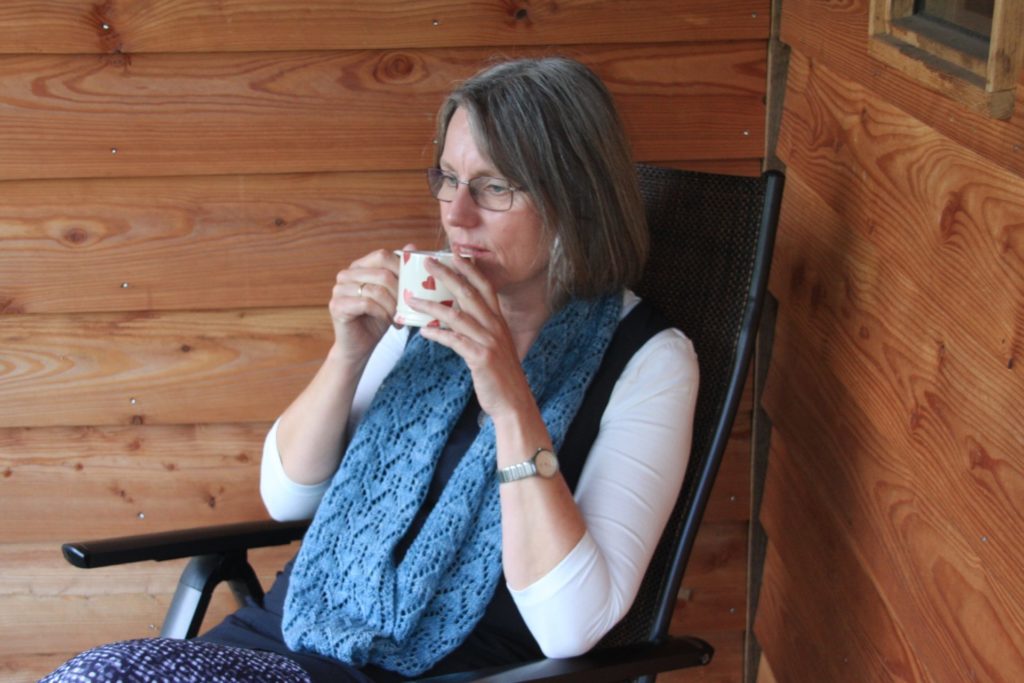
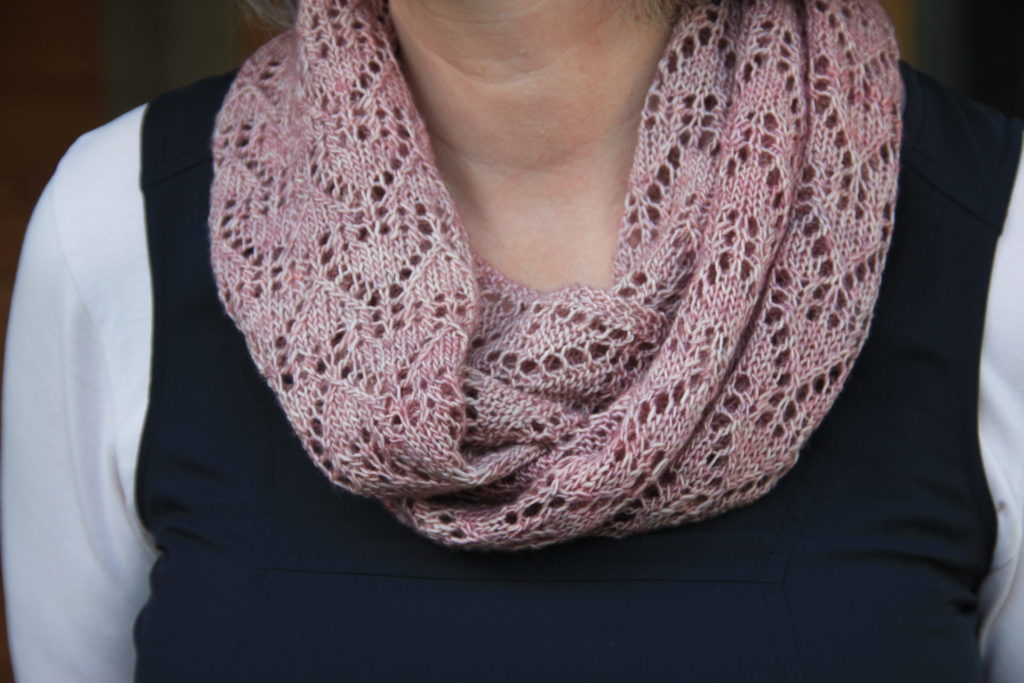
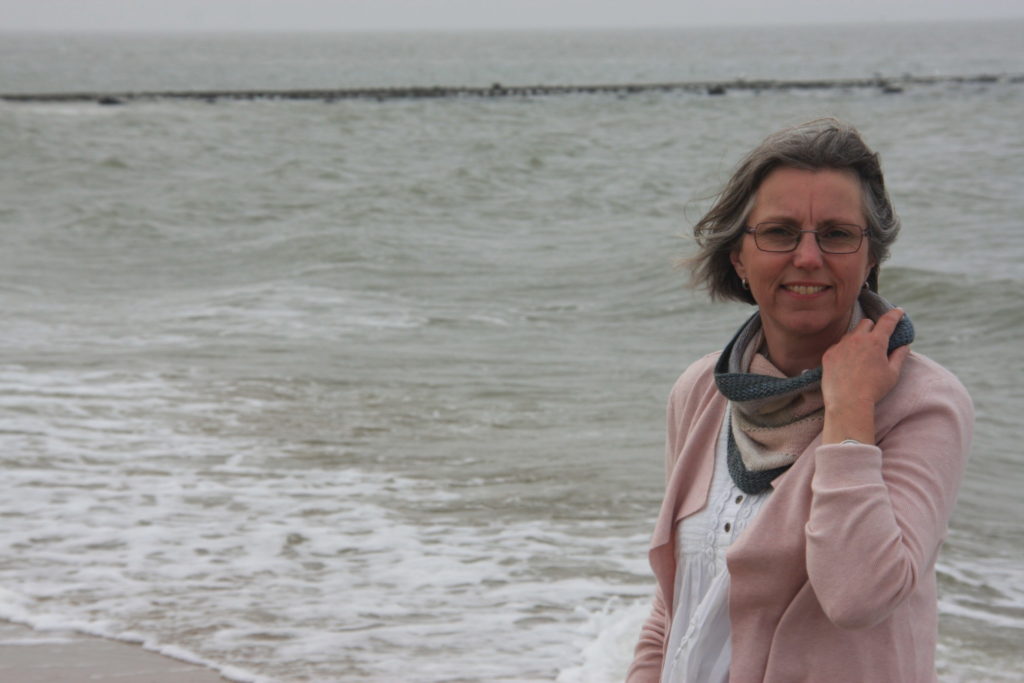
After many swatches, sketches and tries, it became this loop. I’ve made two versions. You’ve already seen the pink one at the top of this post, and this is me wearing the blue one.
(I’m so not cut out to be a model. It is way out of my comfort zone to be in the spotlights like this, but someone has to show what it looks like when worn.)
Knitting may seem trivial in a world in crisis. And maybe it is. But for me it’s a way to bring some beauty into the world, and also a way to express my love and concern.
With a little bit of imagination, you can see that the stitch pattern looks like rows of tiny interconnected houses.
It’s my take on John Donne’s ‘No man is an island’*. Even if we are all staying in our own homes, we are still all connected.
Now, here are some technicalities.
Thús takes just one 100-gram skein of fingering-weight or sock yarn. I think most knitters will have something like this in their homes somewhere. I chose blue and pink, because those are the colours I feel most at home with.
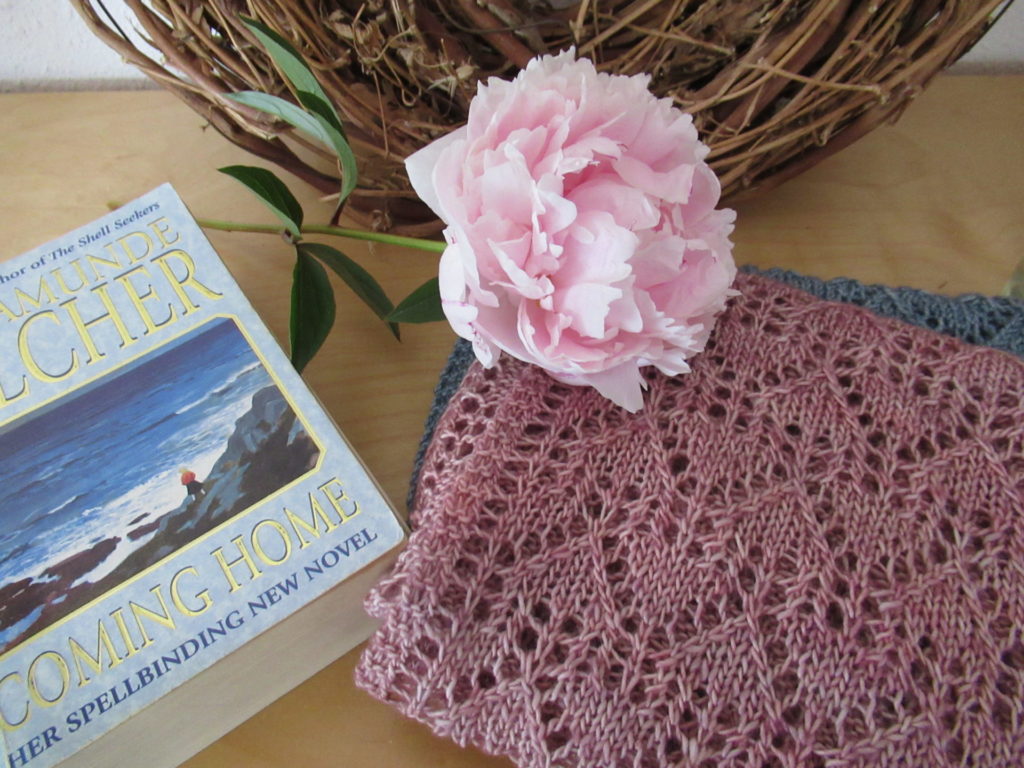
The pink version is made from a skein of Merino Singles dyed by Catharina at Wolverhalen (I wrote about her here). For the blue version I used a skein of Tosh Sock that had been marinating in my yarn stash for a while. These two yarns are very similar, and yet knit up differently.
Specs of the blue yarn: 100% merino wool; total meterage/weight 361 m/395 yds/100 g Specs of the pink yarn: 100% merino wool; total meterage/weight 366 m/400 yds/100 g
The difference is that the pink yarn is a single, untwined thread, while the blue yarn consists of two plies. As a result, the blue version turned out shorter, cosier and squishier, while the pink version is sleeker, drapier and considerably longer than the blue one – it has five more rows of tiny houses.
The loop starts with a provisional cast-on and is knit flat (back and forth). I’ve heard of knitters who love grafting ends together, but I have never met any of them. I certainly don’t belong to that rare species. So, no grafting here. The ends are joined together using a much more knitter-friendly three-needle bind-off (all explained in the pattern).
Thús can be worn single…
…or wrapped around twice.
Thús is a free pattern – no strings attached. But if you’d like to do something in return, please consider making a donation to an organisation supporting refugees, other homeless people, or children/adults in unsafe home situations.
Thús can be found here on Ravelry (available in English AND Dutch, also to non-Ravelry members)
Thank you and happy knitting!
* The quote comes from John Donne’s Devotions upon Emergent Occasions, Meditation XVII. This is the entire passage:
‘No man is an island, entire of itself; every man is a piece of the continent, a part of the main. If a clod be washed away by the sea, Europe is the less, as well as if a promontory were, as well as if a manor of thy friend’s or of thine own were. Any man’s death diminishes me, because I am involved in mankind, and therefore never send to know for whom the bells tolls; it tolls for thee.’
Hello dear fellow knitters, nature lovers and other readers.
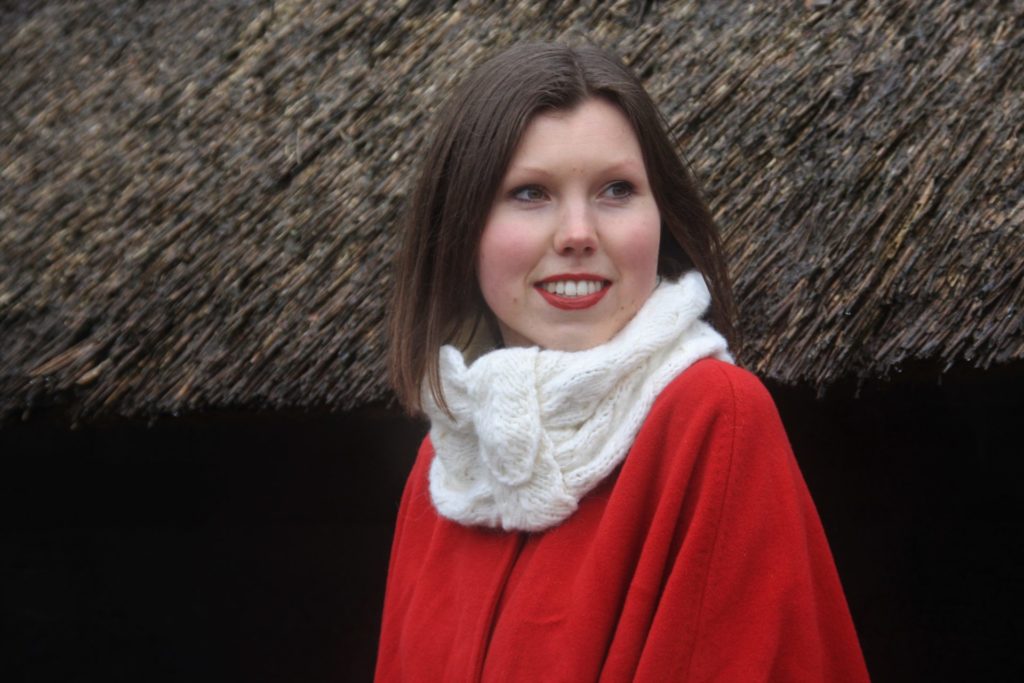
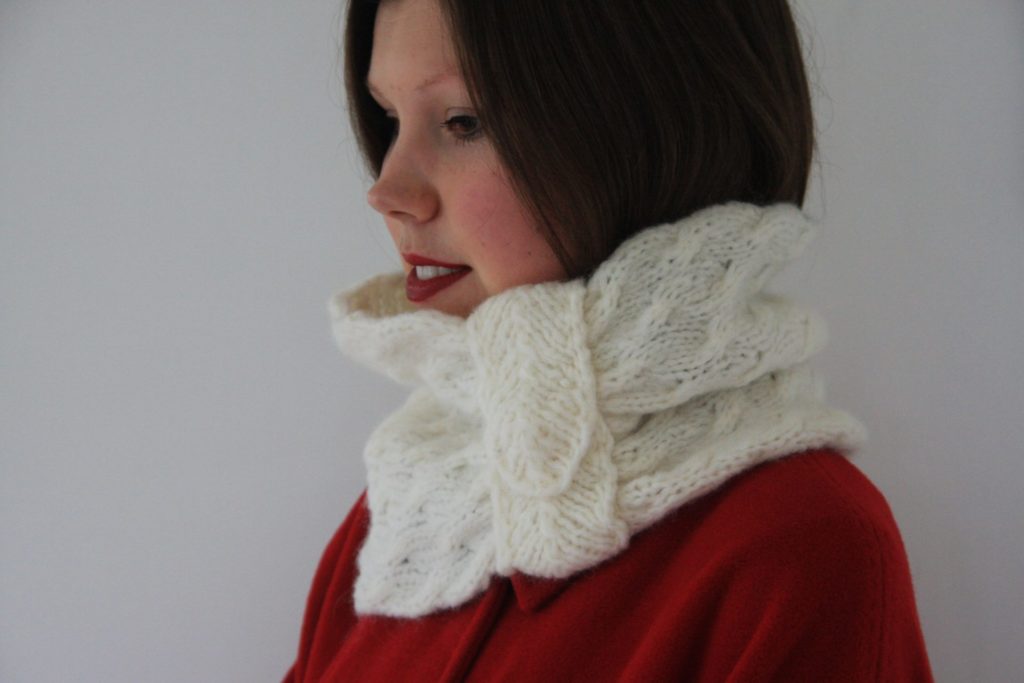
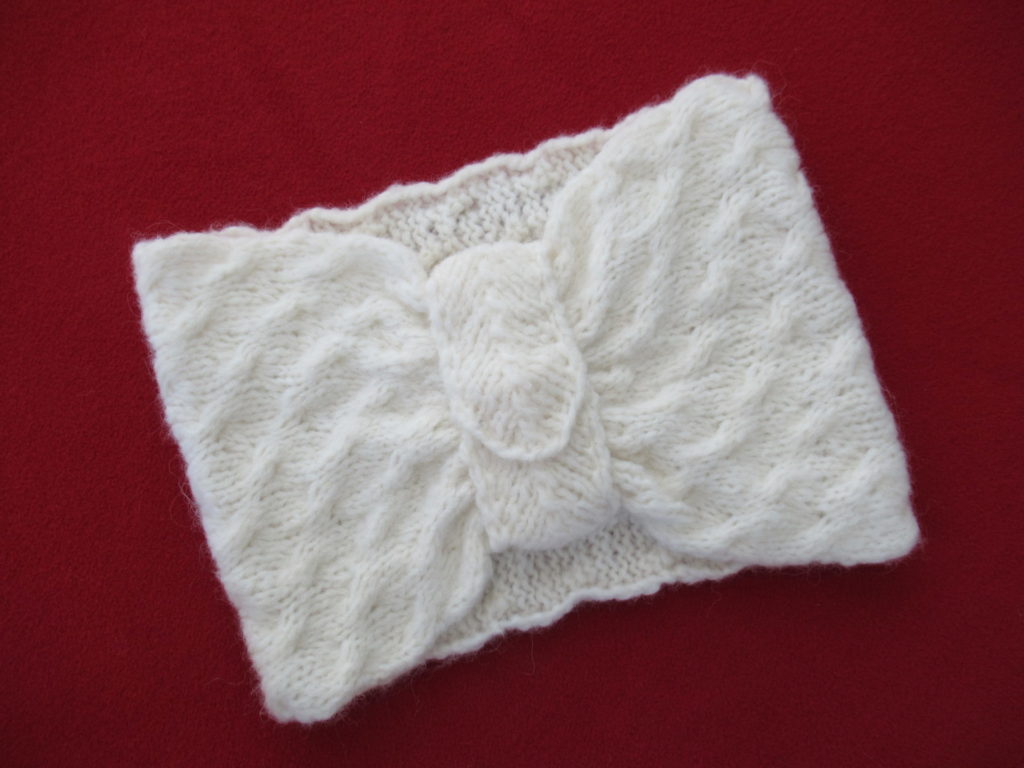
Today’s blogpost is again part of my effort to keep at least this little corner of the world as normal and uplifting as possible. So here is my Cygnus Cowl, the new knitting design I’ve been working on for about four months. I’m not a quick designer. I like to sketch & swatch and test & tweak until every detail is just right.
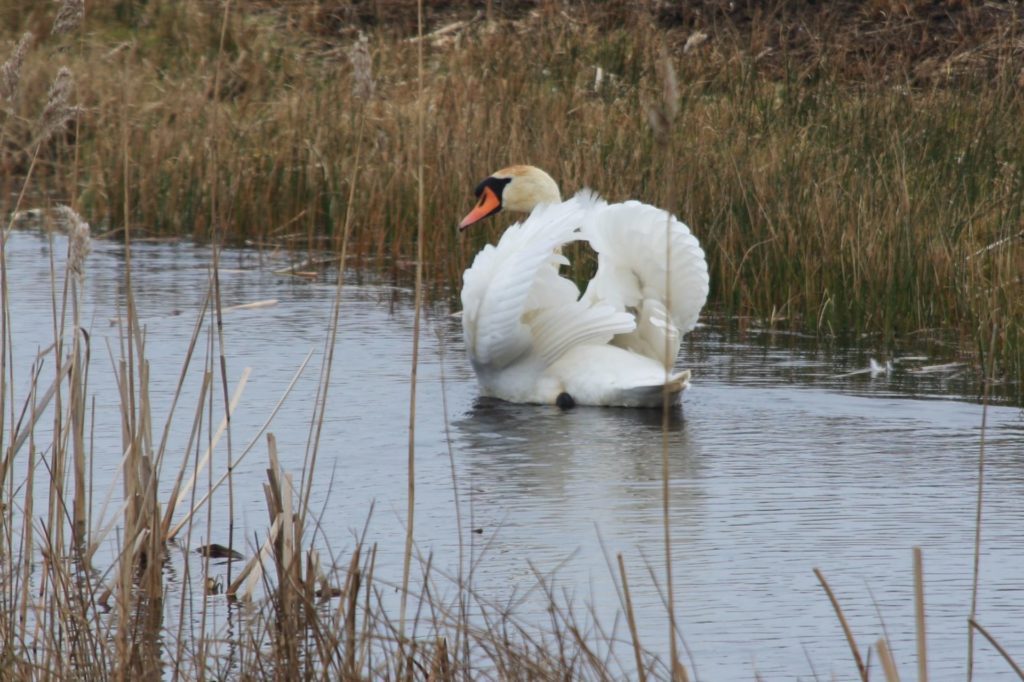
As I told you last week, it was inspired by one of the inhabitants of the reedlands close to our home – Cygnus olor, better known as the mute swan. Here it is, sailing along regally in a still wintry landscape.
Mute swans can produce a weak trumpeting sound, and hiss when provoked, but are mostly silent. Hence their name. I know that they can be aggressive, but from a safe distance they look like fairy tale creatures.
In Dutch they are called knobbelzwaan, for the black knobbel (knob) at the base of their bill. They are fairly common around here. Do they live in your part of the world too?
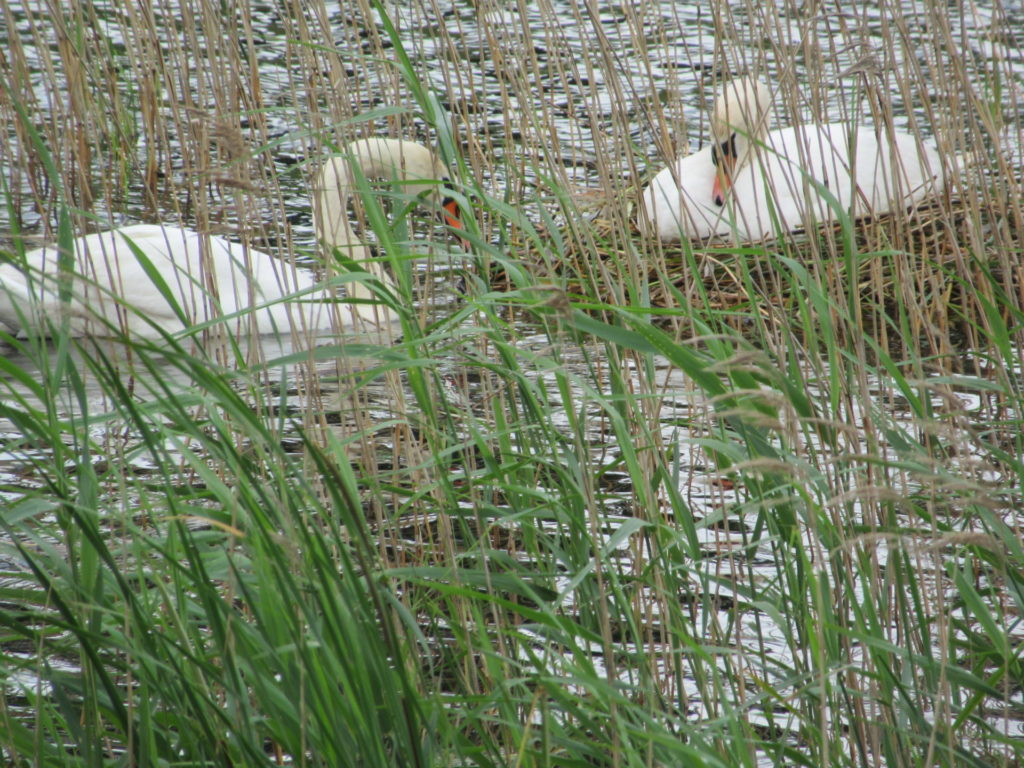
I have photographed them in different seasons. In June last year, I spotted a nesting pair through some reeds.
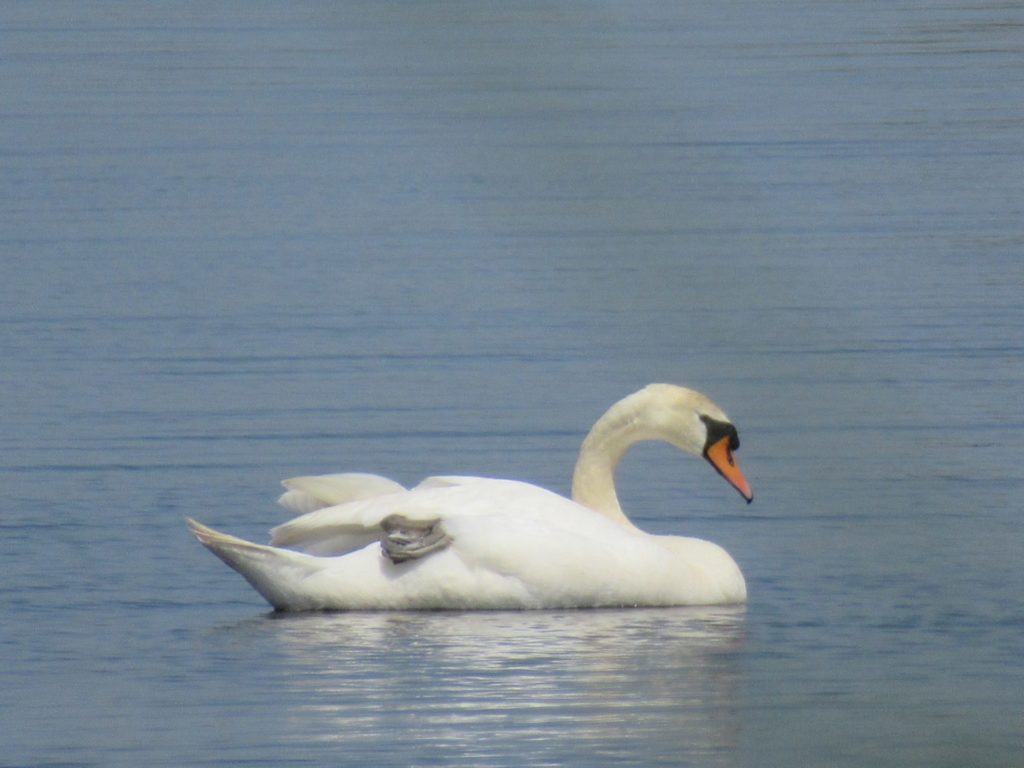
And on a sunny summer’s day, I took this picture:
I asked the swan to please pull up its leg, because it looked silly with its foot sticking out from between its feathers. But it refused to oblige.
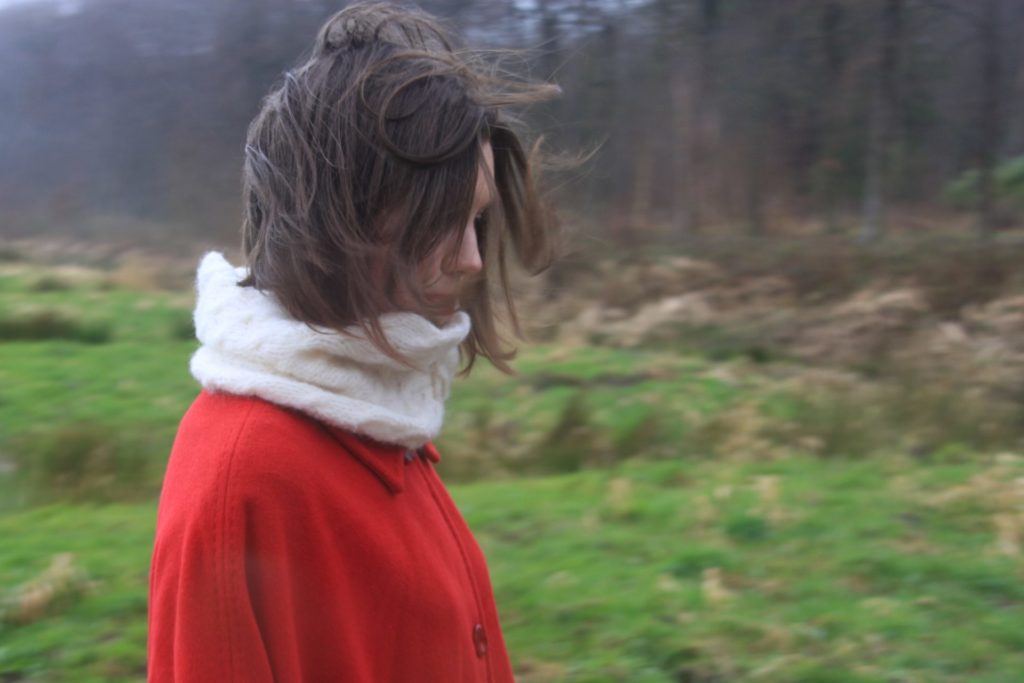
Now, a little more about the cowl. You’ve already seen it at the top of this post, and here’s another picture, with the model’s hair tucked inside to show it in its entirety:
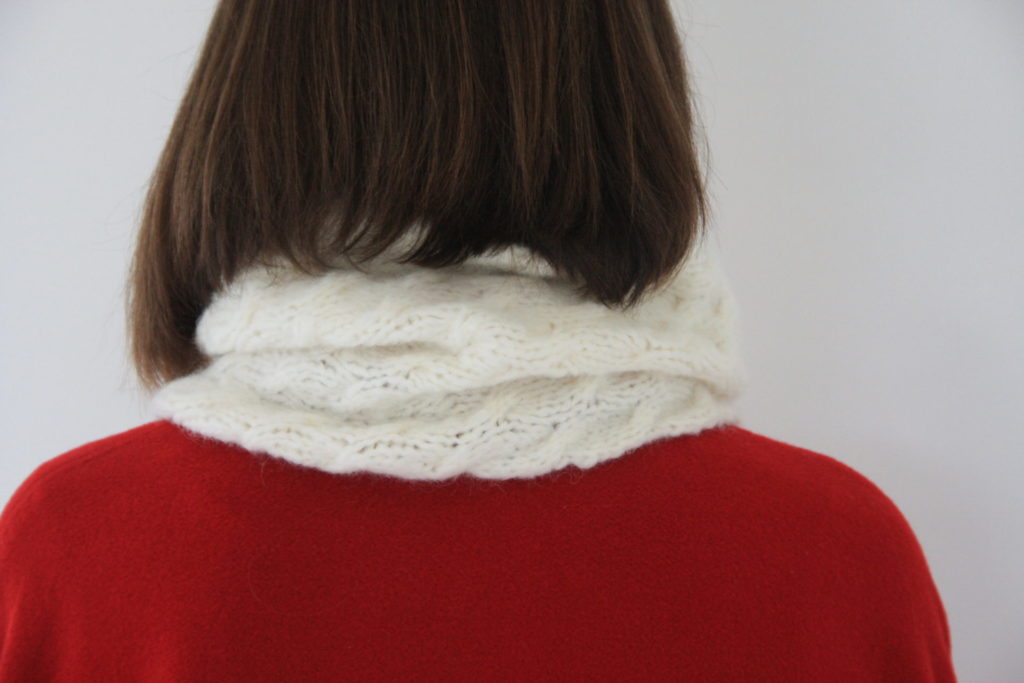
And this is what it looks like from the back:
The lovely model is our daughter, and I’ve designed the Cygnus Cowl with her in mind.
The yarn I used is Rowan ‘Brushed Fleece’, a bulky wool and alpaca blend. Two balls of 50 grams each are enough for the cowl and several swatches. It already feels nice on the ball, but after soaking and drying it is as soft as swan’s down.
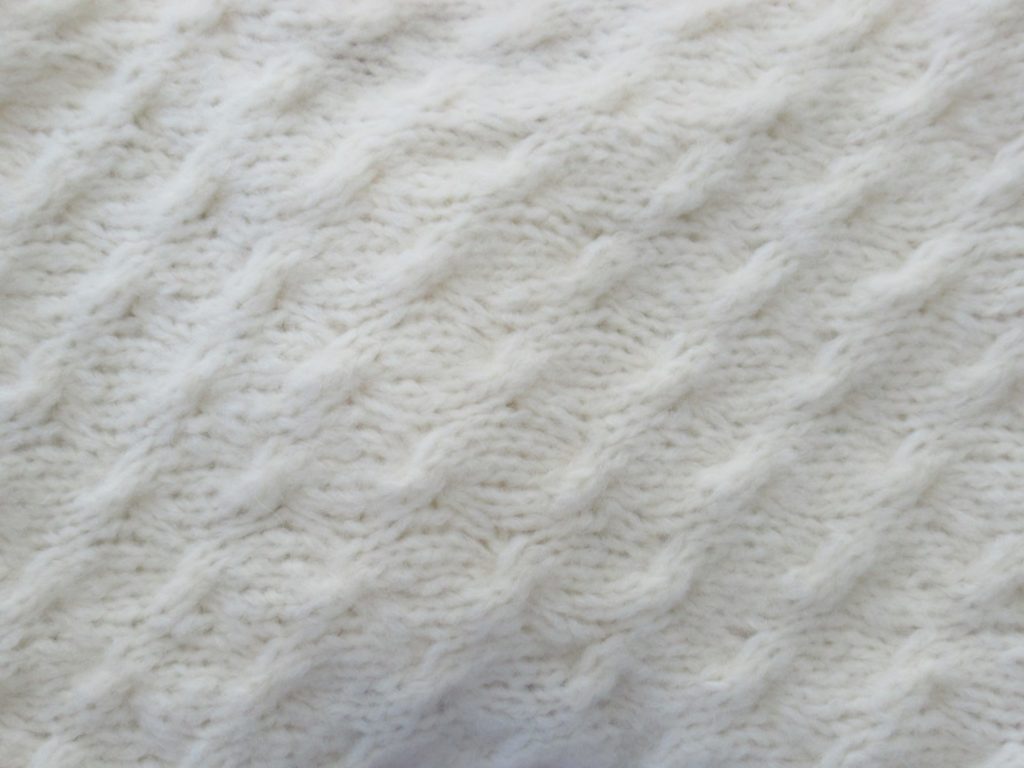
The cowl consists of two parts. First there is the cowl body, knit in an all-over cable pattern resembling rippling water:
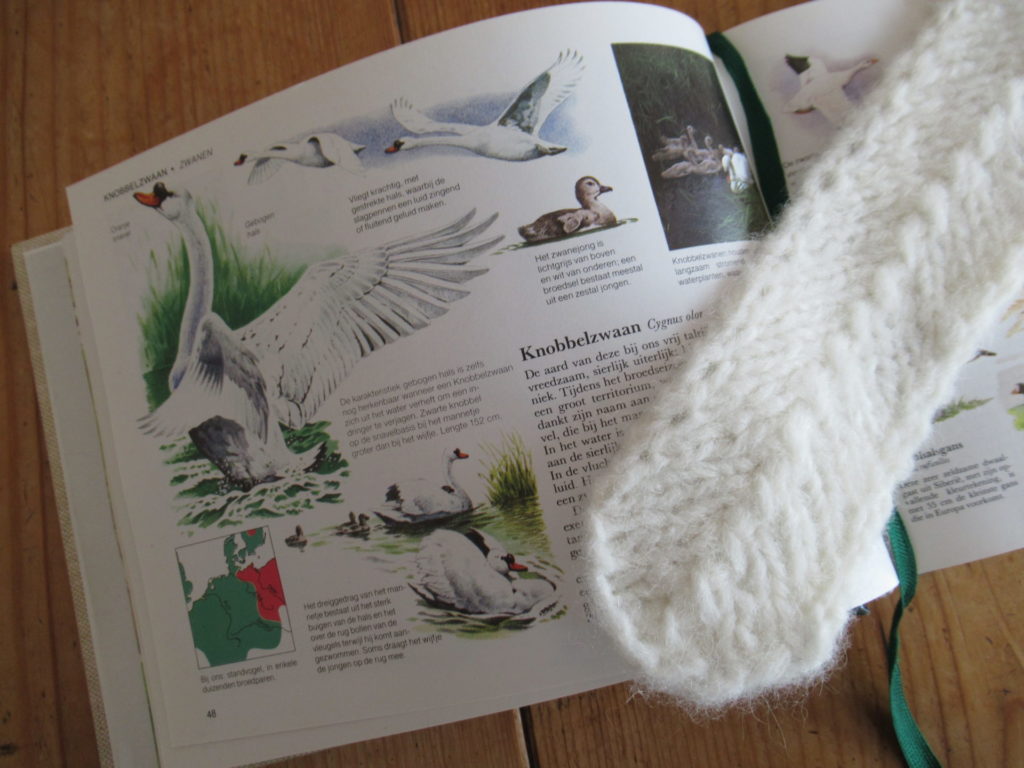
And then there is a long swan’s wing feather, knit separately.
Here the Cygnus Cowl is laid out flat. It has a narrow indentation on one side and the feather is wrapped around it later. White is hard to photograph – I hope you can see the details clearly:
It isn’t a beginner’s knit, but for a slightly more experienced knitter it is totally doable. I’ve explained the cables and several other knitting techniques in the pattern. And the description of how the cowl is finished is accompanied by photos.
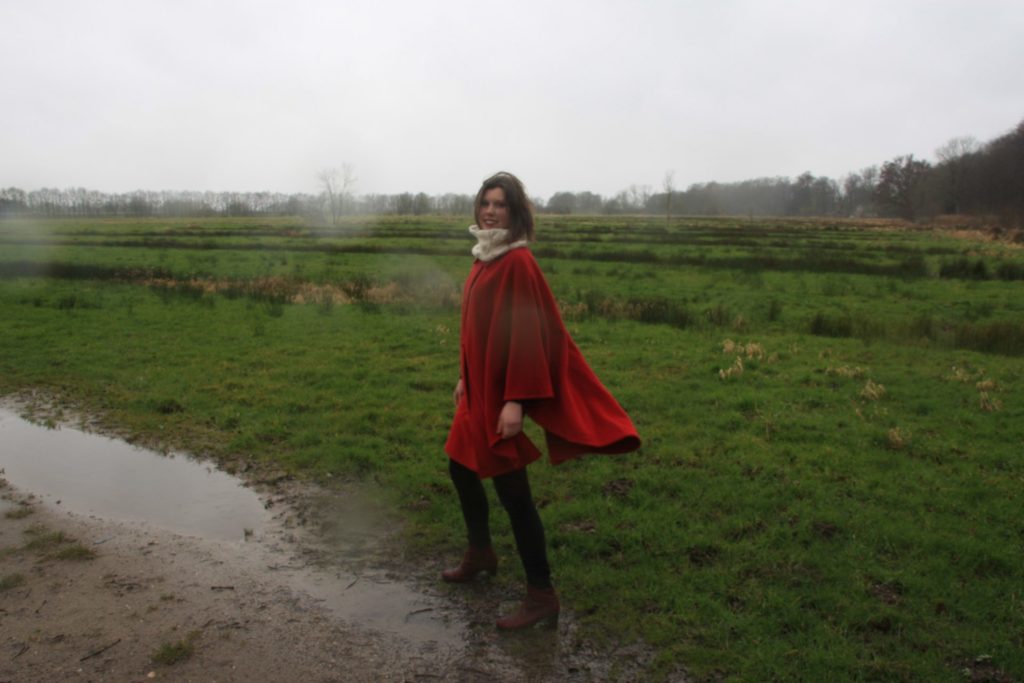
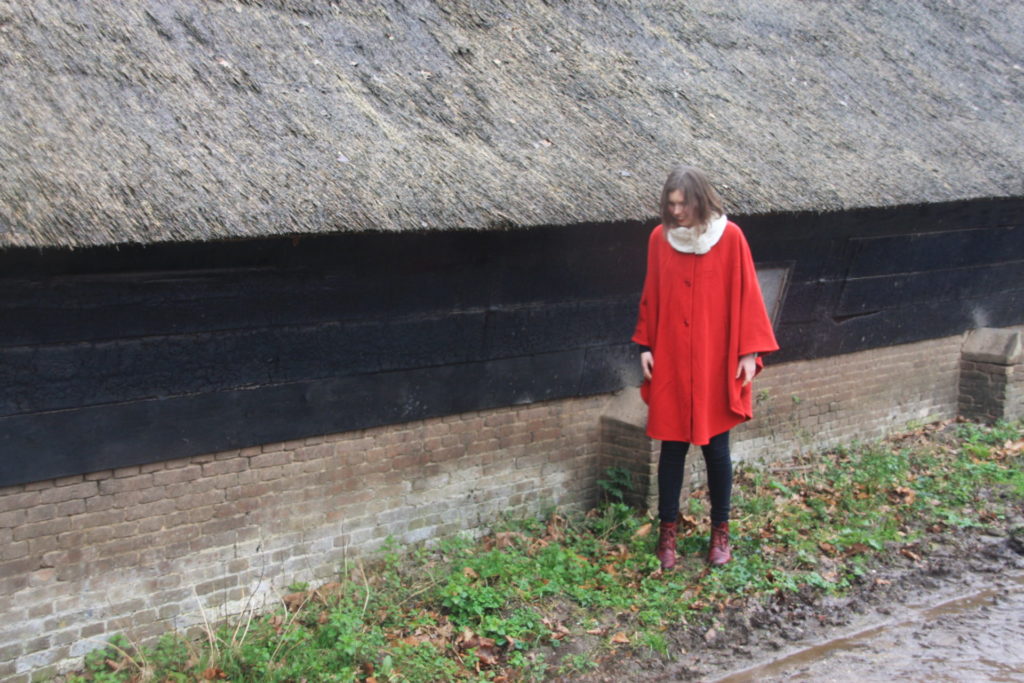
The above pictures were taken indoors. It was early March and our plan was to take lots of photos outside, but the weather was uncooperative. It was a cold, blustery, rainy day. Here’s an impression of our outdoor photo shoot.
Raindrops on the lens and icy hands made it hard to take clear pictures. There were puddles everywhere and the ground was muddy. The wind tugged hard at our daughters red cape (a thrift-shop bargain made with cashmere, squeee!)…
… and made her hair fly all over the place.
In the end we found a sheltered spot behind a reed-roofed barn, but by that time my model/daughter was chilled to the bone. And how to get onto firmer ground again without sliding into the mud?
We had to work fast, and fortunately ended up with enough usable pictures. And in spite of the unpleasant circumstances we had a lot of fun.
I realize that white isn’t for everybody. If white doesn’t suit you but you like the design, why not make it in the colour of your own favourite bird – flamingo pink, raven black, dove grey, owl brown or teal blue?
Hello dear readers. I’m so glad you’re here today, because I have something to celebrate. And it wouldn’t be much fun without you to celebrate it with.
Today, it’s been exactly a year since I started blogging!
I’m usually more of a behind-the-scenes kind of person, so for me, showing myself and the things I do here has been a real adventure. On the whole, despite some jitters now and then, it’s been a very interesting, fulfilling and enjoyable journey. What I’ve enjoyed most of all is looking at the world around me through the lens of my camera and writing about the things I do and love in my own words. As a translator, I always worked with other people’s thoughts and words, and it feels wonderfully liberating to be able to do my own thing here.
I expected to be doing this more or less for myself, at least during the first year or so, but to my surprise and delight I actually seem to have some readers already. Thank you so much for spending some time here, for reading, and for all of your kind comments!
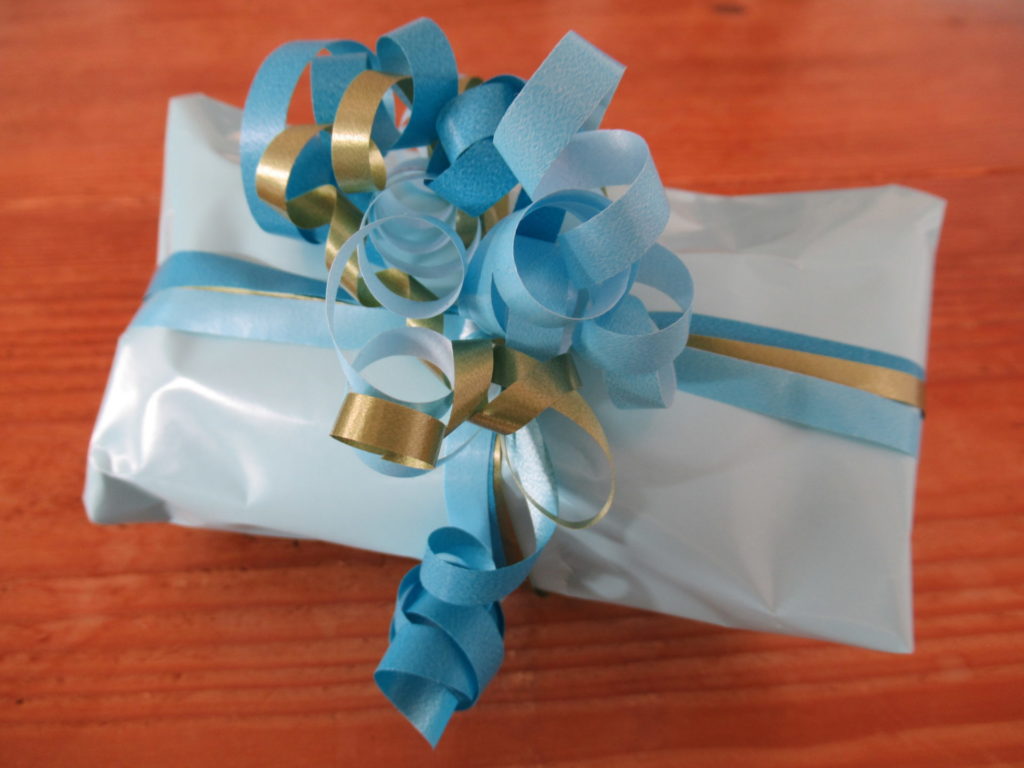
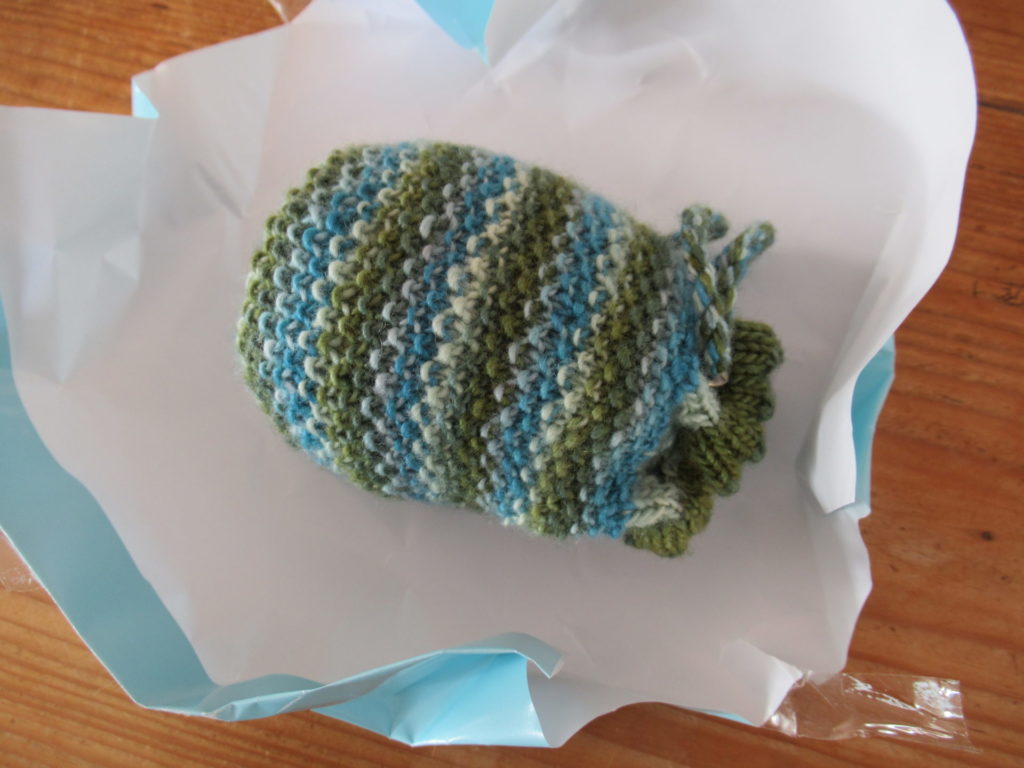
To show my appreciation I’ve made a small gift for you. I’ve learnt a lot during the past year, but what I haven’t learnt yet, is how to post things in 3D, so that you can unwrap it yourself. So I think I’d better do it for you, shall I? Here we go:
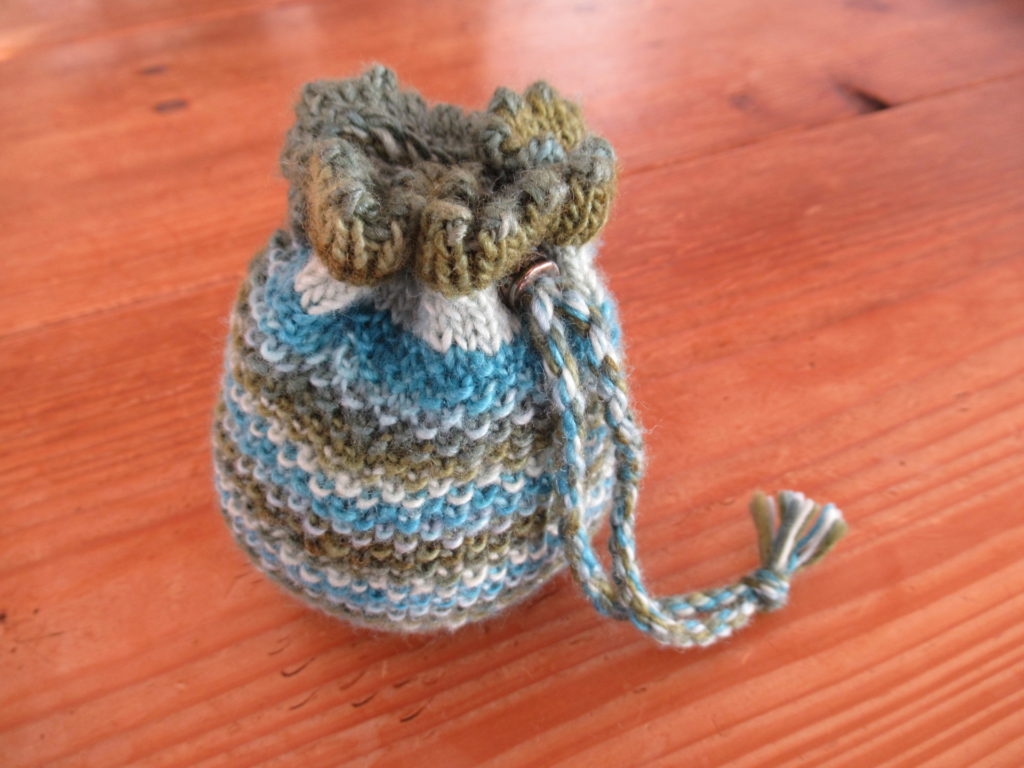
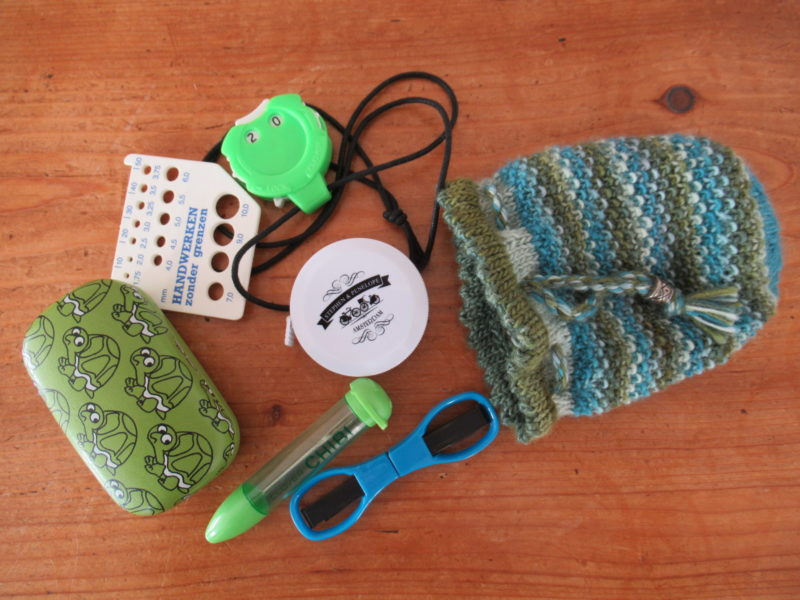
It’s a small knitted drawstring bag. Or rather, the pattern for a small knitted drawstring bag.
To give you an idea of the size and what you could use it for, here it is with some knitting tools I stuffed into it. It may look incredible, with all these things spread out beside it, but the bag really is big enough to hold them all. (It isn’t quite as magical as Hermione Granger’s bag in Harry Potter, though. I tried to stuff a tent and a few sets of spare clothes in, but that didn’t work.)
Pattern notes
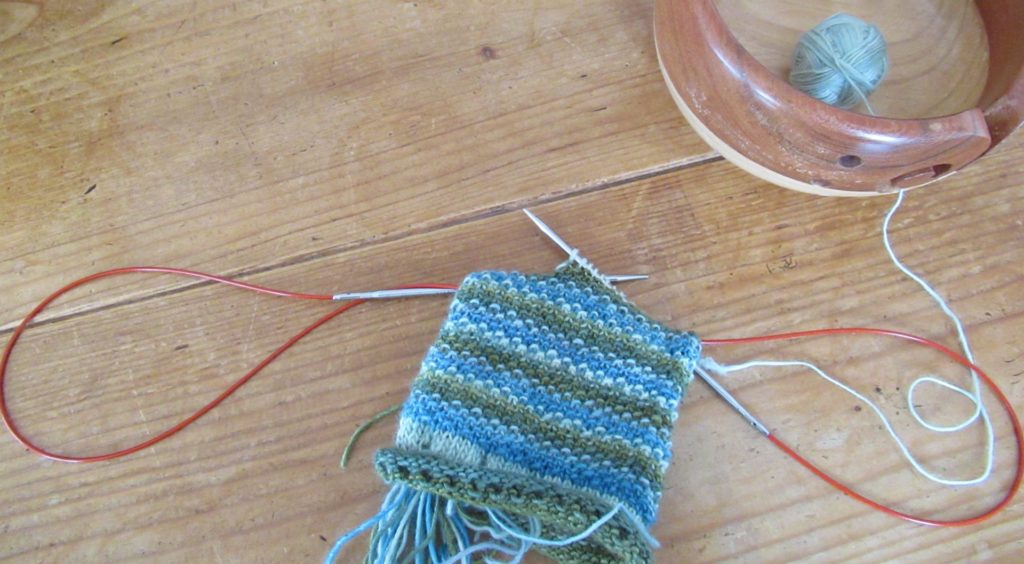
The Blogiversary Bag is worked in the round from the top to the bottom, using a long circular needle and the magic loop technique. If you’re unfamiliar with this technique, you can find a short and simple video showing how to do it here on YouTube. Alternatively, you could use a set of double-pointed sock needles.
This isn’t a very difficult project, but some experience with knitting in the round will help. If you can knit socks, you won’t have any problems with it. Knitting it in a single colour will make it easier, because adding in new colours every few rows is a bit fiddly.
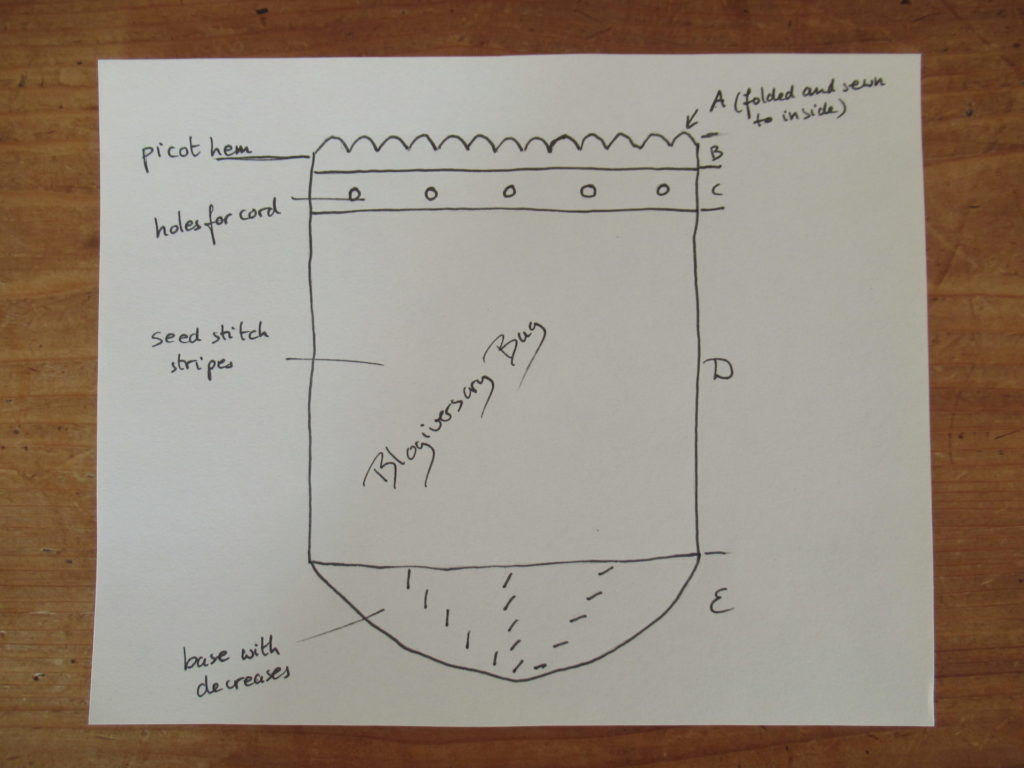
The bag starts with several rows in stocking stitch and a row of eyelets that are folded down and sewn to the inside to make a picot hem. For the sake of clarity I’ve divided the instructions up into 5 sections (A-E, see drawing below).
Gauge: 27 sts x 40 rows = 10 x 10 cm (4” x 4”) in stocking stitch worked in the round.
Finished measurements: Top to start of base 11 cm (4½’’); width 20 cm (8’’) around; base diameter 7 cm (2¾’’).
Yarn, needles and notions
Needles: 3.5 mm (US 4) circular knitting needle at least 80 cm/32″ long.
Notions: Tapestry needle, 1 bead with a 5 mm hole (optional).
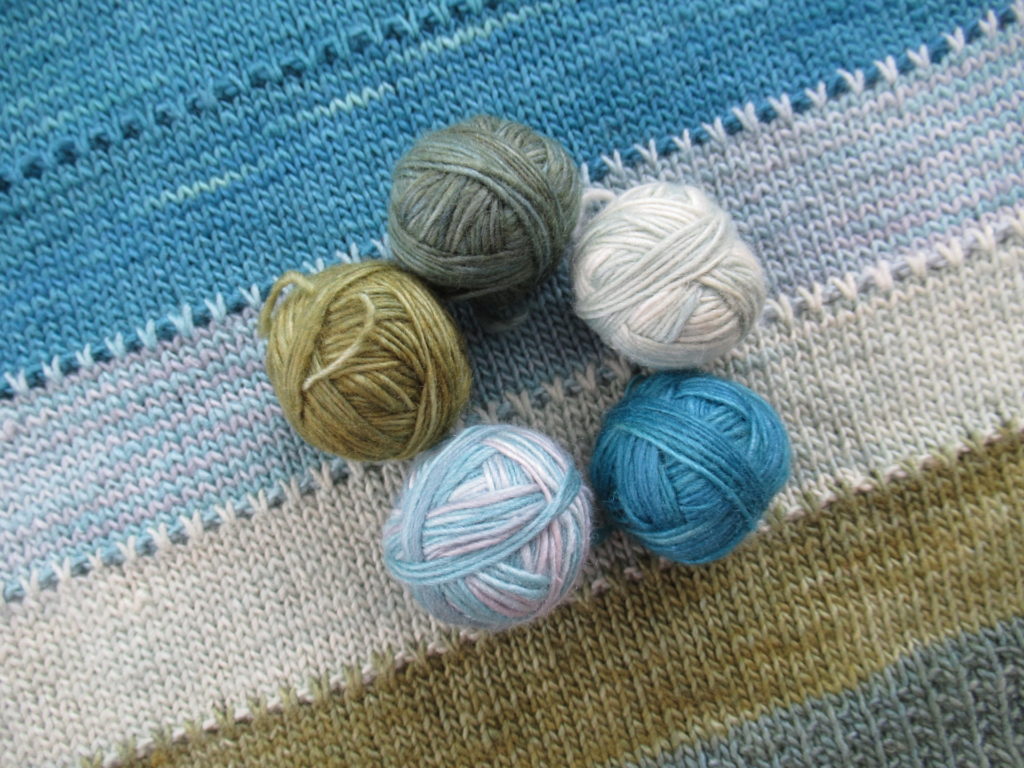
Suggested yarn: A total of approx. 17 g of fingering-weight yarn in 5 colours, for instance Manos del Uruguay ‘Fino’ (70% wool; 30% silk; total yardage/weight approx. 450 m/490 yds/100 g). I used some left-over yarn from Tellina, the simple cowl I made earlier this year, in the colourway ‘Flora’, in this order:
Colour 1: Tincture (darkest green)
Colour 2: Velvet Pincushion (medium green)
Colour 3: Crystal Goblet (pale green)
Colour 4: Folly (dark turquoise)
Colour 5: Watered Silk (pale turquoise)
I used a little more of colours 1 and 4 (approx. 4 grams each) than of the others (approx. 3 grams each).
This is an ideal project for playing with all kinds of left-over bits of yarn. I think it will also work very well in a self-striping (sock) yarn – that will save weaving in a lot of ends! You may have to choose a different needle size, though, and the bag may turn out bigger or smaller.
Abbreviations: K = knit K2tog = knit 2 stitches together P = purl Rnd(s) = round(s) st(s) = stitch(es) yo = yarn over
Instructions
Section A: Cast on 56 sts with colour 1. Rnd 1-4: Knit. Rnd 5: *K2tog, yo; repeat from * to end of rnd.
Section B: Change to colour 2 and knit 5 rnds.
Section C: Change to colour 3. Rnd 1 and 2: Knit. Rnd 3: *K4, K2tog, yo; repeat from * to last 2 sts, K2. Rnd 4 and 5: Knit.
Section D: Change to colour 4. Rnd 1: Knit. Rnd 2: * K1, P1; repeat from * to end of rnd. Rnd 3: *P1, K1; repeat from * to end of rnd.
Repeat rounds 2 and 3 nineteen times more in the following stripe sequence: 2 rnds colour 5; 2 rnds colour 1; 2 rnds colour 2; 2 rnds colour 3; 2 rnds colour 4, ending with 2 rnds in colour 5.
Section E: Change to colour 4. Rnd 1 and all odd rnds: Knit. Rnd 2: *K2tog, K5; repeat from * to end of rnd. Rnd 4: *K2tog, K4; repeat from * to end of rnd. Rnd 6: *K2tog, K3; repeat from * to end of rnd. Rnd 8: *K2tog, K2; repeat from * to end of rnd. Rnd 10: *K2tog, K1; repeat from * to end of rnd. Rnd 12: *K2tog; repeat from * to end of rnd.
Cut yarn. With the tapestry needle, thread yarn through the remaining 8 sts. Fasten off.
Finishing
Weave in all ends.
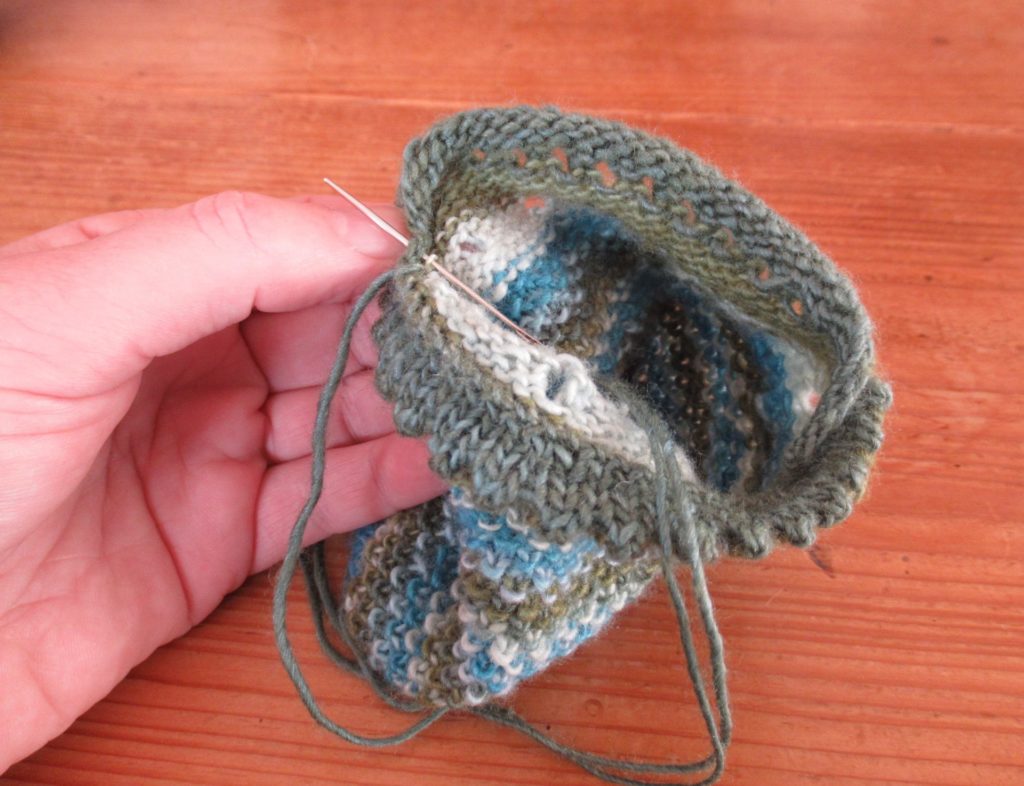
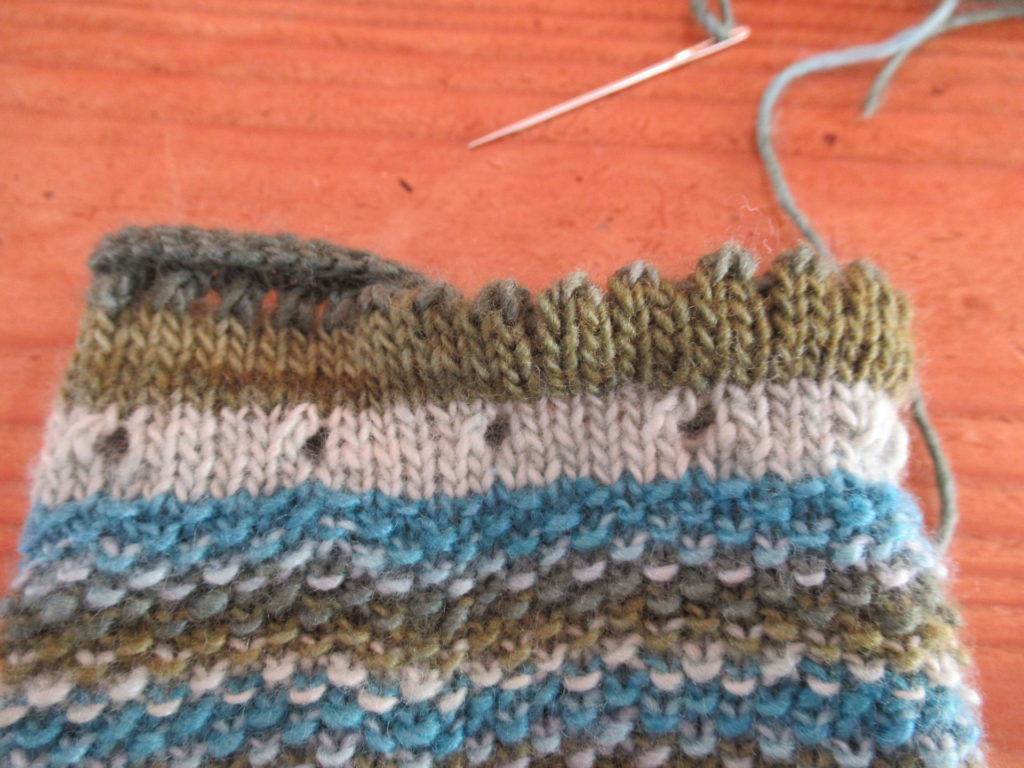
Fold section A to the inside halfway through the eyelets and sew in place with small invisible stitches.
Below there’s another picture of this step, showing what the top looks like before (left) and after hemming (right).
The cord
Thread a cord of approx. 40 cm/16” long through the holes. Use either I-cord, twisted cord, or some shop-bought cord or ribbon.
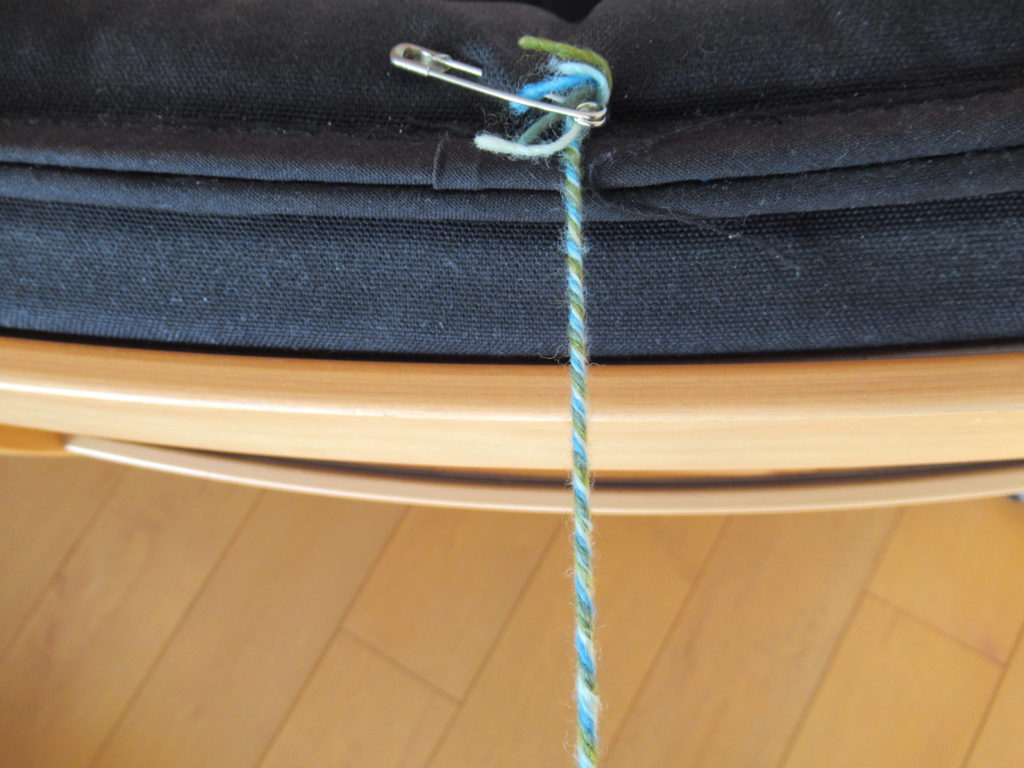
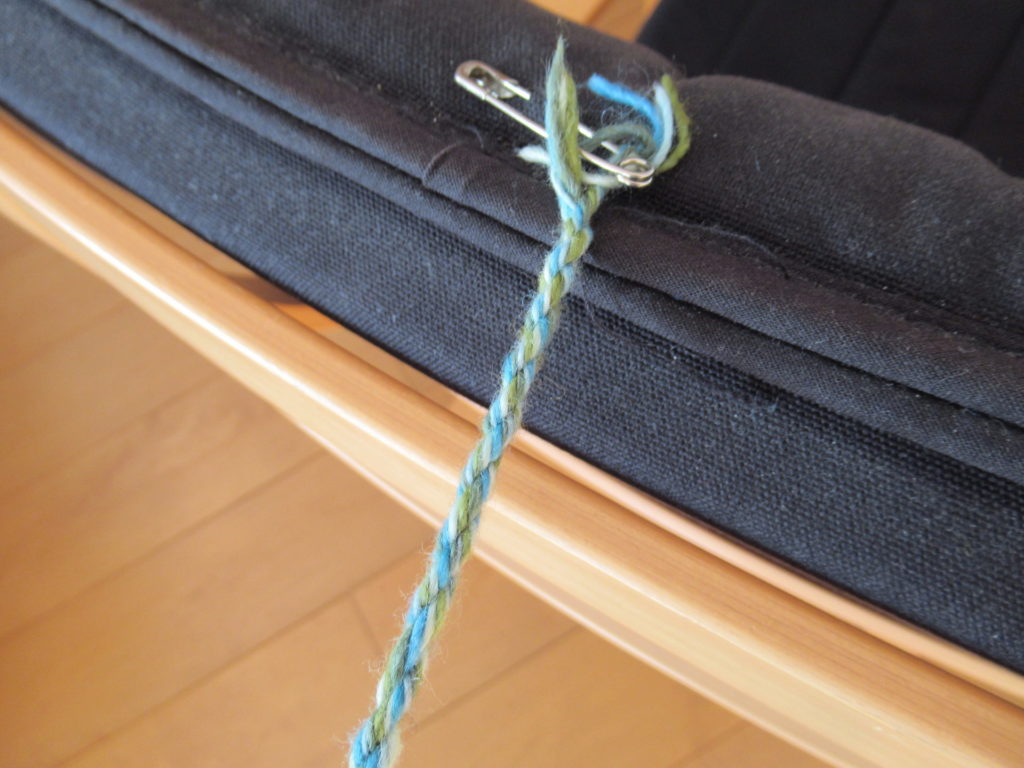
A twisted cord like the one I used, can be made as follows:
Cut five 1 m/40” lengths of yarn in each of the 5 colours.
Make a provisional knot at one end and fasten it with a safety pin to a heavy object, like a chair.
Twist the threads as tightly as possible.
Place your index finger in the middle, fold in half and let the doubled threads twist around each other, smoothing with your hands, if necessary.
Remove safety pin and thread the cord through the holes.
Untie the provisional knot and thread both ends through a bead, if you like. This makes a nice closure, but is not absolutely necessary.
Knot both ends of the cord together and cut off to a nice little tassel.
And that’s it, the Blogiversary Bag all done.
I hope you’ve enjoyed that. If you have any questions about the pattern, please leave a comment and I’ll try to answer as well as I can.
I’ll also add the Blogiversary Bag as a free pattern to Ravelry, so that you can add you own projects there if you like.
‘Pssst! Hey! Take me home with you!’ the ball of yarn in a gradient of blues whispered. It happened at our regional annual crafts fair. ‘I don’t think so,’ I said, ‘You’re far too expensive, and what would I do with you?’ The yarn ball wasn’t impressed. It kept up its insistent whispering, and after walking around it for about a dozen times, I said, ‘Okay, I surrender. I can’t deny that you’re gorgeous, and you can come home with me.’
It would have been so nice to tell you a romantic and poetic story about the inspiration behind Morbihan, my new shawl design. About how I was inspired by the sea – by its myriad shades of blue and its waves lapping the shore. But you may already have gathered from my previous post that it didn’t work that way. It was the other way around. It was the yarn itself that made me make this shawl, and it was only later that I made the connection with the sea.
The yarn that seduced me was Lang Yarns ‘Puno’, a blend of wool, alpaca and silk. What I love about this yarn is, first of all, its gorgeous colours, and also its drape, its softness and its subtle sheen.
And after knitting and blocking, I noticed how beautifully the lighter bits of this semi-solid yarn undulate along with the waves of the lace pattern, especially in the simple stocking stitch sections of the shawl.
This yarn cost € 49.90 for a single ball (or rather ‘cake’). Gulp! Granted, it was a generous 200 grams and 800 metres, but still… Not exactly a bargain.
Because I didn’t have any spare yarn for swatches (I wanted to use up all of this precious yarn for my project), I first tried out my ideas with some yarn scraps. When I had a clearer picture of what I wanted to make, I still hesitated about using the Puno. I didn’t want to spoil the yarn by ripping out my efforts several times. So, I bought some inexpensive yarn for a trial version, and it looks like this:
This is Drops ‘Flora’, a blend of wool and alpaca, with a similar weight/metreage ratio as the blue yarn – four 50 gram balls of this yarn are the equivalent of one ball of Puno. This was a bargain. I bought 4 balls with 30% off for the grand total of € 7.44.
Although this was only meant as a trial version, it has become a lovely shawl in itself. What I like about this yarn is its woolly cosiness and how beautifully it shows the lace pattern.
And it didn’t end there. After I’d decided to publish the Morbihan pattern, I wanted to make absolutely sure that there weren’t any errors in it, so I decided to make another one to check it.
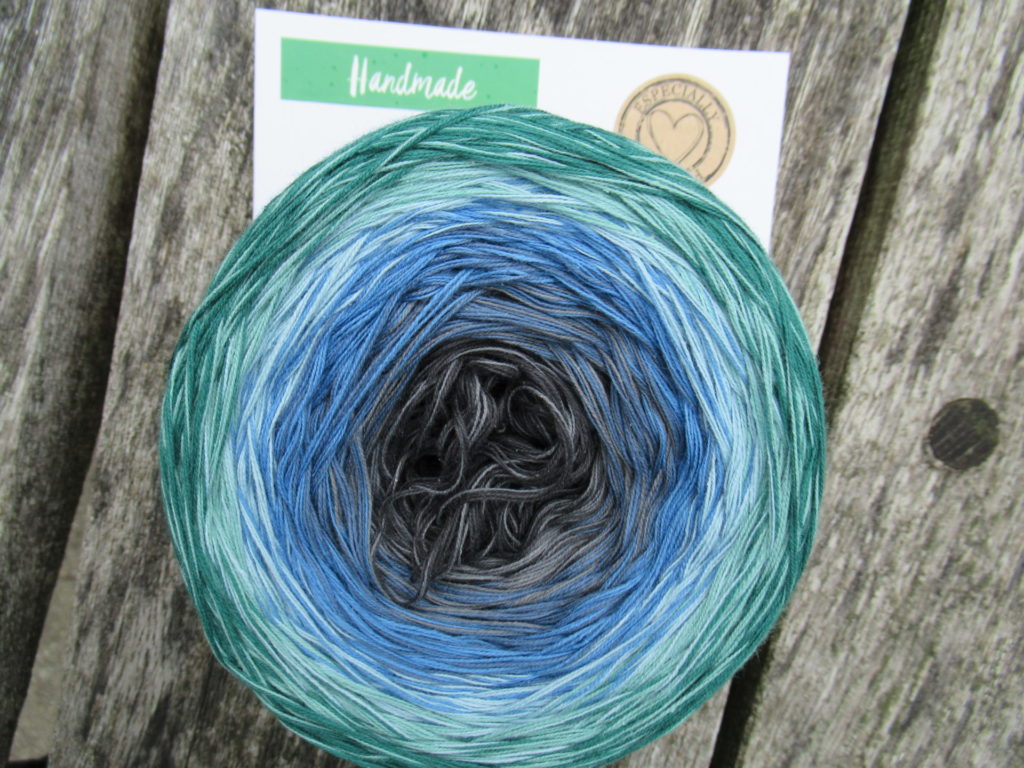
This time I used a cotton yarn. I wouldn’t normally choose cotton for a shawl, but during a very hot period this summer, I started looking for yarns that wouldn’t stick to my hands and found this. I don’t know if your screen is big enough to read it, but the card behind the yarn cake says ‘handmade’.
Huh, handmade? Yes, this yarn cake really is handmade! And it’s organic too!
Saskia, the owner of Wol zo Eerlijk, a yarn shop specializing in fair trade, organic and otherwise sustainable and animal friendly yarns, makes these yarn cakes herself. She combines several threads of a very thin cotton yarn and winds them into fabulous colour gradients. There are over 25 colourways to choose from.
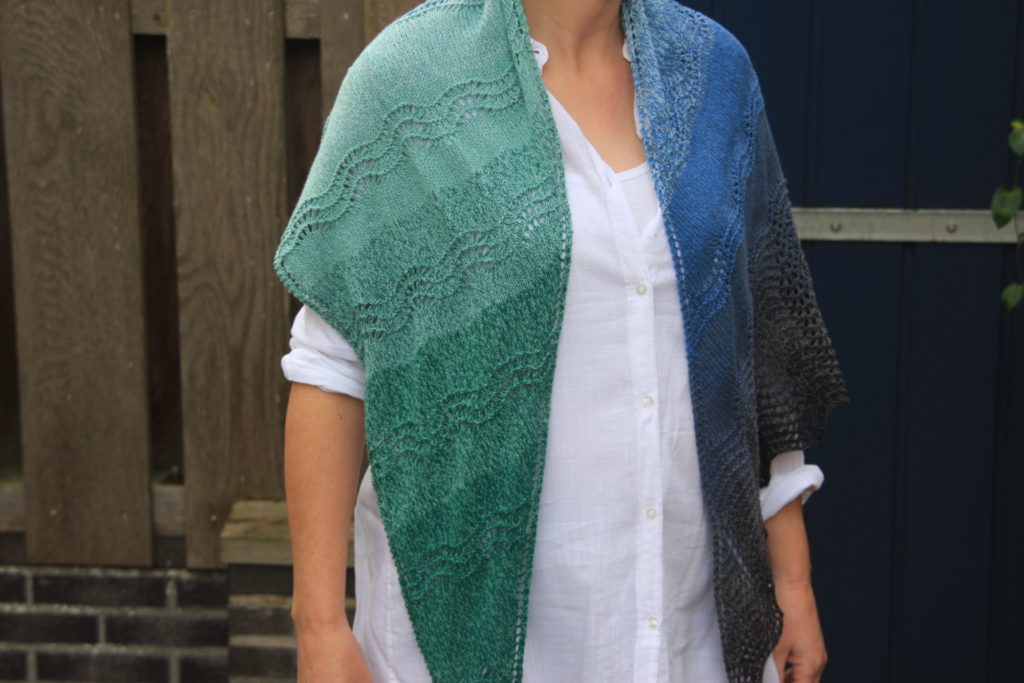
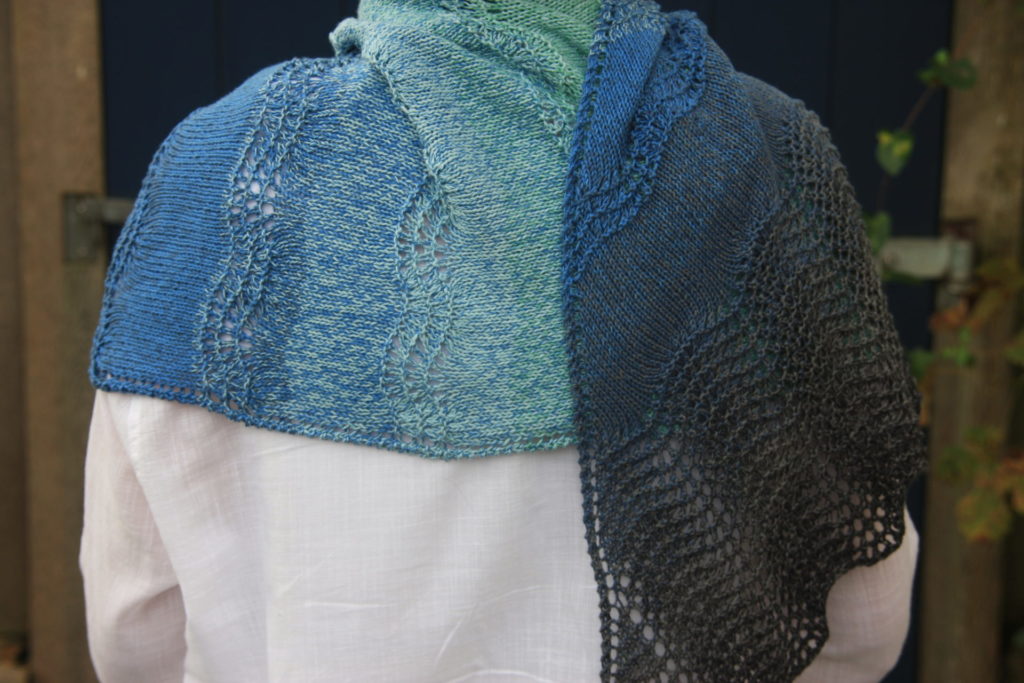
The colourway I chose is called Planet Earth, and goes from a medium green through blue to almost (but not quite) black.
The thin threads that the yarn is made up of, are not twisted around each other, and I was a bit concerned that the yarn would be hard to knit with. I expected to stick my needle between the threads and miss one or two here and there, but personally, I didn’t have any problems.
Because this yarn is handmade, the cakes do not all have exactly the same weight. The ball band says ‘approx. 225 grams’, but mine was 235 grams. This meant that I could add quite a few extra rows to the border (the pattern explains how to do this) and it has become quite a big shawl.
At € 29.95 per cake, this yarn is rather more expensive than that of the grey Morbihan. But considering that it is handmade and organic, and has a generous metreage, I think it really is a bargain, too. It would be an ideal choice for warmer climates, vegans and people allergic to wool.
Well, those are my three versions of Morbihan. I think it will work in almost any yarn – cotton or cashmere, sheep’s wool or silk, viscose or vicuña, alpaca or acrylic… Wait, no, not acrylic! That’s about the only yarn type that I wouldn’t choose. I don’t think it’s very suitable for lace knitting, because it will bounce back after blocking.
Should you decide to make your own Morbihan, in whatever yarn takes your fancy, I wish you happy knitting!
Note: This post isn’t sponsored in any way. The descriptions of the yarns are based on my own experiences with them, and represent my own honest opinions.
Hello! Good morning, good afternoon or good evening, depending on where in the world you are and when you can find a moment to read this.
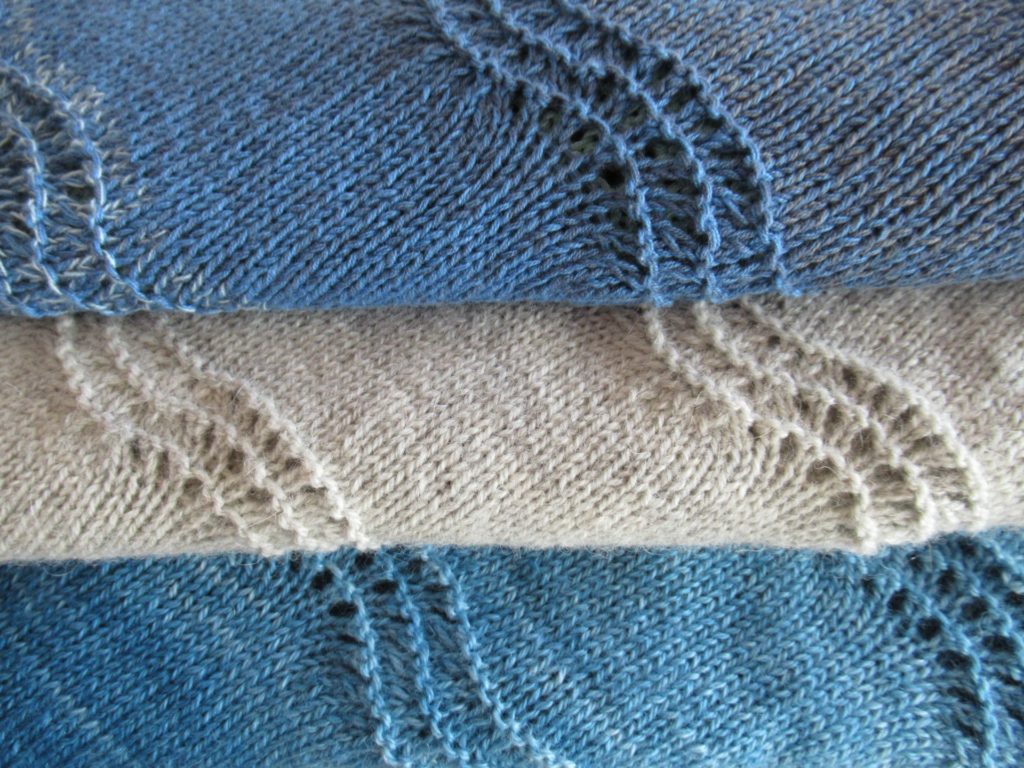
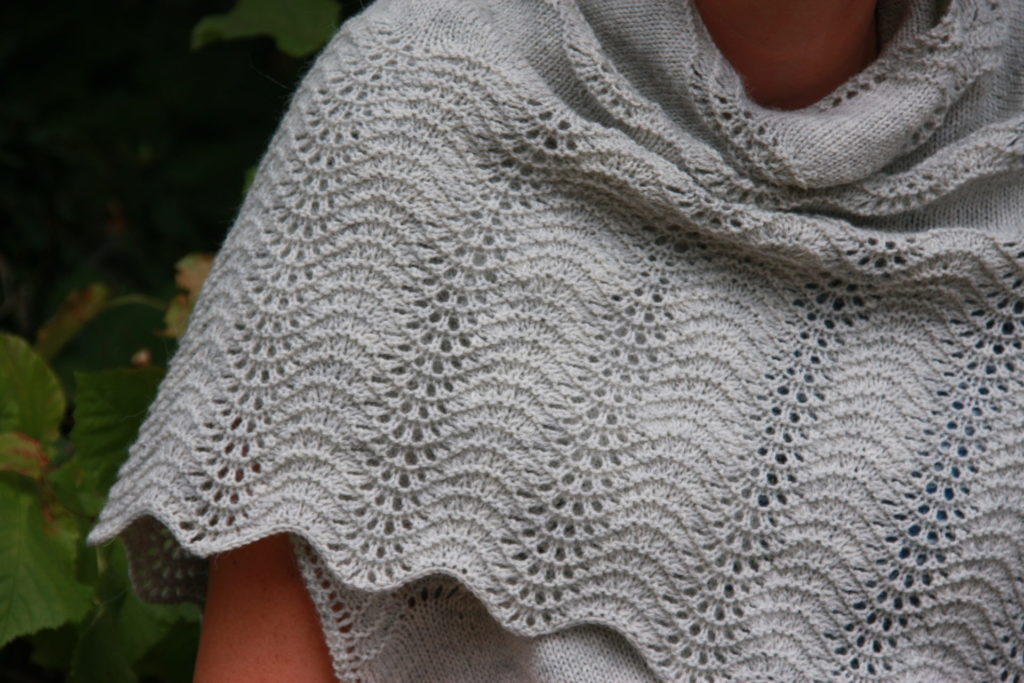
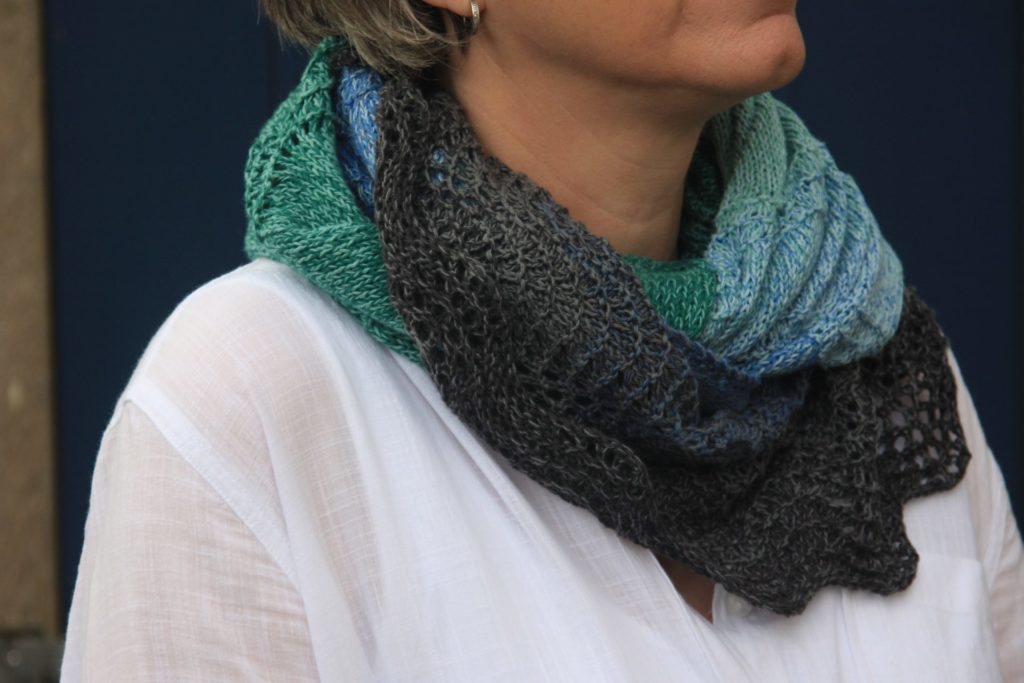
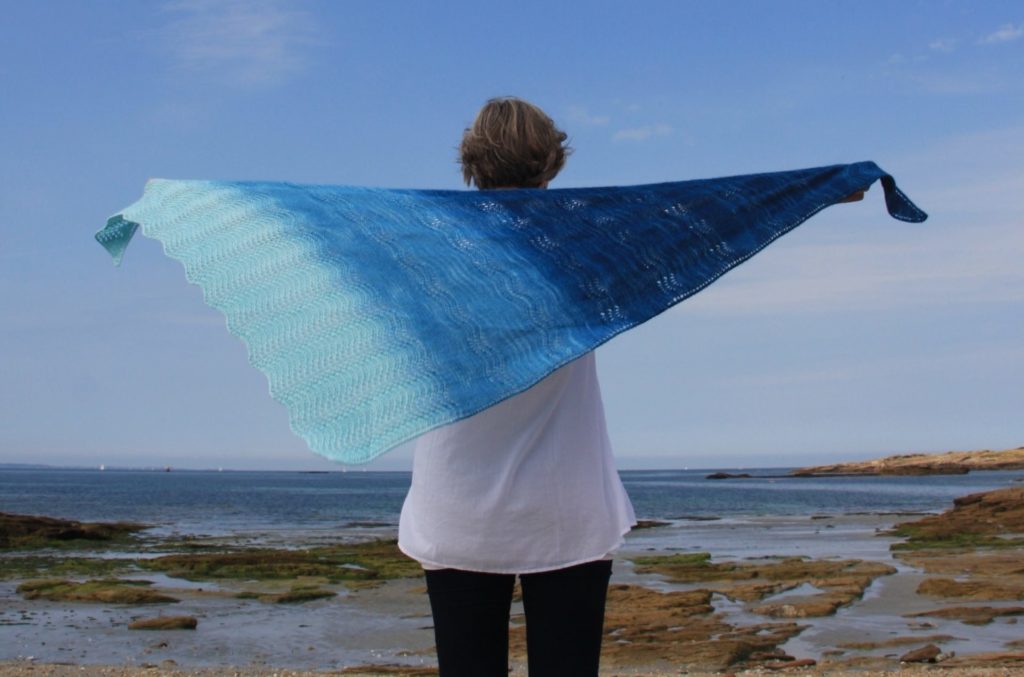
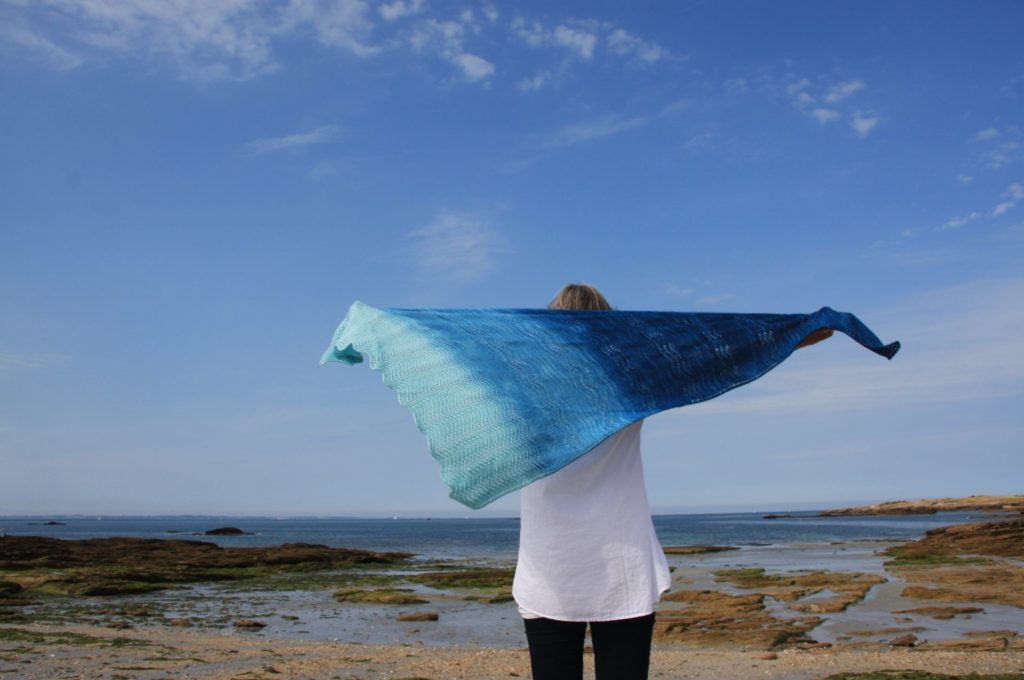
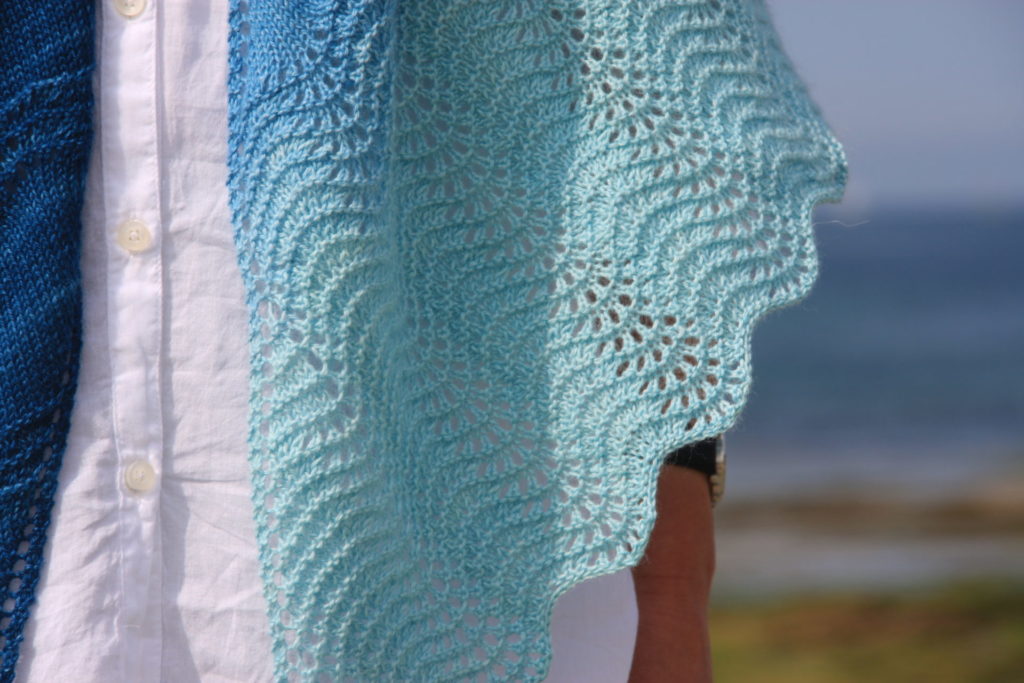
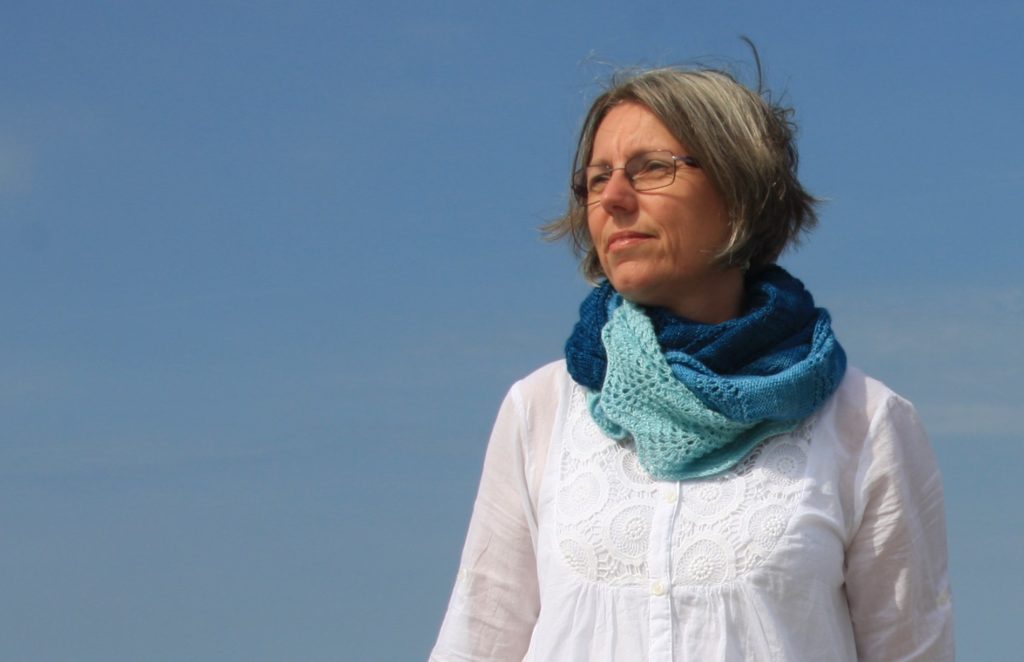
Today, I’d like to tell you about a shawl I’ve designed. I’ve called it Morbihan. As you can see, it’s an asymmetrical triangle, and it is knit in a combination of stocking stitch and a traditional, wavy lace pattern.
But before I tell you more about the shawl itself, I’d like to tell you how it came by its name.
I designed and knit the (then nameless) shawl in the early summer of 2018, months before I started this blog. I made it for myself, but at the back of my mind was the thought, ‘Who knows, maybe I’ll publish the pattern someday.’
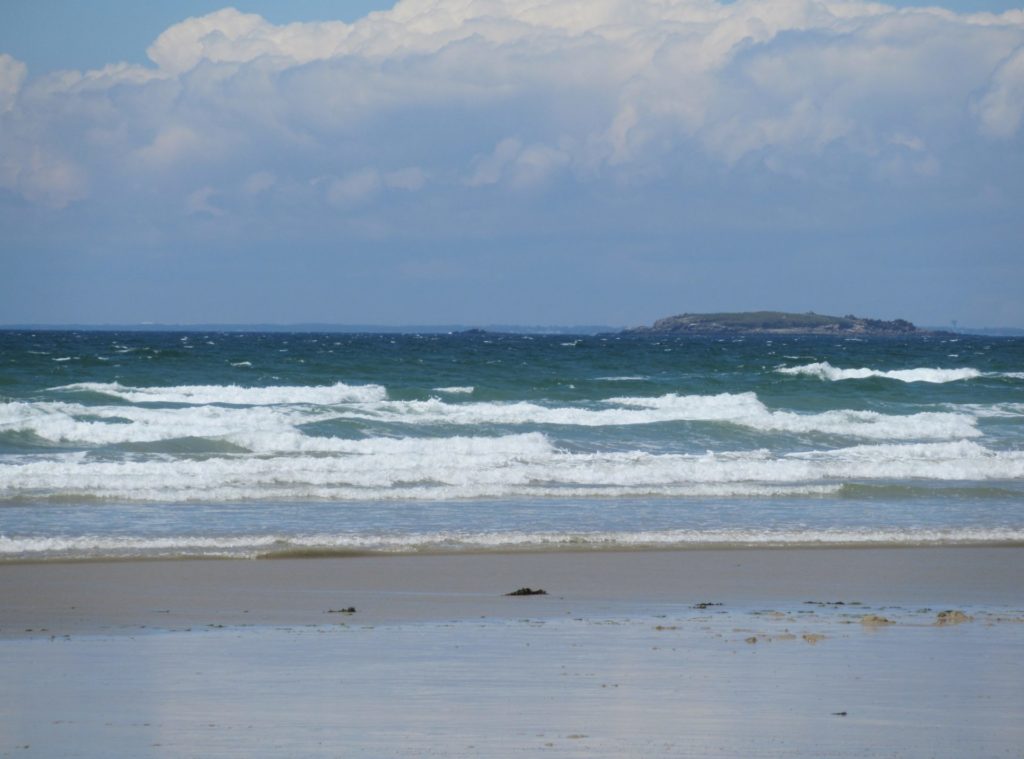
That summer, were going to spend our holiday on the south coast of Brittany, France, and while I was packing I decided to add the shawl to my suitcase for chilly evenings. We were to spend part of our holiday in the region of Finistère, and part of it in the region of Morbihan.
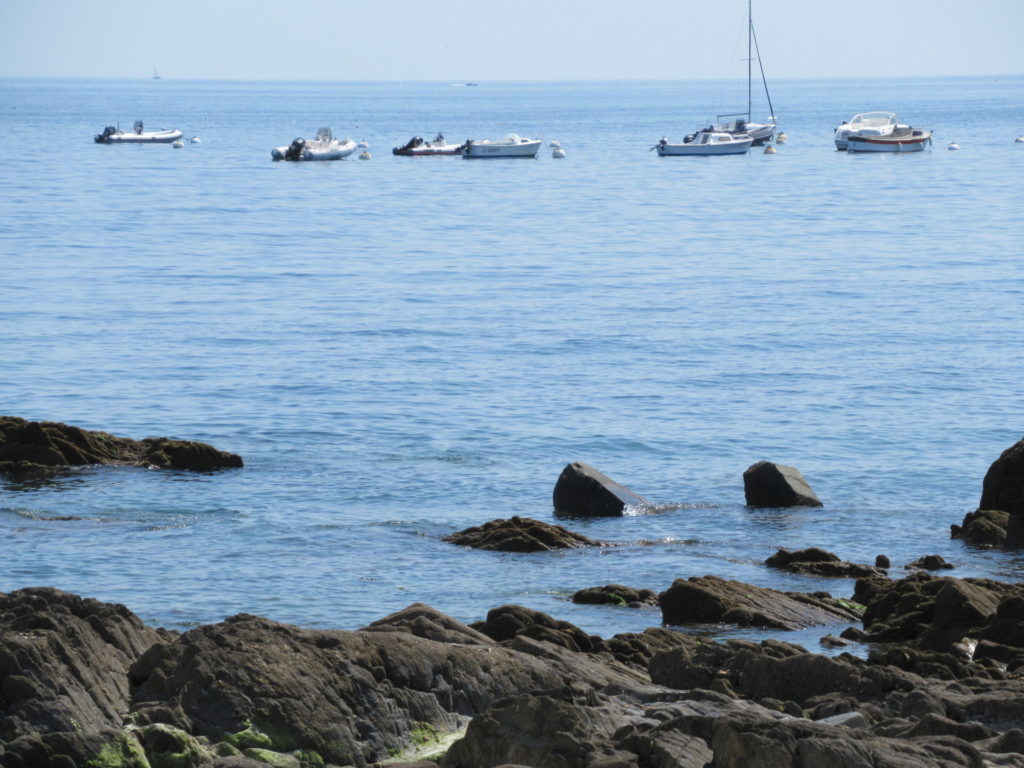
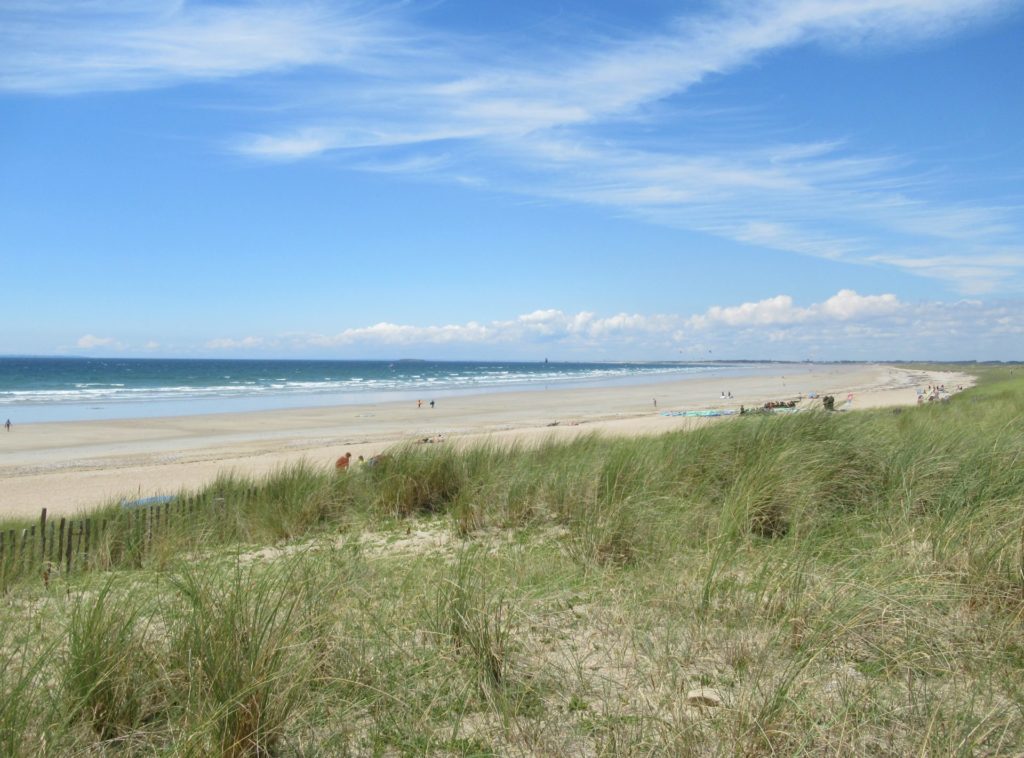
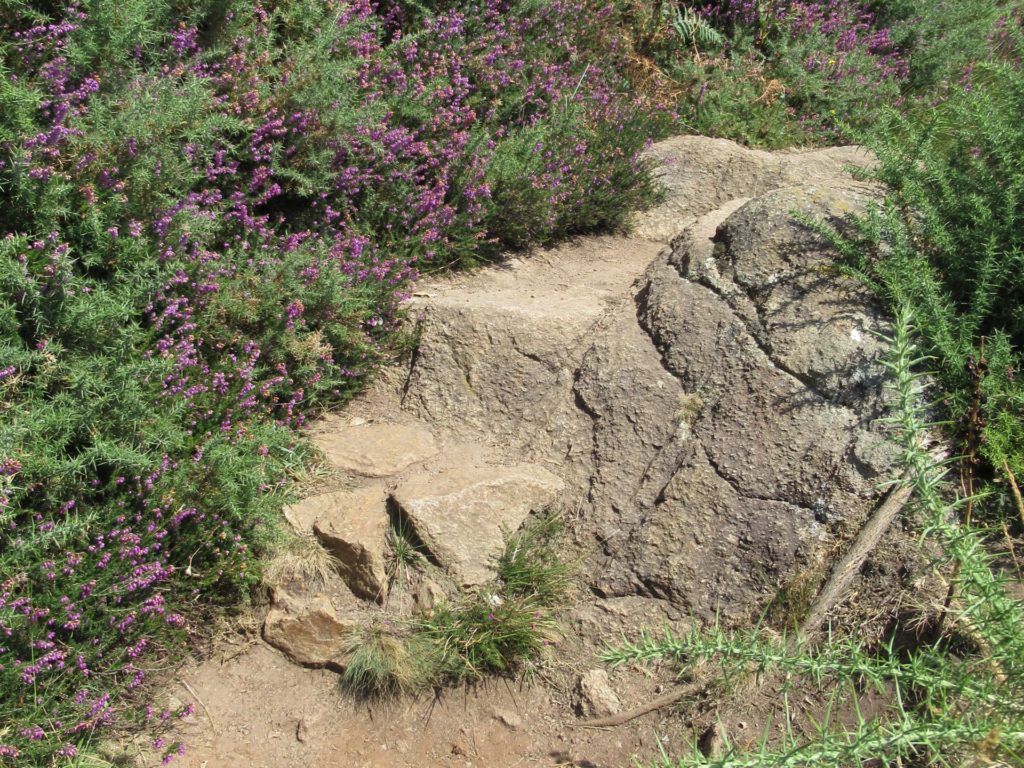
The coastline over there is so, so beautiful, especially that of Morbihan. There are rocky stretches…
… as well as wide, white sandy beaches.
In the Breton language the gulf of Morbihan, which gave the region its name, is called Ar Mor Bihan, meaning ‘the little sea’.
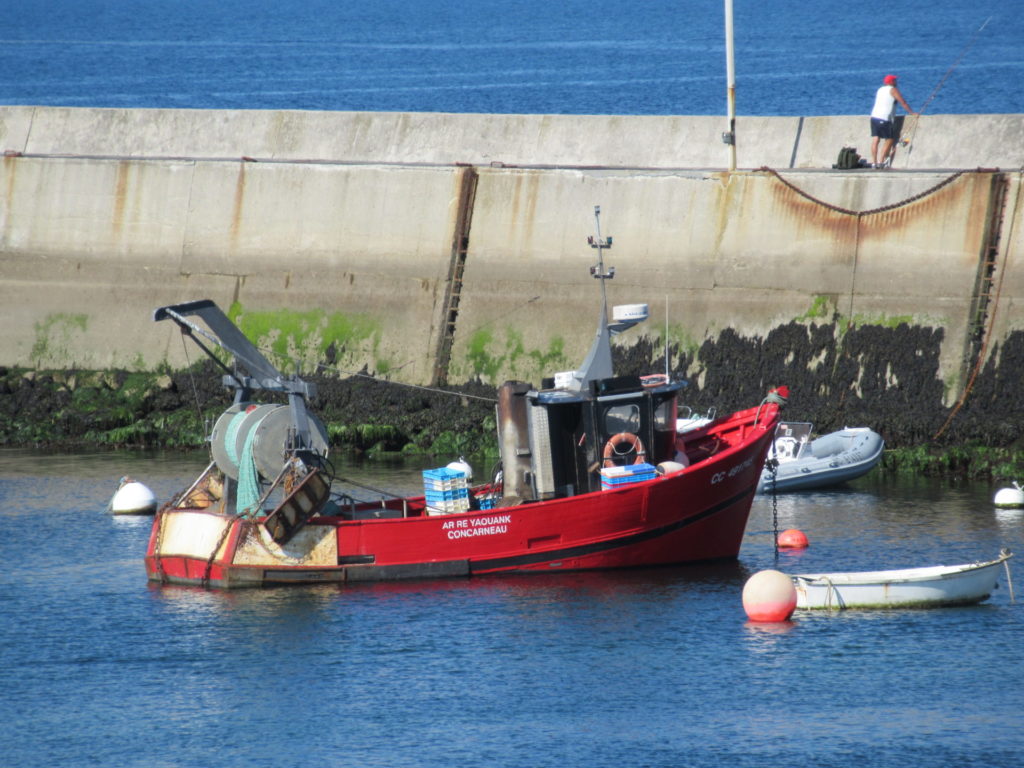
What I love most of all about the coast in this part of France, is the clear light and the vibrant colours. Very different from the generally more muted colours of my own country. The bright red of a fishing boat…
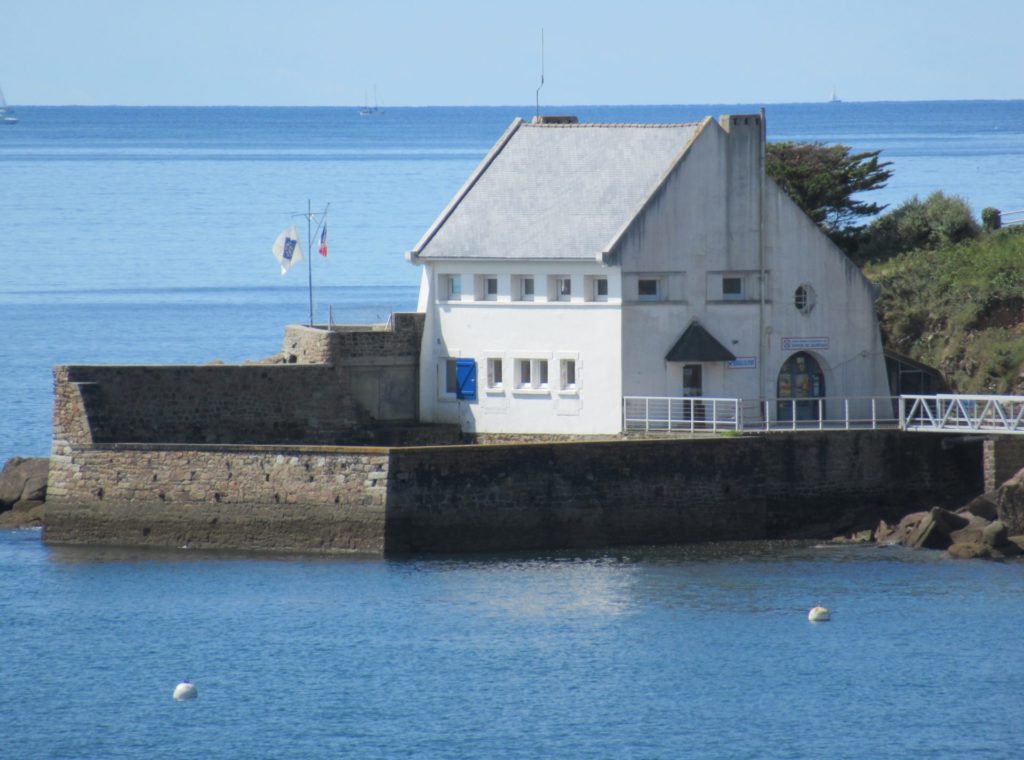
… but especially the many, many shades of blue. The translucent blue of the sky. A blue shutter on a white building. And the ever changing blues of the sea, of course. Sometimes pale and in stripes…
… and sometimes a much darker blue shading to turquoise.
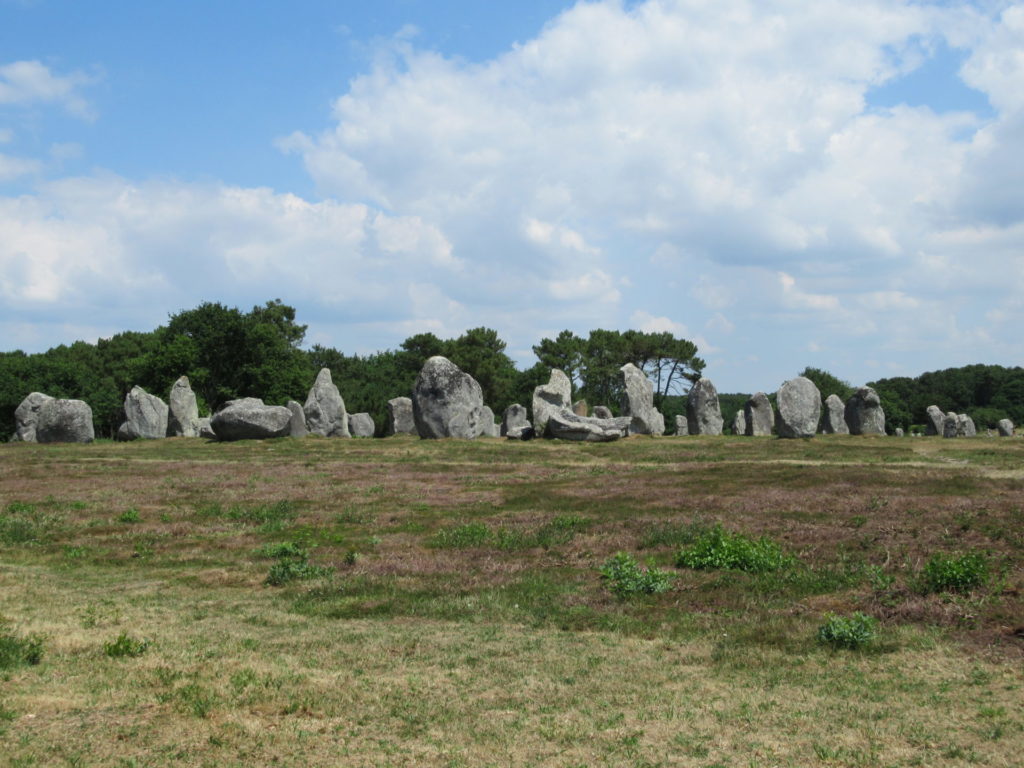
We didn’t spend our entire holiday staring at the sea, though. While we were there, we just had to pay a visit to the famous standing stones of Carnac. The sheer number of upright stones, all neatly arranged in rows pointing in the same direction, is amazing.
There were some interesting museums and galleries, and we also visited a stately manoir, with a granary (below) that was even more beautiful than the house itself.
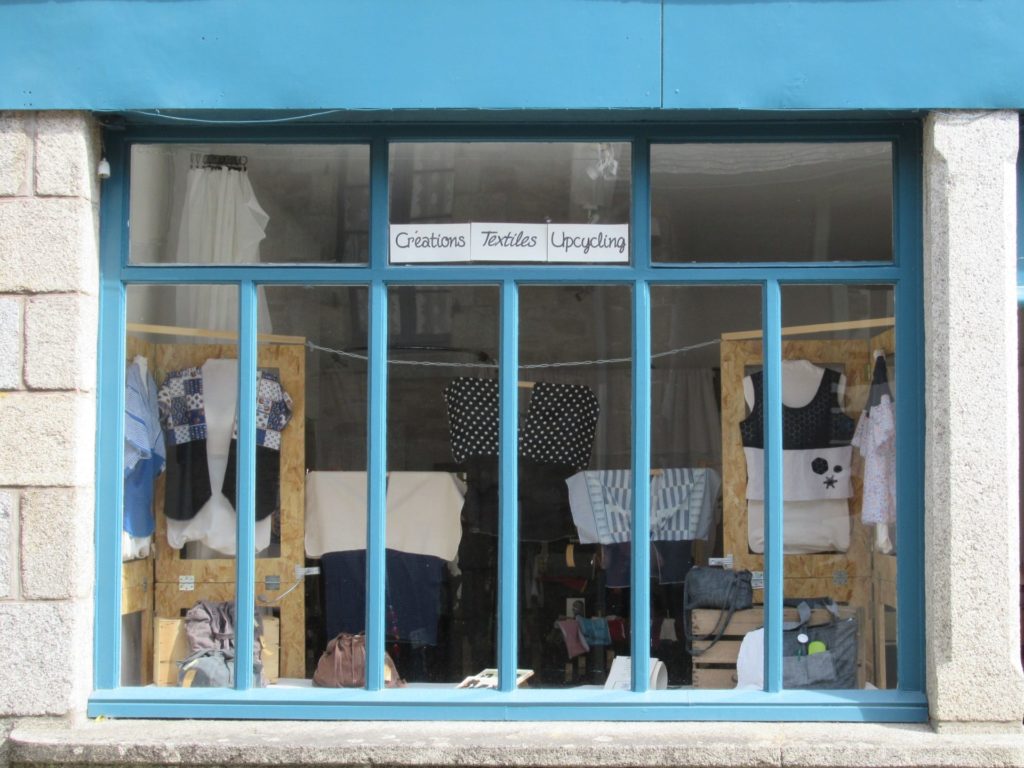
And then there were the delicious thin pancakes called crêpes, the tempting restaurants, and the lovely fishing villages. In one of these villages I took this picture of a shop window:
It’s an ‘upcycling’ shop, where they make and sell wonderful creations from second-hand clothes. Here, too, it was all about blue.
But, all in all, we spent most of our time on the coast, either walking along the coastal path
or strolling along the beach, camera in hand, taking pictures of the sea, rock pools and birds, and just soaking up the sun and gazing out over the sea.
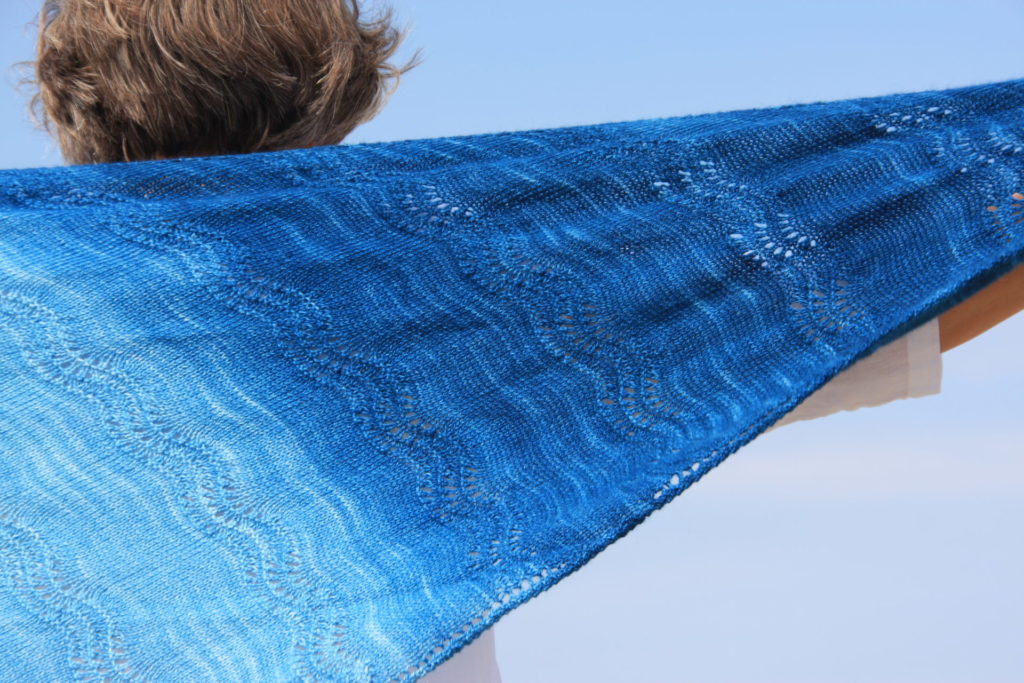
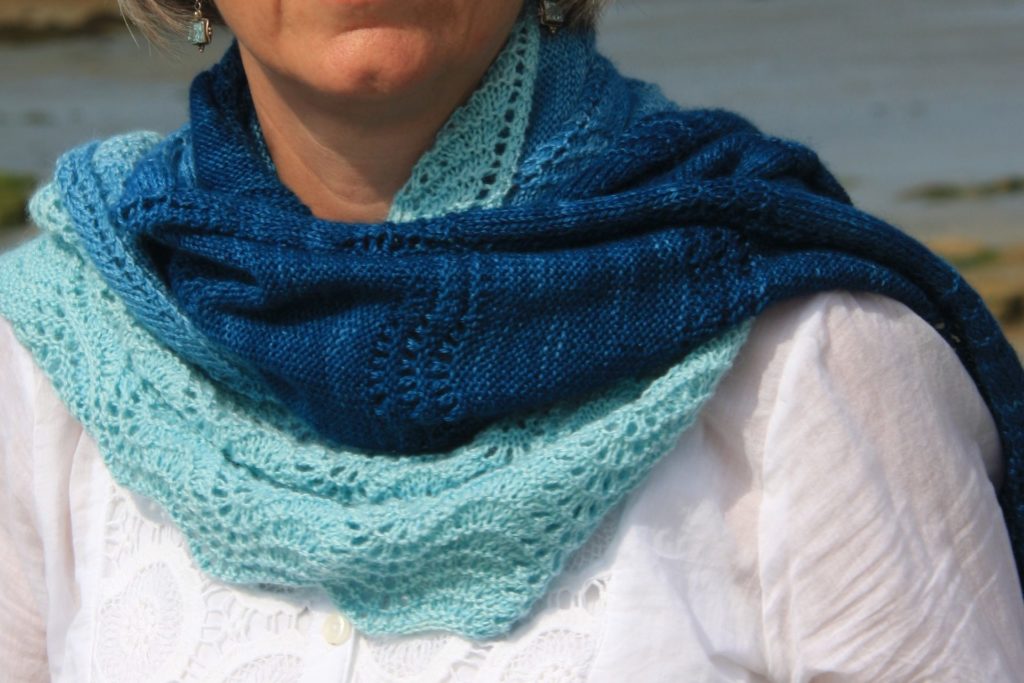
On one of these beach days, I asked my beloved private photographer to take some pictures of my shawl. You’ve already seen it in its entirety at the top of this post, but here’s another picture of it fluttering in the sea breeze.
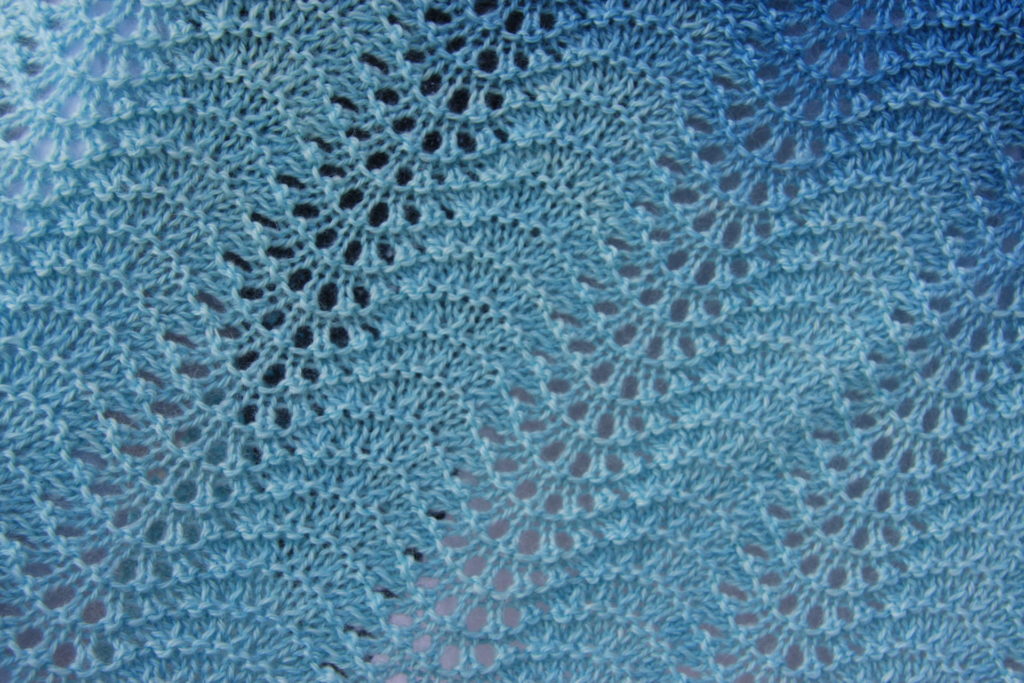
The triangle starts with just 3 stitches and gradually grows wider with increases along one side. The lace pattern I’ve chosen is an all-time favourite called Old Shale. The body of the shawl consists of stocking stitch sections alternating with sections in Old Shale, and it ends in a border knit entirely in the wavy lace pattern.
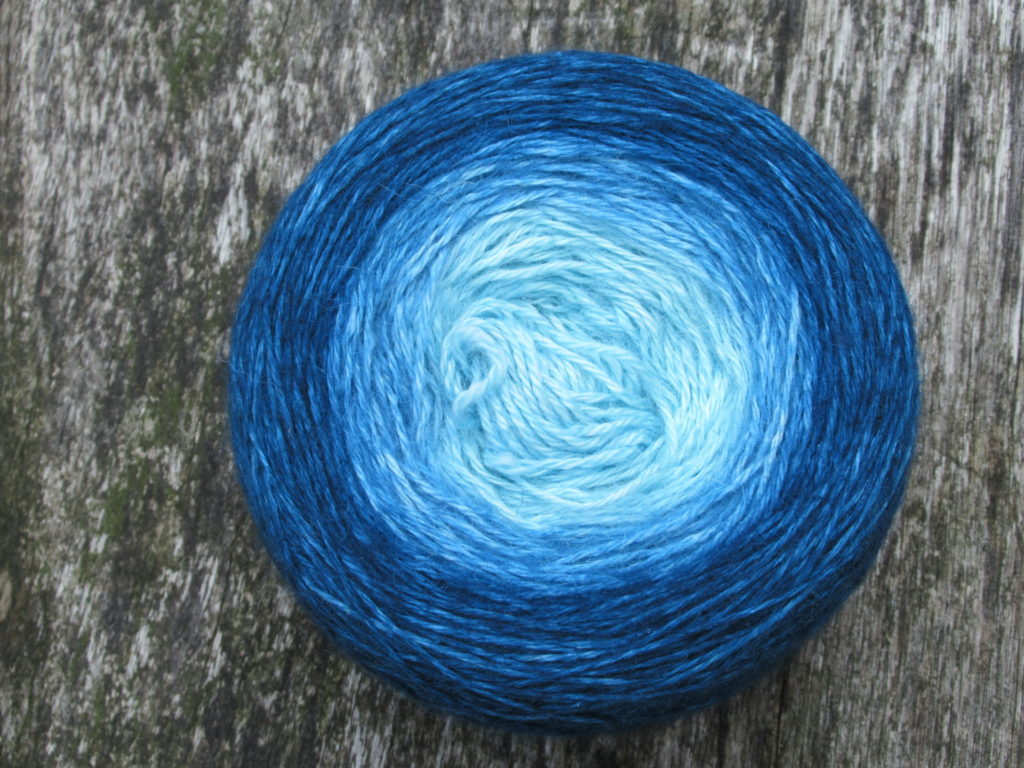
I used a yarn in a gradient of blues, from a deep sea blue at the narrow end to a pale turquoise at the wide border.
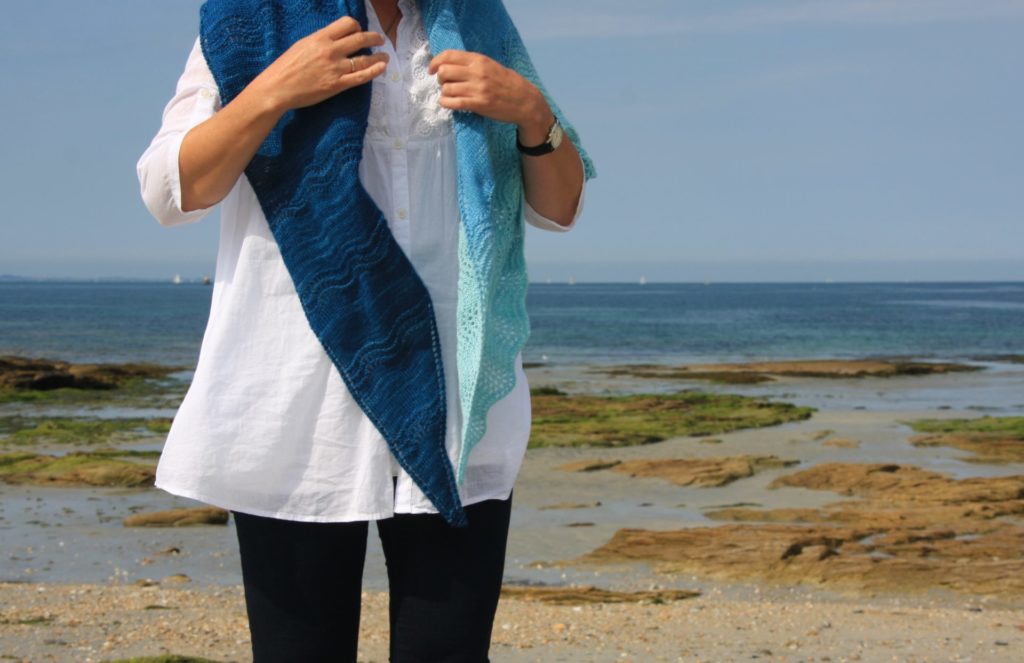
Here’s a close-up of the border.
To an inexperienced knitter, it may look complicated, but it isn’t. It’s a fairly simple shawl, in fact, with the ‘action’ taking place in only one in every four rows of the lace pattern. For the rest it is just a matter of knitting and purling.
By now, you’ll probably understand why I’ve called this shawl Morbihan. Although I hadn’t planned it beforehand, the shawl and ‘the little sea’ turned out to have much in common. The colours, the waves…
… and also a certain soothing rhythm.
It’s taken me a while, but I’ve finally written out, tested and uploaded the pattern. If you’d like to knit a Morbihan shawl, too, you can find the pattern here on Ravelry.
The pattern has all the details about yarn, knitting needles etcetera, written instructions as well as a chart for the lace pattern, and a tip about making the shawl longer or shorter.
In addition to this one, I’ve made several more versions of Morbihan. I’ll tell you more about them and the yarns I’ve used soon.
Surprise! I’ve published a pattern on Ravelry! It’s a simple pattern for a cowl, knit in stripes of five different colours, and I’ve called it Tellina.
I’ve been working on this project for quite a while. The reason I haven’t mentioned it here before is that I wasn’t sure if it was going to work out and how long everything would take. And now, suddenly, it’s all finished.
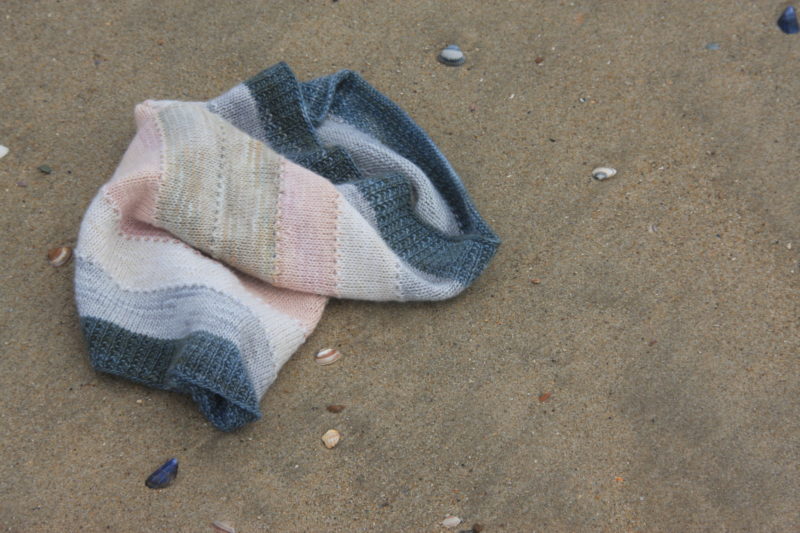
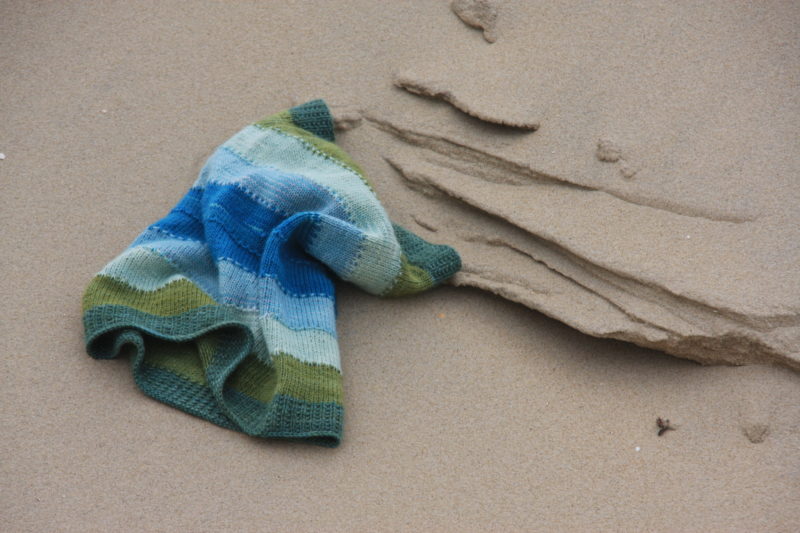
At the top you can see the cowl in neutrals and pink. And here it is in blues and greens:
Before I show you some more pictures of the cowl, let me first tell you how it came about.
It all started with the yarn…
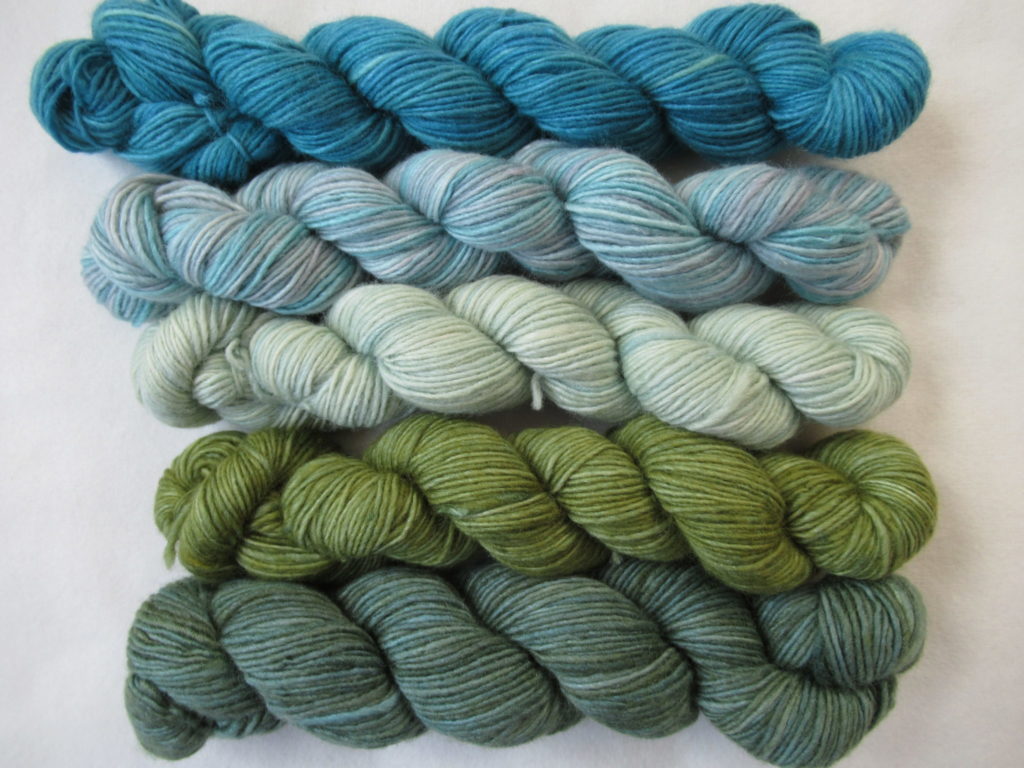
These days, my policy is not to buy any yarn unless I have a specific project in mind to make with it. But at a crafts fair in February, I fell head over heels in love with a yarn that came in sets of five mini-skeins. (I wrote about it in a previous post). It was soft, it had a slight gleam, it was hand-dyed and fair trade, and the colours! Oh, those colours!
The blues and greens reminded me of the sea, the sky and the marram grass on sand dunes on a sunny day. (The day we took these pictures wasn’t all that sunny, so the colours below are a bit more muted than those of the yarn.)
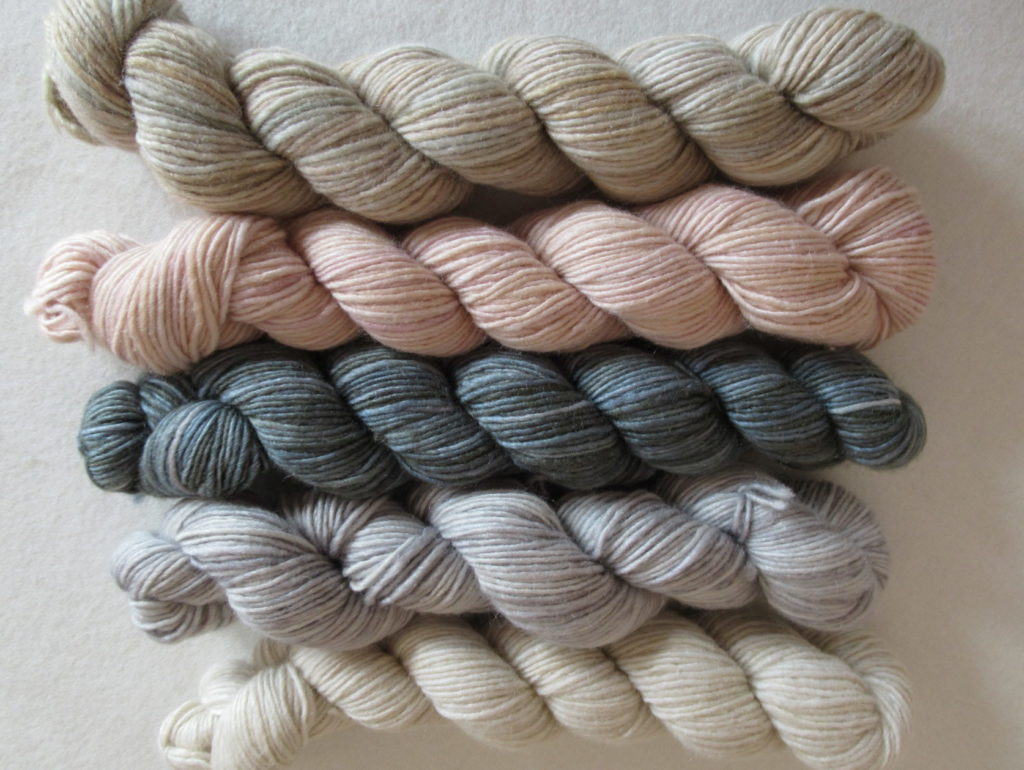
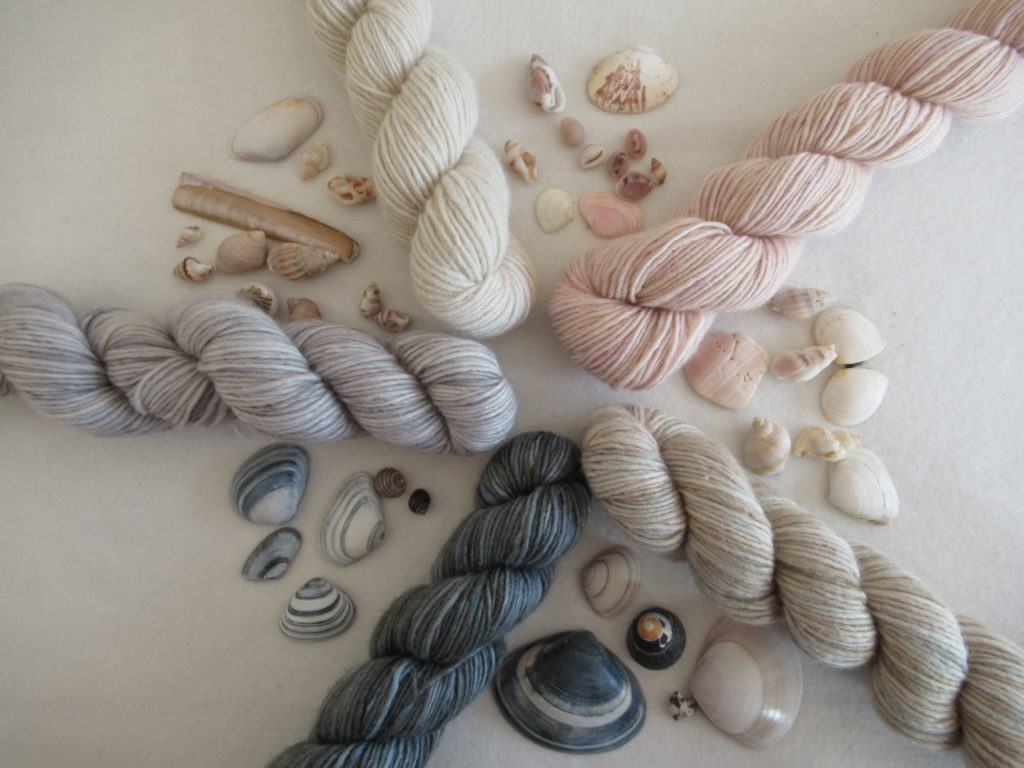
And the grey, fawn, cream and pink combination made me think of seashells. To me, seashells are some of nature’s small miracles, with all of their different shapes and subtle colours. I keep some in jars on my window sill – souvenirs of many trips to the seaside, in the Netherlands and abroad.
So, I caved in and the yarn came home with me. At first, I only looked at it and petted it. Then I played with it for a bit, just for the fun of seeing the colours of the shells and the yarn together.
And then I started thinking about what to make with it. I looked around on Ravelry and in my pattern books, but couldn’t find anything that spoke to me. So I decided to design something myself. It couldn’t be a big project, or I’d have to buy more yarn to go with it. (I only had 100 grams of each colour combination.)
I soon decided that a cowl would be perfect. It would be a lovely thing to make and to wear, and I could use up as much of the mini-skeins as possible.
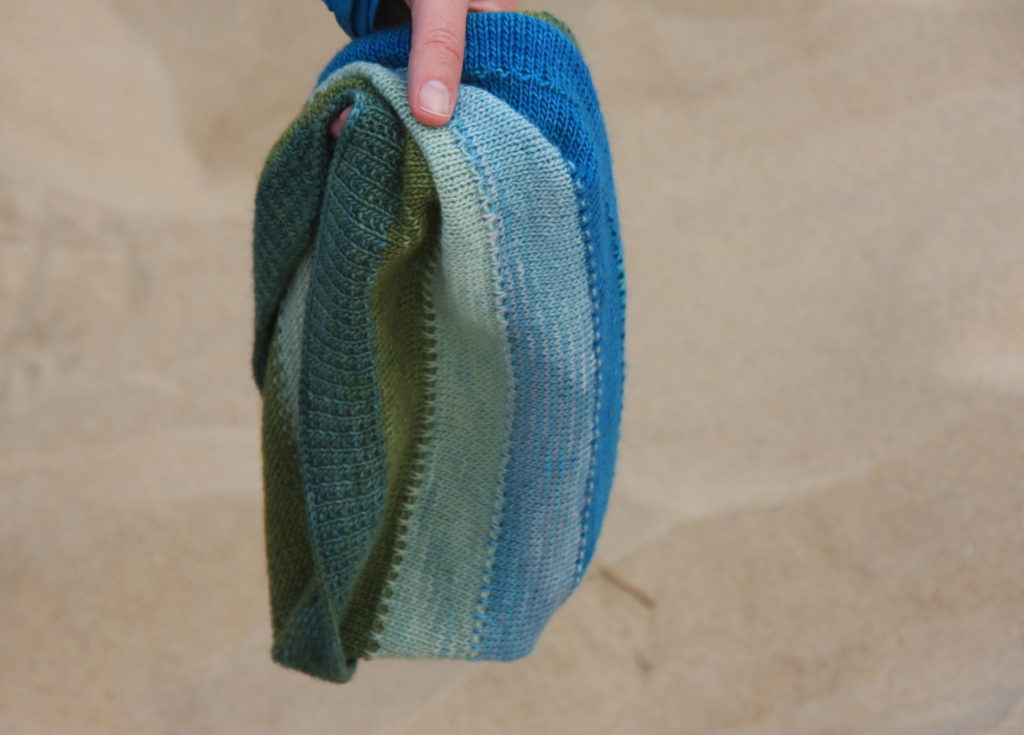
I made swatches in all kinds of stitch patterns. I daydreamed, sketched and coloured. I knit more swatches, to try out different needle sizes. I cut some knots (figuratively speaking) and knit a prototype. Then I finally knit the actual cowls. Here you can see them side by side (click on images to enlarge).
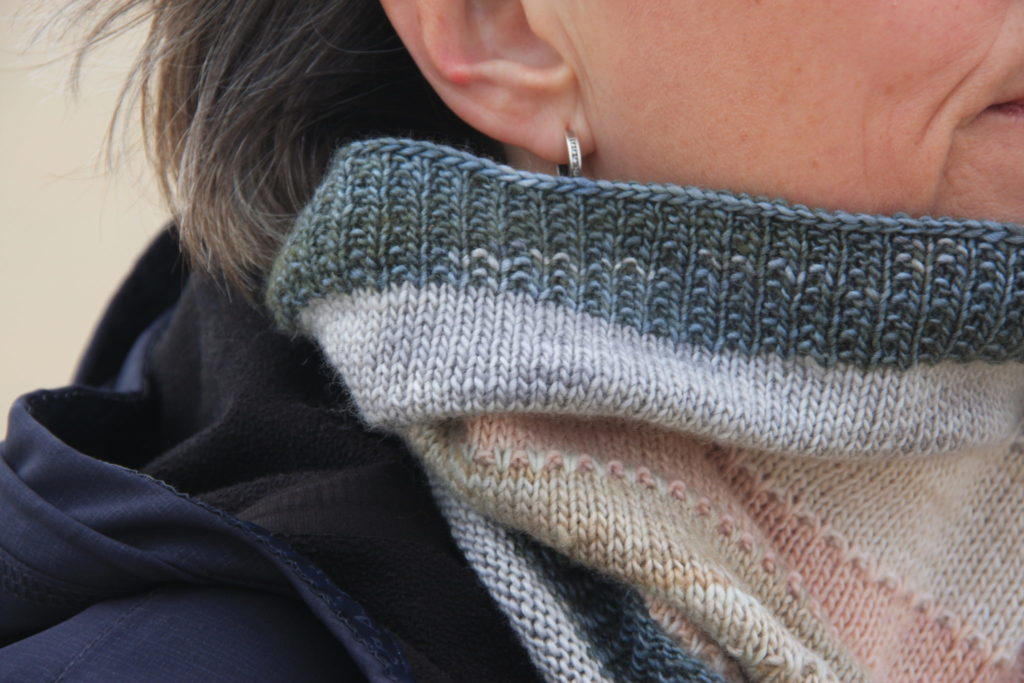
The cowl is knit in the round, in a combination of broken rib, stocking stitch and rows of slipped stitches. Here you can see the different pattern stitches and the subtle variegations in the yarn from close up:
The pattern owes its name to a group of shells commonly found along our shores, called Tellina in Latin. One of them is the thin tellin (Tellina tenuis), a small, delicate shell with bands of colour in various shades. My favourites are the rosy pink ones, like the top left one in the photo below:
The cowl is suitable for all levels. For experienced knitters it will be a breeze to knit. And it’s totally doable for inexperienced knitters, too. (Only if you’re really new to knitting, I’d suggest asking a slightly more experienced knitter to cast on the stitches and knit the first two rounds for you. After that you should do fine.)
For those of you who’d like to make their own Tellina, you can find the pattern here on Ravelry.
IMPORTANT NOTE: Should you decide to knit this pattern, please don’t throw away the scraps! There won’t be a lot of yarn left over, as I’ve tried to use up as much as possible, but it would be a shame to throw away even the tiniest amounts. I’ll try to think up something to do with them. I don’t know exactly what it’s going to be yet, but I have some ideas and hope to publish a few small projects here on my blog during the summer months.