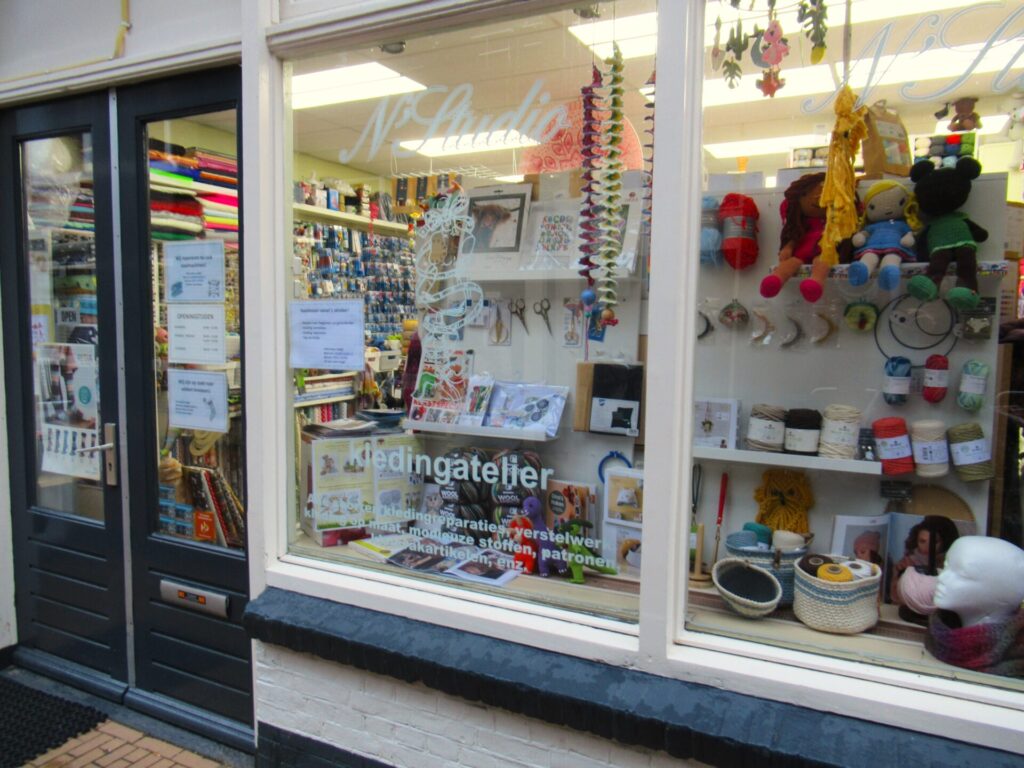
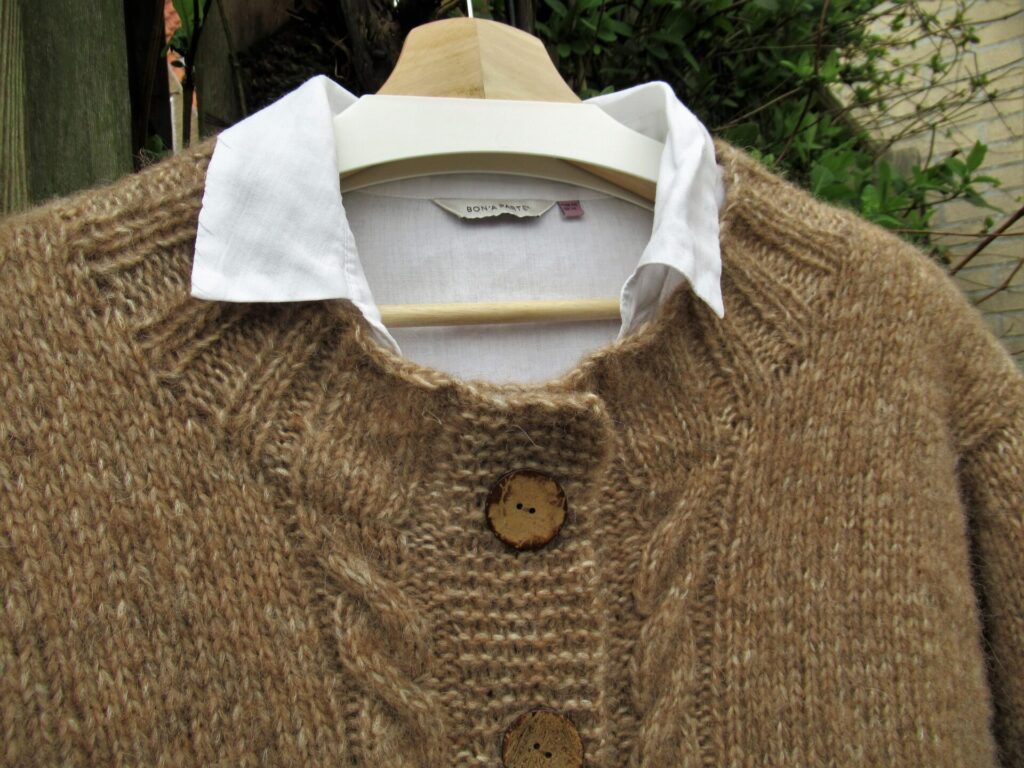
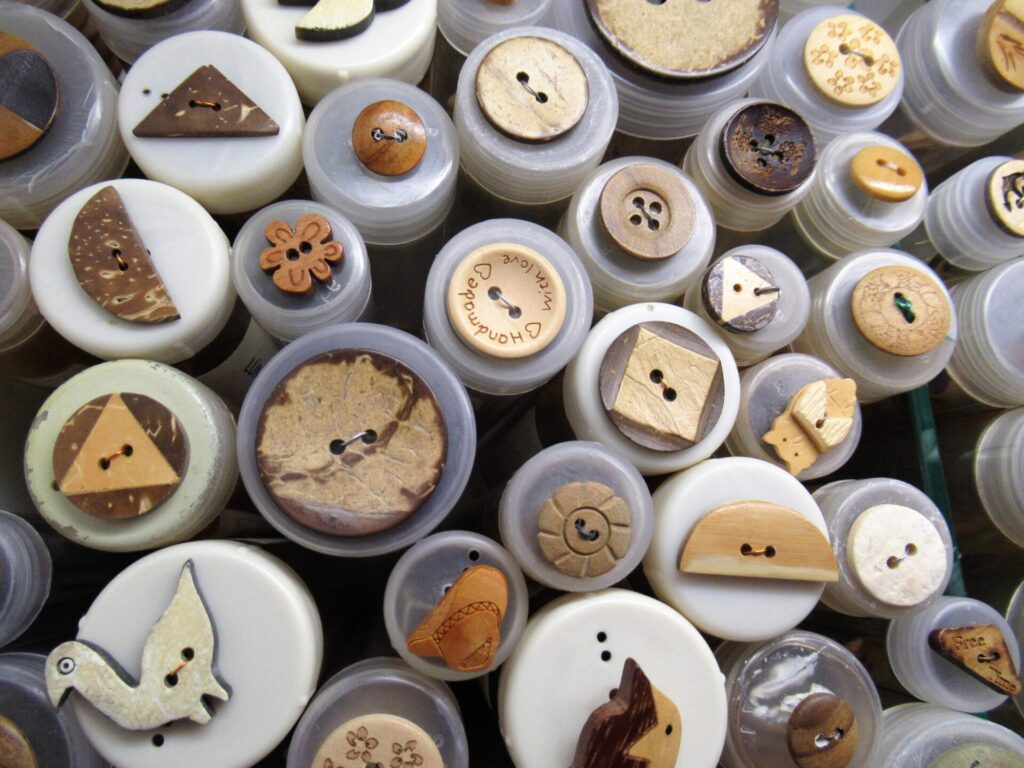
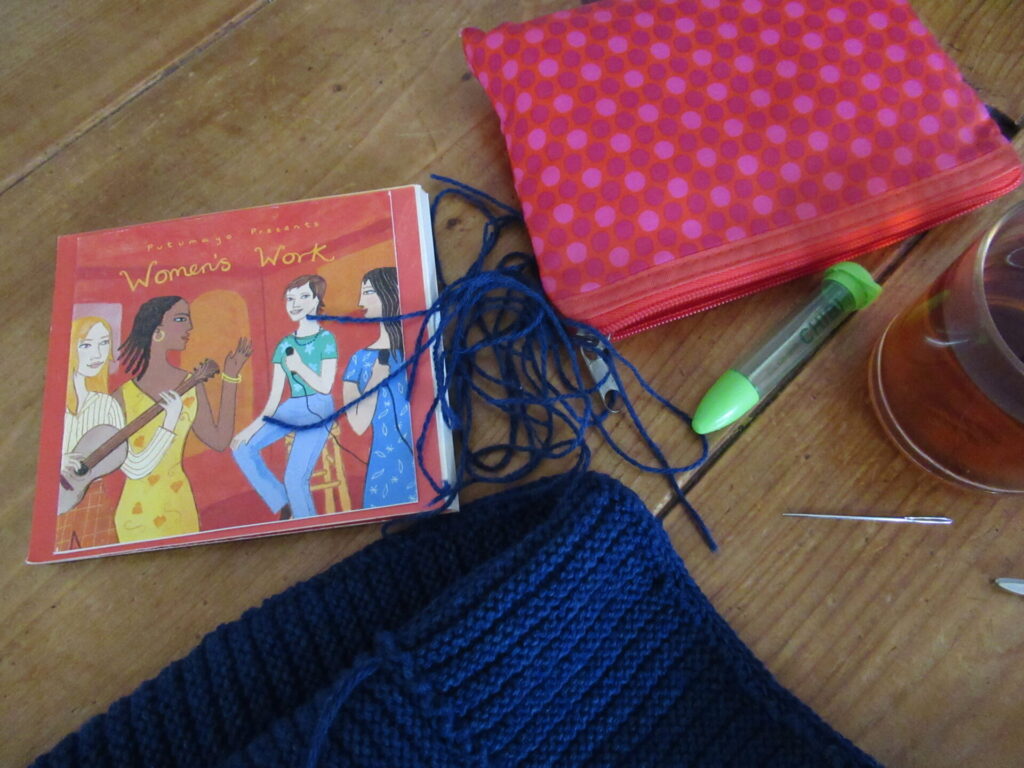
Hello! Can you smell the scent of spices wafting to you from my kitchen through the internet? I’ll give you the recipe further on, but first I’d like to talk a bit about buttons. My Norwegian cardi still needed buttons, so I went to a nearby haberdashery shop. On a drizzly morning, when everything else in the street was still closed, it was a haven of colour and cosiness.
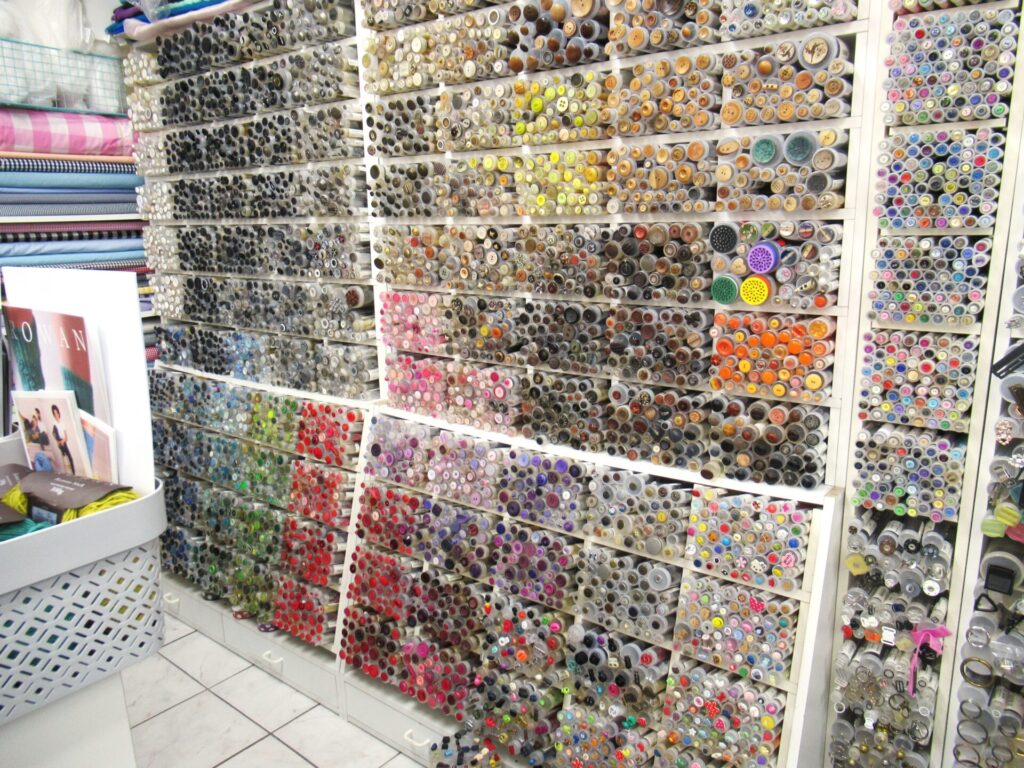
It is a tiny shop, crammed with sewing and knitting notions, tools and yarns. And they have a fabulous button wall.
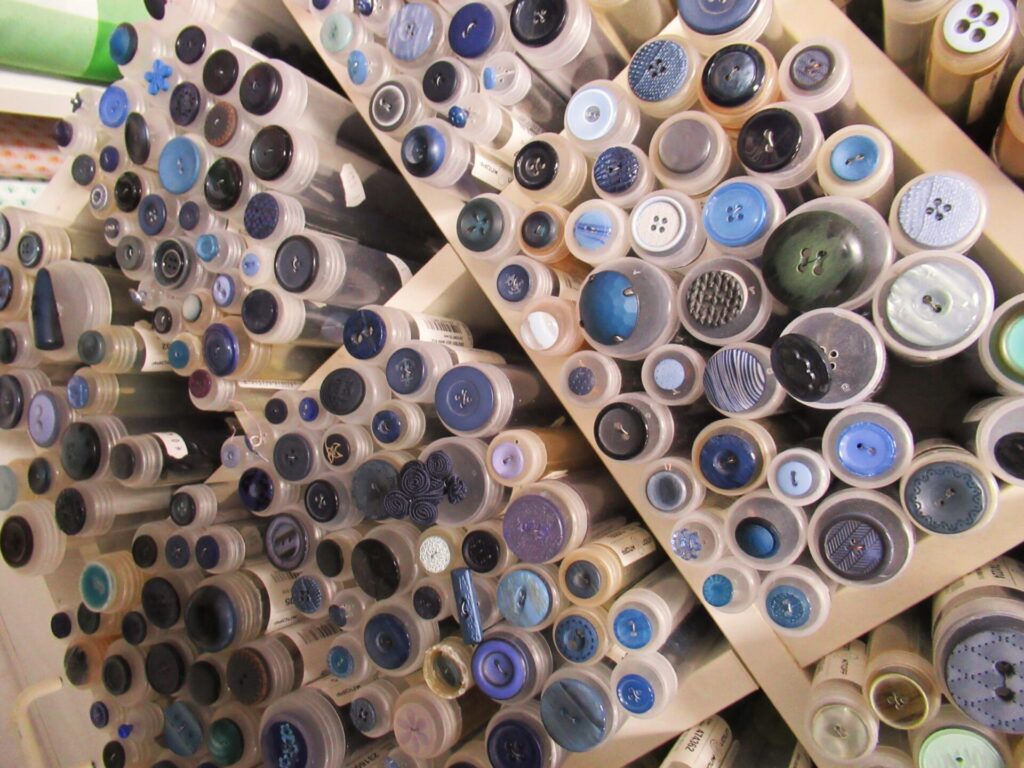
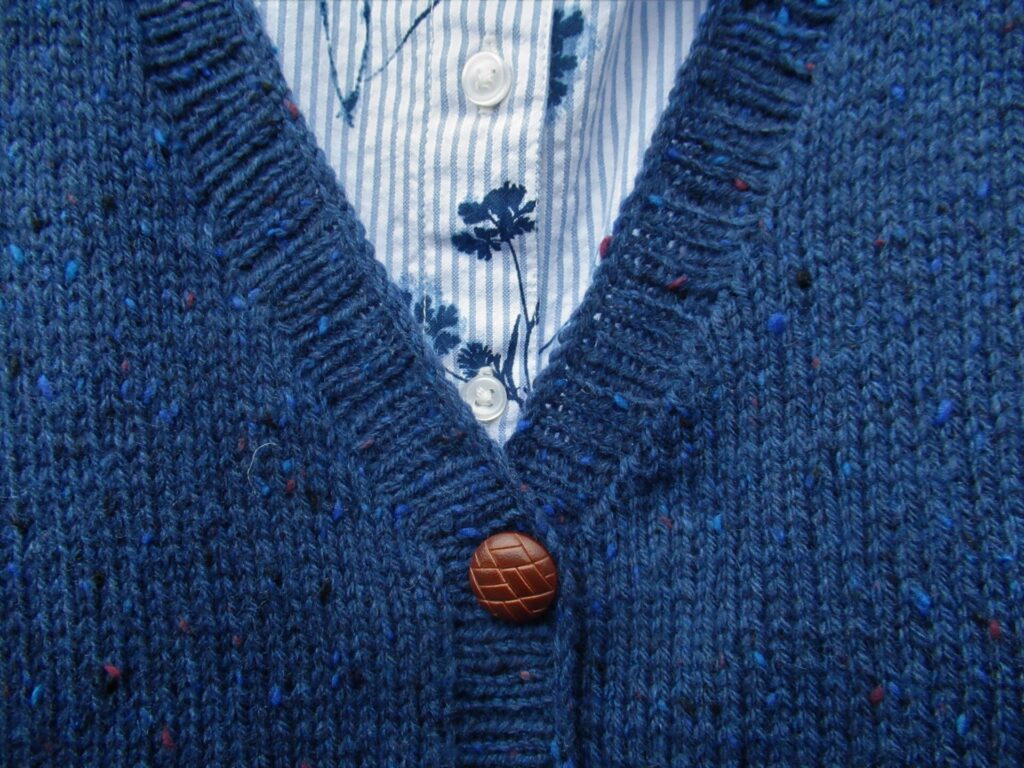
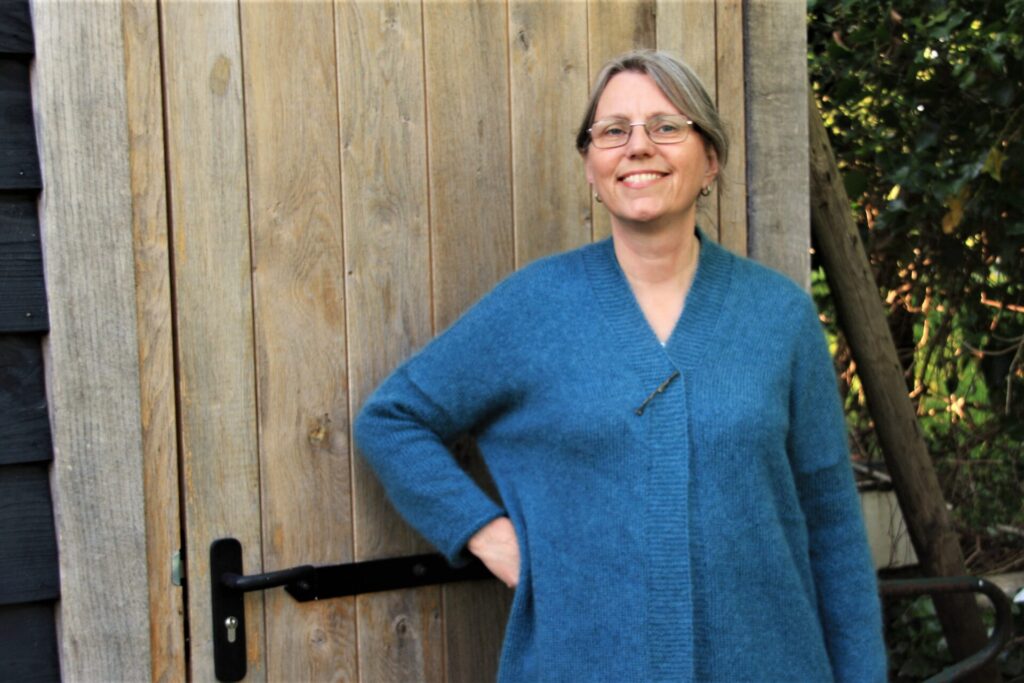
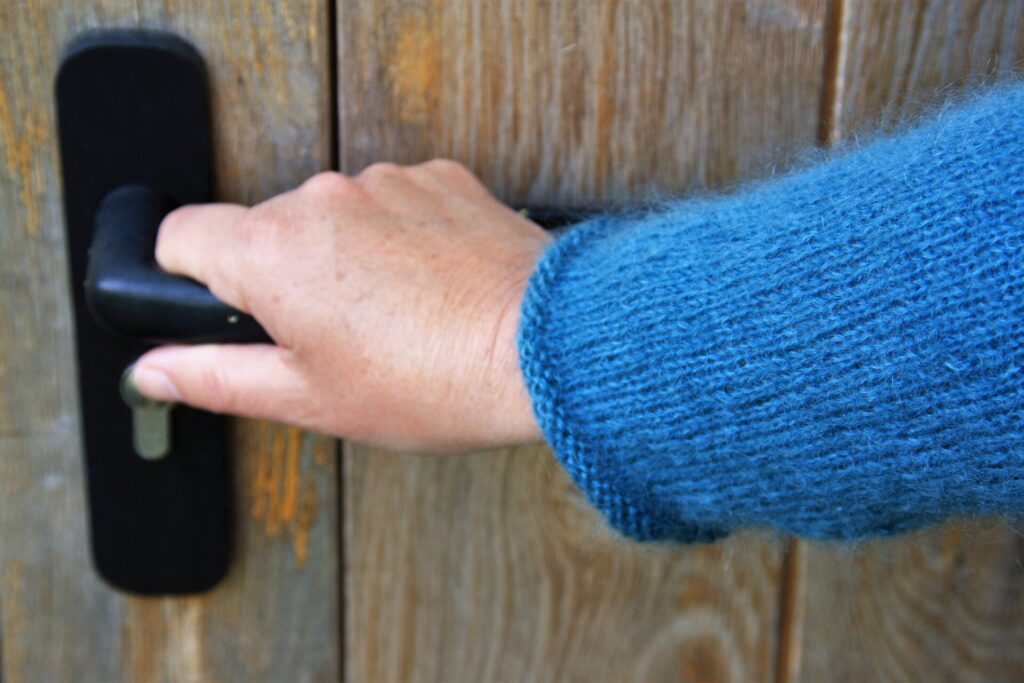
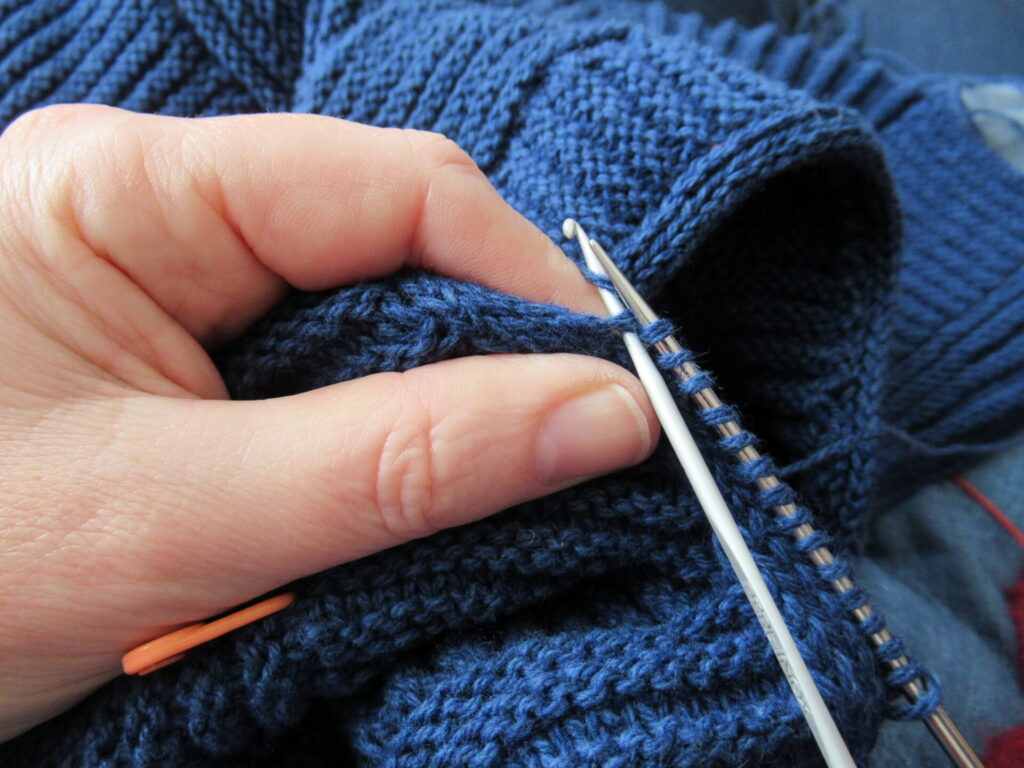
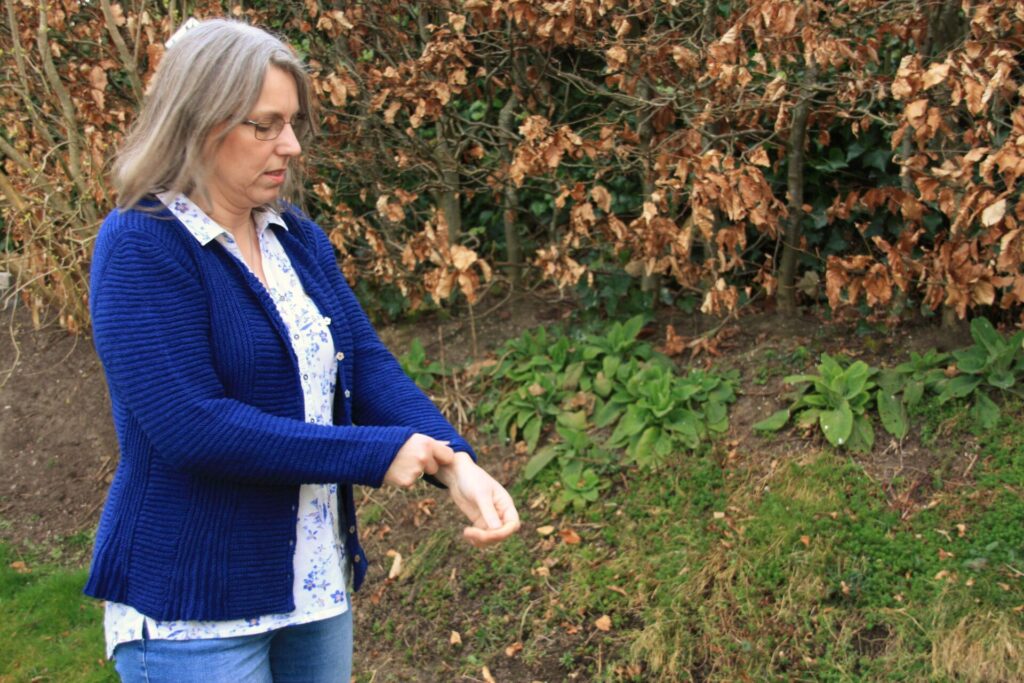
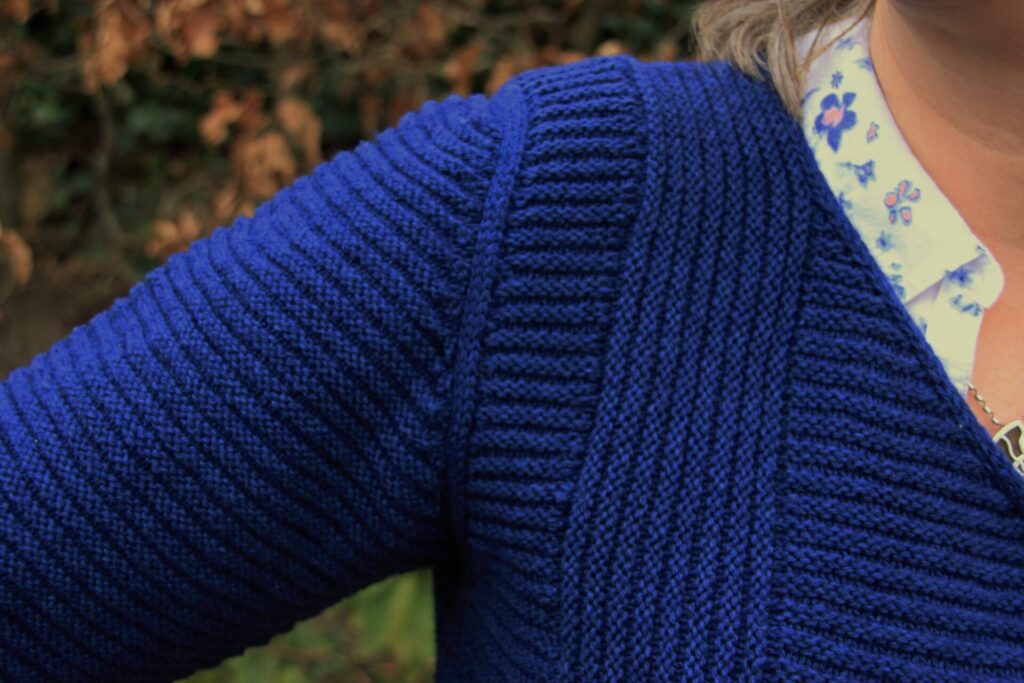
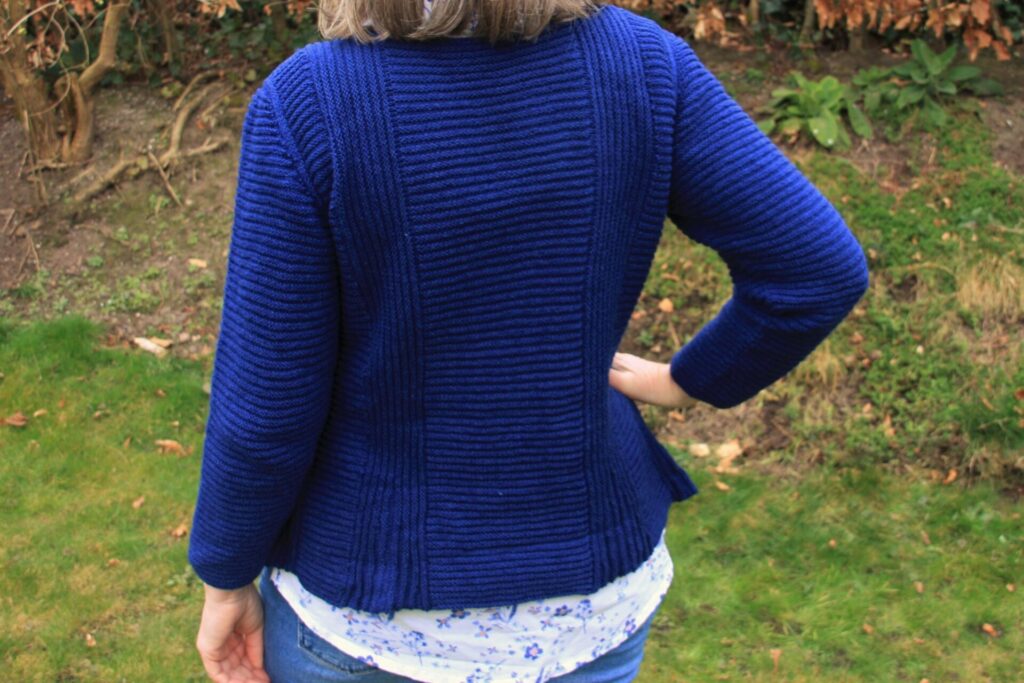
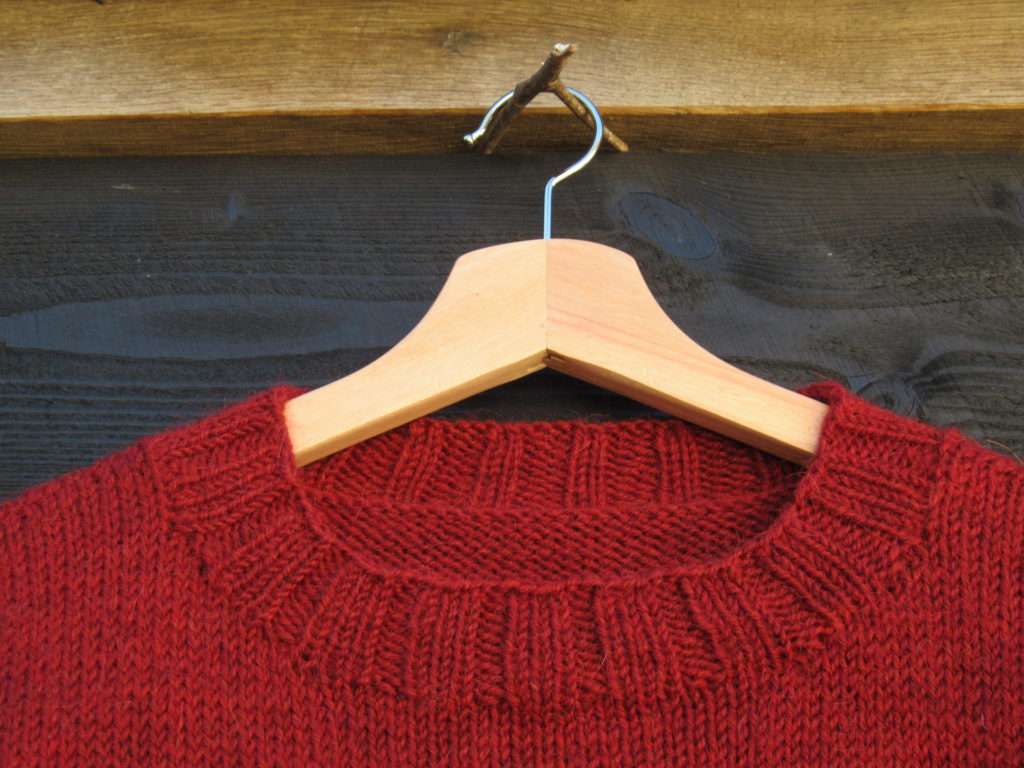
The cardigan I knit is a kind of greyish, fairly dark blue. So, I first looked at blue buttons.
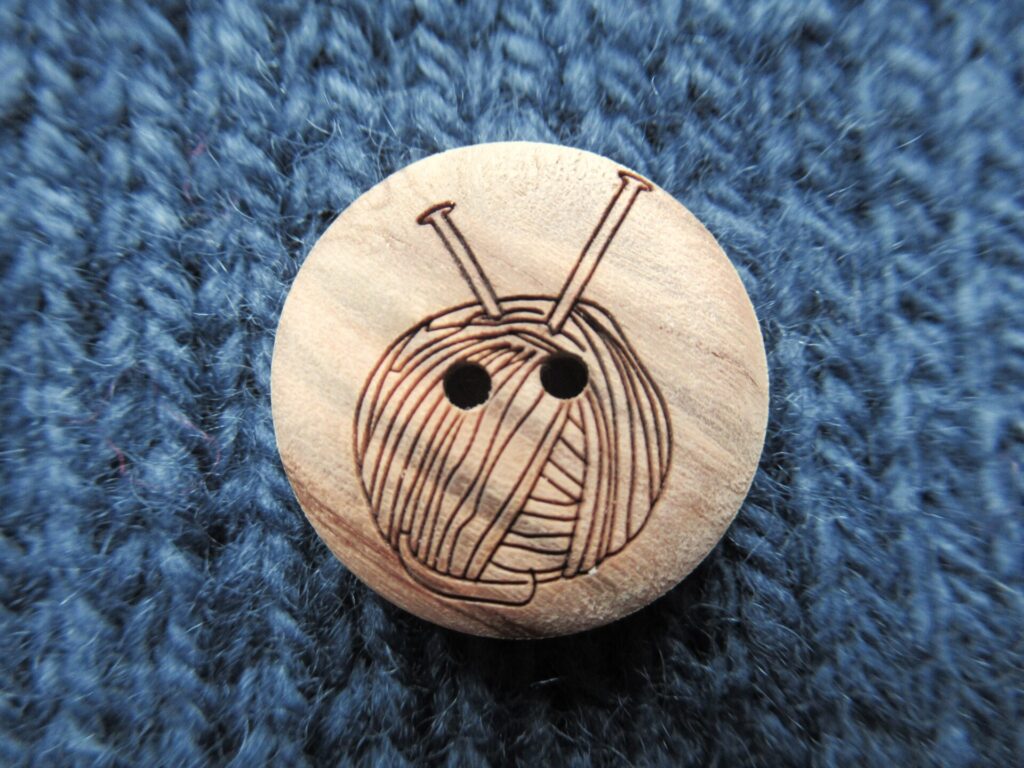
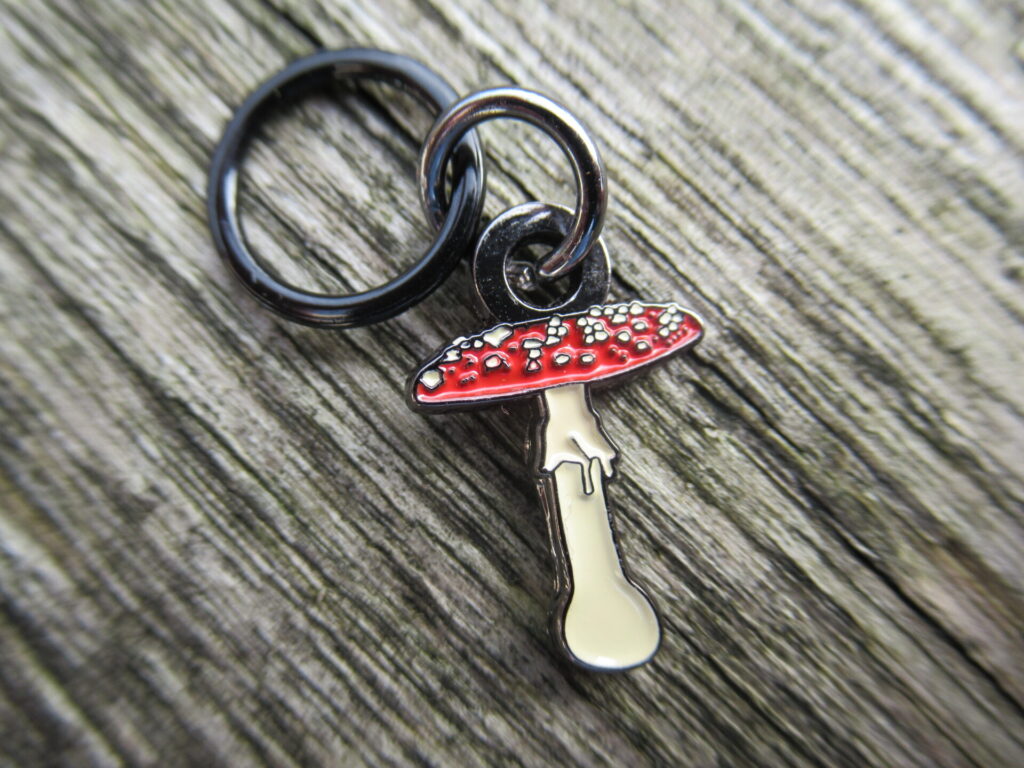
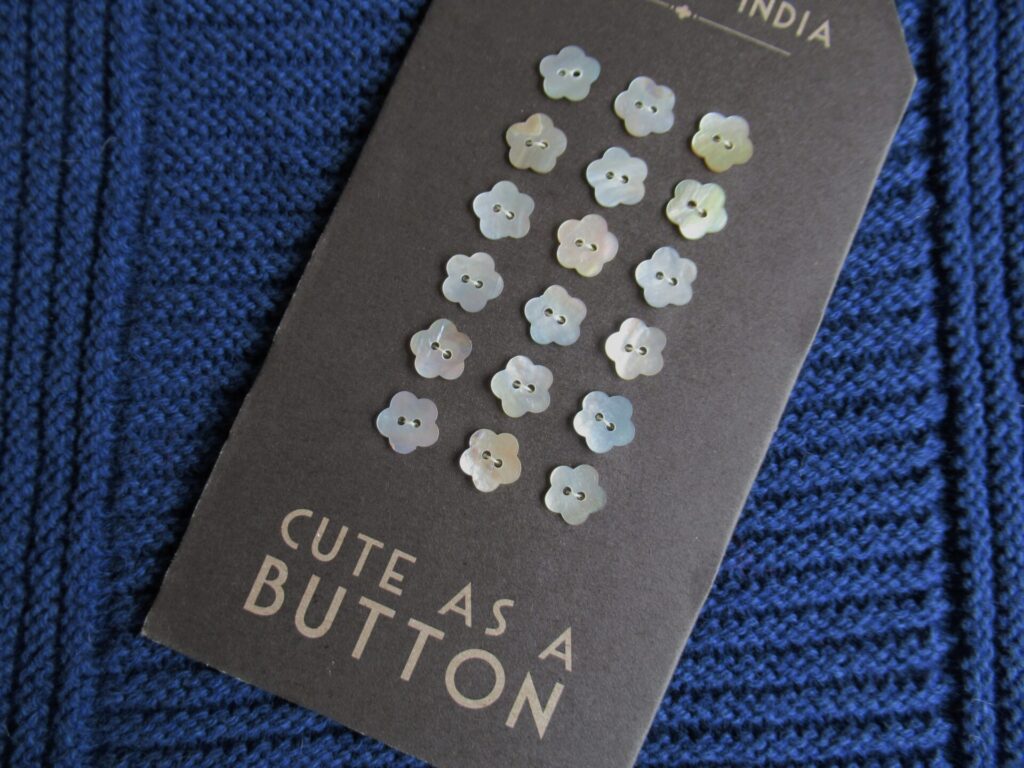
I found some in the right size that matched my yarn exactly, but… they looked a bit dull. Looking at the wooden button section for something more exciting, I fell in love with these – aren’t they fun?
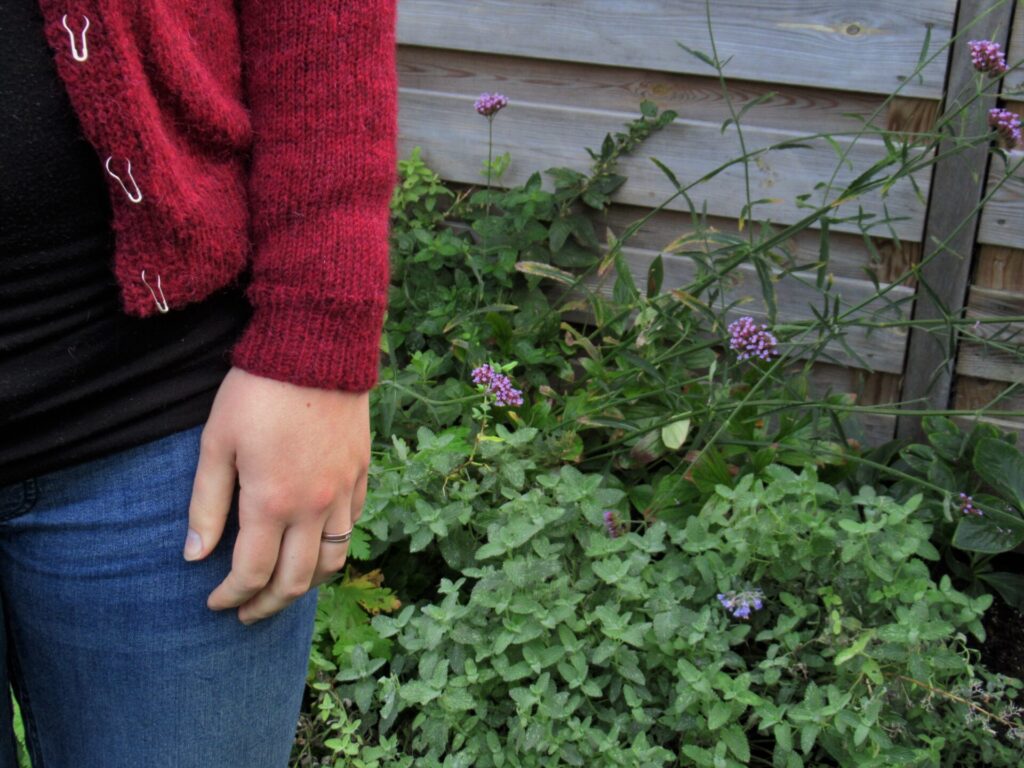
The cardigan I sewed them on to is the Lang Yndlingskofte from Kofteboken 2 (this beautiful Norwegian book can be found here on Ravelry). It’s the cardigan I steeked in this blogpost. The yarn I used is CaMaRose ‘Økologisk Hverdagsuld’ (100% organic wool, 150m/164yds/50g). It is warm and light, and became very nice and soft after washing. A really, really lovely yarn. I’ve shortened the cardi by 10 cm/4 inches, but it is still fairly long and would also be great worn with a dress.
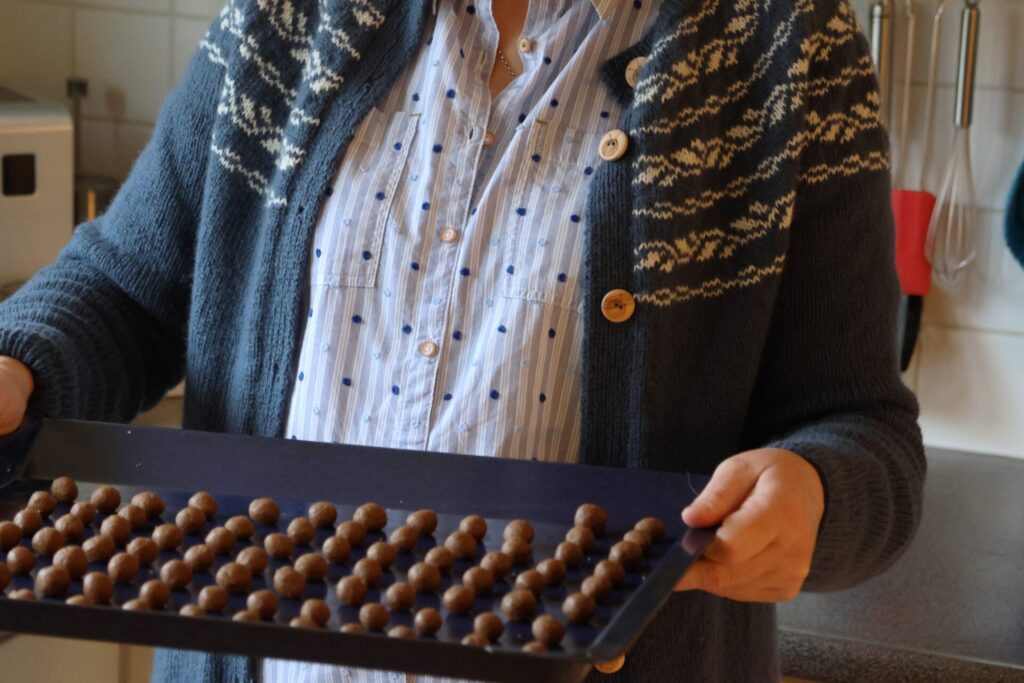
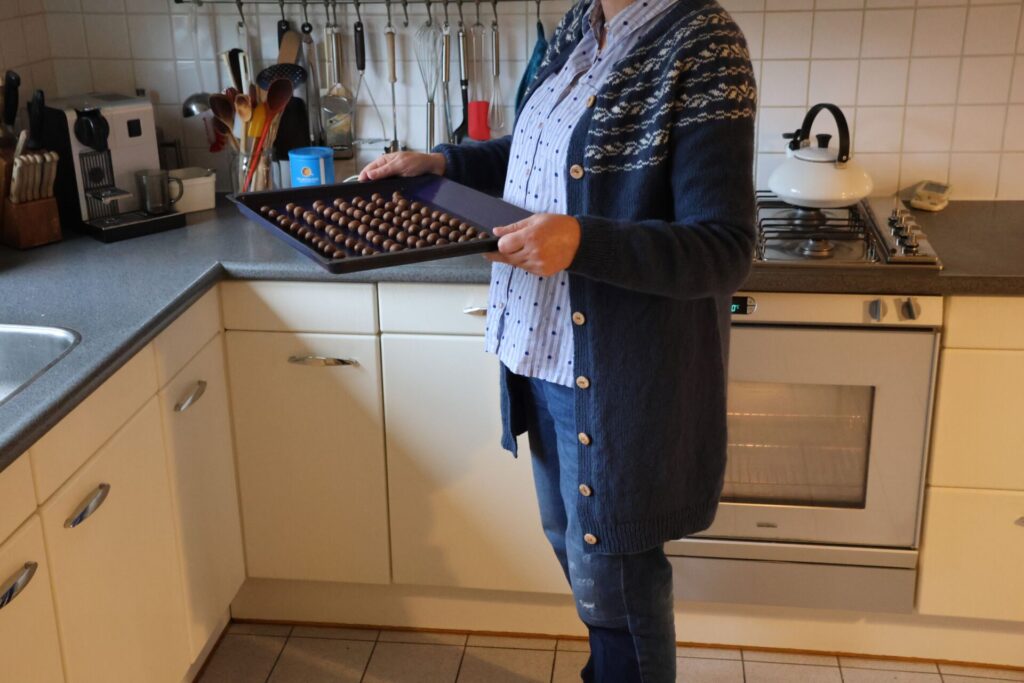
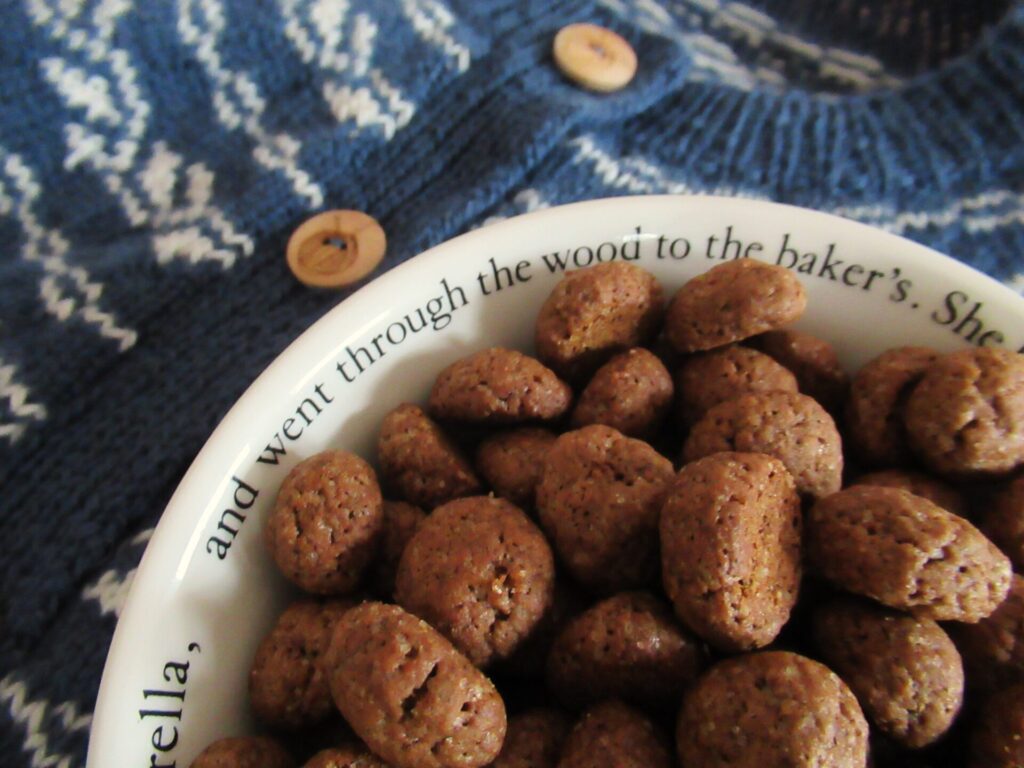
So, what is that on the baking tray I’m holding in my hands? Kruidnootjes! Kruidnootjes (literally: spice nuts) are a traditional Dutch Sinterklaas treat. In the Netherlands, Sinterklaas is celebrated with gifts on December 5th, the eve of Saint Nicholas’ Day. Three weeks before the day, the venerable Sinterklaas arrives in the country by steamboat. We welcome him with special songs, and in the weeks leading up to the celebration we eat tons of kruidnootjes. They’re great to bake with children. Here is my recipe:
Kruidnootjes
(makes about 100)
Ingredients:
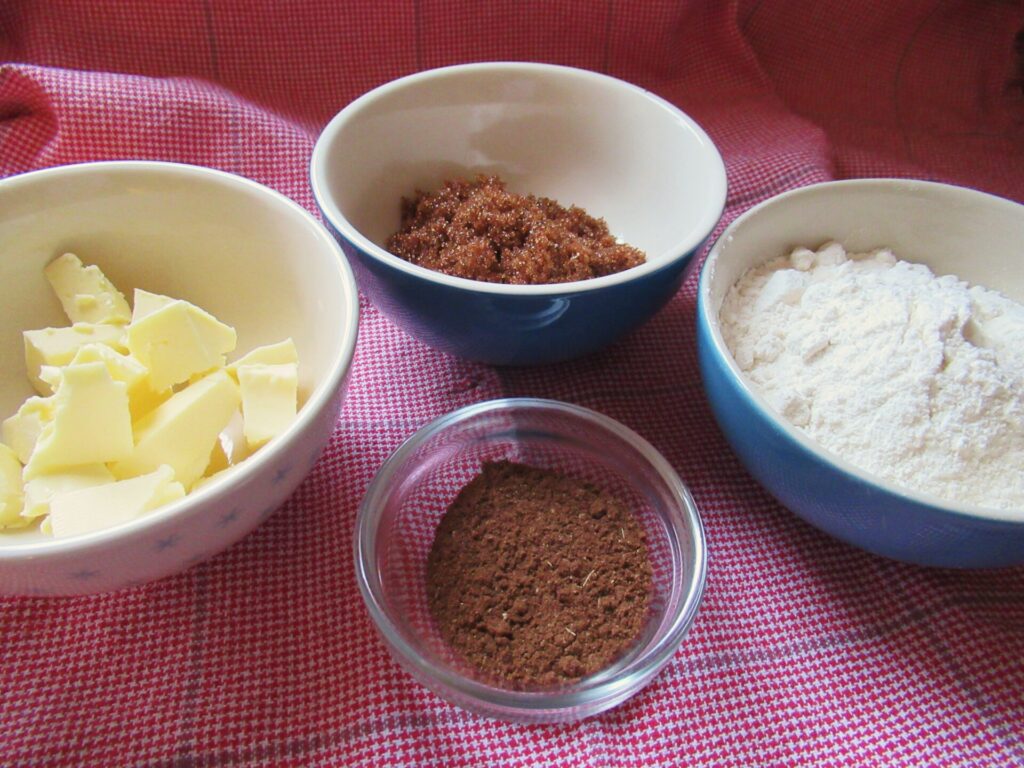
100 g self-raising flour
50 g dark brown muscovado sugar
40 g unsalted butter (softened)
1 tablespoon mixed spice*
A pinch of salt
2 tablespoons milk
*The Dutch spice mix used in this and other traditional recipes is called speculaaskruiden. It does not always have exactly the same ingredients, but is usually a blend of: ground cinnamon, coriander, aniseed, ginger, nutmeg, cardamon and cloves. Sometimes it also contains pepper or allspice. If you can’t get speculaaskruiden where you live, why not make your own? A beautifully illustrated recipe can be found here.
Method:
Knead all the ingredients together by hand until they form a ball. Wrap the ball in clingfilm and place it in the fridge for 30 minutes.
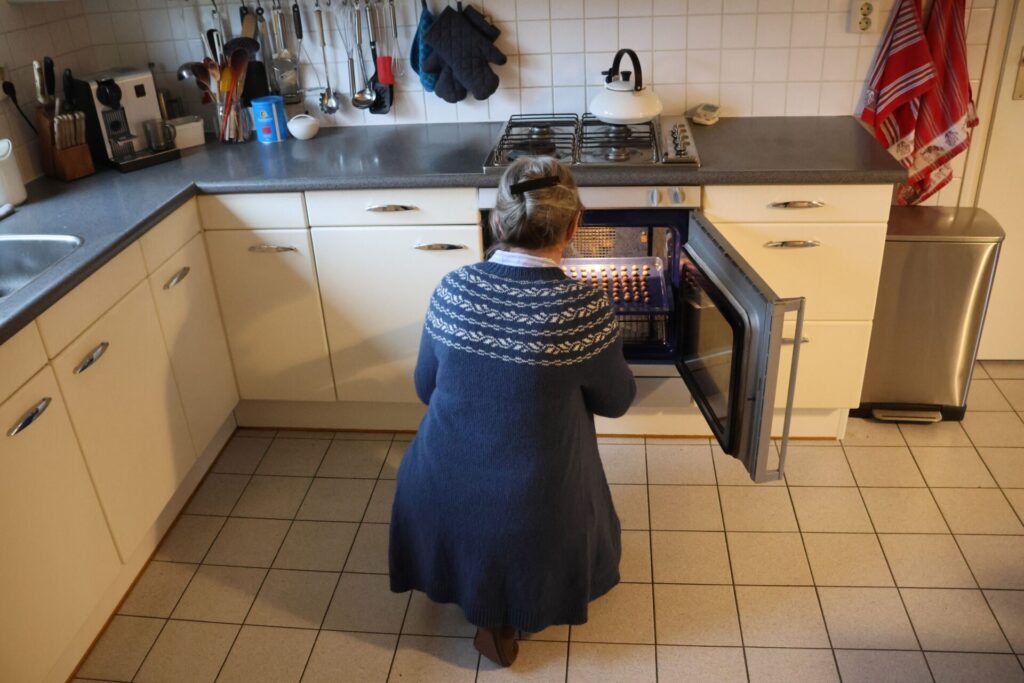
Preheat the oven to 175˚C/345˚F (hot air: 160˚C/320˚F)
Roll the dough into about 100 small balls (approx. 1.5 cm/½ inch in diameter). Place them on a lightly greased baking tray.
Place them in the oven…
… and bake for 20 minutes.
Leave to cool until they are nice and crunchy.
Eat straightaway or store in an airtight container
Hello! Sitting down at my computer to write this, it occurs to me that every story can be told from different angles. I could choose to make today’s post into a blood-curdling story, with ghost rows (boo!), yarn the colour of blood, a ripped-off limb and nightmare-inducing toadstools. But I think the world is scary enough as it is without me adding to it, so I’m choosing to write a comforting tale instead.
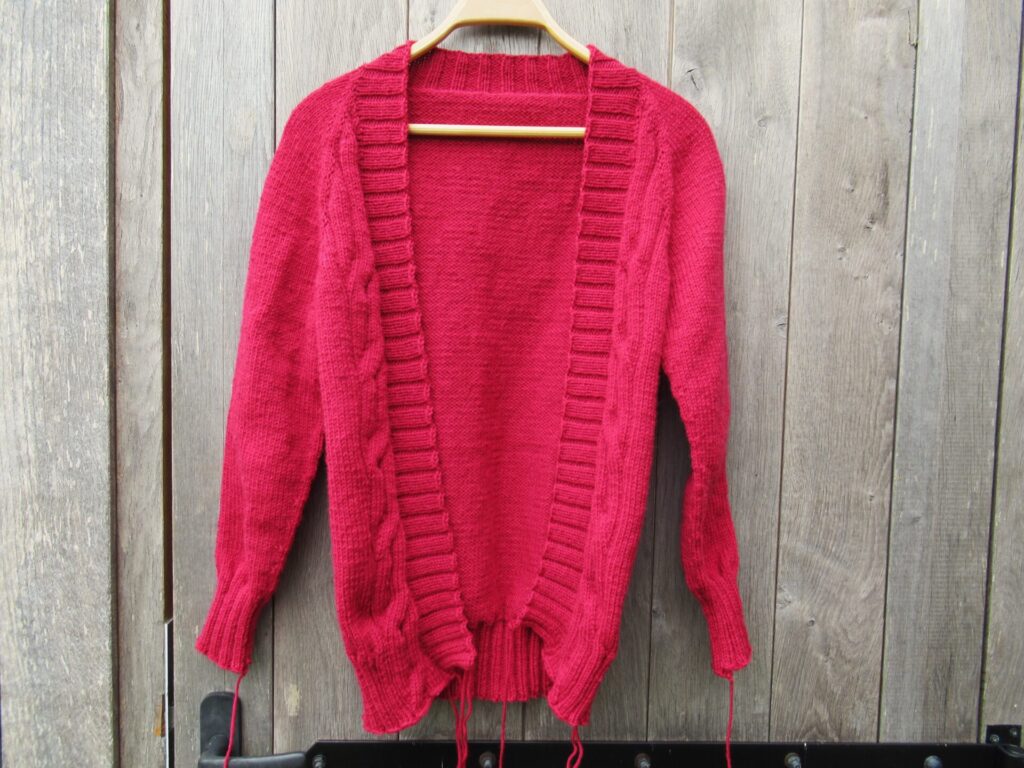
Once upon a time, in a small low-lying country, there was a woman who was feeling miserable on a personal level and filled with worries about the world. Blue was her favourite colour, followed by green and pink, but now she was suddenly longing for something red.
Well, yes, that’s lovely, but not exactly what she meant.
Very nice, too, but that wasn’t what she meant either.
What she was longing for was red yarn for something simple and comforting to knit. Fortunately she knew that if she climbed the stairs in her very own home, turned right and then left at the top, she’d come to a portal leading to a secret hoard of yarny treasures. And lo and behold, she found exactly what she wanted – six 100-gram skeins of worsted-weight red wool. With a little techno-wizardry, the perfect pattern landed in her in-box and she could start knitting.
The pattern designer said this top-down and seamless cardigan could be knit in 4 days, but the woman in our story didn’t have magic flying needles and it took her a couple of weeks longer. Partly because after she’d knit the first sleeve she realized it was far too tight, had to rip it out and re-knit it using a larger needle. Would she never learn that she always needed to go up a needle size for sleeves knit in the round? Still, fairly quickly it was finished.
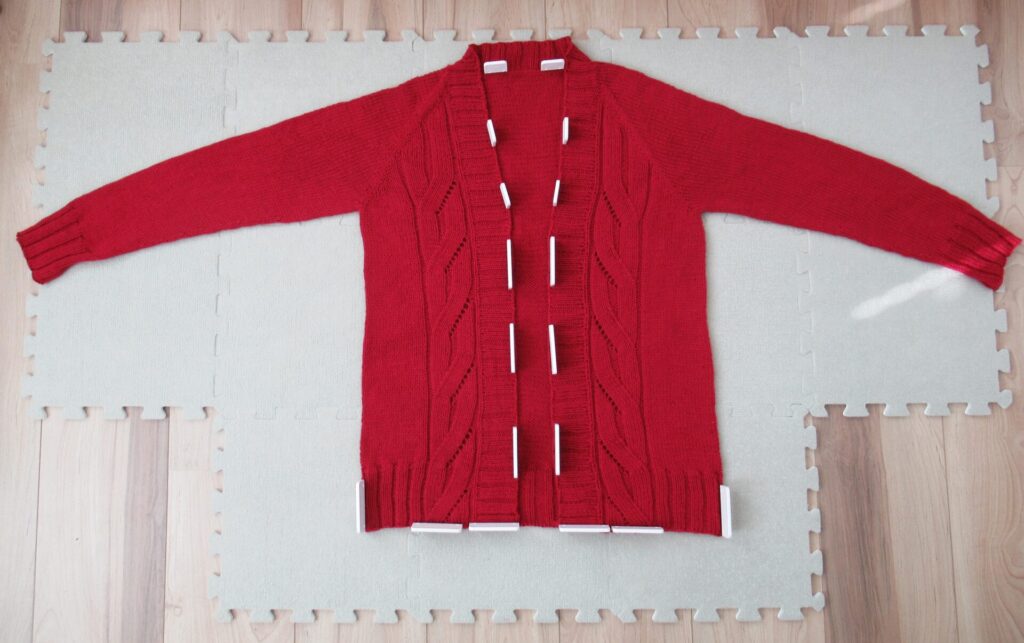
But, oh, how disappointing. It didn’t look nearly as nice as the designer’s cardi and the front bands seemed far too short. Maybe it needed a good soak and some blocking magic?
Ah, yes, much better. Now the wave pattern along the fronts looked lovely, and the front bands were the right length, too.
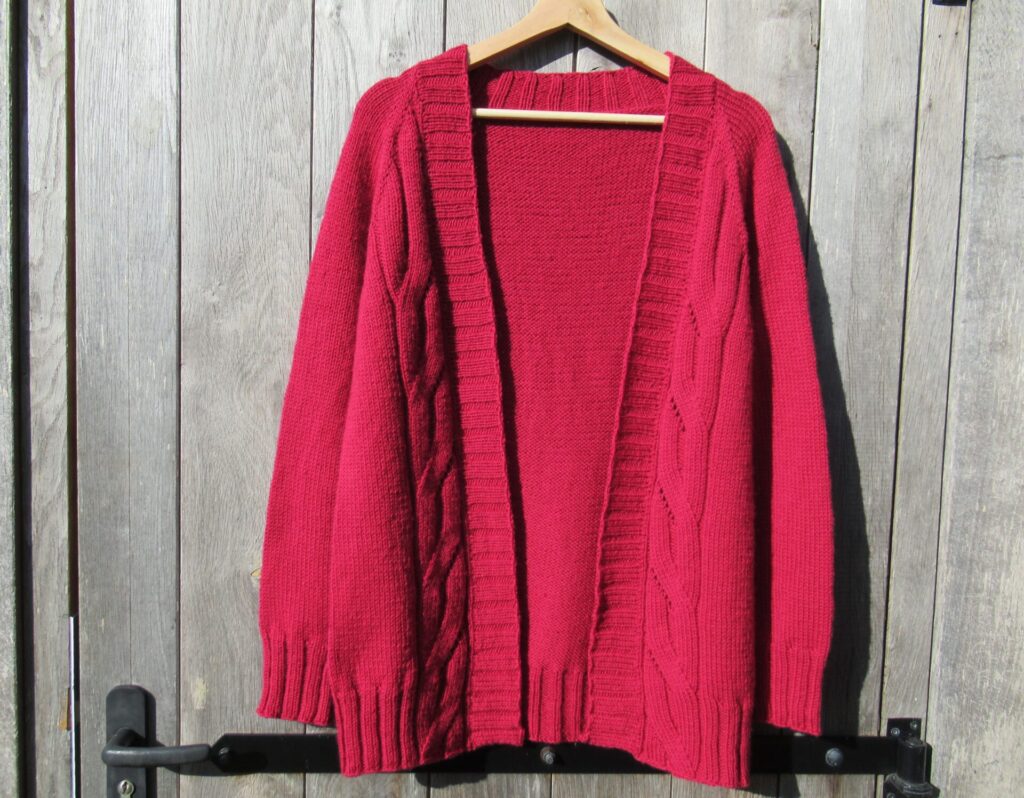
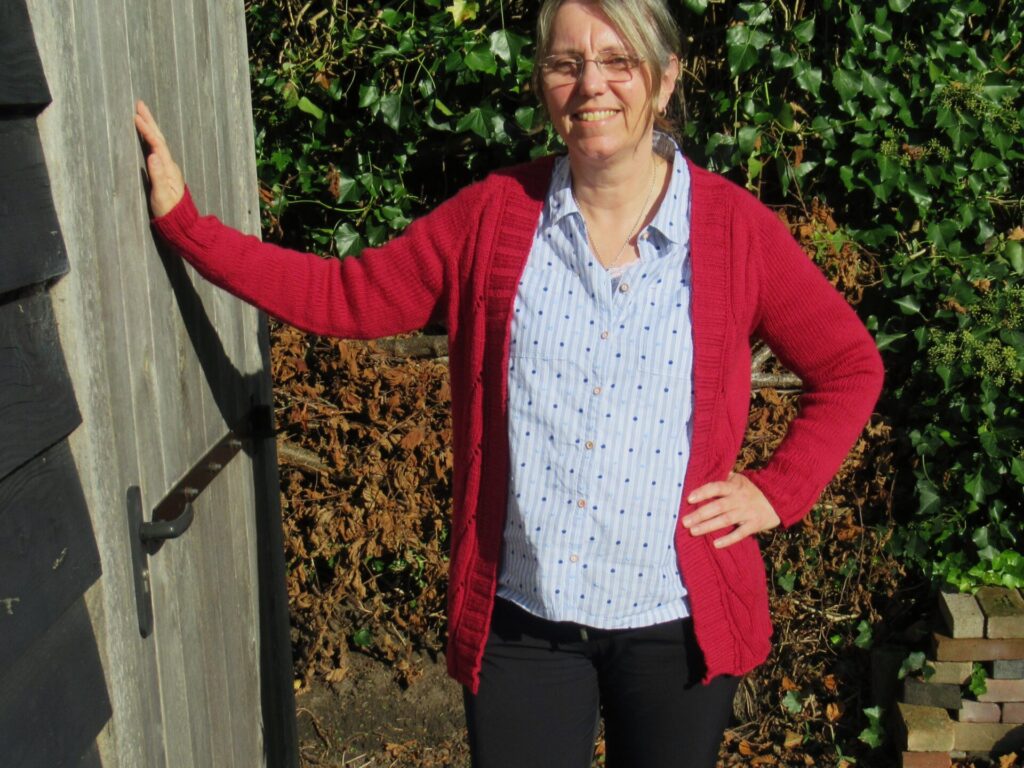
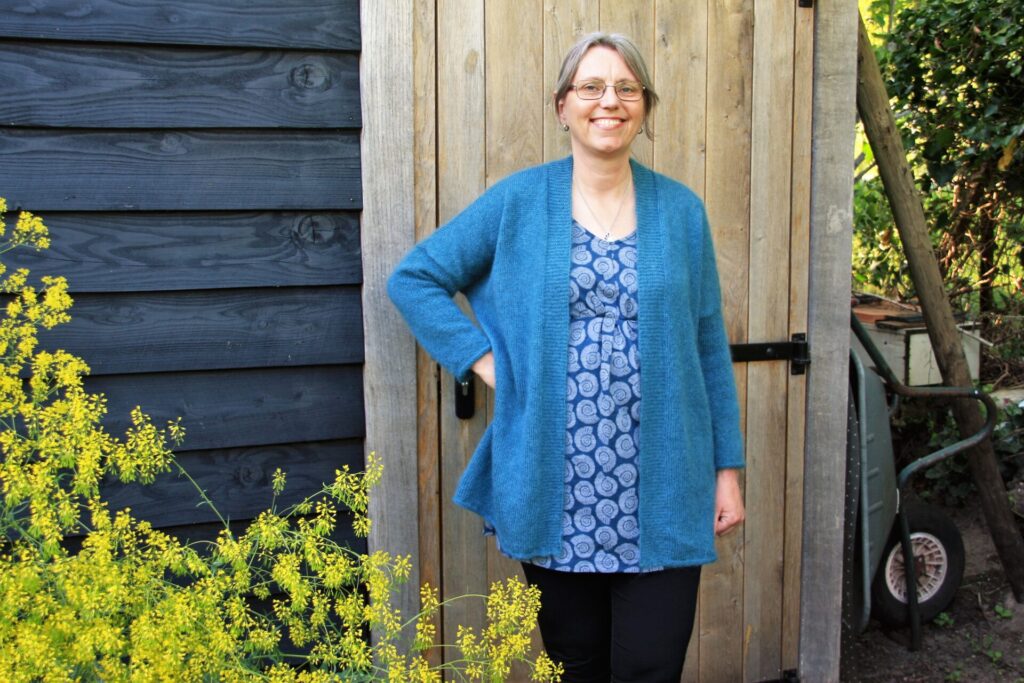
The cardigan is designed to be worn open, with quite a large gap between the fronts. The woman in our story wanted a little more coverage and made hers one size larger than recommended. She also lengthened the cardi by approx. 5 cm/2.5” and gave it long sleeves instead of ¾-length ones. Even though she didn’t feel in the least like a fairy-tale princess, she thought it would be useful to have her picture taken to show you what it looks like when worn:
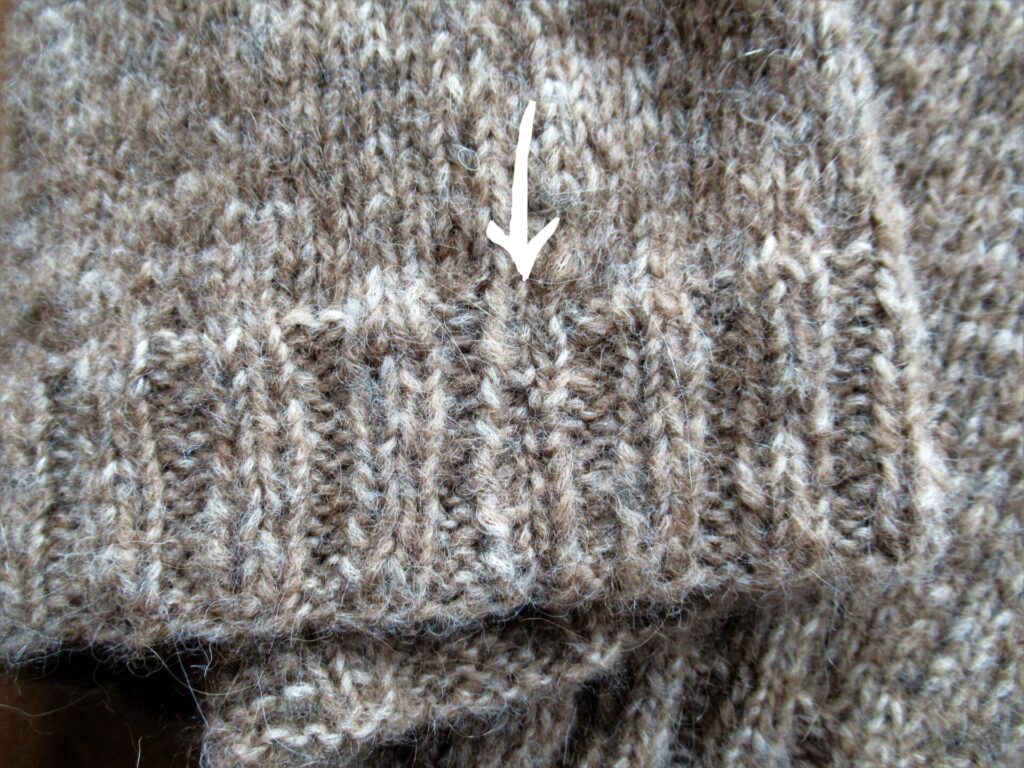
Unable to get the correct row gauge (instead of 24, she got 27 rows to 10 cm/4”), the woman inserted several extra rows without increases (called ‘ghost rows’ by the designer) into the raglan, because otherwise it would be too tight. She was afraid these rows would spoil the nice and regular raglan slant, but they didn’t show at all.
Blue would always remain the woman’s favourite colour, but red was just right for this cardi – and for this time of the year, too.
Knitting the red cardigan had not magicked all the woes and worries of the world away, but at least it had been peaceful and its gentle magic had made the woman feel better inside.
In case you could use some of this kind of magic, too, here are some links:
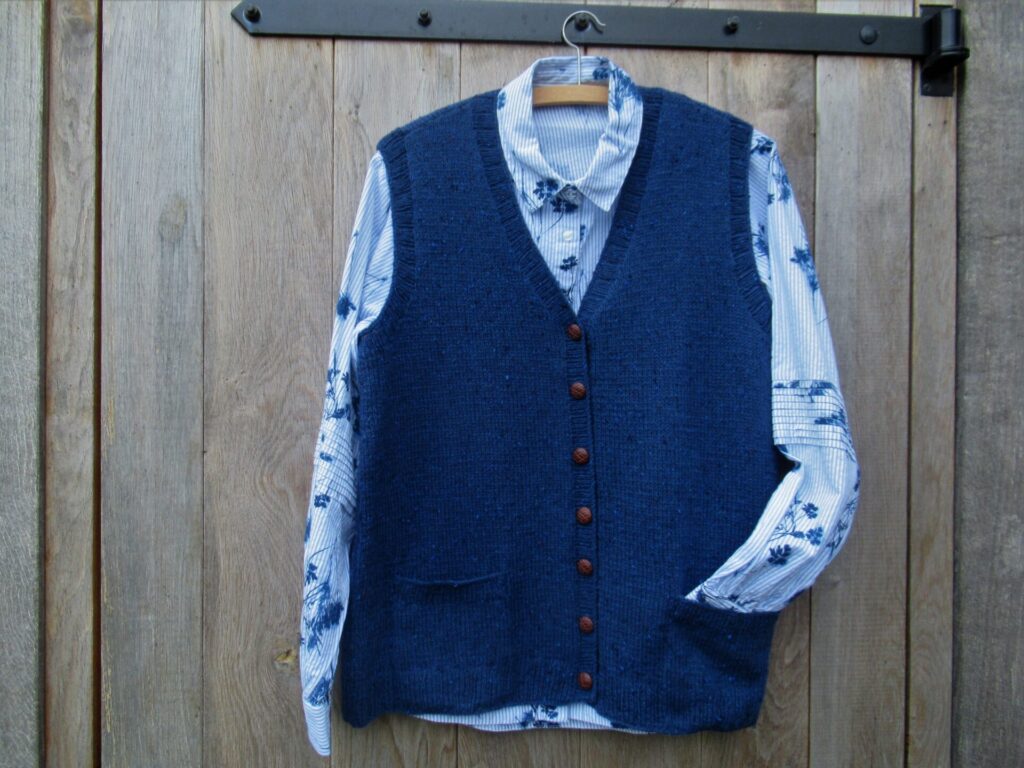
Last week, instead of writing a blog post, I gave myself some extra knitting time. I knit a number of mini-mittens, a sock, and half a sleeve for a cardigan. I also finished my Library Vest, a project I chose partly because of its name.
To me, libraries are wonderful places. I still remember the first time my mum took me to the local library (I must have been about four) – so many books! And you can even take some home! Working in a library seemed a great job, being among books all day and stamping return-by dates in them. At home, I played being a librarian as a child, but apart from working as a library assistant in the evenings for a while to earn some much-needed income as a student, I never became a librarian.
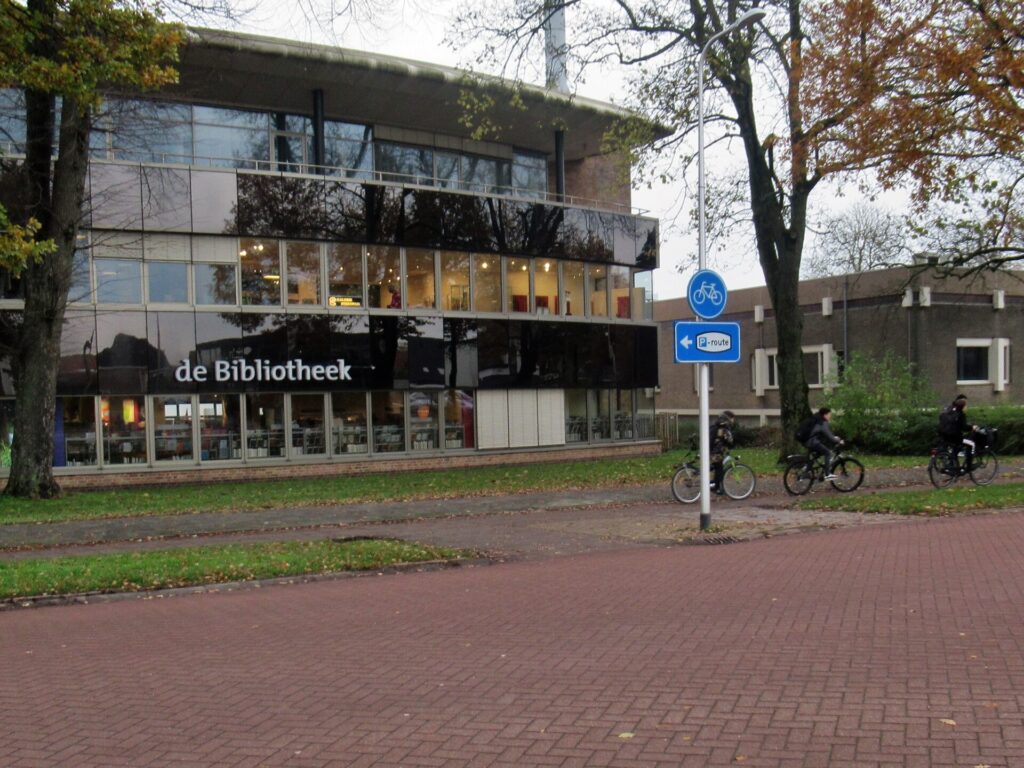
I still love spending time in libraries. This is ‘our’ library in the nearest town, in a building that used to be a bank:
Not terribly attractive on the outside, but very welcoming inside.
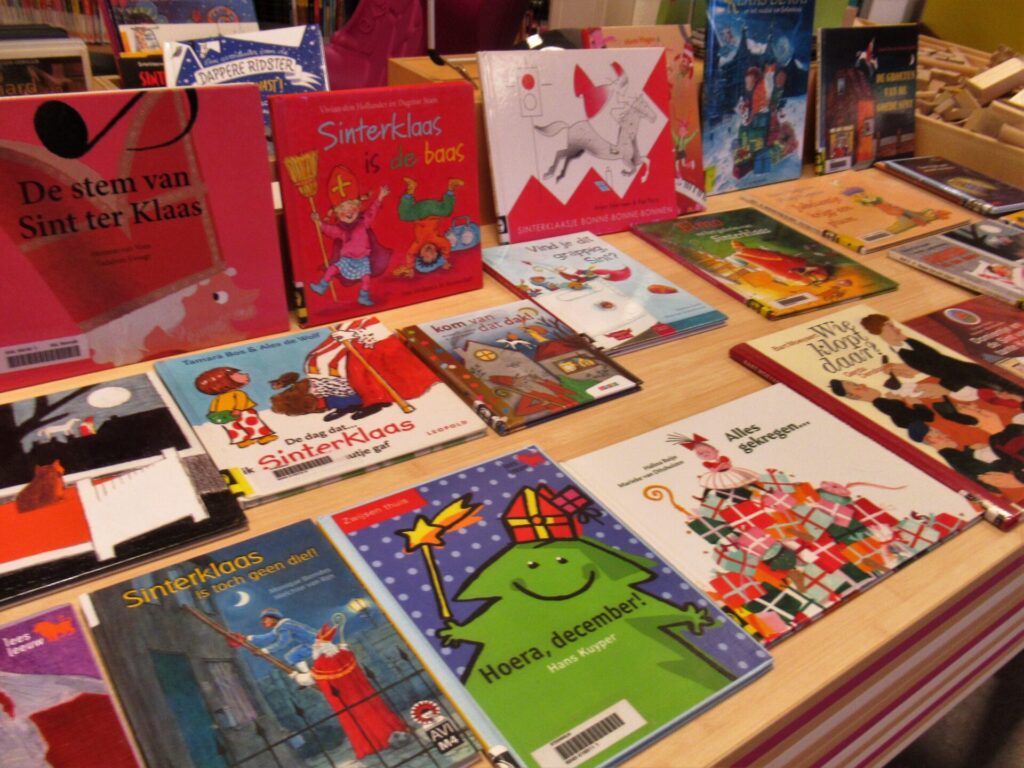
Dotted around the place there are always themed displays of books. Last week, there was a large table with books about Sinterklaas in the children’s section.
Officially Sinterklaas is on the 5th of December, but for practical reasons we are celebrating it tomorrow. Shopping for Sinterklaas gifts, I spent an afternoon in Bolsward, a town with a great independent bookshop and other non-chain stores. Its library is housed in a far more impressive building than ours:
The library shares these beautiful premises with a museum and a café. Part of the café staff have Down’s syndrome, which gives the place a relaxed and light-hearted atmosphere. The young woman serving me proudly announced that the carrot cake they had baked that morning was one of the best ever, so how could I not have a slice?
Well, let’s not forget the Library Vest this whole story started with. It’s a sleeveless garment knit in simple stocking stitch, with a slight A-line, a few short rows above the hem to make it hang more evenly and shoulder seams placed a little forward.
It also has knit-in pockets. It is always hard to sew pocket bands in place neatly, but the pattern has a clever technique for that. Selvedge stitches are added on either side using bits of waste yarn (photo tutorial in the pattern). Perfect!
Beside the name, another reason for knitting the Library Vest was that I had exactly the right yarn for it left over from another project – a soft, navy blue tweed yarn called Lamana ‘Como Tweed’. It looks and feels like a fingering-weight yarn, but knits up at 22 sts on 10 cm/4”. With 120 meters/131 yards to a 25 gram(!) skein it goes a long way.
Instead of the rolled reverse stocking stitch edges that the original design has along fronts, armholes and pockets, I used the same ribbing as along the bottom (k3, p1). The faux leather buttons nicely bring out the tweed neps and somehow I think they are just what a librarian would choose.
If I’d become a librarian, I would probably have lost my job years ago, when almost all of the paid staff were replaced by computers and volunteers. Sometimes I think it might be nice to work in the library as a volunteer, but, hmmm, should I? It isn’t that the volunteers aren’t doing a good job, but it doesn’t feel quite right that this valuable work isn’t valued monetarily. Is this just a Dutch thing, paid staff being replaced by volunteers in certain sectors, or does it happen in other countries too?
I’ll consider volunteering seriously when I retire. Until then I’ll just play being a librarian at home, wearing my Library Vest (pattern here on Ravelry) and my geeky computer glasses.
Wishing you a relaxing yarn and book-filled weekend! Xxx
Autumn has well and truly arrived here, and with it the need for warm and woolly sweaters, scarves, socks etcetera. And I’ve just finished a light and airy summer cardi! I don’t know how other people do it. I mean, summer is the time for knitting with cool and summery yarns, but that means that summer knits are always finished after the season you’d want to wear them.
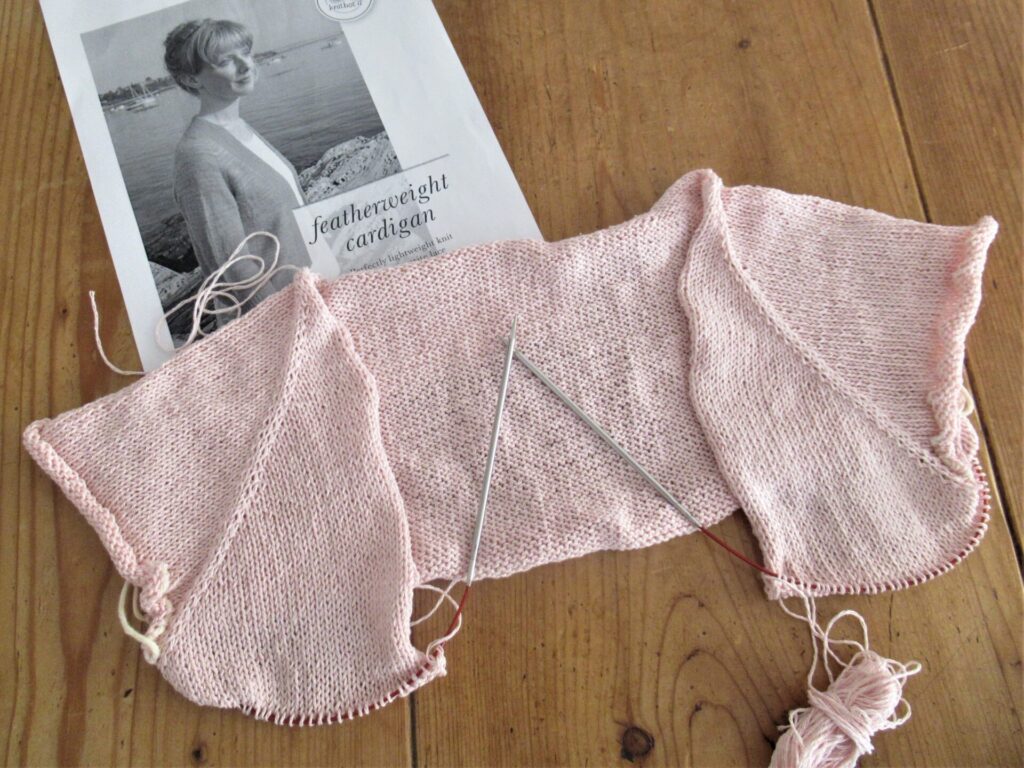
The summer cardi I’m talking about is the famous Featherweight Cardigan, designed by Hannah Fettig. It is knit from the top down.
I am the ten-thousand-two-hundred-and-fifty-first knitter to post her Featherweight on Ravelry. And there probably are thousands more who knit it. That’s mind-boggling. Why is it so popular? I can’t speak for others, but for me it’s the elegant silhouette and the use of fine yarn. And most of all the utter simplicity, which makes knitting it into a wonderfully meditative experience.
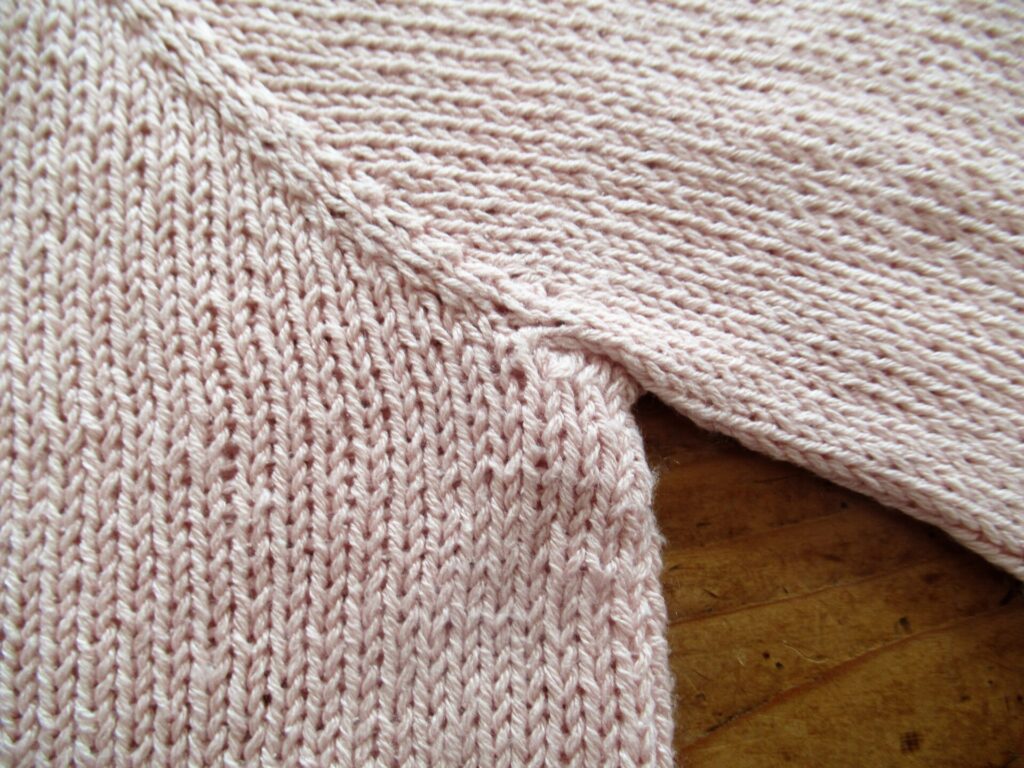
The only slightly tricky part of Featherweight is picking up the underarm stitches. To prevent large holes, I used the technique explained clearly by The Chilly Dog in this YouTube video. Here is a close-up of the end result – pretty neat, isn’t it?
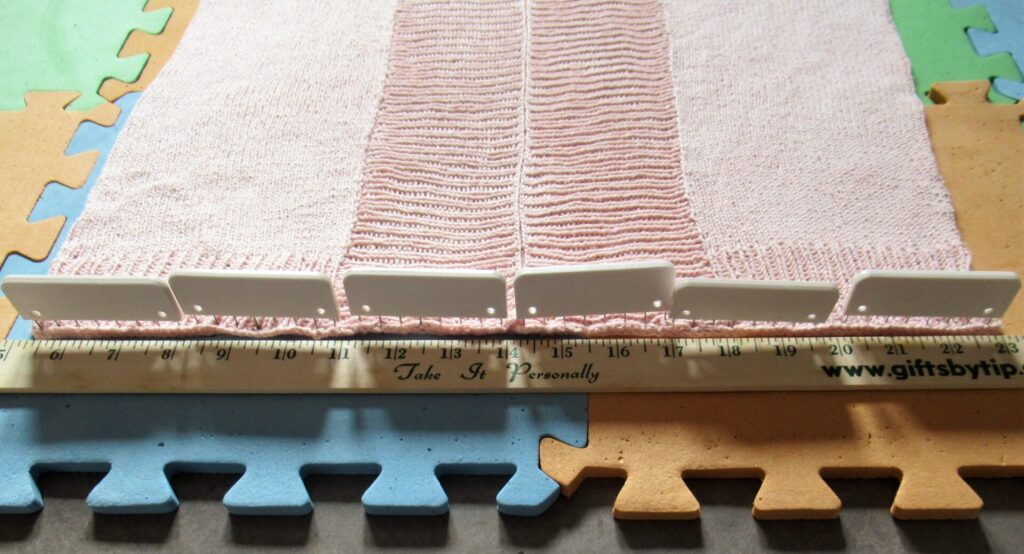
After I’d finished knitting it, my Featherweight looked terribly frumpy. I was especially worried about the bottom edges of the front bands. So, I soaked it in a non-rinse detergent, laid it out flat on blocking mats, pinned the front bands into place using multi-pronged KnitBlockers, and left it to dry.
That did the trick as you can see on these before-and-after pictures (click on them to enlarge), although the edges are not quite as neat as I would have liked them:
Before blocking
After blocking
How could I make them neater next time?
The original is very short, almost like a bolero. I lengthened the body by 11.5 cm/4.5” and made the sleeves a little longer, too. Knit in a fine fingering-weight yarn on 3.5 mm/US 4 needles, the knitted fabric is slightly transparent. Here is my Featherweight all finished:
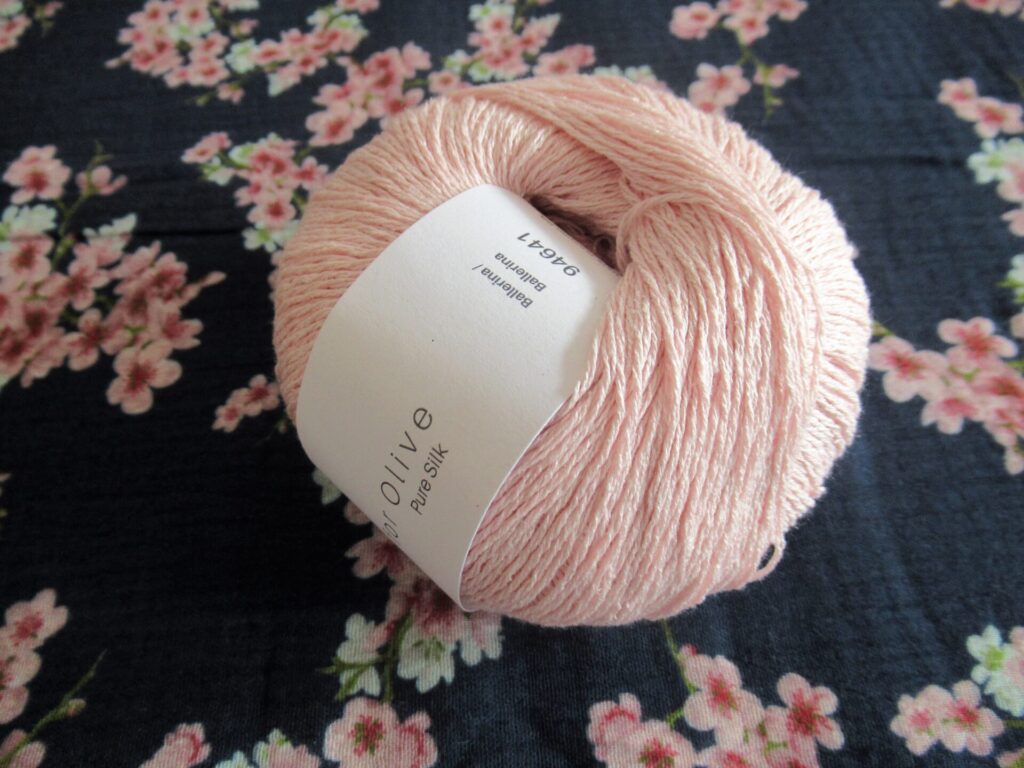
The yarn I used is Knitting for Olive ‘Pure Silk’ in a shade called Ballerina. It is a 100% Bourette Silk (raw silk) yarn with a meterage/yardage of 250 m/273 yds to a 50 gram skein. A big plus is that it’s a butterfly-friendly yarn – the fibres are collected after the silk moths have left the cocoons.
It isn’t the sleek and slithery kind of silk, but matte with a cottony feel. The thread is composed of three very loosely plied strands and is rather splitty. I love the look and feel of this yarn, but its splitty-ness makes it a little harder to knit with.
My cardi isn’t exactly featherweight, but at 203 g it is pretty lightweight. All in all, I’m very happy with it. Only if I were to knit this again, I’d make the armholes slightly larger and try to do something about the edges of the ribbing. Or I’d use a different stitch pattern instead of the ribbing. Perhaps a pretty lace pattern?
I was also going to sew a summer dress to go with it, from the cherry blossom fabric I photographed the skein of yarn on, but, alas, I didn’t get round to it. A sensible person might sew it now, so that it would be finished in time for next summer, but I don’t know if I’m sensible enough for that.
I do know that I feel a sudden urge to knit lots of warm and woolly sweaters, scarves, socks etcetera, etcetera, etcetera. I’ll keep you posted about those. Bye for now! xxx
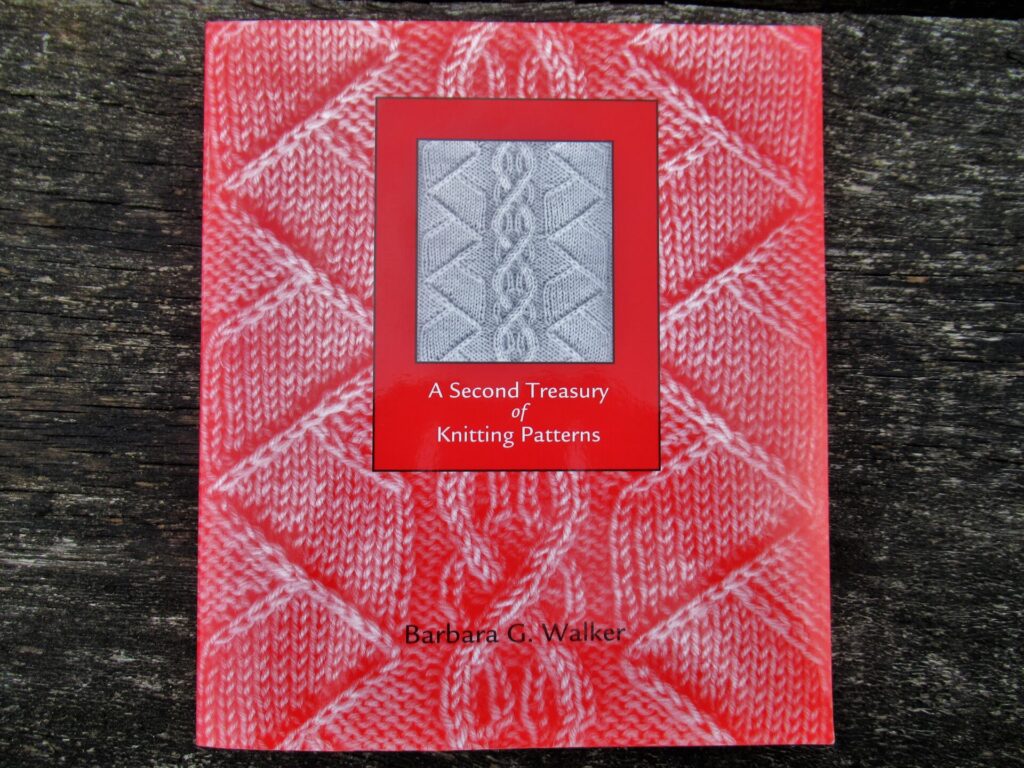
After the red tweedy stocking stitch cardigan I wrote about two weeks ago, I’ve finished another cardigan, again in stocking stitch (stockinette stitch in the US). The design is called Modern Wrapper Fine. According to Barbara G. Walker it is all wrong.
In the introduction to A Second Treasury of Knitting Patterns she writes:
“All-over plain stockinette stitch is dull to look at and boring to work, even for the beginner. Though it may be done entirely by hand, it lacks the inimitable flavor of hand-knitting. A machine can make it very nicely, but the hand-knitter is not a machine and should not try to imitate one.”
“This being so, there is no reason to spend the time and care of hand-knitting on a garment of stockinette stitch. It is a waste of both. The finished garment, which ought to display the knitter’s taste and skill, displays nothing but poverty of invention.” (p. xx)
Oh dear! Was my cardigan a waste of time? Does it display a lack of taste and skill? Let’s take a closer look.
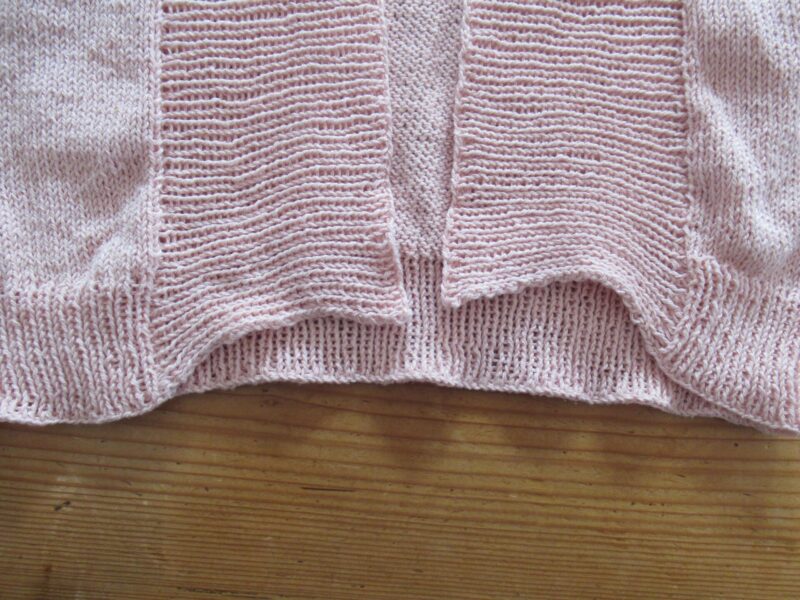
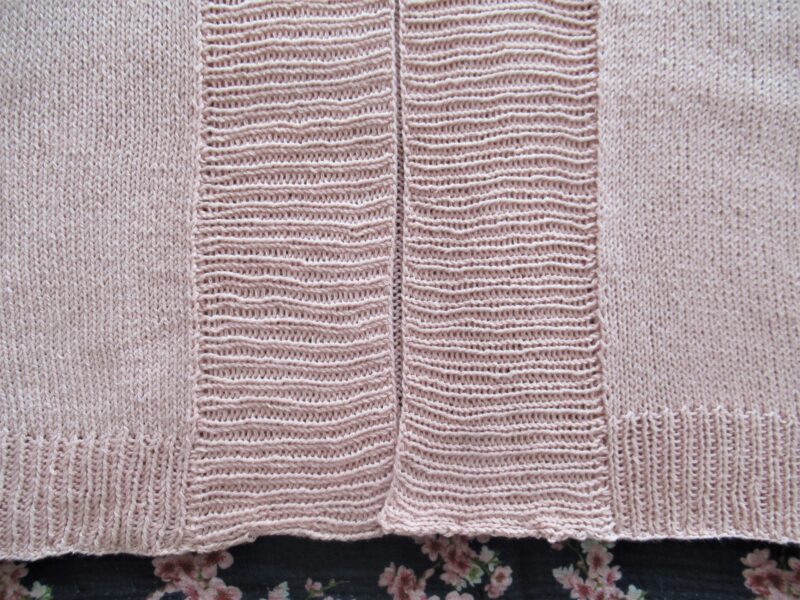
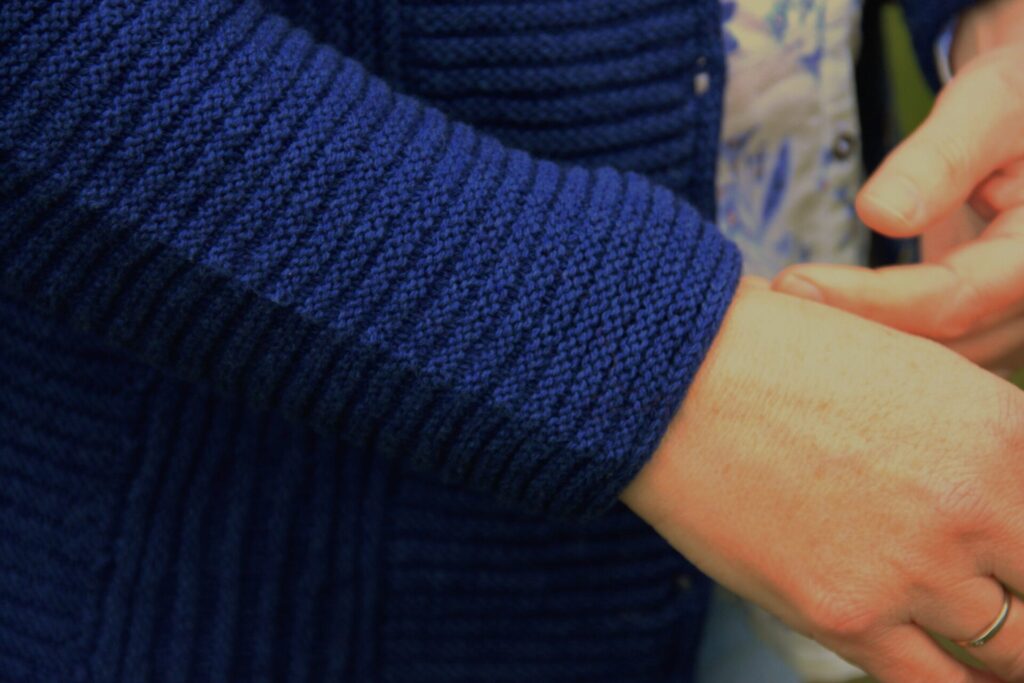
The Modern Wrapper Fine is worked completely in stocking/stockinette stitch, apart from the wide front bands in garter stitch. Back and fronts are knit from the bottom up. It does not have buttons and can be worn open or closed with a nice pin.
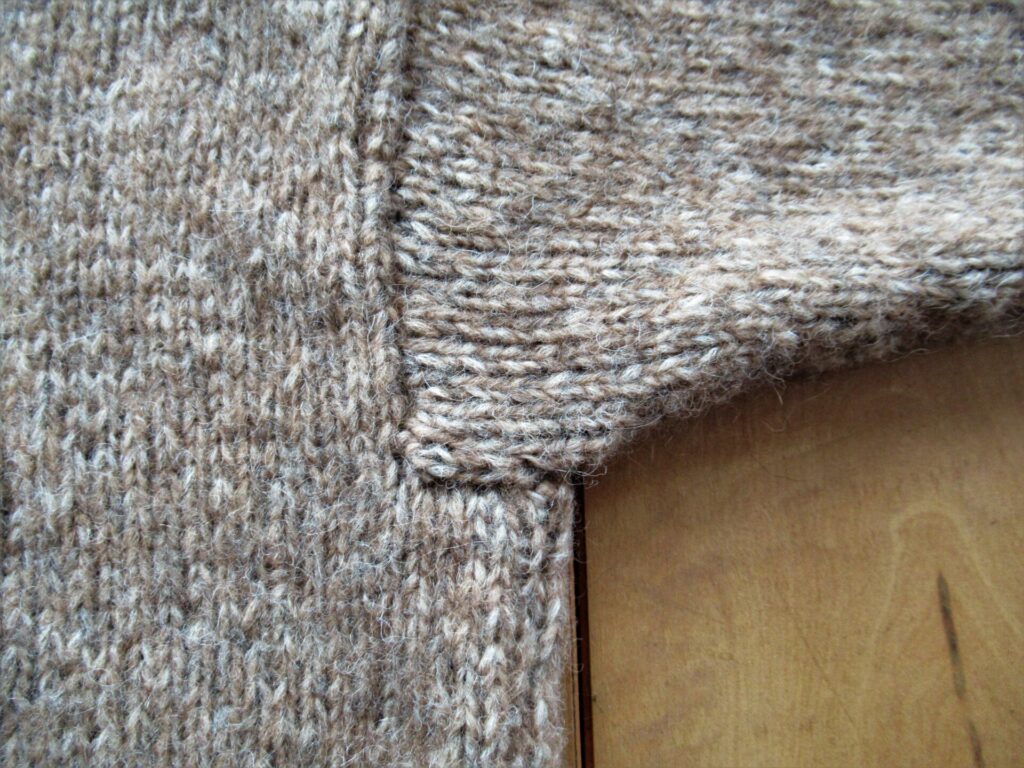
It is oversized, with sloping shoulders that are joined with a 3-needle bind-off. Instead of armholes that curve inwards, the fronts and back taper outwards at the top. This means that the sleeves hang very low. In my case they start halfway on the upper arm.
The sleeves are knit from the top to the cuff, from stitches picked up at the ‘armholes’. Sleeve and side seams are closed with mattress stitch. The hems and the sleeve cuff have a small band of reverse stocking stitch.
The best feature of the Modern Wrapper Fine, in my opinion, is hidden at the back of the neck. There are a few clever short rows there that make the neck band sit perfectly. It doesn’t show very well in the fuzzy yarn I’ve used this time, so here is a picture of the MWF I knit years ago in a different yarn combo.
The details:
Pattern: Modern Wrapper Fine (here on Ravelry). It is a finer variation on the original Modern Wrapper, which is even more oversized (here on Ravelry).
Size made: XS/S. I usually wear size M or L. This garment is really, really oversized. The finished bust in this size is 137 cm/64”. For me that means it has 46 cm/18” of positive ease.
Yarn: 7 balls of Rowan Kidsilk Haze (shade 582 ‘Trance’) and 4 balls of Rowan Fine Lace (shade 933 ‘Aged’) held together. There was quite a bit of yarn left over; my MWF weighs approx. 300 grams.
Needles: 3.25 mm (US 3) and 3.75 mm (US 5)
This project took me over a year from start to finish. Not because it was so time-consuming, but for the silly reason that I made a mistake in the front band and didn’t notice it until I’d finished the entire front.
Kidsilk Haze is notoriously difficult to unravel, and it took me a long time to pluck up the courage to fix the mistake. In the end, the combo of these two yarns wasn’t hard to unravel at all.
So, was this project a waste of time? All I’ll say is that for me, knitting big panels of stocking stitch in these two lightweight yarns was like meditating. For the rest I’ll let the pictures speak.
Now that I’m taking up sewing again and am looking for suitable projects to make, I find descriptions on other maker’s blogs very helpful. And also pictures of the finished items worn by ordinary people (not photo models.) I hope my descriptions and pictures will be helpful in the same way.
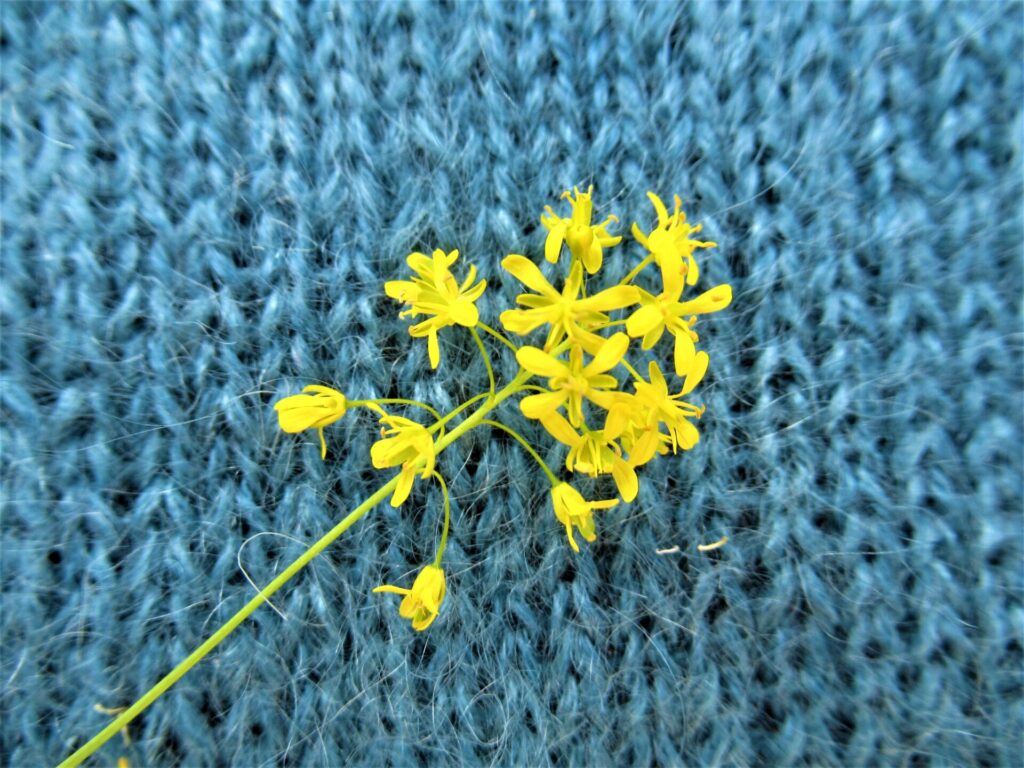
The yellow-flowering plant in the background is woad, the dye plant I grew as part of a community project. I was going to write about it, too, today, but on second thoughts I’ve wittered on long enough already and it really deserves a post of its own. I hope to come back to it soon.
Instead of just showing you the cardigan I’ve designed and knit for our daughter, I thought it might be more interesting to tell you how I did it.
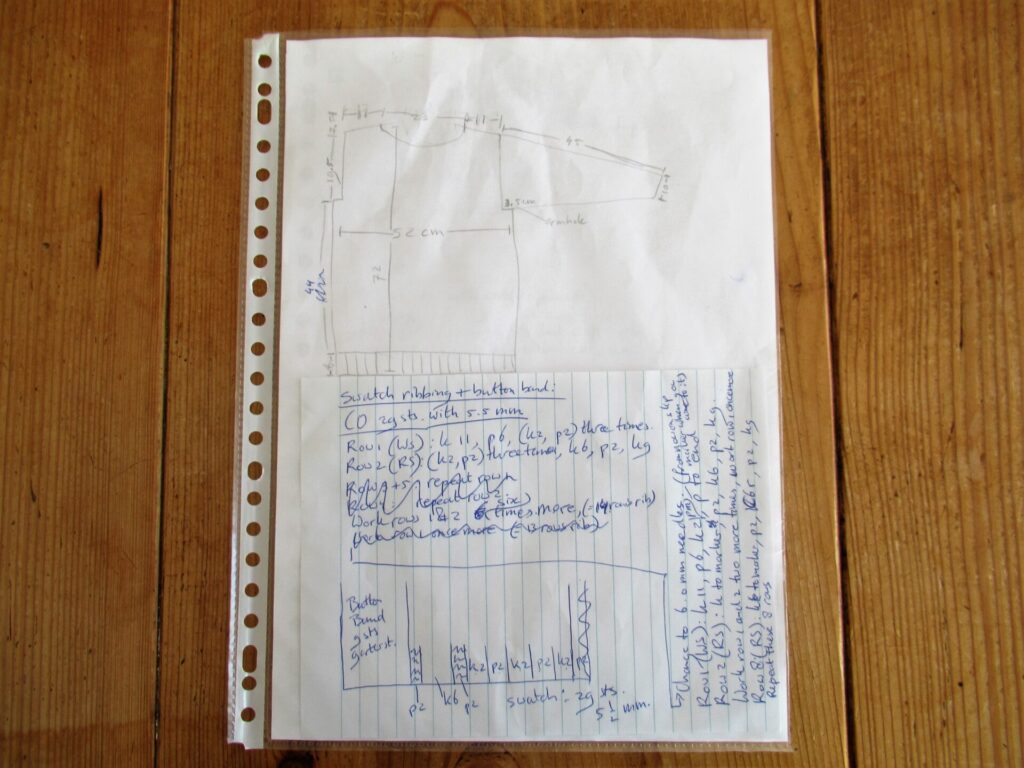
There are many approaches to designing things, of course. This is merely my simple, practical way for designing a sweater knit from the bottom-up in pieces sewn together later. I’ve developed this method over the years and have tried to summarize it in 10 (hopefully easy to follow) steps. So, here we go.
How to Design Your Own Sweater in 10 Steps:
1 – Decide what you’re going to make For whom would you like to knit a sweater: For yourself? A loved one? What type of sweater would you like to make: A pullover? A cardigan? A summer top?
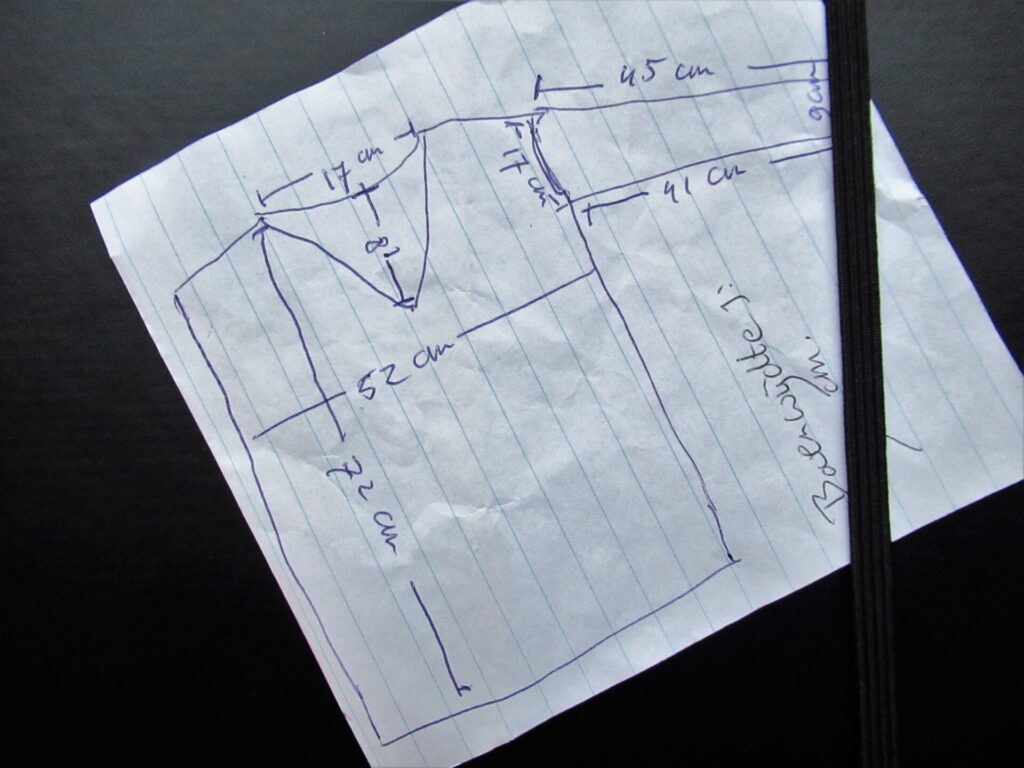
2 – Take measurements and draw a diagram Find a garment with approximately the fit you’re looking for and measure:
Chest width
Length
Armhole
Neck width and depth
Width at shoulders
Sleeve length
Sleeve circumference at wrist
Any other things you think may be useful
The chest/shoulder/armhole part is the most important. The rest is easy to adapt. Draw a diagram incorporating these measurements. It doesn’t need to be to scale, it’s just for your own reference. This is mine:
3 – Think about what you want and draw another diagram Things to consider are:
Details: buttons, pockets, stitch pattern, ribbing or no ribbing…
Add any relevant measurements to your new diagram.
Tip: If you have never designed anything before, keep it simple. If you have a little experience, you could set yourself a challenge. I used a very simple armhole and sleeve cap:
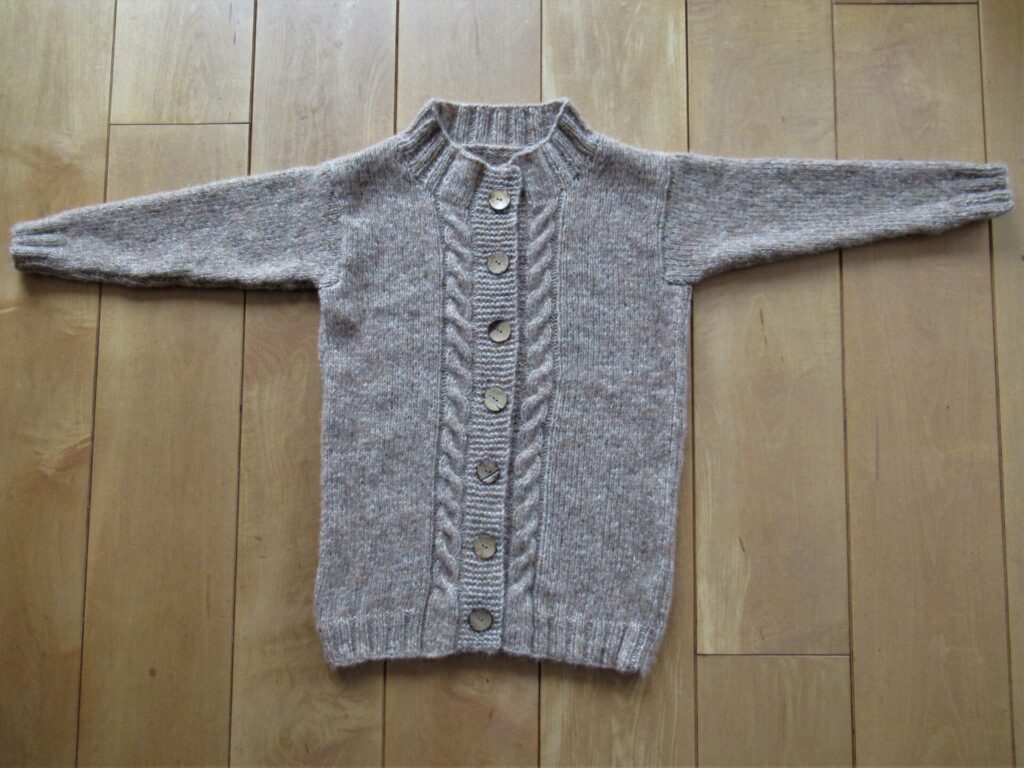
And gave myself the challenge of adding a cable, flowing from the ribbing at the bottom and into the neckband.
Another challenge I set myself was matching the ribbing of front and back so that the seam would be near invisible.
4 – Choose your yarn and work out approximately how much you’ll need If you’re an experienced knitter you’ll probably have some idea. It also helps to look at other people’s projects from the same yarn on Ravelry. Find a few similar garments in a similar size and check how much they took. Then add some extra for swatches and to be on the safe side.
Note: I did it the other way around: Fell in love with the yarn first and bought a generous quantity. Far too generous as it turns out. Never mind – it only means that I have enough left for a hat and a scarf.
5 – Swatch a – First swatch to decide what needle size you’re going to use: how open, drapey or dense do you prefer your knitted fabric for this project? Knit generous swatches – aim for at least 12 x 12 cm/5 x 5”. Wash your swatches and leave them to dry flat, or block and/or press them, just like you intend to treat your finished sweater. b – Then knit more swatches. This time in different stitch patterns and ribbings you might want to use. Again wash/block/press them.
6 – Decision time Decide what needle size(s) and pattern stitch(es) you’re going to use, how wide your ribbings and button bands (if any) will be, exactly what your neckline is going to look like, where any pockets will be placed etc. Add details to your diagram if you think that will be helpful.
7 – Start knitting the back Using your swatches, calculate how many stitches you need to cast on. Do you need to increase or decrease for, say, an A-line or waist shaping? Write down everything you do and keep your notes together. It isn’t necessary to work everything out beforehand. You can think about the armhole, neck and shoulders while knitting.
8 – Do the maths for the front(s) If you’re designing a cardigan with button bands, make sure they overlap. Work any buttonholes in the second front. Think deep about your neckline, and work out how to get what you want.
9 – Work out the sleeves How long? How many rows to armhole? How many stitches do you start with? How many do you need at the armhole? Spread the increases out over the length.
10 – Work out and knit the final details Now all you need to do is wash, block and/or press your pieces and seam everything together. Add button bands (if not incorporated), patch pockets, neckband etc.
There, all done!
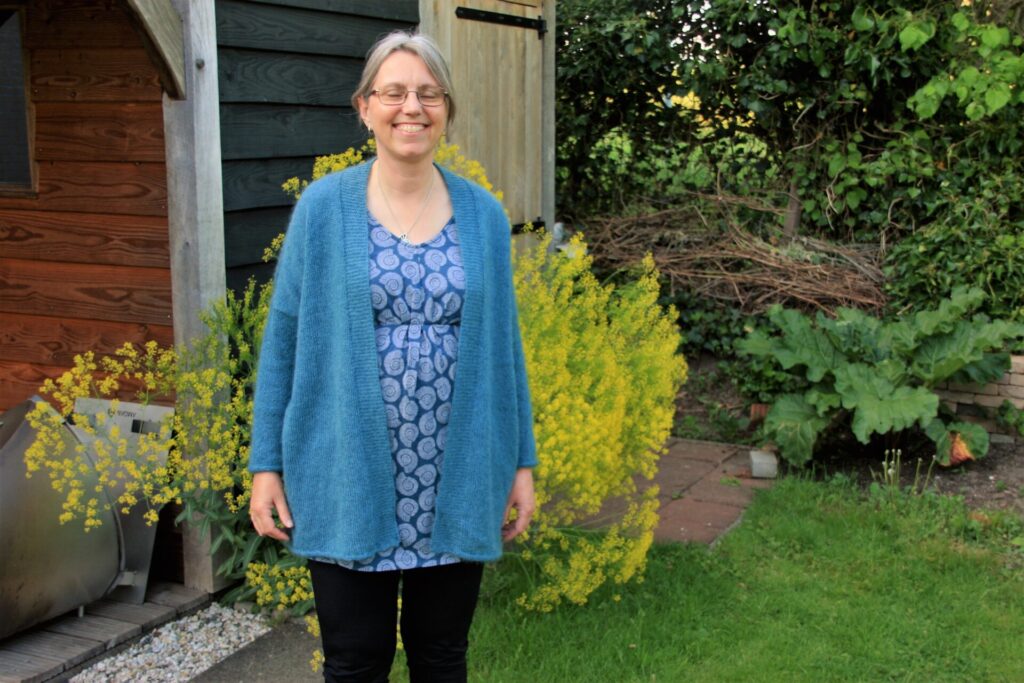
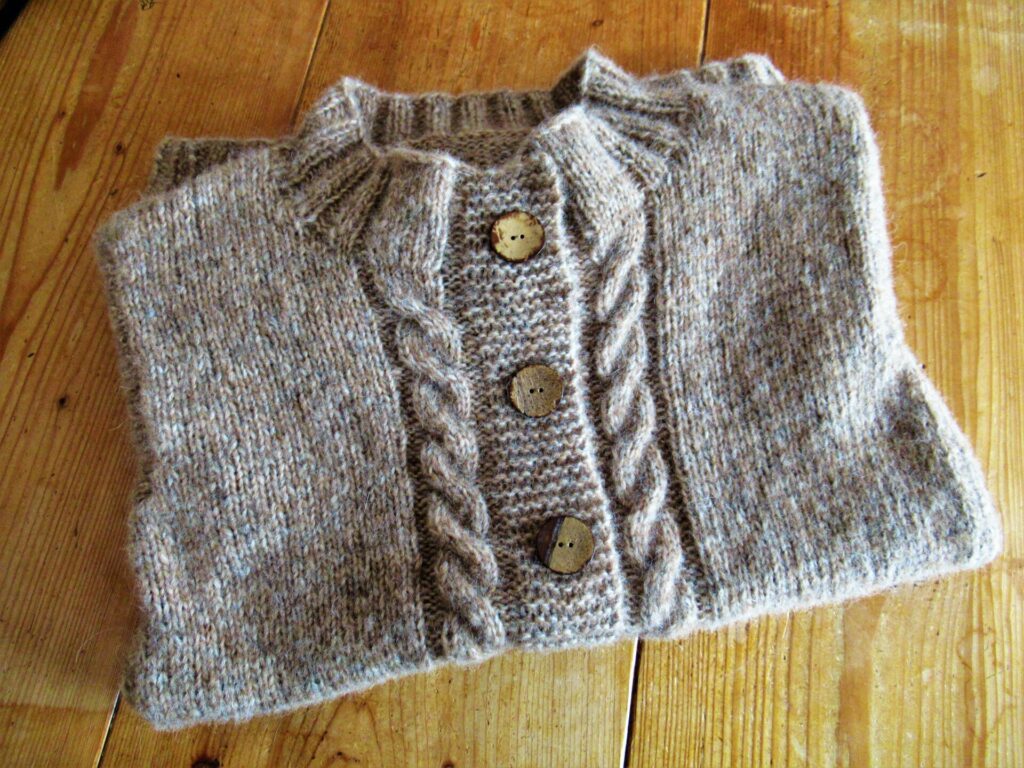
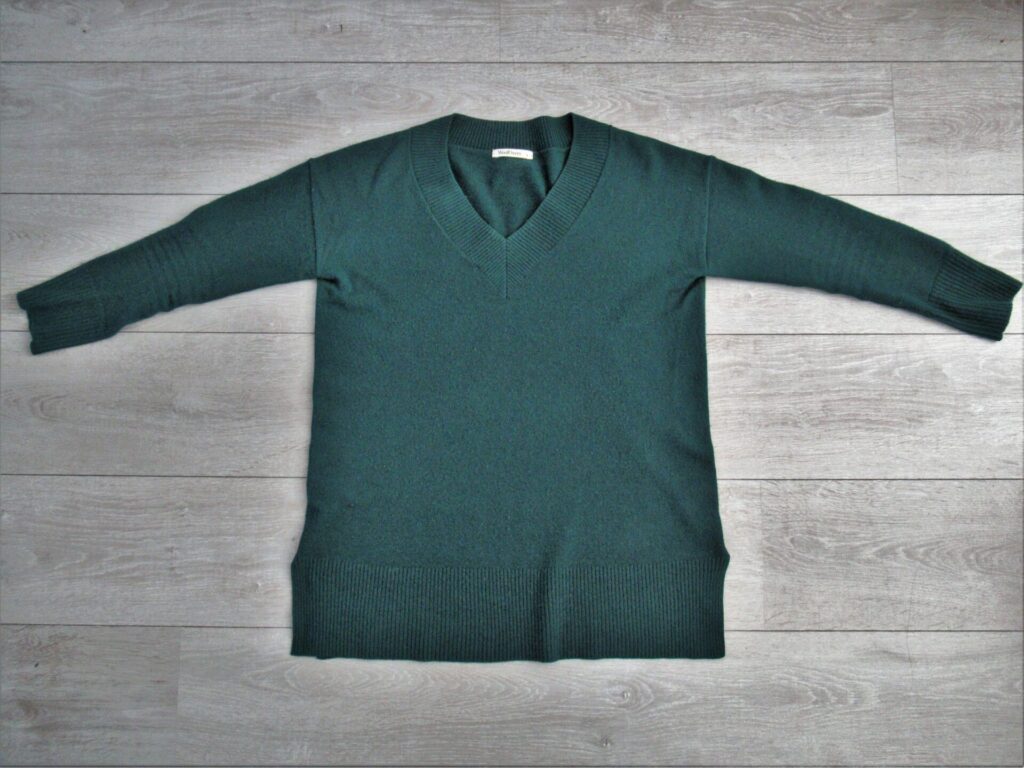
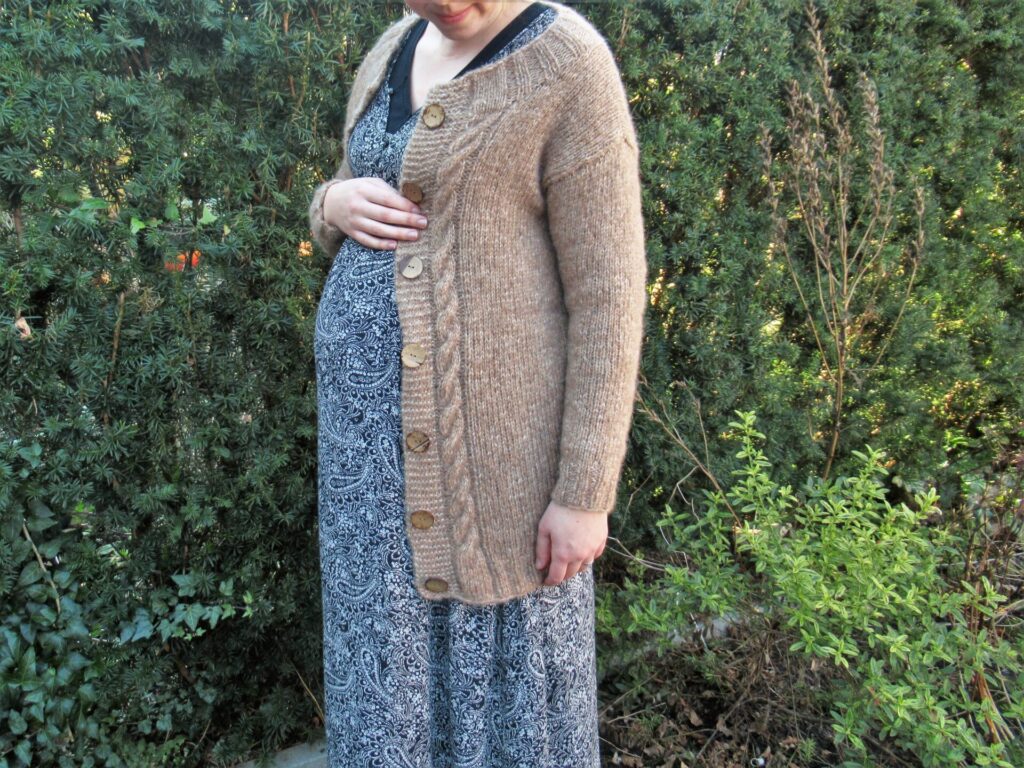
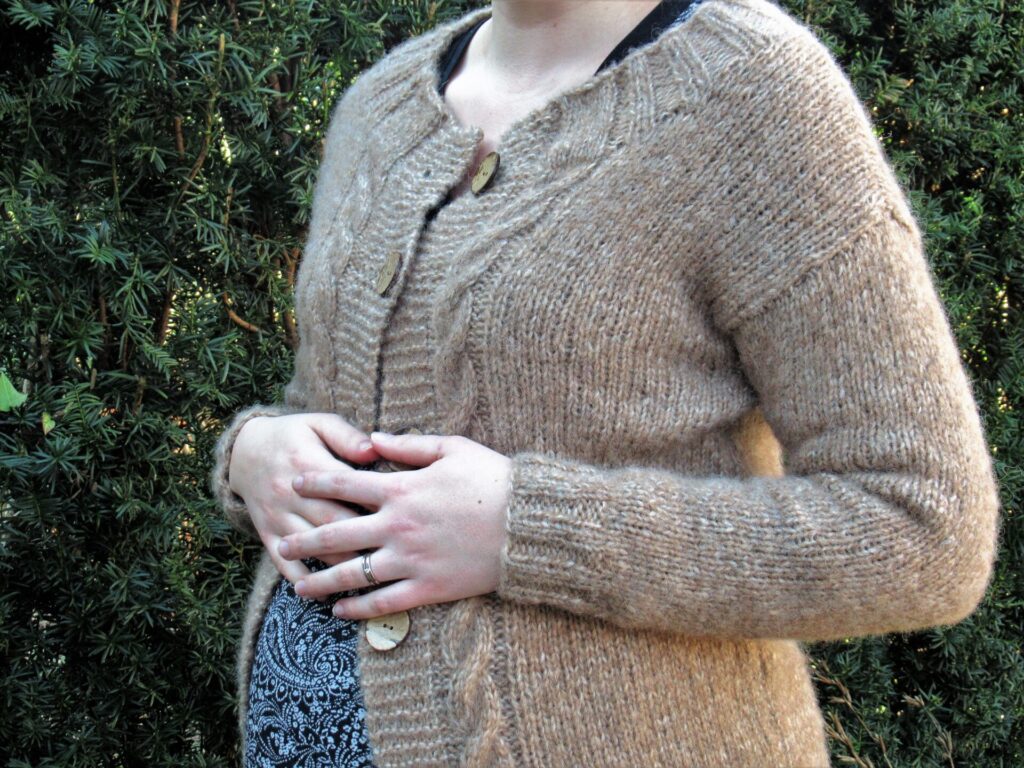
Starting from a deep green, finely knit, shop-bought V-neck pullover, I arrived at a fawn, chunky, hand-knit cardigan with a round neck and cables along the fronts.
It does not fit over our daughter’s already impressive bump, but will keep her back and shoulders warm.
With quite a few weeks to go, how much more will that belly grow?
Well, I hope this all makes sense. Do you sometimes design your own sweaters, too? Is your method very different from mine? If you’ve never designed anything yet, why not give it a try? Your sweater may not turn out perfect or exactly how you envisioned it, but it will be uniquely yours.
Thank you for your kind comments about last week’s autumn walk. Today it’s all about knitting again. Looking through my photos I have a feeling it may become a longish post, so why not make yourself a nice cup of tea or coffee before diving in?
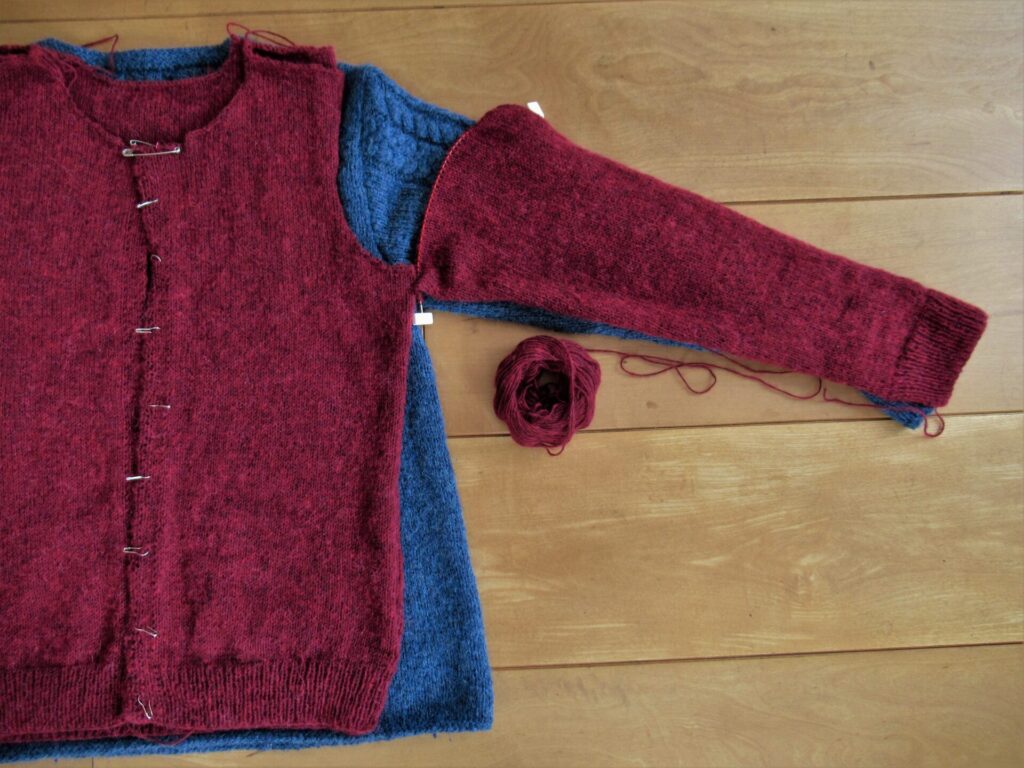
I’ve just finished a cardigan for our daughter and thought I’d talk about that for a bit. It’s the cardi I had to unravel the front of because I hadn’t read the pattern properly. Well, that was quickly remedied and it was soon time to check the sleeve length.
I didn’t have our daughter or any of her clothes at hand to measure the length, but I found an old sweater of mine she often borrows that I thought had exactly the right sleeve length.
It’s a different shape and size, but that didn’t matter. As long as the measurements across the chest and along the underarm were the same it would be all right (I hoped). Measured by the old sweater, the sleeve had reached the arm hole and the starting point of the sleeve cap. The sleeves were soon finished and it was time to go looking for buttons.
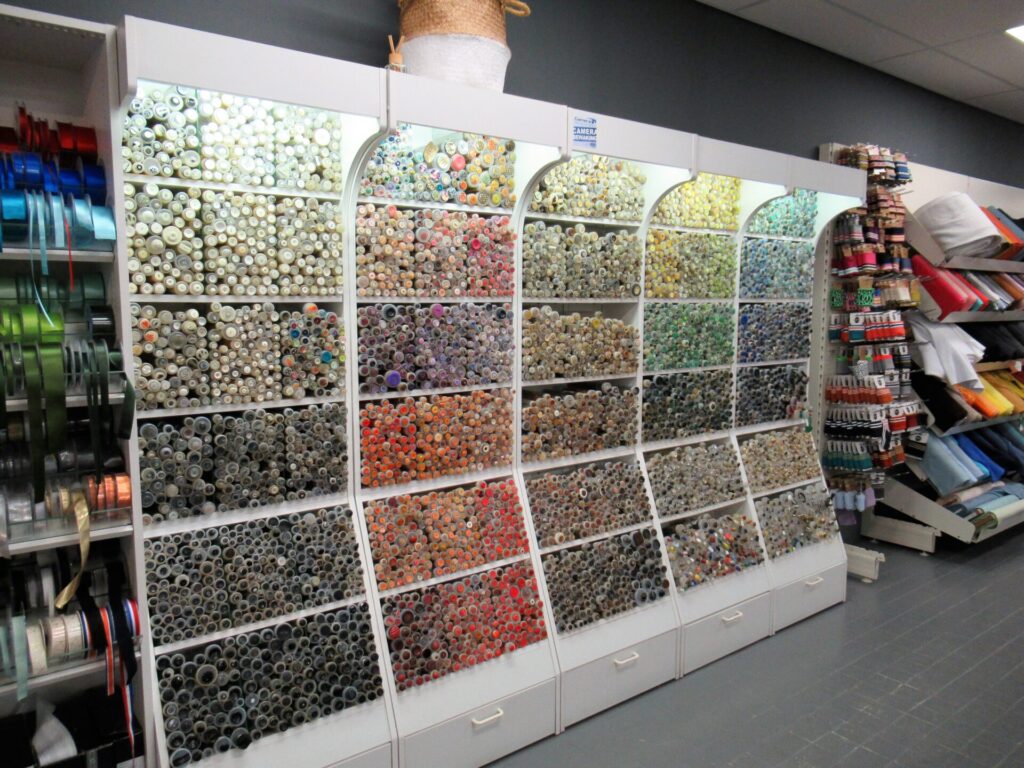
I popped into a large fabric store while we were on our way to visit our daughter and was greeted by a colourful wall of buttons. (For those of you in the Netherlands, it is just outside Deventer. There is nothing on their website but the address and opening hours, but as there are so few fabric stores left, I thought I’d include a link here anyway.)
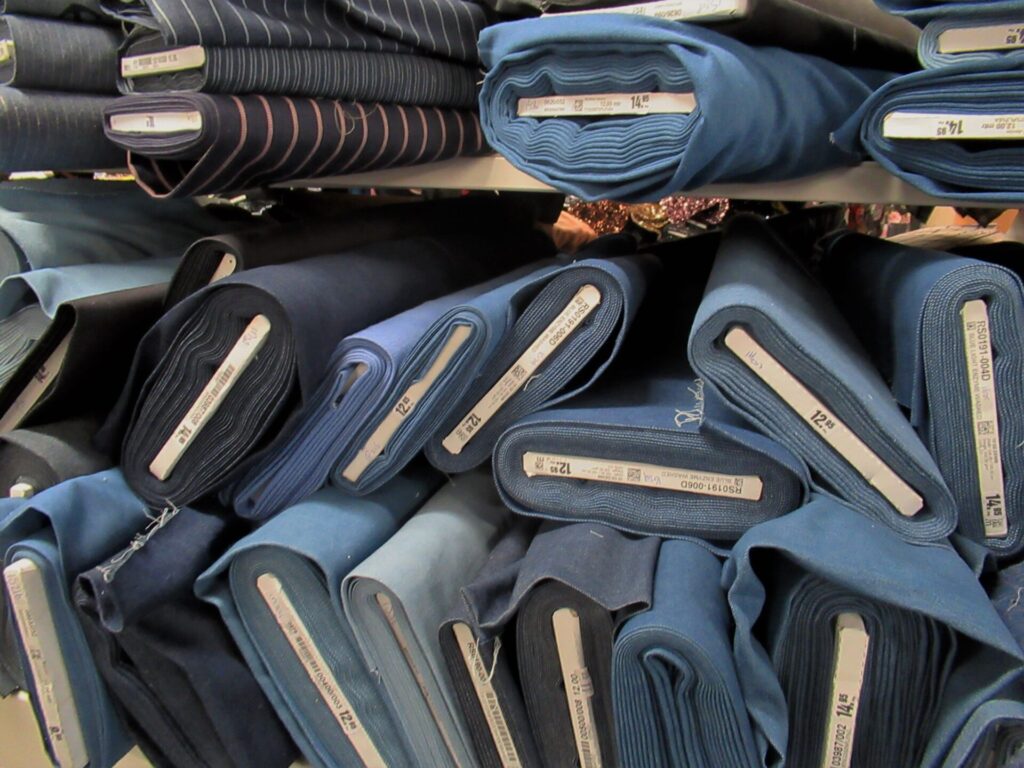
I tried to be quick because my husband was waiting outside. He is always patient, but I didn’t want to keep him waiting too long or arrive too late. I got briefly distracted, though, by the displays of satin ribbons…
… denim fabrics…
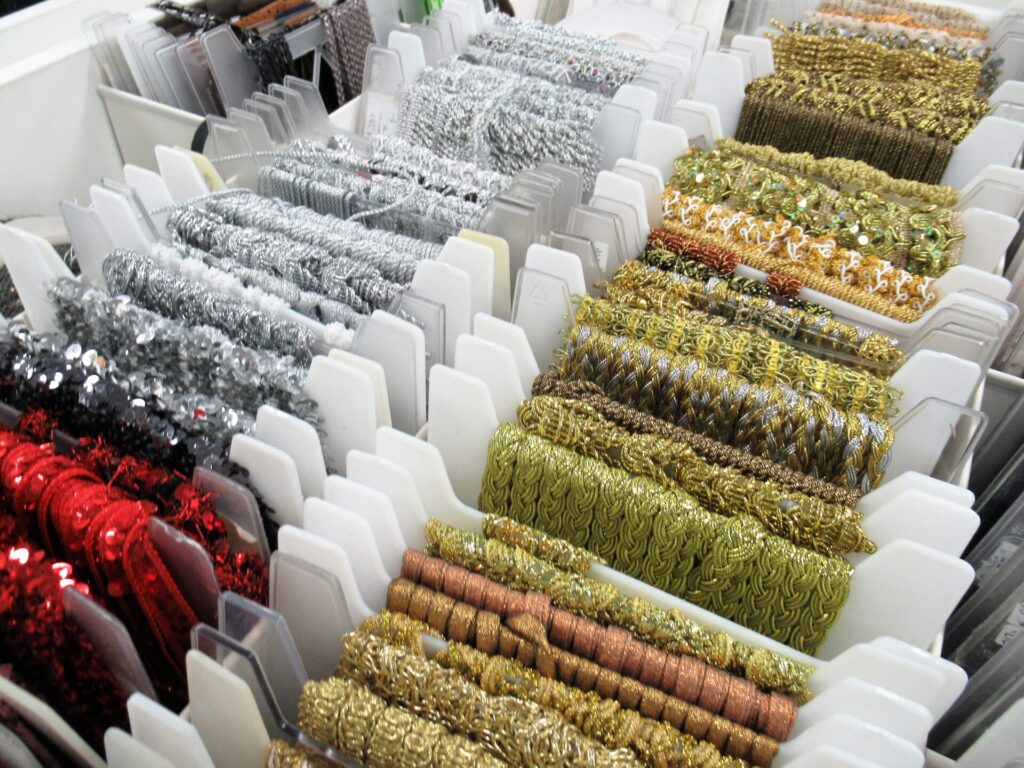
… and bling-bling.
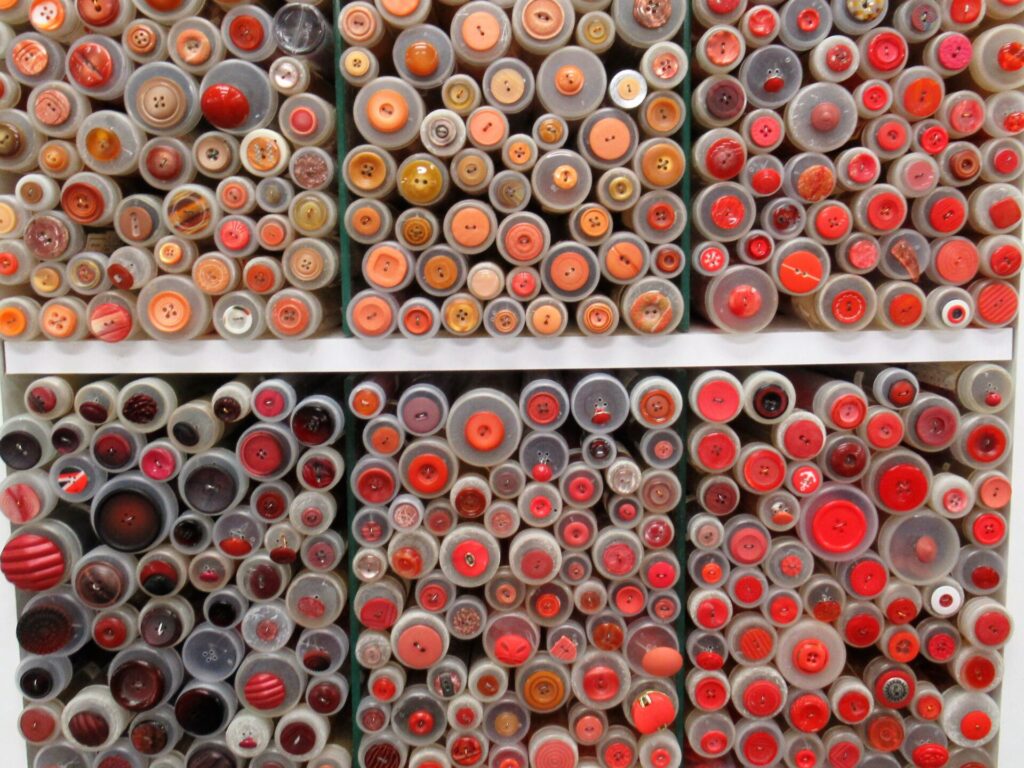
‘Come on, just focus on the buttons, you can do it,’ I told myself. I looked at the wooden buttons…
… as well as the red ones.
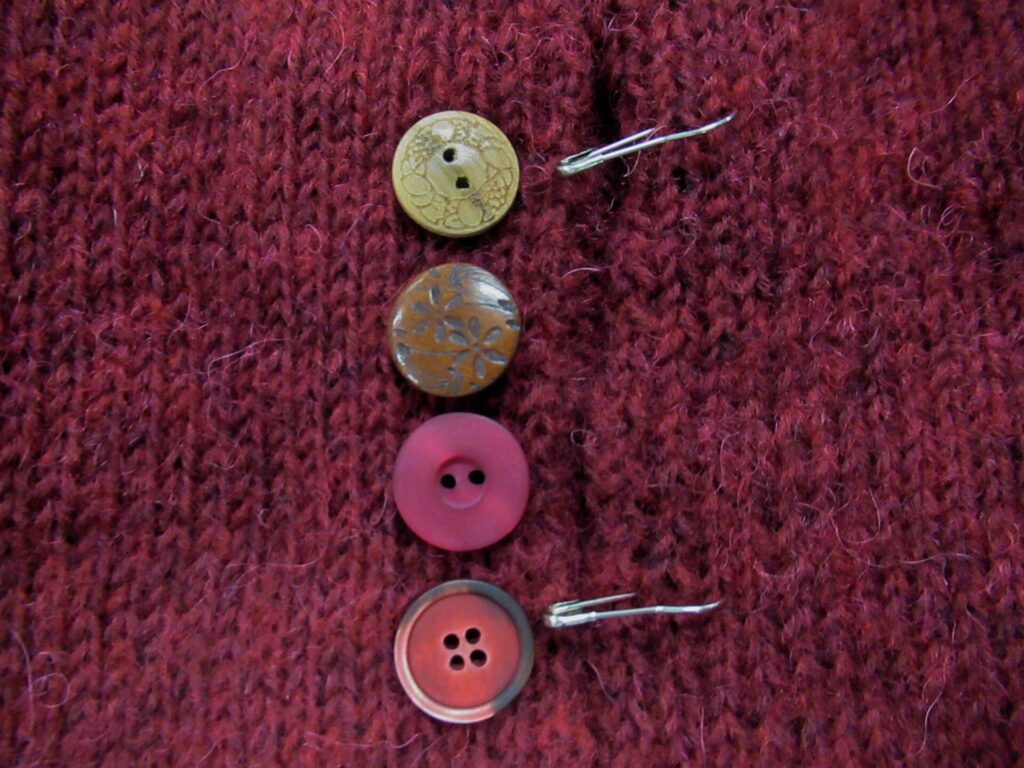
So much choice! These 4 seemed most suitable.
In the end I chose the colour that matched the yarn best, the bottom one.
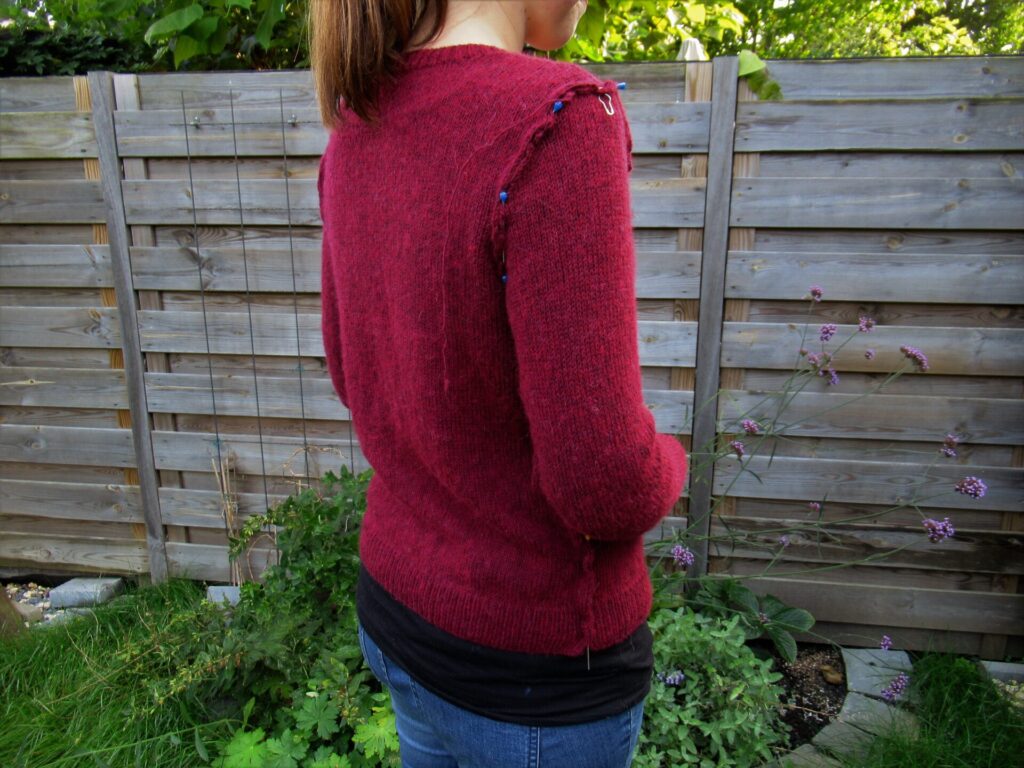
Time to see if the cardi fit and the sleeves were the right length. I pinned it together on the outside to make it easier to try on.
Yes, perfect! And the sleeves were the right length too.
Now all that was left to do was seam everything together.
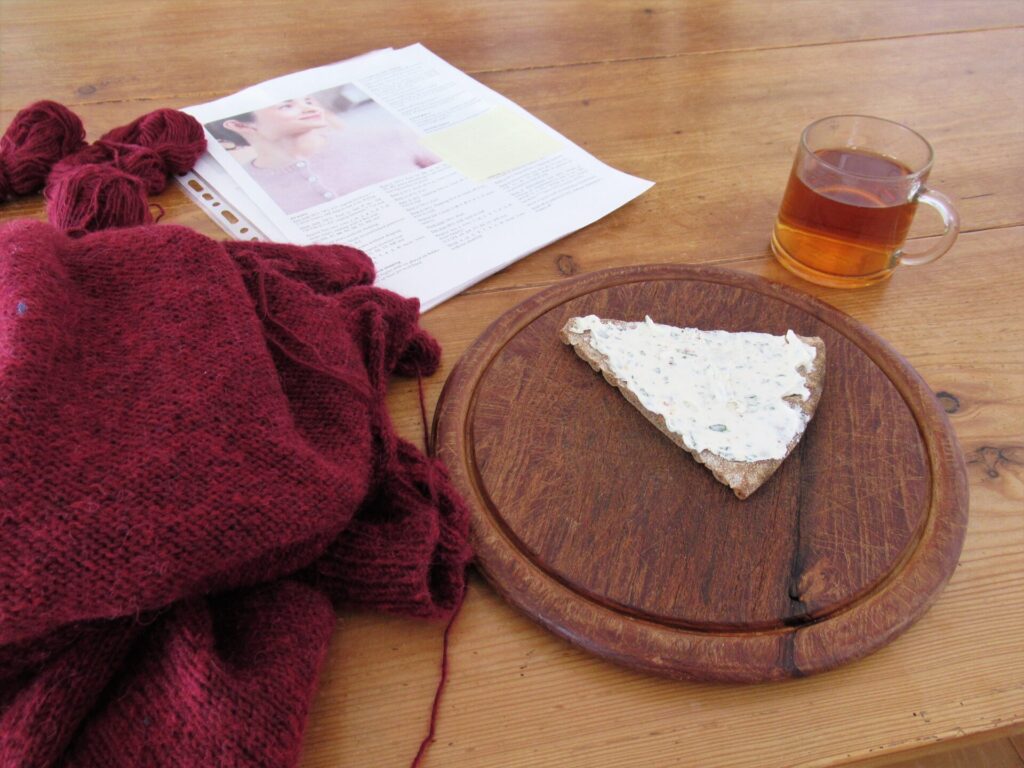
My waistbands are getting a little tight and I don’t think it is because my clothes have shrunk. I’ll really need to watch what I eat for a while.
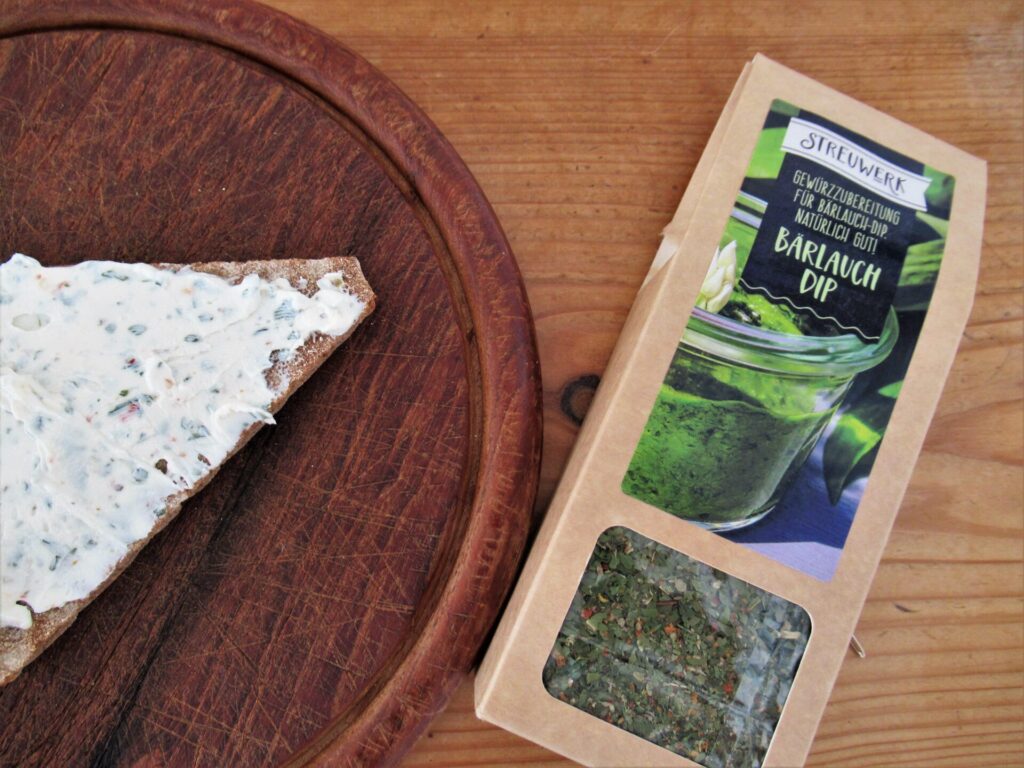
For a low-calory, high-protein spread, I emptied a tub of no-fat fromage frais into a sieve lined with a piece of moist cheesecloth, placed the sieve on a mixing bowl and left it in the fridge overnight. The next morning it had a nice spreadable consistency and I mixed in a couple of tea spoons of dried herbs and some sea salt.
I used a tasty German mixture with wild garlic and chili flakes that we got as a gift, but almost any fresh or dried herbs will do.
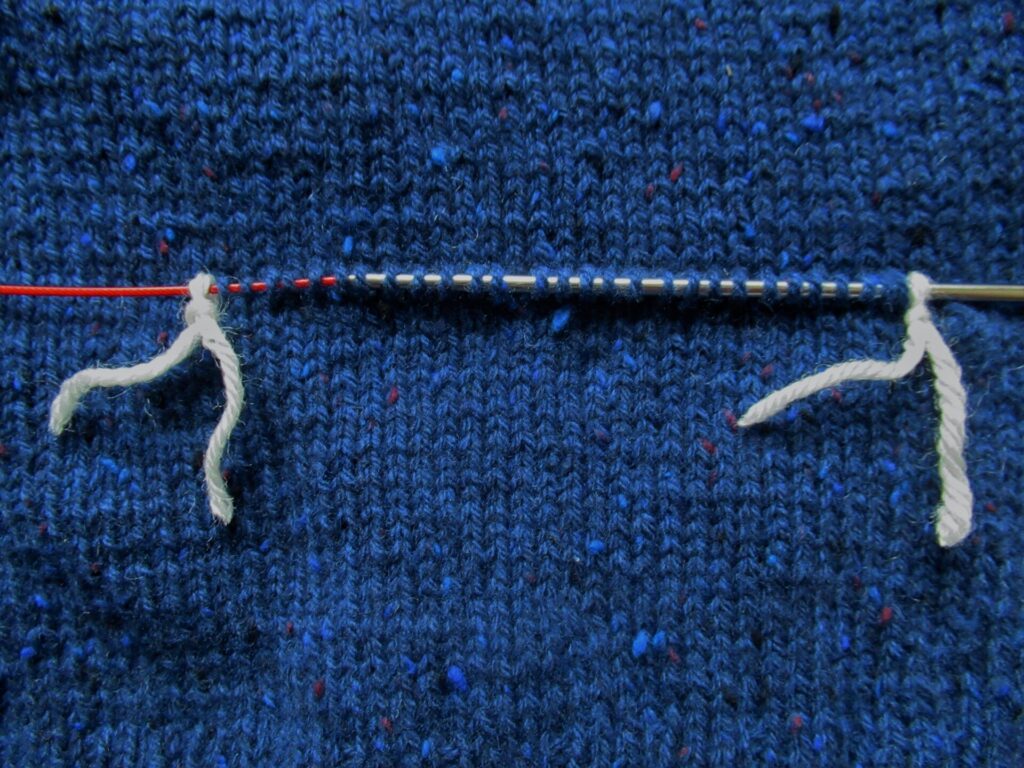
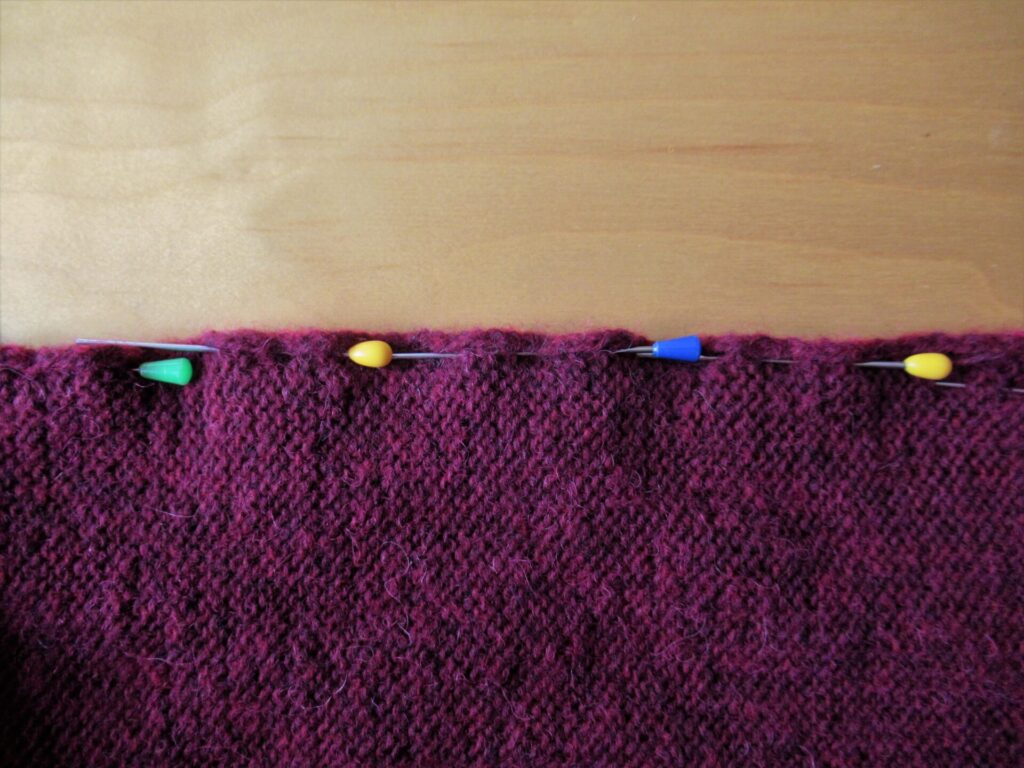
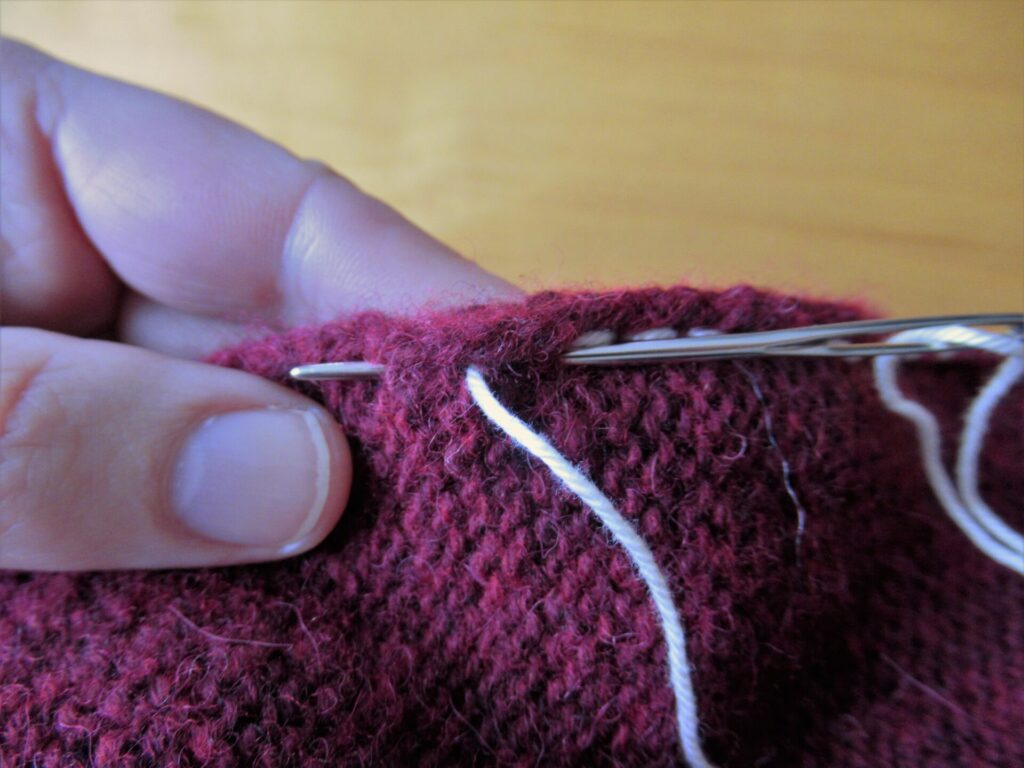
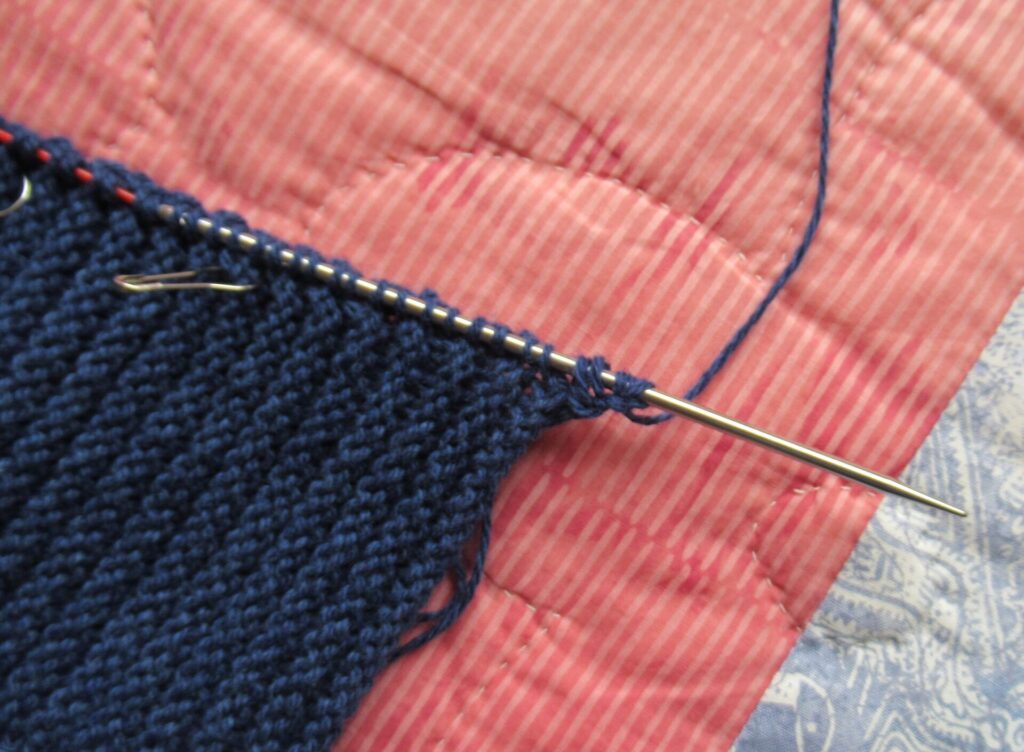
Well, back to the cardigan. To sew everything together I used the ordinary back stitch. At least I thought it was ordinary. But a while ago I talked with someone who always used mattress stitch and didn’t know how to do the back stitch. For her, and others who have never back stitched their knitting together, I’ve sewn a part of the side seam with a contrasting thread and taken pictures.
Mattress stitch is worked from the outside. It is very precise and best for very delicate knitting and for matching up stripes. Back stitch is much faster and works well for anything else. It is worked on the wrong side of the knitted fabric. First everything is pinned together with the right sides together.
(My pins come from the chemist’s and are meant for fastening old-fashioned hair rollers.)
It’s very simple, really, but not so easy to put into words. I hope the picture below is clear enough.
Back stitch is worked from right to left, holding the edges of the fabrics up. What you do is, basically:
Insert your needle from nearside to far side about 0.5 cm/¼ inch to the right from where the thread came up,
*Insert the needle from far side to near side about twice the distance to the left.
Pull the yarn through and insert the needle from near side to far side again through the same hole where the yarn originally came up* (where the vertical white thread is in the picture)
Repeat from * to *.
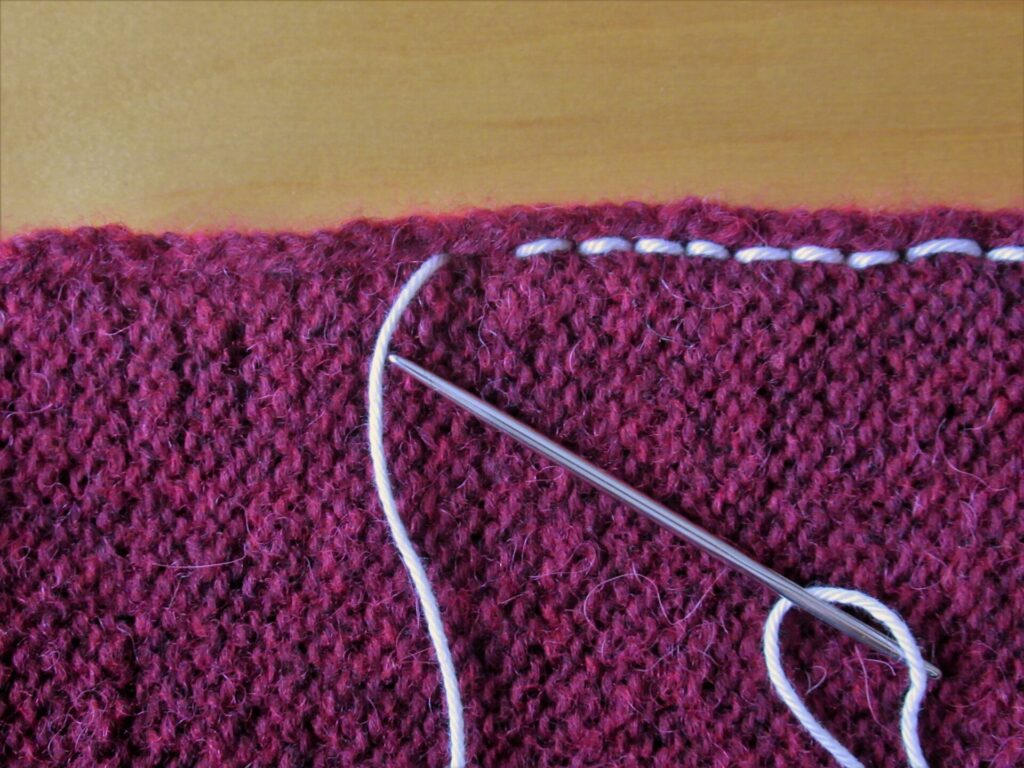
It gives a neat seam on the outside and looks like this on the inside:
I hope this is clear. If not, there is a good video here on YouTube.
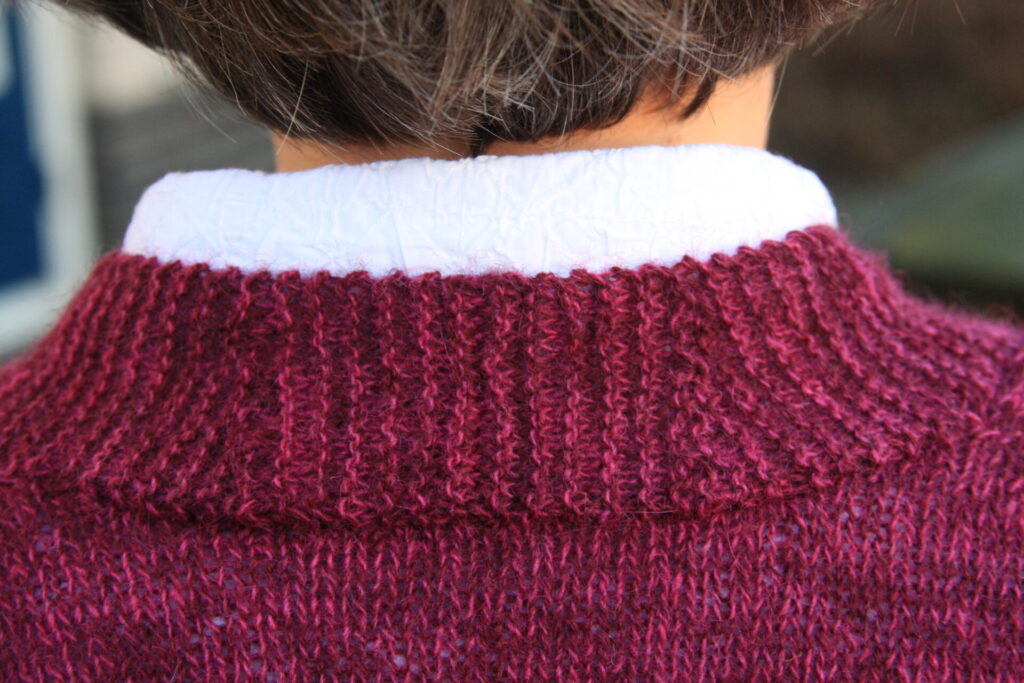
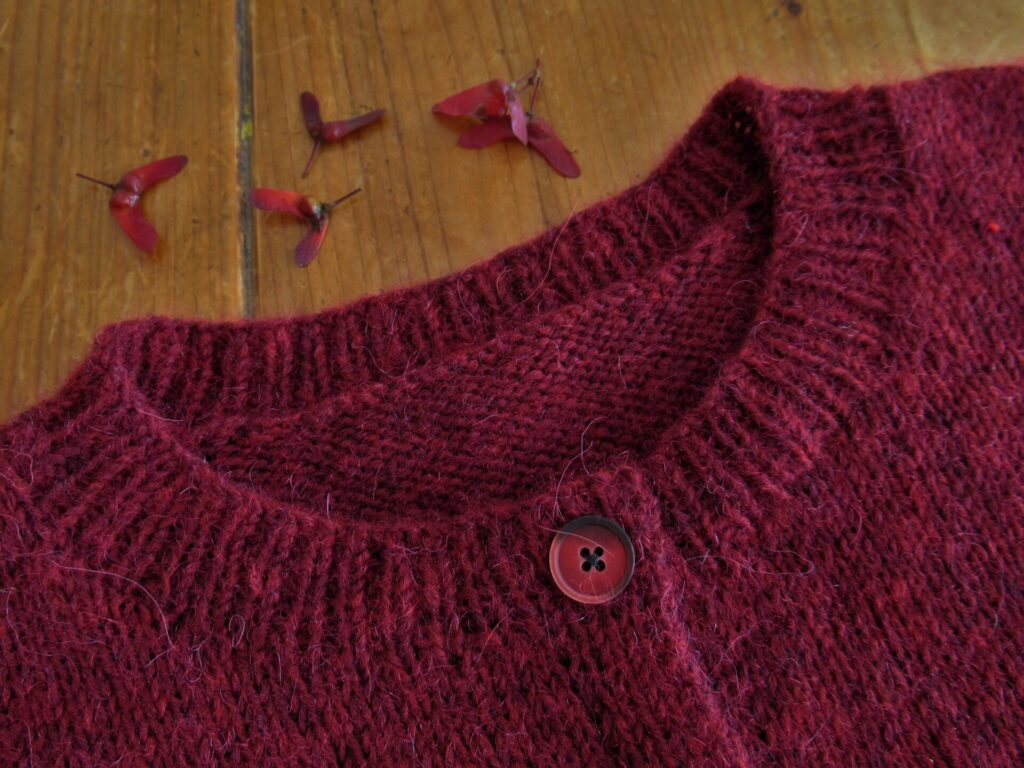
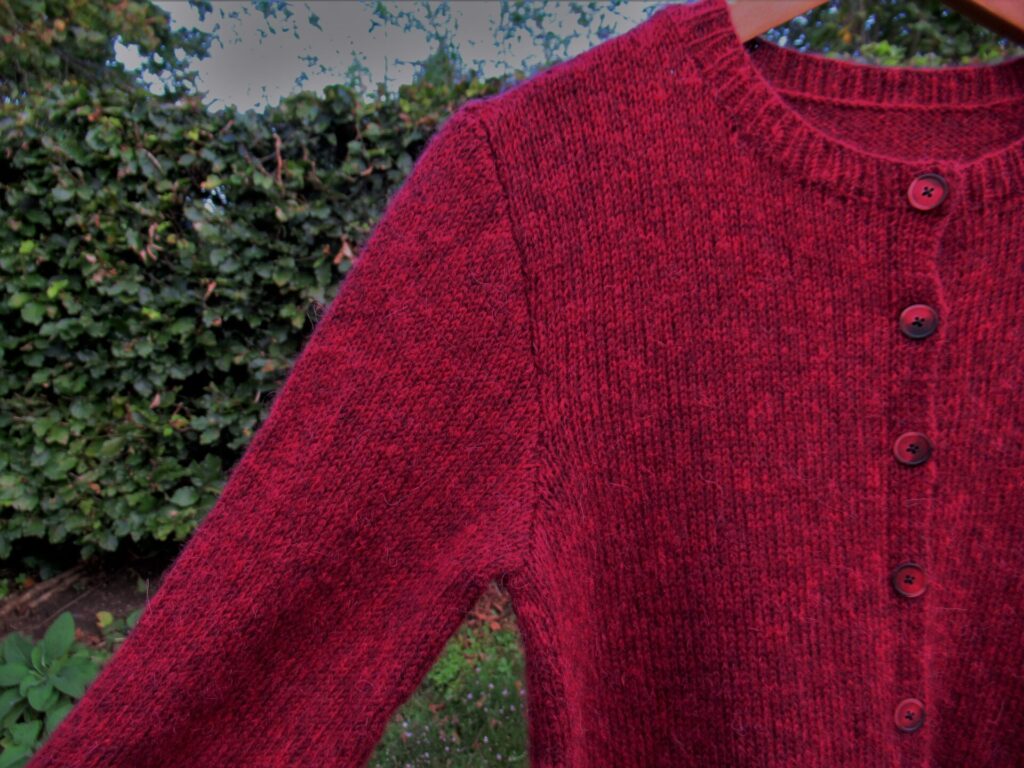
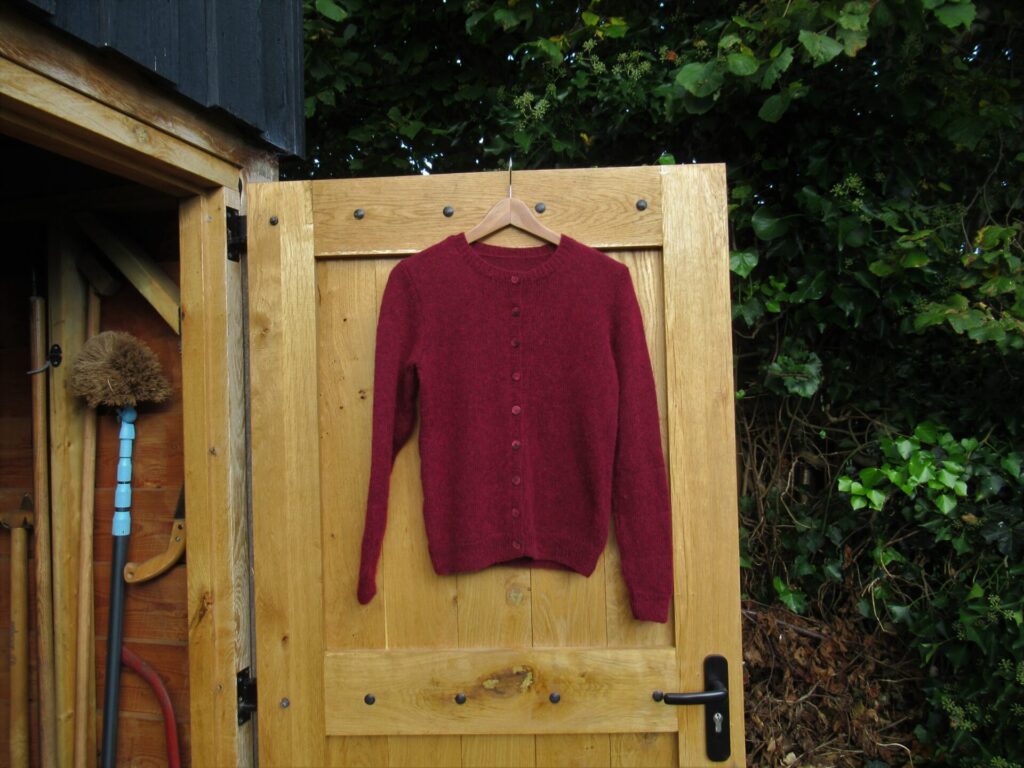
After sewing on the buttons the cardigan is all finished. The pattern I used is the Quintessential Cardigan by the Churchmouse design team – a simple, classic cardi with great attention to detail. An elegant neckline, neat button bands, a few short rows at the hem, nicely sloping shoulders and well-fitting armholes.
The yarn I used is Lana Grossa ‘EcoPuno’. It looks warm and woolly, but actually is 72% cotton. The other 28 percent is a mixture of merino and alpaca. It does not stand up very well to unravelling, but other than that it was a nice enough yarn to knit with. The ‘Eco’ suggests that it is (partly) organic, but the ball band or the manufacturer’s website do not say anything about that.
It is an airy, lightweight yarn and the entire cardi in the size I made (finished bust size 99 cm/39”) weighs only 270 grams. Here it is in its entirety:
It was a lovely cardi to knit and I can see myself making more of these in different colours and yarns.
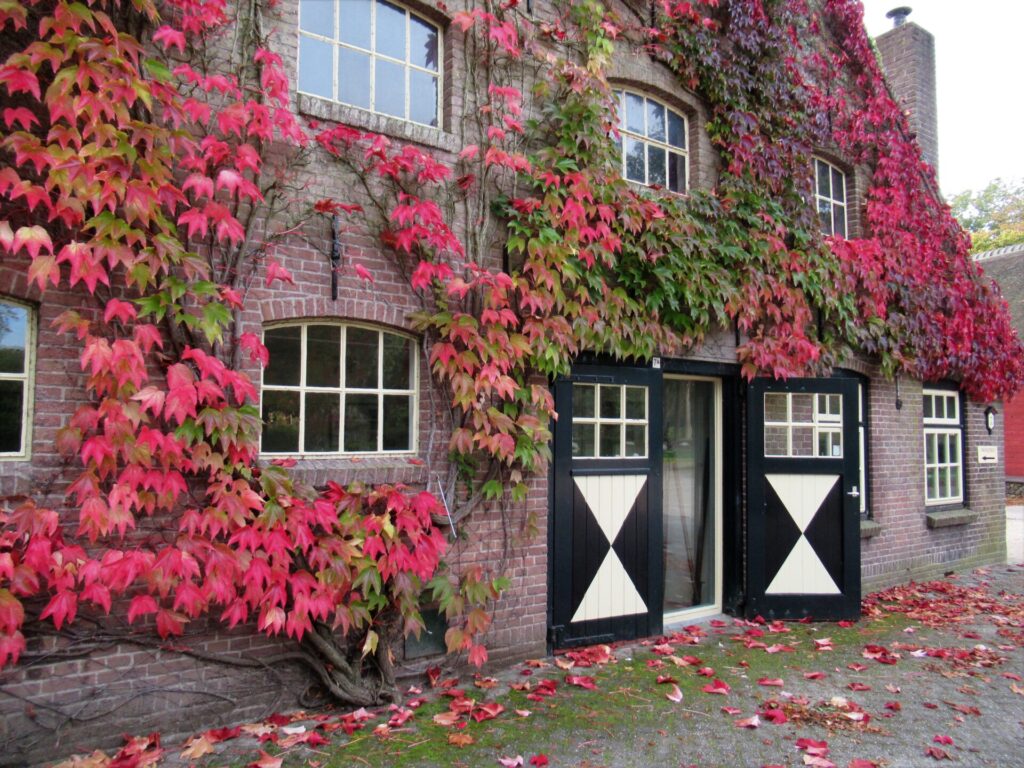
I had great difficulty capturing the colour in my photos. In some it looked purple, in others almost fuchsia. In real life it is the colour of the darkest leaves on this farm building that we often pass on our walks.
A beautiful deep burgundy.
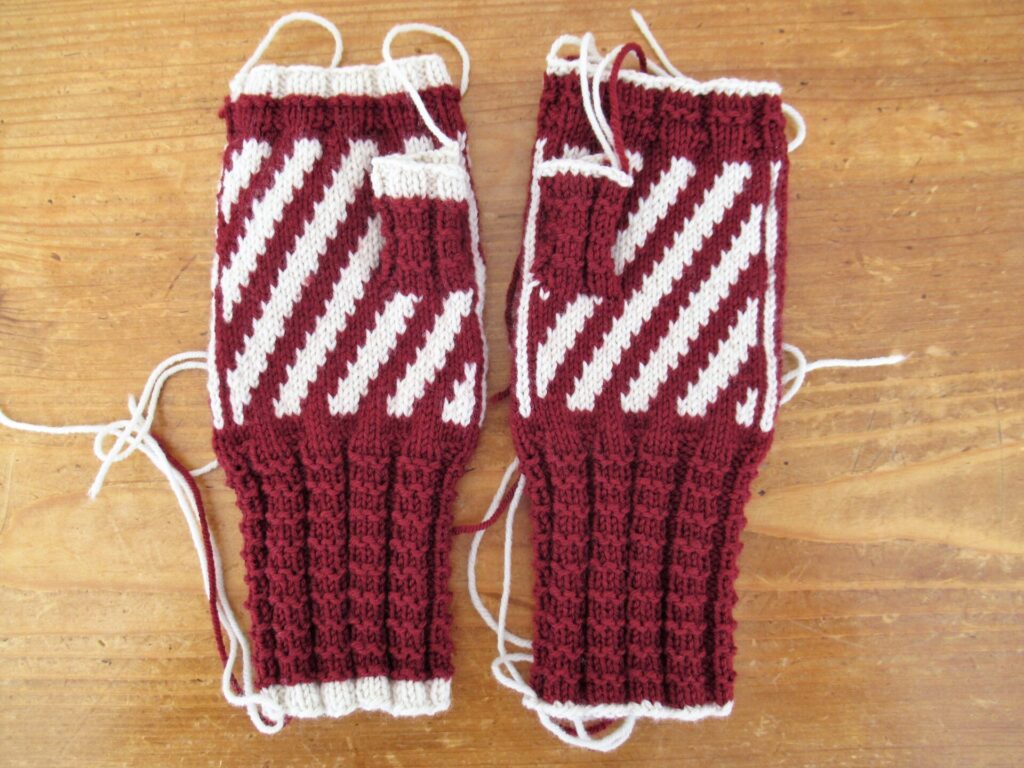
Talking about this burgundy colour reminds me of something else – an unmatched pair of Gazelle Mitts. I knit many of these mitts before I was completely satisfied with the design.
The one on the left is the final version, before I knit the ones that ended up in the pattern. The one on the right is a discarded version that is ever so slightly different. Can you spot the differences?
I think I’ll unravel that and reknit it to make a matching pair. They’ll make a nice December gift.
With that we’ve come to the end of today’s looooong blog post. As always, thank you for reading and have a lovely weekend!
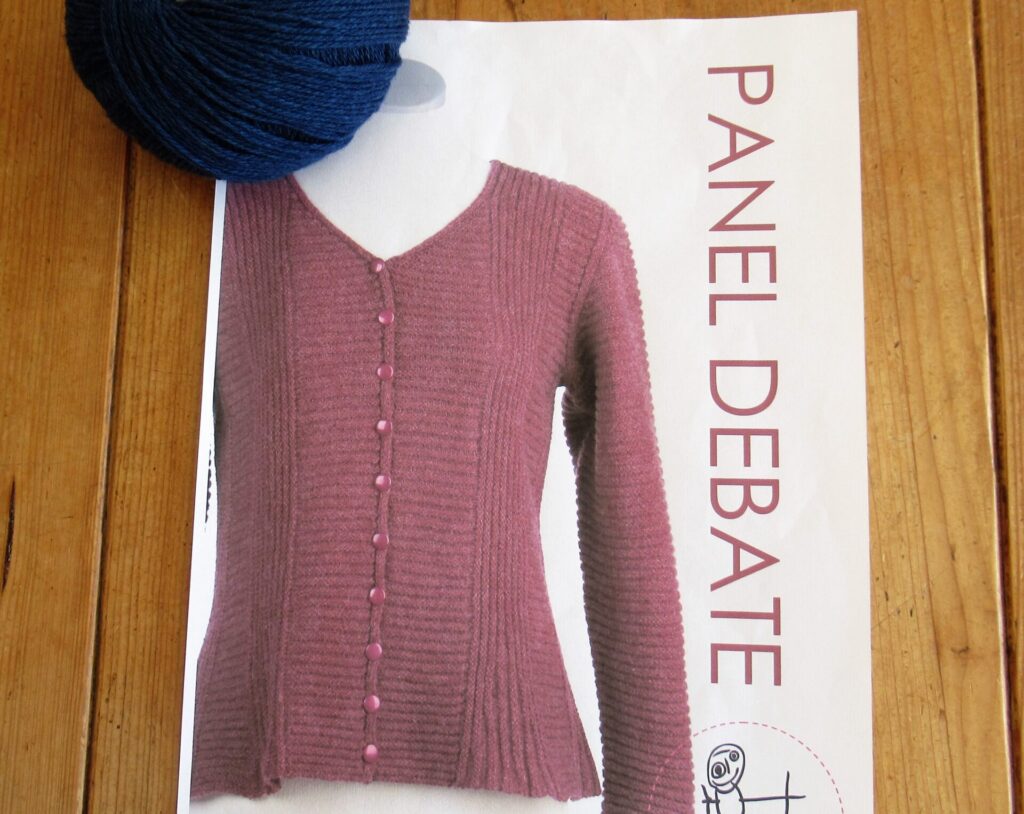
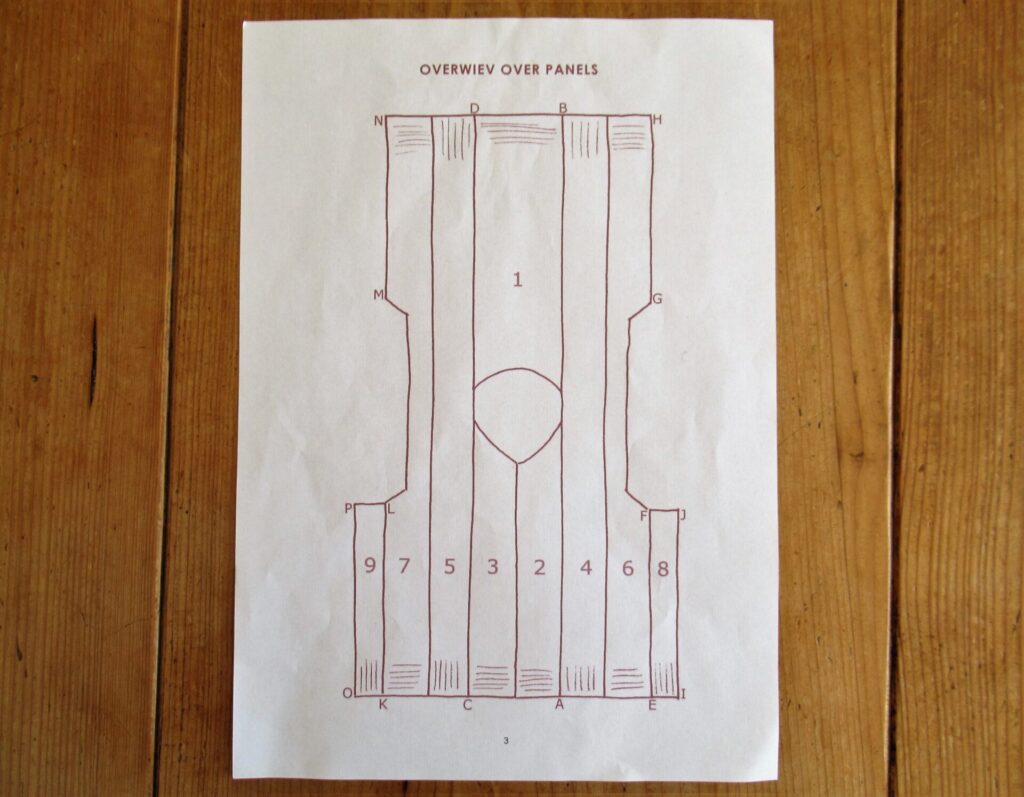
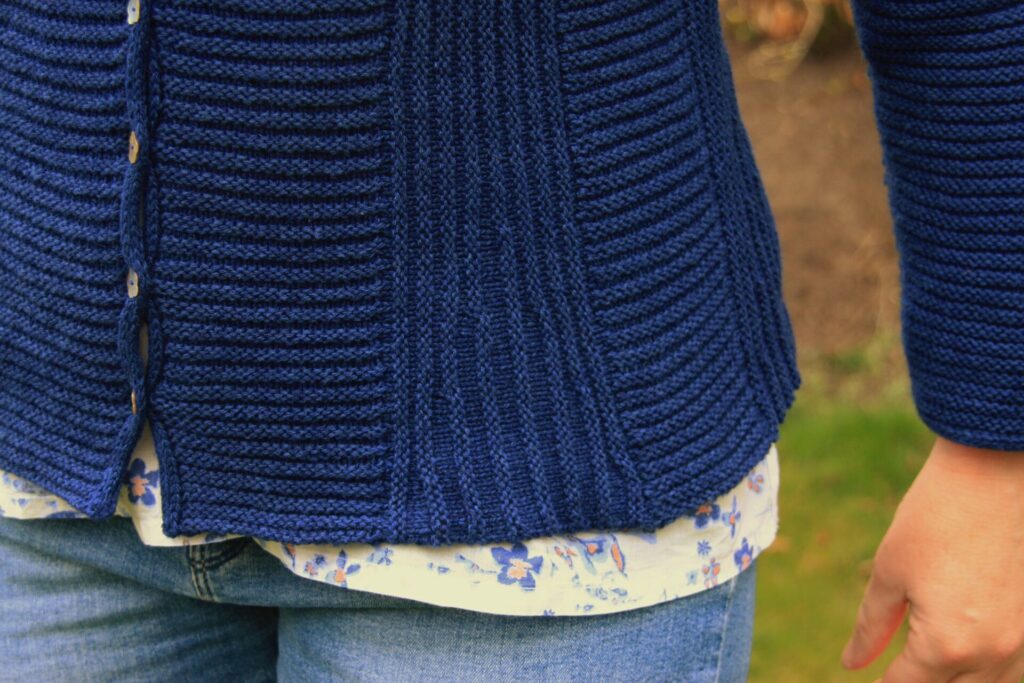
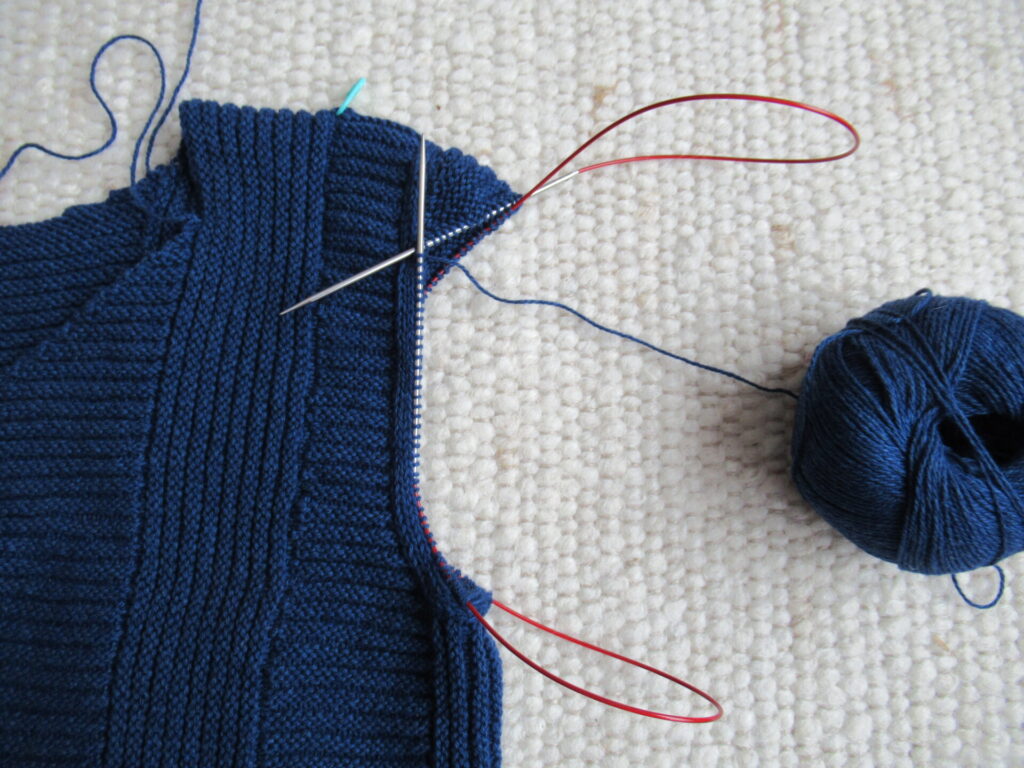
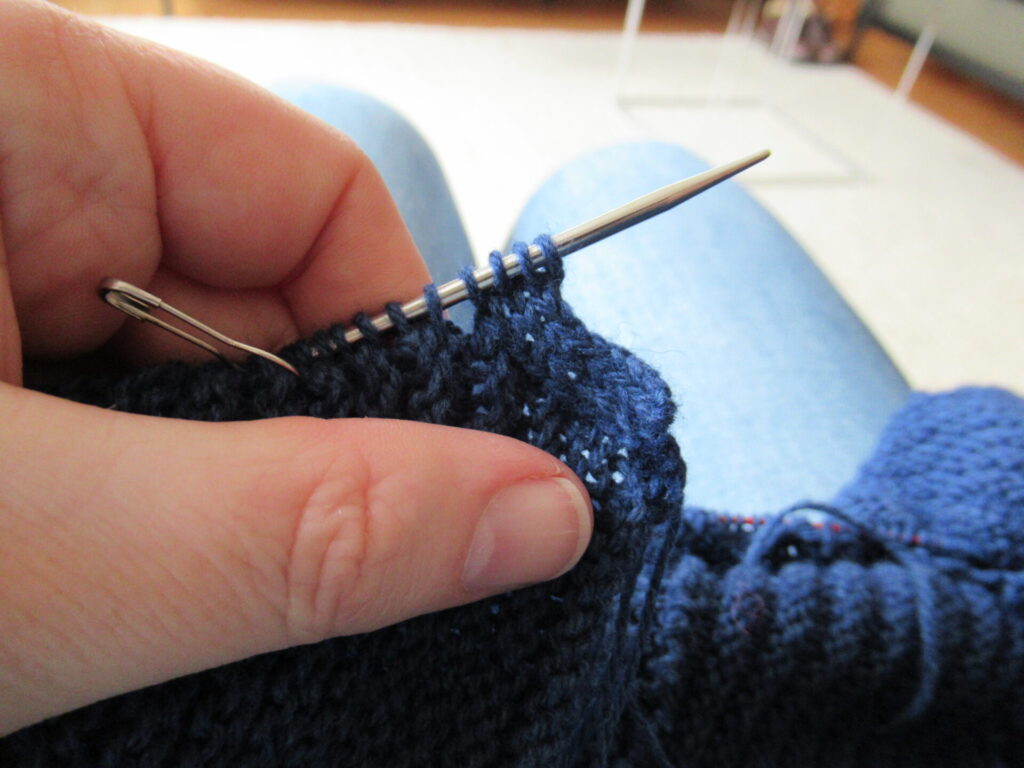
Phew, it’s finished! My Panel Debate cardigan, I mean. It took me about 8 months from start to finish. Well, I knit several other things in between, but on 2.75 mm (US 2) needles and with quite a few technical challenges, it wasn’t a quick knit.
It certainly was interesting, though, and I thought you might like to read about some of the special techniques (so much I-cord!) and what helped me finish it.
Panel Debate is a pattern by Danish designer Bente Geil, and can be found on Ravelry under its Danish name Paneldebat. I used one of the designer’s own yarns: Geilsk Bomuld og Uld – a light fingering weight blend of 55% wool and 45% cotton.
Reading through the pattern, I couldn’t make head nor tail of the instructions for the neckline. There seemed to be something wrong, so I e-mailed the designer. She said she’d look into it and sent me a new version of the pattern the very next day (during her Summer break!). Excellent service, I have to say.
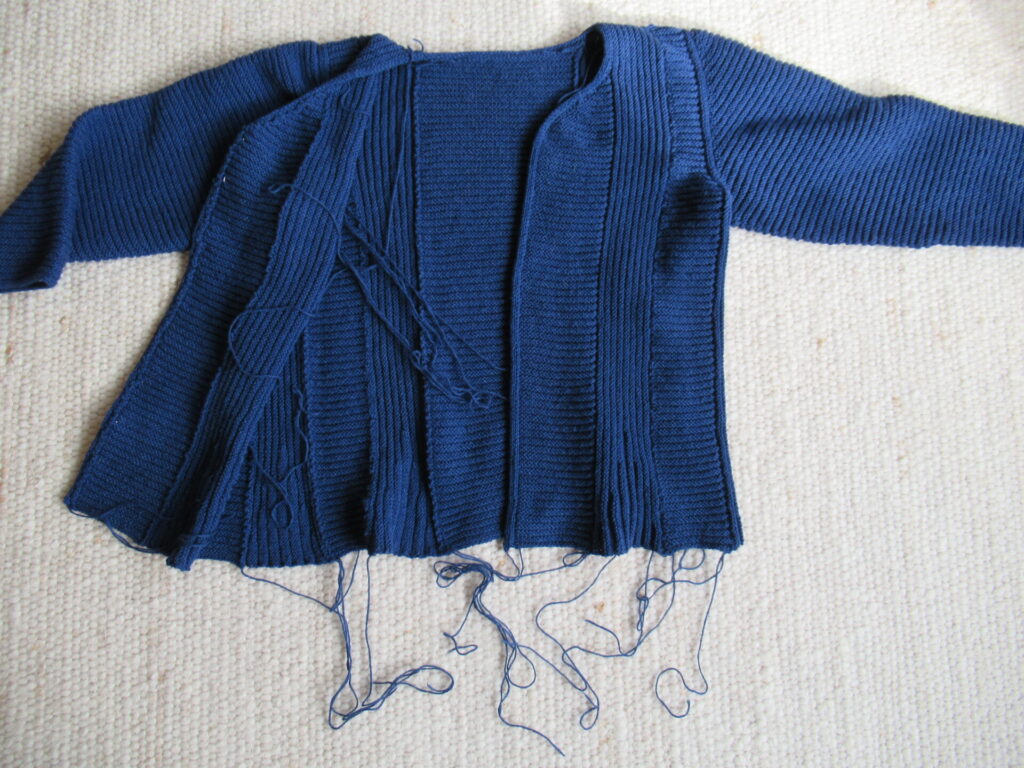
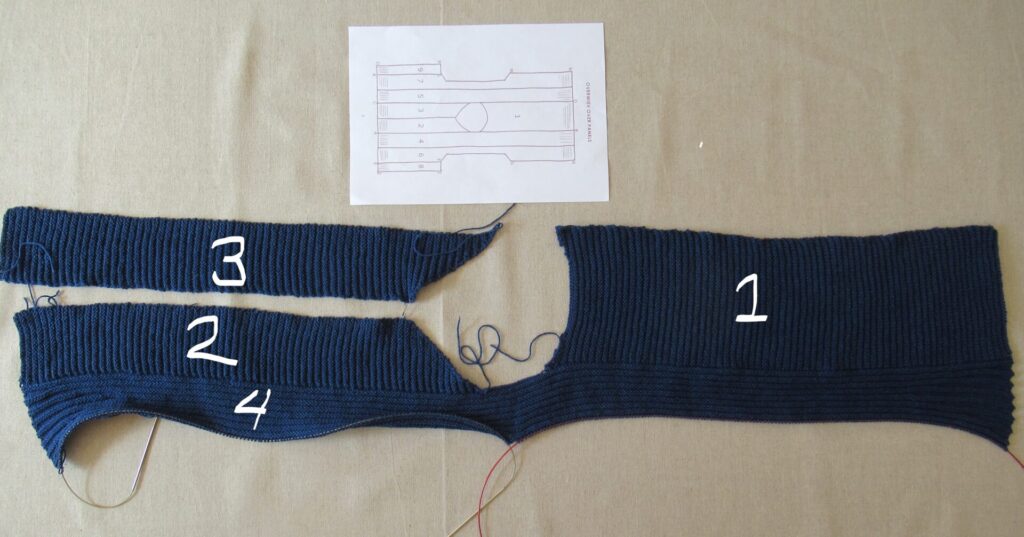
The design is modular and is made up of many panels (hence the name).
Each panel is knit onto the previous one, and the panels are alternately knit horizontally and vertically. The vertical strips end in fans made by knitting short rows.
What helped me knit the fans, was copying the instructions for them onto a separate page, with each step on a new line. I marked the row I was knitting with a sticky note and moved that down after each row. That way I was able to keep track of where I was.
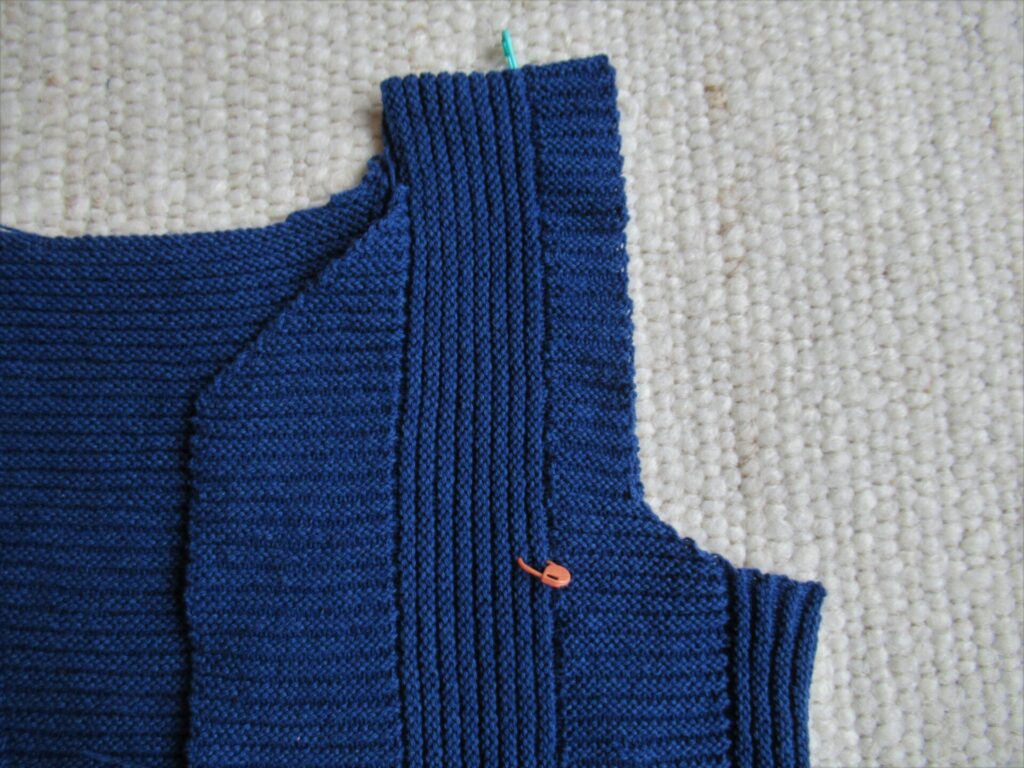
I lengthened the body by 4 cm (approx. 1.6 inches). No problem at all – just added the required length to the first 3 panels and the rest took care of itself. I also enlarged the armholes because I’d heard from several other knitters that they’d turned out rather tight.
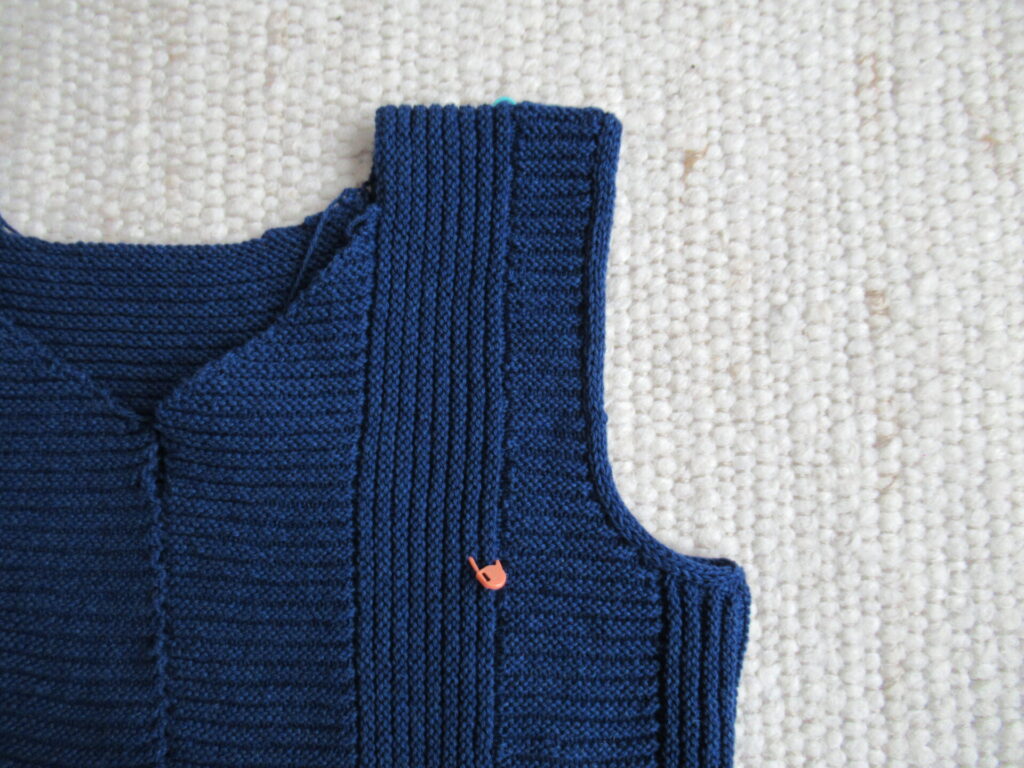
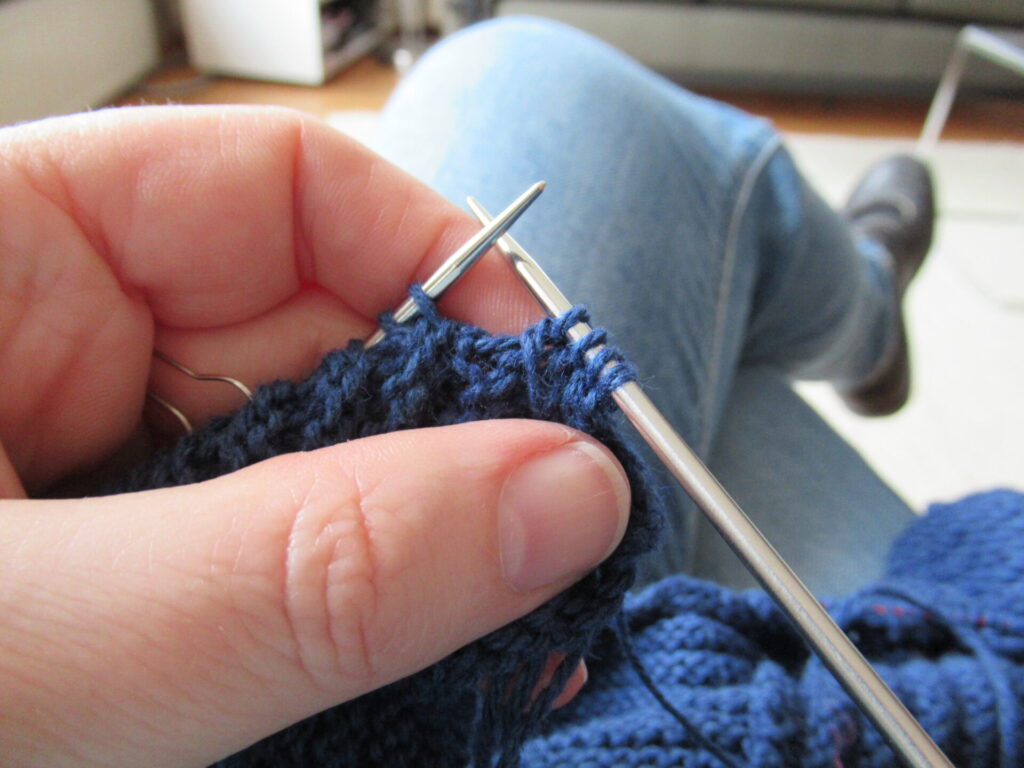
After the body was completed, the armholes were finished with attached I-cords.
Armhole before…
… and after attaching I-cord.
Then stitches for the sleeves needed to be picked up from the I-cord (the sleeves are knit from the top down). That really was a pain at first. But it went a lot better using a crochet hook and slipping the stitches from the hook onto the knitting needle.
Then I had to adapt the sleeve cap to the enlarged armhole. That was a bit of a puzzle, but after several tries I was happy. I used the magic loop method to knit the sleeves.
I’m not entirely happy with that, because it shows all along the middle of the sleeves. I hope the line will fade with washing and wearing. I haven’t had this problem before. Could it be because of the cotton content of the yarn? Or the reverse stocking stitch ridges?
The sleeves are finished with I-cord along the wrists as well.
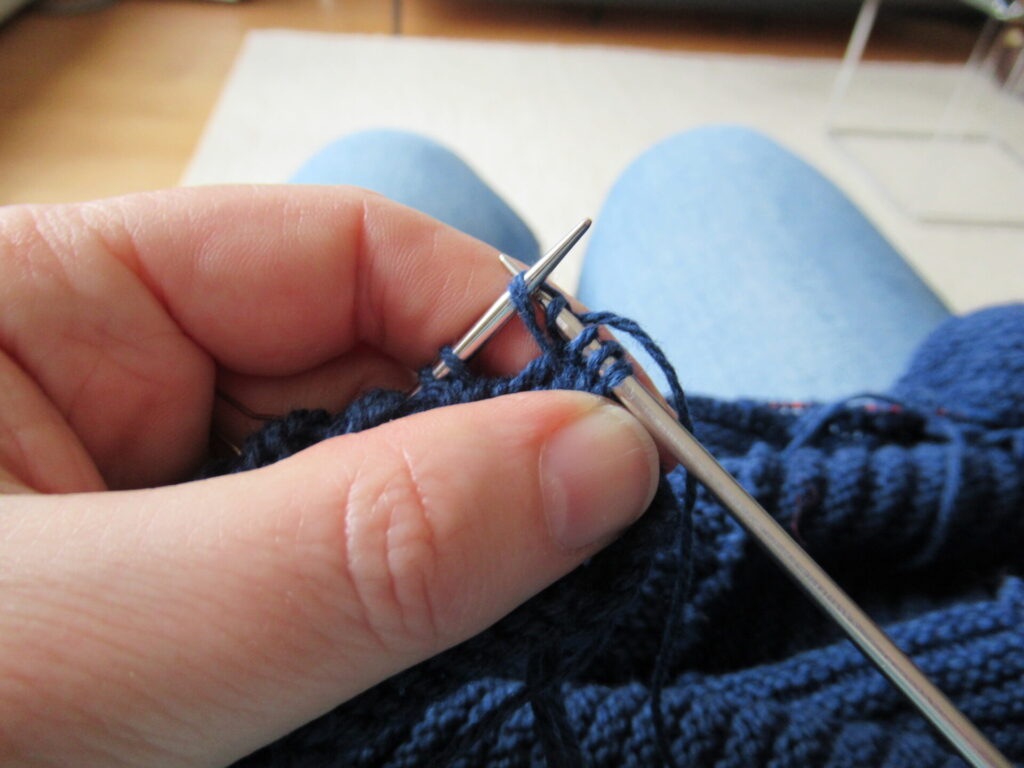
Finally there was more I-cord to knit – all along the fronts and the neck. First I had to pick up a zillion stitches. Then I cast on 4 extra stitches for the I-cord.
I knit a few inches, saw that the I-cord ‘pulled’ on the front and frogged it. After repeating this several times, I finally found out how to solve it – by pulling the first stitch (on the outside of the I-cord) up a little longer than usual and holding it between my thumb and index finger while knitting the second stitch, to keep it from tightening.
This is the attached I-cord knitting process step by step:
1 – The 4 I-cord stitches are on the left needle, together with the picked-up stitches on the panel. At this stage, the yarn is hanging between the picked-up stitches on the garment and the 4 I-cord stitches. Now the yarn is passed behind the stitches to the first stitch on the right.
2 – Knit 3 stitches (knitting the 1st stitch very loosely and keeping it from tightening by holding it between thumb and index finger while knitting the 2nd stitch). Slip the 4th stitch knitwise, knit the first picked-up stitch along the panel and lift the slipped stitch over this stitch.
3 – Now slip the 4 I-cord stitches back onto the right needle.
Repeat these 3 steps for hours on end, until all of the picked up stitches along the fronts and neck have been used up, meanwhile making button holes along the right front.
Finally, ‘all’ I needed to do was weave in what seemed like an endless number of ends.
I put on some music, and several cups of tea later that was done, too.
Oh, and let’s not forget the buttons! I happened to have just the right ones, bought long ago in a lovely little shop.
There, all finished!
Here is a close-up of the very special armhole.
And this is what the cardi looks like from the back.
What helped me through the challenging parts of this knit was:
Finding moments in my week when my brain was up for a challenge (for me especially Saturday mornings)
Cutting the process up into smaller steps, taking a break after finishing a step and giving myself a figurative pat on the back
Using a crochet hook for picking up stitches
Copying difficult bits onto a separate page and keeping track of where I was by means of sticky notes
Relaxing and uplifting music in the background
Having good (day)light
Blogging about it
All in all, I’m happy with the process and happy with the result!
Well, that was a lot of technical detail. Sorry to the non-knitters among you (it’s a miracle you even got this far). If all goes according to plan, my next post will be of more general interest. Bye for now, and hope to see you again soon!
After all the gadding about of the past few weeks, I think it’s time for some serious knitting again. I hope you’re up for it.
I first heard of domino knitting from a Danish woman I once met on a campsite in Rondane, Norway. She was sitting in front of her tent knitting back and forth on very short wooden needles. I was intrigued and asked her what she was making.
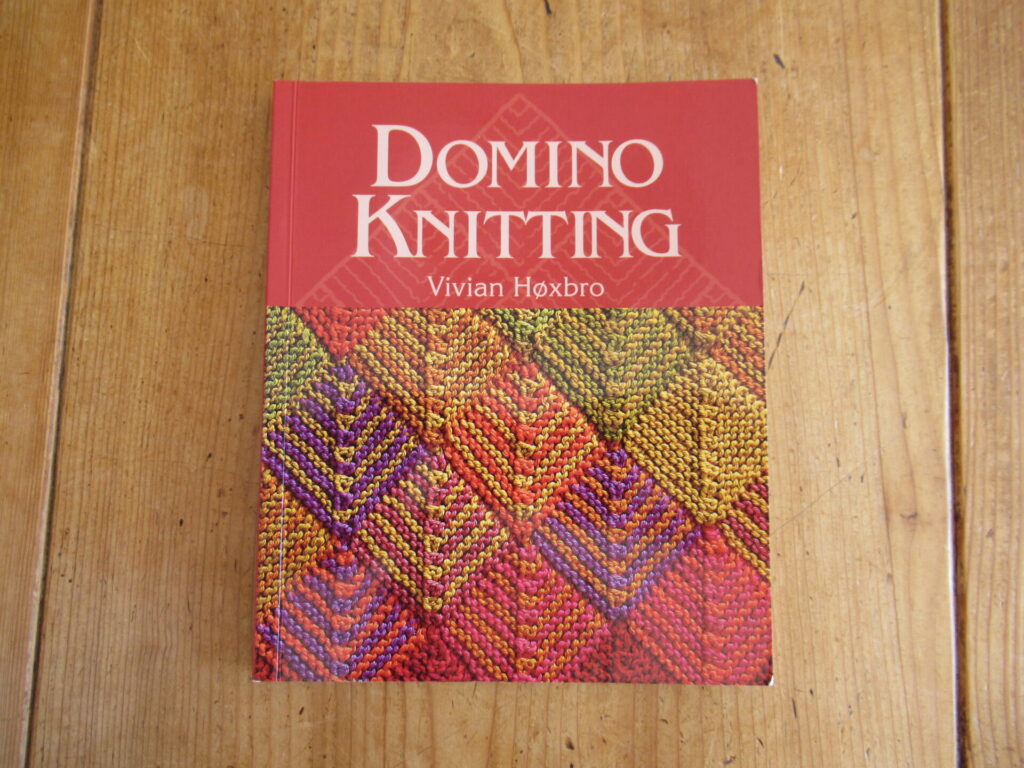
As is often the way with knitters, she was only too happy to talk about it. She told me that she was making a scarf for her sister-in-law from a pattern in the booklet Domino Strikk, by Danish designer Vivian Høxbro.
As soon as the booklet came out in English, in 2002, I bought it.
Høxbro didn’t invent the technique. In her foreword she tells us that it had been around for at least a century before she discovered it, only it wasn’t called domino knitting then. She was the one who made it popular, though.
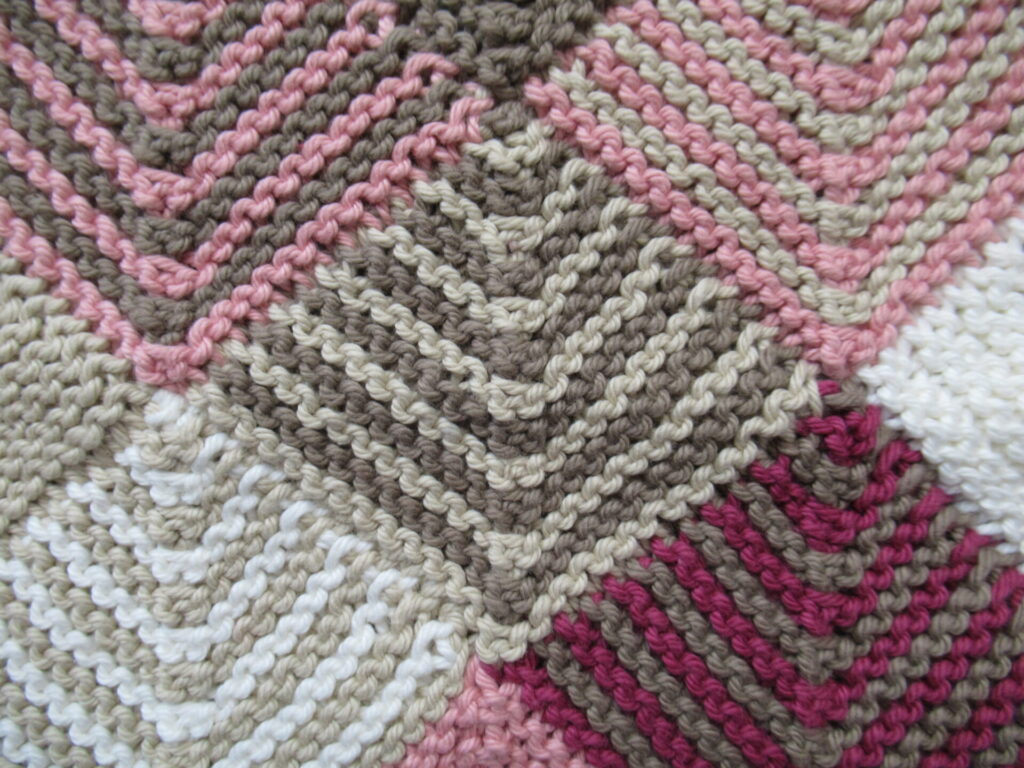
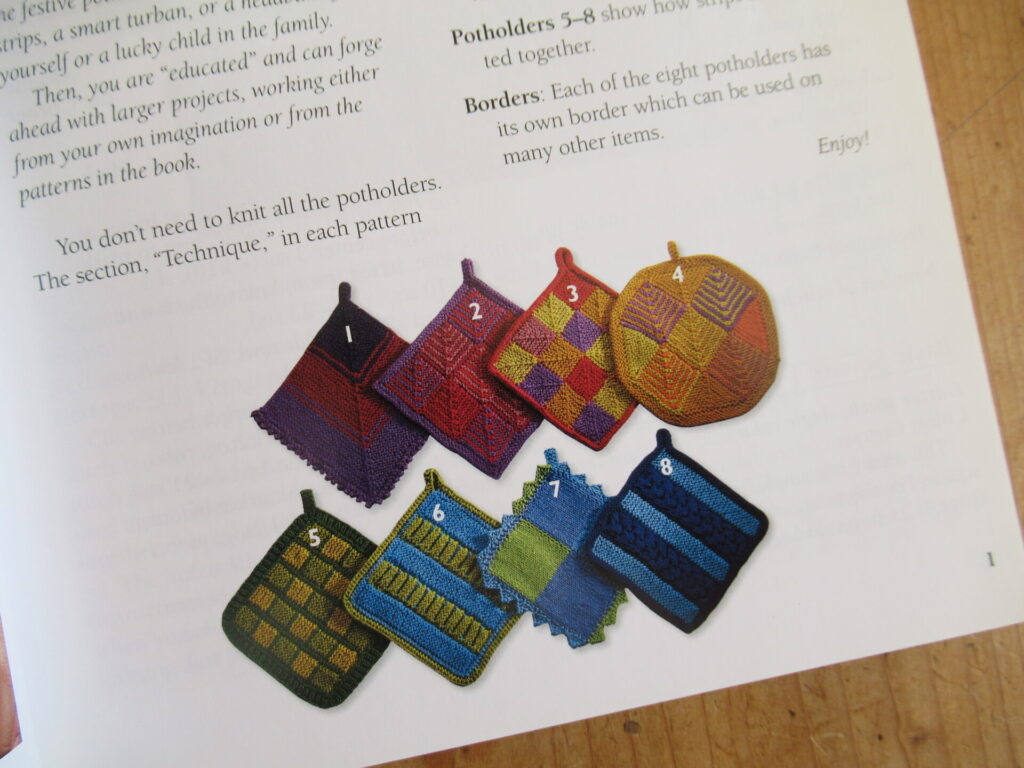
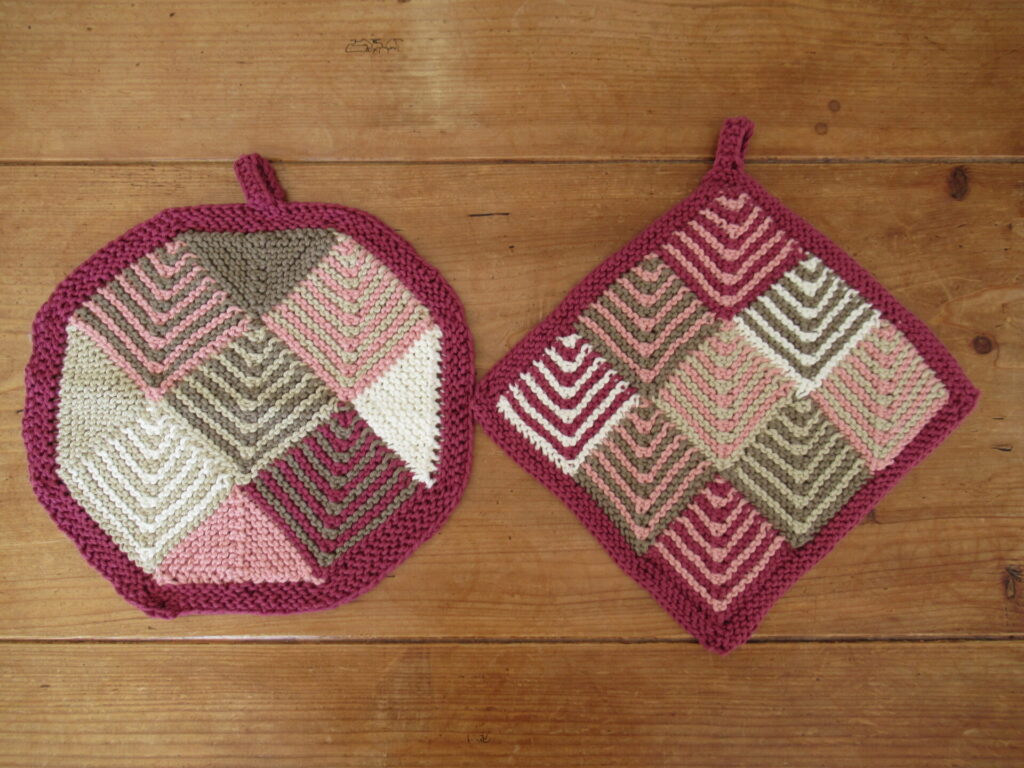
The booklet clearly explains how domino knitting works with small modules, ‘knitted together while the work progresses, just as one “pieces” the tiles in dominoes’, and encourages us to try the techniques out by knitting potholders first.
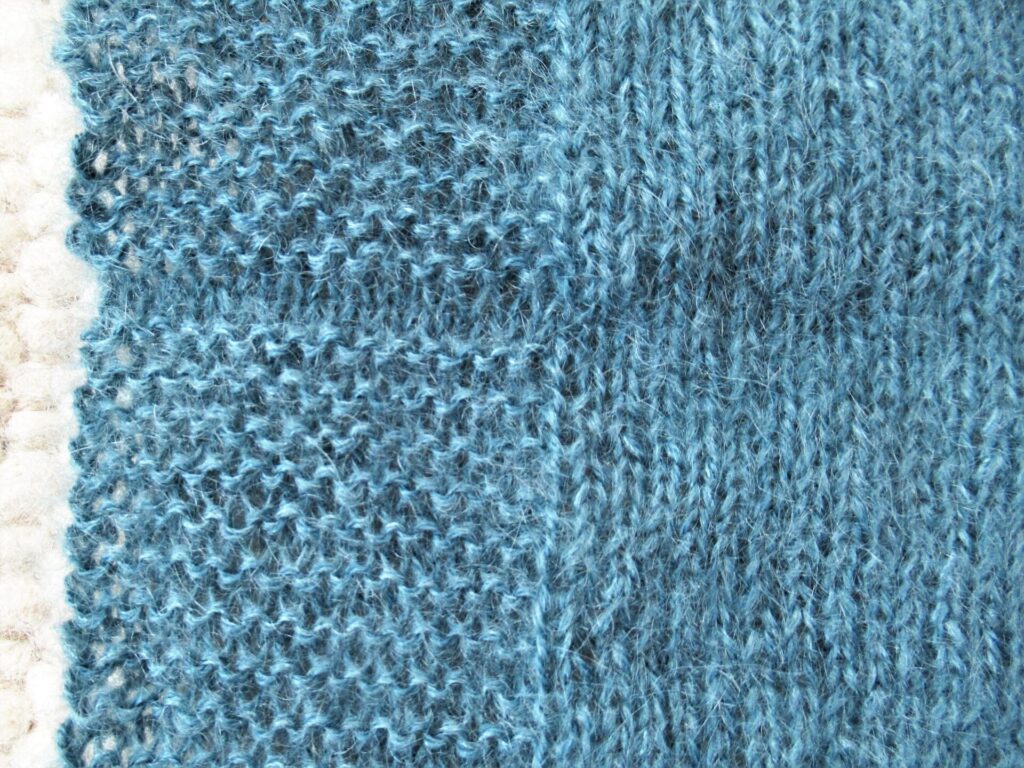
I made a couple of potholders to give domino knitting a try. They turned out too big and floppy to be useful. I have never used them, but kept them as a kind of curiosity. Here they are:
I left it at that, went on to knit other things, and more or less forgot about domino knitting. Until I started knitting a cardigan called Panel Debate last month.
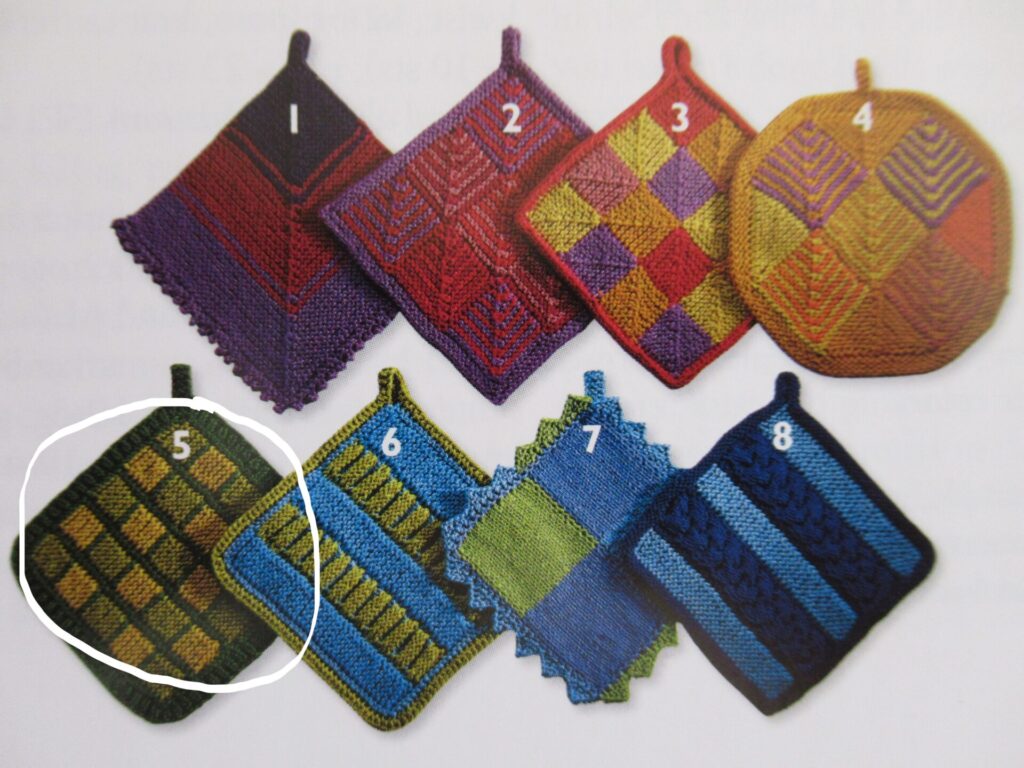
As the name suggests, it is made up of panels. After finishing the first three panels, I suddenly thought, Why does this feel so familiar? Wait, this is potholder number five!
Well, it’s more like a super extended version of potholder #5, but it follows the same principle.
Narrow panels (1-3 below) are knit back and forth in alternating knit and purl ridges. Then stitches are picked up along the long sides for the next panel (4), knit lengthwise. The panel next to that is a narrow strip again, attached by knitting it together with the stitches of the previous panel every other row, and so on and so forth.
Calling Panel Debate an extended potholder doesn’t do it justice at all, of course. What with the knitted-on sleeves and I-cord finishing it is much more than that. The designer has also added lovely short-row fans at the bottom of fronts and back.
It’s a lot of stitches on 2.75 mm needles, and after I’d knit the swatches I wondered if this cardigan really was a good idea and if I’d ever finish it. But because of the modular technique, Panel Debate stays interesting and makes me want to keep on knitting.
There are heaps more domino-knit type of garment patterns around. Many of them use variations on the mitred squares of my potholders.
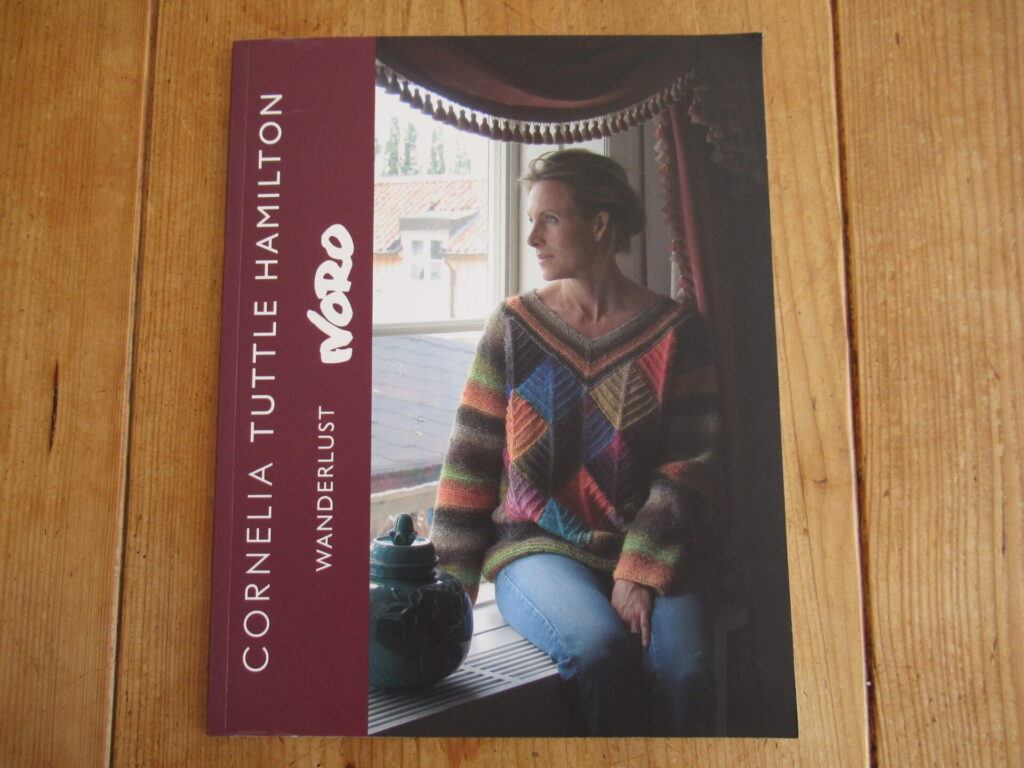
It’s a technique particularly suitable for colour-shift yarns like Noro. I really love the way this sweater makes use of the colours.
As Høxbro warns us in her foreword, ‘Domino knitting is addictive.’ Why did it take me so long to get hooked?
Hello! It’s so good to ‘see’ you here again. I really hope that you’re all doing okay. Life here is very much as usual, strangely enough, apart from the almost constant feeling of unease and worry in the background. I’m still working (from home), cooking, cleaning, and doing everything else I need to do. And I’m still always knitting. I really, really miss seeing people in real life, but am grateful for all the other ways we have for keeping in touch, including this blog, although this is a bit of a one-way thing.
After a cold spell with night frosts and a raw wind, spring really and truly arrived here about two weeks ago. All of a sudden it was warm and sunny, leaves were unfurling and trees were starting to blossom.
Only my knitting was out of sync.
I was knitting a warm wool-and-alpaca sweater for our daughter. Not exactly something she would need in spring. And even the colour was unspringlike!
When I think of spring colours, I think of yellow, fresh green and pink. I associate the (hard to capture) deep burgundy-meets-terracotta of my knitting yarn more with autumn. Warm yarn, wrong colour – uh-oh, another knitting project in danger of becoming a UFO!
But then my eye fell on the newly unfurled leaves of the Japanese maple in our back garden…
… and on the fresh young leaves of the skimmia.
Through the lens of my camera, I started seeing more and more of these so-called autumn colours. Enchanted by the frothy pink blossoms of Japanese ornamental cherries, I had never really noticed their leaves before. Now I saw that they were actually orange:
And the flowers of the elephant’s ears in our front garden are a really springlike pink, but look at the stalk!
Walking around with a camera in hand can be like a treasure hunt. I often see things that I would otherwise not have noticed. Besides, it helps me to focus outward and keeps me from ruminating too much. You could give it a try, too, if you like (or perhaps you already do?). Any old point-and-shoot camera will work.
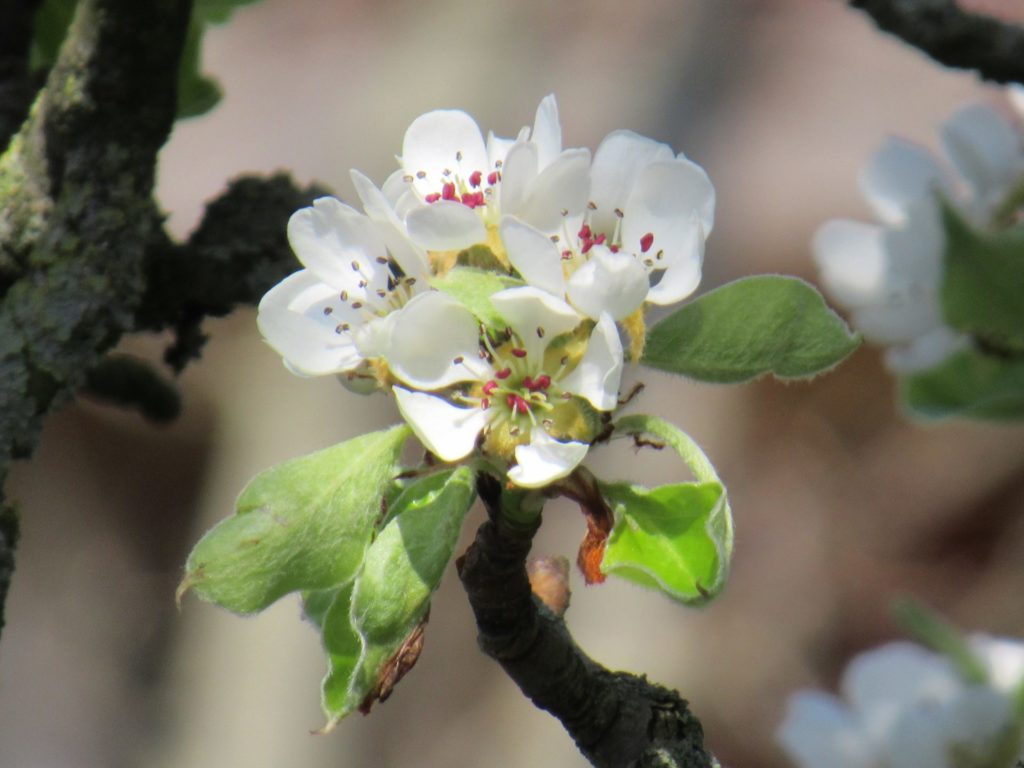
Here’s just one more treasure I found – pear blossoms on the big old pear tree in our back garden. The general impression is white, but there are lovely red ‘things’ inside. I’m no expert, but I think they are the anthers (correct me if I’m wrong).
Phew! UFO attack avoided. Having seen all these springtime reds and oranges, the colour didn’t feel wrong anymore. I felt like finishing my knitting project, and that’s what I did.
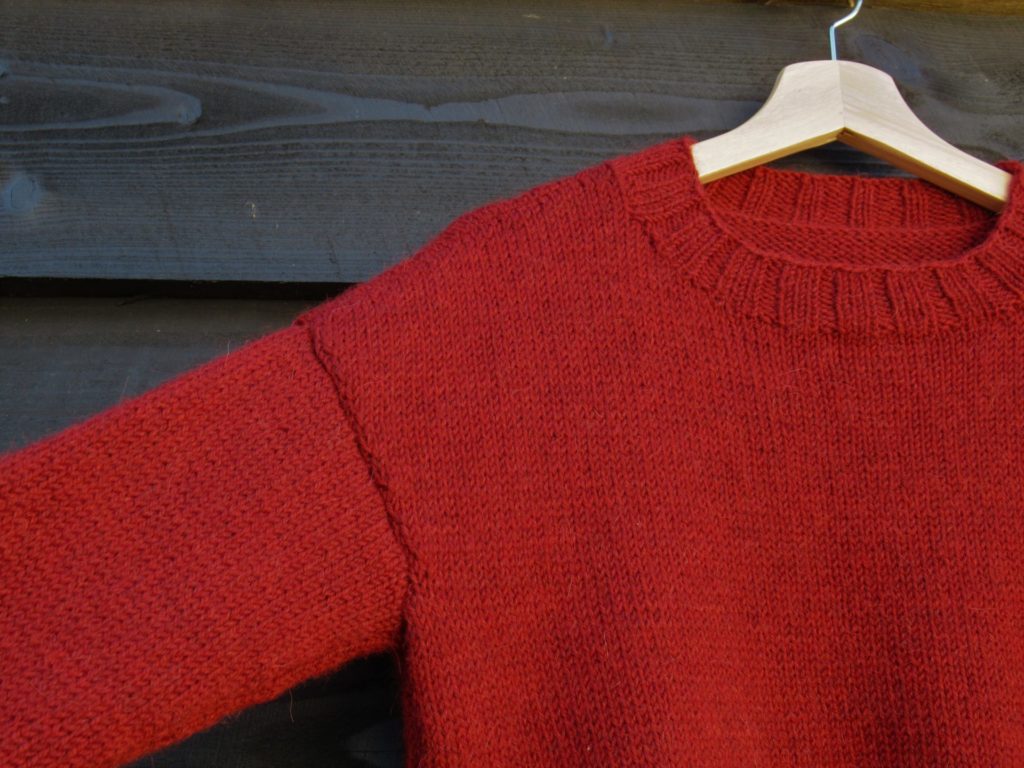
And here is the finished sweater (it would have been nice to photograph my daughter wearing it, but unfortunately I didn’t have the opportunity for that):
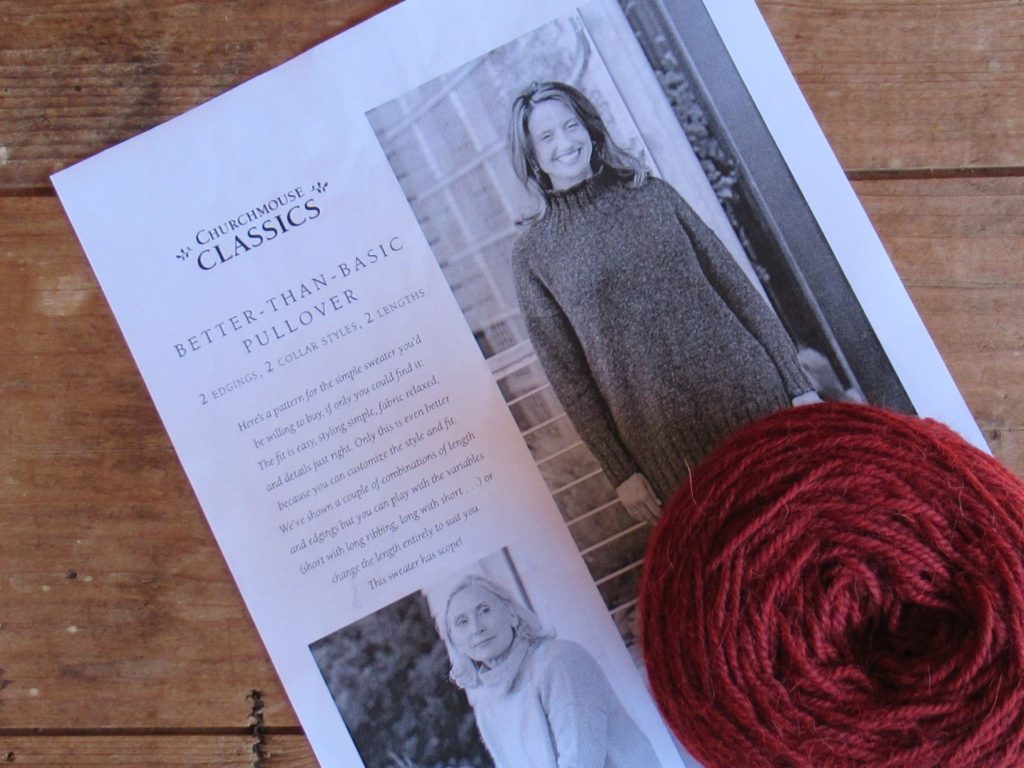
It looks pretty basic at first glance, so why is it called Better-than-Basic?
To start with, the pattern has options for several different versions: tunic or hip length (mine is in between), wide or narrow ribbed edgings (I’ve chosen wide), and a funnel or a turtle neck (I’ve done neither of these).
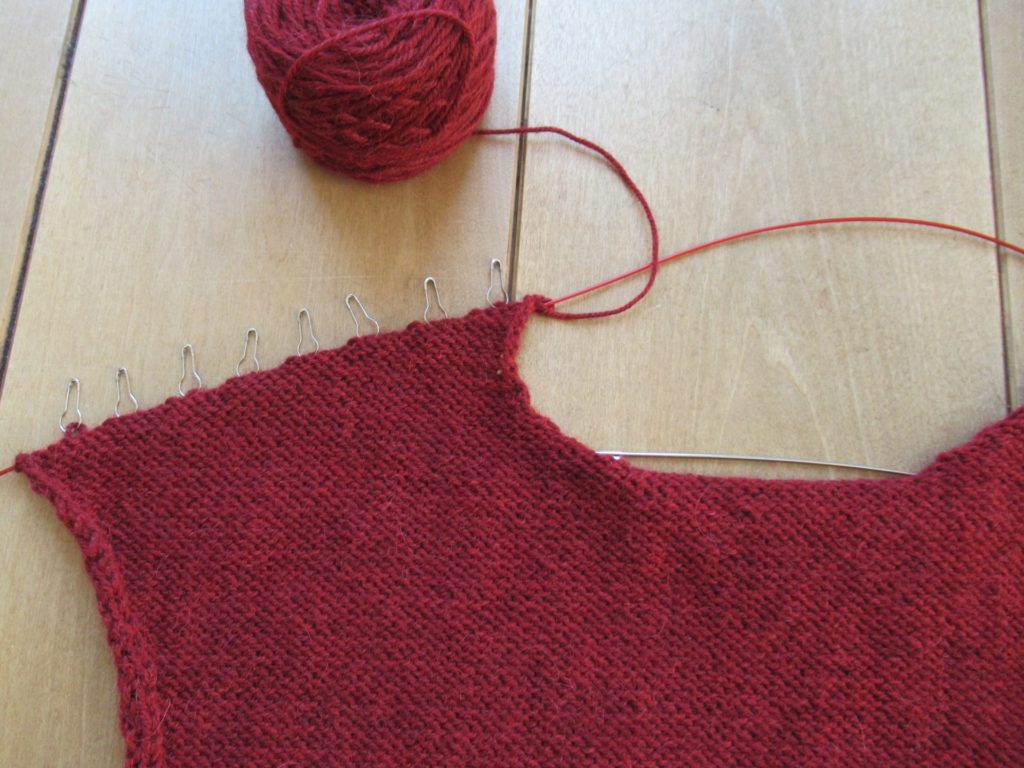
Then there are the special techniques, like the ‘clip & turn’ short rows for a gradual shoulder slope:
The same short-row technique is also used at the hems, so that the sweater hangs more evenly.
Other features are an invisible cast-on, two special bind-off methods, and tips for customizing sleeve and body length – all explained very clearly.
The shoulder seams are placed slightly forward and the special sloping armhole results in a relaxed dropped shoulder without too much bulk under the arm.
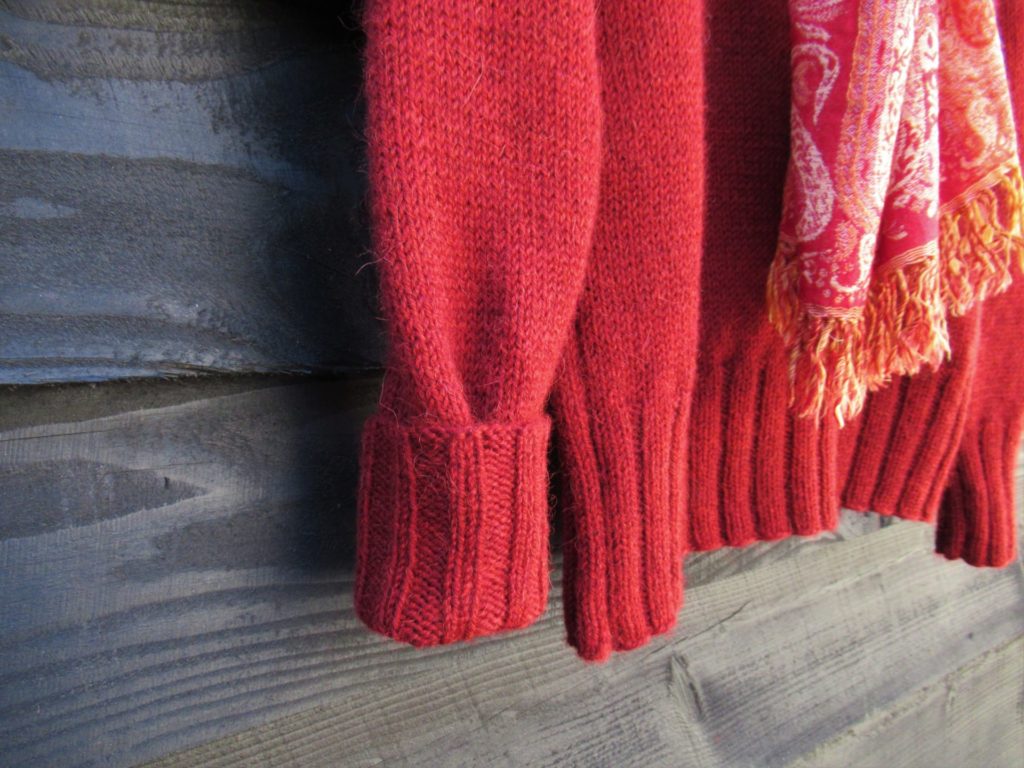
On special request, I made the sleeves extra long, so that they can be used as hand warmers during bicycle rides. Or they can be worn folded up, like here:
Okay, maybe this is not an ideal springtime knit, but it is definitely a pattern to keep in mind for next autumn.