Knitters love abbreviations. An experienced knitter will be able to instantly visualize an instruction like ‘K2, yo, *(k2tog) 3 times, (yo, k1) 6 times, (k2tog) 3 times; work from * to last 3 sts, yo, k2tog, k1’.
Now, please don’t run away screaming if you’re not all that into abbreviations. For this post it’s enough to know just these three:
FO = Finished Object – This speaks for itself. Any piece of knitting that is completed (including weaving in the ends and sewing on buttons) is an FO.
WIP = Work In Progress – This refers to a piece of knitting that is actively worked on, or at least is still in the forefront of the knitter’s mind.
UFO = UnFinished Object – A UFO is an incomplete piece of knitting that has been abandoned, hidden away in a dark cupboard or even completely forgotten.
Note: the line between a WIP and a UFO may be thin.
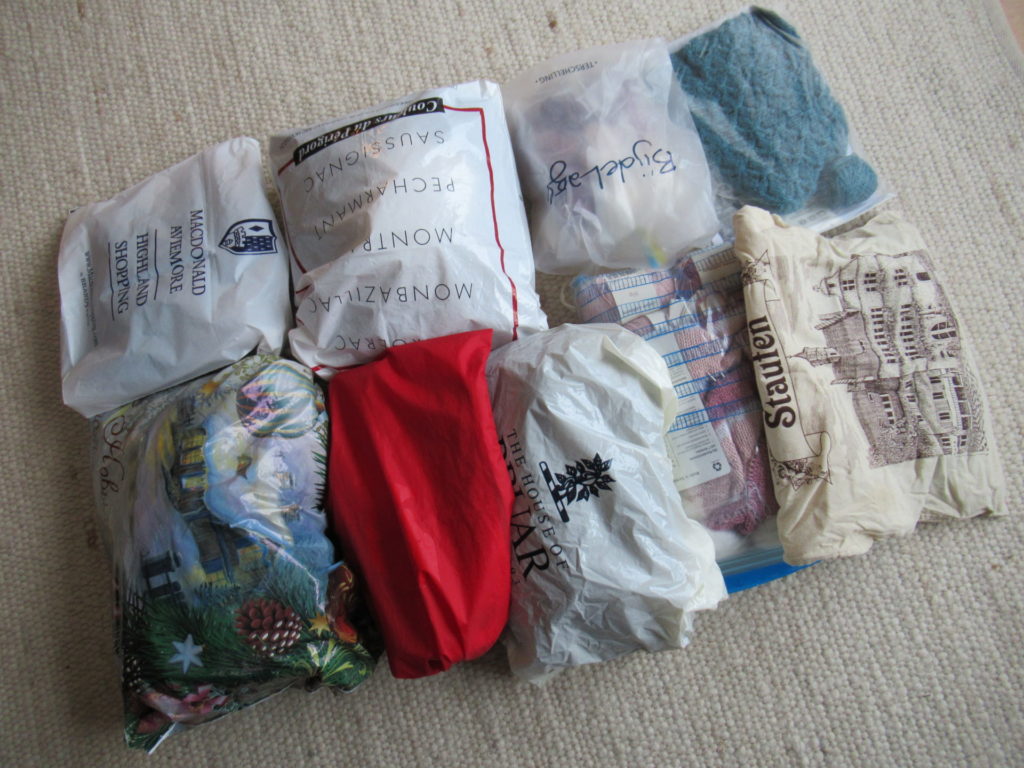
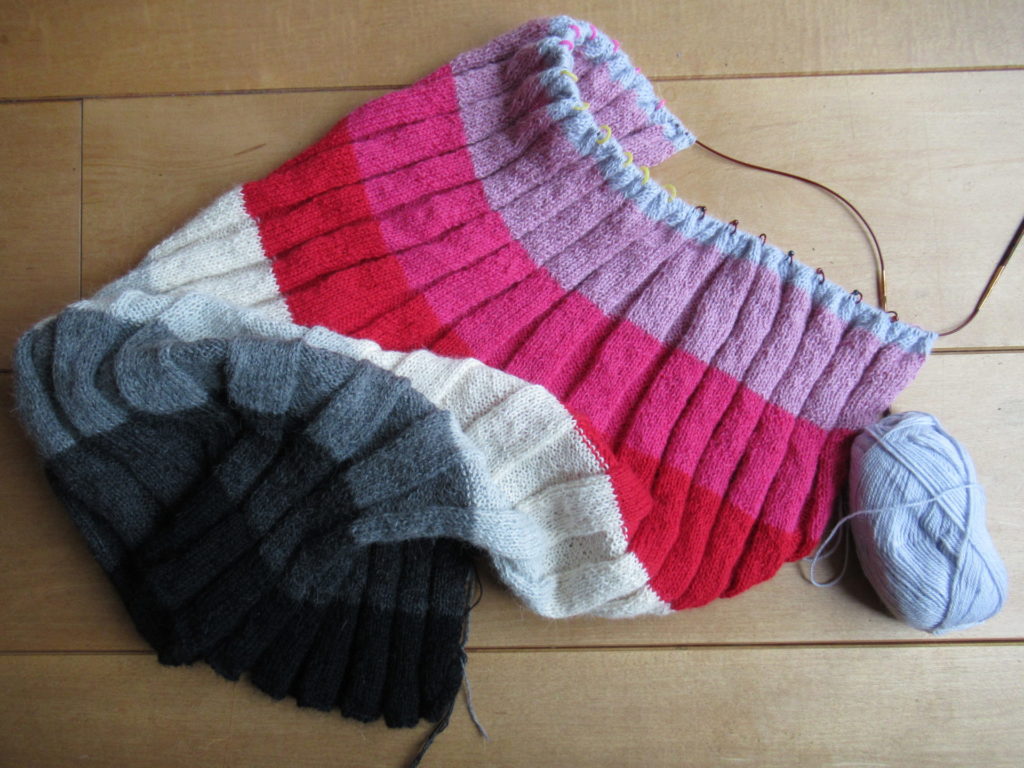
As I told you last week, I have more than a few UFOs. Some of them have lived in a dark cupboard for quite a while. Here they are:
There are 9 items in total: 4 cardigans, 2 scarves, 2 cowls and 1 crochet project.
Embarrassing? Yes, slightly. But there are worse skeletons to have in one’s cupboard, aren’t there? And I can’t be the only one, surely?
My resolution is to finish them all in 2020, or rip out the ones that I don’t want to finish anymore and repurpose the yarn. I’ll write about them here, now and then, hoping that they’ll provide some inspiration, or an interesting or funny story. The only rule I’m imposing on myself is that they should all be gone (finished or repurposed) by the end of the year.
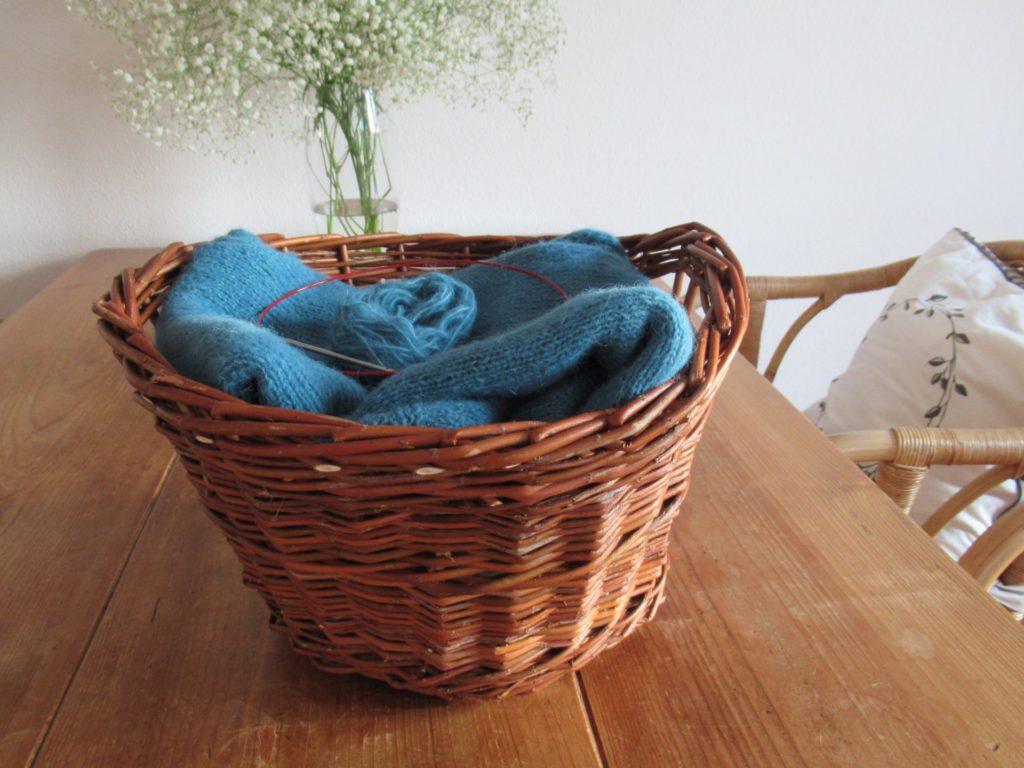
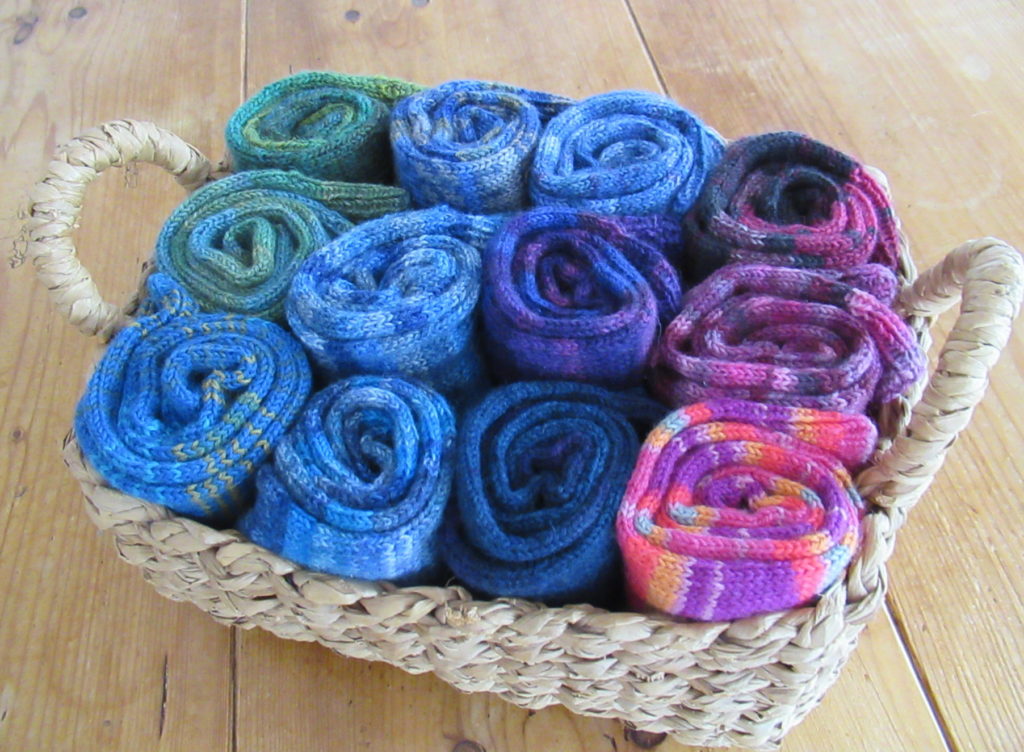
I plan to take the UFOs out of their hiding place one at a time, and transfer them, one by one, to the basket I made last year. I’ll place the basket in plain sight, so that I won’t forget it.
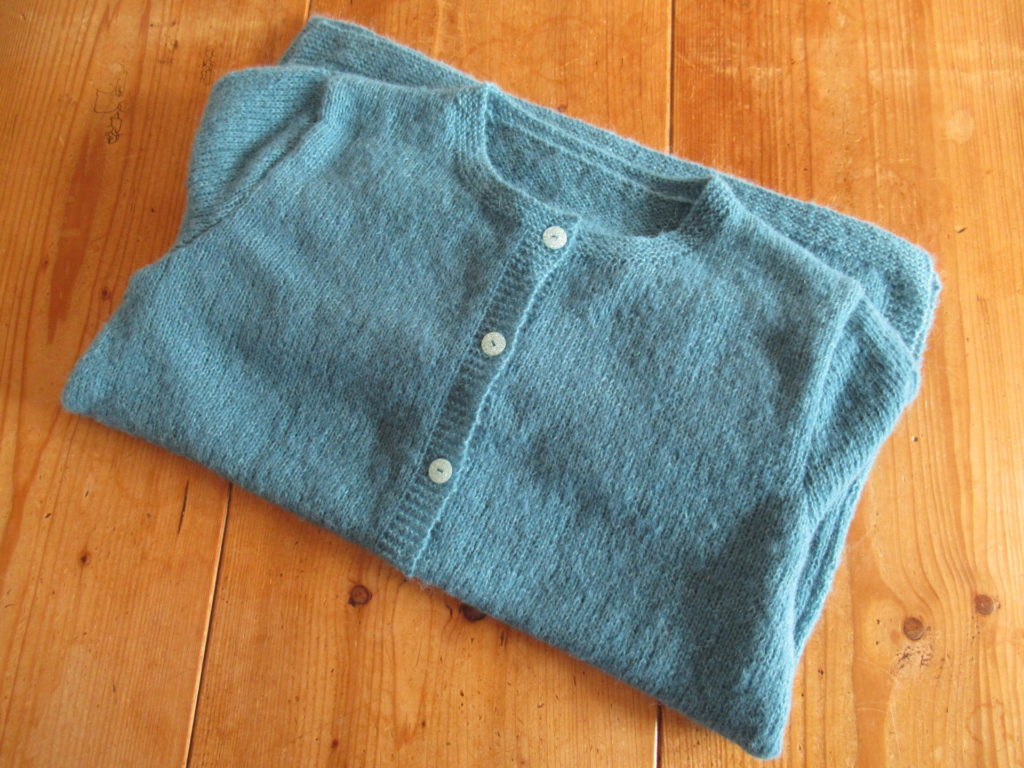
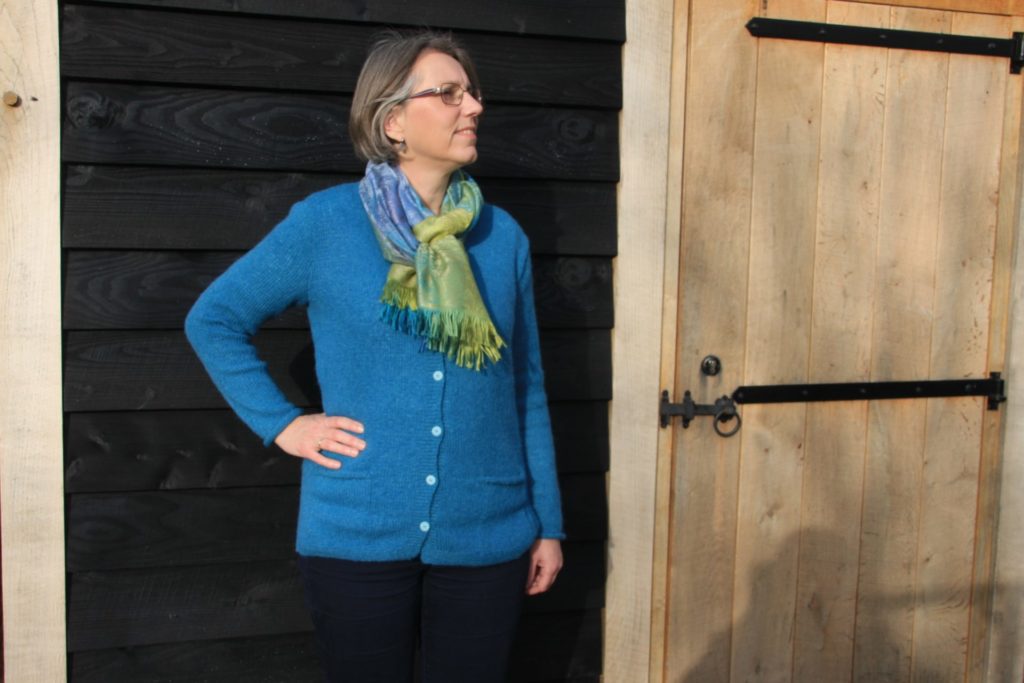
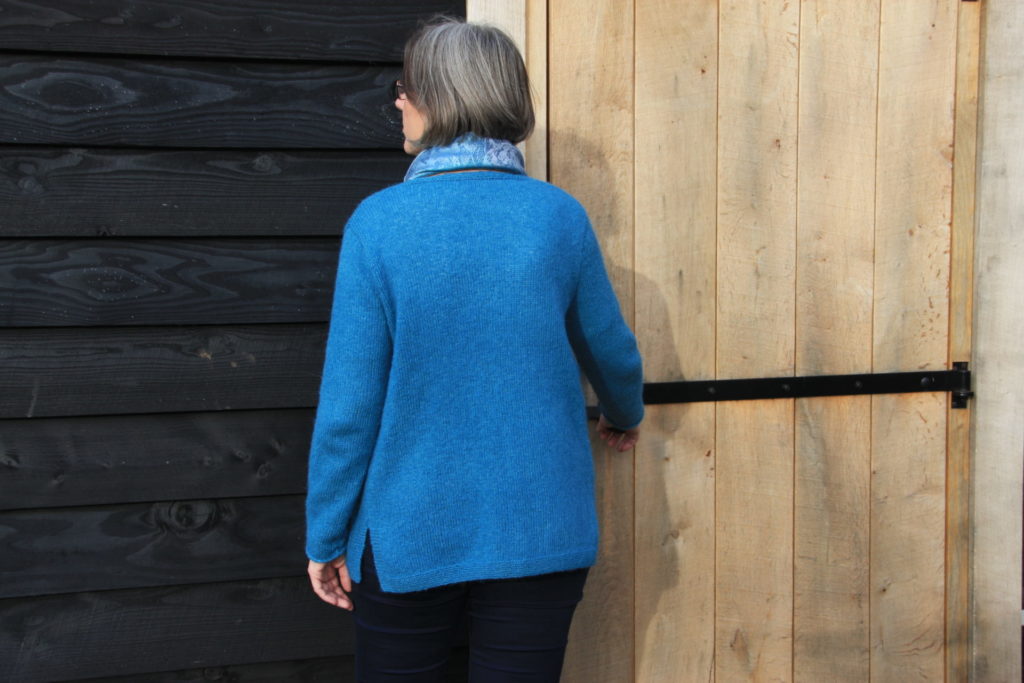
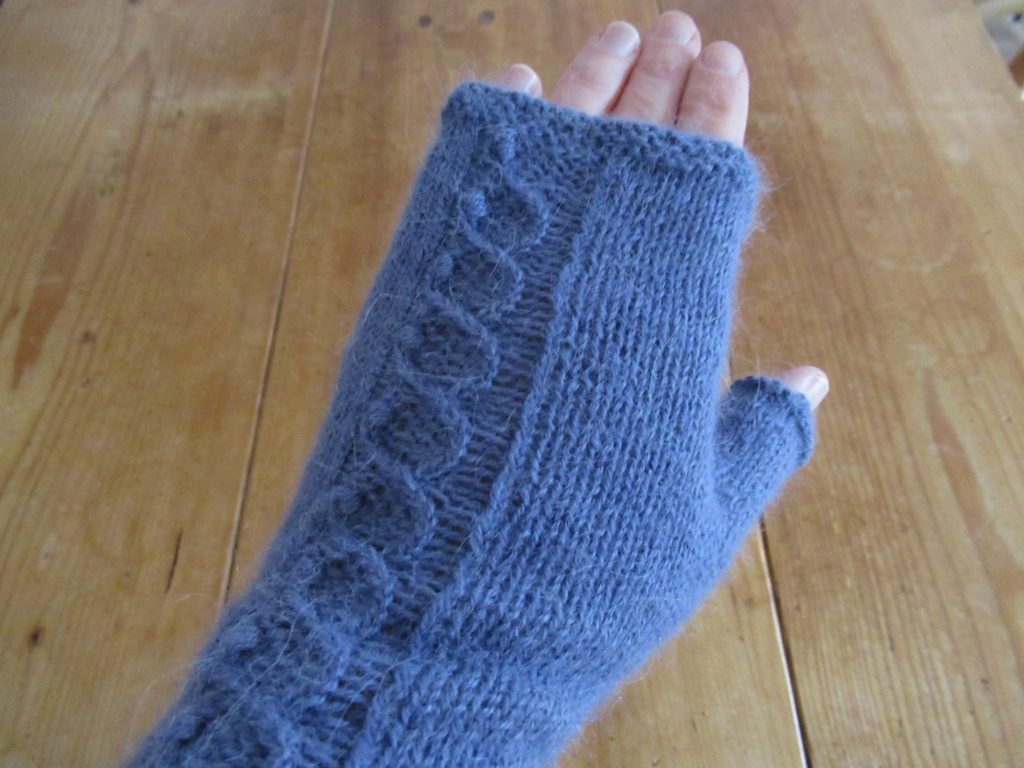
But first I needed to free up the basket. So to start with, I’ve finished my blue knitting project. This wasn’t a UFO but definitely a WIP.
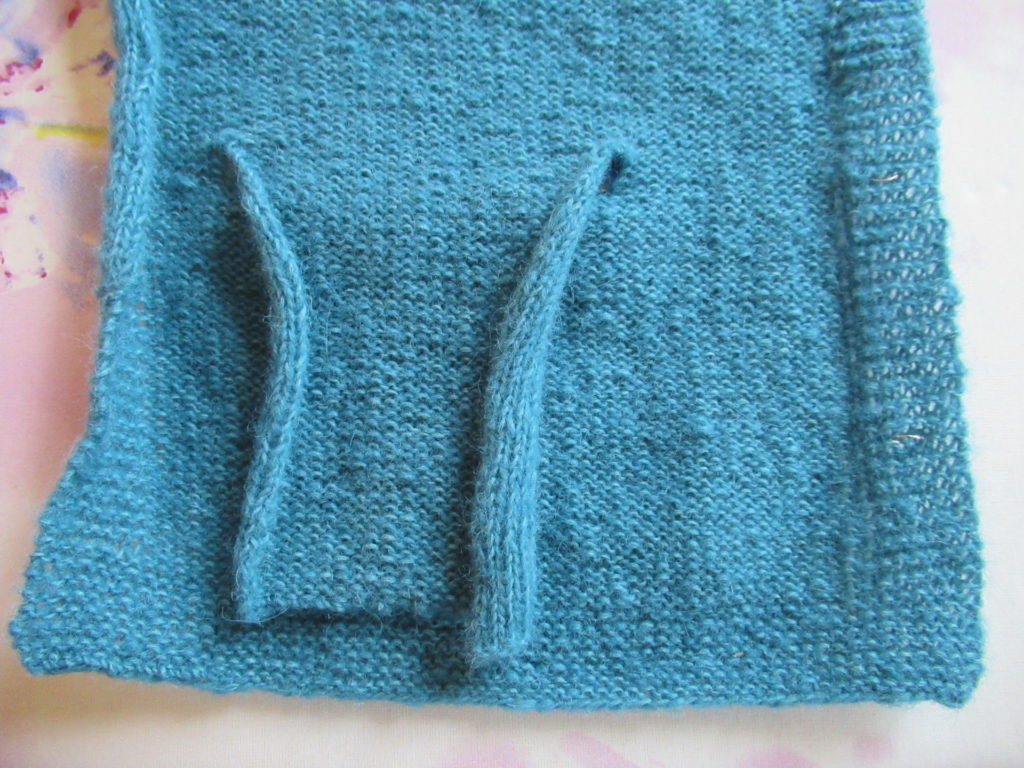
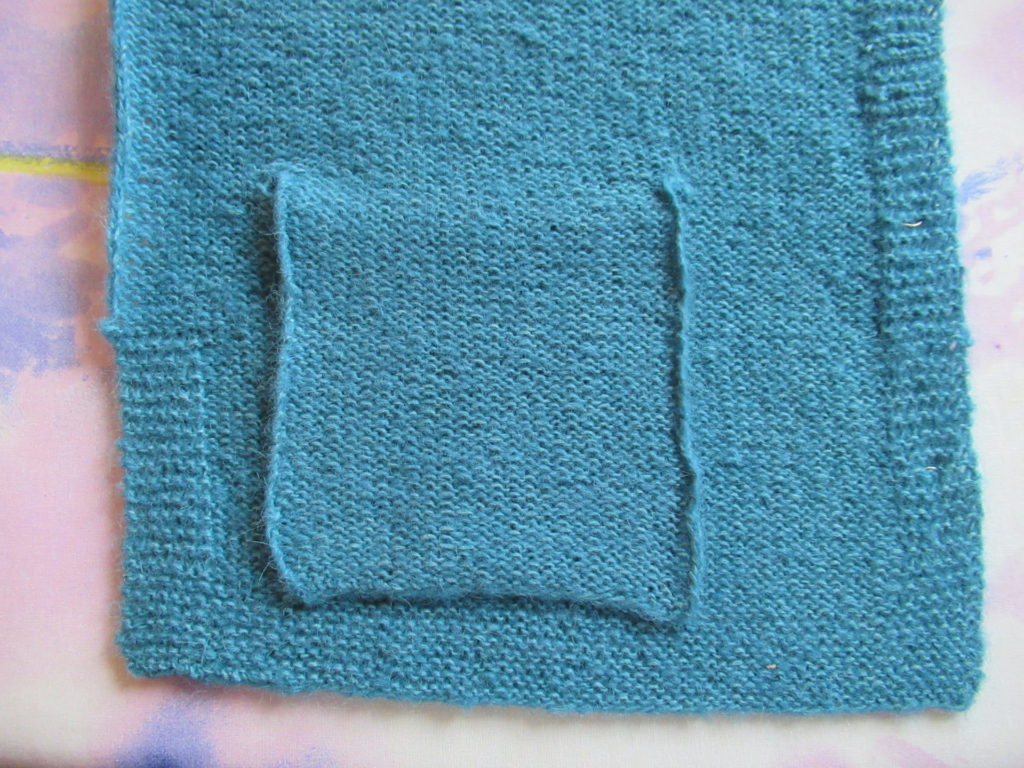
It is a long-sleeved cardigan with knit-in pockets. I chose this pattern by Kim Hargreaves because I wanted something simple for everyday wear.
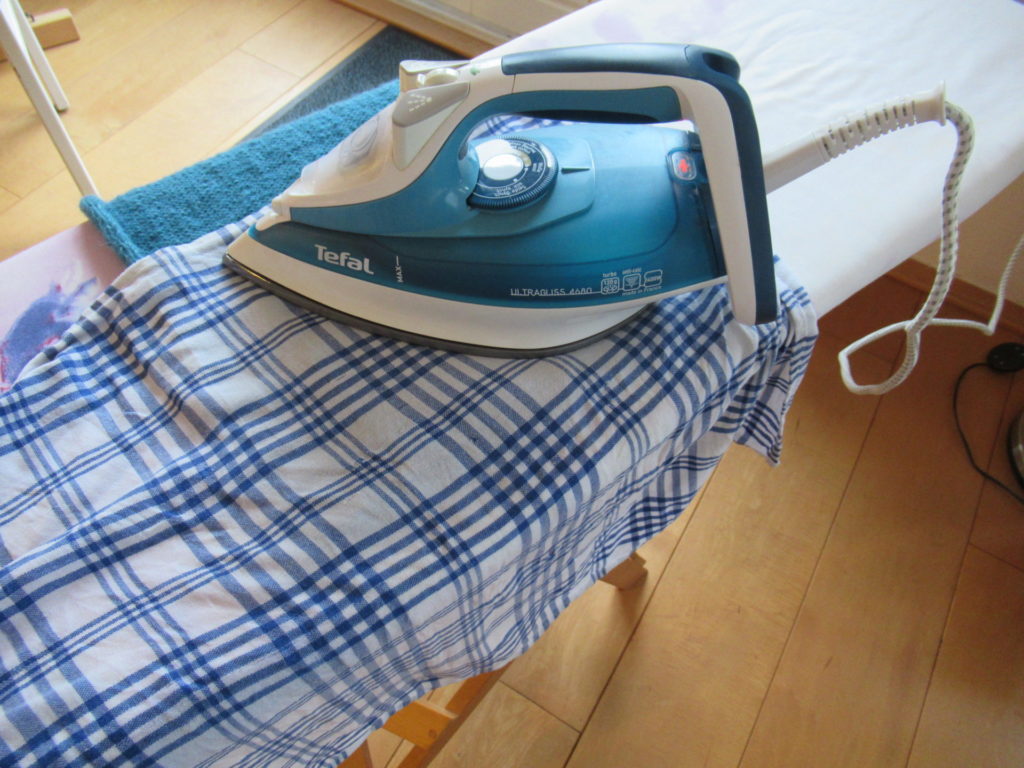
Sometimes I block garment pieces, but this time I followed the designer’s instructions and pressed them. I placed the pieces on the ironing board, covered them with a damp tea towel and, with the iron on ‘wool’, carefully pressed them.
It’s a miracle what this does to the knitting:
Inside of pocket before pressing...
...and after pressing
It’s very satisfying to see all the neatly pressed pieces hanging over the back of a chair:
For me, it is at the finishing stage that a WIP is most in danger of becoming a UFO. No matter how much positive self-talk I use, I don’t enjoy the finishing part of knitting. But some music and a mug of tea help a little.
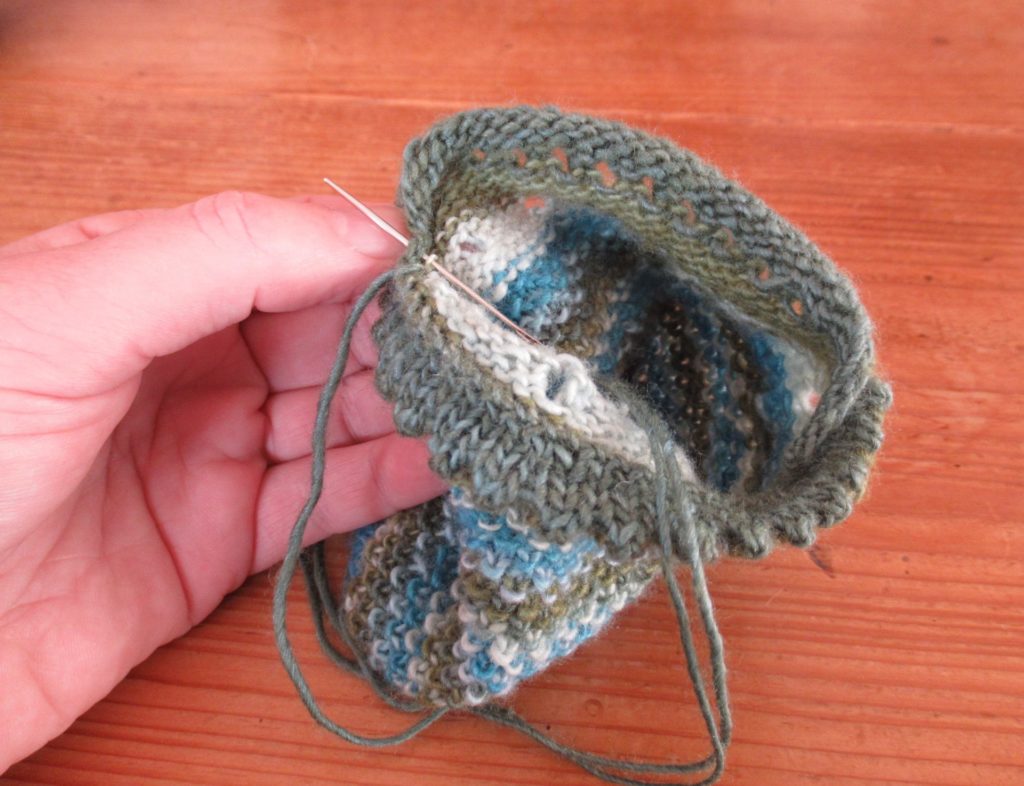
Invisibly sewing the pocket linings to the inside of the fronts took several attempts. After seaming the rest together and sewing on the buttons, the entire cardigan was done. A WIP turned FO.
Am I happy with it? On the whole, yes, but there are two things I’m not entirely happy with. The first is that the cardi twists slightly to the right, as you can see in the photo below.
It’s not that I put it on hastily. I already noticed that the pieces were slightly askew while I was still working on them. It must be something in the yarn that makes the fabric behave this way.
The yarn (Rowan ‘Alpaca Classic’) is made with a new technique. The alpaca fibres are blown into a cotton tube, resulting in a soft and airy yarn. I’m not an expert, but perhaps the cotton tube needs a tiny bit of tweaking?
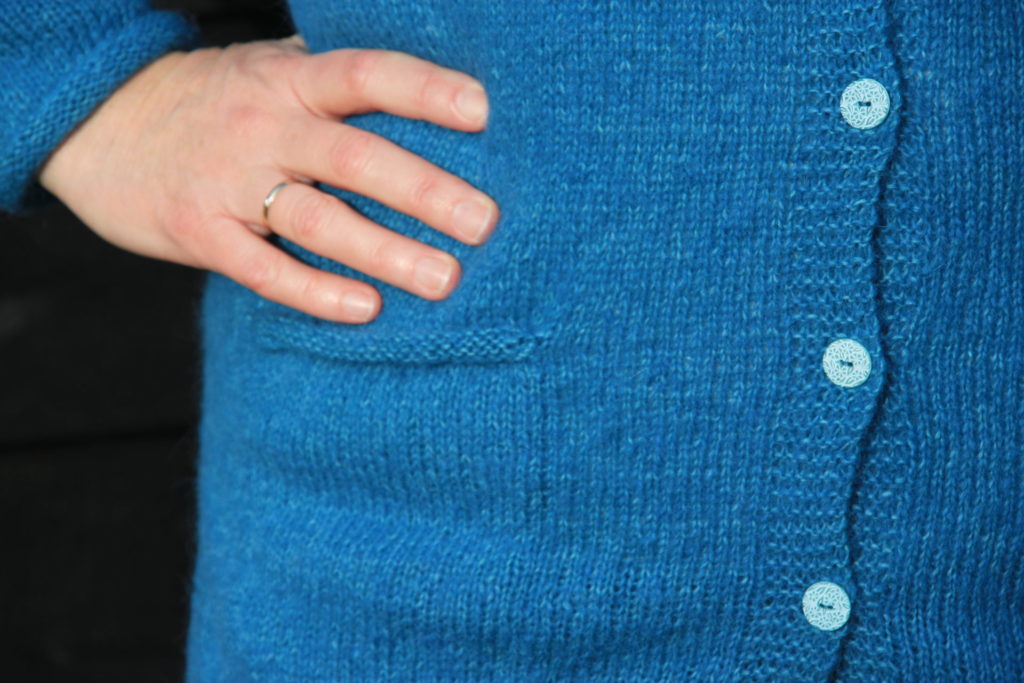
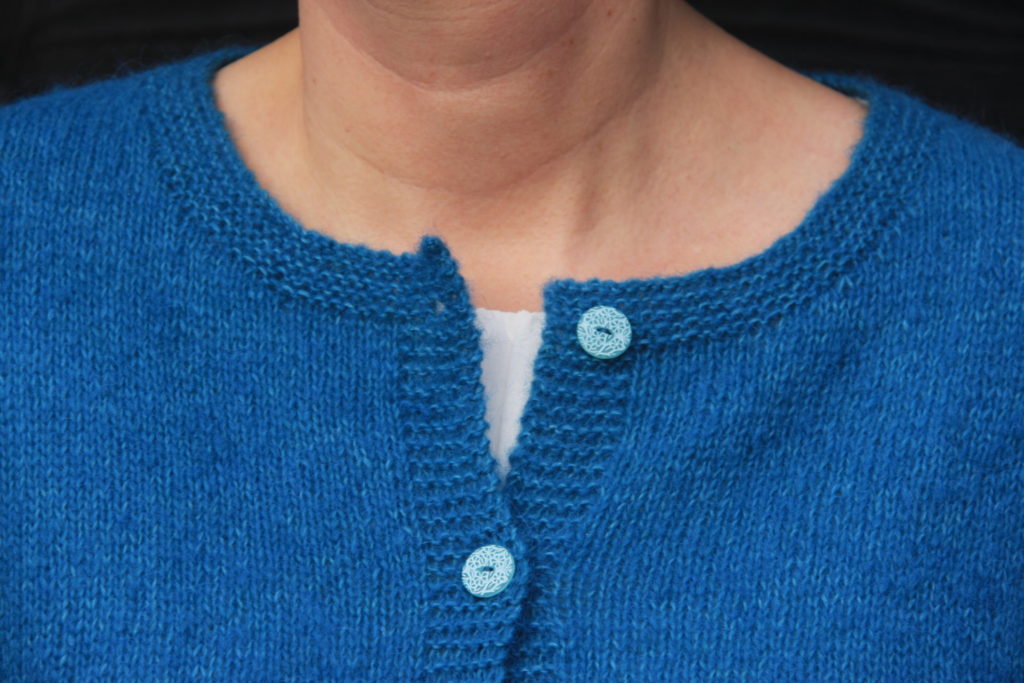
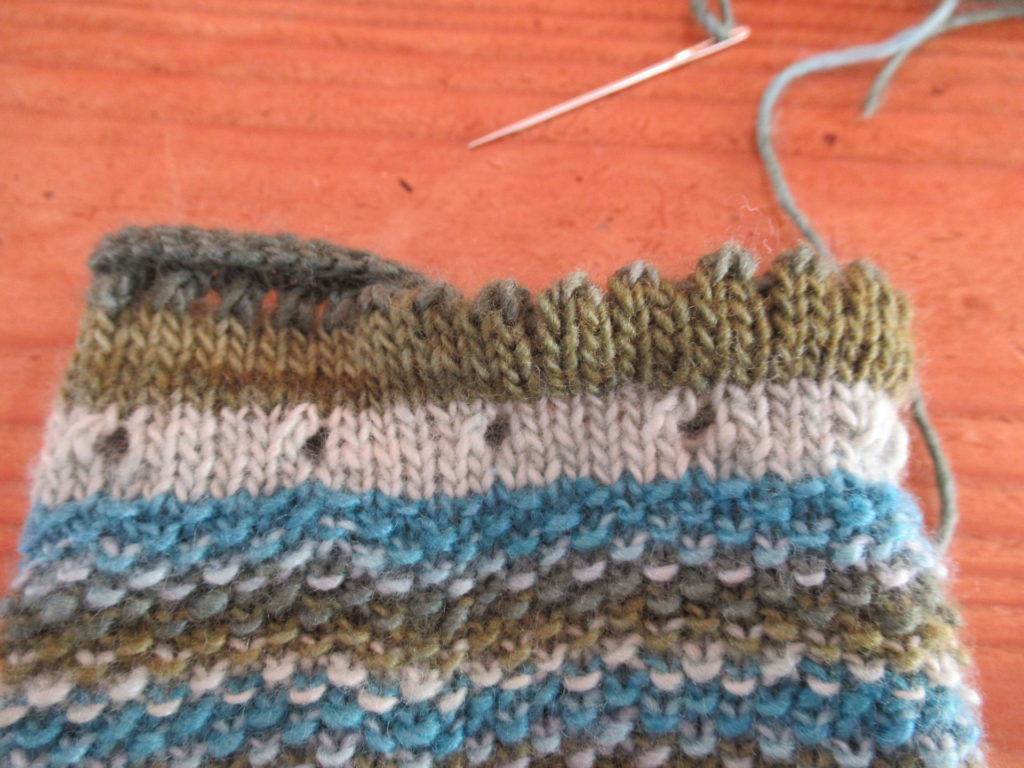
The second thing I’m not happy with is that the button bands gape. Look:
The button bands don’t overlap as they should. This isn’t because the cardi is too tight – it has enough ease as you can see from the back.
It’s always hard to get narrow button bands right. Maybe they gape because the yarn is so very, very soft and airy. Oh well, I’ll usually wear it open anyway.
The things I do like are the simple, round neckline…
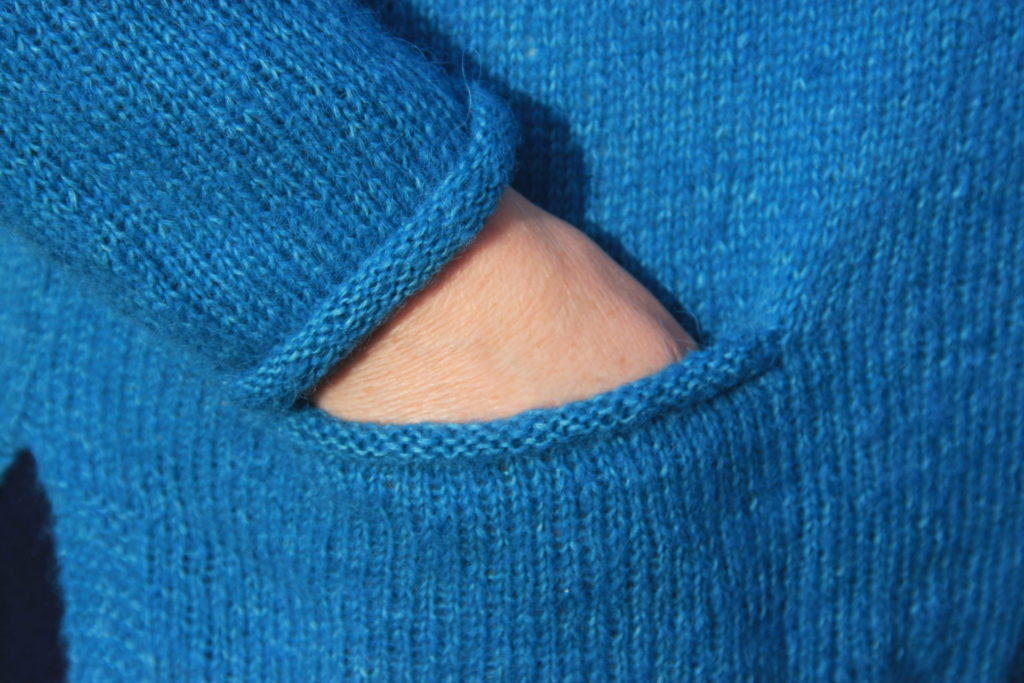
… the rolled sleeve hems and pocket tops…
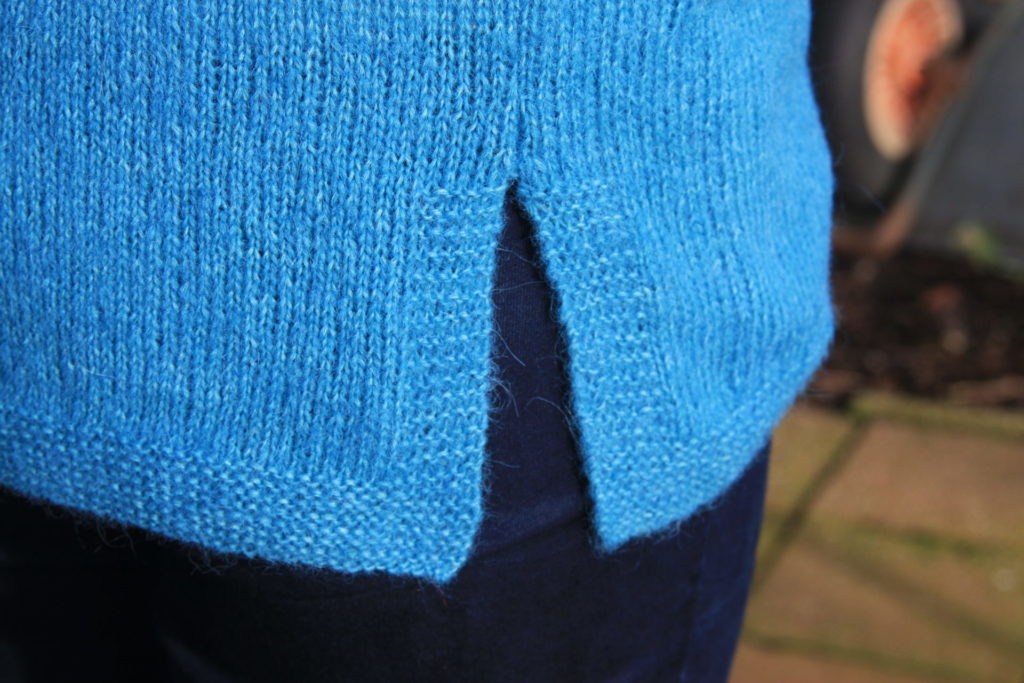
… and the side vents with their neat garter stitch borders that are exactly the same width as the border along the bottom of the cardi.
I love this kind of attention to detail. But what I love most of all about this cardi is that it is incredibly soft and lightweight. It weighs just 250 grams! Very simple and very wearable.
Kim Hargreaves is an independent British designer. Her patterns have given me many hours of knitting pleasure over the years. The pattern of the cardigan above is called ‘Fair’ (Ravelry link) and comes from Kim’s book Pale.
At the end of 2019, I was suddenly assailed by doubts. I think it was partly the time of year, and partly my first blogiversary that involuntarily made me look back and look ahead. Questions that went through my mind were: Where am I going with my knitting and my blog? Should I be going anywhere with my knitting and my blog? Shouldn’t I be doing something more important or useful?
Fortunately, I received some lovely comments that really helped me put things in perspective. Some of them said things along the lines of ‘giving people pleasure with your blog is worthwhile in itself.’ I’m really grateful for these remarks, because they reminded me of why I started blogging in the first place – the hope that some of the things that make me happy will make others happy too.
Others commented about the importance of asking questions and suggested that I could, perhaps, try some slightly more controversial writing. Thank you for all of those comments – they have given me food for thought.
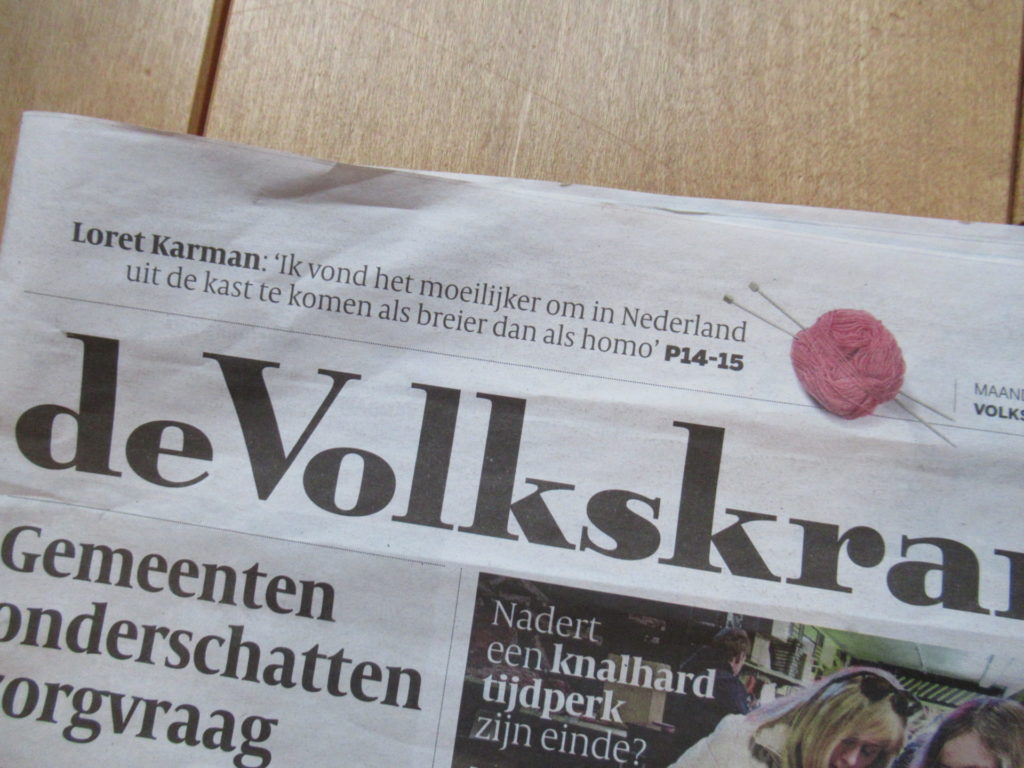
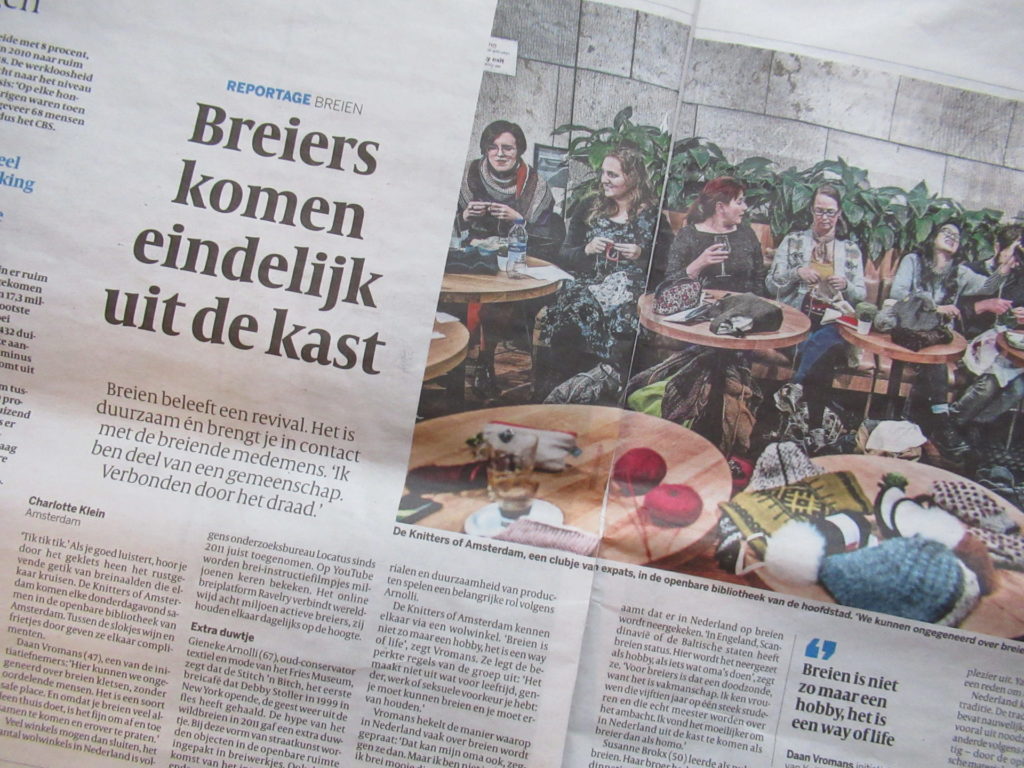
Then, on December 30th 2019, De Volkskrant, a big national newspaper in the Netherlands, published an article about knitting that provided me with more food for thought. It was even introduced on the front page!
The article, entitled ‘Knitters are Finally Coming Out of the Closet’, was about a knitting group in Amsterdam. Here are some thought-provoking quotes:
‘Knitting isn’t just a hobby, it’s a way of life.’ (Is it? How?)
‘In Britain, Scandinavia or the Baltic states knitting has status. Here it is seen as a mere hobby, as something grannies do.’ (Do people in those countries really feel that knitting has status, or does it just look like that from the outside? And what’s wrong with grannies anyway?)
‘Coming out as a knitter was harder for me than coming out as a gay person.’ (I think/hope this means that it isn’t very hard for people to openly be themselves in this country. But why this huge embarrassment about knitting? Is it a typically Dutch phenomenon?)
‘The Netherlands do not really have a knitting tradition.’ (?)
‘If you have spent three entire weeks knitting a sweater, you aren’t going to discard it after one season.’ (This was about sustainability, of course, about not throwing things away thoughtlessly. An extremely important issue. But my first, unworthy thought was: Three weeks? An entire sweater in just THREE weeks?!? Further on in the article there is even someone who knits a sweater in two weeks. How?)
More question marks. Interesting.
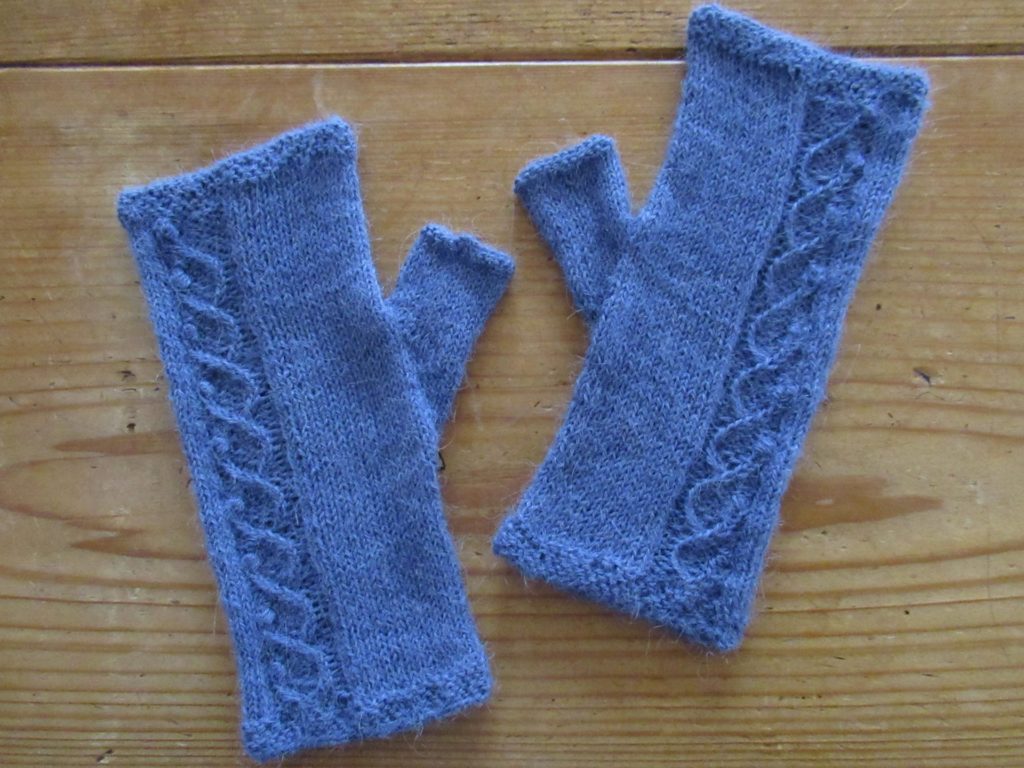
In between al this pondering, family gatherings, meals with friends etcetera, I actually also managed to do some knitting. I finished a pair of fingerless mittens for our niece’s 17th Birthday. We chose the pattern and the yarn together.
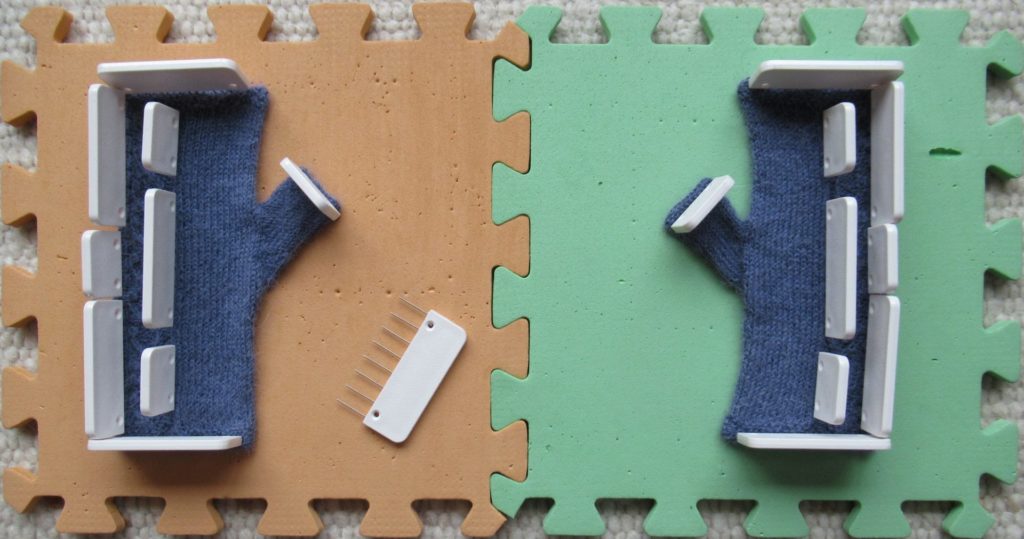
After finishing the knitting and darning in the ends, I soaked and blocked the mittens.
I placed the damp mittens on two foam mats and pinned them into shape with ‘knit blockers’. These nifty tools look a little like combs and come in boxes of twenty blockers in two sizes.
This step is not essential, though. Before blocking, the cable was more or less hidden in a ‘ditch’ between two areas of stocking stitch. Blocking made the cable stand out better and the knitting look more even, which is nice for something meant as a gift. But when worn, the mittens will stretch and the cable will become visible anyway.
The pattern I used is Kujeillen, by Finnish designer Tiina Kuu. I asked Tiina what Kujeillen means and this is what she wrote:
‘Kuje’ could be described as a harmless prank or joke that has warm and positive vibes – ‘kuje’ makes you giggle! The form ‘kujeillen’ can be roughly translated as ‘pranking/joking’ – or ‘as a prank/joke in mind’ – keeping in mind that the action has absolutely no bad intentions.
Kuje was also the name of the LYS for which I originally designed the pattern, thus the name.
A fun knitting project with a fun name, Kujeillen is a free Ravelry pattern. Tiina has published lots of lovely patterns on Ravelry and also writes a blog. I can’t read Finnish, but enjoyed looking at the photos of her beautiful sock designs.
The mittens are long – they cover the little finger almost entirely. For myself I would have made them one repeat shorter, but the recipient thought they were nice and warm like this.
The yarn I used was less than one ball of Drops ‘Alpaca’. It is really soft, but next time I’d use a different yarn, because I think the nupps (bobbles) will ‘pop’ more in a bouncier sheep’s wool yarn.
There, my first FO (Finished Object) of 2020.
And that brings me to UFOs (UnFinished Objects).
While I was looking ahead, and thinking of where I’d like to go with my knitting, I could feel something bubbling in my belly, and it wasn’t the Christmas pudding. I mean figuratively, like new ideas. But that ‘something’ felt very vague and elusive. So I asked myself, ‘What is it that makes this so? What could help me to bring it more to the surface?’
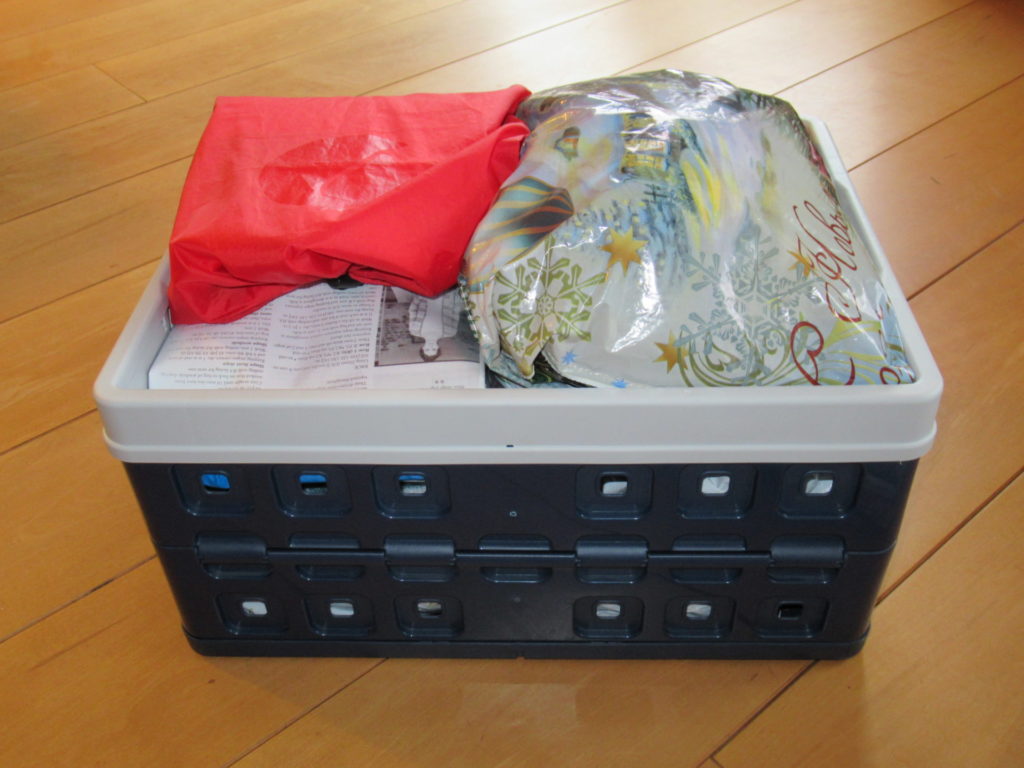
And suddenly a small voice inside me said, ‘You need to make room for new things by finishing some old stuff.’ I immediately knew what this small voice was referring to – this collapsible crate filled with UFOs:
I have quite a few UFOs. That never really bothered me, but it is starting to bother me now, so now I’m going to do something about it.
I haven’t made any New Year’s resolutions since I was a teenager. For a long time they have felt like too much to add to my already crowded to-do list. But this year I’m happy to make this my New Year’s resolution:
In 2020, I’m going to either finish or frog all of my UFOs.
Just one New Year’s resolution. That should be doable, right?
Hello again! 2020 has well and truly started. Maybe it is ‘officially’ too late for New Year’s wishes, but, really, can it ever be too late for good wishes? So, I wish you a very happy, healthy and fulfilling New Year!
In my last blog post of 2019, I asked myself some questions. I would have liked to start this year with some answers, but I haven’t organized my thoughts enough for that. And I am not ready to write about the things I have been knitting either, so I thought I’d ease into the New Year with an impression of our visit to the Dutch Open Air Museum during the Christmas Holiday (focusing on knitting and other fibre-related things, of course).
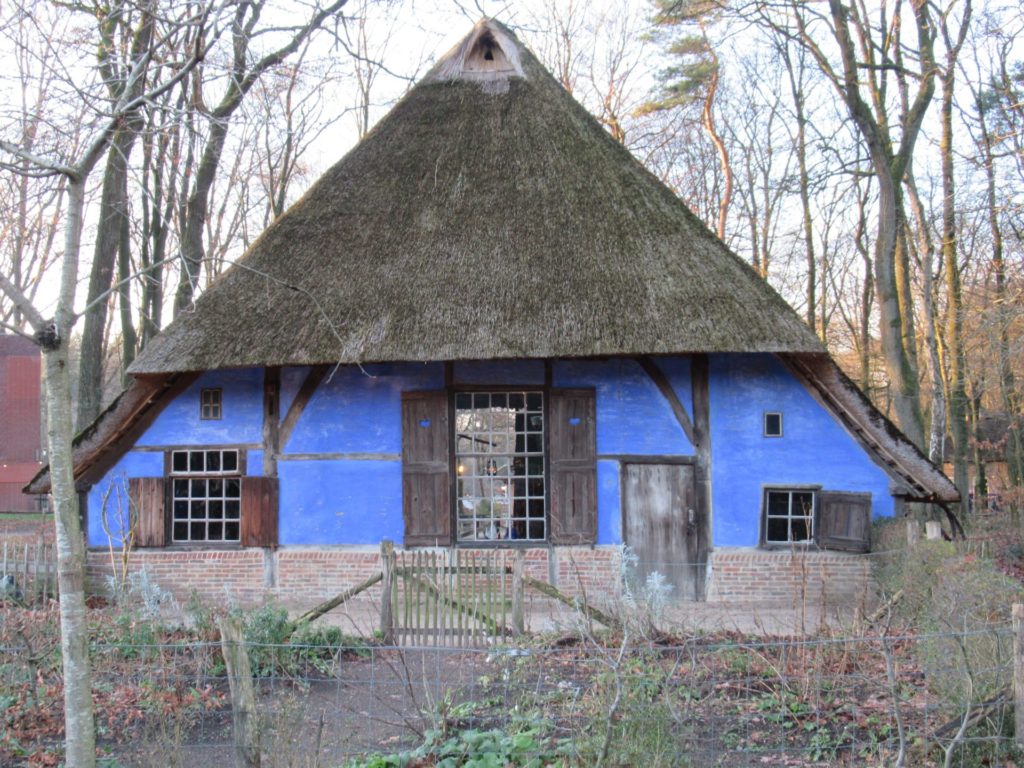
Houses, farms and other buildings from different periods and from all over the country have been moved to the museum over the past 108 (!) years. The first building we entered was this blue farmhouse from the east of the Netherlands:
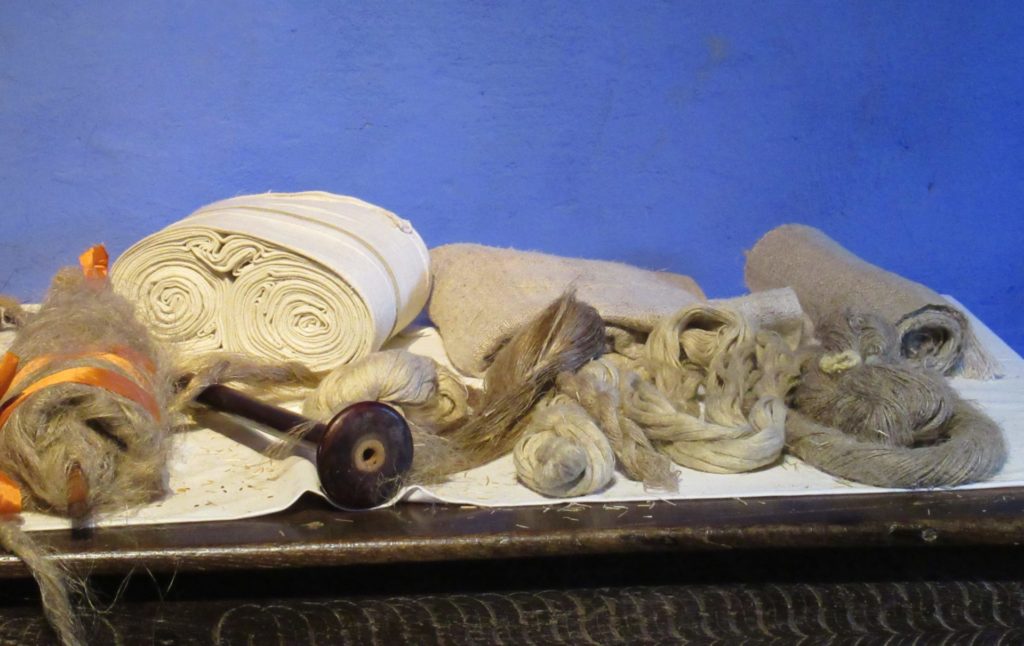
The museum’s theme at this time of year was ‘Winter Jobs’. When there wasn’t a lot of work to do outside in winter, people did all kinds of other jobs. In this particular farmhouse the focus was on spinning (wool and flax) and knitting. There was a display of flax in different stages…
…from unspun fibres in different qualities to woven linen, from coarse and brown (right) to very fine and bleached (left).
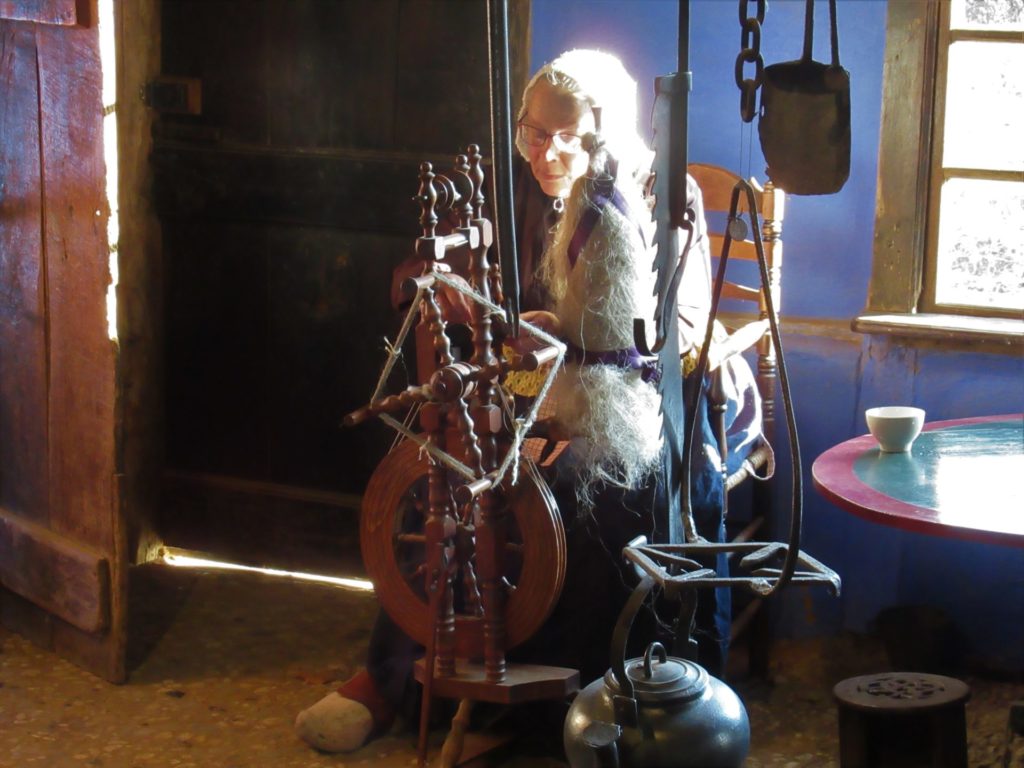
One of the volunteers, dressed in period costume, was spinning flax on a traditional spinning wheel.
She showed us how long flax fibres are – much longer than any wool fibres.
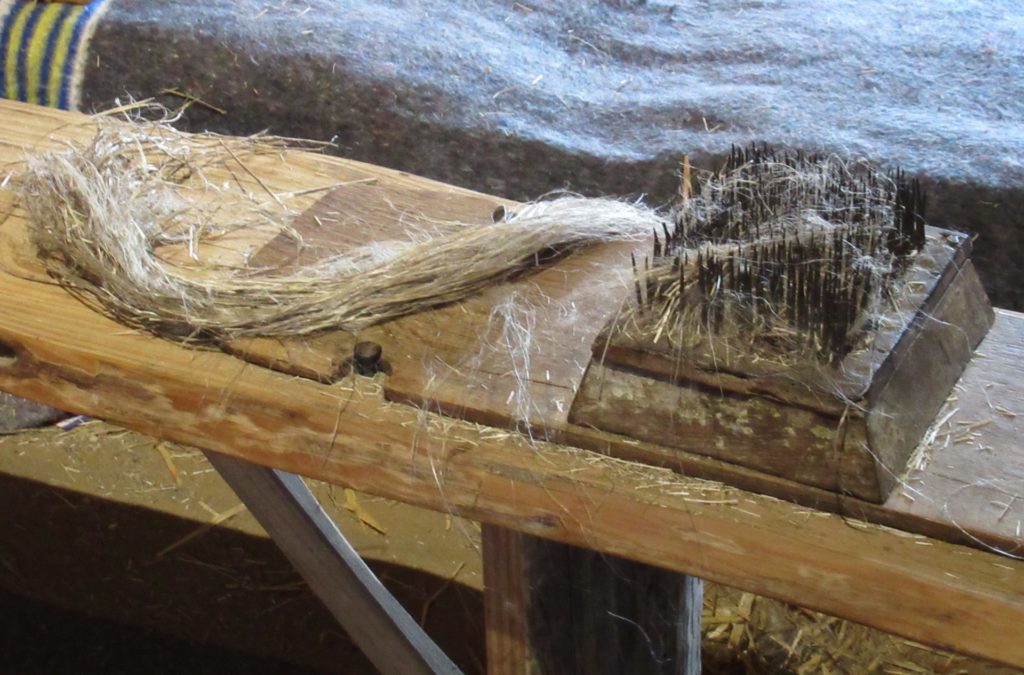
Before flax can be spun and woven into linen cloth, it goes through many stages. The last stage before spinning is hackling. With a hackle like this one…
… the short fibres are removed from the long ones.
All this preparation before flax can even be spun! And then hours and hours of spinning and weaving. No wonder a woman’s linen cupboard was her pride and joy.
I could have spent an entire afternoon in this farmhouse alone, and if the museum wasn’t so far from where we live, I’d love to work here as a volunteer. But there was more to see, so on we went.
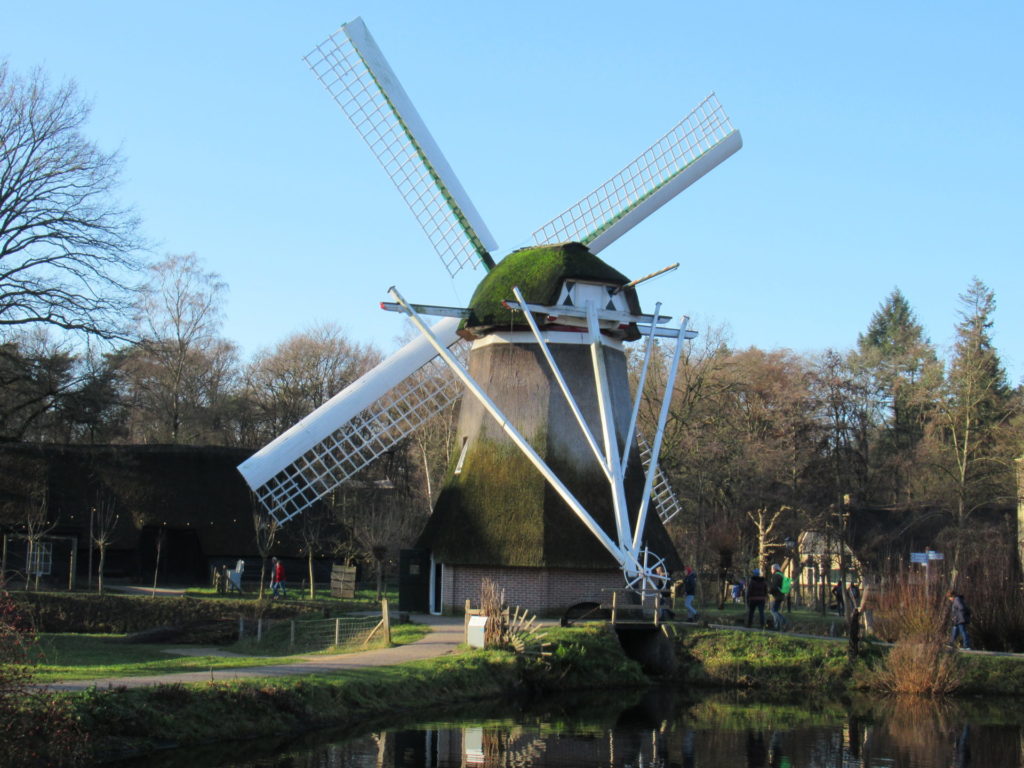
We saw several iconic Dutch windmills, of course, like the thatched one at the top of this post, used for pumping water, in order to drain wet low-lying areas, and this wood-sawing mill:
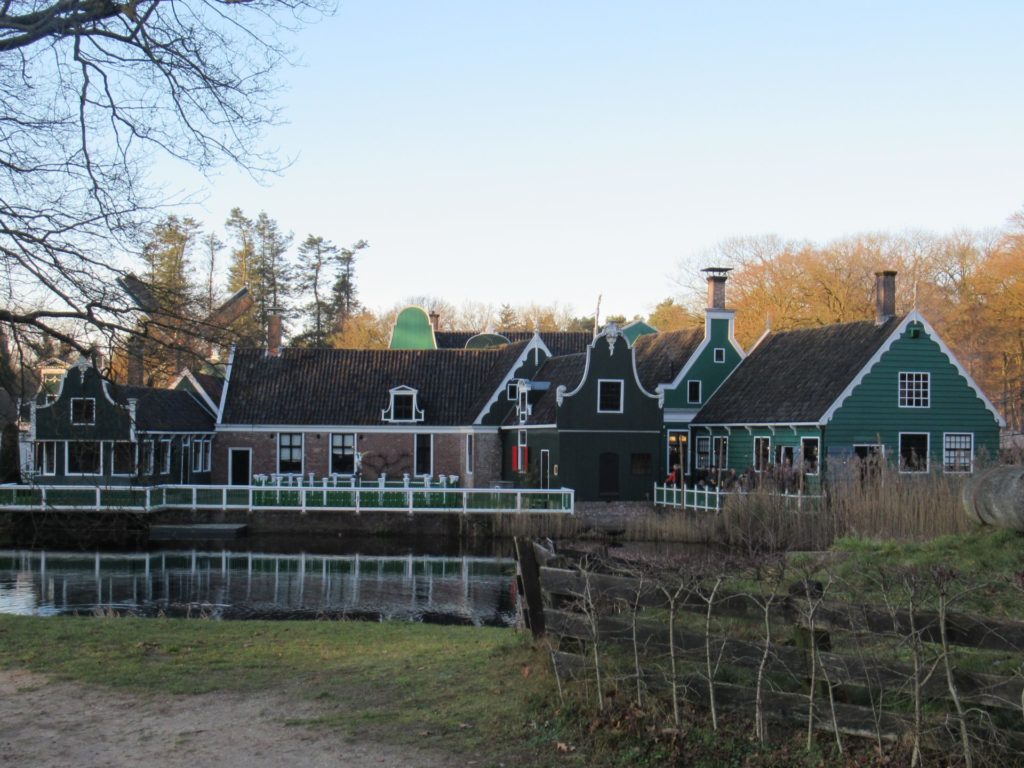
One of the parts of the museum I remember best from when I visited here as a child is this collection of green wooden houses from the Northwest of the country.
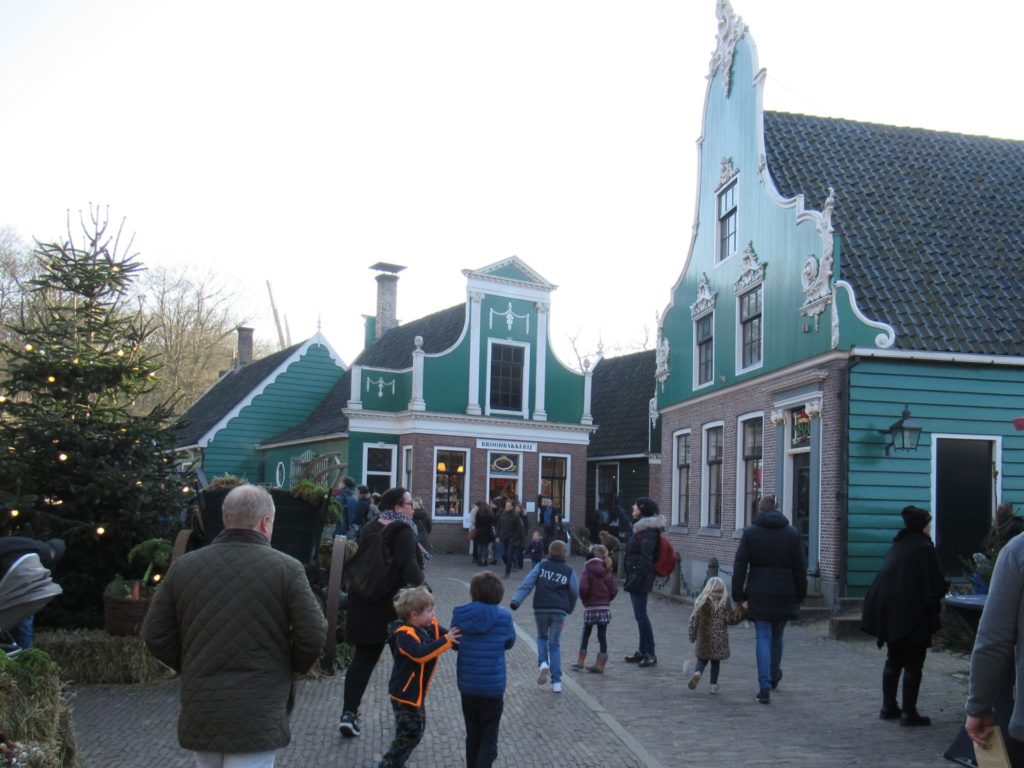
We were not the only ones who had this great idea of visiting the museum. In fact, it was one of the busiest days of the year.
I was dismayed when I saw the crowds at the entrance, but the park is so big that it could easily absorb us all.
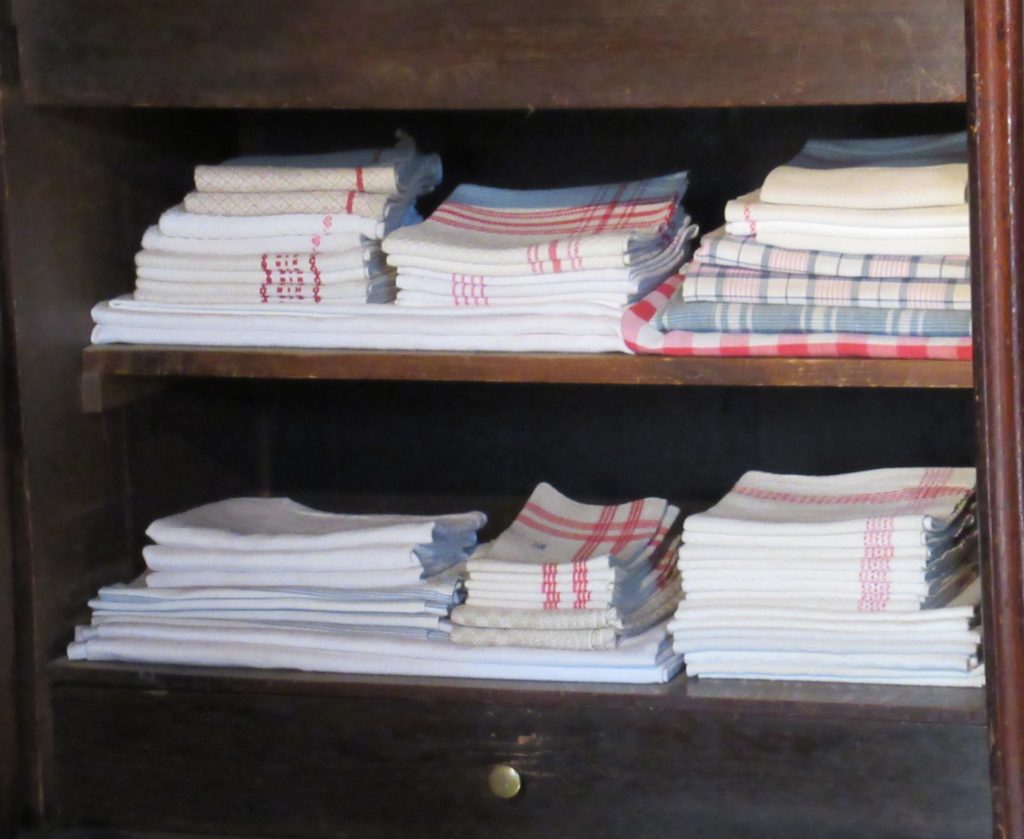
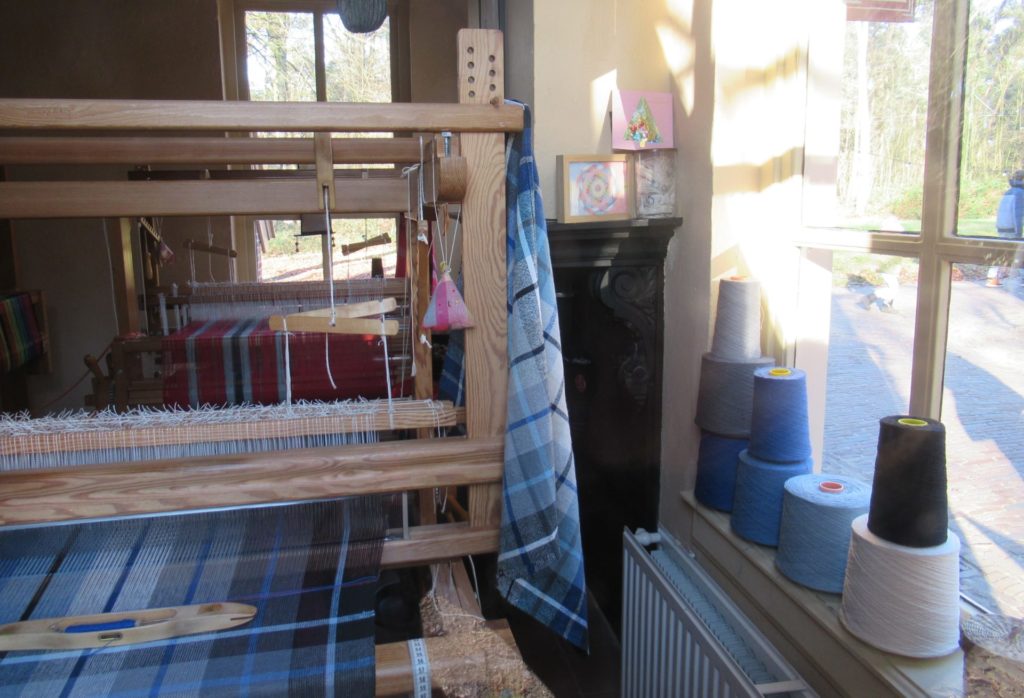
The weaving shed was closed, but I peeked in through the window…
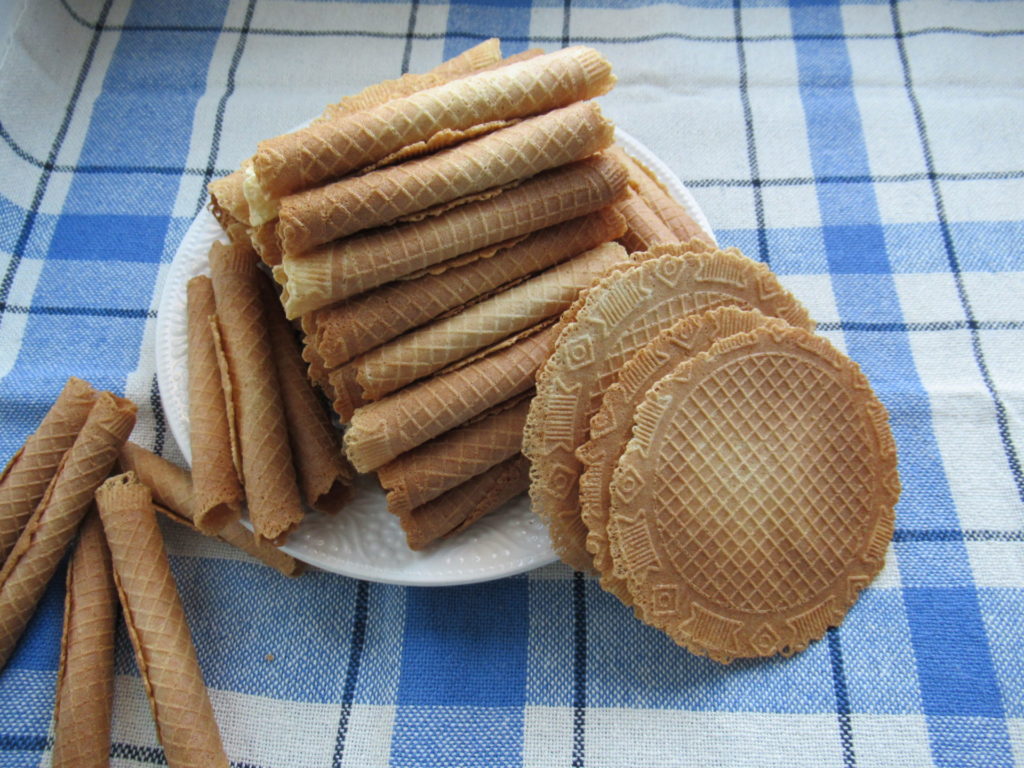
… and later bought two of the weavers’ lovely checked tea towels in the shop. This is one of them with some of the wafers I always bake on New Year’s Eve:
They are called ‘knieperties’ and are very thin, slightly sweet and have a hint of cinnamon.
Uh-oh, this is becoming quite a long blog post. I intended to make them shorter this year, but somehow there is always so much to tell. I hope you have a few minutes more.
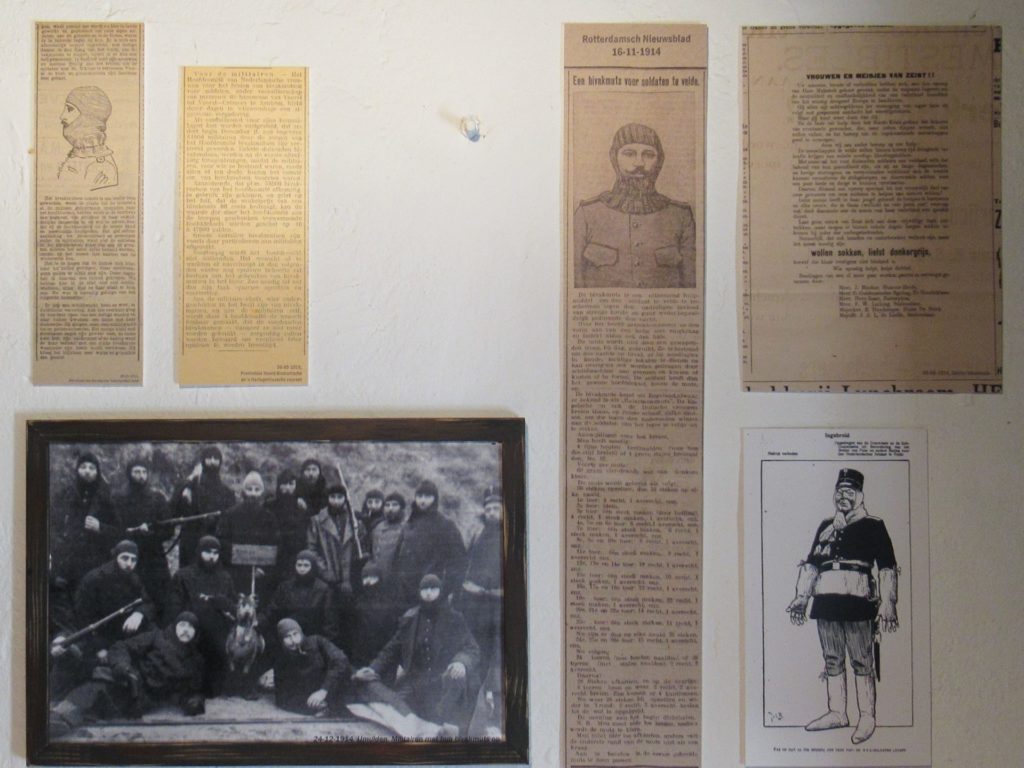
Let’s hurry on to the cottage dedicated to knitting in World War I. On one wall there was a display of newspaper cuttings with articles urging women and girls to knit for our soldiers.
They were asked to knit scarves, mittens, socks (preferably dark grey) and balaclavas. The photograph on the left shows a group of soldiers wearing knitted balaclavas. And here is one in progress:
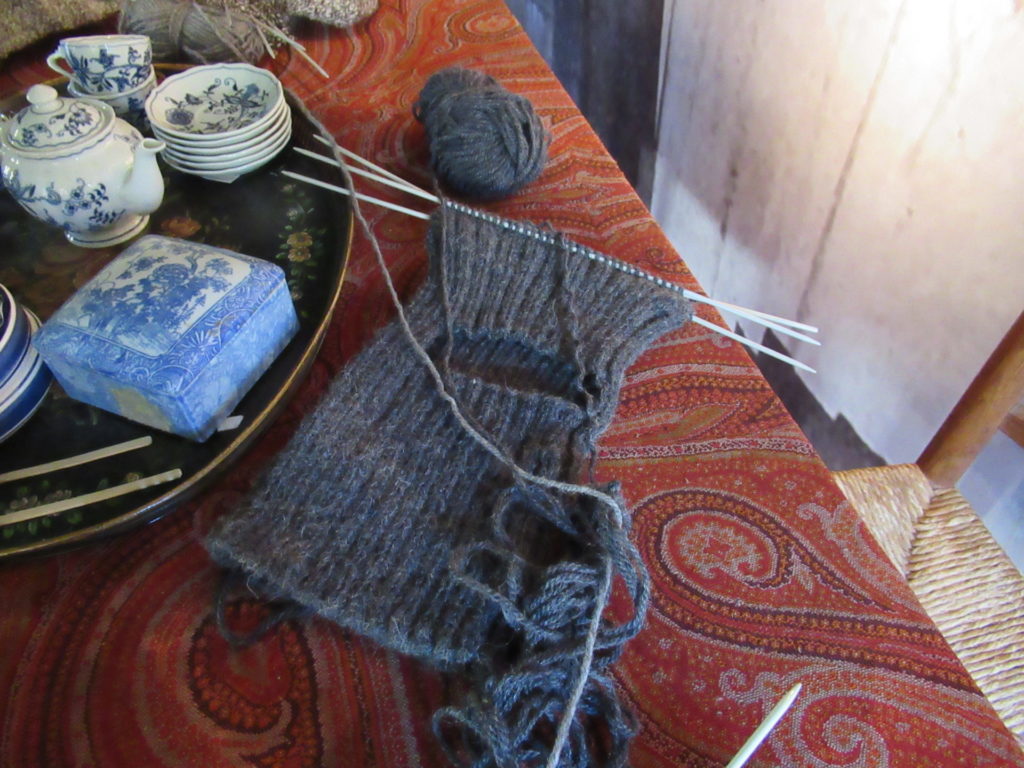
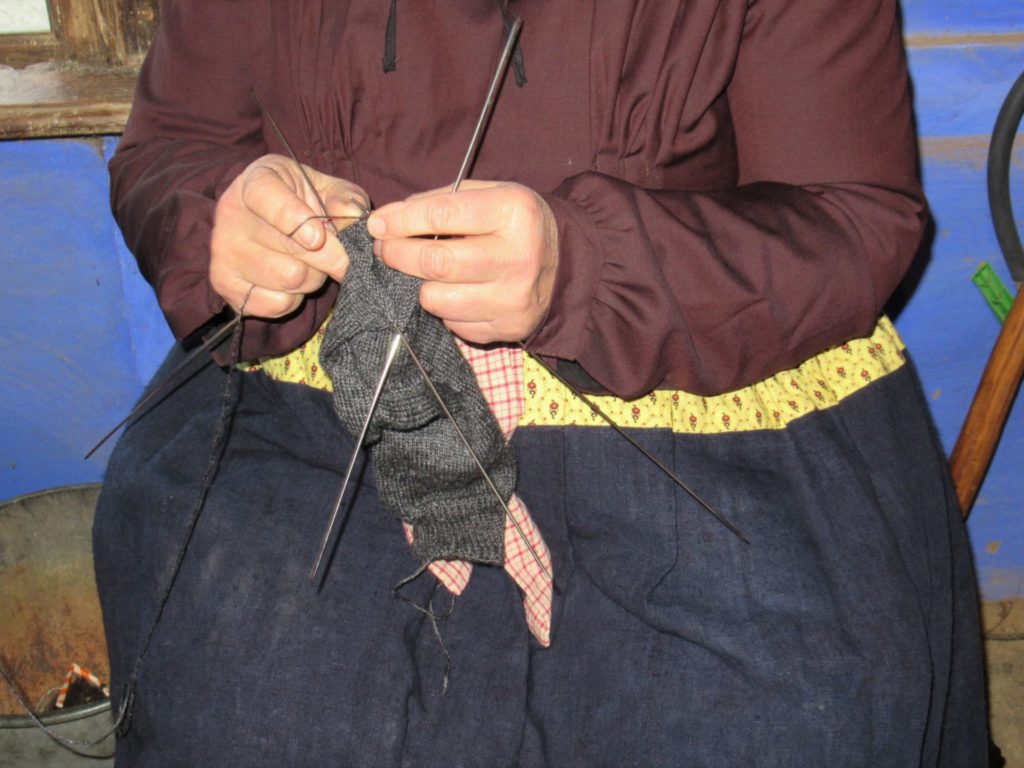
At the end of the afternoon we walked back to the blue farmhouse. The volunteer who sat there spinning earlier, was now knitting. She was knitting a sock in exactly the same way my mother and grandmother did and how I was taught to knit them.
Nowadays, I use a set of five short lightweight sock needles, with the stitches distributed over four and knitting with the fifth. But here you can see how it used to be done. Only four needles (long steel ones) are used, with the stitches on three needles and the knitting done with the fourth.
At this time of the day it was much quieter in the farmhouse and the volunteer had time for a nice chat about spinning and knitting. (It’s always so nice to chat with kindred spirits!)
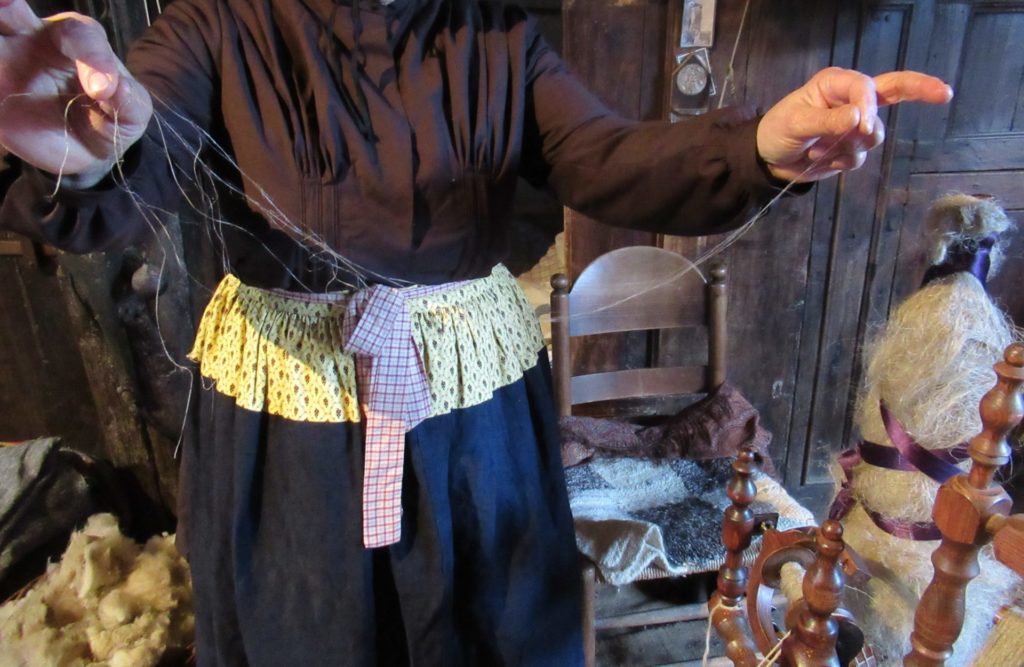
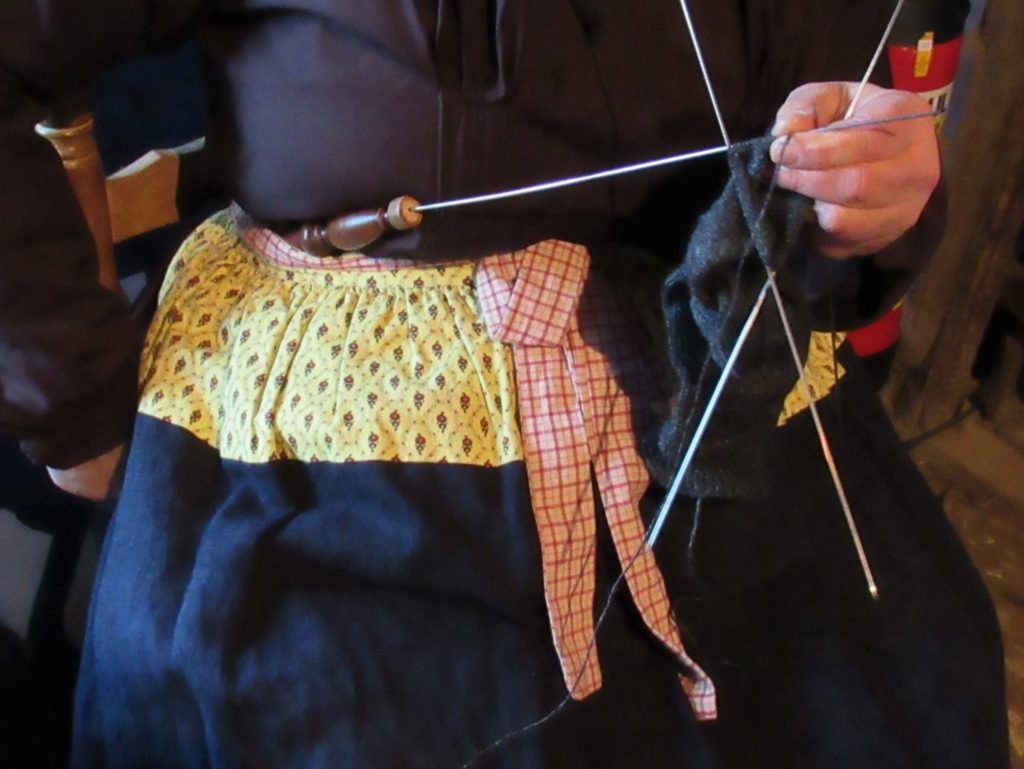
She also showed me something I had never seen in action before – a knitting sheath. It’s a wooden stick with a hole in it, tucked into the knitter’s waistband. It was rather dark inside the house, so I hope you can see it:
The knitting sheath supports the working needle, carries the weight of the knitting, protects the knitter’s clothes from the sharp needle point and speeds up the knitting. Very interesting. I’d like to try that someday.
Well, that’s all for today. I hope to be back with a post about my own knitting soon.
For more information about the Dutch Open Air Museum, please visit their website. There is much, much more to see than I’ve shown you here.
Hello! It’s good to see you here. I hope your life is not too frantic in the run-up to Christmas.
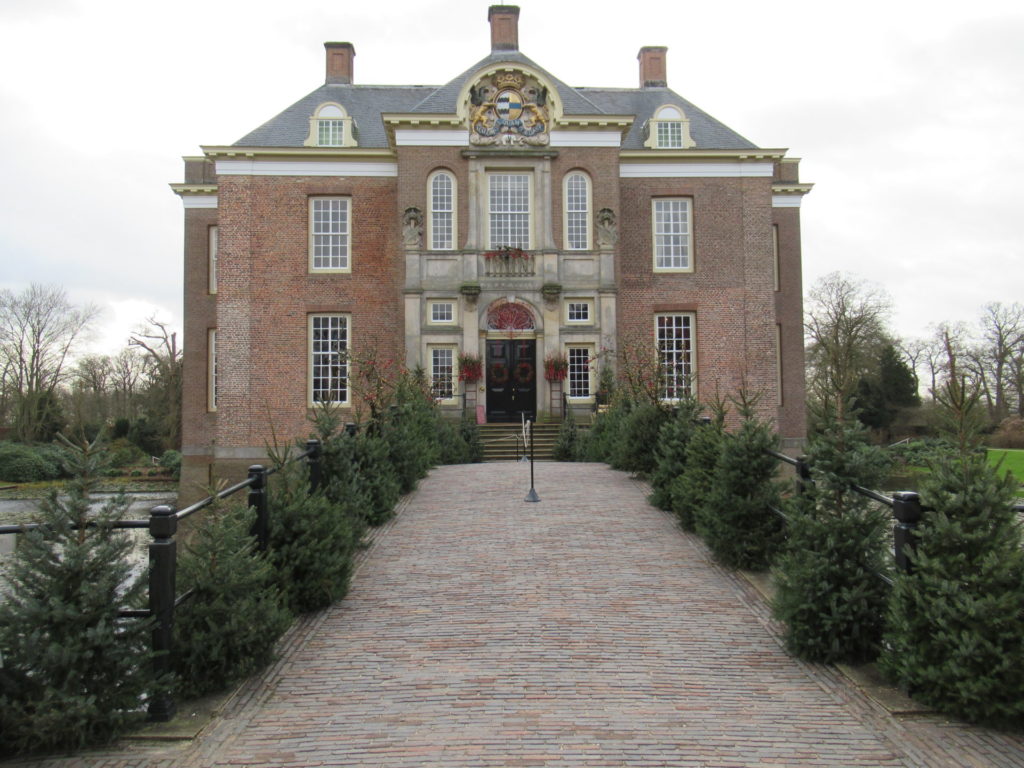
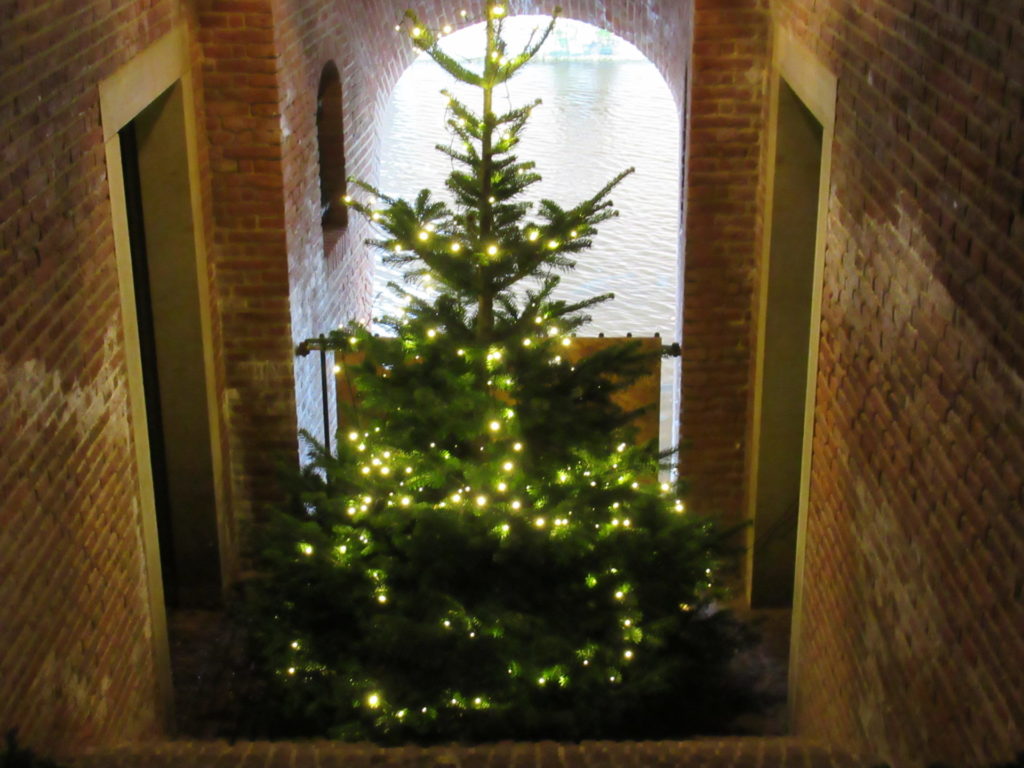
There’s quite a bit of pre-holiday preparation going on here. And some knitting, too. And some mulling, not just of wine, but also in the sense of pondering. But before I get to that, I’d like to take you on a mini-trip to the castle in the picture at the top of this post – Middachten Castle. It’s a private property that only opens on special occasions. The Christmas opening is one of these occasions and we visited it last weekend.
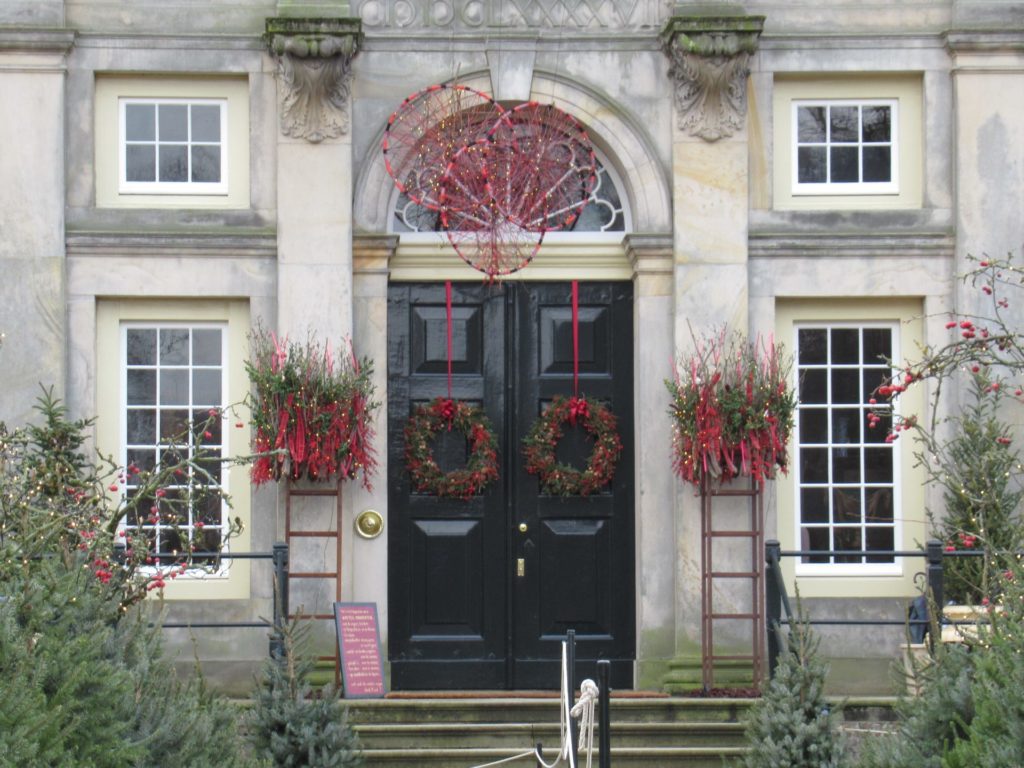
Although the castle has medieval roots, the current building dates from the 17th Century. There’s a moat all around it and a bridge leading to the front door. Or, rather doors. The two glossy dark green doors were decorated with beautiful wreaths flanked by other greenery.
Unfortunately photography wasn’t allowed inside, so you’ll have to take my word for it that the Christmas trees and flower arrangements were amazing. There was at least one Christmas tree in every room and the decorations were themed to the rooms. There were bunches of cigars in the tree in the smoking room, orchids sprouting from books and Christmas ornaments made from printed pages in the library and so on.
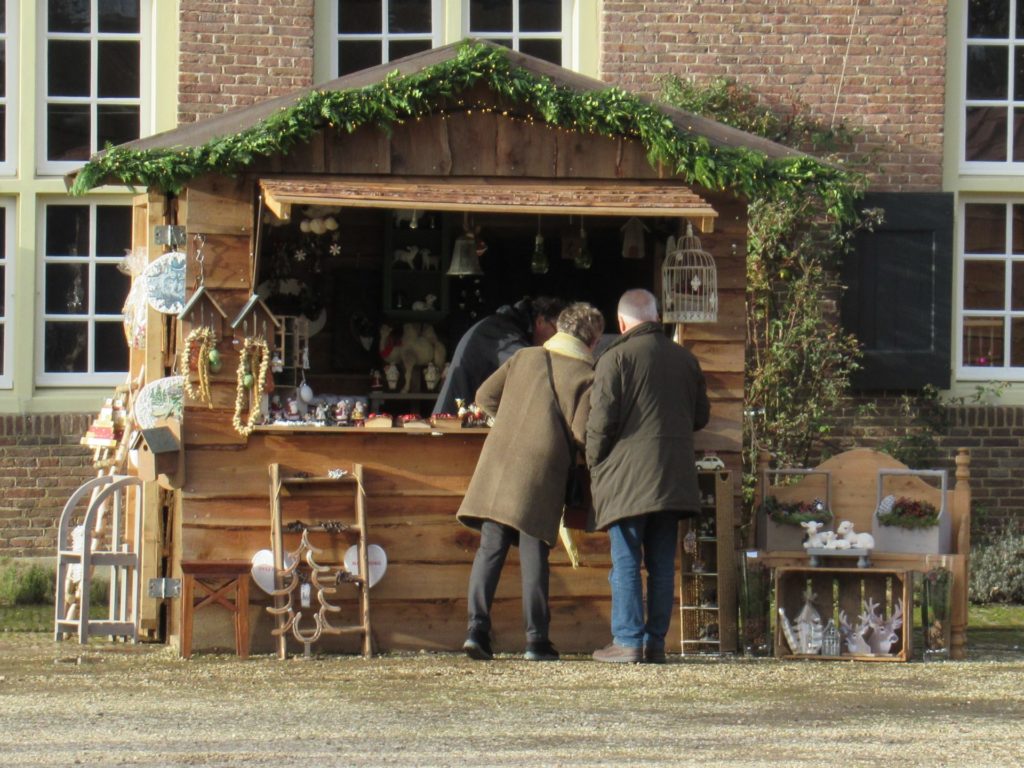
There was a Christmas market outside and in the outbuildings…
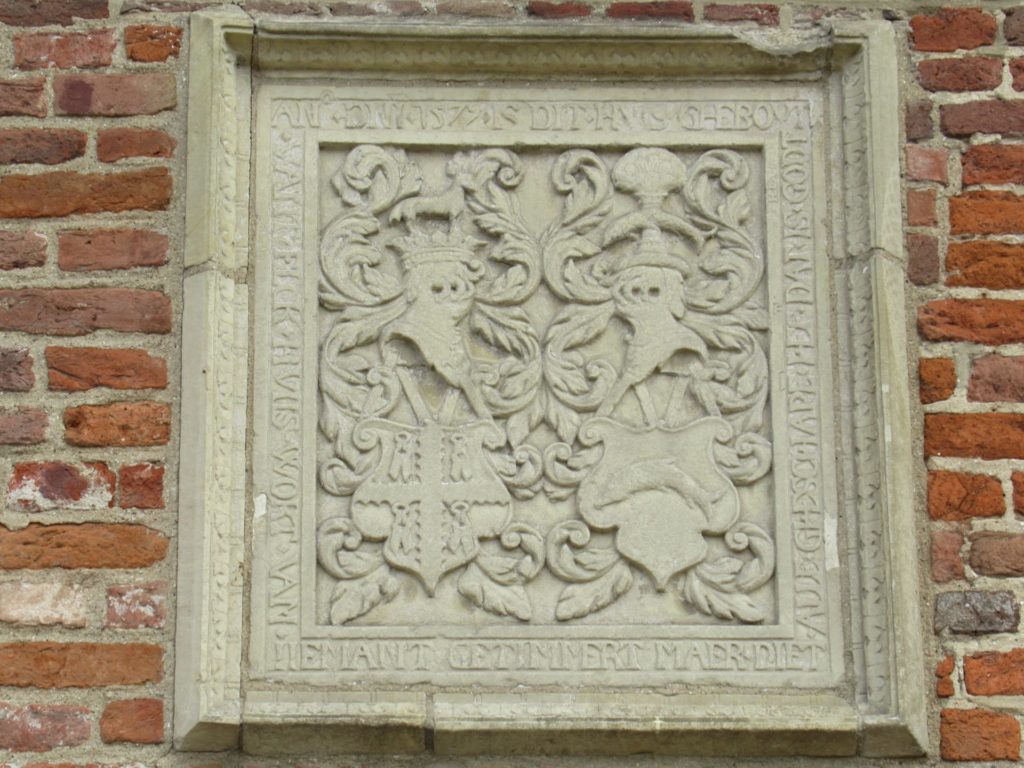
… but looking through my photographs, I see that I was more drawn to the quiet corners…
… and architectural elements.
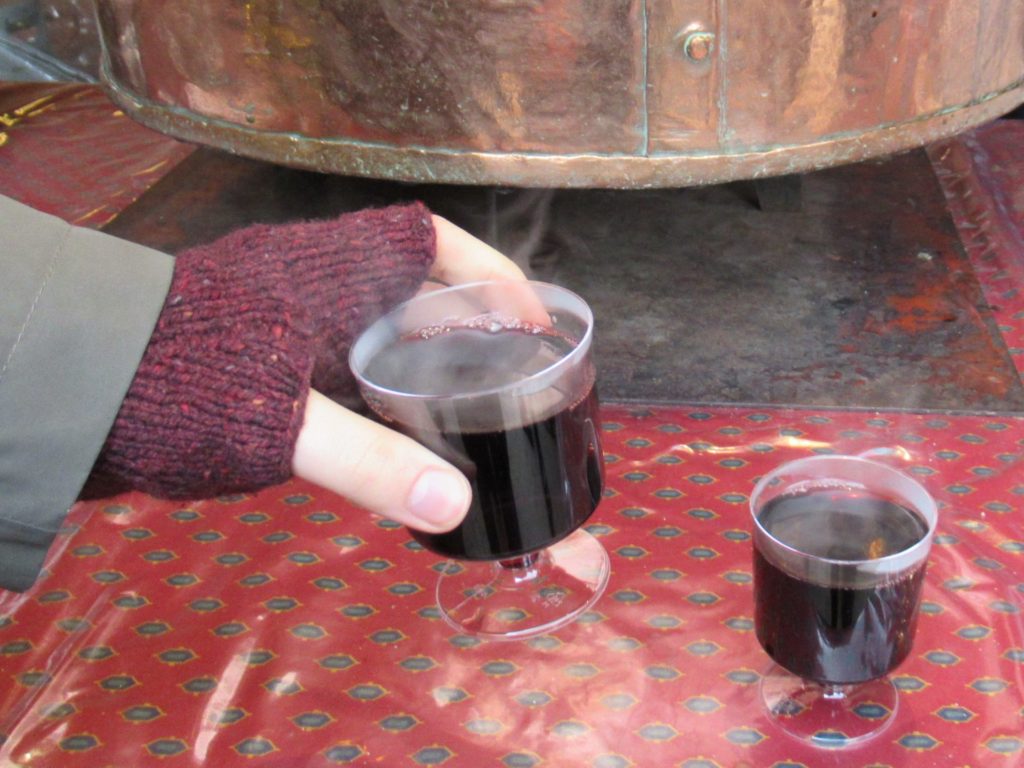
We ended our lovely visit with a shared bowl of barbecued mushrooms and tiny potatoes and some piping hot mulled wine.
Our preparations here, at our own modest abode, are far less elaborate than those at the castle, I’m glad to say.
Taking the Christmas tree decorations out of their box is always a special moment. I put on some music first, to get into the mood. This time it was A Christmas Together, starring John Denver and the Muppets, with The Christmas Wish as one of my favourites. It always really moves me when Kermit sings in his funny voice:
I don’t know if you believe in Christmas, or if you have presents underneath the Christmas tree. But if you believe in love, that will be more than enough for you to come and celebrate with me.
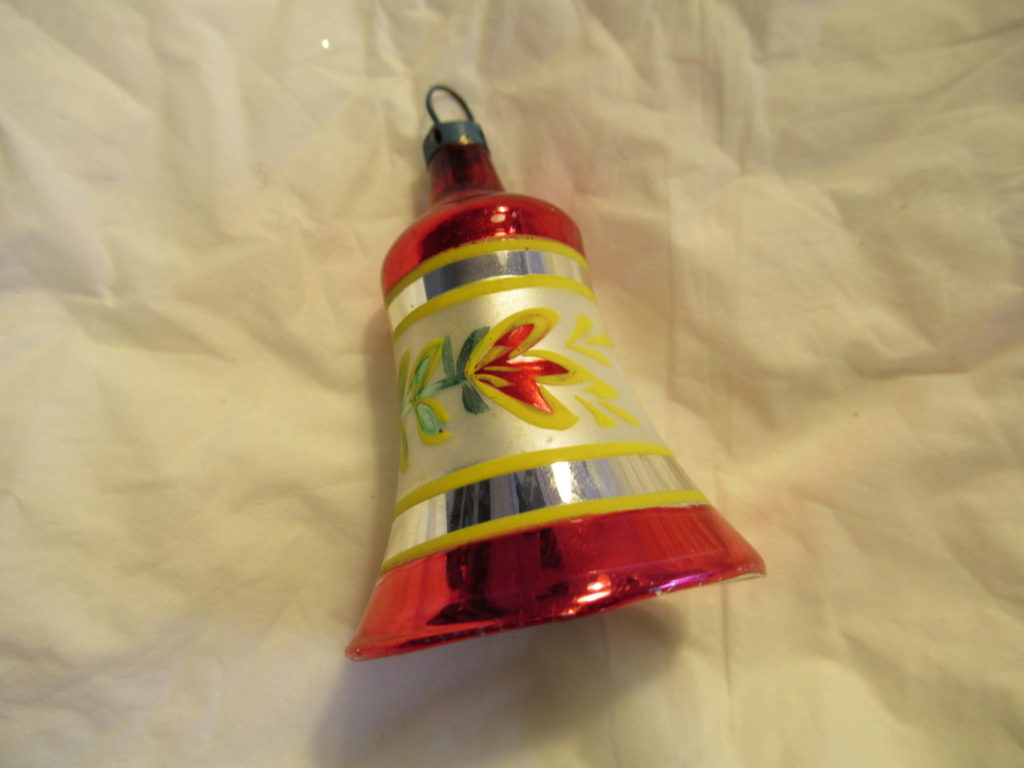
Well, back to decorating, here’s one of my oldest ornaments:
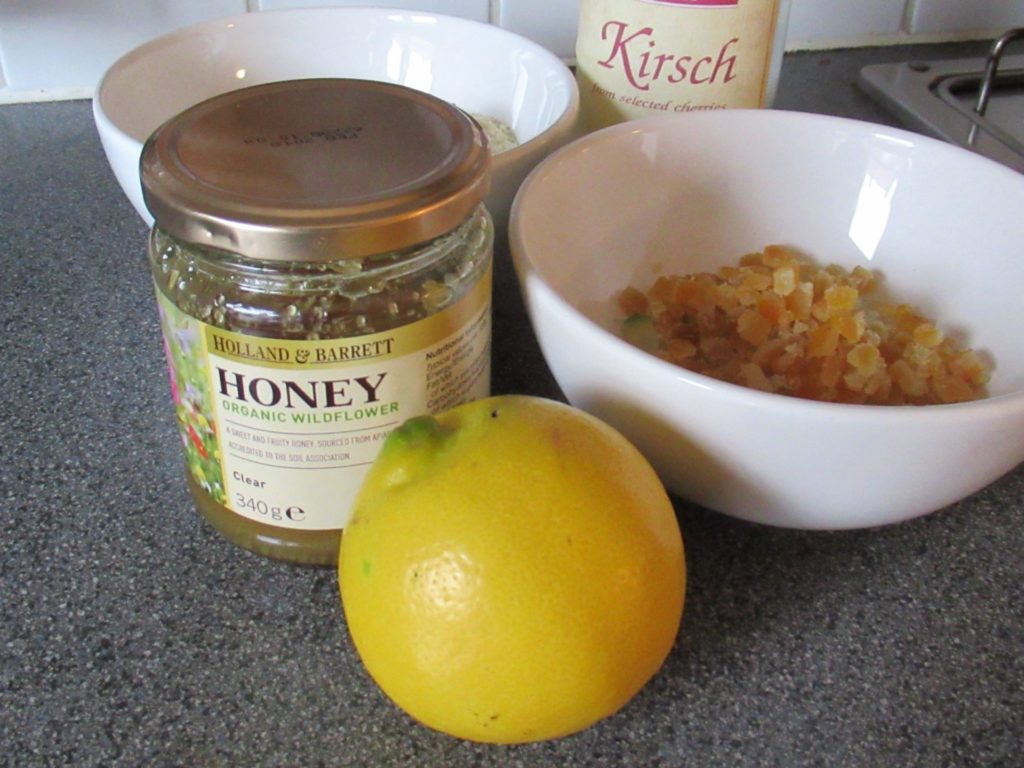
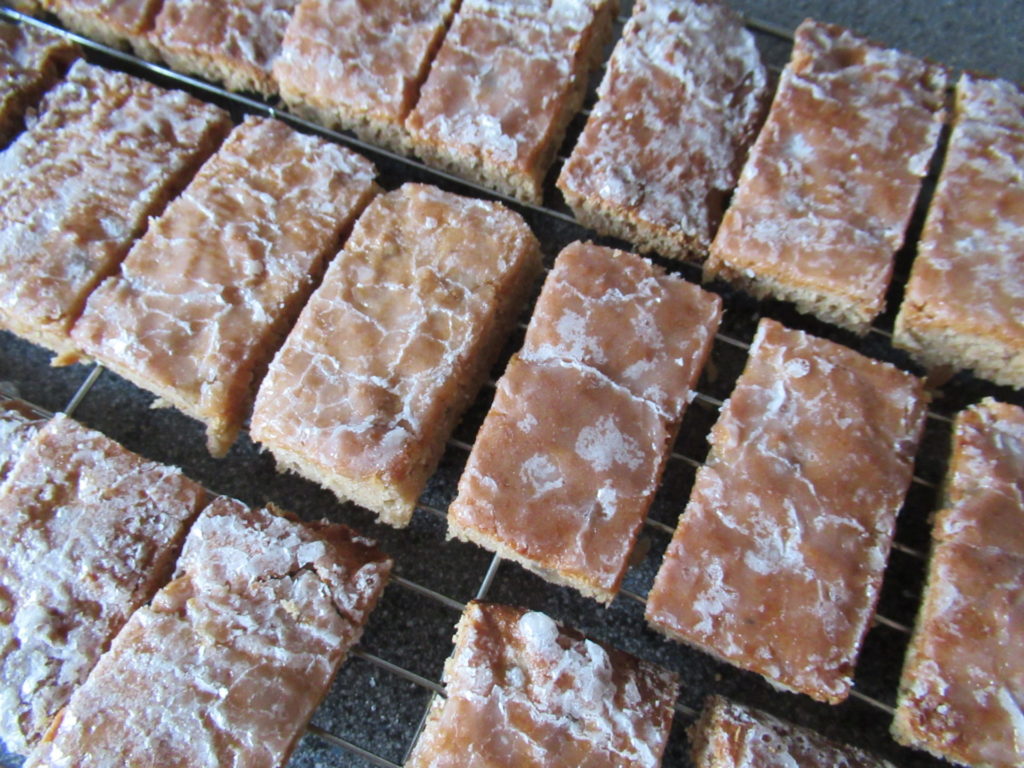
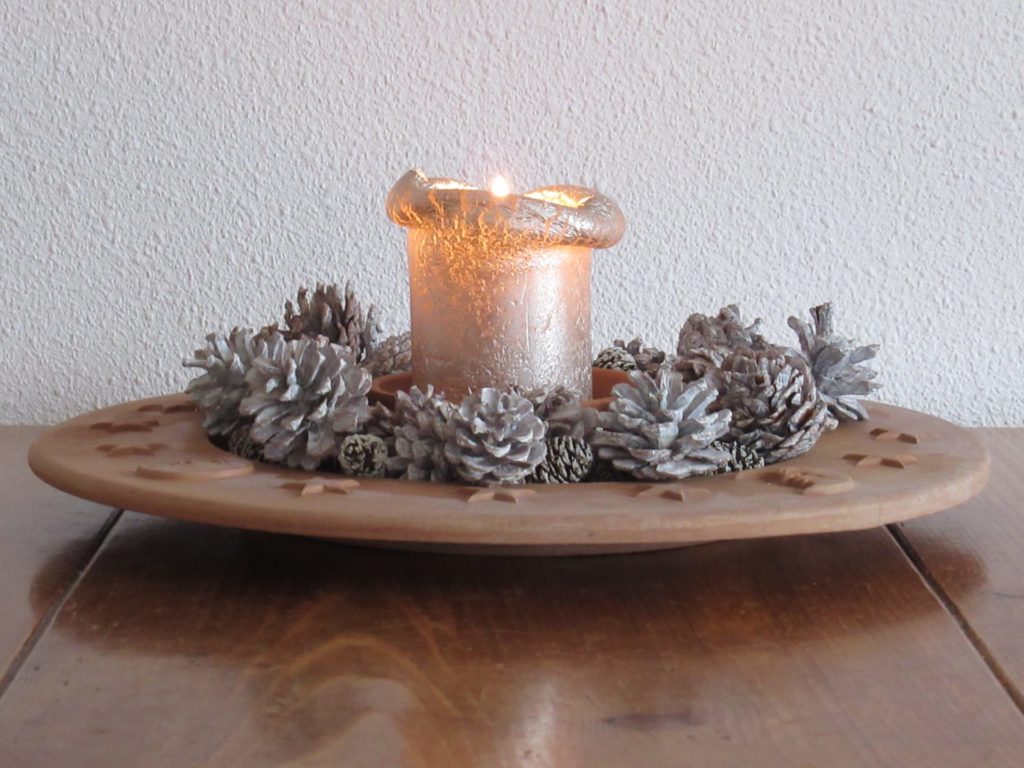
With a little more time on my hands than in the past few years, I also did some baking. I looked up an old recipe for Basler Leckerlis, a kind of gingerbread from Switzerland made with honey, candied and fresh citrus peel, ground almonds, spices and Kirsch liqueur.
After baking, the leckerlis are iced with a mixture of icing sugar and more Kirsch. The heavenly warm, spicy aroma alone is worth the effort. Here they are cooling on a wire rack.
A while ago, someone said that my blog exudes a feeling of contentment – that I must be a very contented person. Scrolling through the blog posts I’ve written in the past year, I can see why people might get that impression. But contented is far from how I feel. I do feel grateful. But also worried.
With everything that’s going on in the world around us, I sometimes feel like pulling up the drawbridge, closing the shutters, and withdrawing into my castle, figuratively speaking. But then again, I don’t think that is the answer to anything.
While I’m knitting, I’m mulling over better answers. Pondering on how to make this world a better place. And on the place of knitting, and blogging about knitting, in it. So far, I’ve mainly come up with question marks. Where am I going with my knitting and my blog? Should I be going anywhere with my knitting and my blog? Shouldn’t I be doing something more important or useful? Should I go into politics? Answer to the last one: No, I’d be totally useless as a politician. I’ll ponder on the rest for a little longer.
Meanwhile, I just keep knitting.
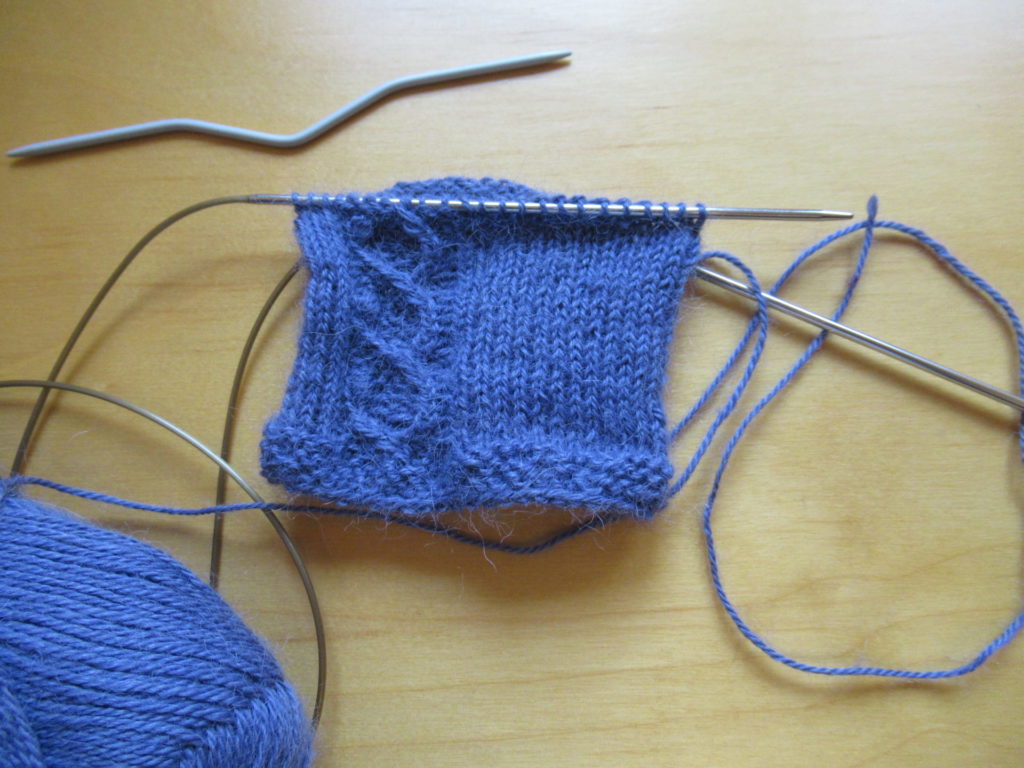
I’m knitting a pair of fingerless mittens for a gift. They have a lovely little cable with tiny nupps (an Estonian term for delicate bobbles).
I can show them here because the recipient already knows that I’m making them. She chose the yarn and the pattern herself, in fact.
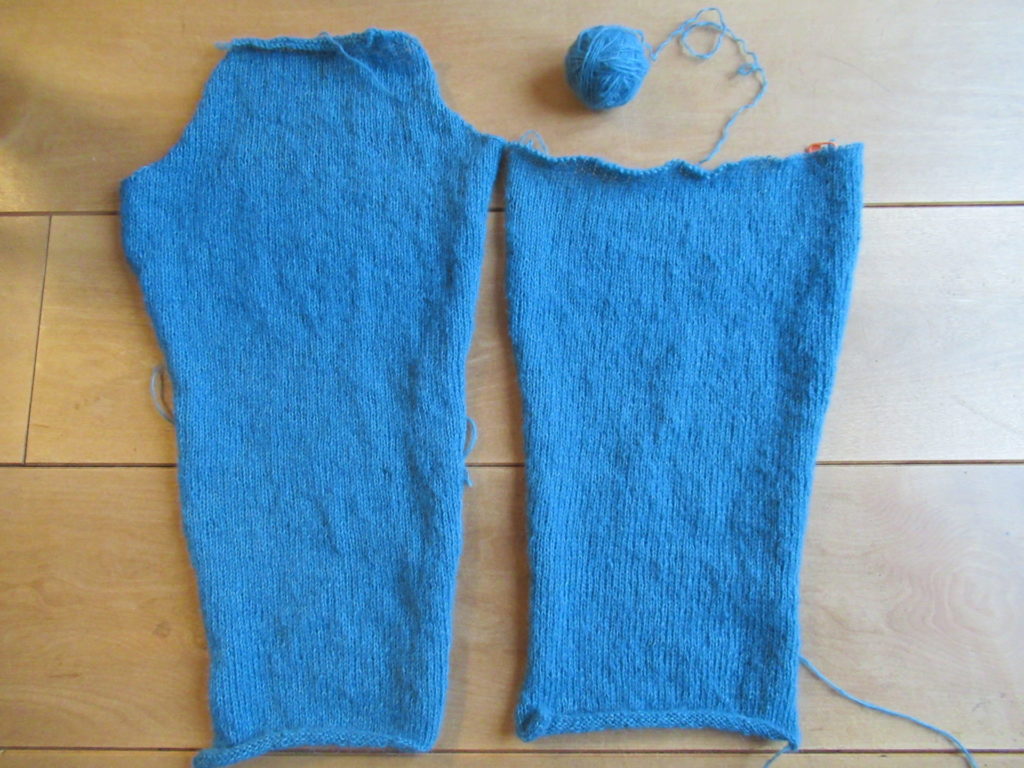
I’m also still knitting the blue cardigan I’ve been working on for quite a while. I had almost finished the second sleeve when I realized that I wouldn’t have enough yarn for the neck band and the pocket tops. Pinning the parts together to find out what could be done, I saw that the sleeves were on the long side and unravelled them to a few centimetres below the sleeve cap (not much fun with this sticky yarn, I can tell you). The one on the left is now re-knit, and I’ll soon be able to finish the rest.
When I’m stuck on a knitting project, like with the sleeves above, I get out what I call my in-between-projects-project – a large stole.
I add a few rows or even an entire stripe to it when I have no inspiration for other things. But now I’m stuck on that too, because I’m not entirely happy with the last two colours I’ve added. I think I may rip them out and substitute them for different colours, but I’m not sure yet.
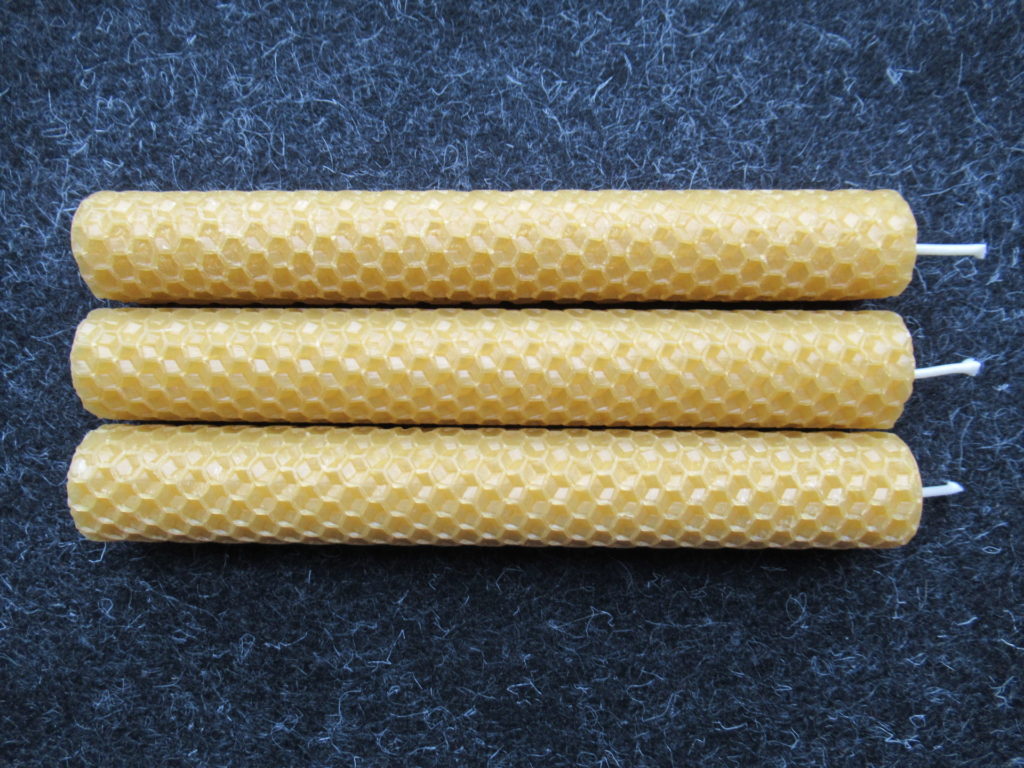
In between all this knitting and baking, I also made some beeswax candles. I’ll come back to those when I’ve experimented more and can find the time to write up a post about them.
These at least literally make life a little lighter.
And finally, I’m knitting some swatches for a new design idea I have. If it works out the way I envision it, I’ll show you more sometime in the New Year.
Well, this is my last blog post for 2019. I’m taking some time off to eat, drink and be merry first. And then some time to knit, read, take naps and go for walks, so it may be a while before I’m back.
I wish you a lovely Christmas and hope to see you here again in 2020!
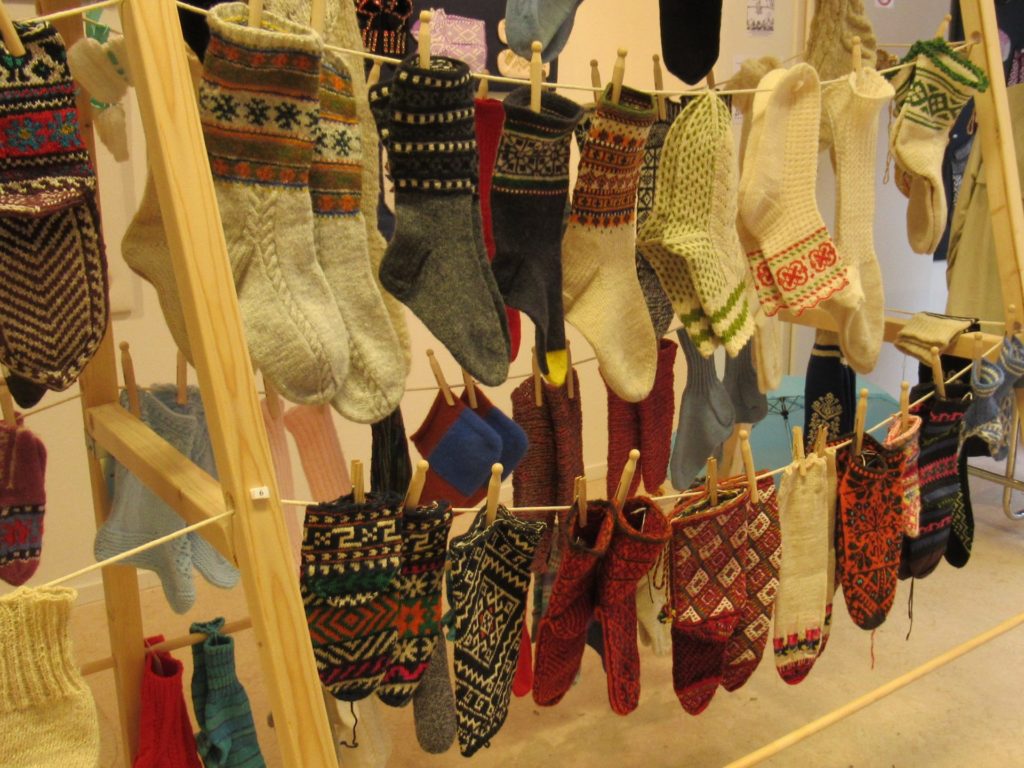
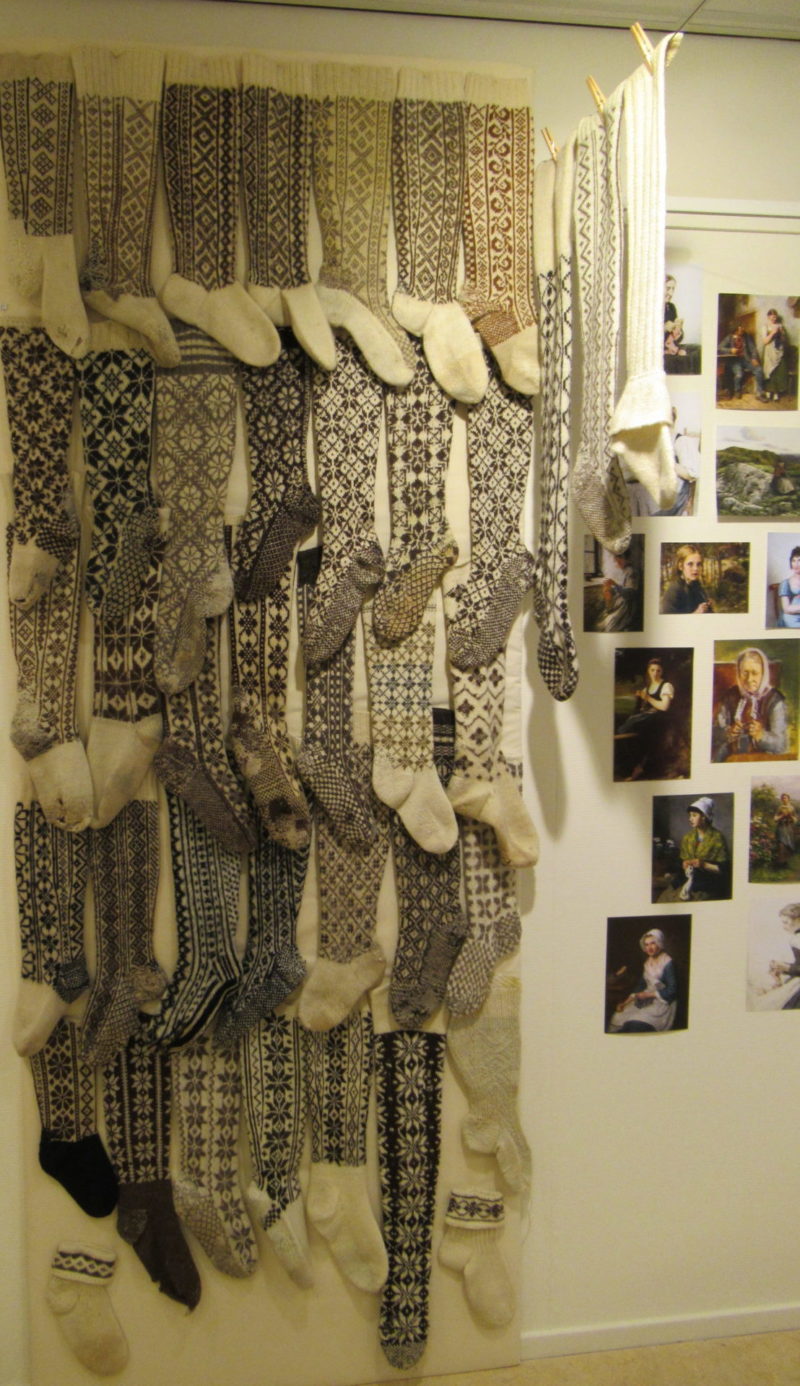
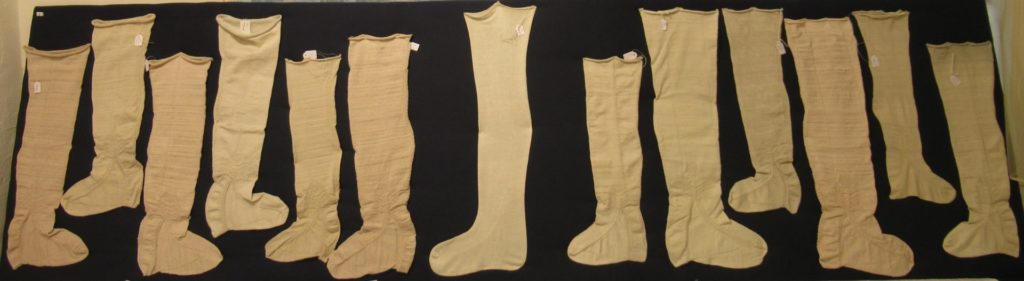
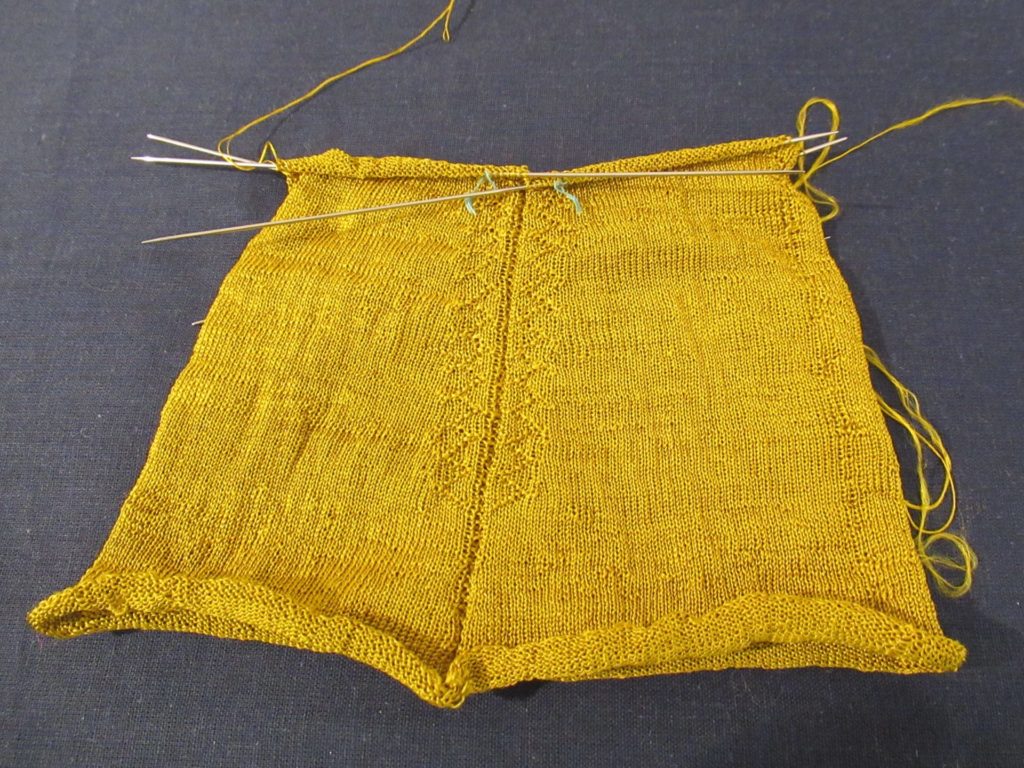
Washing line upon washing line filled with colourful handknit socks greeted me as soon as I opened the door. A cheering sight on a dismal day. We’re back at the same exhibition at the Textile Research Centre in Leiden where I saw the stockings I wrote about last week.
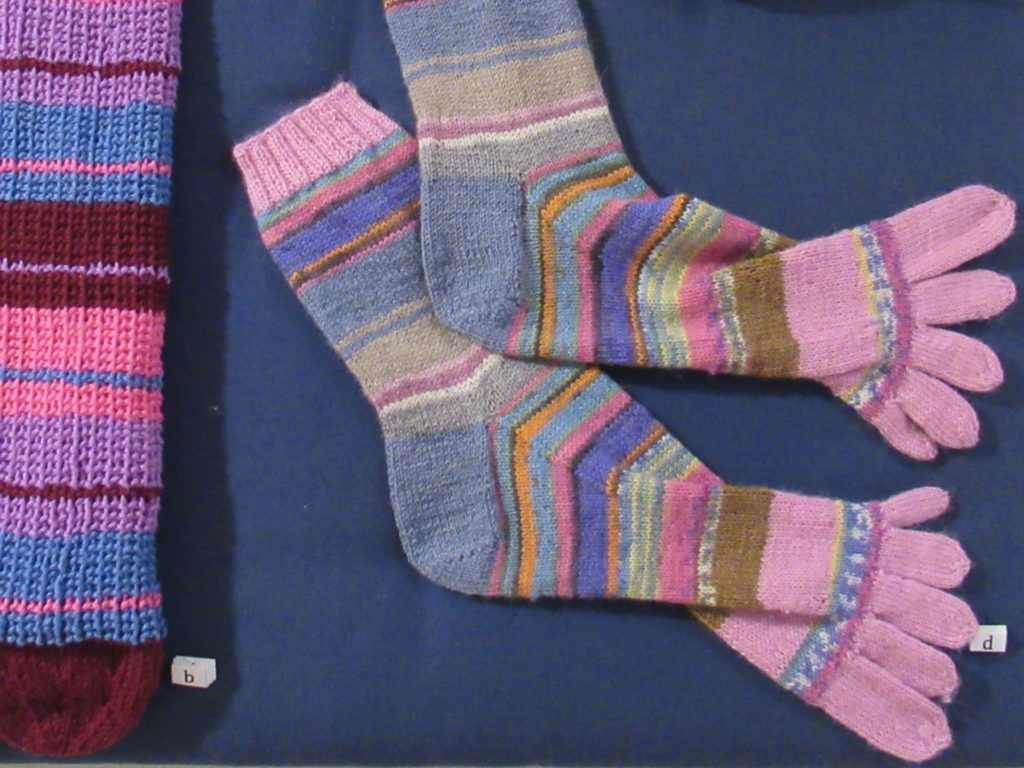
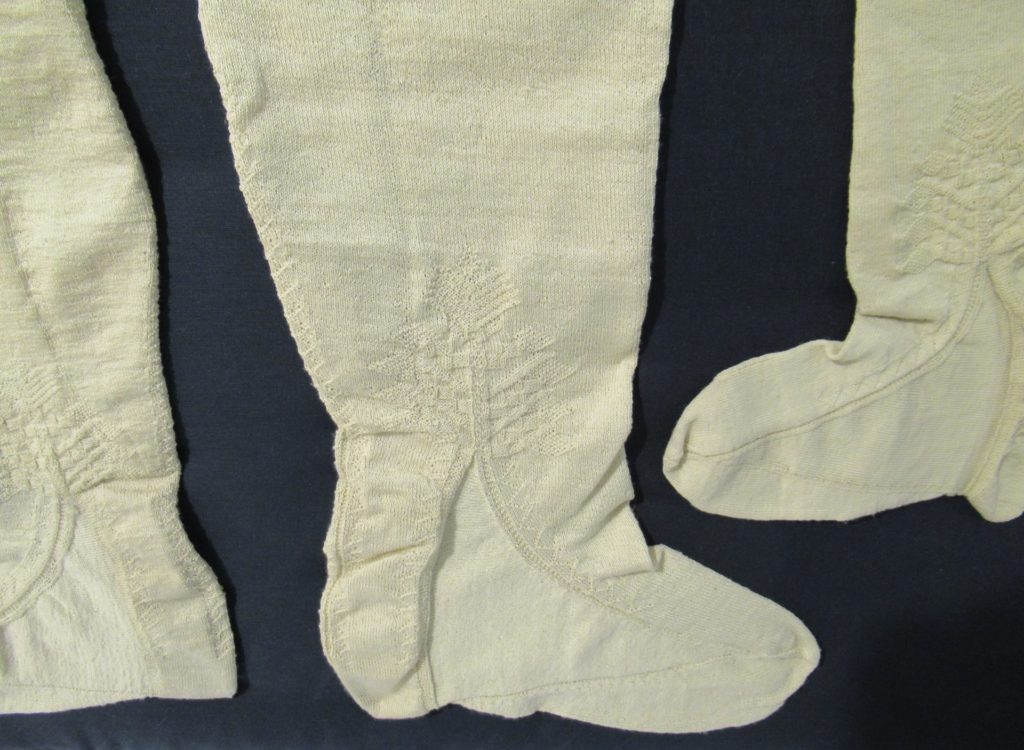
Today I’m focusing on the huge variety of socks on display. Old socks, new socks, simple socks and intricate socks. There were socks with separate toes:
Fun, but apart from the toes, fairly simple.
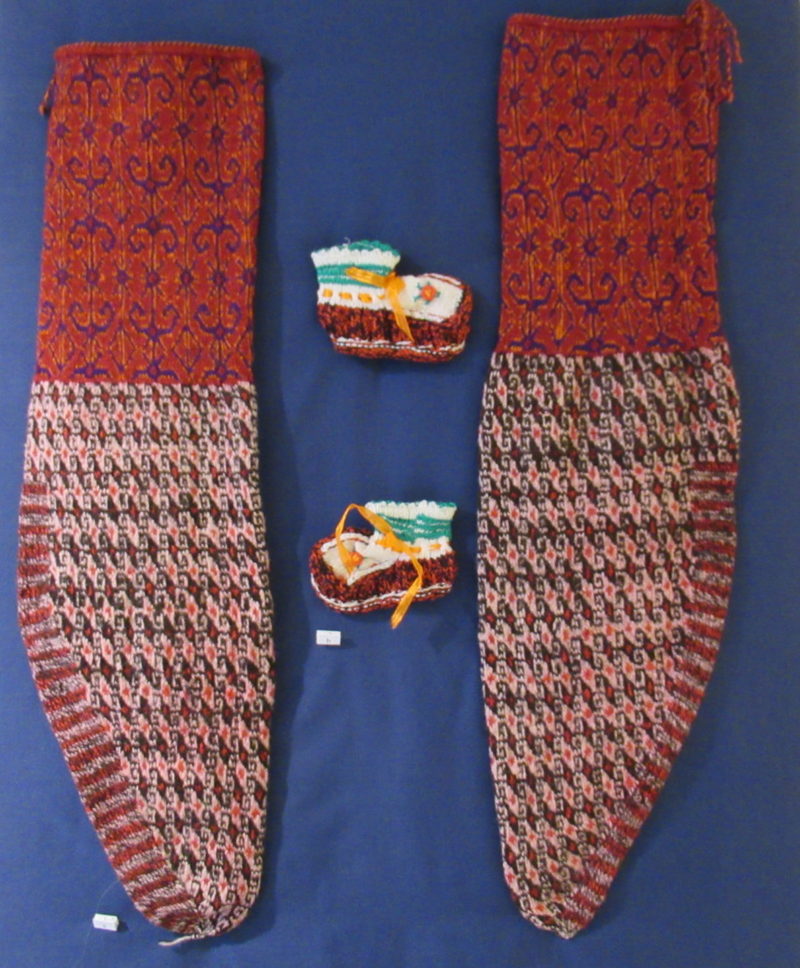
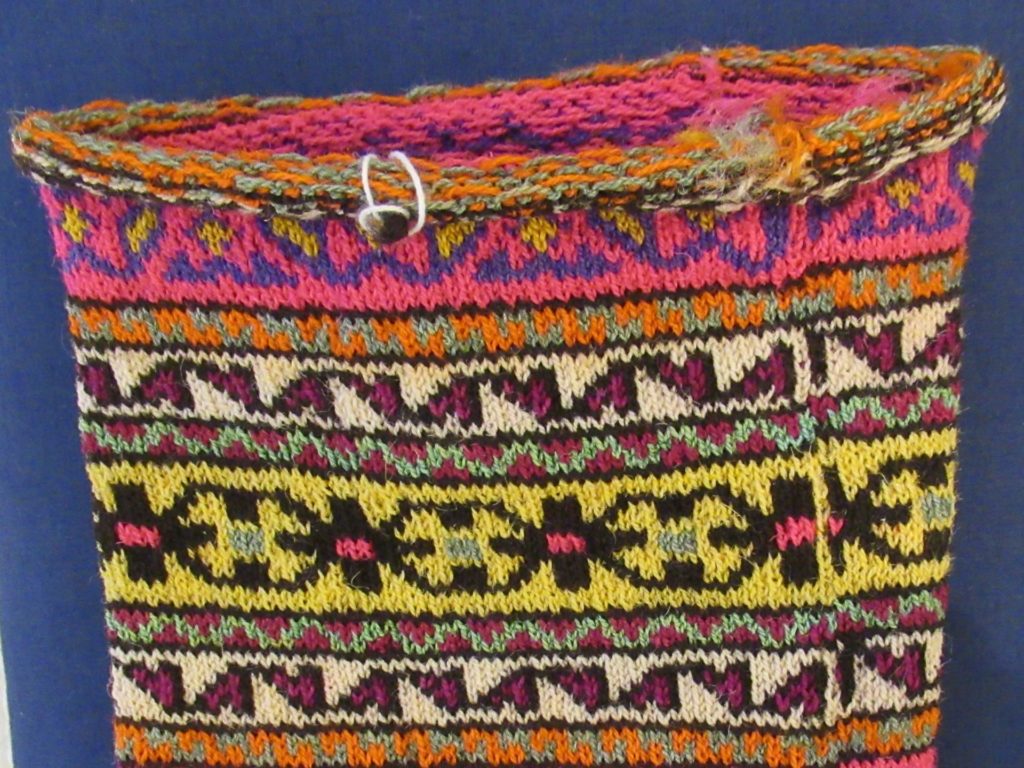
On the other end of the spectrum there was a very, very elaborate pair from Tajikistan (below). The baby booties next to them give an indication of their size. They’re huge! And they don’t even look much like socks at all.
The information sheet says that these kind of socks ‘sometimes reached halfway up the thigh’ and ‘were held in place by tying them at knee height with a woollen cord or belt, or by pulling on the knitted threads at the top.’
The sheet also gives us information about the way the yarn was dyed, the names of some of the motifs and the knitting techniques used.
For a knitter, the wonderful thing about this exhibition is the wealth of information provided about materials, patterns and techniques.
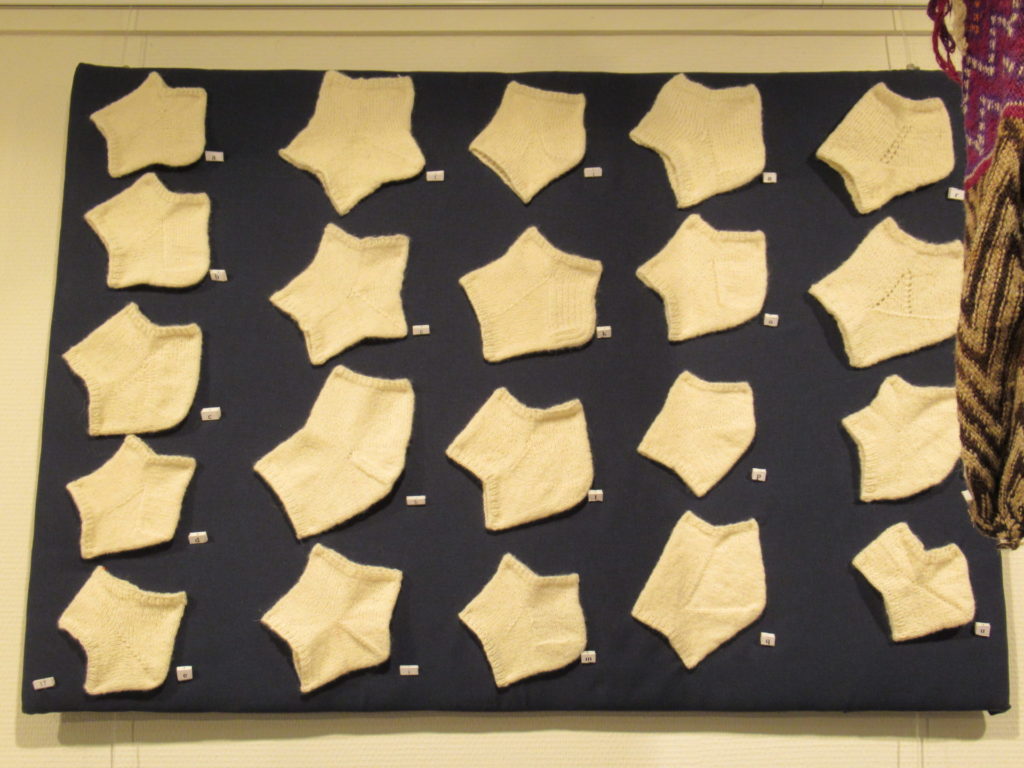
Speaking about techniques, there was a board with examples of over 20 different ways to knit sock heels.
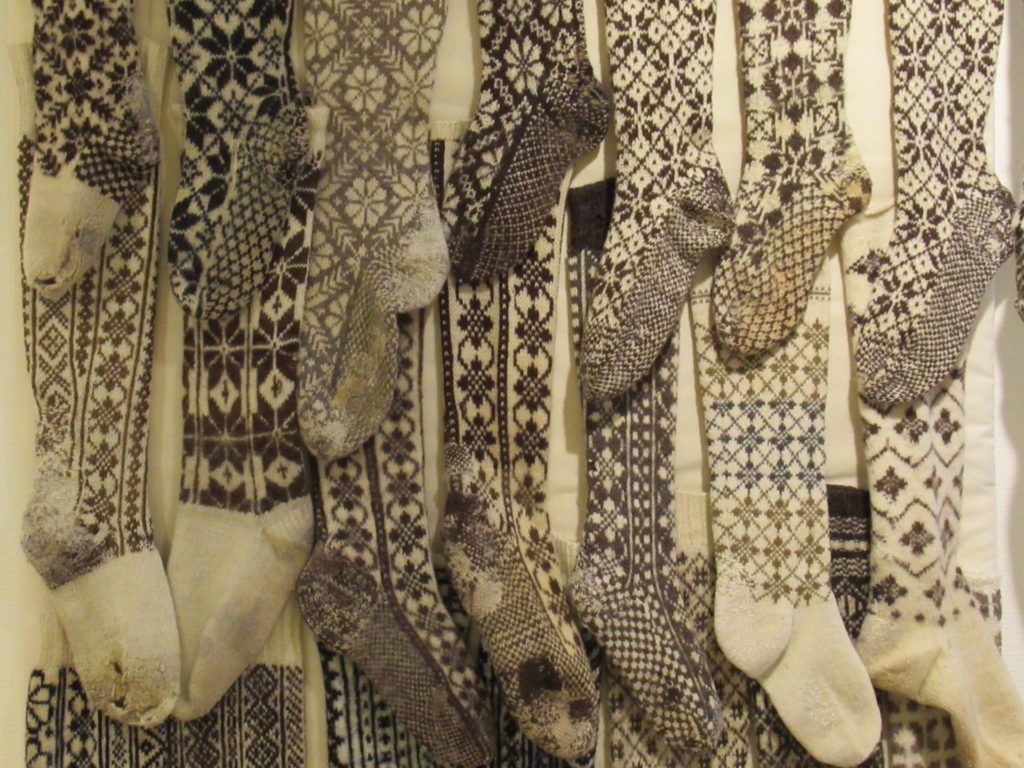
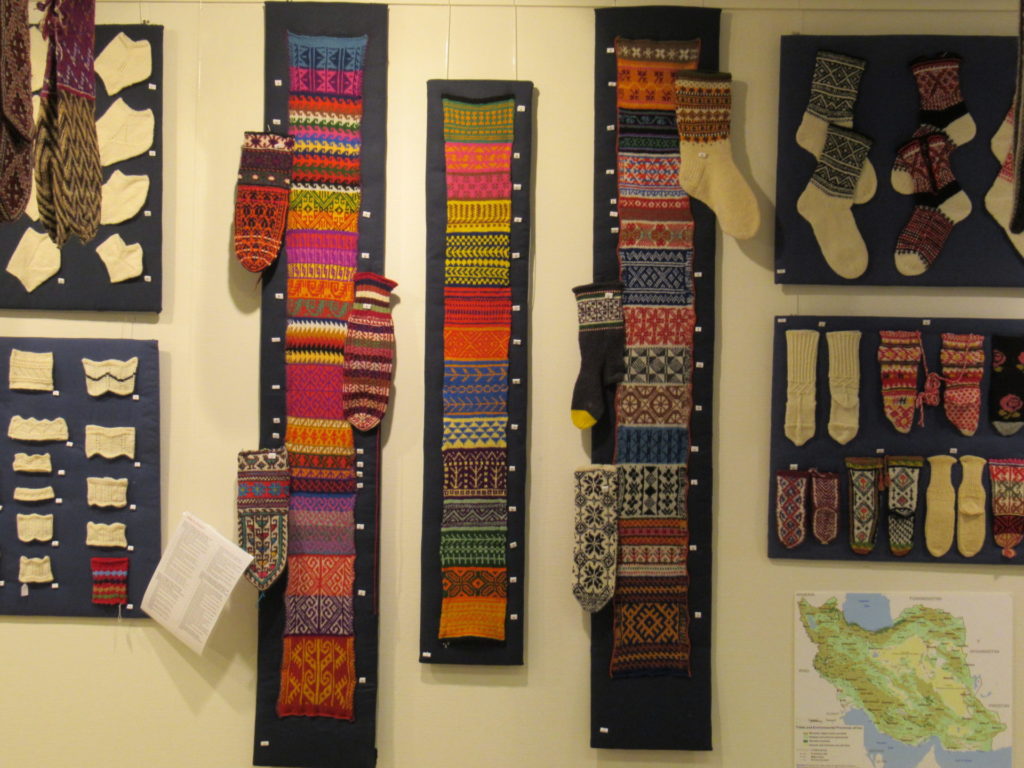
And as for patterns, just look at this cascade of stockings from Norway:
From floor to ceiling, they’re all knit in neutral, natural colours. Still, they are all different because of the patterns used. Many of them (or perhaps even all of them?) have variations of a pattern called ‘åttabladsrosa’ or eight-pointed star.
Some are covered entirely in a pattern, including the foot. And some of them have a plain, unpatterned foot. Why knit a complicated pattern when it is hidden inside a shoe anyway? Or perhaps the foot was re-knit in a single colour because it was worn out?
These stockings are just a small part of Annemor Sundbø’s collection, or her ‘rag pile’, as she calls it. If you’d like to hear more, she is giving a lecture at the TRC on December 18th 2019. There’s more information here (please remember to register beforehand).
Looking closely at these stockings, you can see that they are well worn and that some of them have been mended…
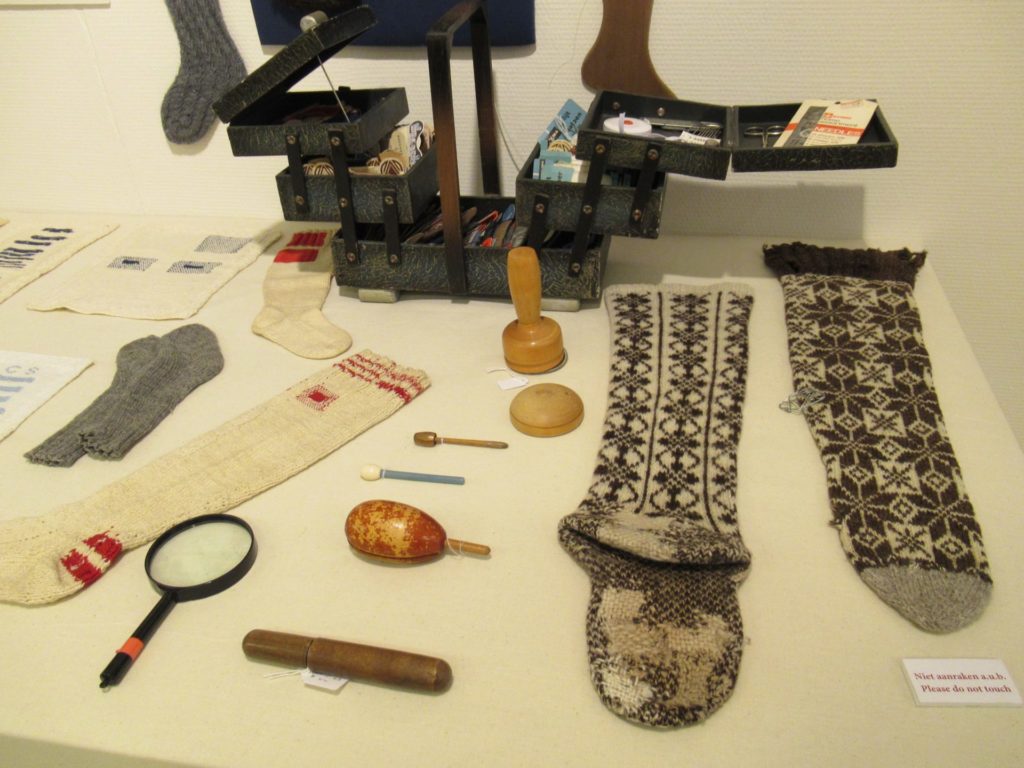
… which brings us to the mending corner.
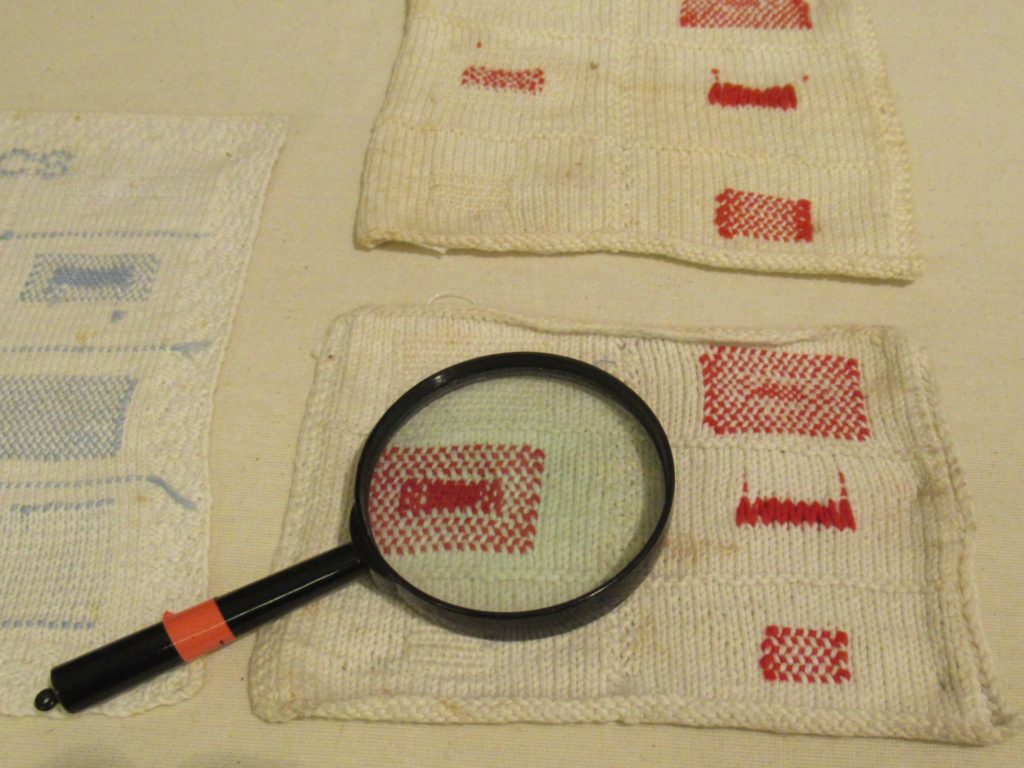
What I loved about this exhibition was its friendly, open accessibility. There are several signs telling us not to touch things, but nothing is behind glass and everything can be studied in detail from close up.
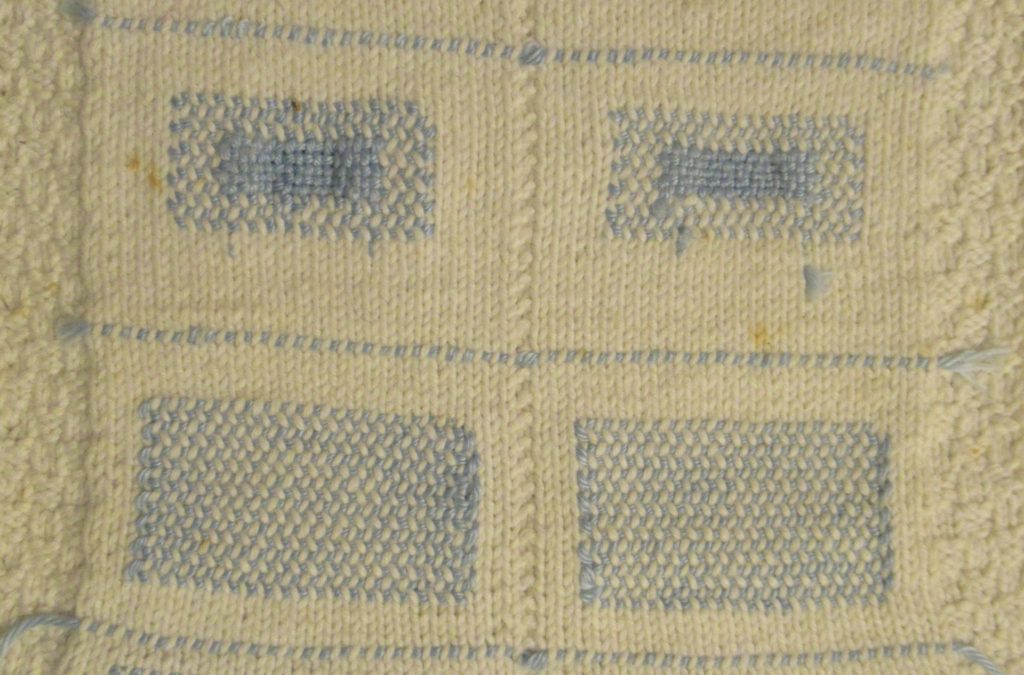
I zoomed in on the bit of blue mending you can see below. I learnt the weaving technique in the middle of the two rectangles at the top from my Mum. But the technique around it and in the two rectangles below, picking up alternately the left and right leg of the knit stitch, is new to me.
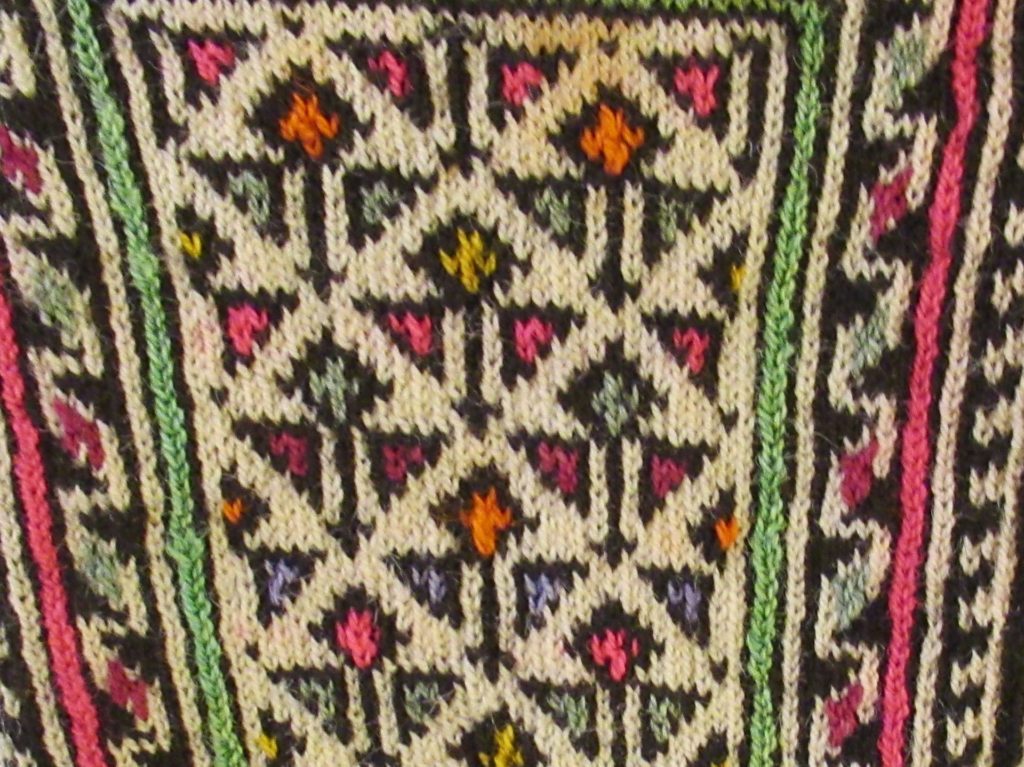
Apart from new things to learn, there was also a lot of inspiration to be found. There were many motifs and other elements that I could use in my own knitting. Take for instance the pattern on the foot of a pair of socks from Iran:
The black shapes filled with bright colours could easily be multiplied into an all-over pattern for a larger surface.
And one or more of the bands on the cuff would make a lovely border for all kinds of projects.
For more inspiration, there were three colourful samplers with many beautiful patterns:
Very, very inspiring. And humbling too. We tend to think that we’re always making progress, knowing more, doing things better and more efficiently. We can certainly produce socks more efficiently. But for the rest, we’re fortunate to have museums and other centres to preserve the knowledge and expertise about making things by hand for us.
I’ve only given you a taster of the exhibition here. You can still visit to see more if you don’t wait too long – it’s open until the 19th of December. And if you are unable to go, because you can’t find the time in the busy month of December, have the flu or live too far away, there’s always the TRC website. Their online collection catalogue can be viewed at any time or place.
My day in Leiden has given me much inspiration and food for thought. In addition to visiting the sock exhibition, I also took a needle binding workshop on the same day. I need to digest everything I learnt there before I can write about it, but you’ll probably hear more about that later.
Early one morning last week. It was still dark. The first raindrops started to fall as soon as I left home. Before I had cycled to the end of our street it was bucketing down, and by the time I reached the railway station, I felt like a drowned cat. How fitting. I was on my way to Leiden, to visit an exhibition about some of the finds from a shipwreck.
It must have been a day just like this when, somewhere around 1650, a ship filled with trade goods from the Mediterranean sank off the coast of the Island of Texel. About 360 years later, a group of divers found the wreck. They discovered that it contained a load of boxwood and resins, but also many luxury items, like Italian pottery, an elaborately decorated silver gilt goblet, and a leather book cover embossed with the crest of the House of Stuart.
Most exciting of all were the textiles that were found, perfectly preserved by the sand that had covered them for centuries. Among them were a gorgeous silk dress and a pair of silk stockings. It is these stockings that the exhibition I was visiting was about. The original 17th Century stockings were not on display, but replicas of them, like the ones you can see at the top of this post and these:
So, why would I travel all the way to Leiden (20 minutes cycling through pouring rain, 2 hours by train, 15 minutes by bus) to see some replicas of stockings? I hope you’ll understand by the end of this post.
For me, it all started a year or two ago, when I read about a citizen science project involving knitting. I attended a lecture by archaeologist Chrystel Brandenburgh, describing the shipwrecked stockings and the idea of recreating them to find out more about the materials and techniques used at the time they were made and who they may have belonged to. My interest was piqued, but when I heard about the very thin needles that would be used, and had estimated approximately how much time it would cost me to knit one of these stockings, I chickened out.
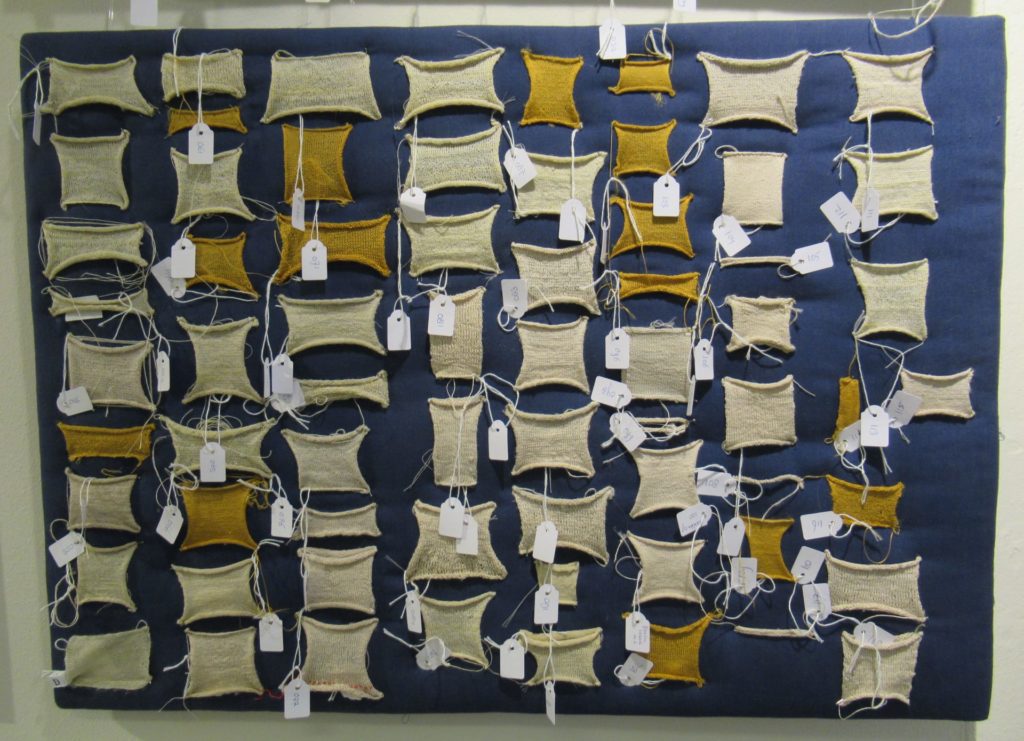
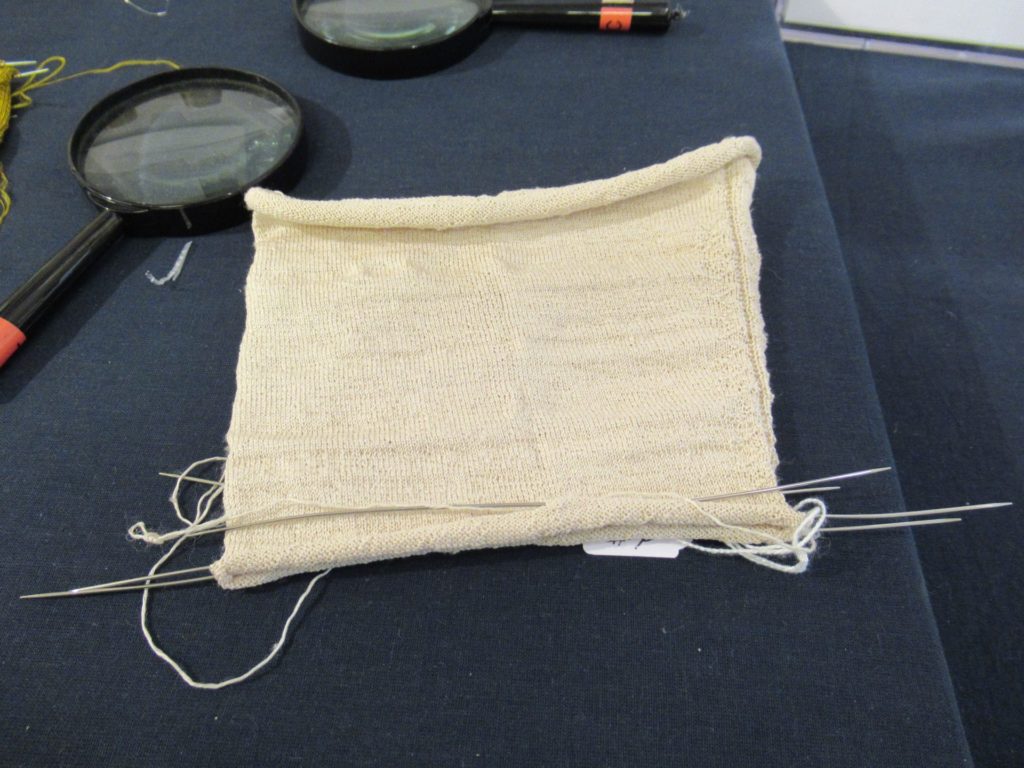
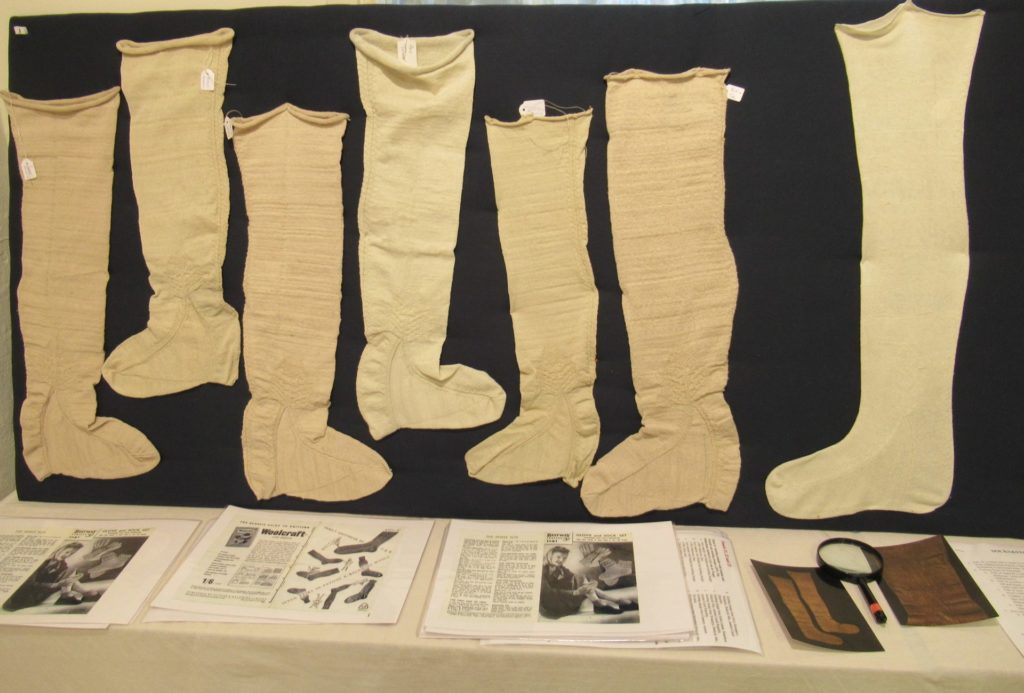
Other people had more pluck. Over a hundred experienced knitters from the Netherlands and abroad took part in the project. They started by knitting swatches.
They tried out different types of silk thread to find out what came closest to the original stockings. They were faced with questions like ‘should the silk be degummed before or after knitting?’ Silk contains a natural gum, called sericin, that needs to be removed for the silk to become soft and shiny. I didn’t know that. It is one of the things I learnt from the exhibition.
That’s one of the reasons I’m glad I went – there’s so much to see and learn. I loved the magnifiers dotted about the place, through which I could study the tiny details.
The needles the knitters used were very, very thin, from 0.7 to 1.0 mm (US 000000 to 00000). I heard that it took them on average 240 hours to finish one stocking. Two-hundred-and-forty hours to finish ONE stocking! I can quite understand that they didn’t all manage to actually finish theirs. The unfinished stockings were not a waste of time, though. Even the unfinished ones yielded valuable information.
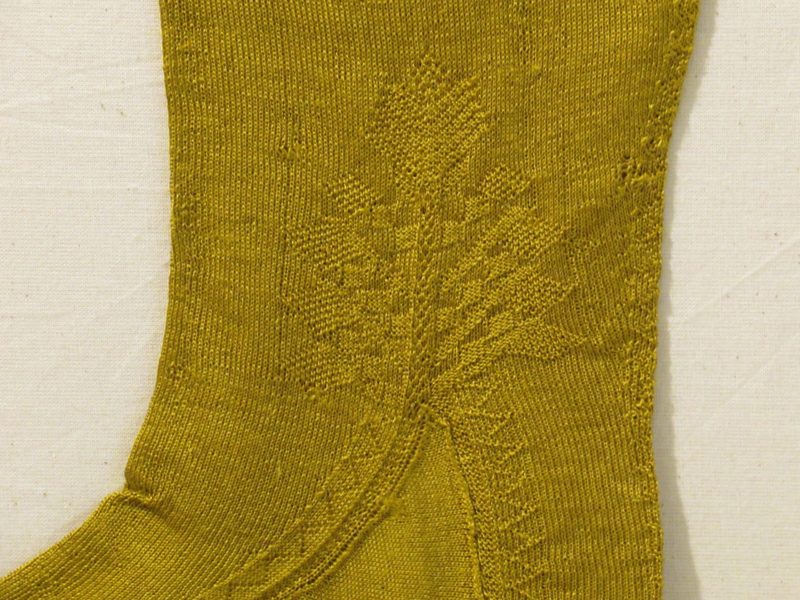
Together, the knitters and researchers studied the needles and materials used, and also the stitch patterns. The stockings were mainly knit in stocking stitch, but had a kind of fake ‘seams’ decorated with purl stitches.
And they had a tree of life motif at the top of the gusset.
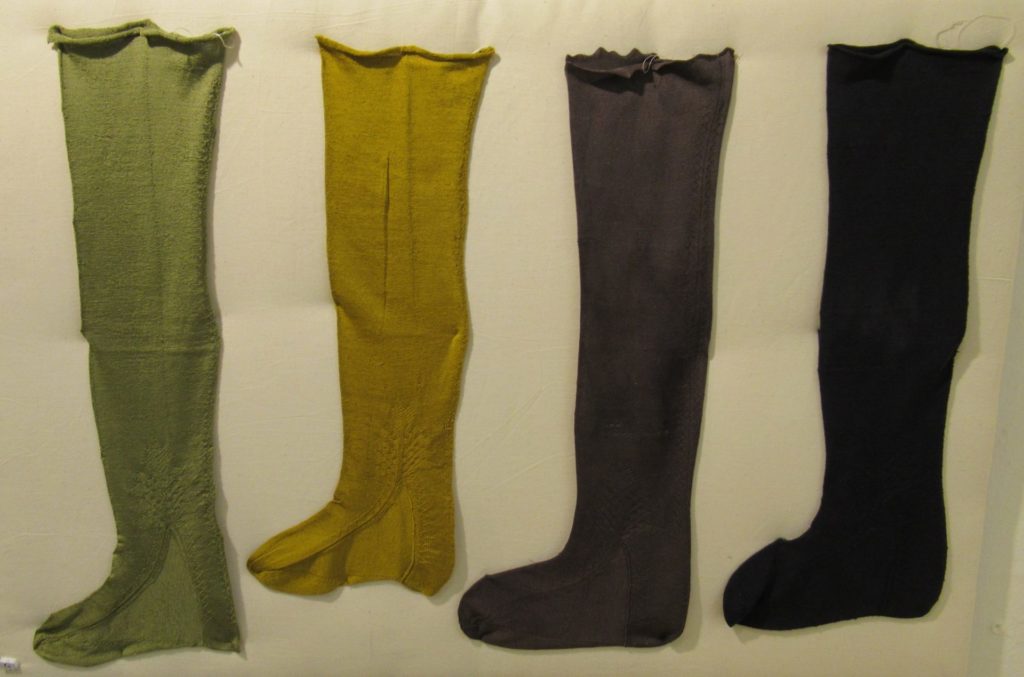
Most of the stockings I saw were off-white, but some were coloured. I don’t know why and how. There was so much information there, that I missed some of it.
Replicating the shipwrecked stockings made it clear that they were probably meant to be worn by a man, because they were long enough to go over the knee, which was how men used to wear them at the time. Women wore theirs tied below the knee.
Well, that was my brief impression of the exhibition ‘Socks and Stockings’ at the TRC. I hope you now understand why I traveled all the way to Leiden to see some stockings. Do go and visit if you can – the exhibition is still on until December 19th 2019.
If you’re still not convinced that you should go – apart from these stockings, there are also many, many colourful and interesting socks to see. Maybe I’ll write more about those in my next post.
Links:
If you’re unable to travel to Leiden or would like to read more, please visit the website of the Textile Research Centre, where the exhibition is held (Dutch and English).
There’s also some information on the website of Chrystel Brandenburgh, the archaeologist involved in the project (Dutch only).
The original stockings are temporarily housed at archaeology centre Huis van Hilde, for further research. They are not on display, but the website has a lot of interesting information (in Dutch, English and German).
Eventually, the stockings and other finds will be displayed at Kaap Skil, the museum on the island of Texel. Their website has pictures of the original stockings and several interesting articles too (in Dutch, English and German).
For most of these websites, the best way to access the information is to enter ‘stockings’ or ‘kousen’ into the search menu.
Hello dear readers. I’m so glad you’re here today, because I have something to celebrate. And it wouldn’t be much fun without you to celebrate it with.
Today, it’s been exactly a year since I started blogging!
I’m usually more of a behind-the-scenes kind of person, so for me, showing myself and the things I do here has been a real adventure. On the whole, despite some jitters now and then, it’s been a very interesting, fulfilling and enjoyable journey. What I’ve enjoyed most of all is looking at the world around me through the lens of my camera and writing about the things I do and love in my own words. As a translator, I always worked with other people’s thoughts and words, and it feels wonderfully liberating to be able to do my own thing here.
I expected to be doing this more or less for myself, at least during the first year or so, but to my surprise and delight I actually seem to have some readers already. Thank you so much for spending some time here, for reading, and for all of your kind comments!
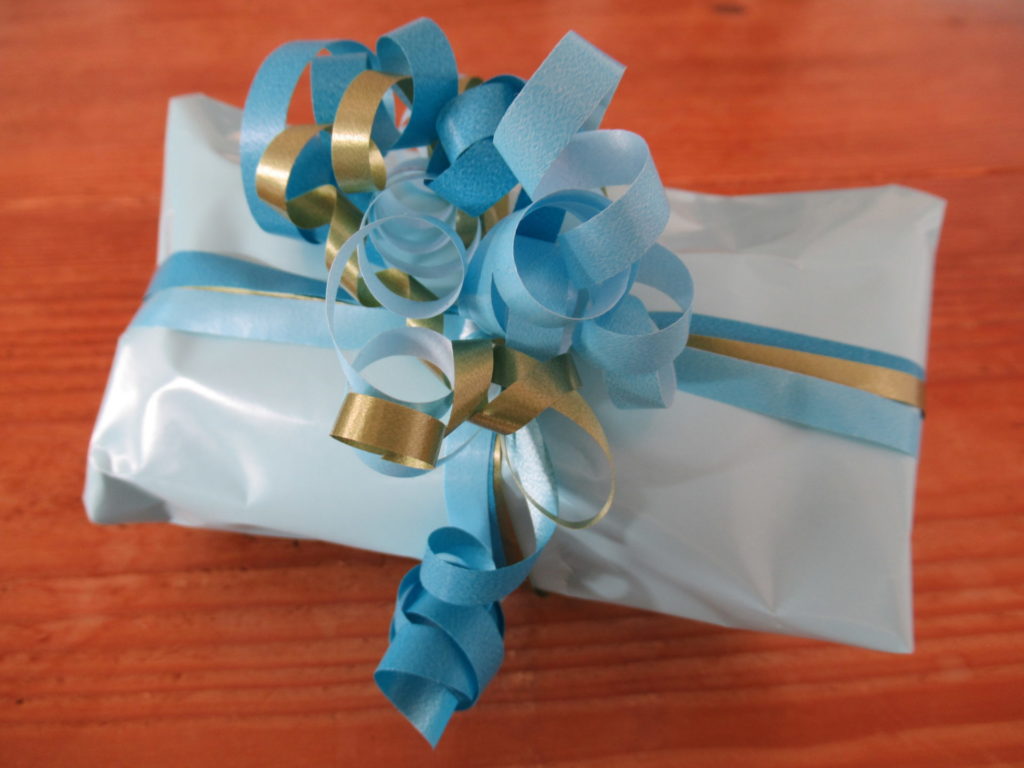
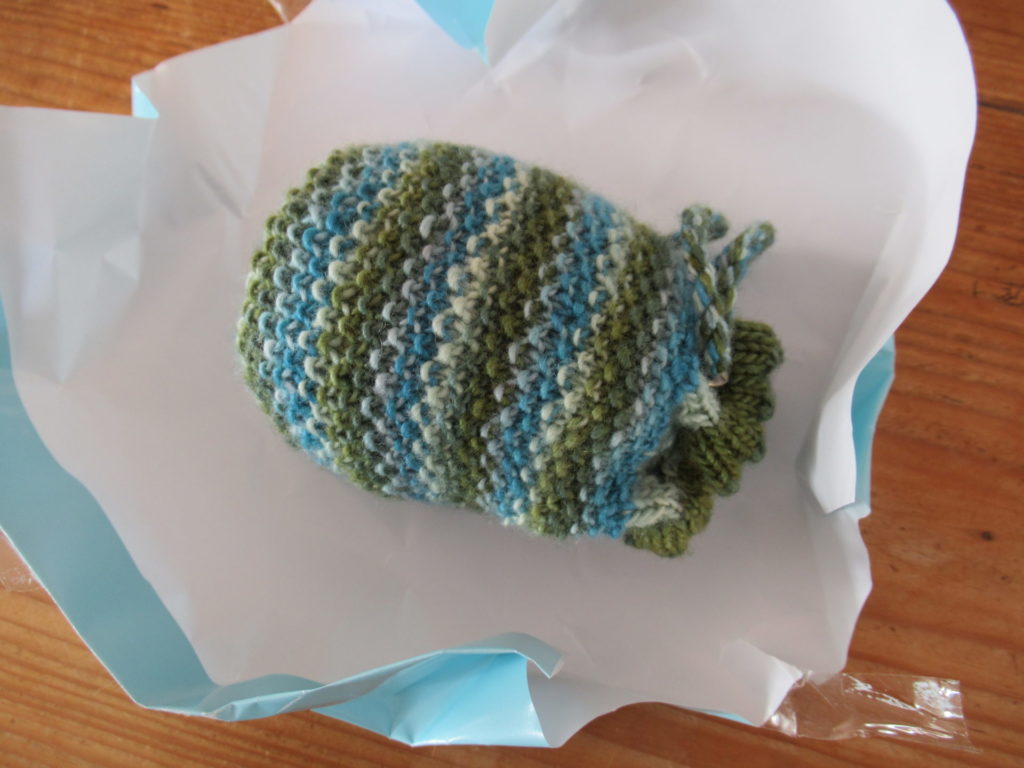
To show my appreciation I’ve made a small gift for you. I’ve learnt a lot during the past year, but what I haven’t learnt yet, is how to post things in 3D, so that you can unwrap it yourself. So I think I’d better do it for you, shall I? Here we go:
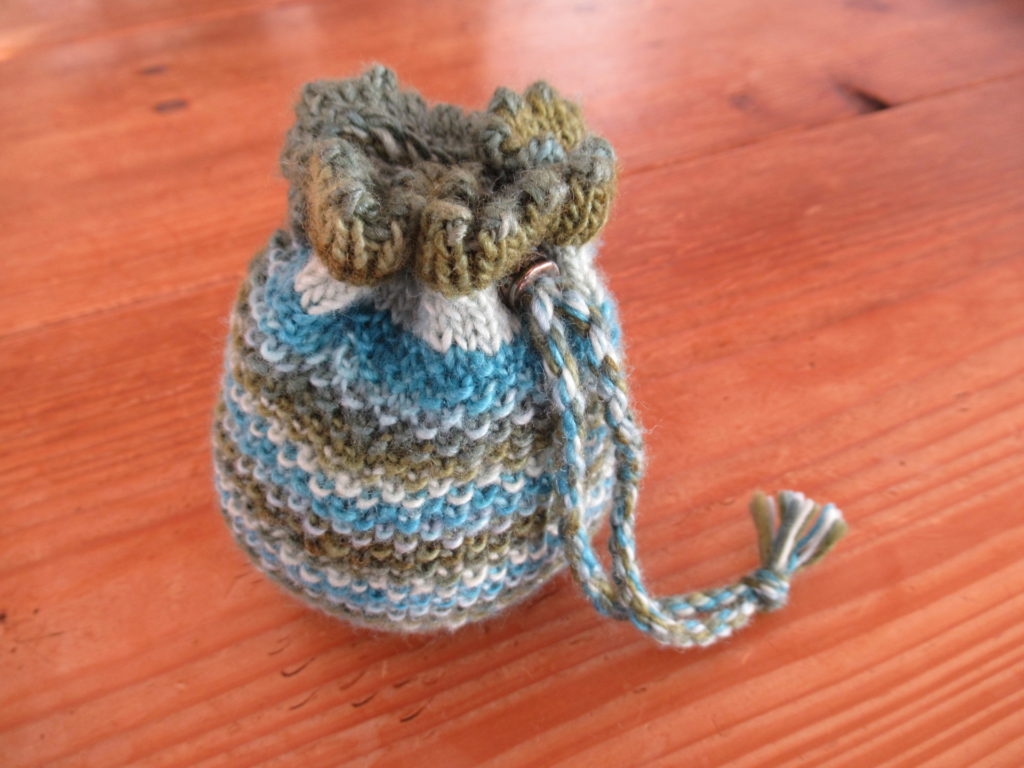
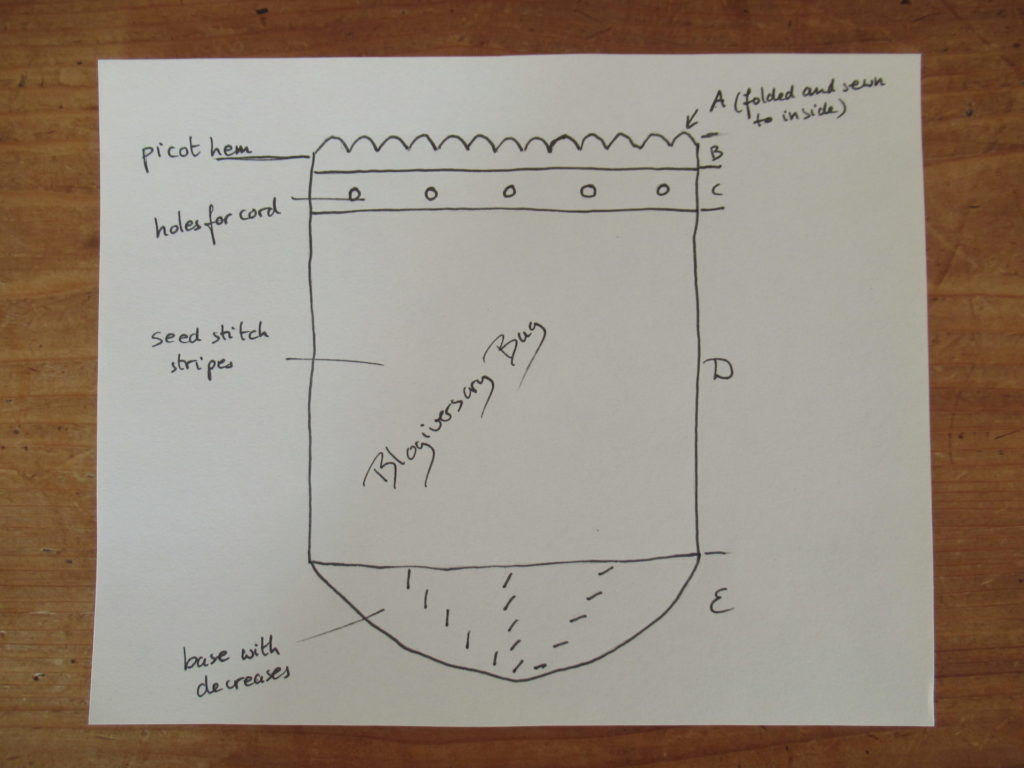
It’s a small knitted drawstring bag. Or rather, the pattern for a small knitted drawstring bag.
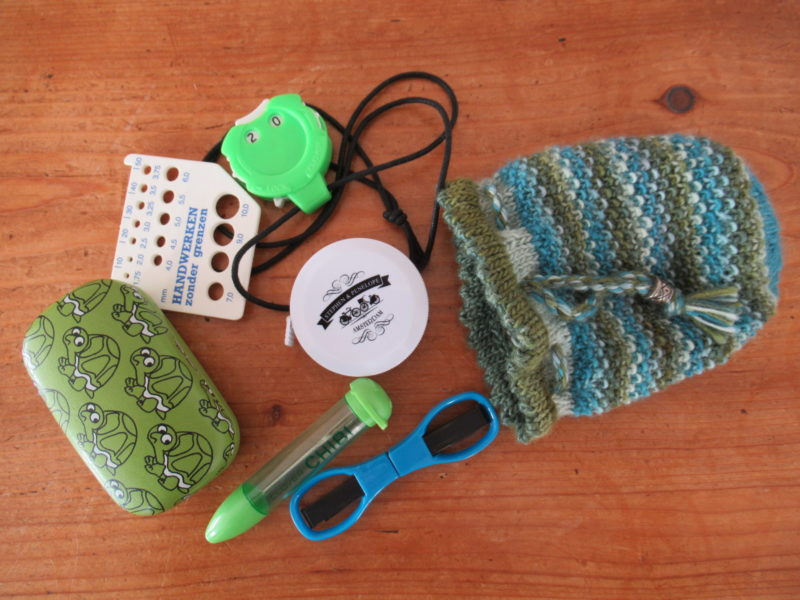
To give you an idea of the size and what you could use it for, here it is with some knitting tools I stuffed into it. It may look incredible, with all these things spread out beside it, but the bag really is big enough to hold them all. (It isn’t quite as magical as Hermione Granger’s bag in Harry Potter, though. I tried to stuff a tent and a few sets of spare clothes in, but that didn’t work.)
Pattern notes
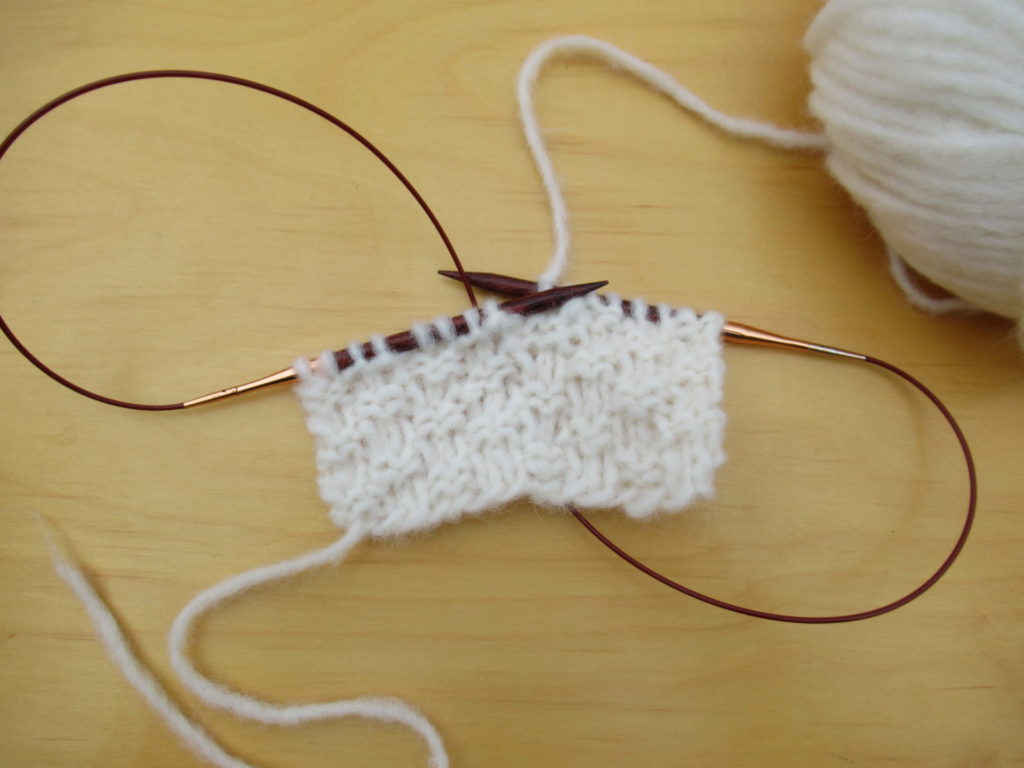
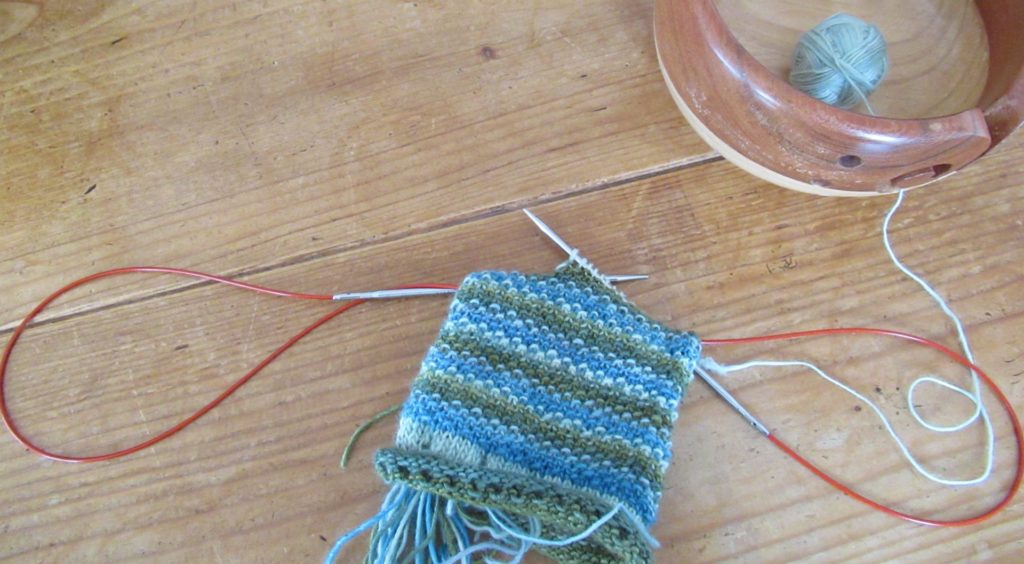
The Blogiversary Bag is worked in the round from the top to the bottom, using a long circular needle and the magic loop technique. If you’re unfamiliar with this technique, you can find a short and simple video showing how to do it here on YouTube. Alternatively, you could use a set of double-pointed sock needles.
This isn’t a very difficult project, but some experience with knitting in the round will help. If you can knit socks, you won’t have any problems with it. Knitting it in a single colour will make it easier, because adding in new colours every few rows is a bit fiddly.
The bag starts with several rows in stocking stitch and a row of eyelets that are folded down and sewn to the inside to make a picot hem. For the sake of clarity I’ve divided the instructions up into 5 sections (A-E, see drawing below).
Gauge: 27 sts x 40 rows = 10 x 10 cm (4” x 4”) in stocking stitch worked in the round.
Finished measurements: Top to start of base 11 cm (4½’’); width 20 cm (8’’) around; base diameter 7 cm (2¾’’).
Yarn, needles and notions
Needles: 3.5 mm (US 4) circular knitting needle at least 80 cm/32″ long.
Notions: Tapestry needle, 1 bead with a 5 mm hole (optional).
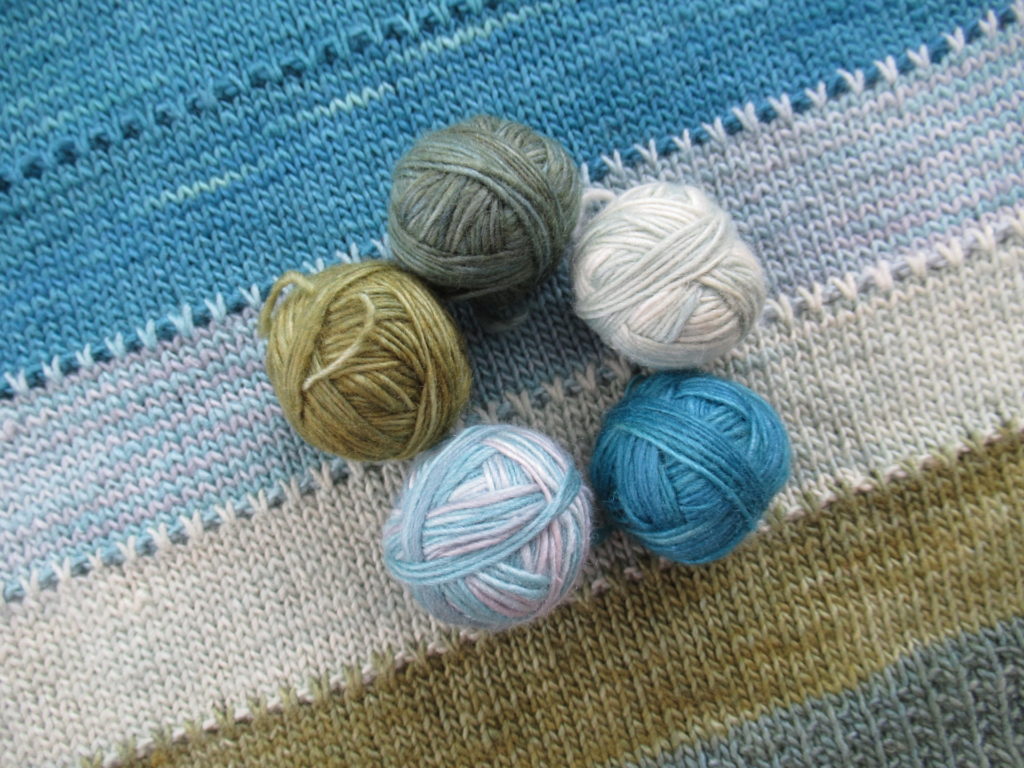
Suggested yarn: A total of approx. 17 g of fingering-weight yarn in 5 colours, for instance Manos del Uruguay ‘Fino’ (70% wool; 30% silk; total yardage/weight approx. 450 m/490 yds/100 g). I used some left-over yarn from Tellina, the simple cowl I made earlier this year, in the colourway ‘Flora’, in this order:
Colour 1: Tincture (darkest green)
Colour 2: Velvet Pincushion (medium green)
Colour 3: Crystal Goblet (pale green)
Colour 4: Folly (dark turquoise)
Colour 5: Watered Silk (pale turquoise)
I used a little more of colours 1 and 4 (approx. 4 grams each) than of the others (approx. 3 grams each).
This is an ideal project for playing with all kinds of left-over bits of yarn. I think it will also work very well in a self-striping (sock) yarn – that will save weaving in a lot of ends! You may have to choose a different needle size, though, and the bag may turn out bigger or smaller.
Abbreviations: K = knit K2tog = knit 2 stitches together P = purl Rnd(s) = round(s) st(s) = stitch(es) yo = yarn over
Instructions
Section A: Cast on 56 sts with colour 1. Rnd 1-4: Knit. Rnd 5: *K2tog, yo; repeat from * to end of rnd.
Section B: Change to colour 2 and knit 5 rnds.
Section C: Change to colour 3. Rnd 1 and 2: Knit. Rnd 3: *K4, K2tog, yo; repeat from * to last 2 sts, K2. Rnd 4 and 5: Knit.
Section D: Change to colour 4. Rnd 1: Knit. Rnd 2: * K1, P1; repeat from * to end of rnd. Rnd 3: *P1, K1; repeat from * to end of rnd.
Repeat rounds 2 and 3 nineteen times more in the following stripe sequence: 2 rnds colour 5; 2 rnds colour 1; 2 rnds colour 2; 2 rnds colour 3; 2 rnds colour 4, ending with 2 rnds in colour 5.
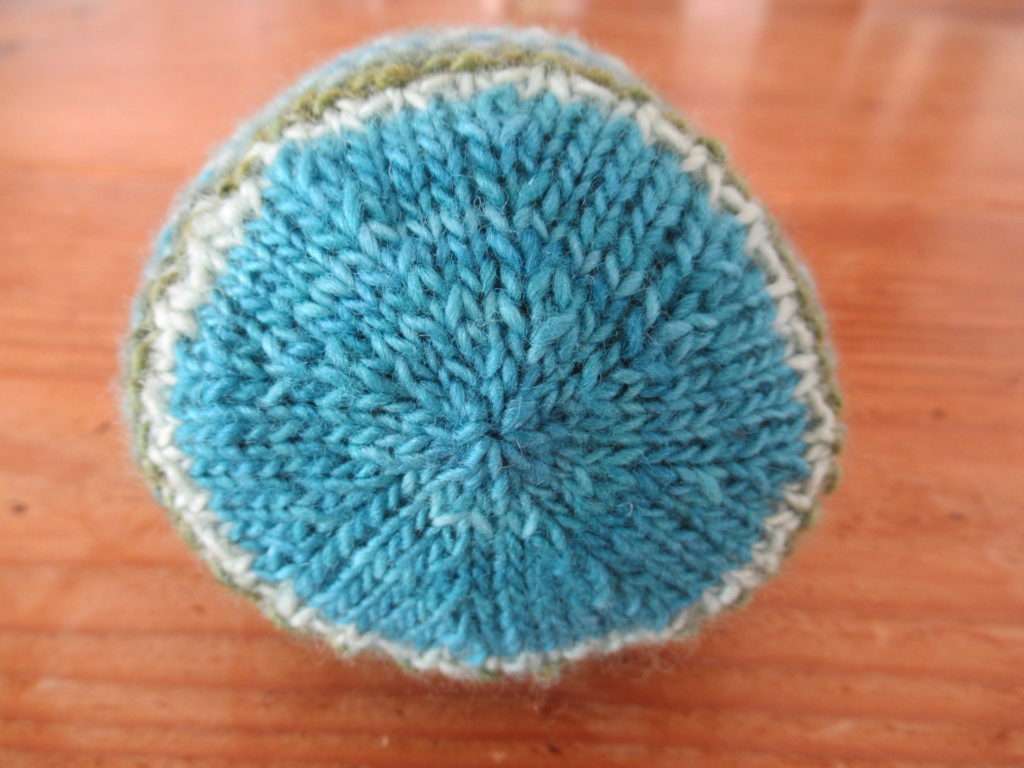
Section E: Change to colour 4. Rnd 1 and all odd rnds: Knit. Rnd 2: *K2tog, K5; repeat from * to end of rnd. Rnd 4: *K2tog, K4; repeat from * to end of rnd. Rnd 6: *K2tog, K3; repeat from * to end of rnd. Rnd 8: *K2tog, K2; repeat from * to end of rnd. Rnd 10: *K2tog, K1; repeat from * to end of rnd. Rnd 12: *K2tog; repeat from * to end of rnd.
Cut yarn. With the tapestry needle, thread yarn through the remaining 8 sts. Fasten off.
Finishing
Weave in all ends.
Fold section A to the inside halfway through the eyelets and sew in place with small invisible stitches.
Below there’s another picture of this step, showing what the top looks like before (left) and after hemming (right).
The cord
Thread a cord of approx. 40 cm/16” long through the holes. Use either I-cord, twisted cord, or some shop-bought cord or ribbon.
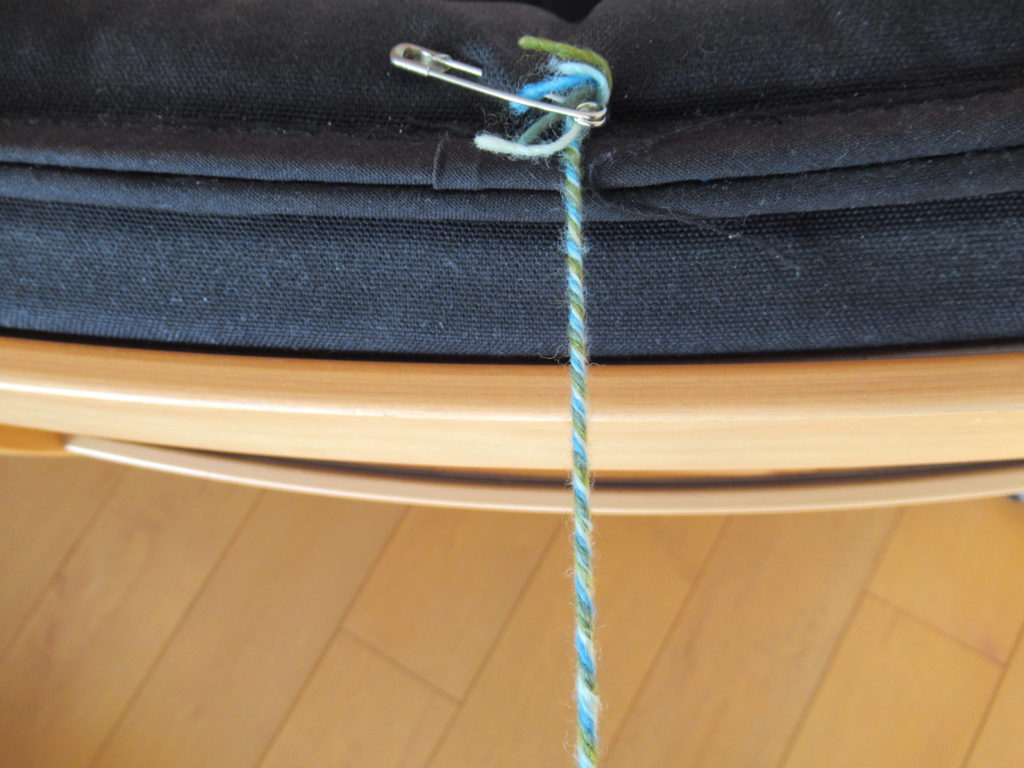
A twisted cord like the one I used, can be made as follows:
Cut five 1 m/40” lengths of yarn in each of the 5 colours.
Make a provisional knot at one end and fasten it with a safety pin to a heavy object, like a chair.
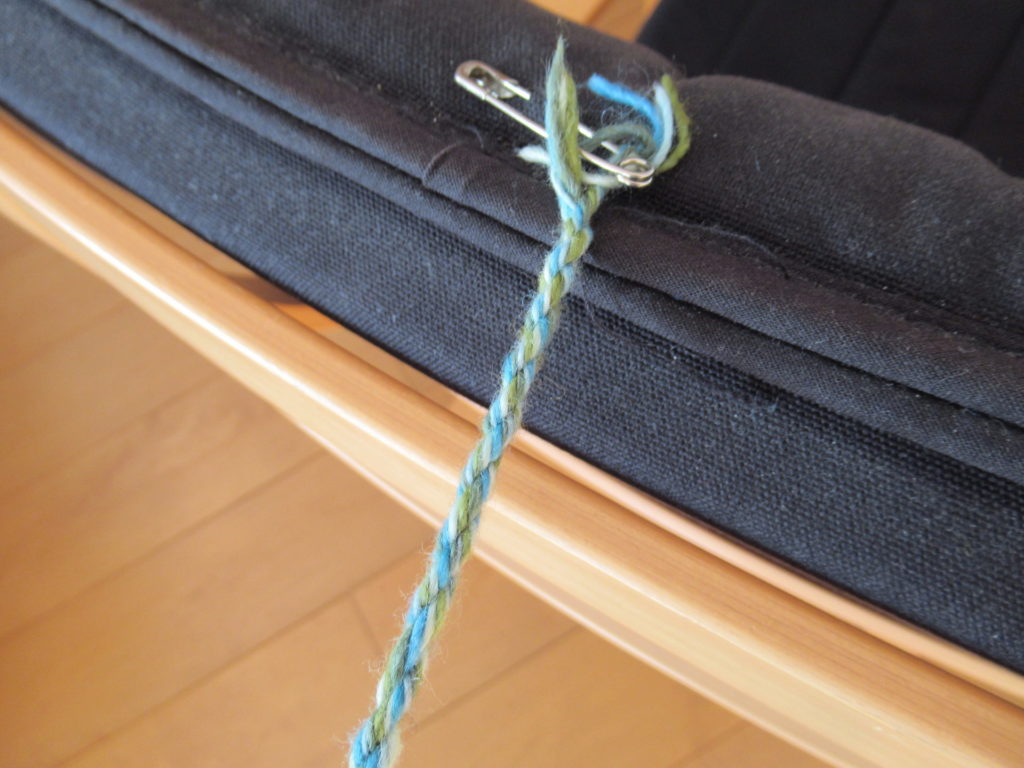
Twist the threads as tightly as possible.
Place your index finger in the middle, fold in half and let the doubled threads twist around each other, smoothing with your hands, if necessary.
Remove safety pin and thread the cord through the holes.
Untie the provisional knot and thread both ends through a bead, if you like. This makes a nice closure, but is not absolutely necessary.
Knot both ends of the cord together and cut off to a nice little tassel.
And that’s it, the Blogiversary Bag all done.
I hope you’ve enjoyed that. If you have any questions about the pattern, please leave a comment and I’ll try to answer as well as I can.
I’ll also add the Blogiversary Bag as a free pattern to Ravelry, so that you can add you own projects there if you like.
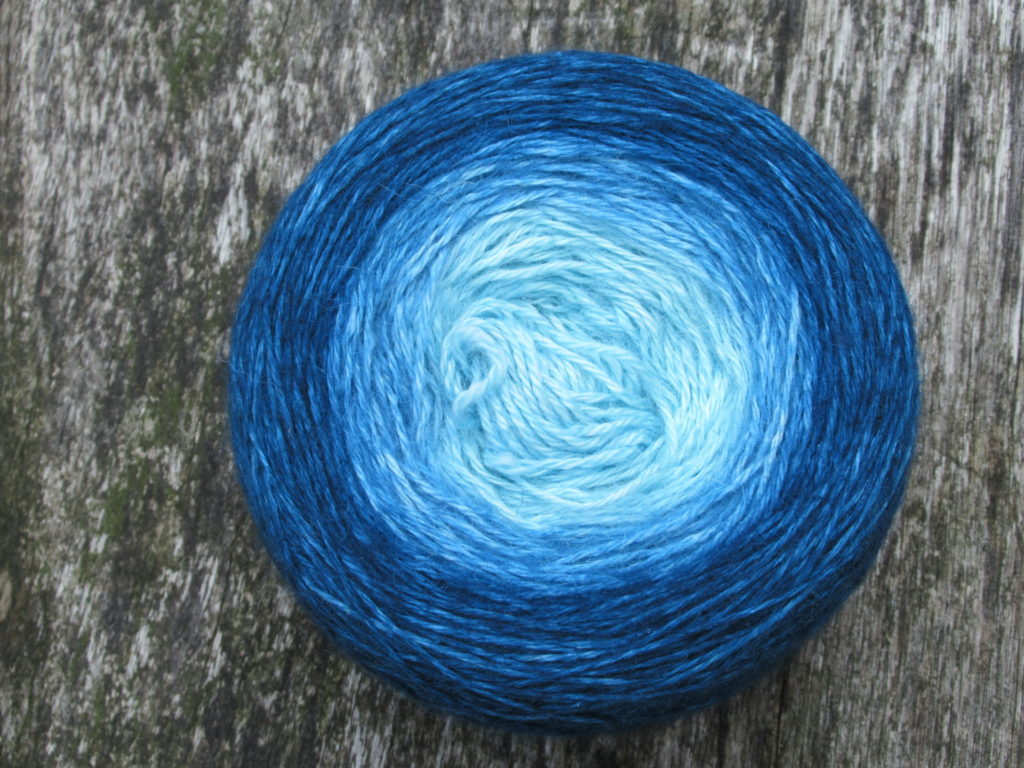
‘Pssst! Hey! Take me home with you!’ the ball of yarn in a gradient of blues whispered. It happened at our regional annual crafts fair. ‘I don’t think so,’ I said, ‘You’re far too expensive, and what would I do with you?’ The yarn ball wasn’t impressed. It kept up its insistent whispering, and after walking around it for about a dozen times, I said, ‘Okay, I surrender. I can’t deny that you’re gorgeous, and you can come home with me.’
It would have been so nice to tell you a romantic and poetic story about the inspiration behind Morbihan, my new shawl design. About how I was inspired by the sea – by its myriad shades of blue and its waves lapping the shore. But you may already have gathered from my previous post that it didn’t work that way. It was the other way around. It was the yarn itself that made me make this shawl, and it was only later that I made the connection with the sea.
The yarn that seduced me was Lang Yarns ‘Puno’, a blend of wool, alpaca and silk. What I love about this yarn is, first of all, its gorgeous colours, and also its drape, its softness and its subtle sheen.
And after knitting and blocking, I noticed how beautifully the lighter bits of this semi-solid yarn undulate along with the waves of the lace pattern, especially in the simple stocking stitch sections of the shawl.
This yarn cost € 49.90 for a single ball (or rather ‘cake’). Gulp! Granted, it was a generous 200 grams and 800 metres, but still… Not exactly a bargain.
Because I didn’t have any spare yarn for swatches (I wanted to use up all of this precious yarn for my project), I first tried out my ideas with some yarn scraps. When I had a clearer picture of what I wanted to make, I still hesitated about using the Puno. I didn’t want to spoil the yarn by ripping out my efforts several times. So, I bought some inexpensive yarn for a trial version, and it looks like this:
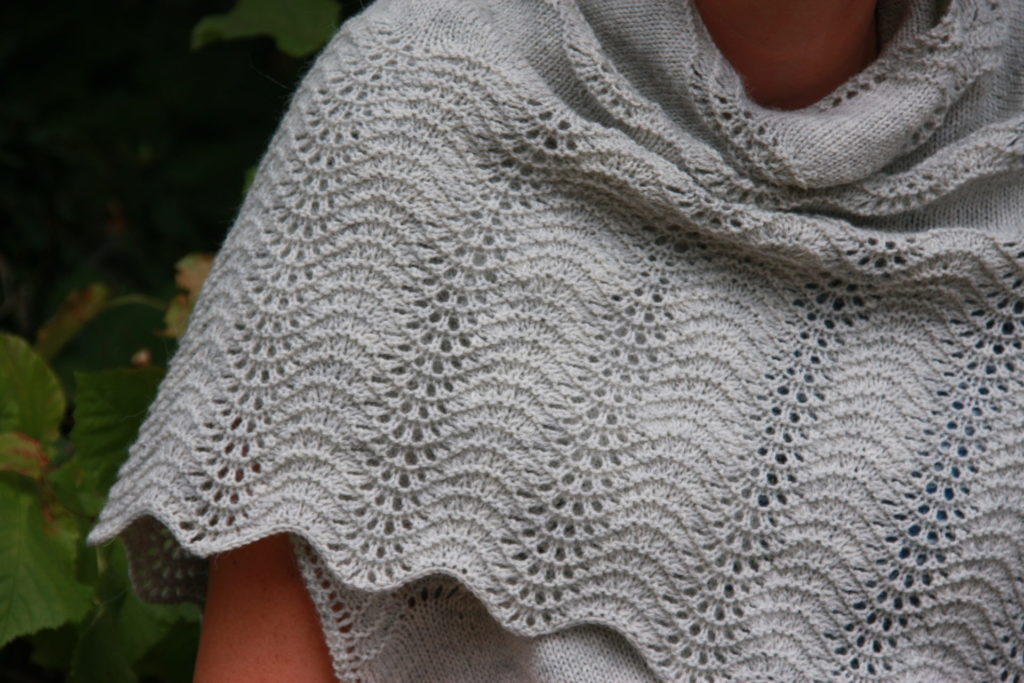
This is Drops ‘Flora’, a blend of wool and alpaca, with a similar weight/metreage ratio as the blue yarn – four 50 gram balls of this yarn are the equivalent of one ball of Puno. This was a bargain. I bought 4 balls with 30% off for the grand total of € 7.44.
Although this was only meant as a trial version, it has become a lovely shawl in itself. What I like about this yarn is its woolly cosiness and how beautifully it shows the lace pattern.
And it didn’t end there. After I’d decided to publish the Morbihan pattern, I wanted to make absolutely sure that there weren’t any errors in it, so I decided to make another one to check it.
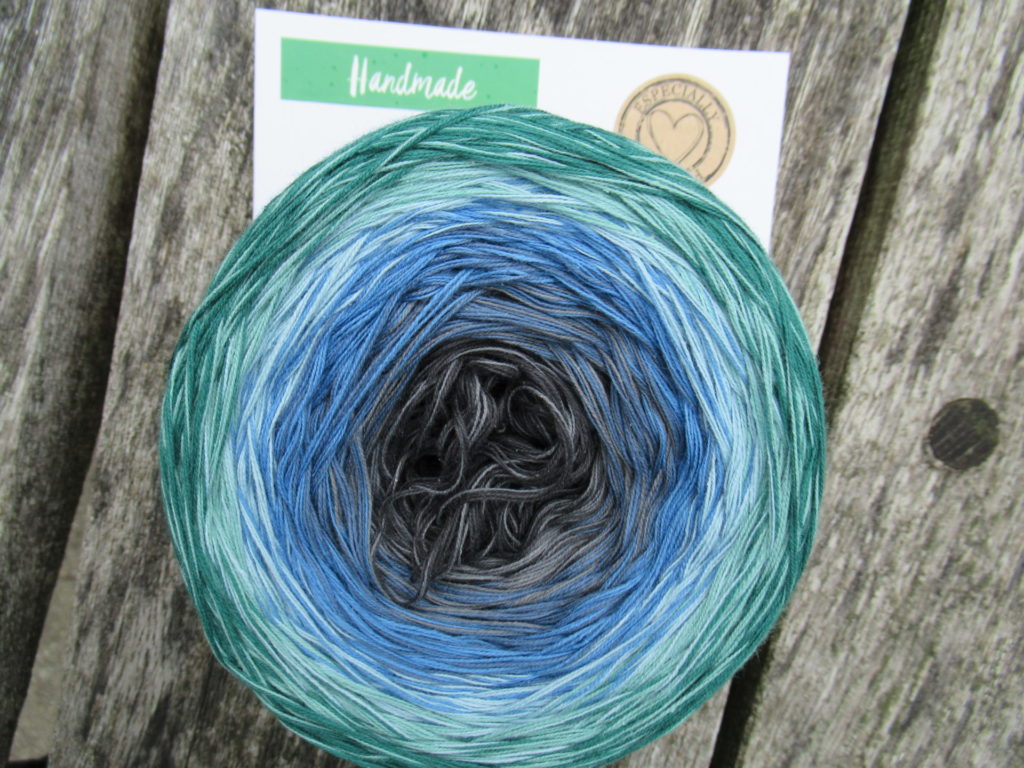
This time I used a cotton yarn. I wouldn’t normally choose cotton for a shawl, but during a very hot period this summer, I started looking for yarns that wouldn’t stick to my hands and found this. I don’t know if your screen is big enough to read it, but the card behind the yarn cake says ‘handmade’.
Huh, handmade? Yes, this yarn cake really is handmade! And it’s organic too!
Saskia, the owner of Wol zo Eerlijk, a yarn shop specializing in fair trade, organic and otherwise sustainable and animal friendly yarns, makes these yarn cakes herself. She combines several threads of a very thin cotton yarn and winds them into fabulous colour gradients. There are over 25 colourways to choose from.
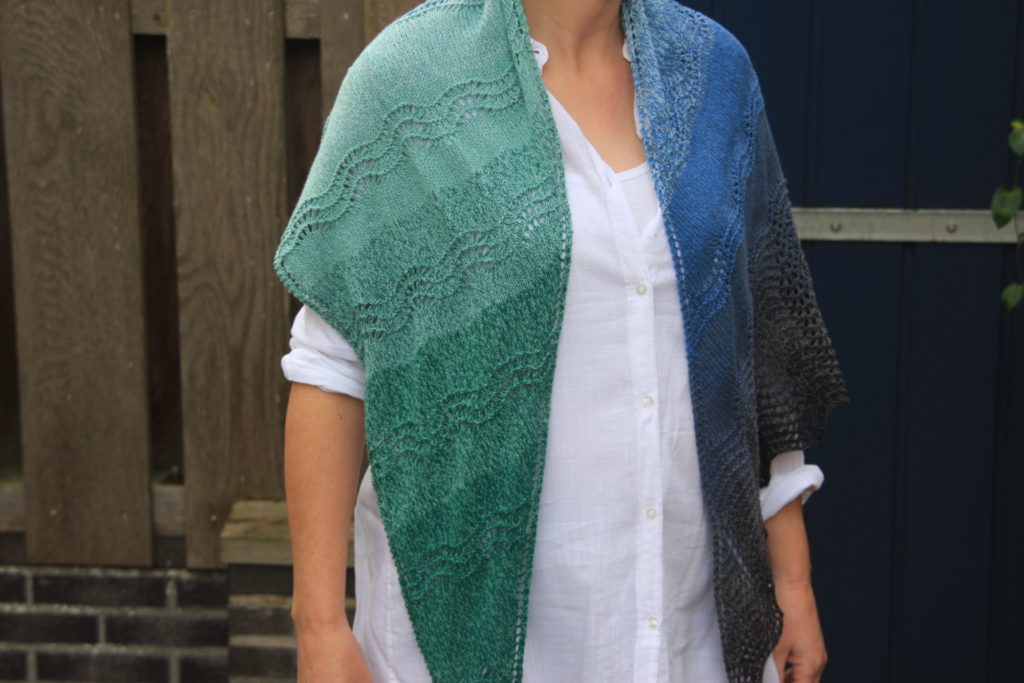
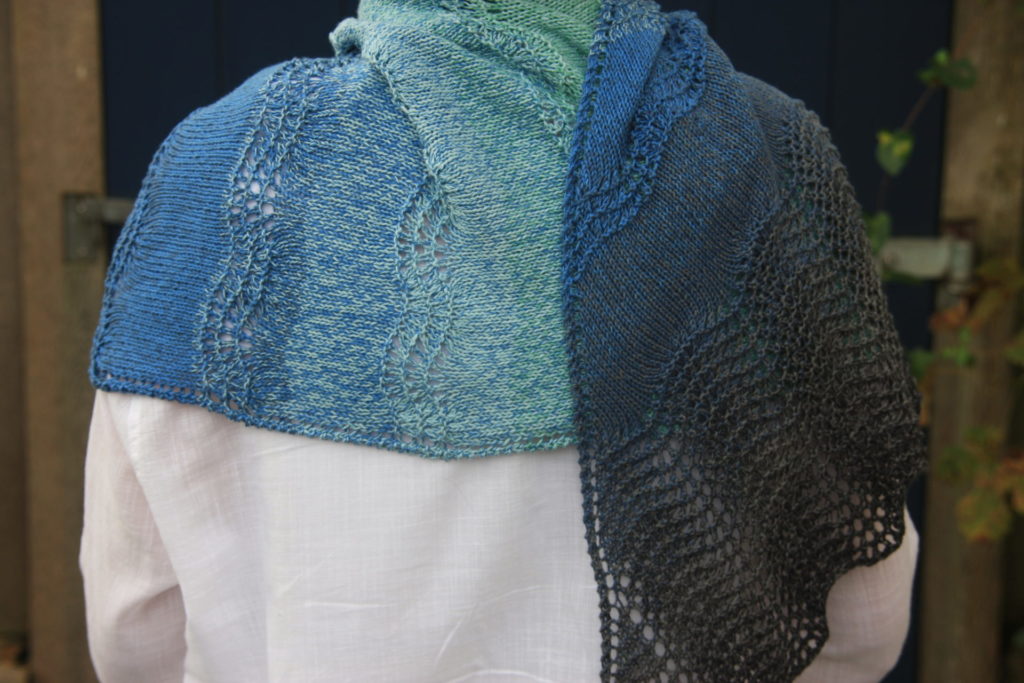
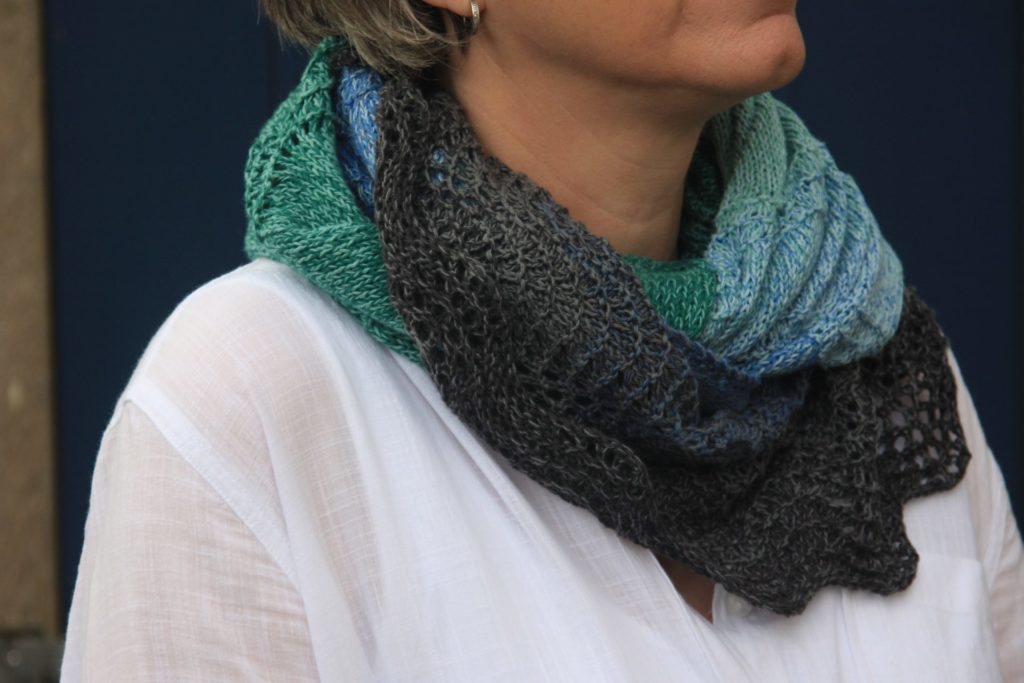
The colourway I chose is called Planet Earth, and goes from a medium green through blue to almost (but not quite) black.
The thin threads that the yarn is made up of, are not twisted around each other, and I was a bit concerned that the yarn would be hard to knit with. I expected to stick my needle between the threads and miss one or two here and there, but personally, I didn’t have any problems.
Because this yarn is handmade, the cakes do not all have exactly the same weight. The ball band says ‘approx. 225 grams’, but mine was 235 grams. This meant that I could add quite a few extra rows to the border (the pattern explains how to do this) and it has become quite a big shawl.
At € 29.95 per cake, this yarn is rather more expensive than that of the grey Morbihan. But considering that it is handmade and organic, and has a generous metreage, I think it really is a bargain, too. It would be an ideal choice for warmer climates, vegans and people allergic to wool.
Well, those are my three versions of Morbihan. I think it will work in almost any yarn – cotton or cashmere, sheep’s wool or silk, viscose or vicuña, alpaca or acrylic… Wait, no, not acrylic! That’s about the only yarn type that I wouldn’t choose. I don’t think it’s very suitable for lace knitting, because it will bounce back after blocking.
Should you decide to make your own Morbihan, in whatever yarn takes your fancy, I wish you happy knitting!
Note: This post isn’t sponsored in any way. The descriptions of the yarns are based on my own experiences with them, and represent my own honest opinions.
Hello! Good morning, good afternoon or good evening, depending on where in the world you are and when you can find a moment to read this.
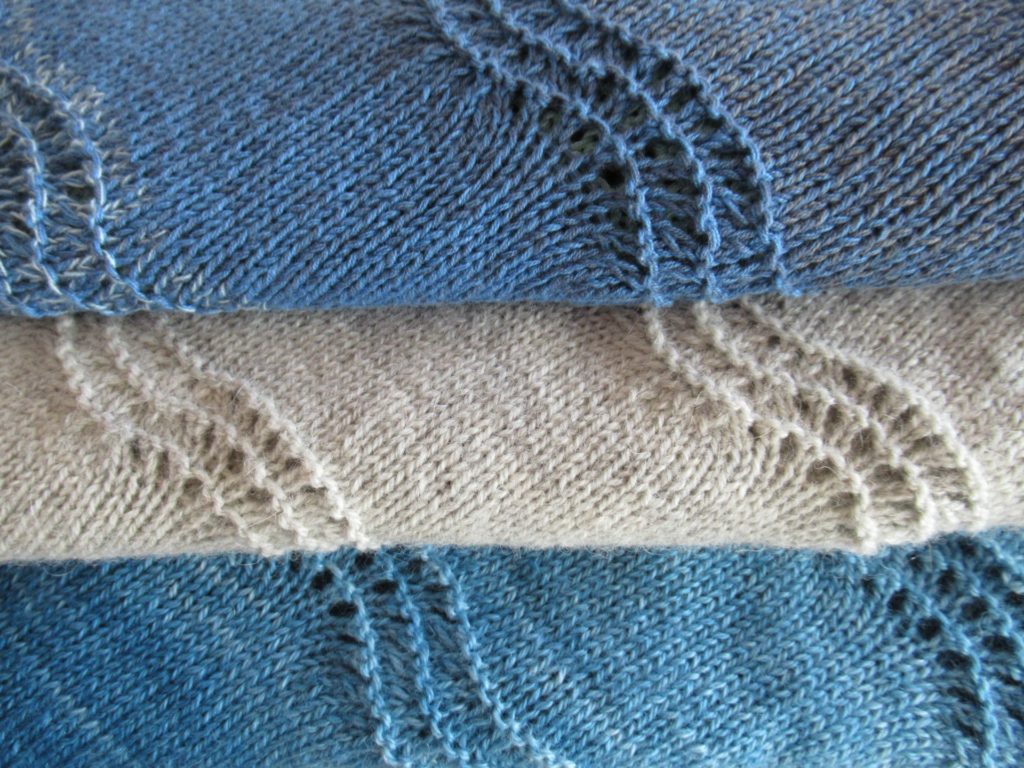
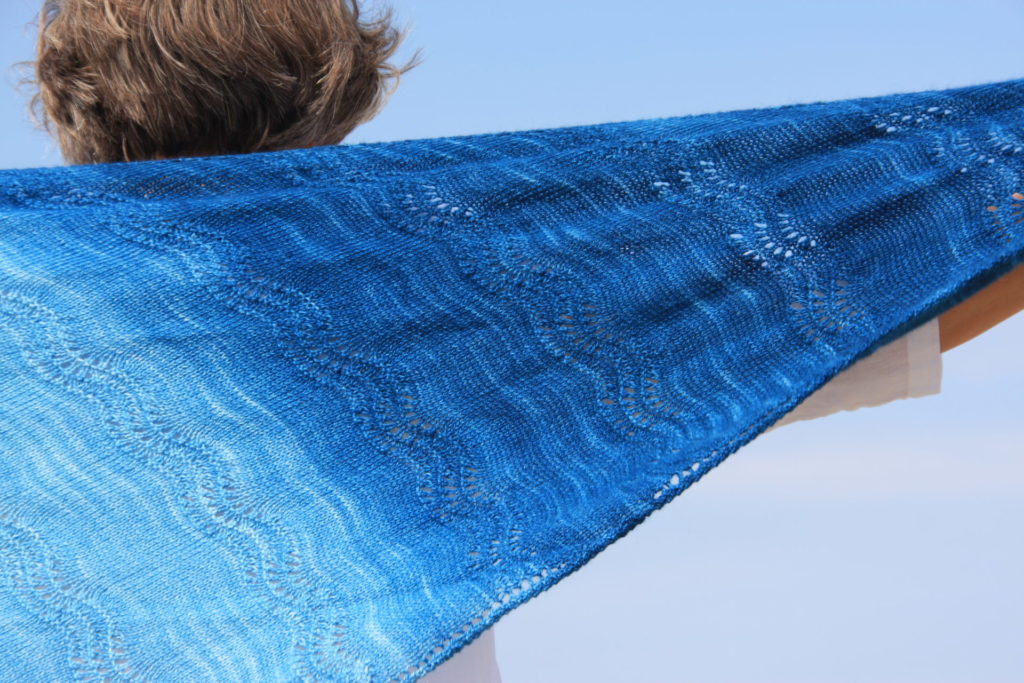
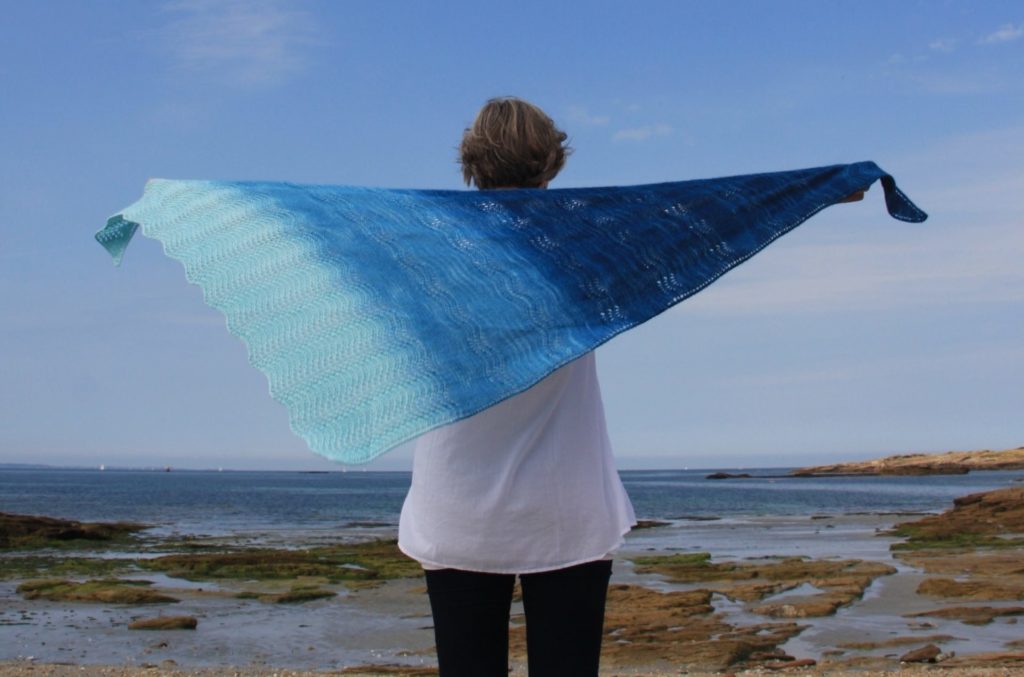
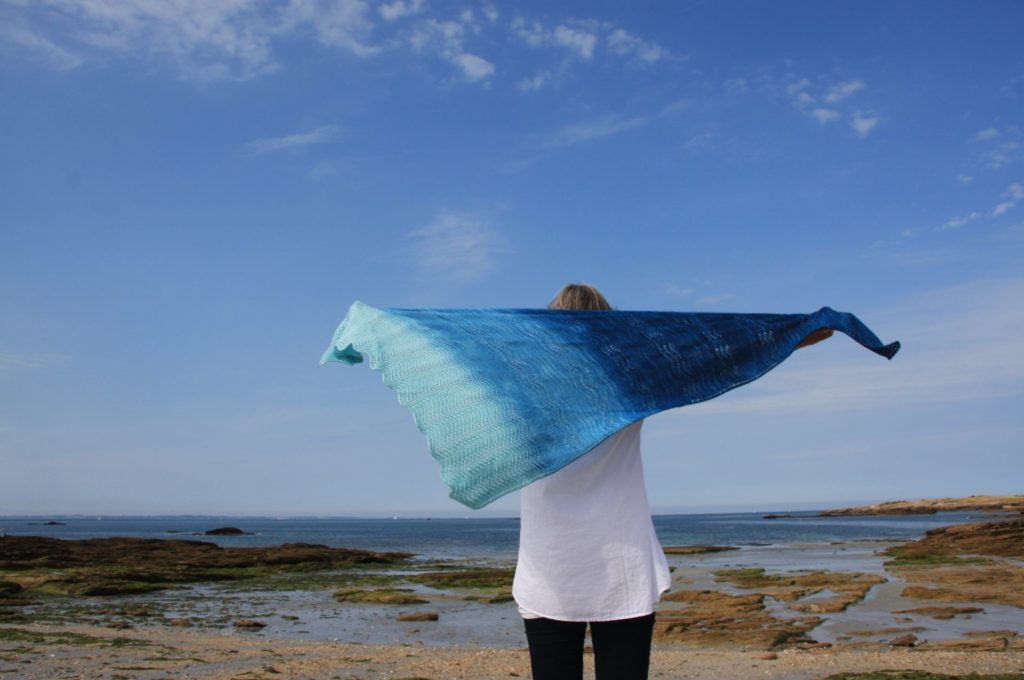
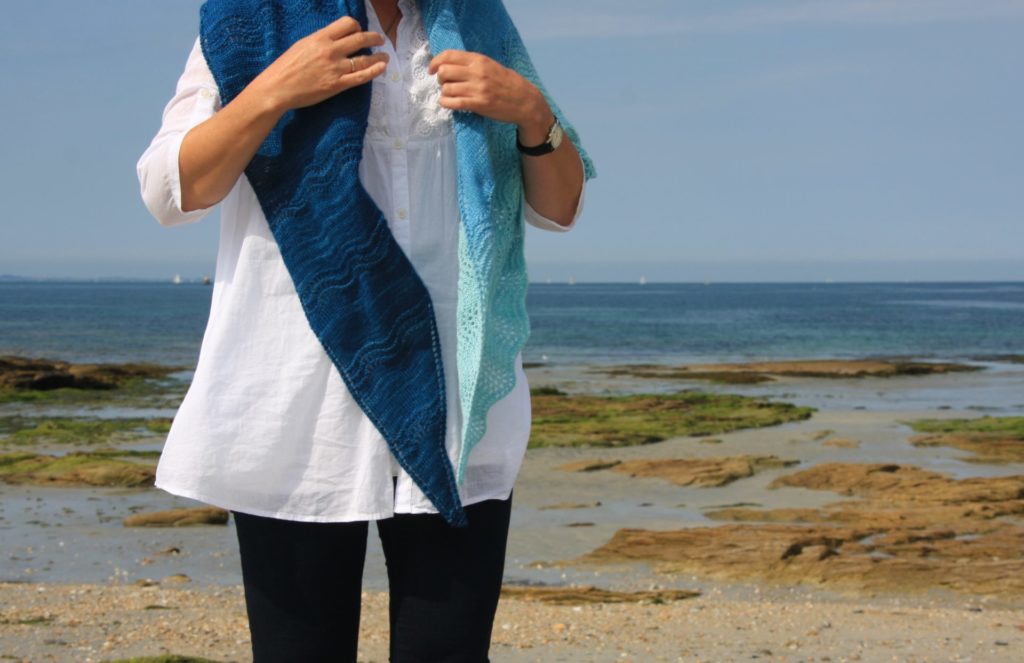
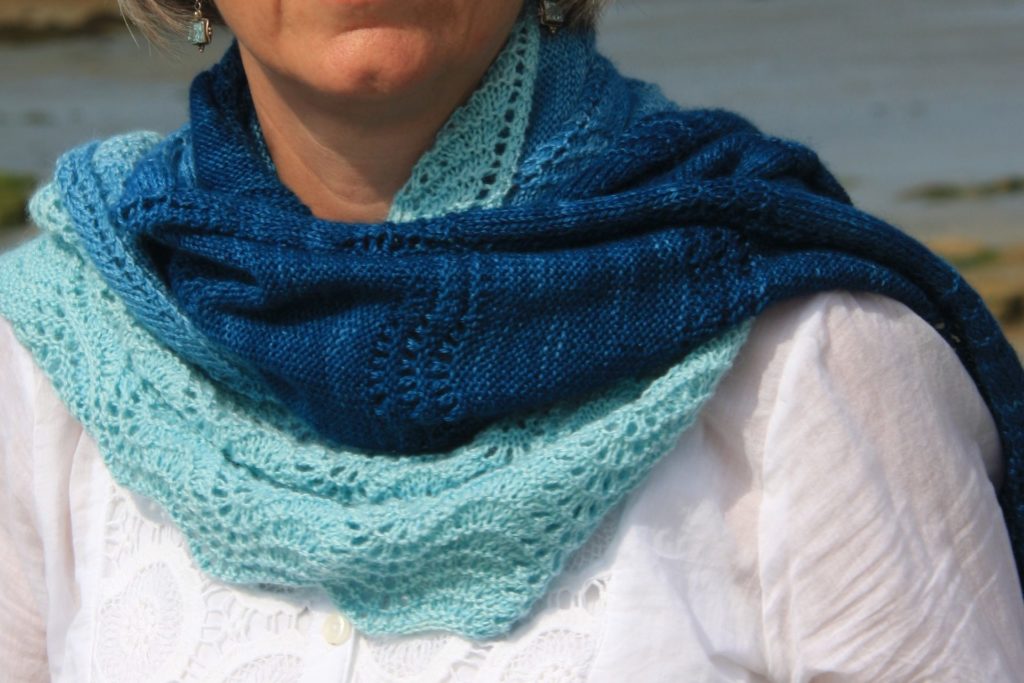
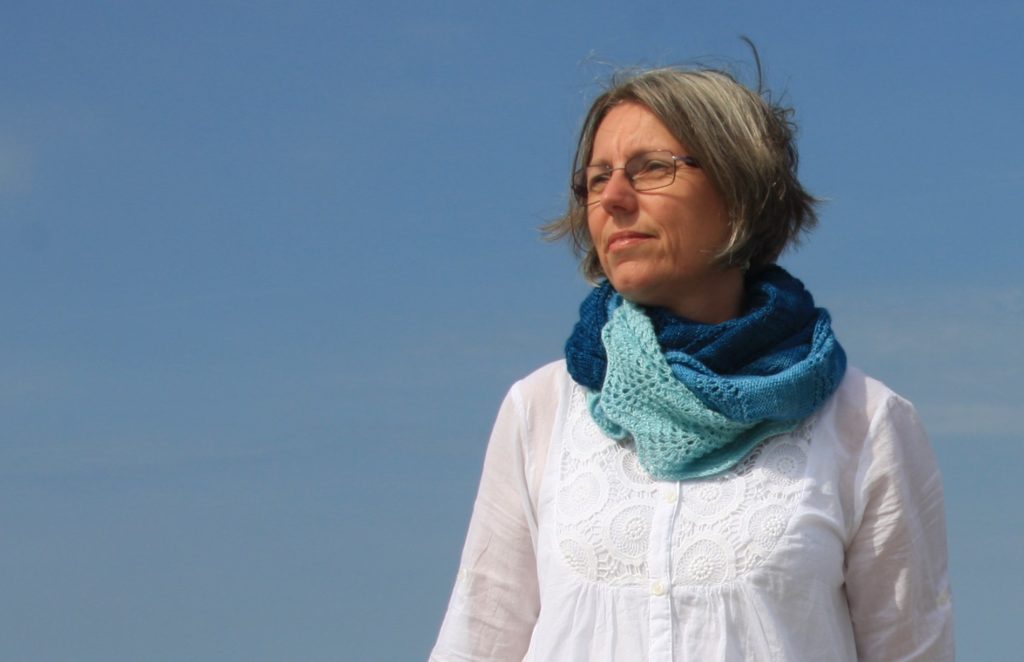
Today, I’d like to tell you about a shawl I’ve designed. I’ve called it Morbihan. As you can see, it’s an asymmetrical triangle, and it is knit in a combination of stocking stitch and a traditional, wavy lace pattern.
But before I tell you more about the shawl itself, I’d like to tell you how it came by its name.
I designed and knit the (then nameless) shawl in the early summer of 2018, months before I started this blog. I made it for myself, but at the back of my mind was the thought, ‘Who knows, maybe I’ll publish the pattern someday.’
That summer, were going to spend our holiday on the south coast of Brittany, France, and while I was packing I decided to add the shawl to my suitcase for chilly evenings. We were to spend part of our holiday in the region of Finistère, and part of it in the region of Morbihan.
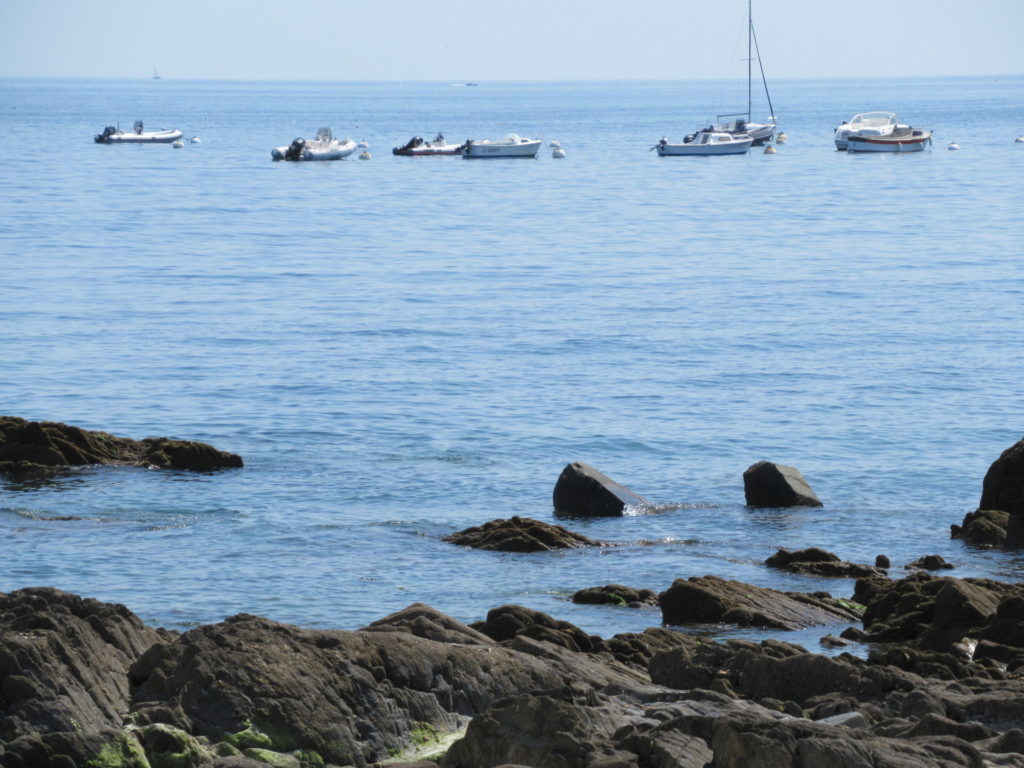
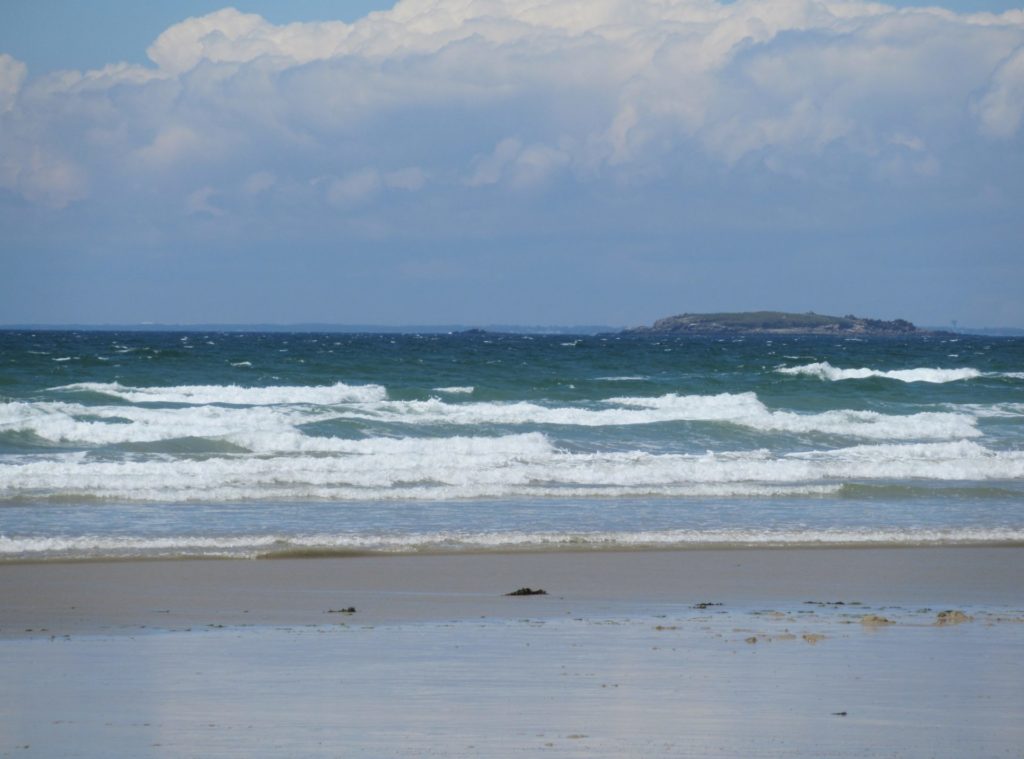
The coastline over there is so, so beautiful, especially that of Morbihan. There are rocky stretches…
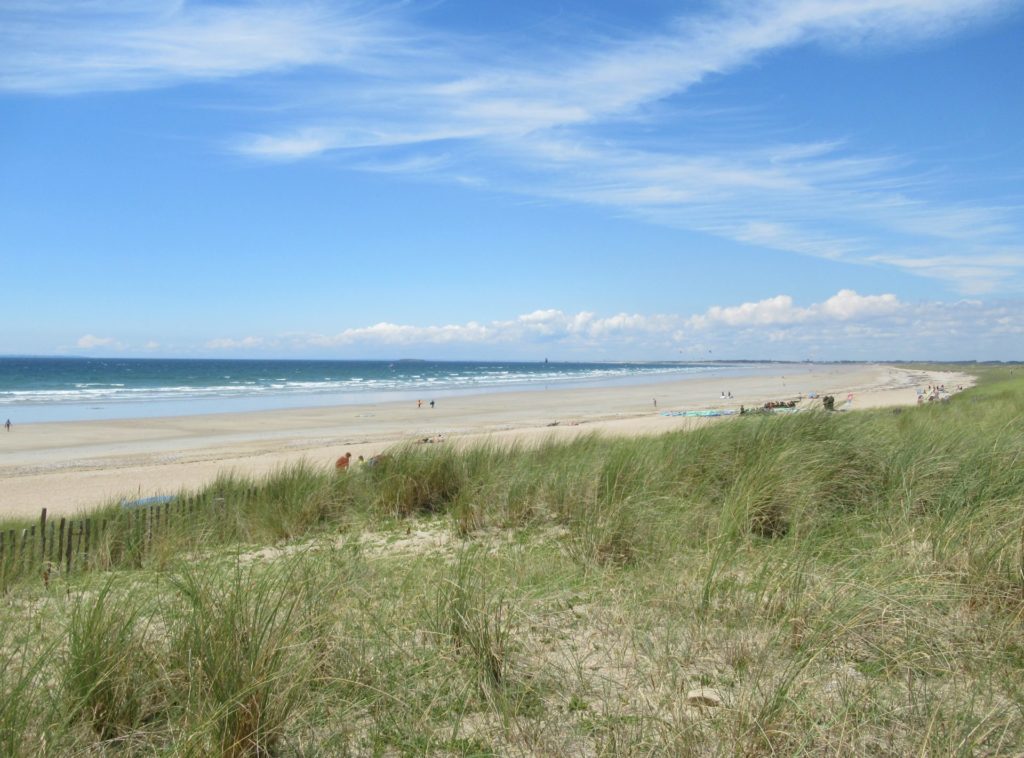
… as well as wide, white sandy beaches.
In the Breton language the gulf of Morbihan, which gave the region its name, is called Ar Mor Bihan, meaning ‘the little sea’.
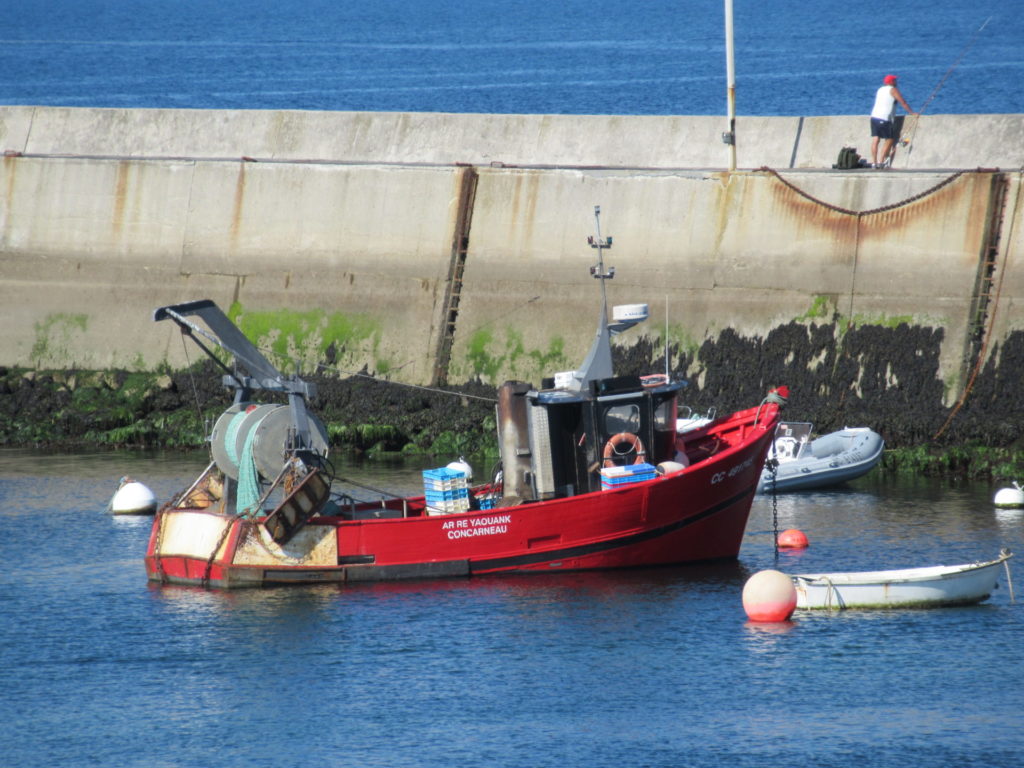
What I love most of all about the coast in this part of France, is the clear light and the vibrant colours. Very different from the generally more muted colours of my own country. The bright red of a fishing boat…
… but especially the many, many shades of blue. The translucent blue of the sky. A blue shutter on a white building. And the ever changing blues of the sea, of course. Sometimes pale and in stripes…
… and sometimes a much darker blue shading to turquoise.
We didn’t spend our entire holiday staring at the sea, though. While we were there, we just had to pay a visit to the famous standing stones of Carnac. The sheer number of upright stones, all neatly arranged in rows pointing in the same direction, is amazing.
There were some interesting museums and galleries, and we also visited a stately manoir, with a granary (below) that was even more beautiful than the house itself.
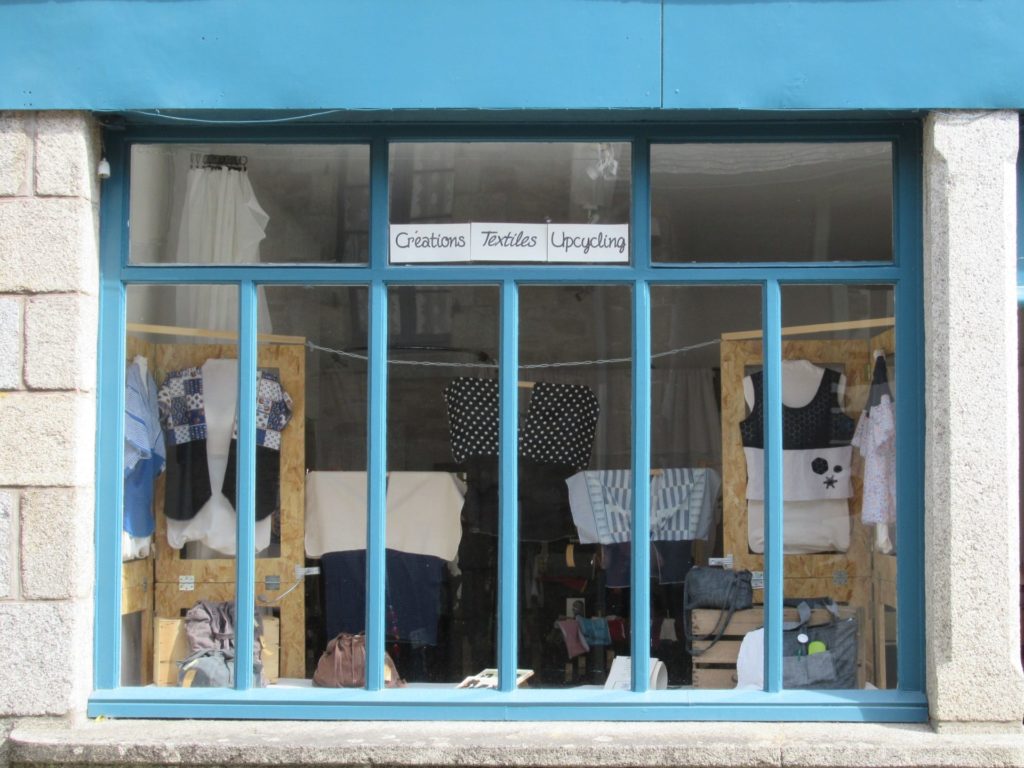
And then there were the delicious thin pancakes called crêpes, the tempting restaurants, and the lovely fishing villages. In one of these villages I took this picture of a shop window:
It’s an ‘upcycling’ shop, where they make and sell wonderful creations from second-hand clothes. Here, too, it was all about blue.
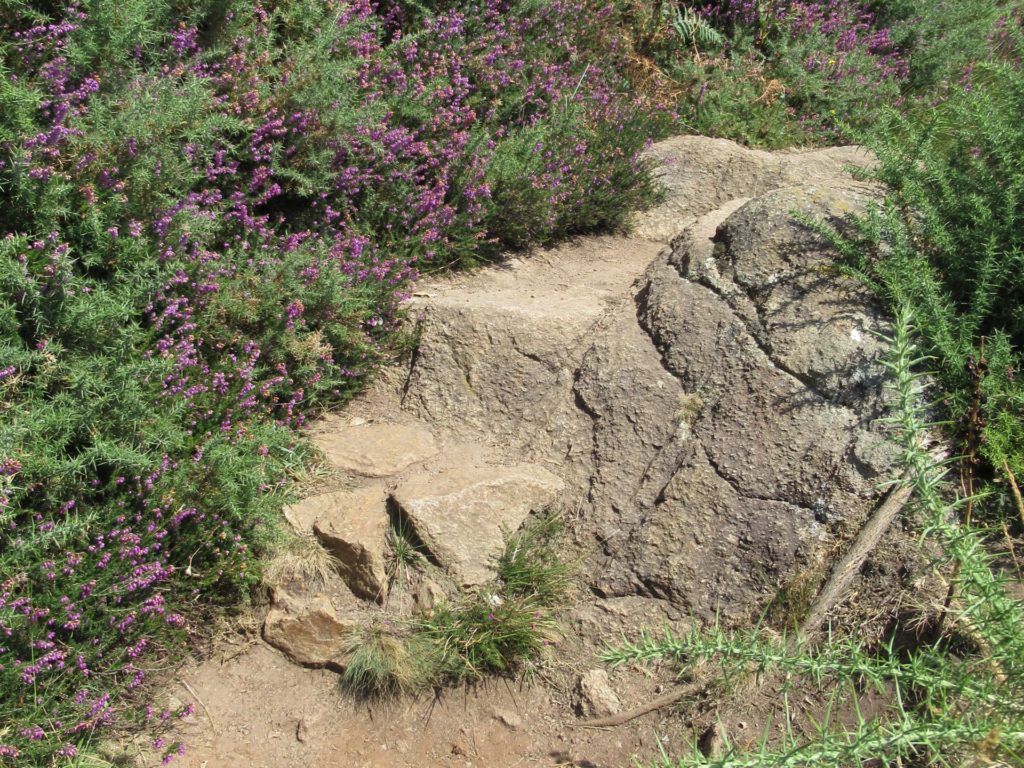
But, all in all, we spent most of our time on the coast, either walking along the coastal path
or strolling along the beach, camera in hand, taking pictures of the sea, rock pools and birds, and just soaking up the sun and gazing out over the sea.
On one of these beach days, I asked my beloved private photographer to take some pictures of my shawl. You’ve already seen it in its entirety at the top of this post, but here’s another picture of it fluttering in the sea breeze.
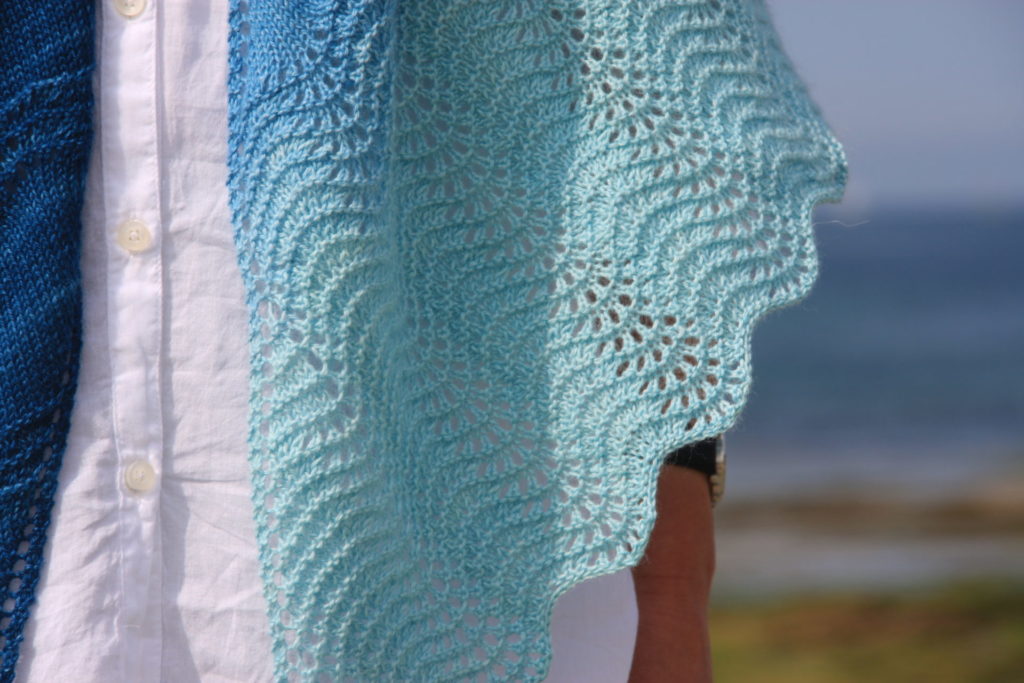
The triangle starts with just 3 stitches and gradually grows wider with increases along one side. The lace pattern I’ve chosen is an all-time favourite called Old Shale. The body of the shawl consists of stocking stitch sections alternating with sections in Old Shale, and it ends in a border knit entirely in the wavy lace pattern.
I used a yarn in a gradient of blues, from a deep sea blue at the narrow end to a pale turquoise at the wide border.
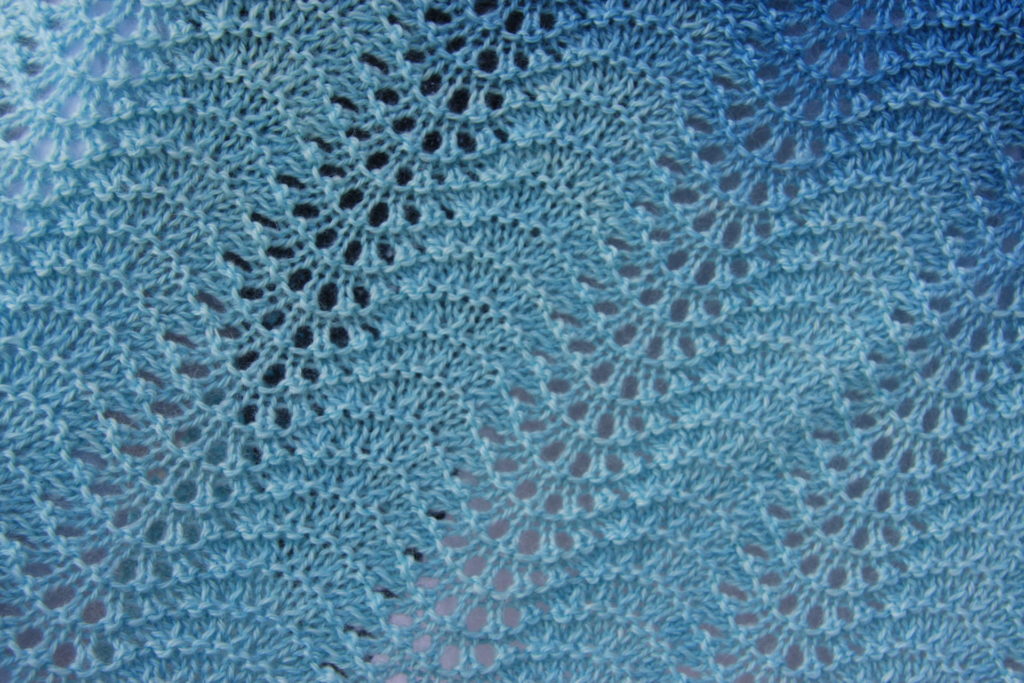
Here’s a close-up of the border.
To an inexperienced knitter, it may look complicated, but it isn’t. It’s a fairly simple shawl, in fact, with the ‘action’ taking place in only one in every four rows of the lace pattern. For the rest it is just a matter of knitting and purling.
By now, you’ll probably understand why I’ve called this shawl Morbihan. Although I hadn’t planned it beforehand, the shawl and ‘the little sea’ turned out to have much in common. The colours, the waves…
… and also a certain soothing rhythm.
It’s taken me a while, but I’ve finally written out, tested and uploaded the pattern. If you’d like to knit a Morbihan shawl, too, you can find the pattern here on Ravelry.
The pattern has all the details about yarn, knitting needles etcetera, written instructions as well as a chart for the lace pattern, and a tip about making the shawl longer or shorter.
In addition to this one, I’ve made several more versions of Morbihan. I’ll tell you more about them and the yarns I’ve used soon.
Over the years, our front garden has become a bit of a mess. Some conifers and shrubs that started out as cute little things, have become unwieldy monsters. We could live with that. In a busy life, the garden doesn’t always get top priority, and it’s impossible to have everything perfect all the time. But now that several trees and some plants have died after two very hot and dry summers, it’s high time to take action.
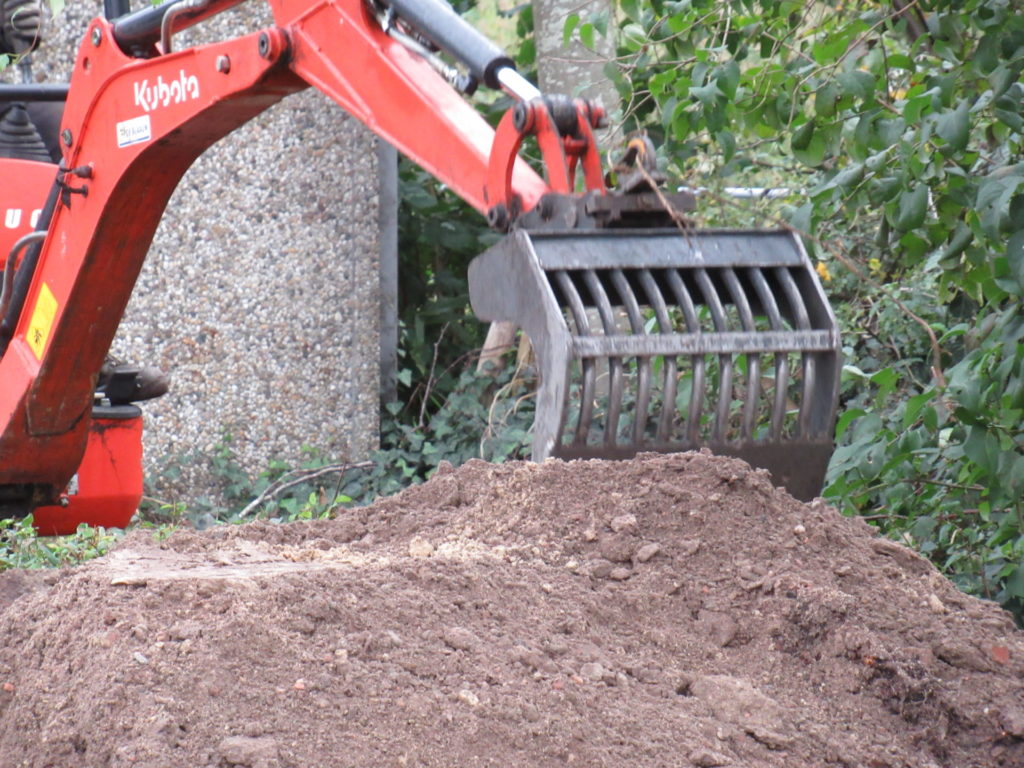
So we’ve taken this week off for a big overhaul. Fortunately we have some help with the planning and the heavy lifting.
(This may make it look as if we have a huge estate. We don’t, but this is the only way to dig out the tree stumps.)
Because the garden work comes first this week, I’m keeping everything else as simple as possible, including our meals. Soup is ideal for weeks like these. One of my all-time favourites is mushroom soup, and I’ll share my recipe with you here.
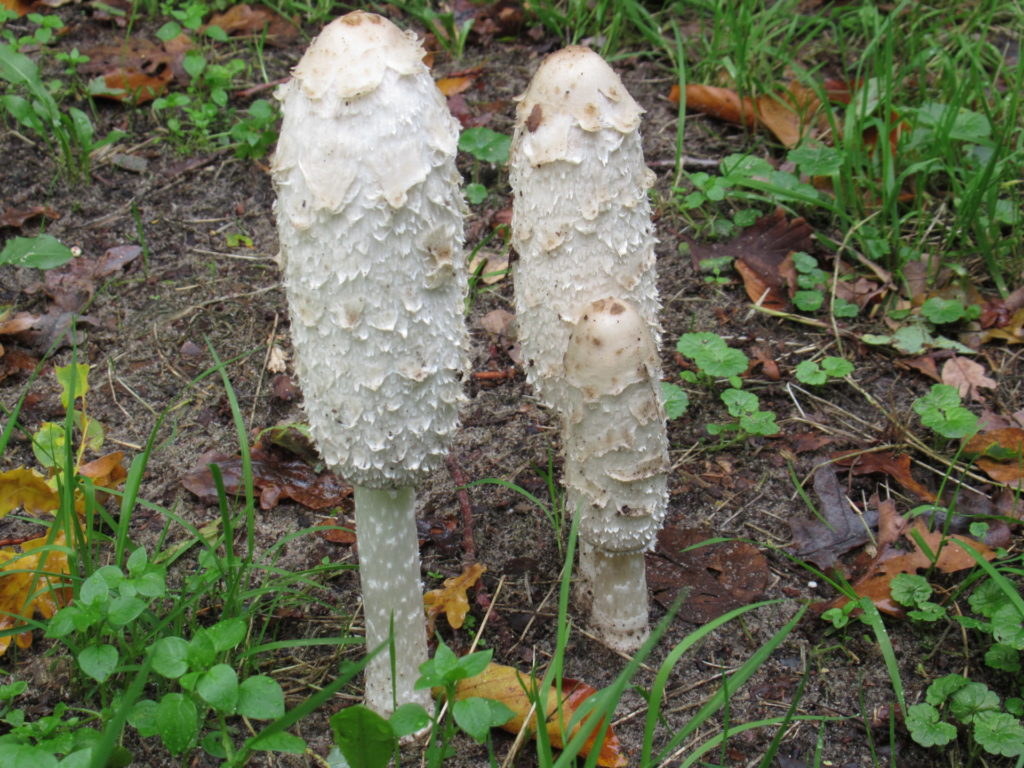
I could have used these shaggy inkcaps, but left them in place.
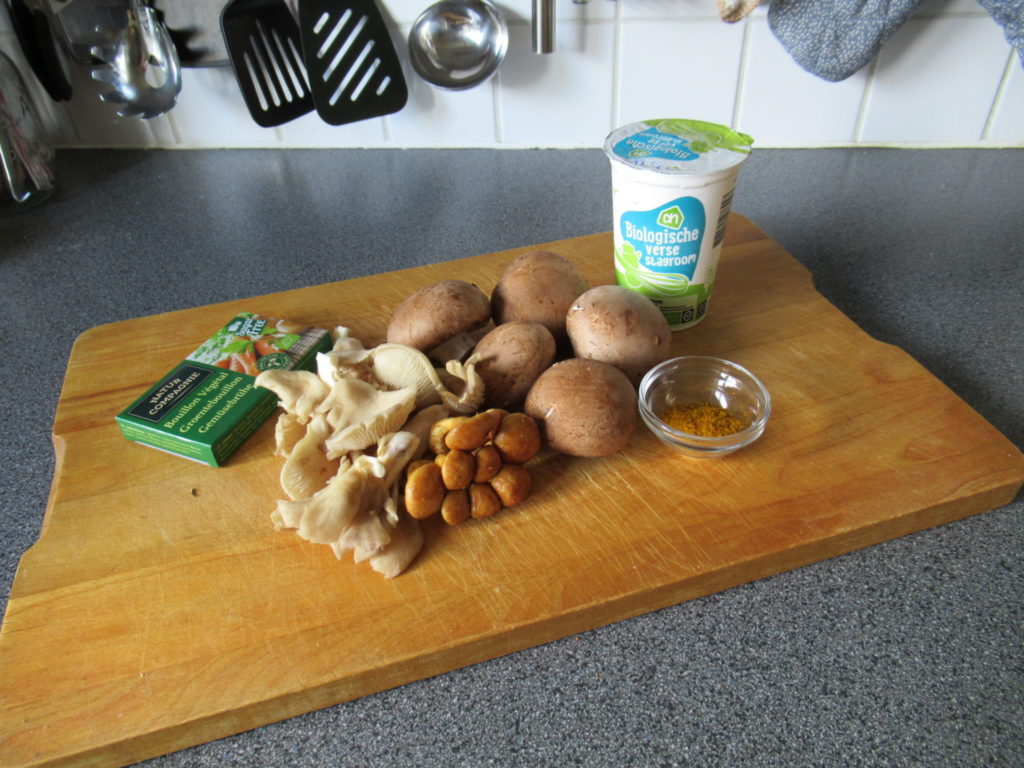
Although I know these are edible, I don’t feel very comfortable eating wild mushrooms. So I bought a mixture of mushrooms from the supermarket instead. If you can’t get a variety, any old mushrooms will do. White button mushrooms, chestnut mushrooms, flat caps, whatever is available is fine.
Simple Mushroom Soup
Serves 6 as a starter or 3 as a main course
Ingredients
250 g mushrooms, chopped or sliced
1 onion, finely chopped
1 tsp mild curry powder
1 tbsp butter or oil
2 vegetable stock cubes
750 ml water
250 ml cream
Method
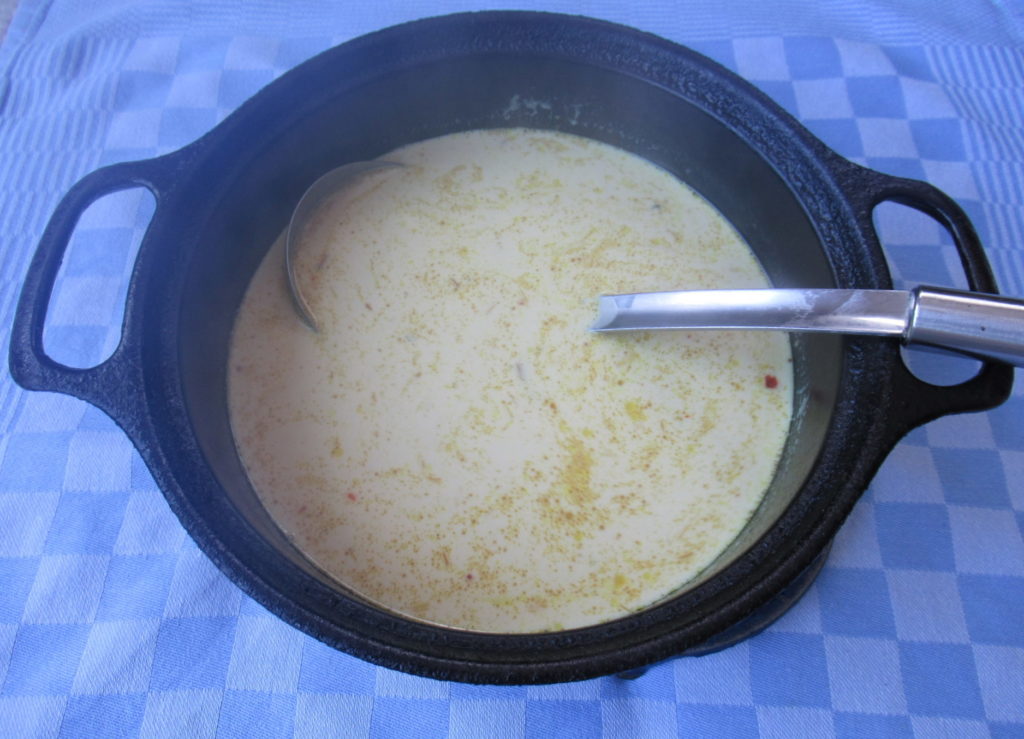
Sauté the onion in the oil or butter over medium heat until soft.
Add the mushrooms and cook for a further 5 minutes.
Stir in the curry powder and sauté for about 1 minute, until it releases its fragrance.
Pour in the water, add the stock cubes and bring to the boil.
Turn down the heat and leave to simmer with the lid on for 15 minutes, stirring now and then.
Add the cream and heat through gently.
Ladle into bowls and serve with some bread and a salad for a complete main course.
Enjoy!
Taking these pictures has taught me that food photography is not as easy as it looks. When I take pictures of things I’ve knit and am not happy with the result, I can always do them again. But with food, well, if you’re not happy with the photos, you don’t get another try because the food is gone.
With the photo above, I wanted to show that the soup is steaming hot, but it just looks hazy. And the mushrooms have all sunk to the bottom of the pan. I can only hope that it still looks tasty enough anyway.
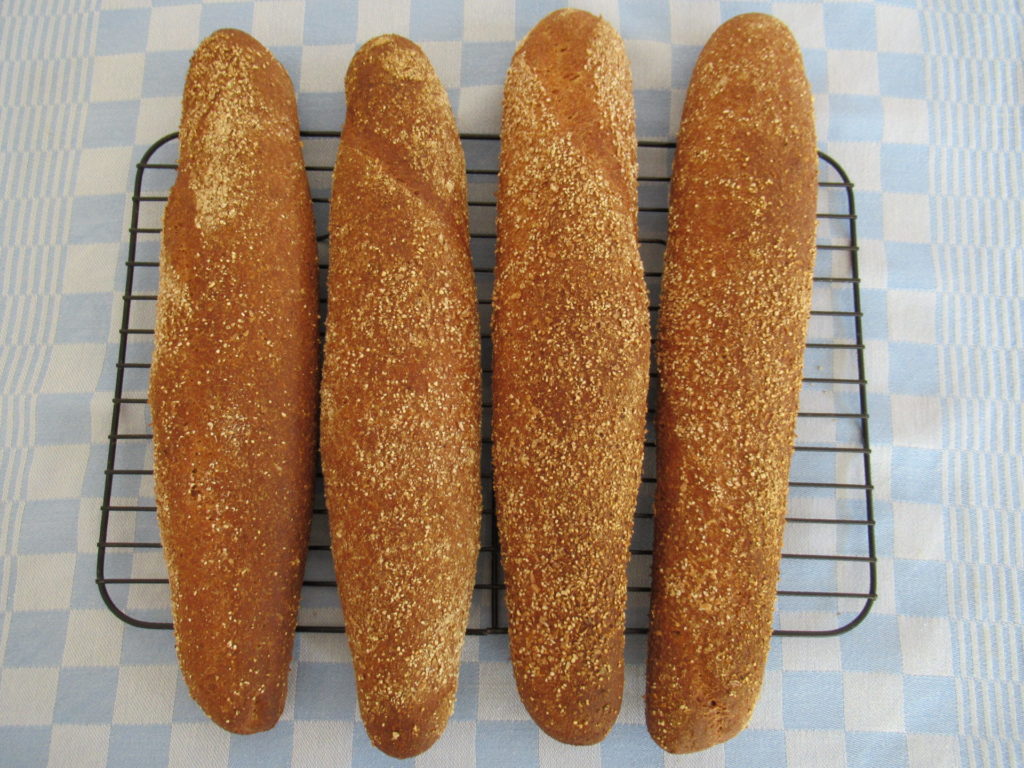
One of my husband’s hobbies is baking bread, and he baked these beauties. We ate some straightaway and put the rest in the freezer.
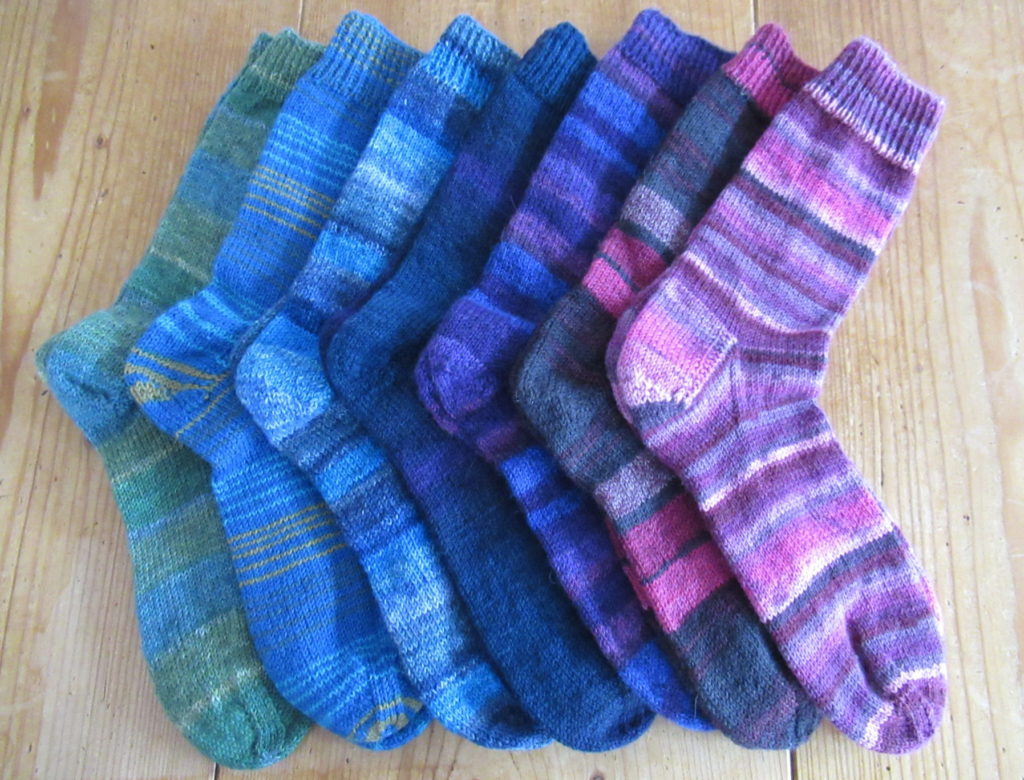
What with all the physical work and fresh air, I’m rather drowsy in the evenings. All I have energy for is writing a blog post, bit by bit, and some simple knitting. For me, socks are the ultimate simple knits.
I’ve just started some from a yarn that will make an identical pair. This kind of yarn is sold under names like ‘pairfect’, ‘perfect pair’, or something with ‘twin’ in the name. Some of these yarns work with a starter thread.
In this case, the neon green thread in the photo below is the starter thread. This is pulled from the centre of the ball until you get to the first bit of yarn in a ‘normal’ colour. Cast on the required number of stitches, then knit, knit, knit stripes until you come to a solid bit. Then start the heel (heel and foot are knit in solid blue in this case), and when you get to the toe, stripes appear from the inside of the ball again like magic.
For the second sock, pull the yarn from the inside of the ball again until you come to the end of the next starter thread and start knitting again. It’s really clever how this yarn has been dyed.
I’ve knit many, many pairs of socks over the years. I always have a sock on the needles. Sometimes a pair is finished in a week, sometimes it takes a lot longer. It depends on how much time I have, and what other knitting projects I’m working on, but there’s no hurry.
I like wearing them myself, but also give many away. They make welcome gifts. Sometimes I choose yarn specifically for a certain person. But often, I just choose yarns and colours that I like, and when the socks are finished, I look at them and ask them, ‘Now who would like to wear you, do you think?’