Hello! No big projects or FOs today, but 7 small things that have made me happy over the past week.
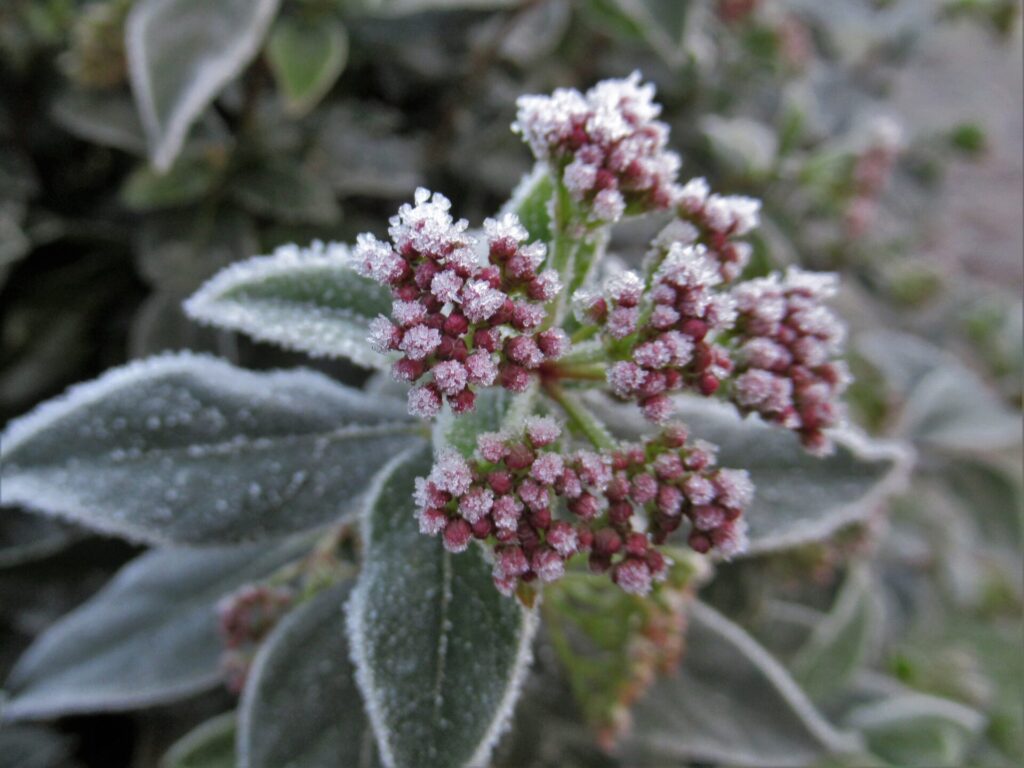
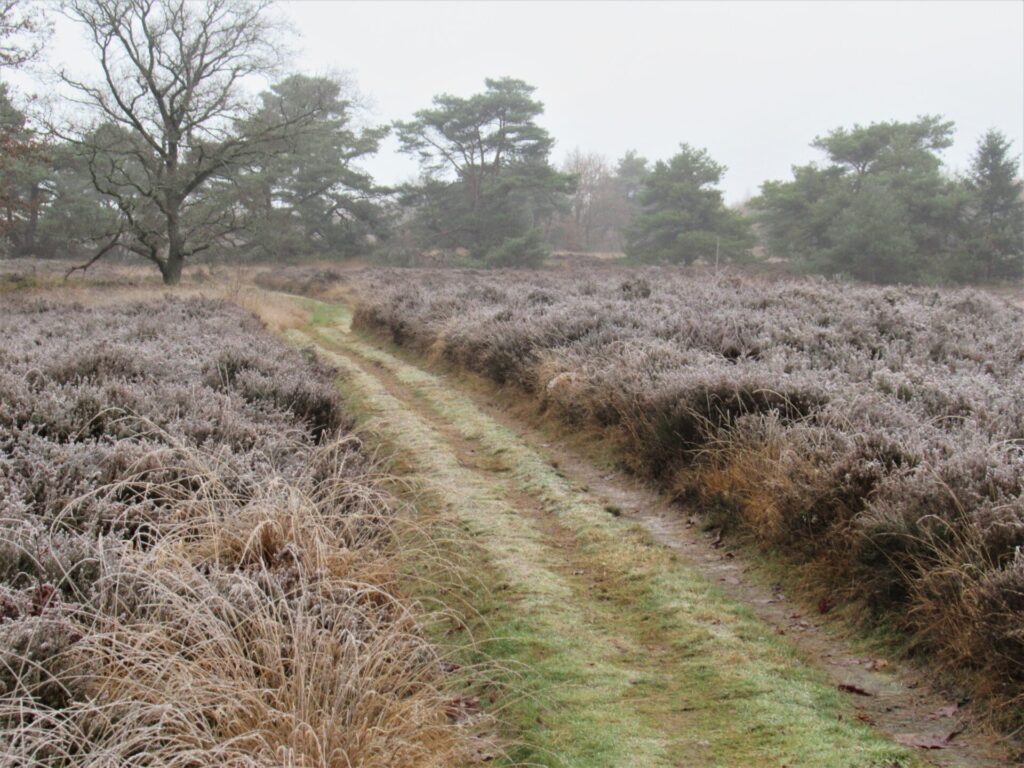
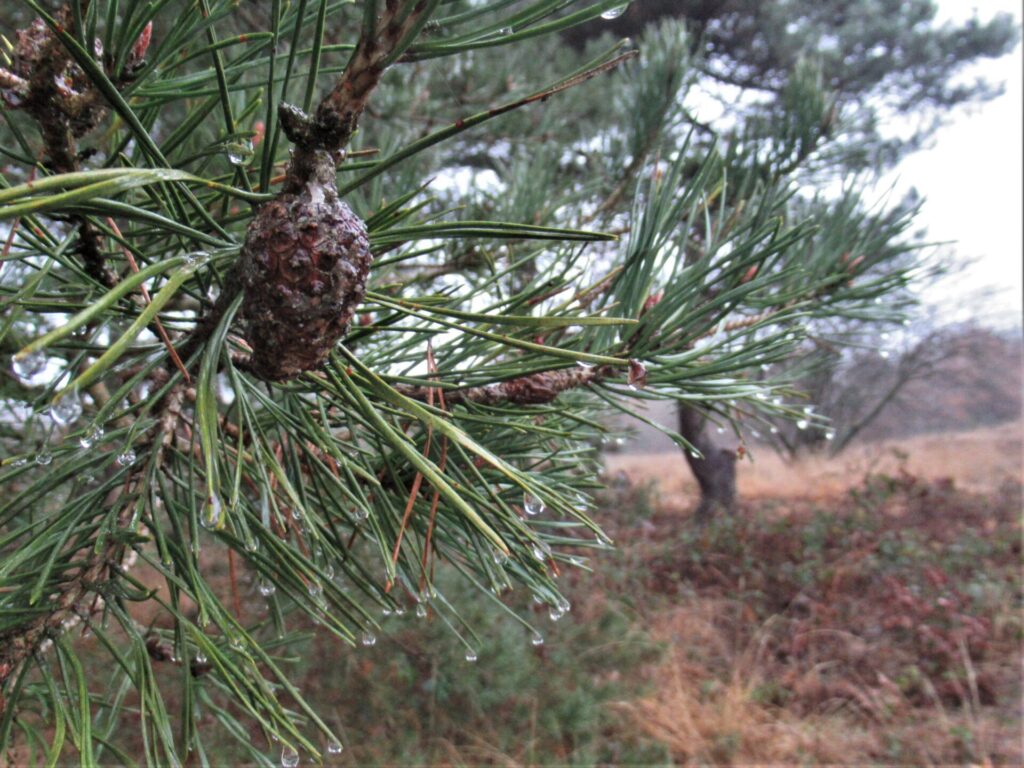
1. A walk The nights have been frosty this week, with temperatures just above zero during the daytime. On Sunday morning it was dark, cold and foggy, and I didn’t feel much like going for a walk. We went anyway. The heather and grasses were still white and frozen.
But the trees were already dripping.
It was cold, it was wet, it was gloomy. And it was lovely.
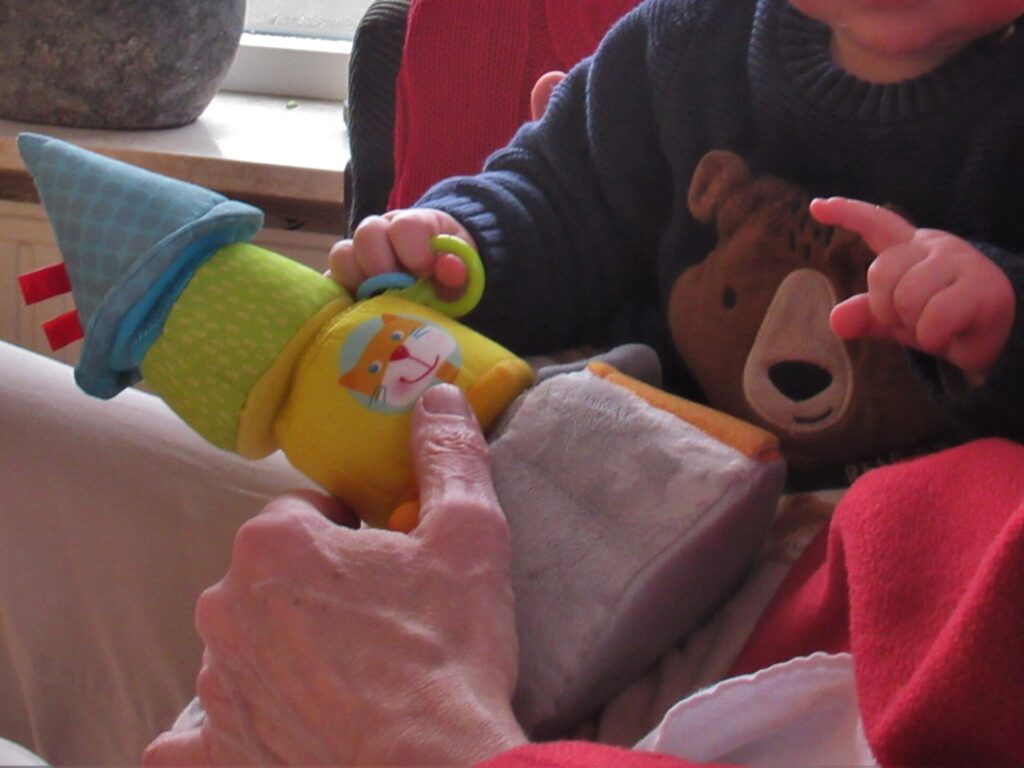
2. Small hands, big hands Our grandson and his parents came to celebrate Sinterklaas last Saturday. At 8 months, he was more interested in the wrapping paper than in the gifts inside them. His small hands next to my husband’s big ones made me sigh a sigh of happiness.
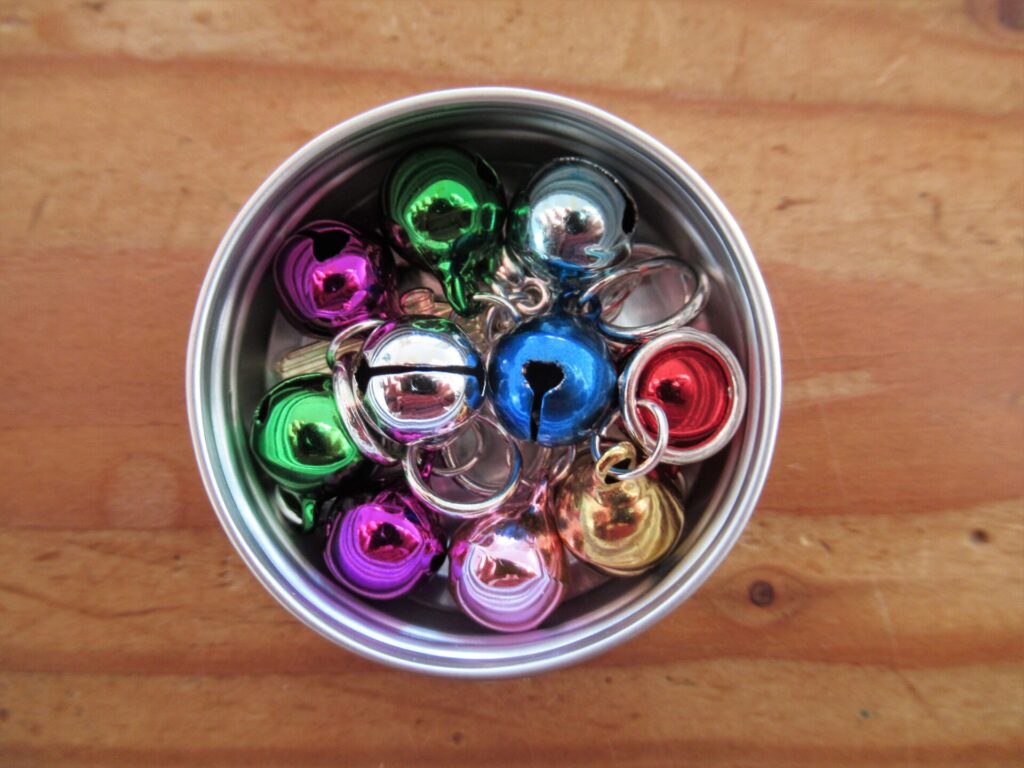
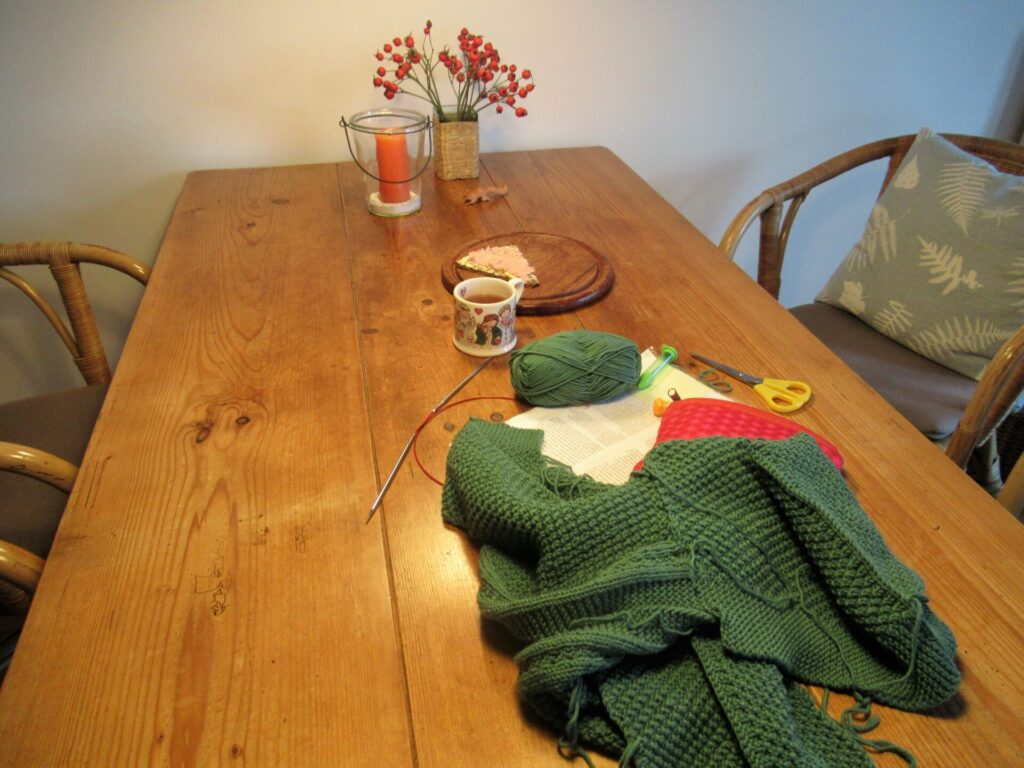
3. Jingle bells Sinterklaas brought me a few gifts, too. One of them was a small tin filled with jingle bell stitch markers.
4. Small bird feeder A dear friend came on a very belated birthday visit bearing gifts. One of them was a new bird feeder, hand-made from willow. Too small for woodpeckers and too difficult to hold on to for house sparrows and finches, it is specifically for great and blue tits. I asked them if I could post a picture of them eating pieces of peanut from it on my blog, but they said: uh-uh, we value our privacy! So here is just the feeder.
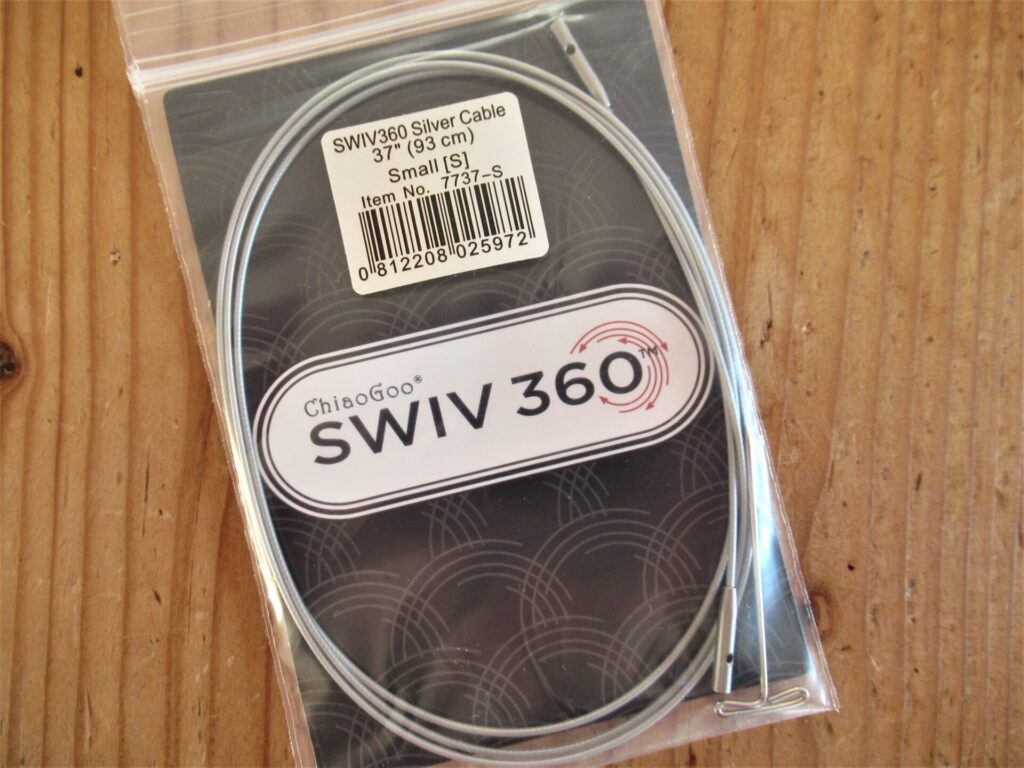
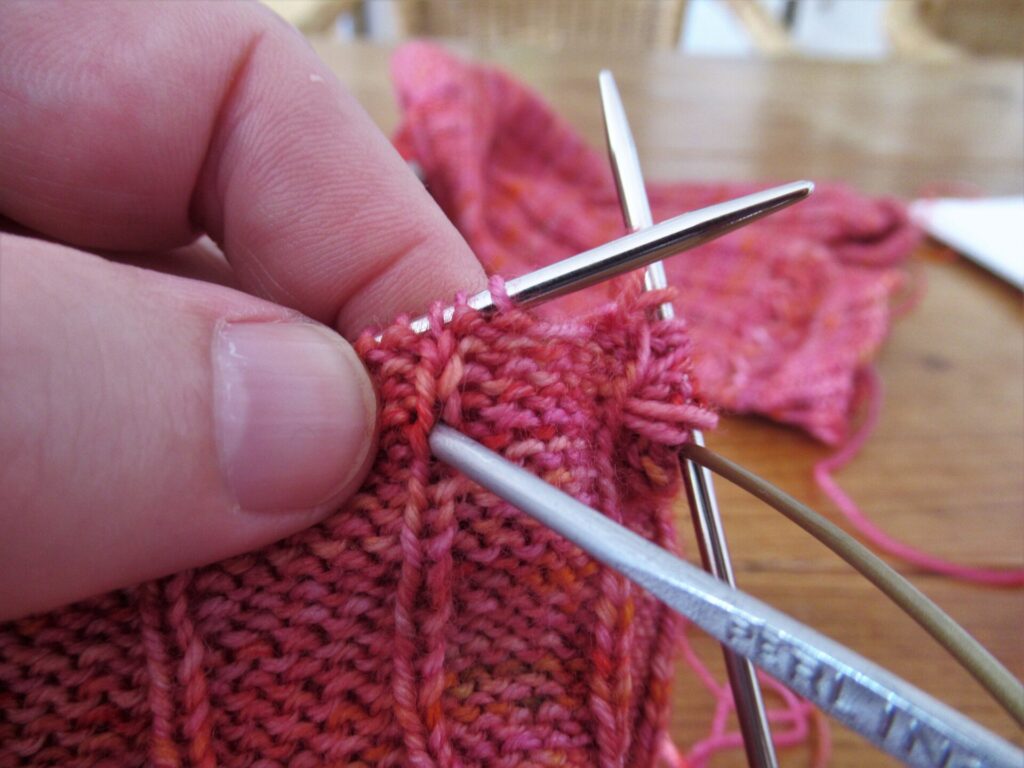
5. Small cable The same friend also gave me this:
Only a fellow-knitter would know how happy that would make me. It’s a new type of cable for my Chiaogoo circular knitting needles. I am trying it out on the small Advent mittens I’m knitting with the magic loop technique.
What can I tell you about it? Well, the Swiv 360 cable is quite a bit thinner than the original red cables, and it is also a lot more flexible – very nice! These cables are attached to the ends that screw onto the needle tips in such a way that they can rotate freely – a tremendous improvement.
The only downside of these new cords is that there is a slight hitch where the cable is attached to the ends, which makes sliding the stitches from left to right over them towards the tip (when moving from one needle to the next with the magic loop method) a little more difficult. But, all in all, I’m very happy with it!
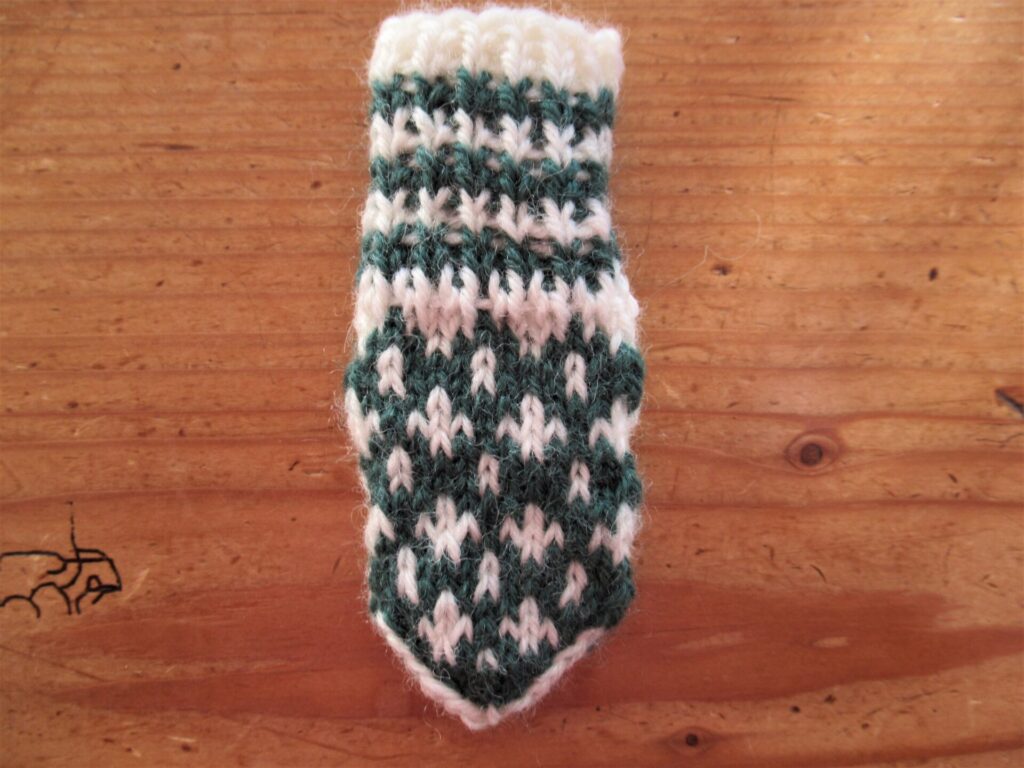
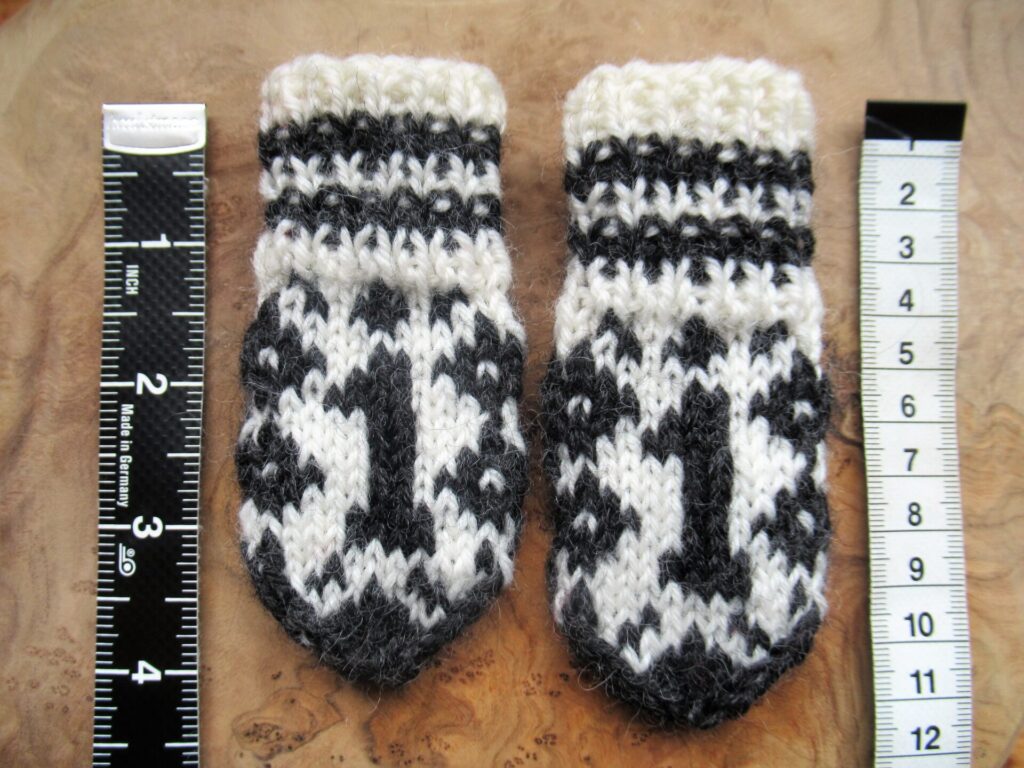
6. Mini-mittens I’m not quite but almost on schedule with the Norwegian mini-mittens I’m knitting for an Advent calendar to gift next year. Number 13 has just slid off my needles.
It’s great fun, knitting these. My idea was to spend some quiet, contemplative time burning a candle and listening to music while knitting one of these every day. In real life it’s more like 15 minutes here, 20 minutes there, sometimes with, sometimes without music, often forgetting to light a candle or to be quiet and contemplative.
Still, I’m getting there and enjoying these knitting moments. The only thing I’m not quite happy with is the bumpiness of the sides of some of the mittens and the irregularity of some of the stitches. But let’s look at it from a positive side: I still have things to learn – yay!
7. Mini-sock The first Christmas card arrived accompanied by a small gift – a mini-sock. No, actually it wasn’t a Christmas card but a New Year’s card. The friend who sent it explains why on her wonderful blog about her life, knitting, walks with her dog and music. It is in Dutch, but Google does a fairly decent job of translating it. You can read about and see all of the mini-socks she knit here.
I’m happy and honoured to be the recipient of one of these sweet little socks. I’ve attached it to the zipper of my babysitting bag, so that it will travel with me every time I’m looking after our grandson.
May your weeks be filled with small things that make you happy, too.
Last week, instead of writing a blog post, I gave myself some extra knitting time. I knit a number of mini-mittens, a sock, and half a sleeve for a cardigan. I also finished my Library Vest, a project I chose partly because of its name.
To me, libraries are wonderful places. I still remember the first time my mum took me to the local library (I must have been about four) – so many books! And you can even take some home! Working in a library seemed a great job, being among books all day and stamping return-by dates in them. At home, I played being a librarian as a child, but apart from working as a library assistant in the evenings for a while to earn some much-needed income as a student, I never became a librarian.
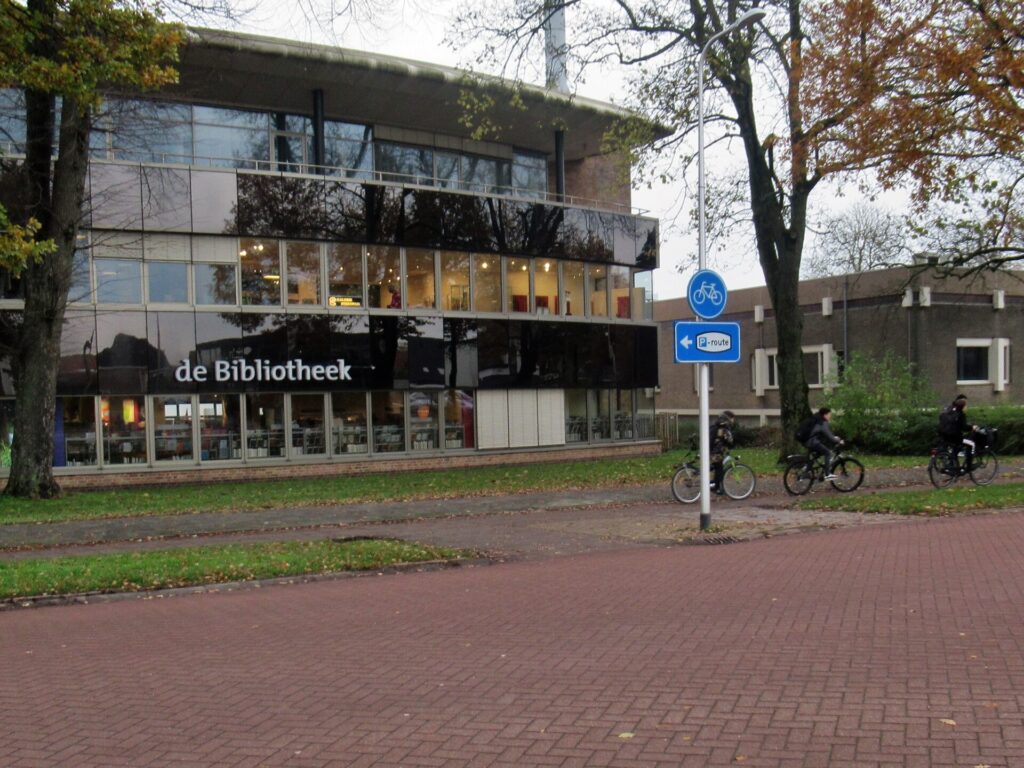
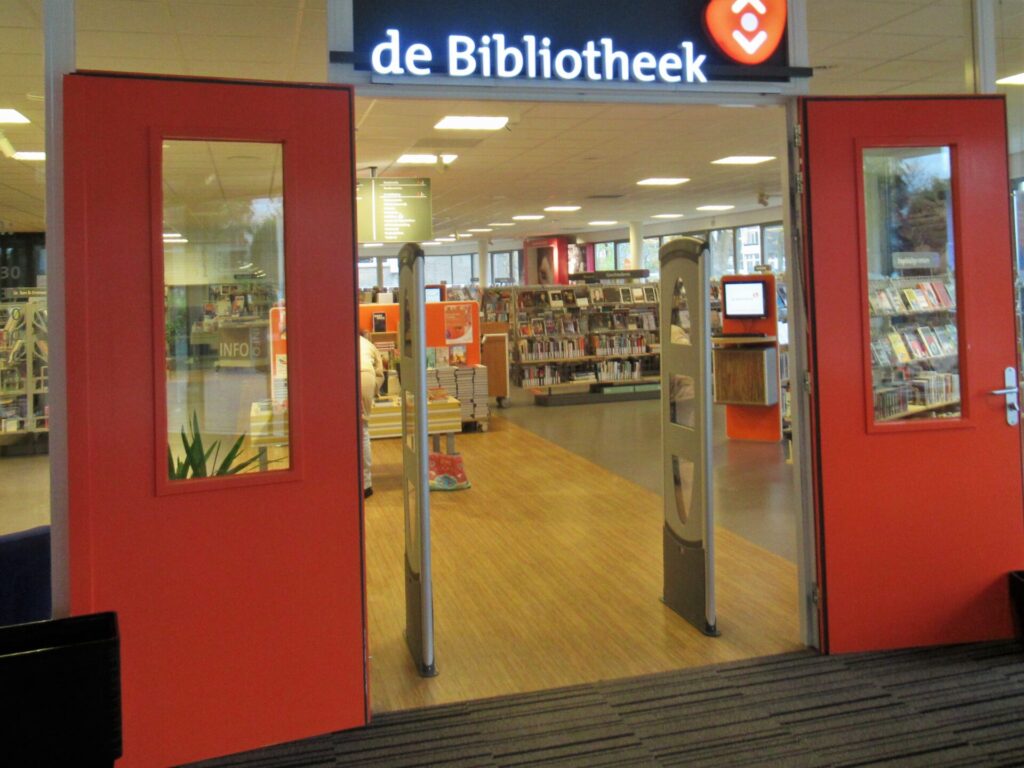
I still love spending time in libraries. This is ‘our’ library in the nearest town, in a building that used to be a bank:
Not terribly attractive on the outside, but very welcoming inside.
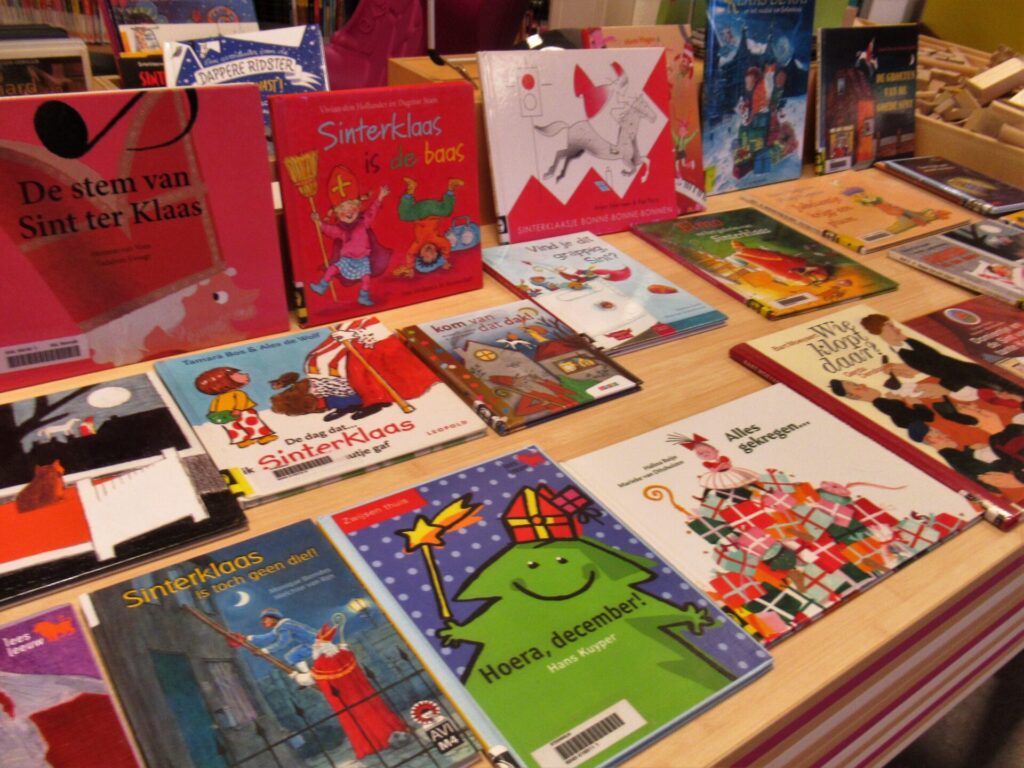
Dotted around the place there are always themed displays of books. Last week, there was a large table with books about Sinterklaas in the children’s section.
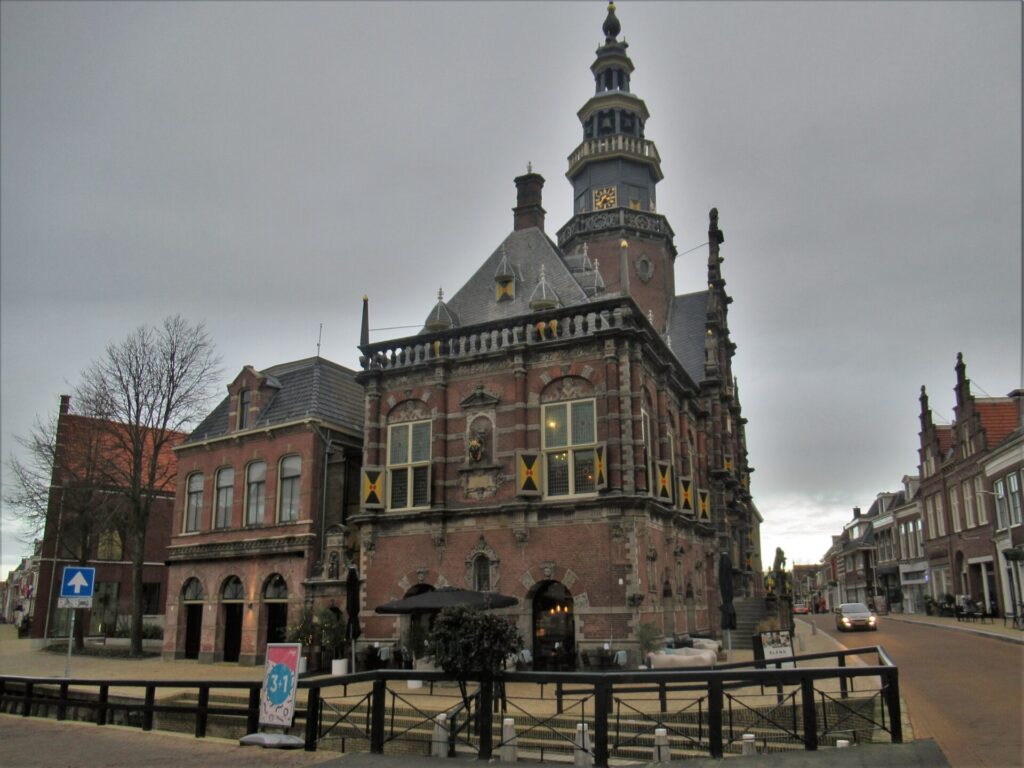
Officially Sinterklaas is on the 5th of December, but for practical reasons we are celebrating it tomorrow. Shopping for Sinterklaas gifts, I spent an afternoon in Bolsward, a town with a great independent bookshop and other non-chain stores. Its library is housed in a far more impressive building than ours:
The library shares these beautiful premises with a museum and a café. Part of the café staff have Down’s syndrome, which gives the place a relaxed and light-hearted atmosphere. The young woman serving me proudly announced that the carrot cake they had baked that morning was one of the best ever, so how could I not have a slice?
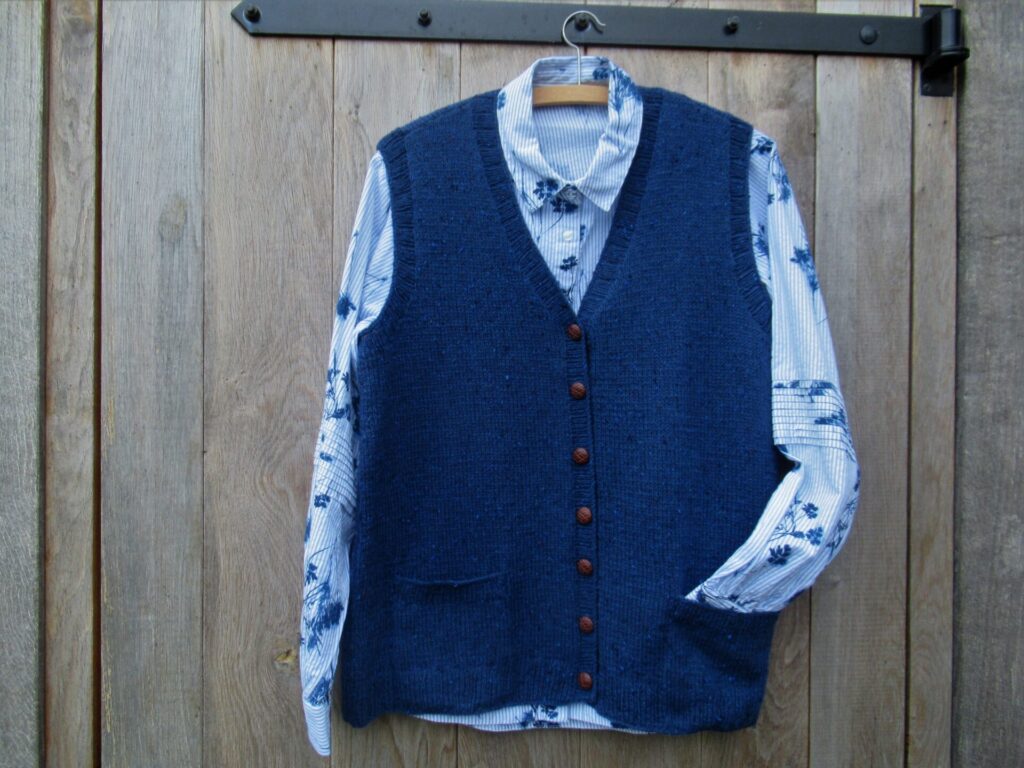
Well, let’s not forget the Library Vest this whole story started with. It’s a sleeveless garment knit in simple stocking stitch, with a slight A-line, a few short rows above the hem to make it hang more evenly and shoulder seams placed a little forward.
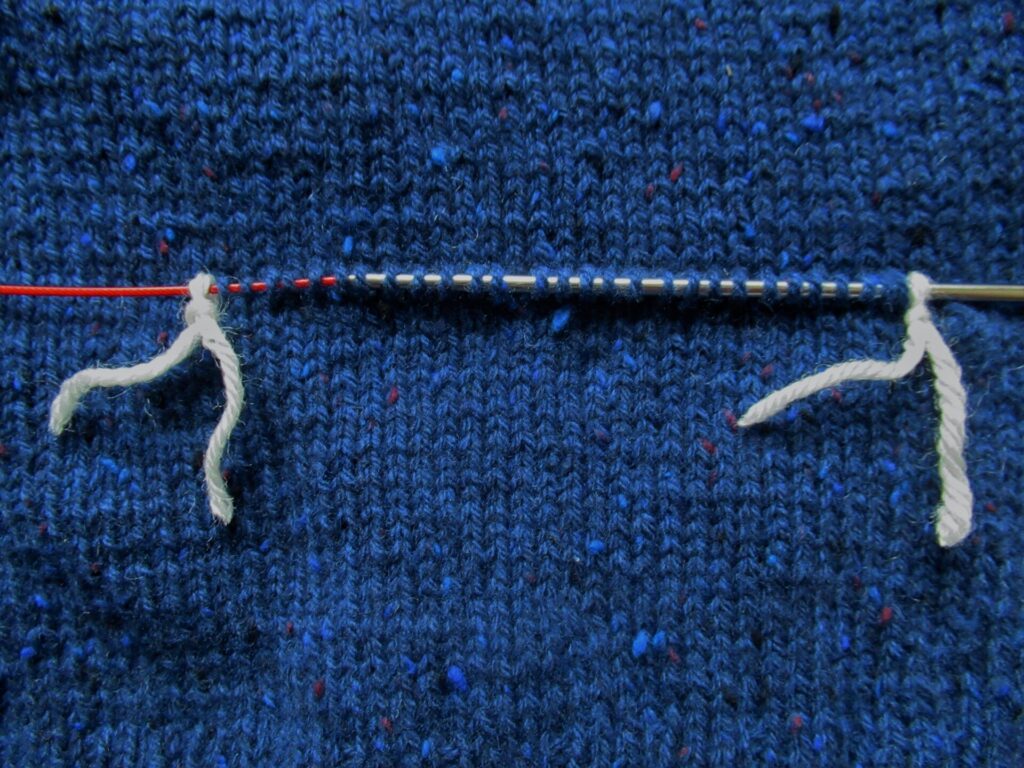
It also has knit-in pockets. It is always hard to sew pocket bands in place neatly, but the pattern has a clever technique for that. Selvedge stitches are added on either side using bits of waste yarn (photo tutorial in the pattern). Perfect!
Beside the name, another reason for knitting the Library Vest was that I had exactly the right yarn for it left over from another project – a soft, navy blue tweed yarn called Lamana ‘Como Tweed’. It looks and feels like a fingering-weight yarn, but knits up at 22 sts on 10 cm/4”. With 120 meters/131 yards to a 25 gram(!) skein it goes a long way.
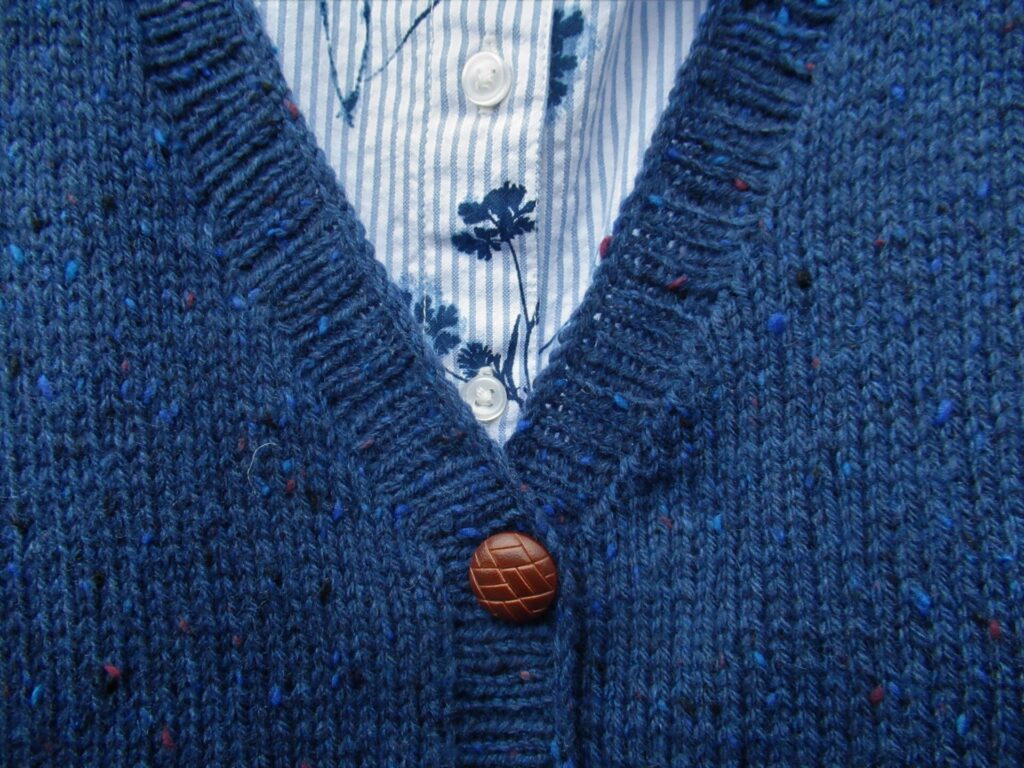
Instead of the rolled reverse stocking stitch edges that the original design has along fronts, armholes and pockets, I used the same ribbing as along the bottom (k3, p1). The faux leather buttons nicely bring out the tweed neps and somehow I think they are just what a librarian would choose.
If I’d become a librarian, I would probably have lost my job years ago, when almost all of the paid staff were replaced by computers and volunteers. Sometimes I think it might be nice to work in the library as a volunteer, but, hmmm, should I? It isn’t that the volunteers aren’t doing a good job, but it doesn’t feel quite right that this valuable work isn’t valued monetarily. Is this just a Dutch thing, paid staff being replaced by volunteers in certain sectors, or does it happen in other countries too?
I’ll consider volunteering seriously when I retire. Until then I’ll just play being a librarian at home, wearing my Library Vest (pattern here on Ravelry) and my geeky computer glasses.
Wishing you a relaxing yarn and book-filled weekend! Xxx
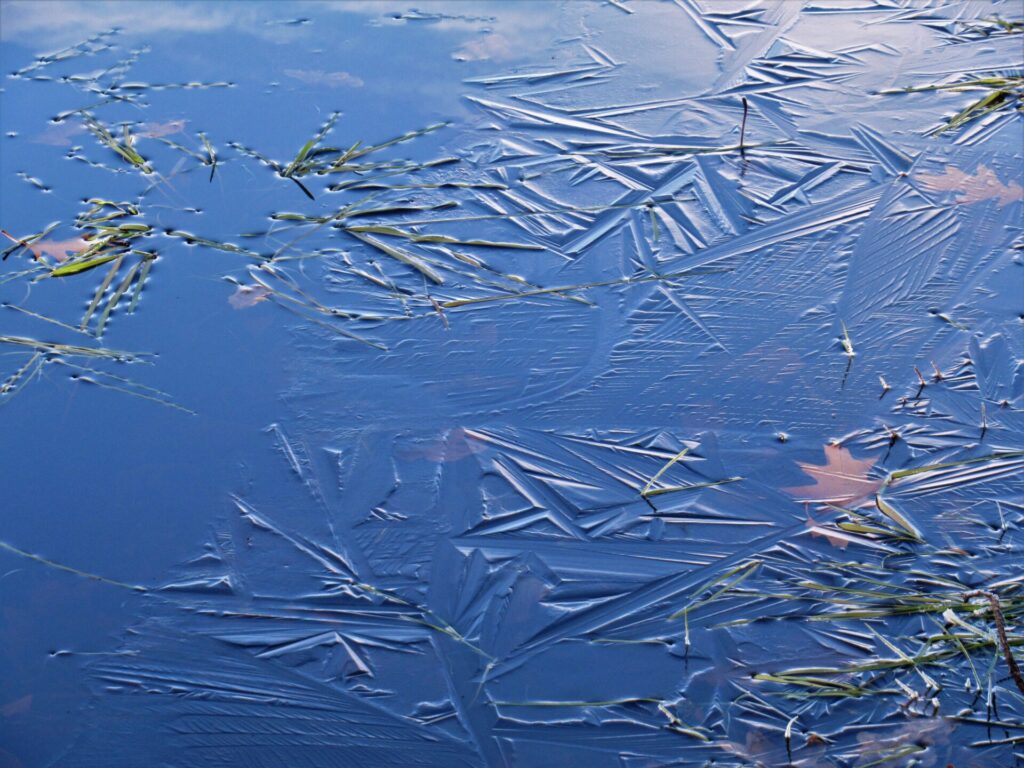
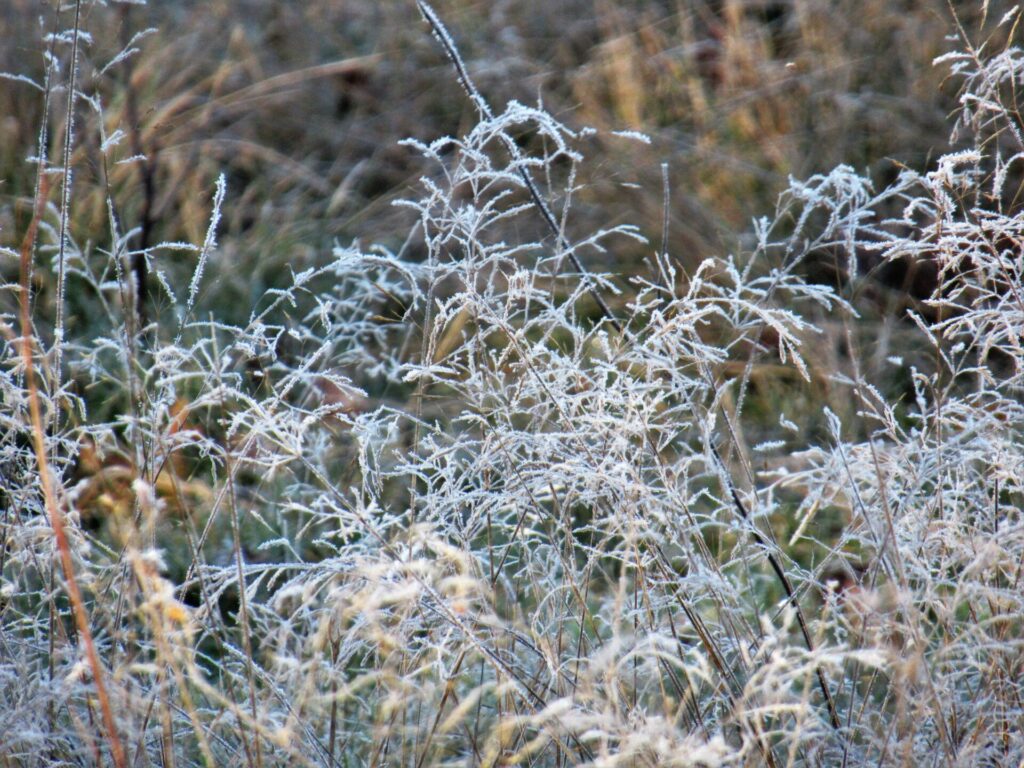
For two nights and a day-and-a-half it was wintry here, with starry nights, bright sunshine during the day and frost in the air. We’re back to higher temperatures and overcast skies now, but it was lovely as long as it lasted, with the thinnest layer of ice on ponds and lakes…
… and hoarfrost on the brittle yellowed grasses.
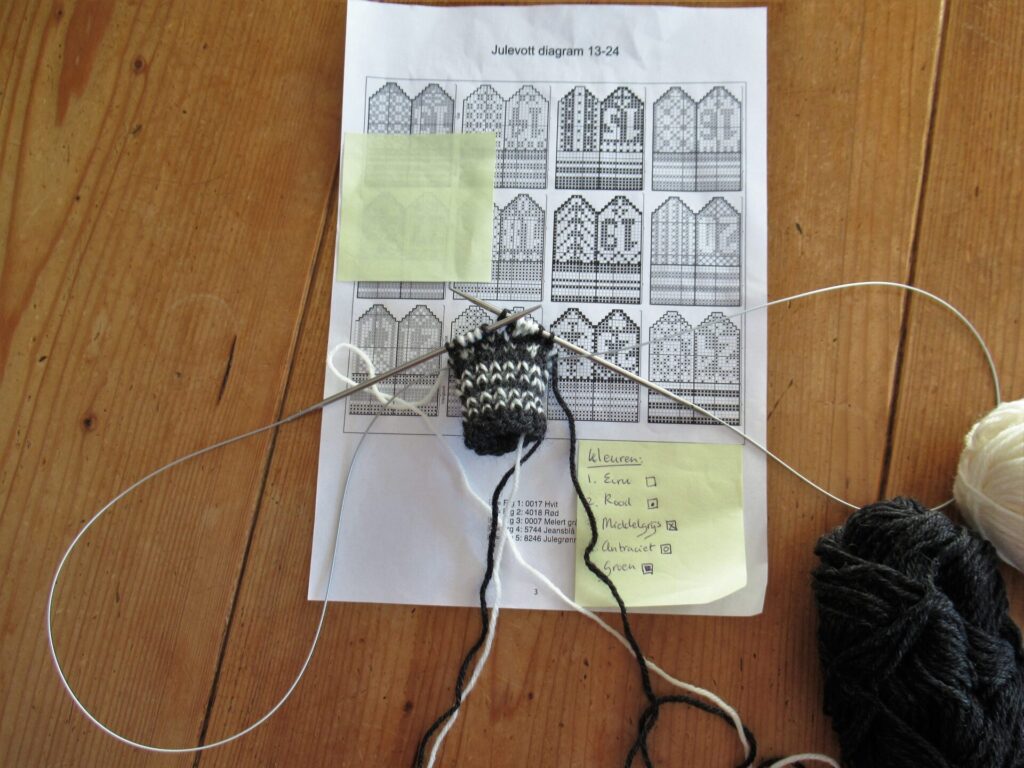
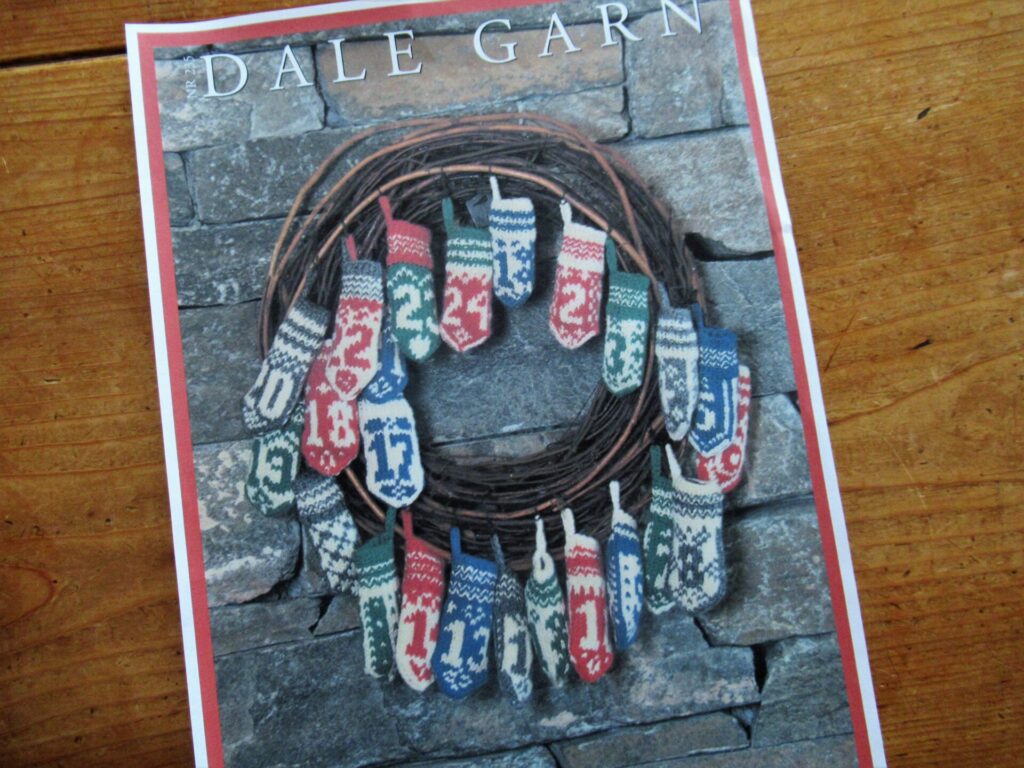
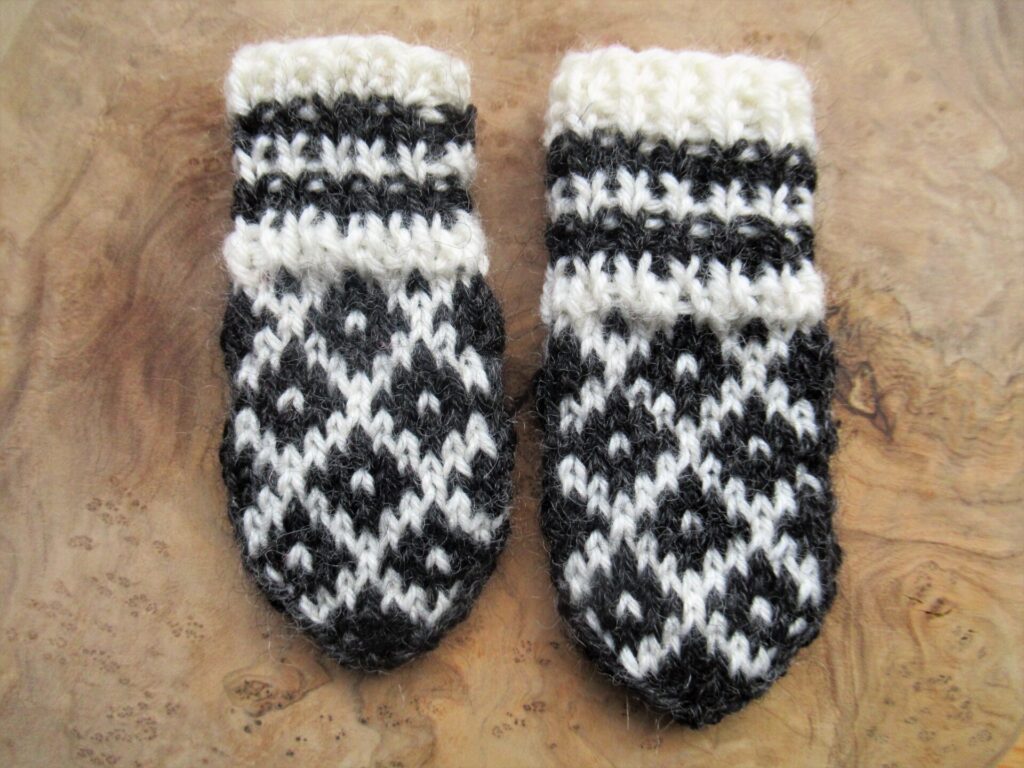
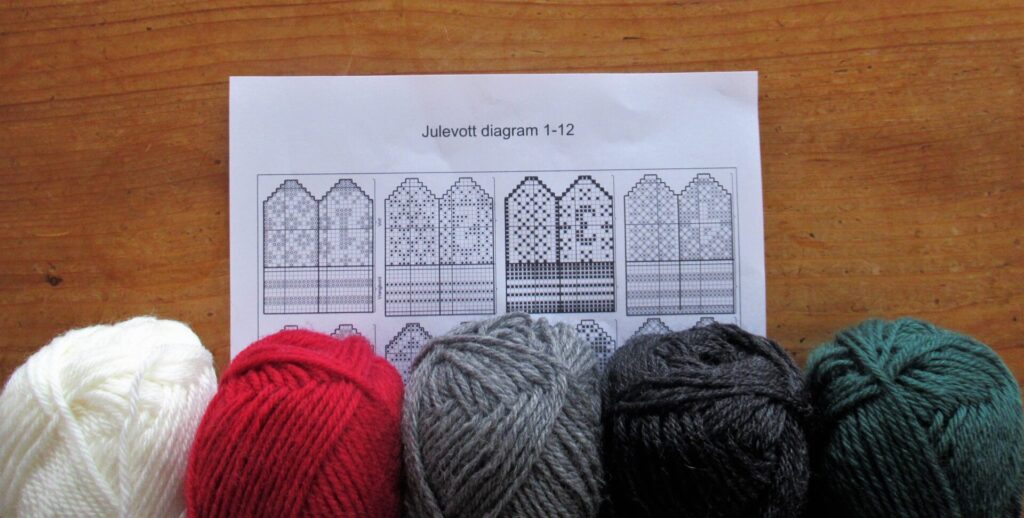
It was on one of these days that I decided to start a new, wintry knitting project: an Advent calendar with 24 small Norwegian Christmas mittens or Julevotter. A few days earlier a newsletter in my in-box mentioned it. As soon as I saw it, I loved it.
I didn’t plan on making one, though, until the wintry weather made me change my mind. It made me crave warm, woolly yarn and things. And, thinking about it, didn’t I have exactly the yarn called for in my stash?
The next minute I was running up the stairs, rummaging through boxes, and Yes! Found it! Some Dale Garn ‘Heilo’ and some Drops ‘Karisma’ in just the right colours.
This advent calendar is going to be a double gift. This year it’s a gift to myself – the gift of some peaceful knitting time every day during the Advent period. And next year it’ll be a gift for someone else – filled with small gifts.
I’ve already knit mitten number 1 to try the pattern out, at first using the indicated 3.0 mm/US 2½ needles. This made a very stiff mitten, so small that it would be almost impossible to wriggle a tiny gift into it. I tried another one on 3.25 mm/US 3 needles and that was better. Still small, but less tight.
Using knitting needles just a quarter of a millimetre thicker made a visible difference.
The pattern is in Norwegian, but that’s not really a problem even if you don’t speak a word of the language. Legg opp 26 m means: cast on 26 sts. The ribbing is k1, p1. And there are charts for the colourwork patterns and the decreases at the top.
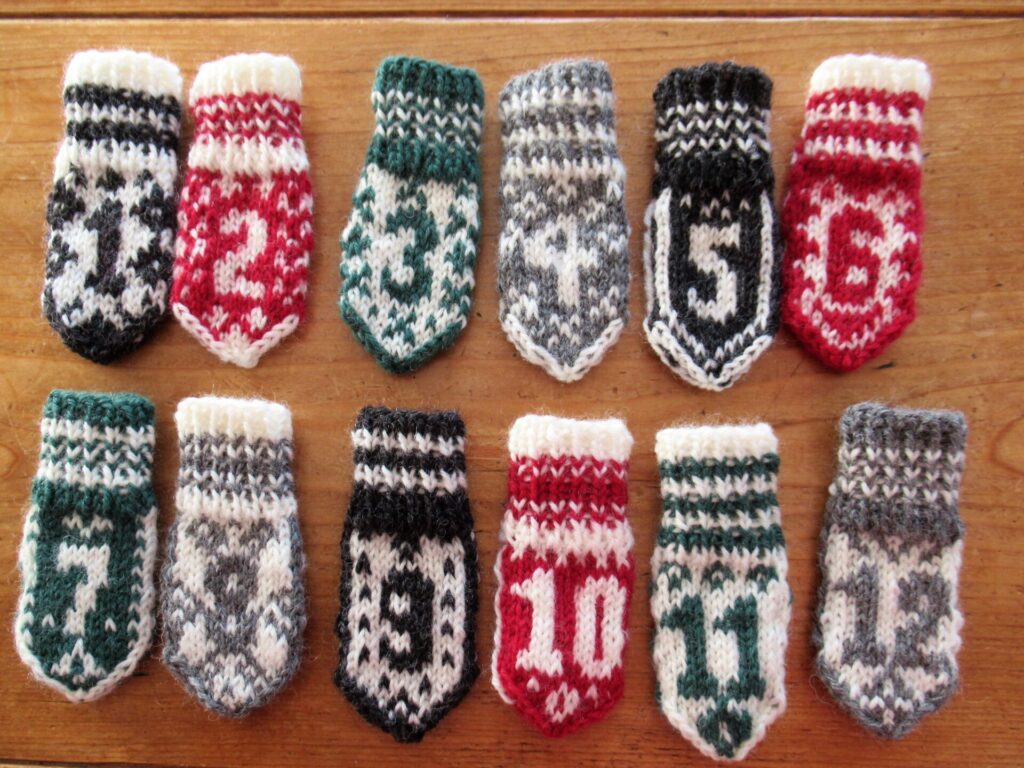
The 24 tiny thumbless mittens are all going to be different, with a number on one side and lovely Norwegian patterns on the other.
I’m not sure it’s doable, knitting a mini-mitten every day during the run-up to Christmas, but we’ll see. I’m really looking forward to spending quality time with them and am not going to hurry. If they’re not finished ‘in time’ I’ll just keep knitting on in the New Year.
I read about this Advent Calendar in an e-mail from Rosy Green Wool, a German producer of organic yarns. I’ve subscribed to their newsletters because they are not too frequent and there is usually something interesting in them. Their post about this project can be read here on their website.
Sabine, the author of this ‘Knitting Letter’ as they call it, has knit one for each of her two children, and it’s fun to see them in the un-Christmassy colours she’s chosen, very different from my traditional ones.
The free pattern for the mini-mittens was published by Dale Garn and can be found here on Ravelry. Rosy Green Wool’s knitting letter says that it is no longer available for downloading, but it is. It is no longer available from Dale Garn, but can now be found on the Wayback Machine. Here is how to find it:
If on Ravelry you click on ‘This pattern is available for free’ or on the link under ‘For more information, see:’ you’re sent on to the Wayback machine (on my computer it takes a while). It looks a bit iffy, but the Wayback Machine is a bona fide internet archive.
When there, click on ‘Last ned katalog’. Then you’ll get a pdf of a lovely booklet with lots of patterns for knitted and crocheted Christmas projects.
For the mitten Advent calendar pattern scroll down past all the cosy pictures and you’ll find it on pages 1-3 of the instructions.
Well, I won’t keep you any longer. I know this is a busy time of year for many, but I hope you can find some quiet time in between all the jobs on your list to just sit and knit, or read, or listen to music, or do whatever else feels peaceful to you. xxx
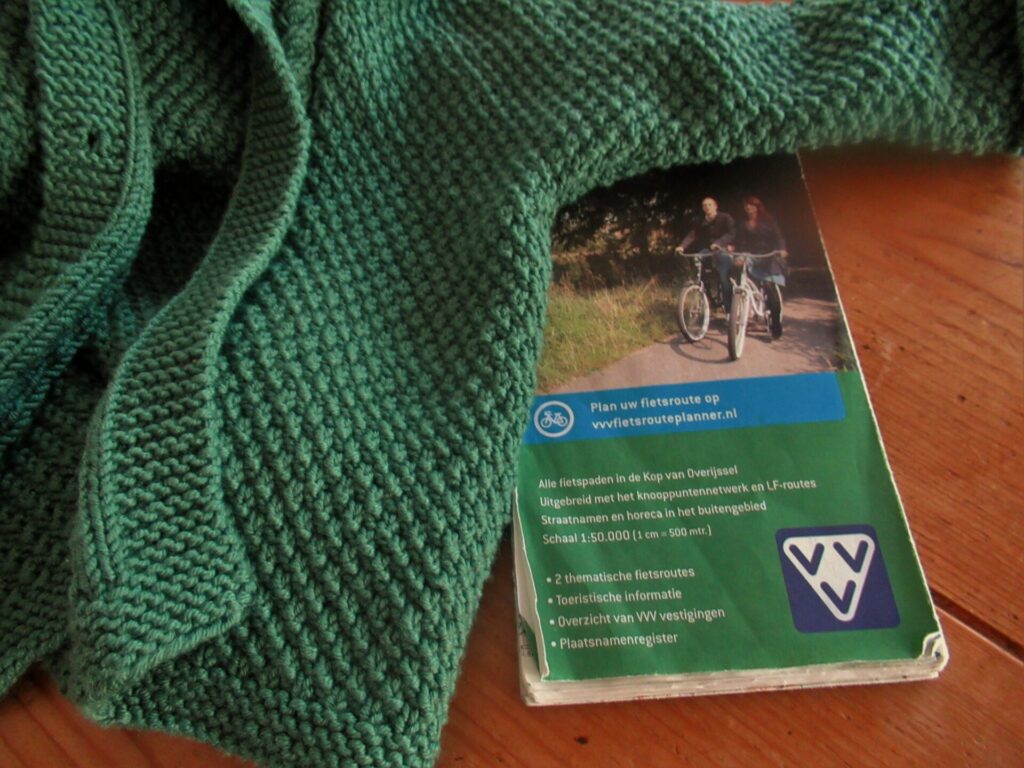
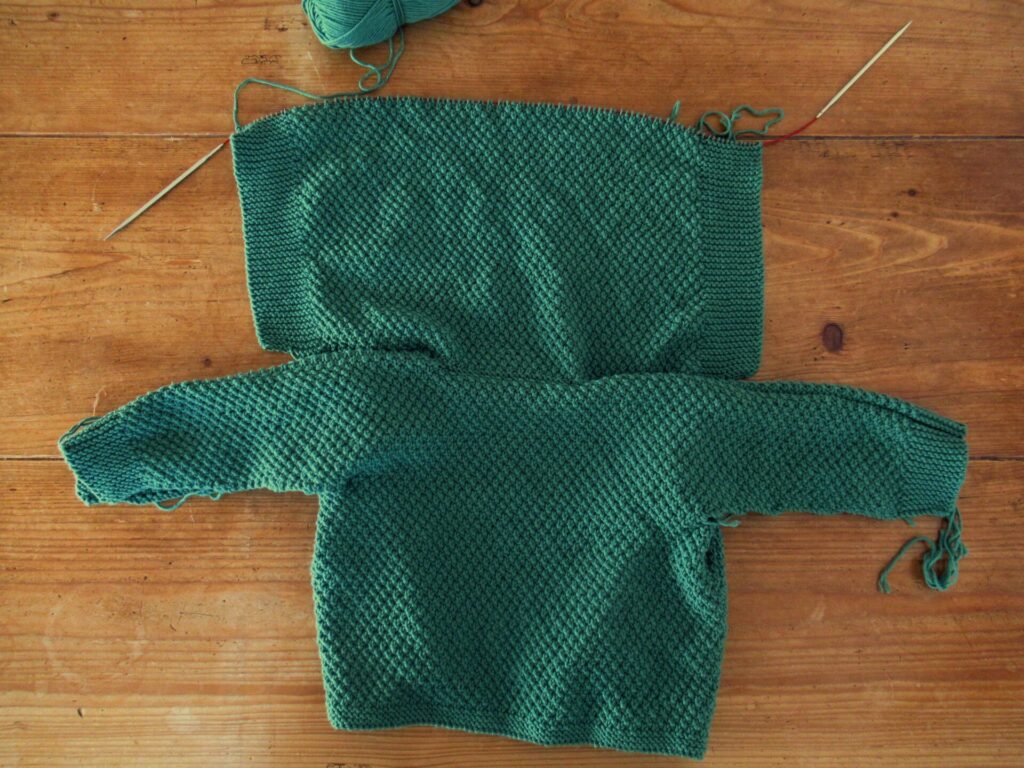
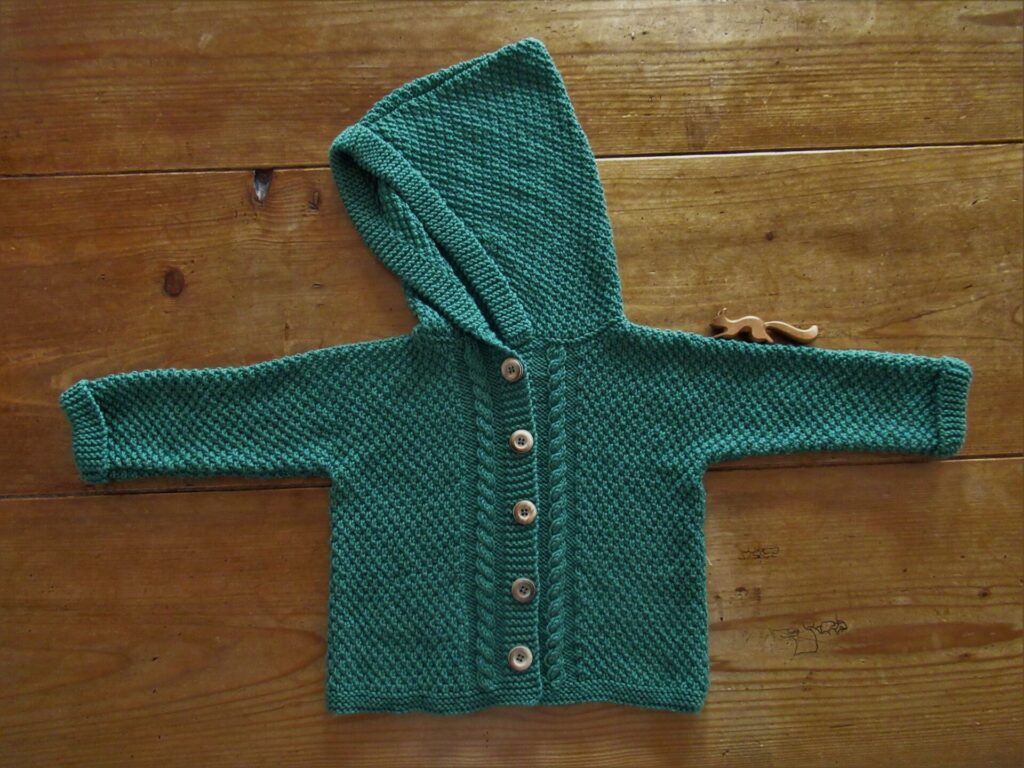
Choosing yarn online is a tricky business, as many of you will know. Colours can look very different on a computer screen than in real life. I had forest green in mind for a jacket for our grandson. You know, that deep, fairly dark, leafy green. The yarn did look lighter and, well, different on my screen, but it was called ‘forest green’, so I thought it would be all right and ordered it.
When it arrived, it was not what I had in mind, and very much what it had looked like on the computer screen. Oh, well, it was a nice colour for a little boy anyway.
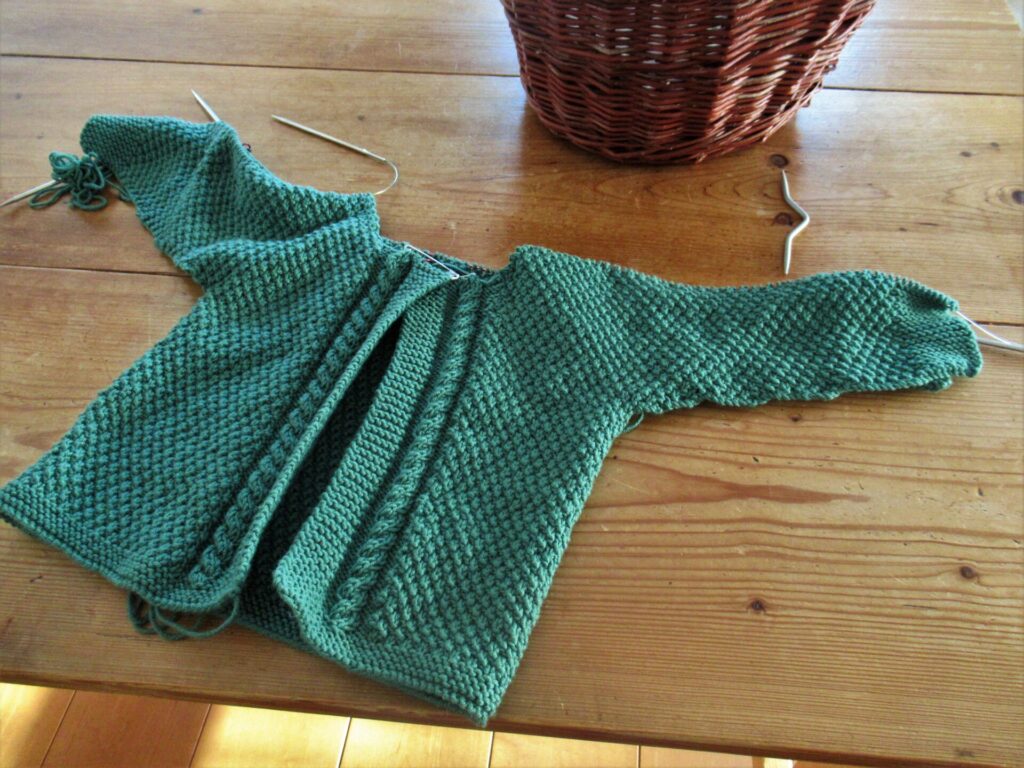
The last time I wrote about the jacket, I said that I ‘only’ needed to knit the hood. Well, the hood was almost as big as the rest of the cardigan.
I finished the knitting on Saturday afternoon and started weaving in the ends and seaming. It is getting dark early at this time of year and for work like this I need to switch the lights on at around three.
While I was seaming and sipping tea, I meditated on the term ‘forest green’. How could the yarn producer have such a different idea about it from what I had in mind? My Oxford Dictionary defines forest green as ‘any of various shades of green associated with forests’. Not very helpful. Googling it, I found out that on various websites about colour, ‘forest green’ is indeed the shade of the yarn, and that what I have always thought of as forest green is generally called ‘dark olive’.
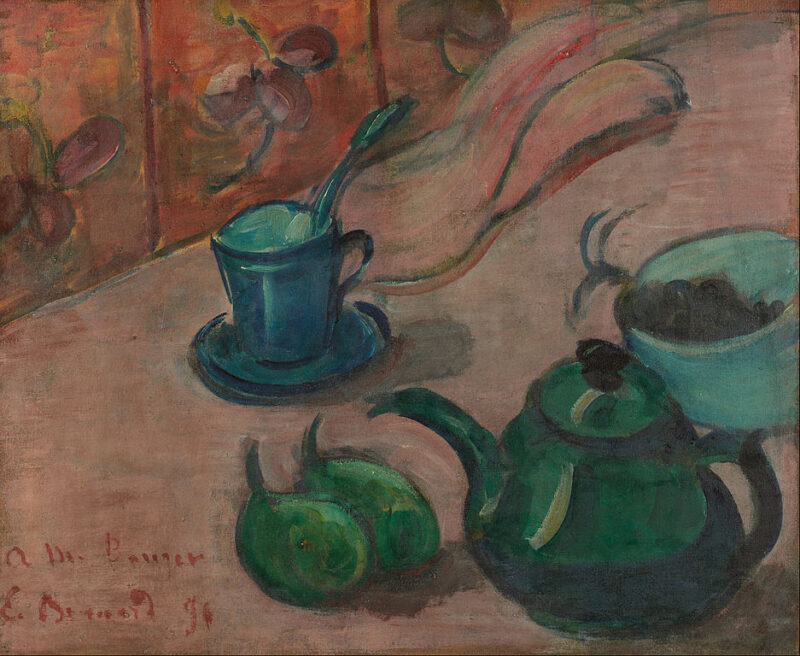
The accompanying text said: ‘In a sense, the name “forest green” is a misnomer, because as artists well know, leaves and mosses are never a single color, much less a single value. Nevertheless, forest green does evoke the overall impression of foliage […] When the color finds its way into domestic spaces, it can lend a degree of earthiness and calm. This connection with nature is apparent in Still Life With Teapot, Cup and Fruit by Émile Bernard (1868–1941), in which the colors of the man-made objects seem to take their cue from the color of the fruit.’
Earthiness and calm – that sounds like a good thing for a baby jacket.
On Sunday, my husband was out on an excursion and I was home alone. A good moment to finish the seaming and sew on the buttons. It was a lovely, sunshiny day. Too lovely to spend indoors entirely, so I went for a bicycle ride as well.
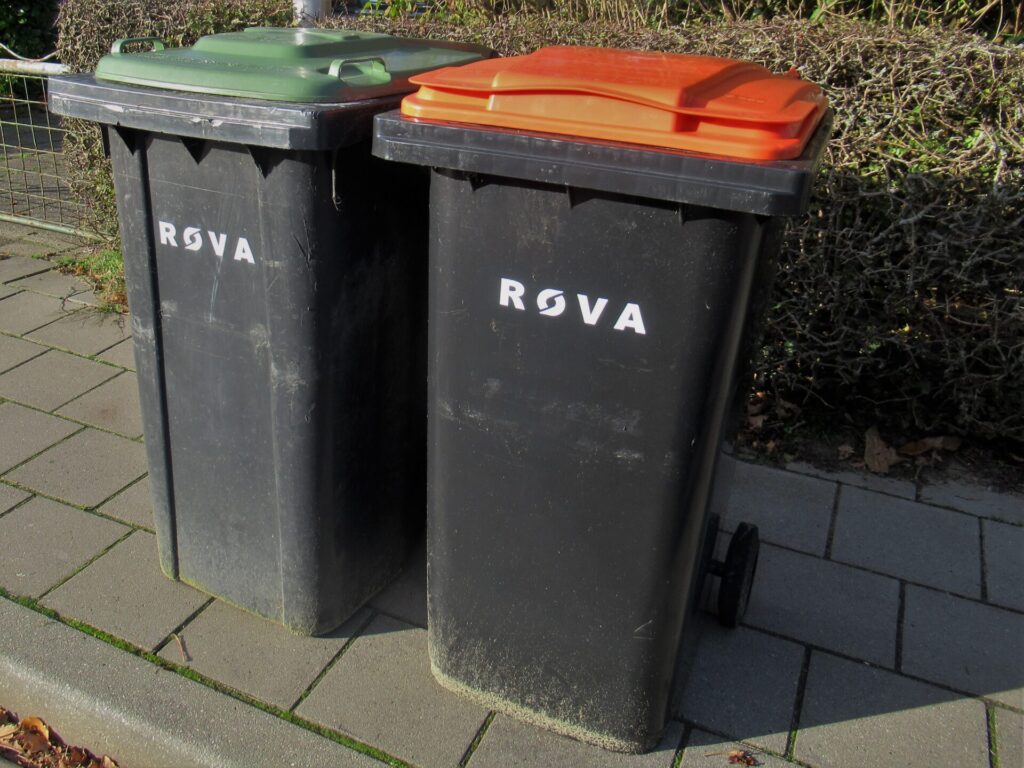
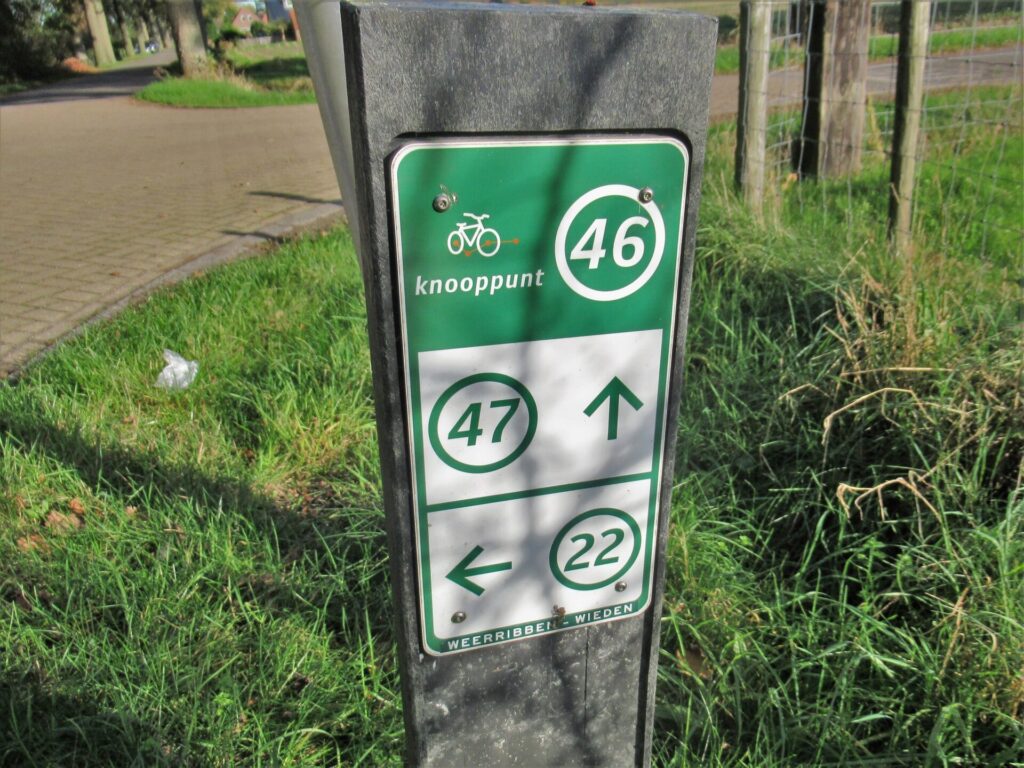
Still shocked by the realisation that I’ve had a different mental image of this shade of green from the rest of the world all my life, I saw what I now know is ‘forest green’ everywhere. On a church door…
… on the lid of a wheelie bin…
… and on every bicycle route sign I passed.
For me, it’s still more like garden-and-kitchen-waste-wheelie-bin-lid-green or bicycle-route-sign-green than the colour of a forest, grumble, grumble. (I’m very much attached to my own mental image of forest green.)
It won’t make any difference to our grandson, though. His favourite colours are still those of his Mum and Dad’s eyes. As long as the jacket is soft and warm, he’ll be happy with it. And it certainly is that.
For any of you with babies and toddlers to knit for, here are a few useful details:
Size made: 74-80/12-18 months (our grandson is only 7 months old, but he’s a big boy)
Yarn: Garnstudio Drops ‘Merino Extra Fine’, 7 skeins, colour 31 Forest Green
Needles: 4.0 mm/US 6
Knitter’s notes:
The sleeves are knit on to the body by casting on stitches at the sides. They have both underarm seams and seams on the top.
I put the sleeve and hood stitches on holders (old circular knitting needles) and used the 3-needle bind-off instead of seaming them.
Having knit this jacket before, I knew that the sleeves were waaay to long and made them a size smaller this time.
The hood is very warm and cosy for babies still lying down in their prams or strollers. For toddlers sitting up or walking, I think the hood will be too heavy and cumbersome hanging down the back.
The hood has a garter edging that is folded to the outside. The pattern says to only attach it at the bottom on both sides, but that won’t keep it in place. I attached it with invisible stitches all around.
Thank you for your patience with my forest green grumblings. Have a lovely weekend and see you next week!
A Ravelry friend of mine is trying out being a monogamous knitter, i.e. working on just one knitting project at a time until it is completely finished. She used to be a multi-project knitter like me, and is now finishing one beautiful project after the next. That made me stop in my tracks: could I be a monogamous knitter, too? It sounds attractively simple.
But what if, for instance, I’m in the seaming stage of a sweater and need something small to take along to knit on a trip? Or what if I’m knitting something intricate, am tired in the evening and would benefit from some restful mindless knitting?
At the moment I have 6 projects on the go, and they all live in separate baskets. There is nothing spectacular inside any of these baskets, but perhaps you’d like to take a look?
Basket 1:
This is the project I want to finish first – a jacket for our grandson. He has almost outgrown the jacket I knit for him before and will need a new one soon. The sleeves are almost finished and then all it needs is a hood.
Basket 2:
This vest is even closer to being finished. All I need to do is knit ribbings for the pockets, sew the pocket linings in place and sew on buttons.
Basket 3:
This is my sock knitting basket. It holds all kinds of knitting paraphernalia, a pair of striped socks that only need their ends woven in, and a ball of beautiful pink sock yarn. Both of these lovely yarns (one with yak down and one with silk!) were a gift from a friend. I’d like to make a very special pair from the solid pink yarn, perhaps something with cables or twisted stitches, or a bit of lace…
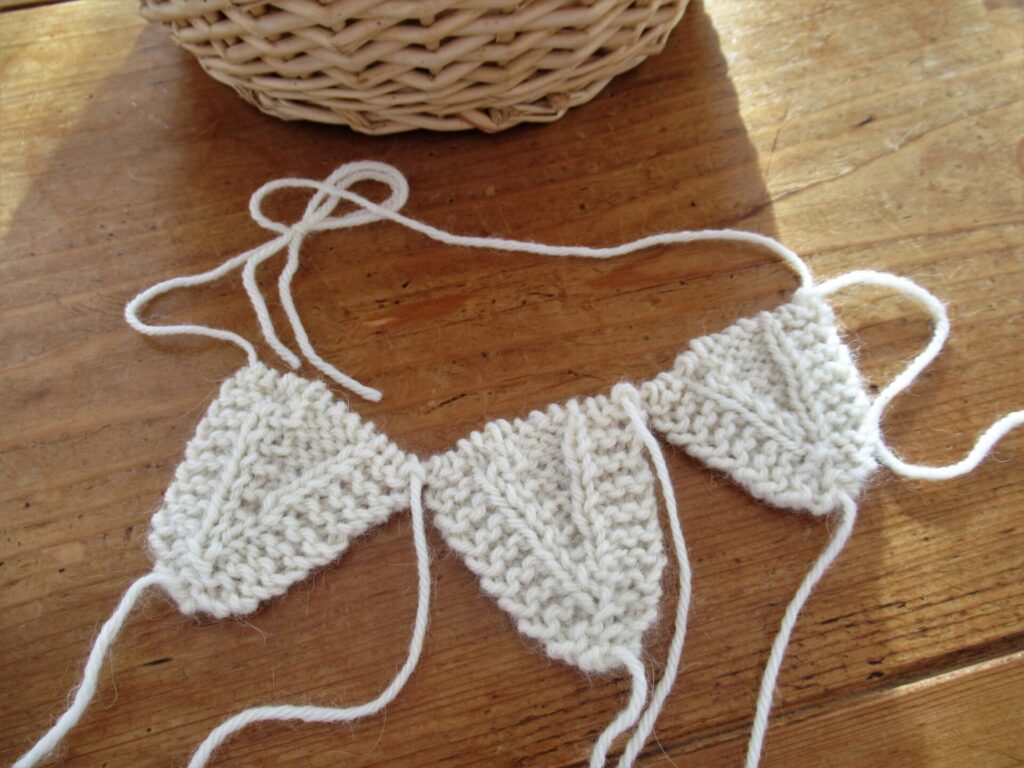
Basket 4:
This may look like knitted bunting, but is in fact part of a series of swatches for a new design of my own. These three mini-swatches are all about increases. M1L, M1R, kfb or kfbf? I’m puzzling out which increases to use where.
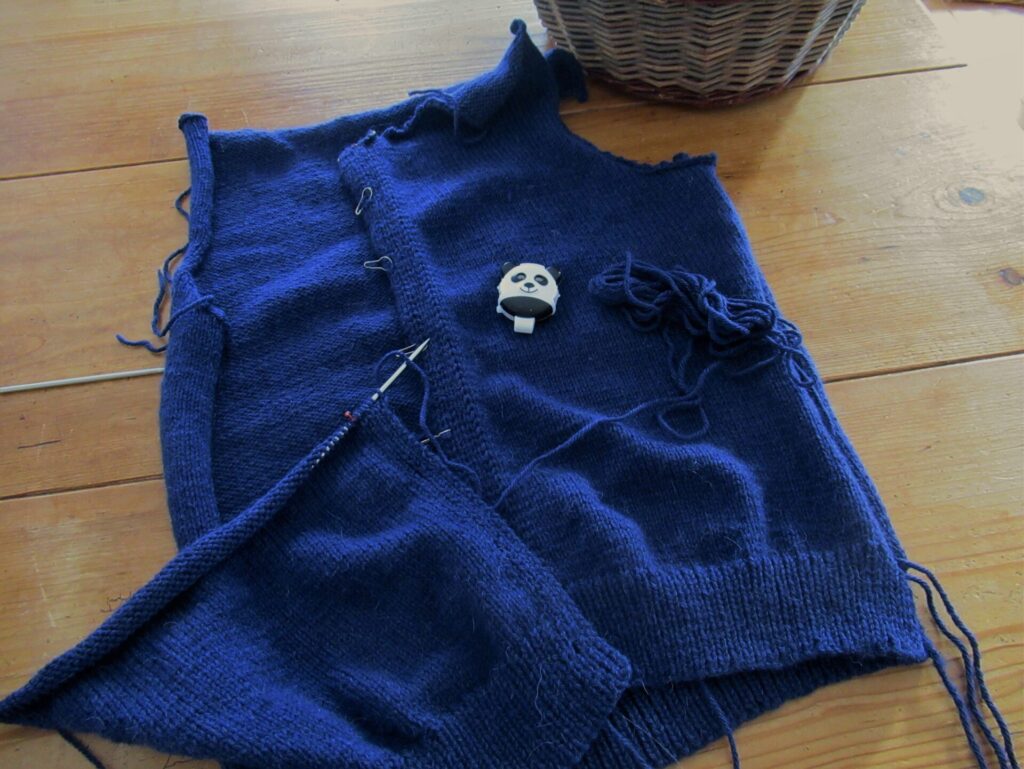
Basket 5:
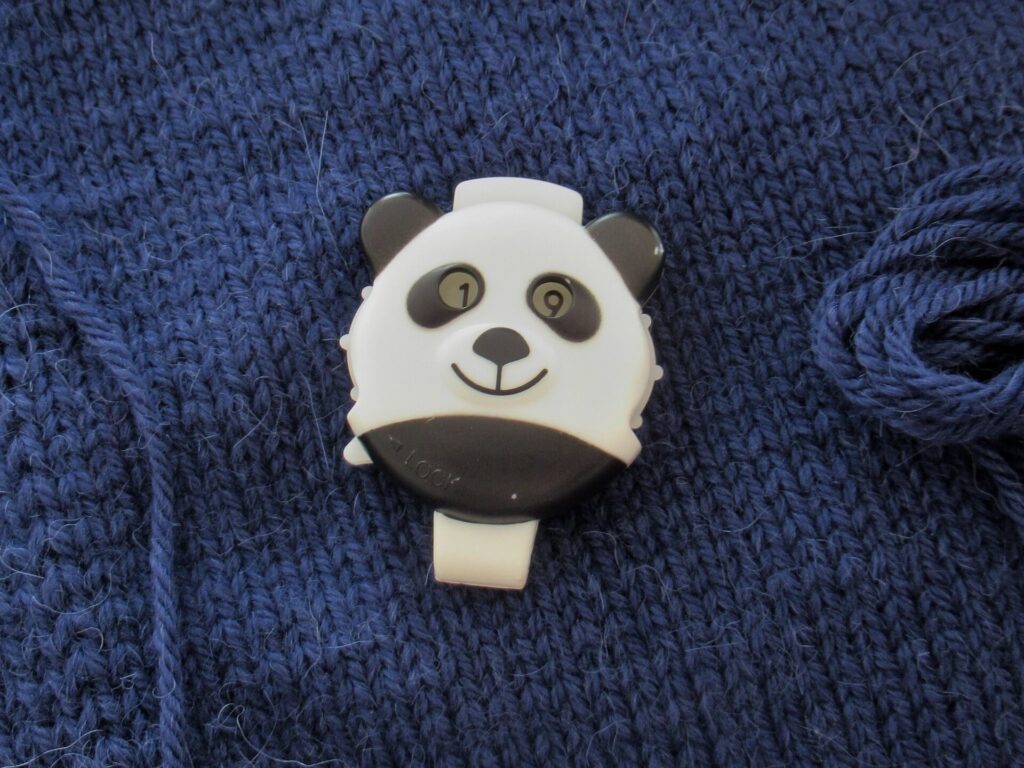
This is a simple cardigan for myself, knit from a very soft wool and alpaca blend. It is hard to capture the colour – it’s a deep navy blue IRL. I’m keeping track of where to knit in the button holes by looking deep into the eyes of this panda:
It’s a fun but unreliable row counter. The problem is that its lock doesn’t function, which means I need to be very careful with it or it’ll jump from 19 to 29 or 39 rows and then where would I be?
Basket 6:
Sorry, I can’t show you what’s inside the last basket. It’s a surprise gift in the making. Well, okay, I can tell you that it’s going to be a pair of mittens. I’ll be able to show you after they’ve been unwrapped, towards the end of December or early in the New Year.
More about my progress with the contents of the other baskets soon, I hope, including details about the patterns, the yarns etc. Six baskets is about the maximum I can handle, I think. And I’d really like to reduce the number to three or four. Or shall I try reducing them to just one? How about you? How many projects do you feel comfortable juggling? And how do you organize them?
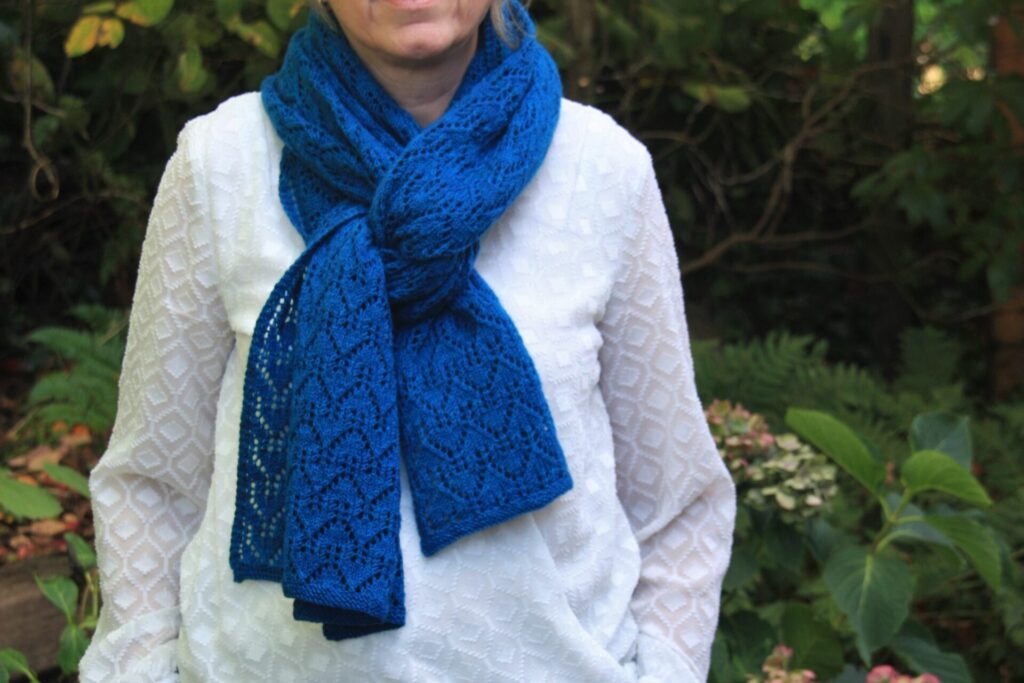
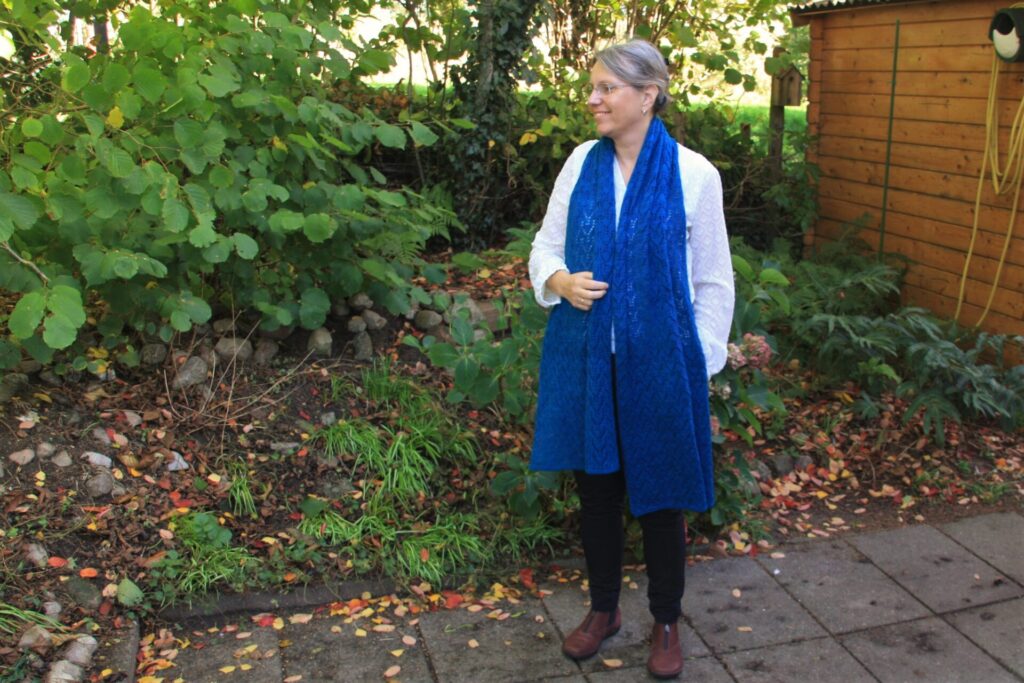
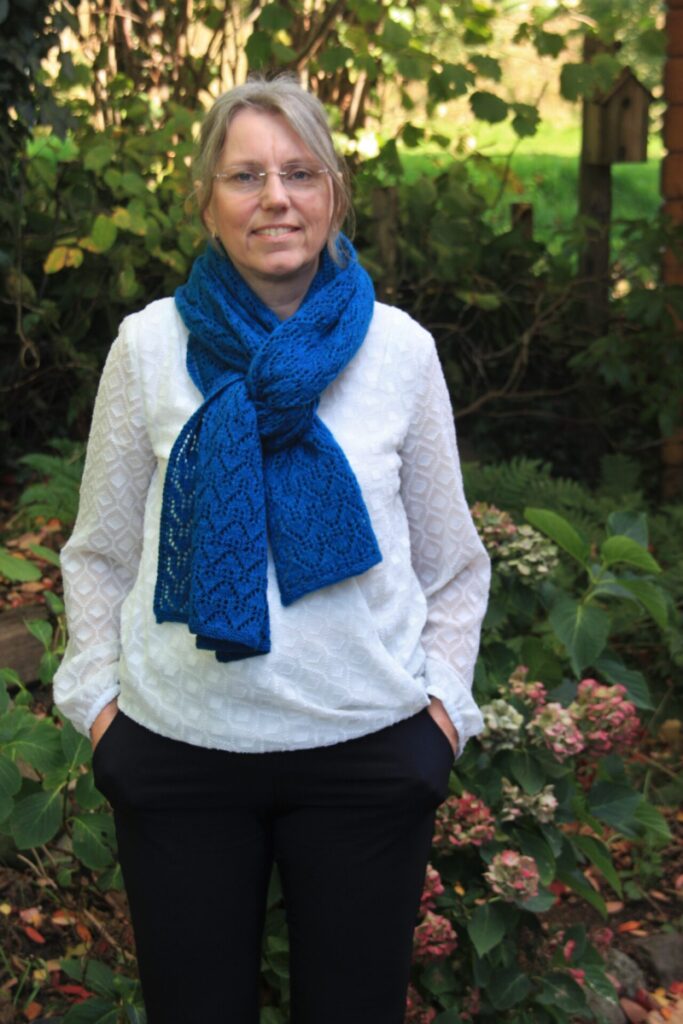
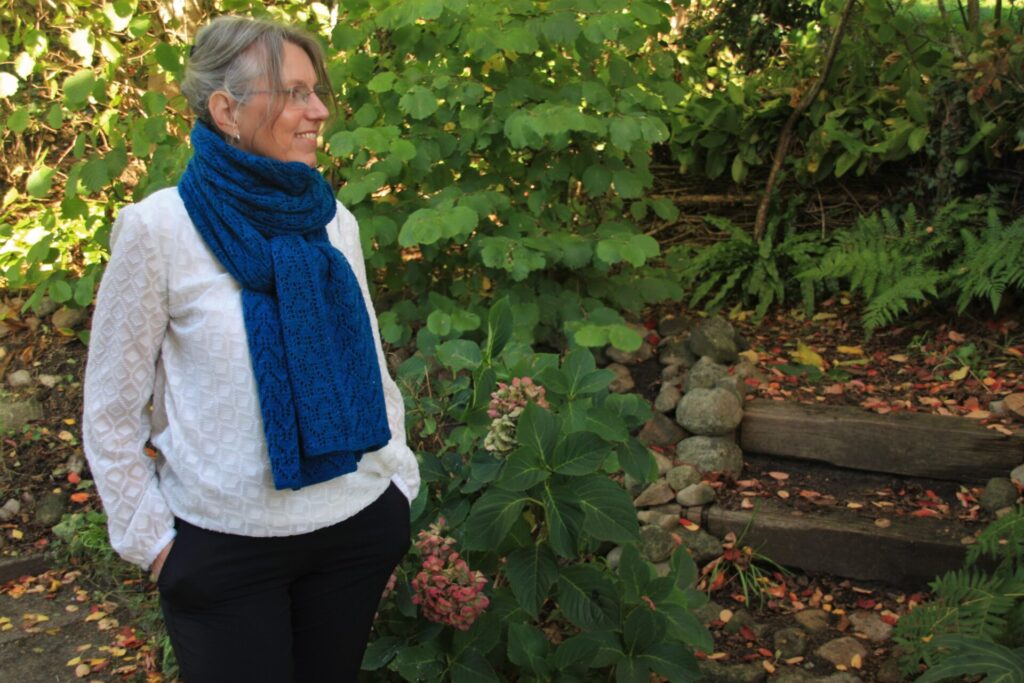
Today, I thought I’d treat you to some knitted gables as well as some real ones. From three skeins of fingering-weight merino non-superwash yarn I’ve knit another Thús 2. Casting on 119 stitches, I made it wider than in the pattern. Then I knit, knit, knit, and knit, row after row of houses, making it longer than the original too, ending up with a 51cm/20” by 2.14m/84¼” wrap. Here you can see how big it is:
I like wearing it like this, with the ends criss-crossed:
Or wrapped around my neck once and knotted:
The gables in my wrap are very simple, rather like the gable of our own home only with an extra pair of windows.
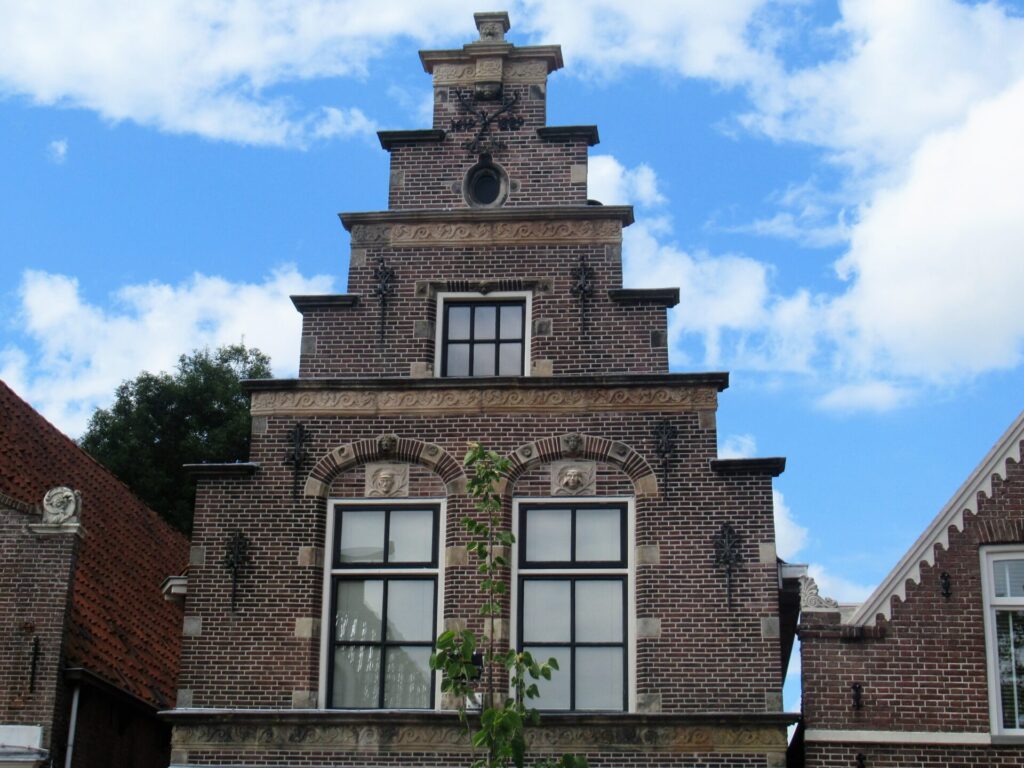
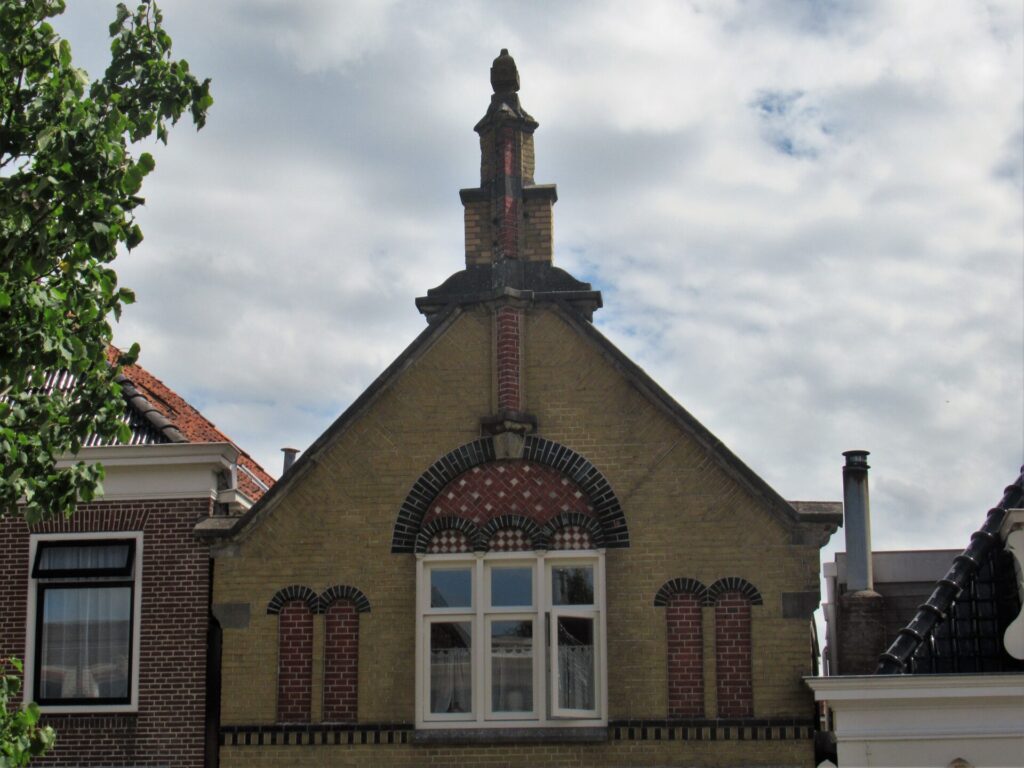
Far simpler than the many beautiful and interesting gables we saw during a visit to the Frisian city of Bolsward in August. There were stepped gables, like this one with its decorative anchor plates and a man’s and a woman’s head above the first-floor windows:
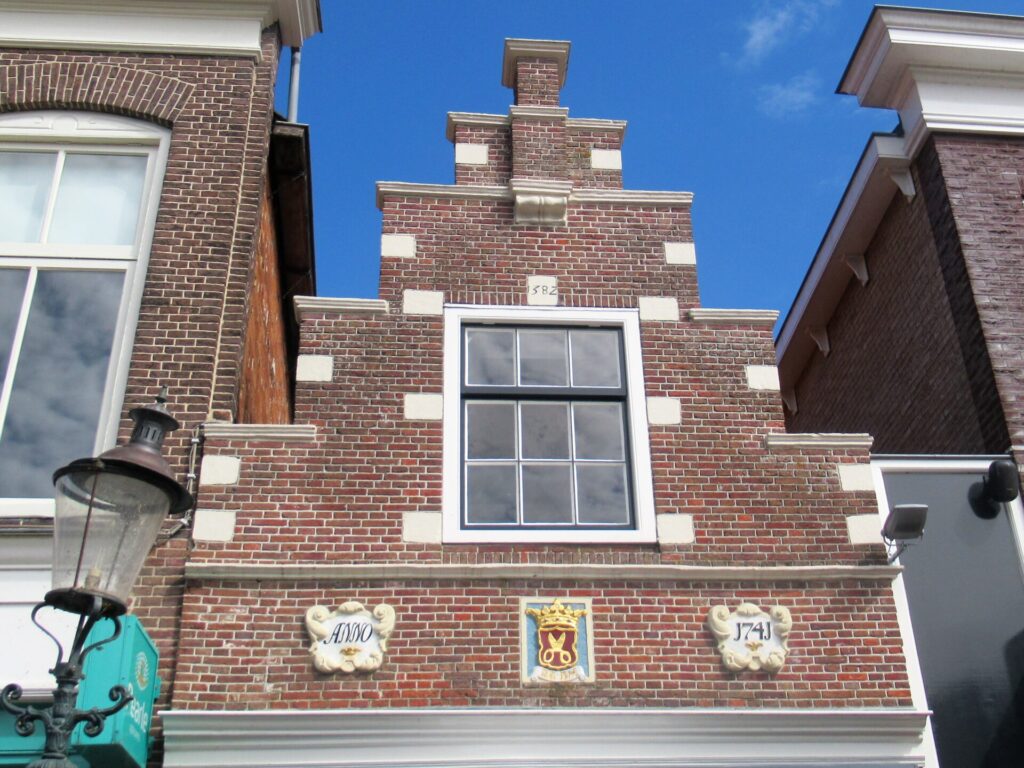
The stepped gable from 1741 below, with a pair of scissors in the centre, must have belonged to a tailor once.
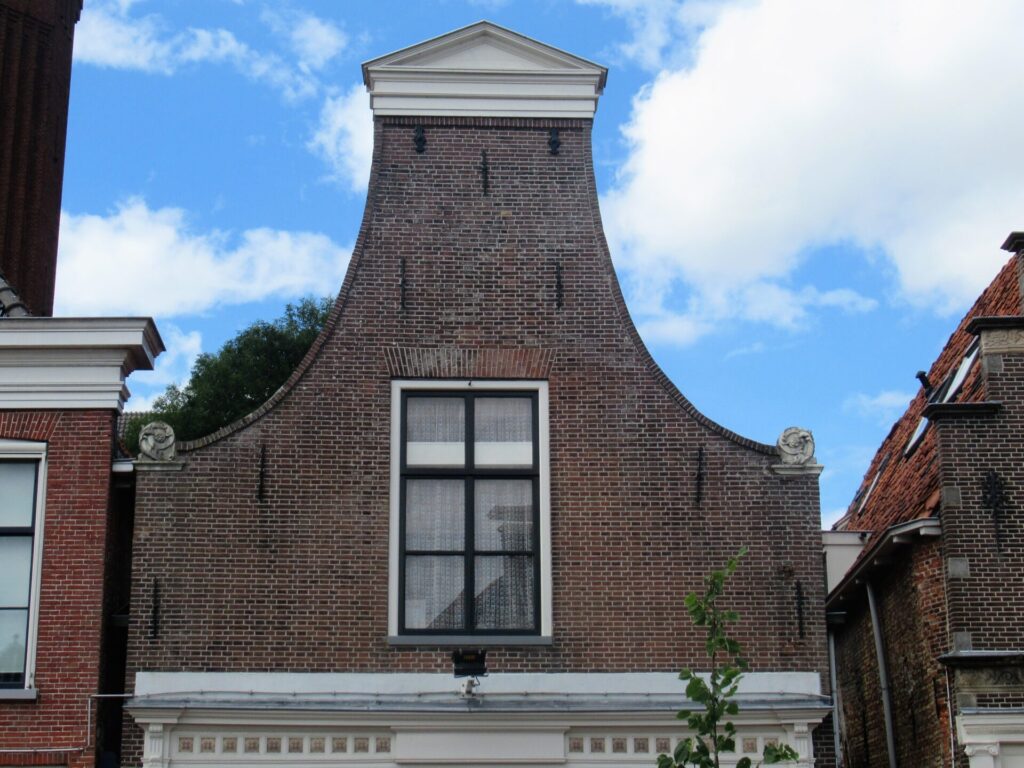
There were simple bell gables:
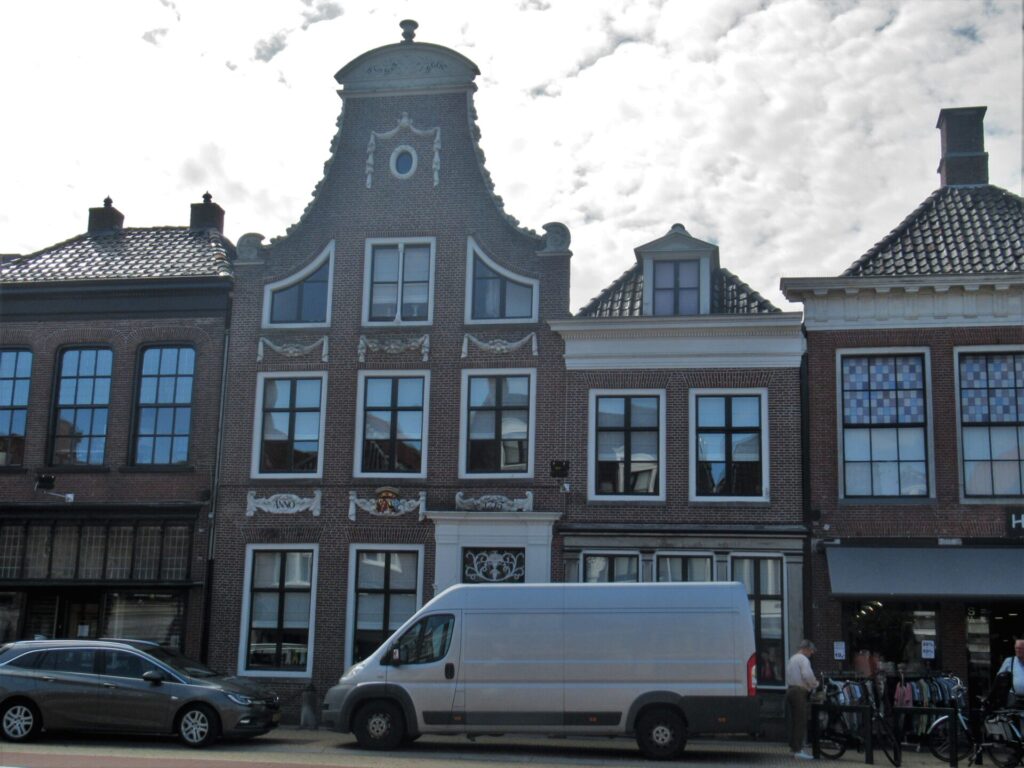
And ornate ones, with swags and frills everywhere:
As well as interesting and fancy gables that seem more modern to me (but I am not knowledgeable enough to tell you from what period or style this one is) :
It was fun walking along the canals wearing how-many-different-gables-can-I-find glasses.
Well, back to my own simple, hand knit gables. If you’d like to copy them, my Ravelry notes can be found here.
There are other knits on my needles now – a simple navy blue cardigan for everyday wear, a jacket for our grandson, swatches for a new design of my own and a pair of mittens for a gift. More about those when I’m a little further along. I hope you have enough to occupy your hands, too. Because, what can be nicer than spending the darkening evenings knitting?
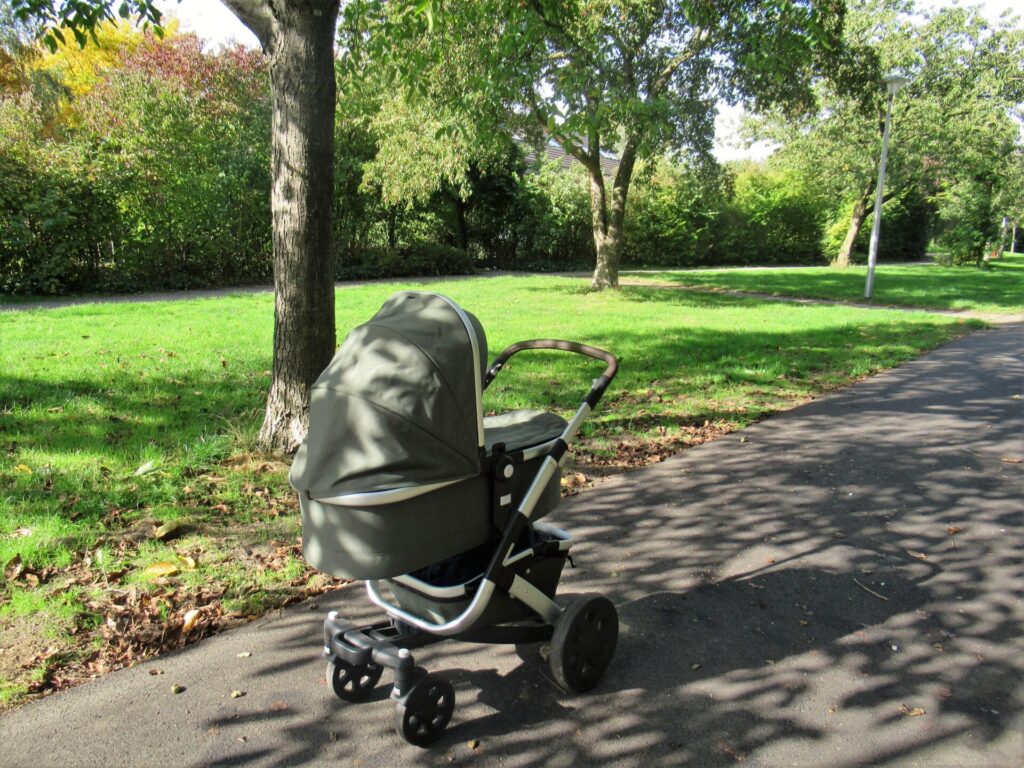
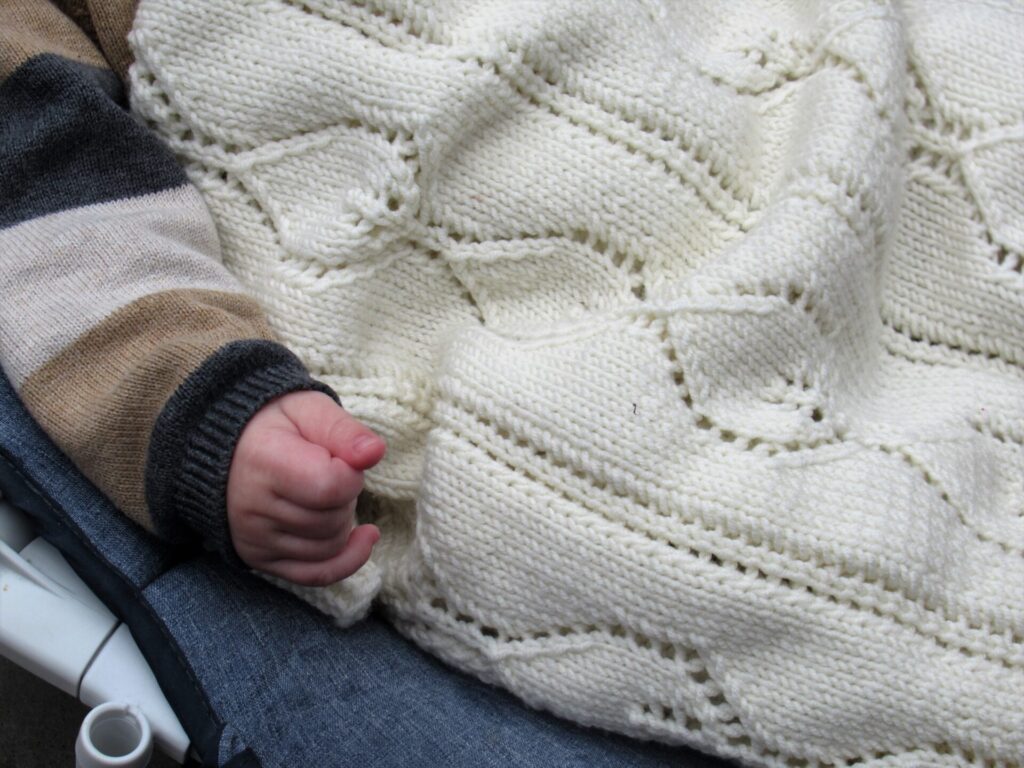
Our grandson is 6 months old now. He cries from time to time to indicate that he needs something, of course, but on the whole he is a cheerful little chap. He is growing fast and it will not be long before he has outgrown his pram.
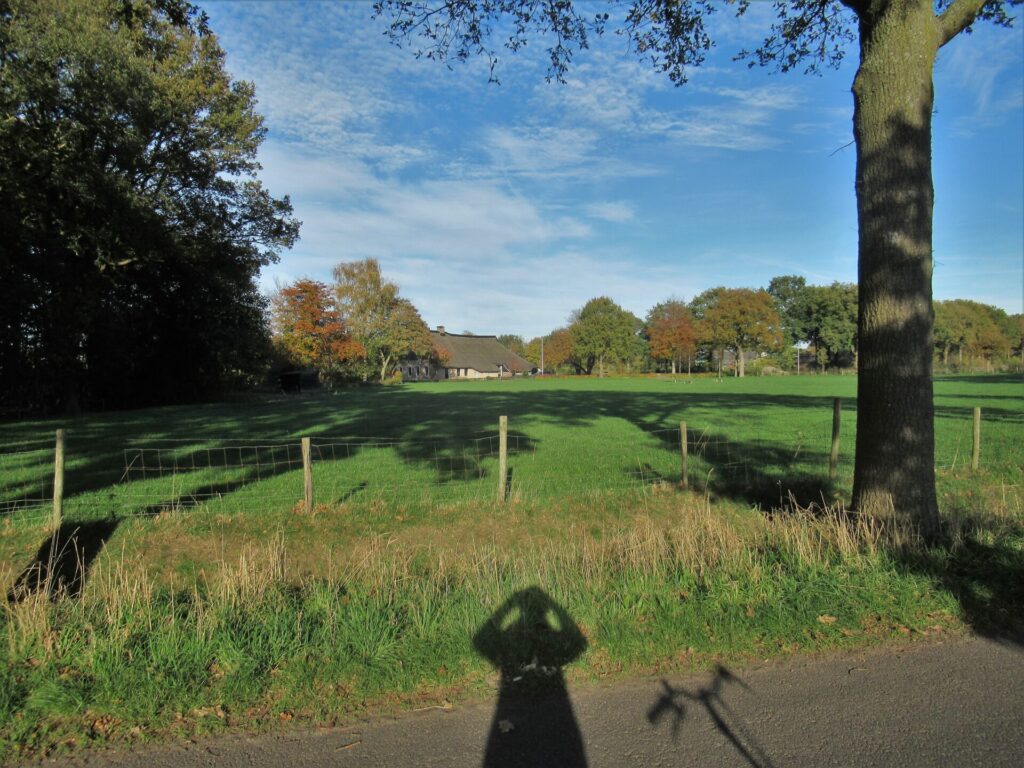
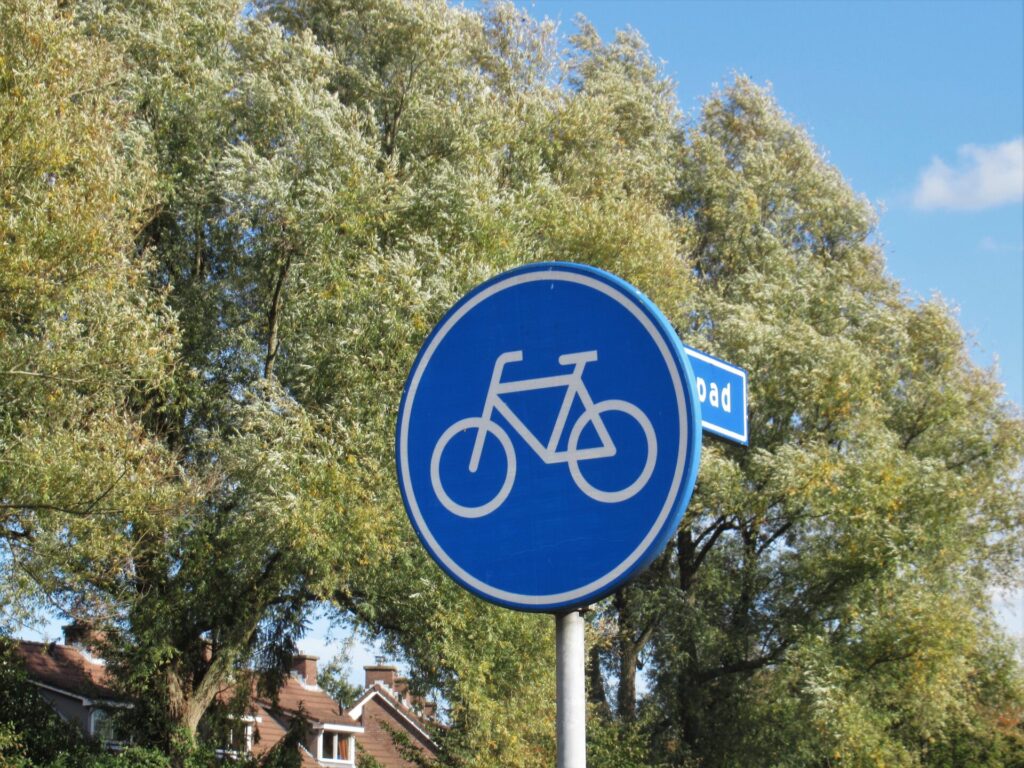
He lives in a quiet neighbourhood with lots of green space. The bicycle tracks meandering through it are perfect for pram walks.
Often he falls asleep as soon as we set off, but when he lies awake, I can see him looking at the sky, and listening to the singing of birds and the rustling of leaves.
I wonder if he is also aware of that special scent of autumn in the air.
How fortunate we are to be able to enjoy our strolls in this peaceful part of the world.
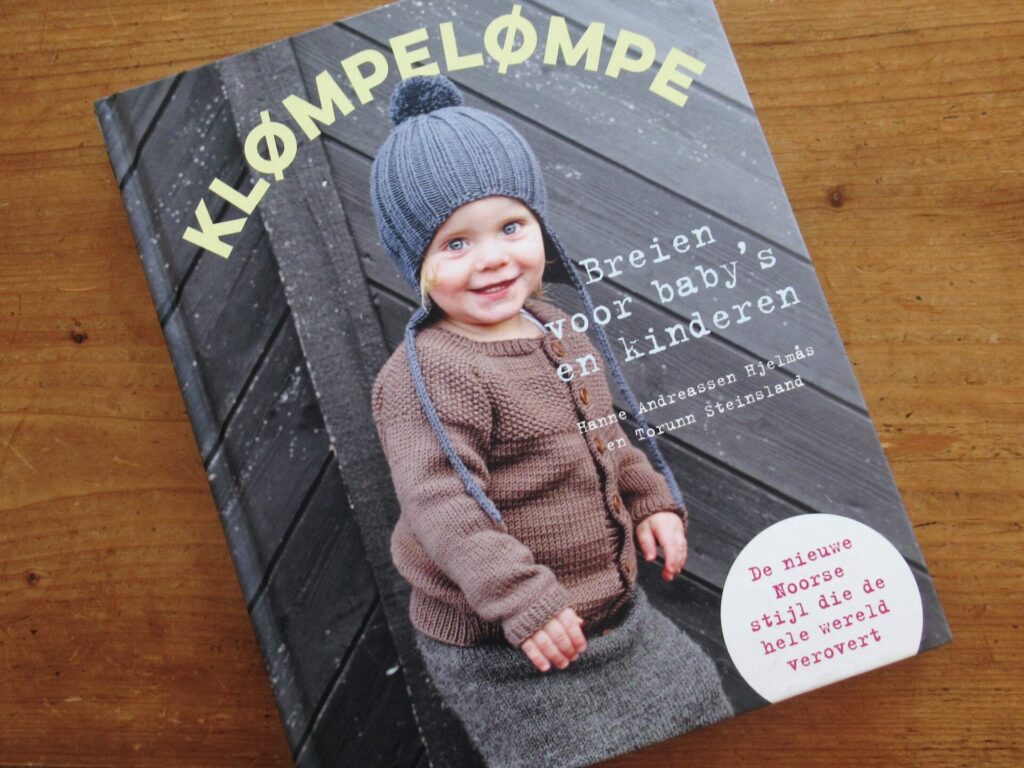
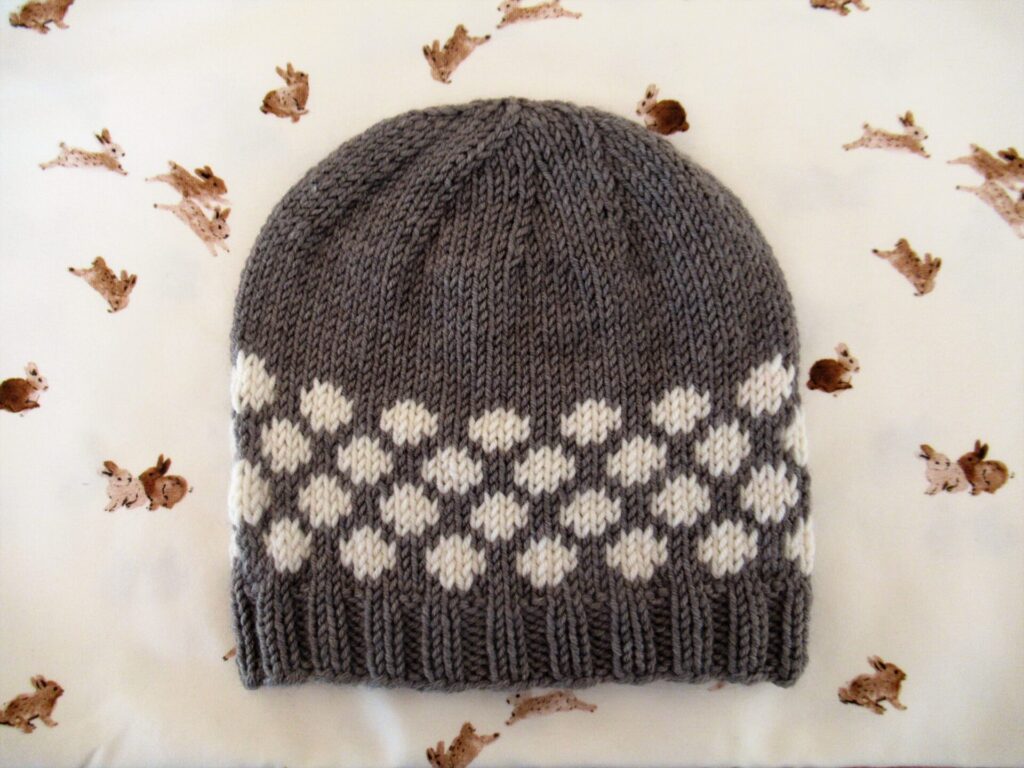
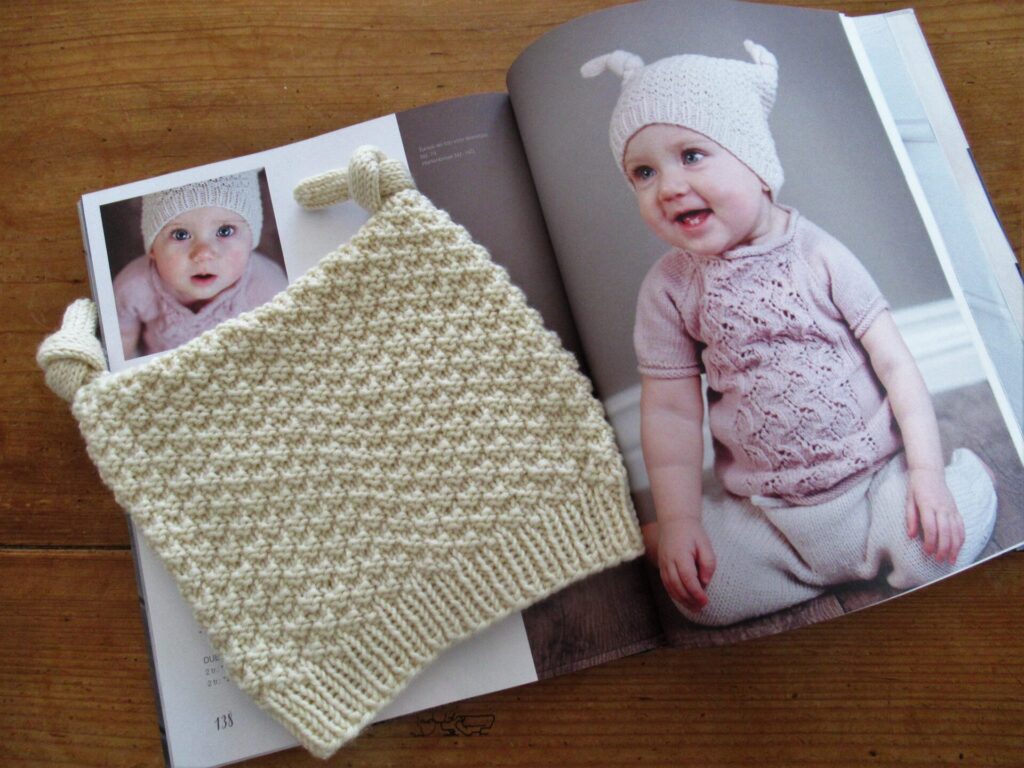
He has suddenly outgrown all of the hats I knit for him, too. So I quickly knit up two new ones, both from patterns in the first Klømpelømpe book.
The first baby cardigan I knit from this book was not a success – the instructions were unclear, the stitch pattern didn’t match up around the raglan armholes, and it turned out far too small. So, I ripped it out and put the book aside disappointed and frustrated.
A visit to a dear cousin of mine made me pick it up again, though. She is mother to 7 and grandmother to the same number, and the proud owner of a stack of Klømpelømpe books. She has knit many items from them for her grandchildren and is very enthusiastic about them.
Her enthusiasm was infectious, so I got the book out again, dug up the yarn left over from a jacket I knit for our grandson, and made the Henry hat.
I was still a bit puzzled by the instructions, but was able to work things out. Based on my earlier experience I made the size for 1-2 years and it fits perfectly.
I also had lots of yarn left over from the Pyrus Blanket I designed myself.
Some of that became the dots in the Henry hat and I had more than enough left for the Knot hat. The Knot hat has two weird antennae knit on to the top that are transformed into an adorable set of knots.
For anyone who hasn’t heard of the Klømpelømpe books yet, they are a series of knitting books from Norway that have been translated into many languages. According to the website Booksfromnorway ‘Klømpelømpe is a Norwegian dialect word from the Western region where the authors come from, and simply is an expression for describing a sweet, little child – a sweetheart.’
The book I’ve knit the hats from has ‘knitting for babies and children’ as its subtitle, and most of the patterns in it are for this age group. But it also contains a few simple accessories for adults as well.
I’m glad these hats turned out well, because everything in the Klømpelømpe books looks incredibly attractive and I’d like to make more from them.
Useful info:
The authors’ website can be found here in Norwegian. And a complete list of all the books in Norwegian here. (There is an English website, too, but it’s very limited.)
If you’re looking for translations of the books in your own language – the English translations all have ‘Knitting for Little Sweethearts’ in their titles, while most other translations retain the word Klømpelømpe or Klompelompe somewhere in the title.
Hello! And how are you all doing? I’ve been busy, busy, busy. And also knitting quite a bit, trying to finish all of my WIPs before starting something new.
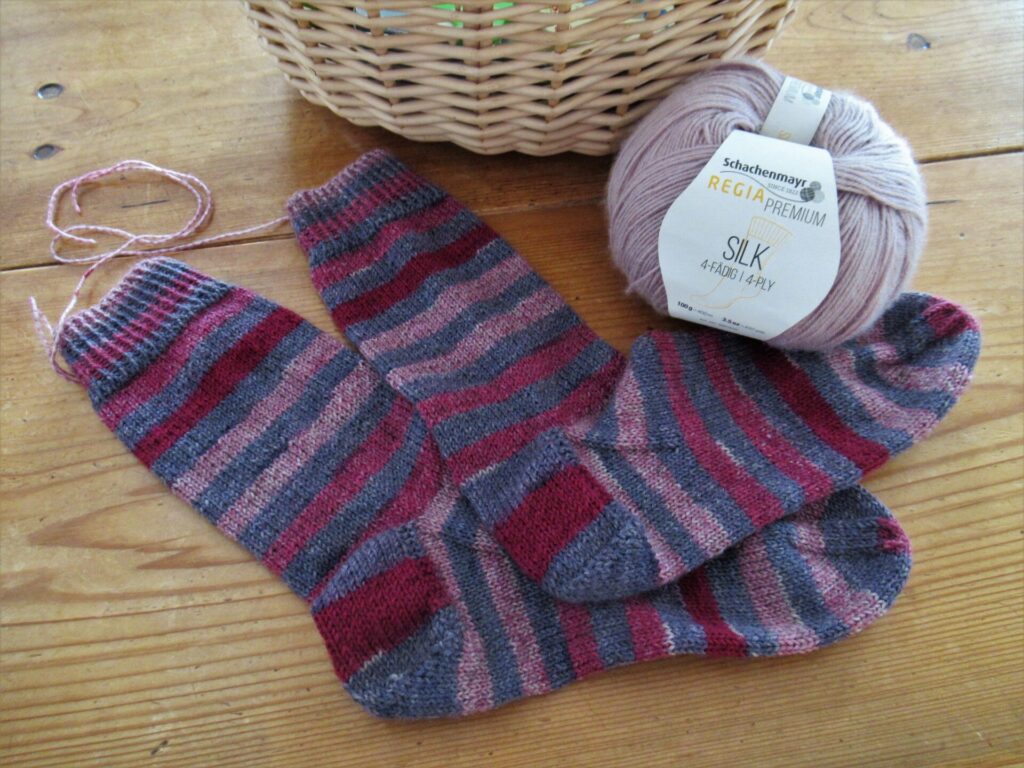
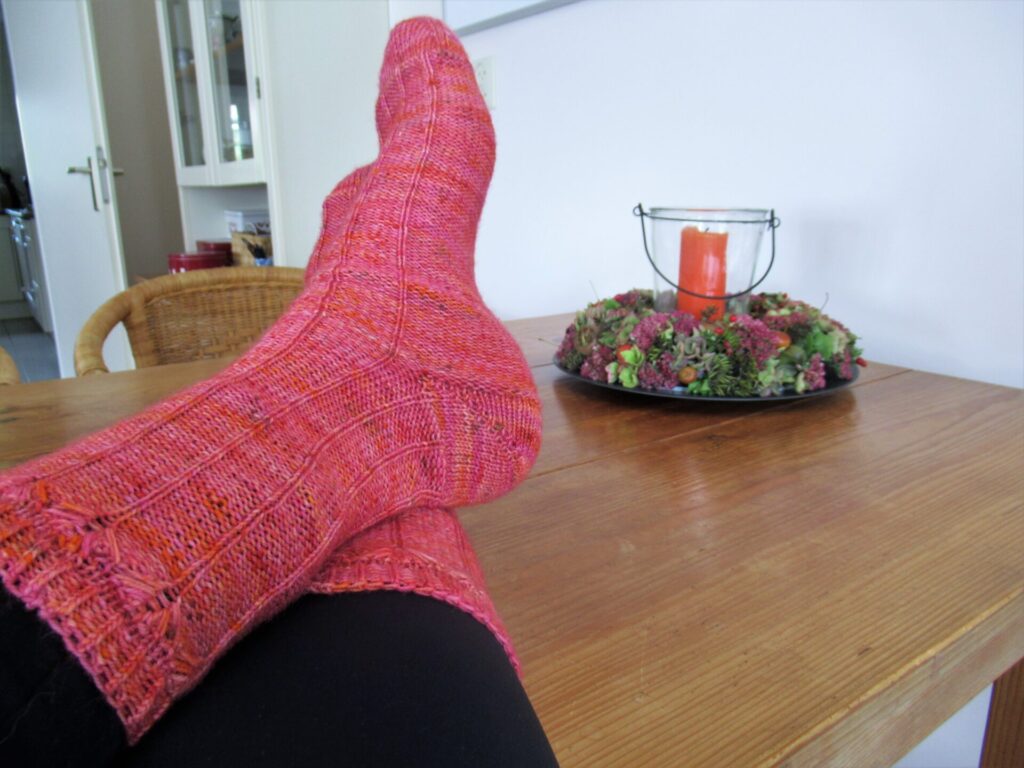
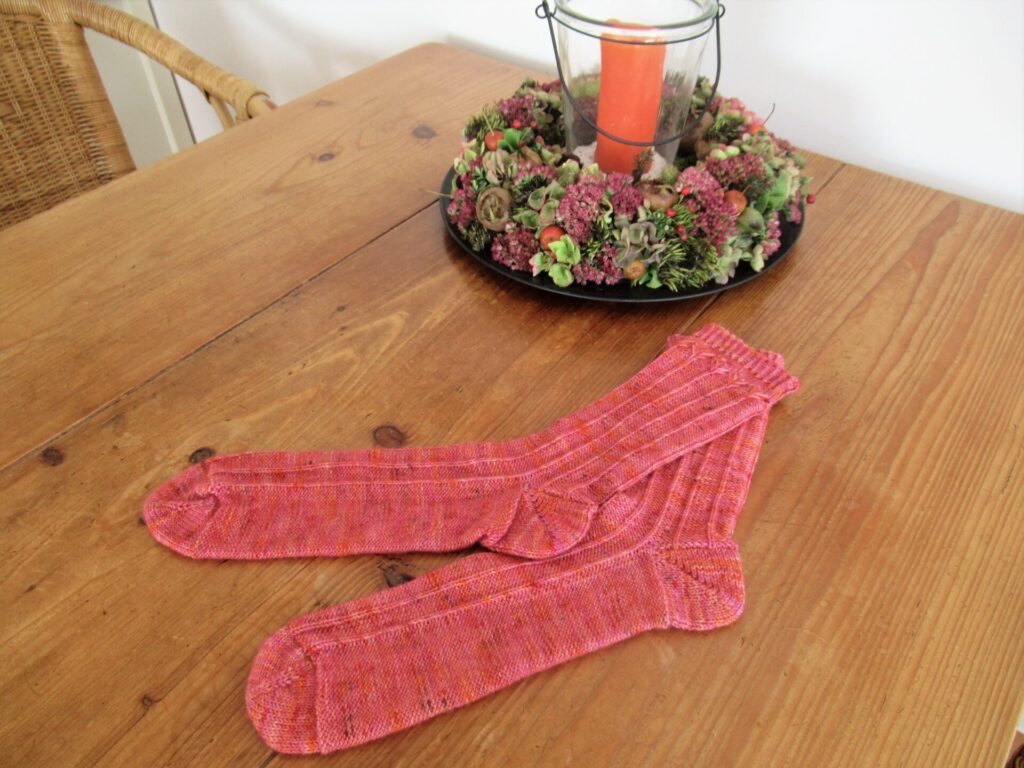
The designer of the socks that have just slid off my needles calls them Garia Socks. She explains that in Basque, her mother tongue, garia means wheat. She chose this name for her design because of the row of wheat ears along the top of the socks.
I’m calling them Dahlia Socks, however, because that is what the motif reminds me of in the shade I’ve used.
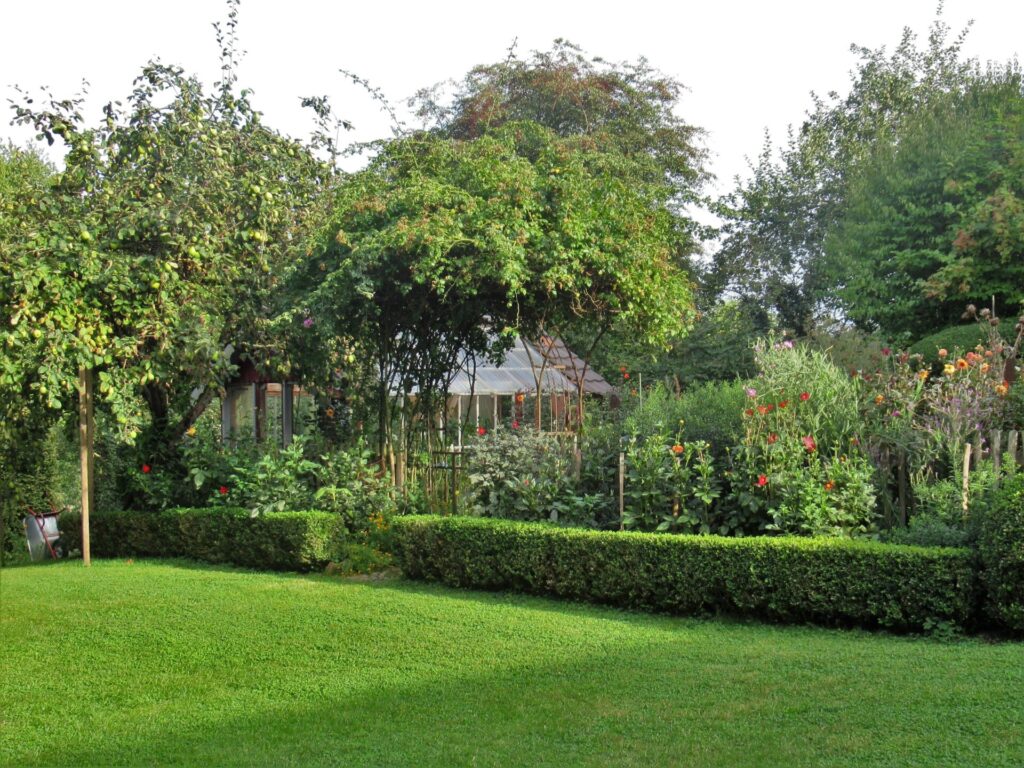
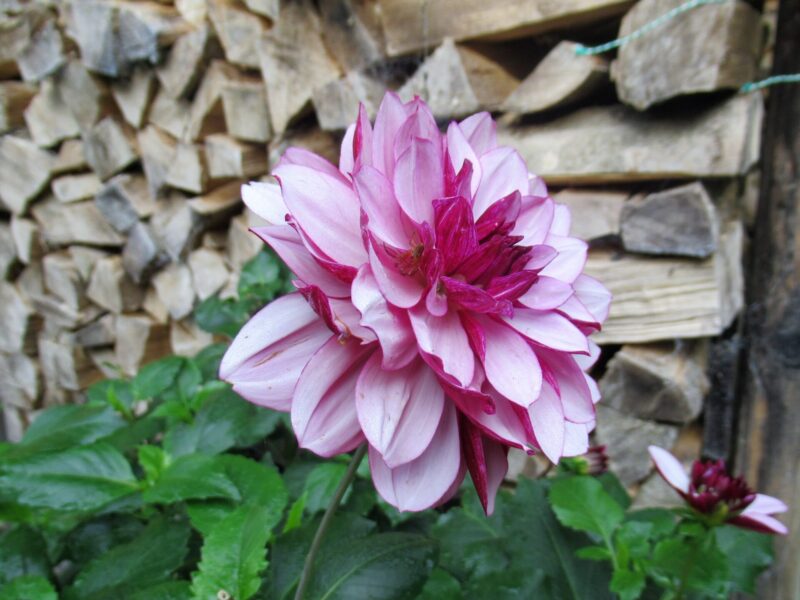
Part of the beautiful garden in Germany that we were allowed to call our own for a week in September, was a mixed vegetable and flower plot.
At this time of year, the dahlias were the star of the show there. Single-flowered dahlias, but also many of those spiky pompom-flowered ones, big and small (click on images to enlarge).
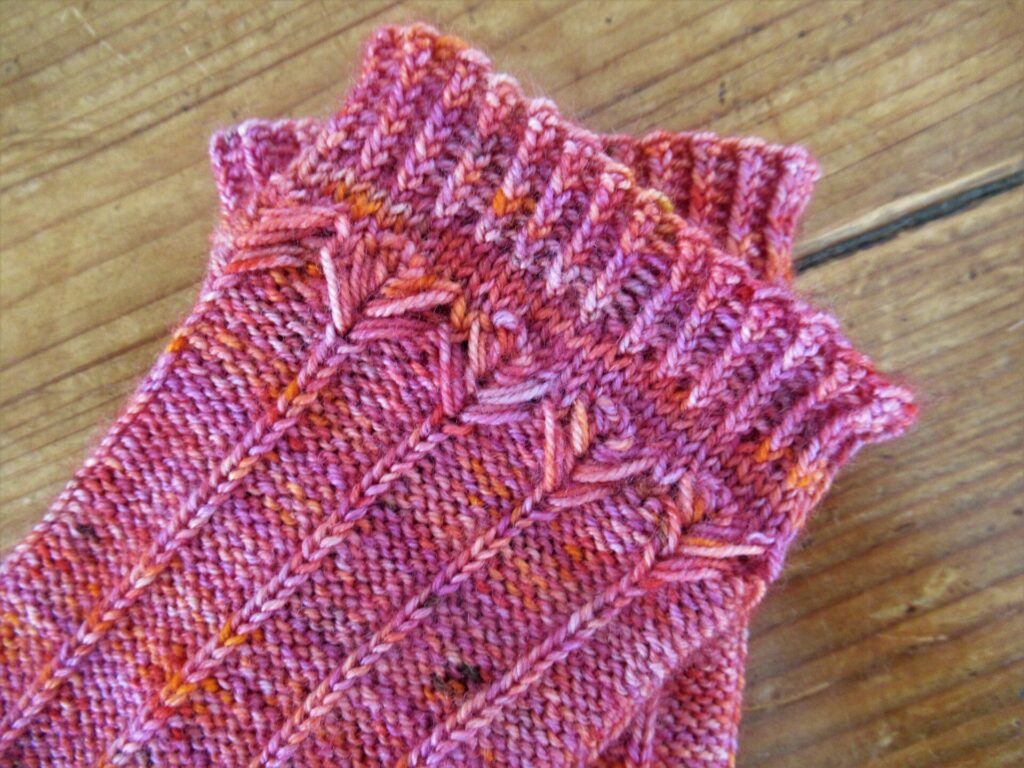
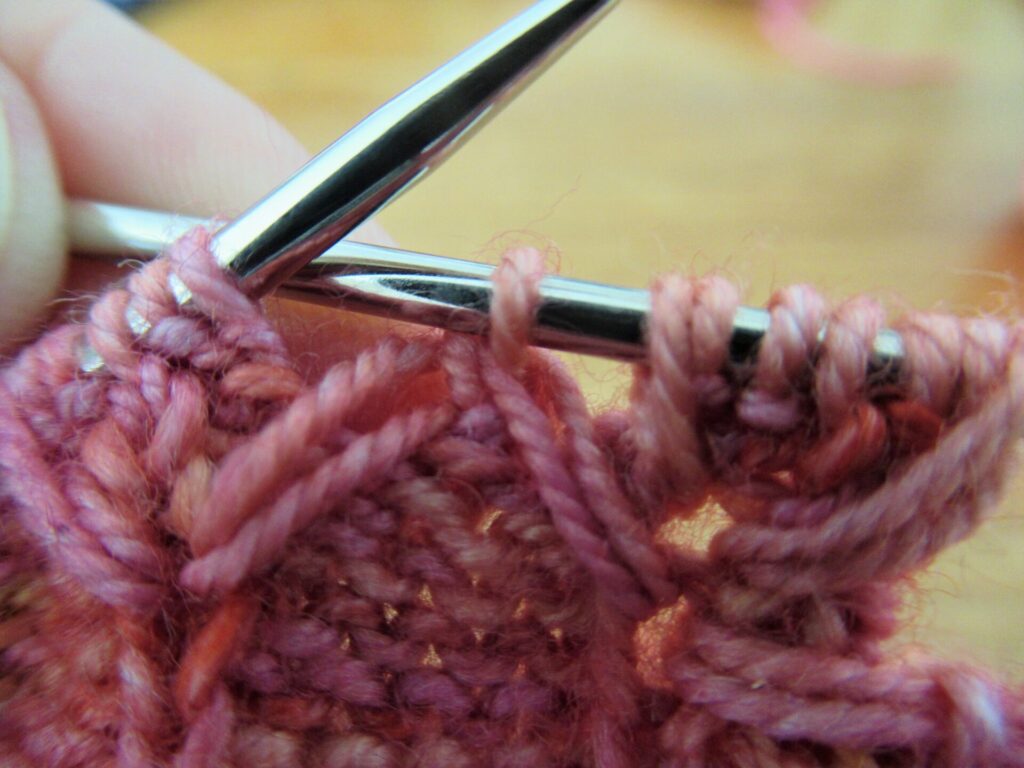
The Garia/Dahlia Socks were fairly easy to knit (from the toe up). Only the wheat ears/dahlia flowers were quite a challenge, and from what I’ve read on Ravelry I’m not the only one who struggled. So I thought it might be helpful for others who’d like to knit these socks to show how I knit the ‘spikelet motif’, as it is called in the pattern.
Notes:
This explanation can only be understood in combination with the Garia Socks pattern designed by Erika Lopez A. It can be found in the book 52 Weeks of Socks or here on Ravelry.
I usually prefer charts, but in this case the written instructions worked better for me.
The yarn should always be held at the back of the work, except when purling sts.
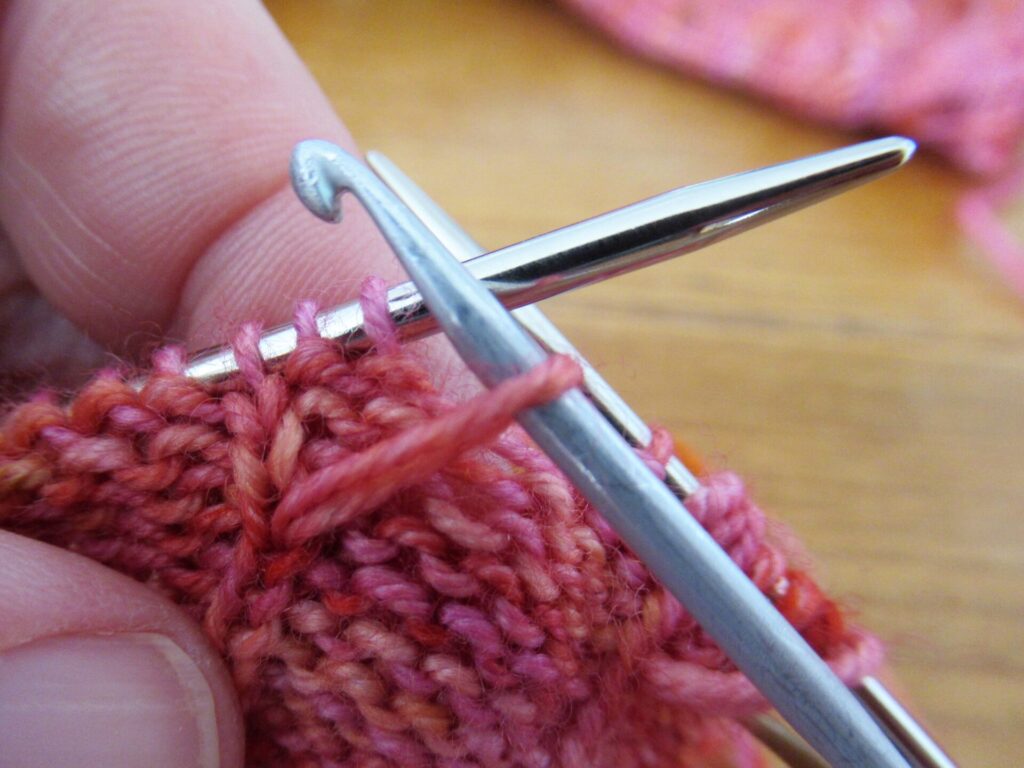
Instead of my knitting needle, I used a crochet needle the same size (in my case 2.5 mm) to pull up the ‘long stitches’.
First of all: Set aside an hour or so for the spikelet motif and hang a ‘Do Not Disturb!!!’ sign on your door.
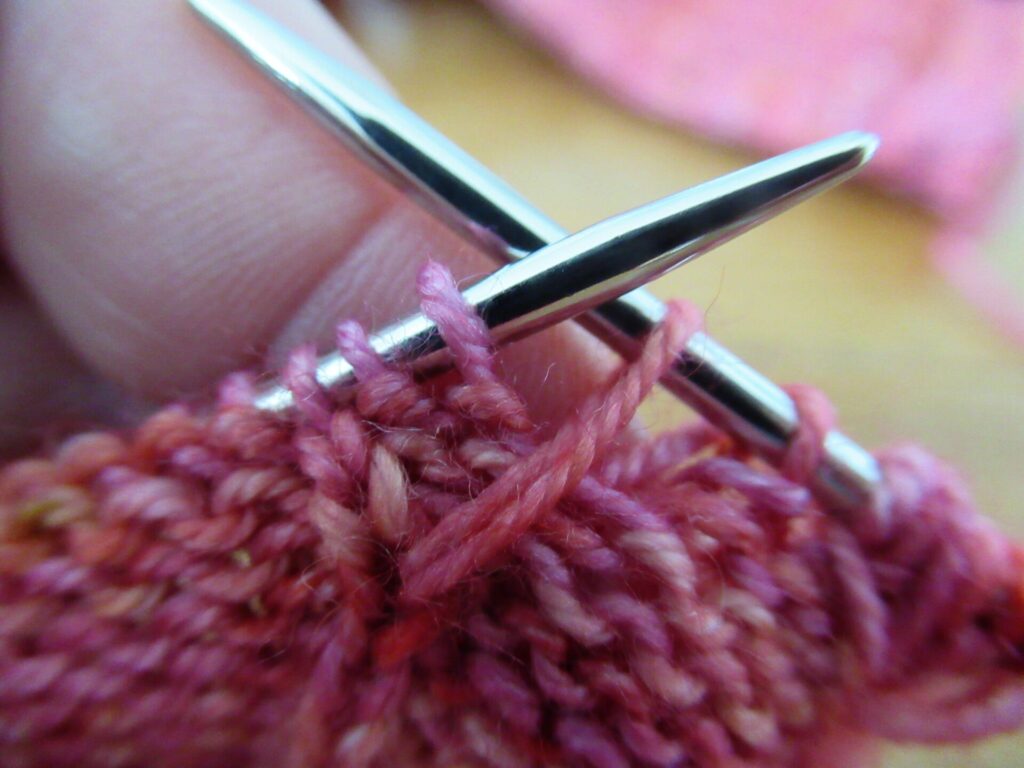
Round 1: After a purl st, bring the yarn to the back, insert your crochet needle into the 4th stitch down…
…pull up a loop…
place it on left needle without twisting, then transfer the stitch to right needle. (It doesn’t have to be placed on the left needle first, but doing so does make things easier.)
The next loop, to the left of the column of knit sts, is pulled up in the same way, in the same hole as before. Don’t pull the loops too tight. The left one tends to pull tighter. Aim at making them the same length.
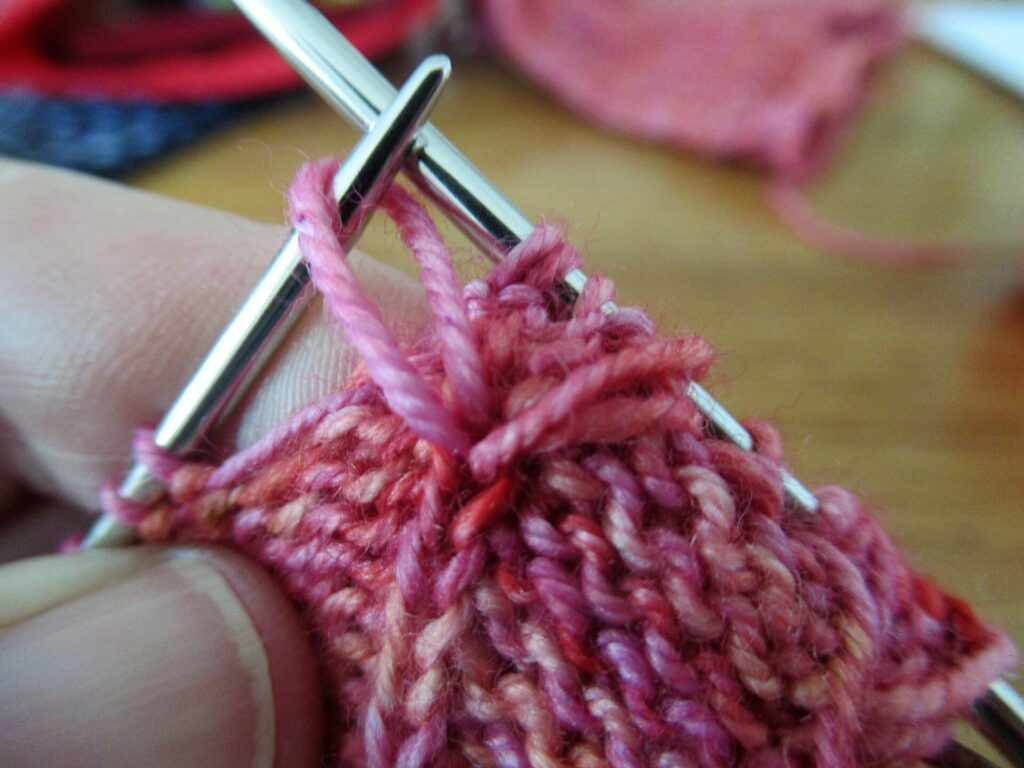
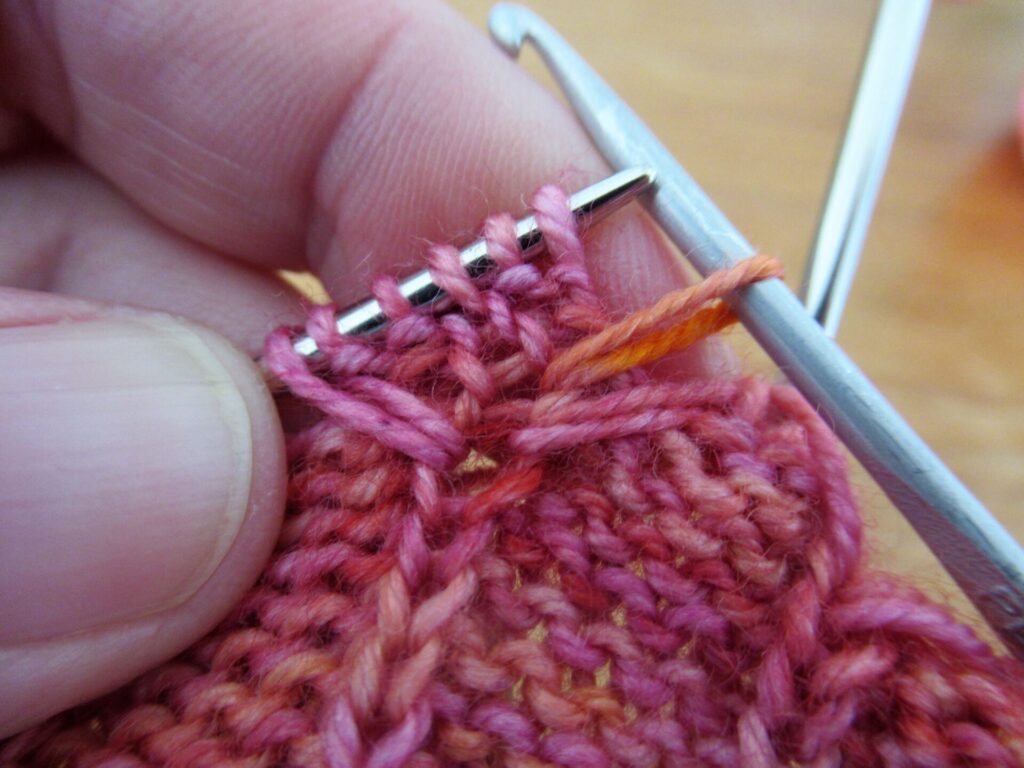
Round 2: The ‘cdd’ can be confusing, because the ‘long’ stitches do not always stay in place. At least on my sock, some of them wandered along the needle and changed places with the purl stitches beside them.
So this is how it goes: Sl. 2 sts purlwise. The first of these 2 sts should be a long st, the second is a purl st. Knit the next st (this is again a long st). Pass the 2 slipped sts over the knit st. Now it looks like this:
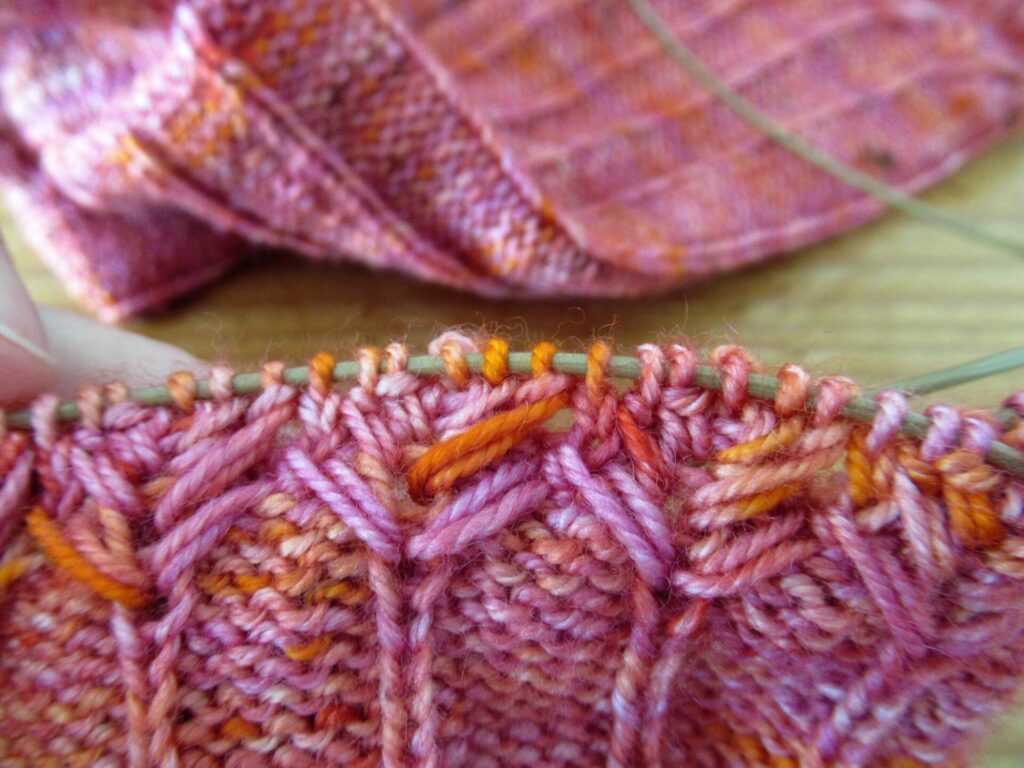
The long sts in rounds 2 and 3 are pulled up 1 round above the ones in the previous round:
After round 3 it looks like this:
Do not despair – there are no more long sts to pull up after this, and everything is going to be fine.
Round 4 shouldn’t be a problem – just one small tip: K2tog = 1 long st + 1 purl st K2togtbl = 1 purl st + 1 long st
There! You can breathe out now – you did it!
Is this an enjoyable pair of socks to knit? Absolutely, especially with a good quality yarn in a lovely colour. The only thing I wasn’t totally happy with was the heel. It is on the small side. And no matter how hard I tried to prevent them, holes appeared on either side. I closed them by doing some darning on the inside afterwards. The German short rows require some experience, and the ‘spikelet motif’ is a great technique for anyone who likes a challenge.
PS: My blog post about the toes, foot and heel can be read here. The yarn I used was one 100-gram skein of hand-dyed Enkeltje Sock in a unique shade that is never dyed twice.
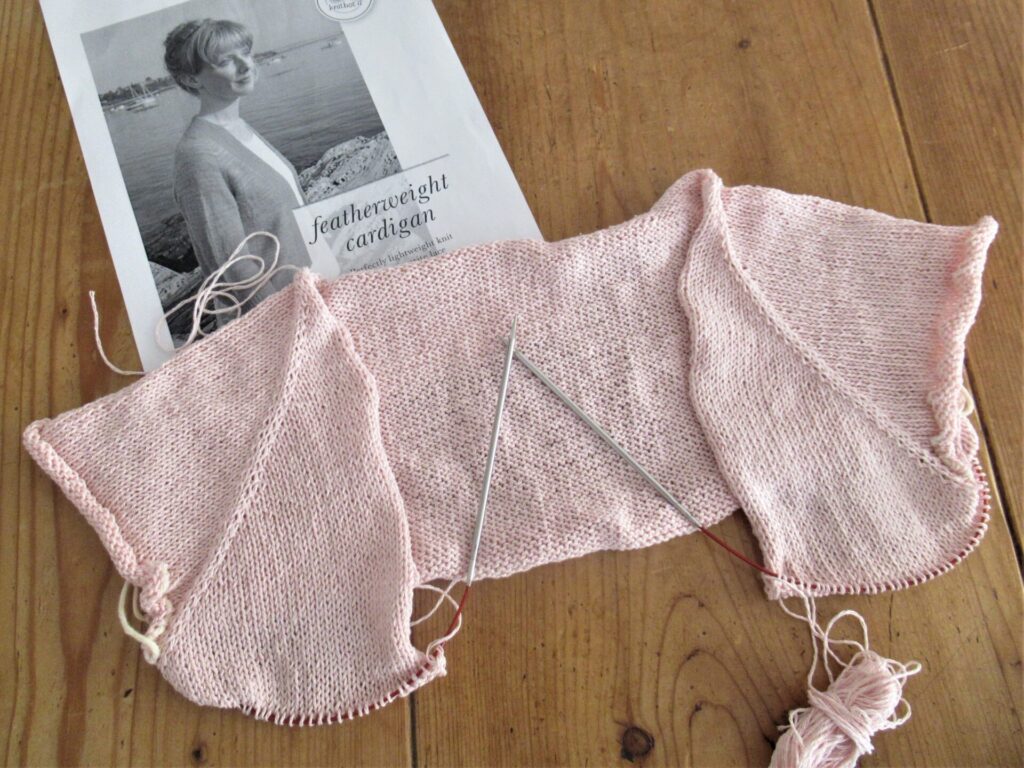
Autumn has well and truly arrived here, and with it the need for warm and woolly sweaters, scarves, socks etcetera. And I’ve just finished a light and airy summer cardi! I don’t know how other people do it. I mean, summer is the time for knitting with cool and summery yarns, but that means that summer knits are always finished after the season you’d want to wear them.
The summer cardi I’m talking about is the famous Featherweight Cardigan, designed by Hannah Fettig. It is knit from the top down.
I am the ten-thousand-two-hundred-and-fifty-first knitter to post her Featherweight on Ravelry. And there probably are thousands more who knit it. That’s mind-boggling. Why is it so popular? I can’t speak for others, but for me it’s the elegant silhouette and the use of fine yarn. And most of all the utter simplicity, which makes knitting it into a wonderfully meditative experience.
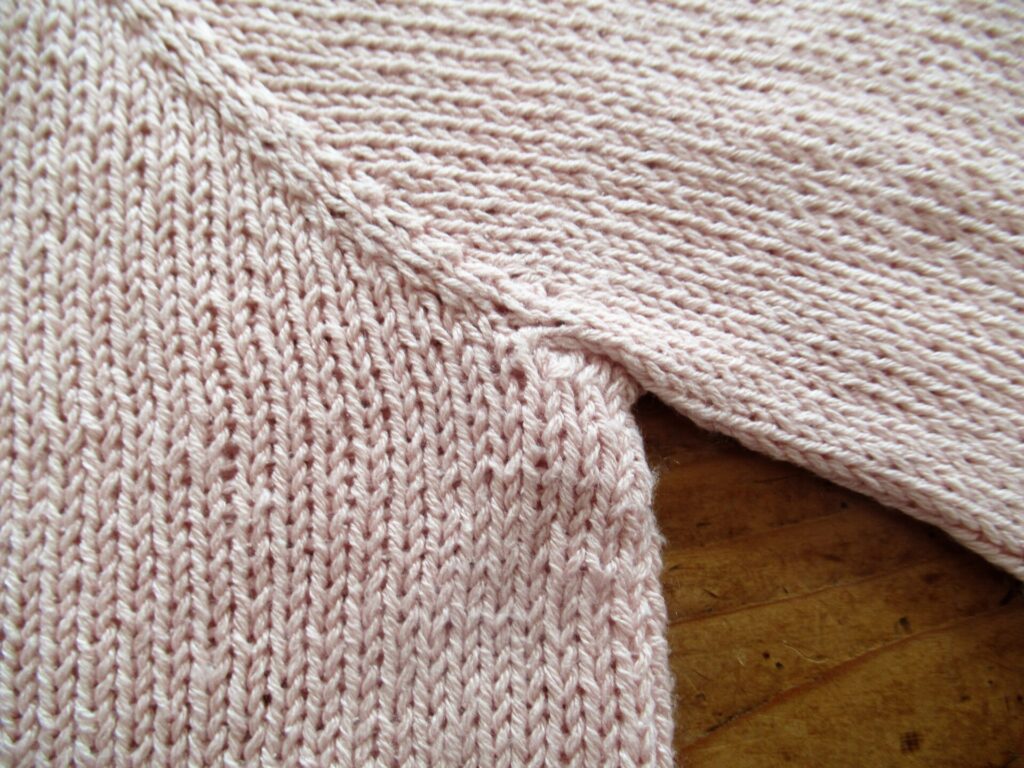
The only slightly tricky part of Featherweight is picking up the underarm stitches. To prevent large holes, I used the technique explained clearly by The Chilly Dog in this YouTube video. Here is a close-up of the end result – pretty neat, isn’t it?
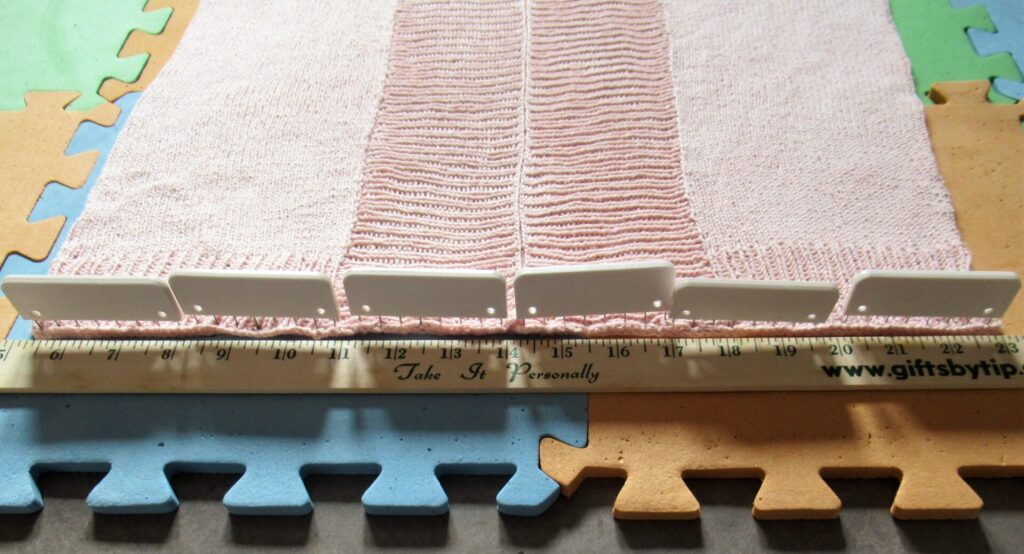
After I’d finished knitting it, my Featherweight looked terribly frumpy. I was especially worried about the bottom edges of the front bands. So, I soaked it in a non-rinse detergent, laid it out flat on blocking mats, pinned the front bands into place using multi-pronged KnitBlockers, and left it to dry.
That did the trick as you can see on these before-and-after pictures (click on them to enlarge), although the edges are not quite as neat as I would have liked them:
Before blocking
After blocking
How could I make them neater next time?
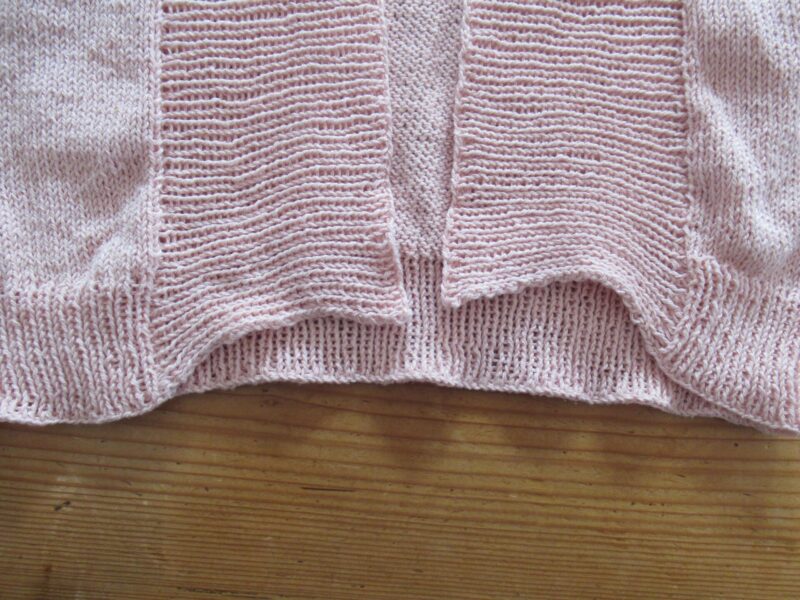
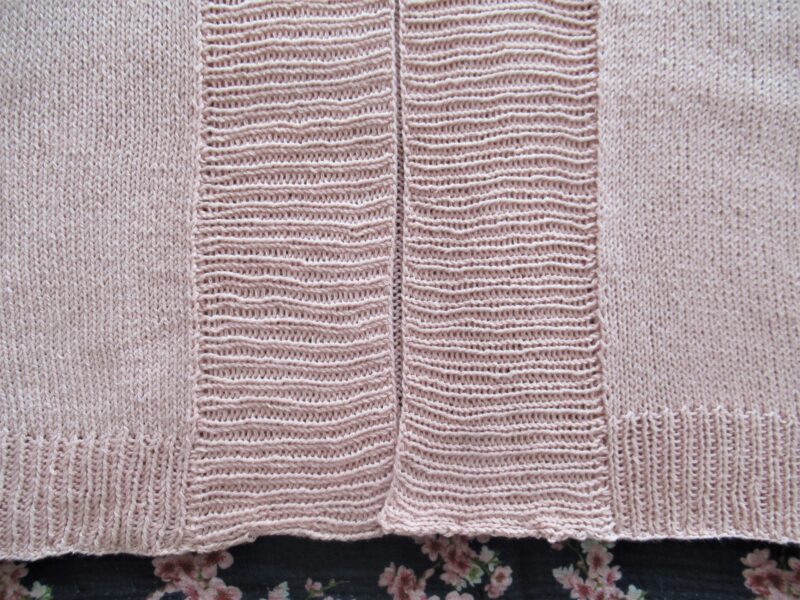
The original is very short, almost like a bolero. I lengthened the body by 11.5 cm/4.5” and made the sleeves a little longer, too. Knit in a fine fingering-weight yarn on 3.5 mm/US 4 needles, the knitted fabric is slightly transparent. Here is my Featherweight all finished:
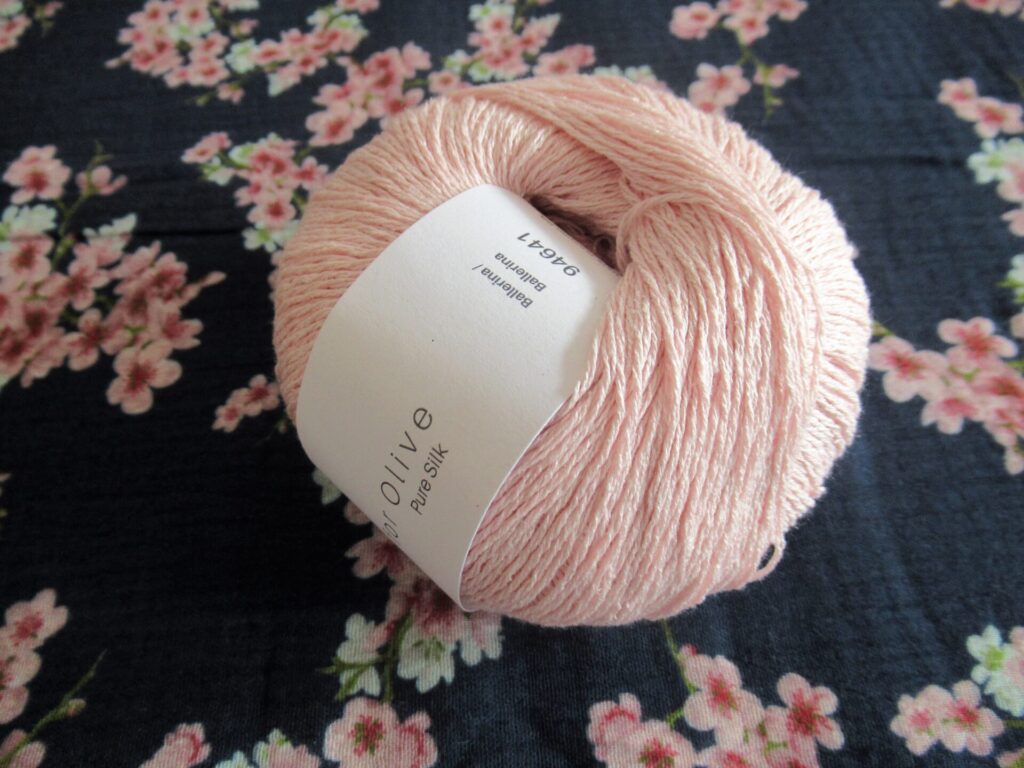
The yarn I used is Knitting for Olive ‘Pure Silk’ in a shade called Ballerina. It is a 100% Bourette Silk (raw silk) yarn with a meterage/yardage of 250 m/273 yds to a 50 gram skein. A big plus is that it’s a butterfly-friendly yarn – the fibres are collected after the silk moths have left the cocoons.
It isn’t the sleek and slithery kind of silk, but matte with a cottony feel. The thread is composed of three very loosely plied strands and is rather splitty. I love the look and feel of this yarn, but its splitty-ness makes it a little harder to knit with.
My cardi isn’t exactly featherweight, but at 203 g it is pretty lightweight. All in all, I’m very happy with it. Only if I were to knit this again, I’d make the armholes slightly larger and try to do something about the edges of the ribbing. Or I’d use a different stitch pattern instead of the ribbing. Perhaps a pretty lace pattern?
I was also going to sew a summer dress to go with it, from the cherry blossom fabric I photographed the skein of yarn on, but, alas, I didn’t get round to it. A sensible person might sew it now, so that it would be finished in time for next summer, but I don’t know if I’m sensible enough for that.
I do know that I feel a sudden urge to knit lots of warm and woolly sweaters, scarves, socks etcetera, etcetera, etcetera. I’ll keep you posted about those. Bye for now! xxx
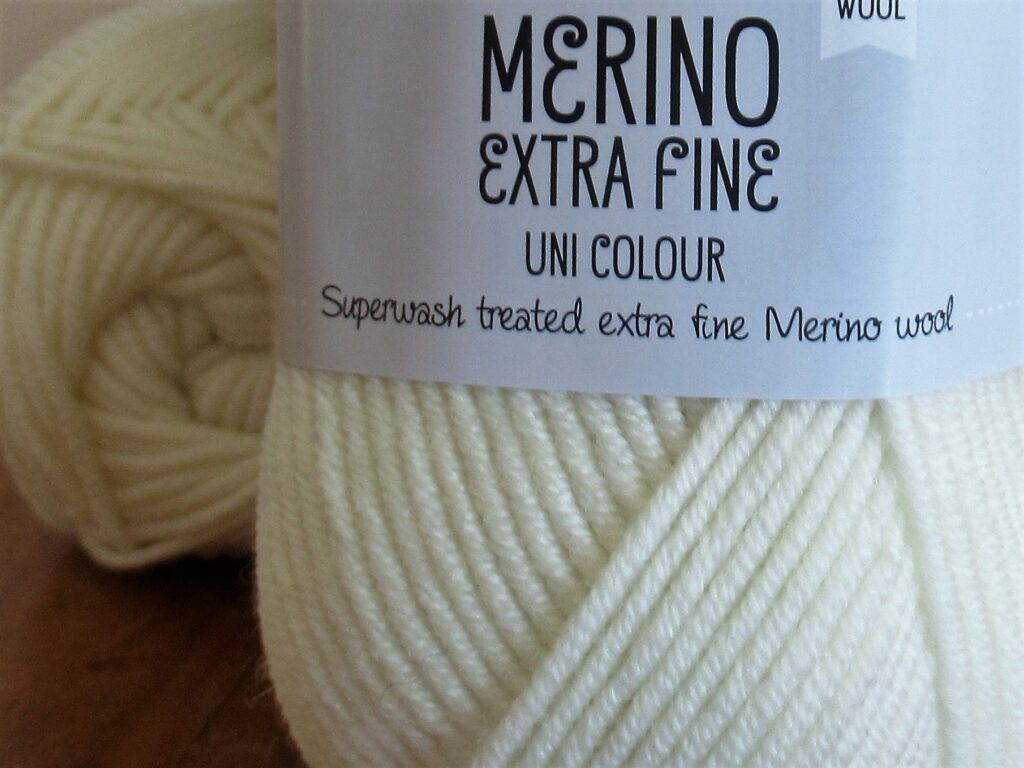
From the 1970s I remember something new appearing on the yarn market: Superwash Wool! It was considered a blessing. Garments knit from superwash wool were so much easier to care for – they didn’t felt, they didn’t shrink and all in all they were more durable.
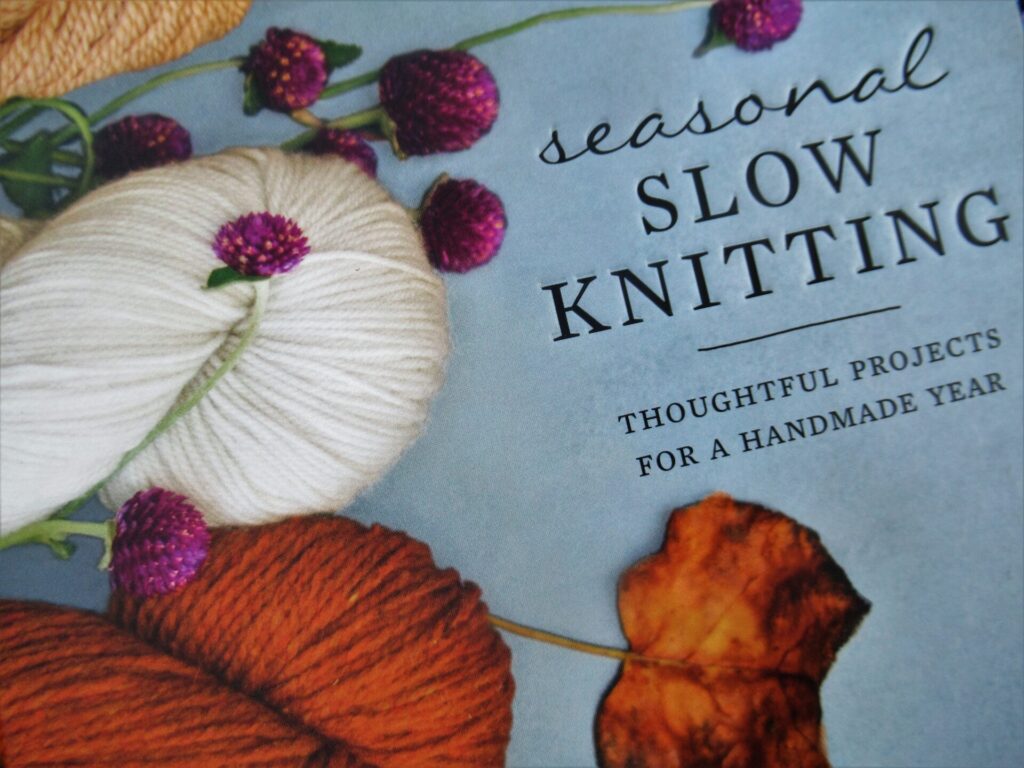
For the blanket I knit for our grandson, I deliberately chose a superwash merino wool to make life easier for his parents. And now, recently, I read ‘…I have stopped purchasing superwash wools…’ in this book:
Why? I thought.
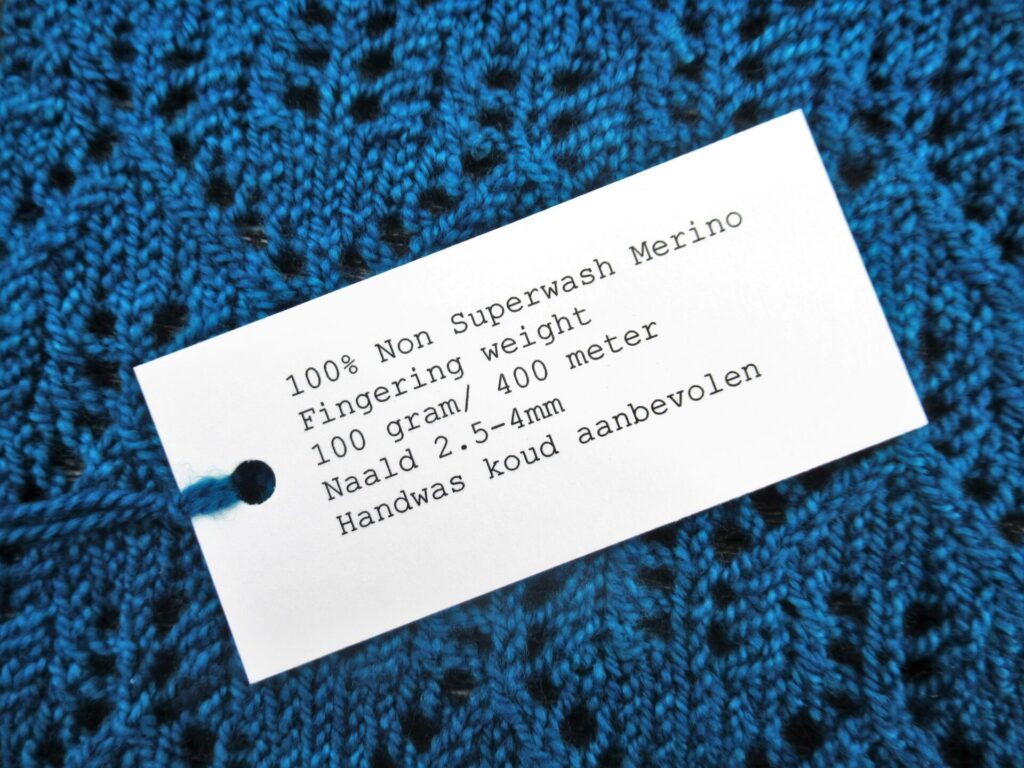
And then I came across a yarn explicitly marketed as non-superwash. Again I thought, Why? (Uh-huh, I have deep thoughts from time to time.)
Intrigued, I bought a few hand-dyed non-superwash skeins. They are now an almost finished Thús 2, that I’ll finish as soon as the weather gets cooler:
‘But’, I asked the indie dyer selling this yarn, ‘does that mean that your other yarns are superwash, even though the labels don’t say so?’ ‘Not all of them, but some of them are,’ she said. I was flabbergasted.
Apparently I’d been using superwash yarns all along without being aware of it! I’d always thought that all yarns were non-superwash, unless specifically labelled as superwash. And what’s wrong with superwash yarns anyway?
Always happy with an excuse to do some research, I dived into an online sea of opinions and information about superwash versus non-superwash wool, almost drowning in it. Here is a summary of what I found out:
Why would wool need superwash treatment at all? Wool fibres have tiny open scales that interlock when friction is applied or when they come into contact with quickly changing water temperatures, leading to felting and shrinking. Superwash treatment can prevent that.
A controversial superwash treatment The most commonly used method for shrink/felt-proofing wool by far is the chlorine-Hercosett process. After washing, but before spinning, the wool goes into a bath of diluted chlorine to dull the scales. And after that the scales are coated with a synthetic (polymer) resin to make them even smoother and prevent the wool from felting/shrinking. There is a lot of debate about this method:
On the one hand: The chlorine-Hercosett method requires large quantities of water and produces an environmentally hazardous effluent. In some parts of the world this may lead to water pollution.
On the other hand: Because of the strict waste water legislation in the EU and some other countries the effluent is treated to such an extent that only very clean water leaves the factory.
Positive: This treatment prolongs the lifespan of items made from the wool.
Question mark: Does the resin coating release micro pollutants when the wool is washed? Some producers say that the resin used is biodegradable and does not, but somehow I do not feel completely assured.
More environmentally friendly alternatives
EXP, which stands for EX-Pollution, was developed by Schoeller. This method avoids pollutants altogether, but still uses extra water.
Naturetexx Plasma, a treatment not using any water at all, but just air and electricity. The drawback is that it uses lots of electricity and there are questions about the durability of the wool treated in this way.
So, what is an environmentally conscious knitter to do? It’s complicated – sigh! The labels don’t tell us much. They sometimes tell us that a yarn has been superwash treated, but not always. And they don’t tell us which treatment process was used. What we can do is this:
Visit yarn manufacturers’ websites. Some of them give useful information about their production process.
Look for yarns with the GOTS (Global Organic Textile Standard) label. Chlorine cannot be used in any stage of the production of these yarns.
Remember that any superwash treatment makes knitted garments last longer, which is also sustainable, and may be necessary for items that need to be washed often, like baby things.
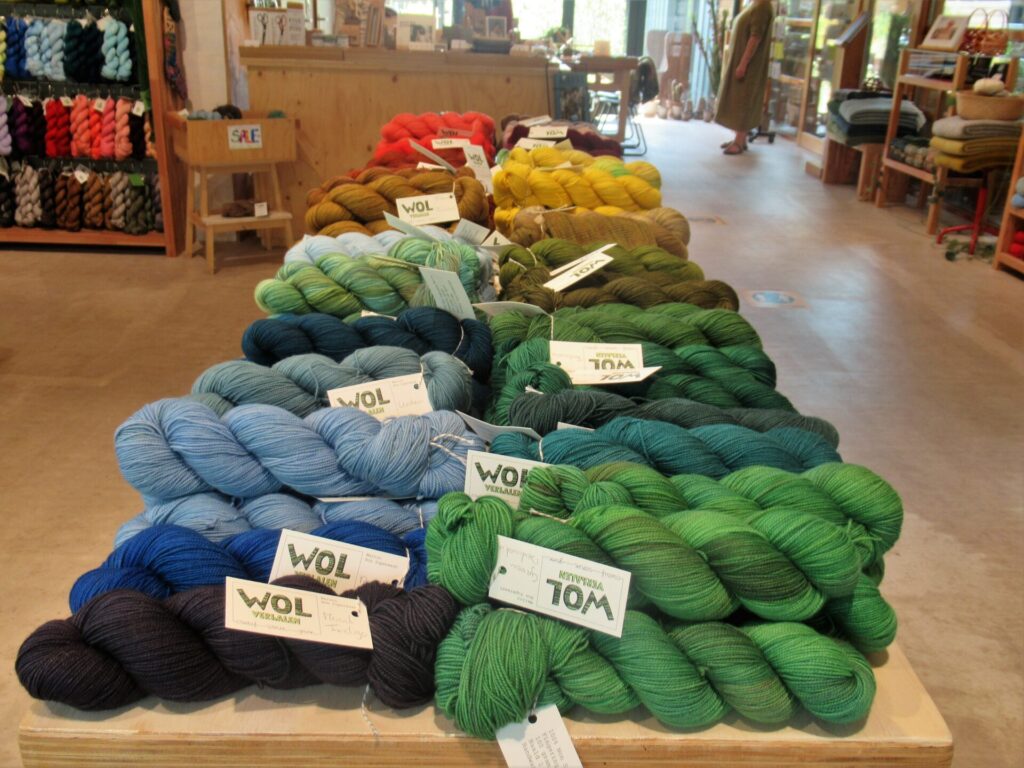
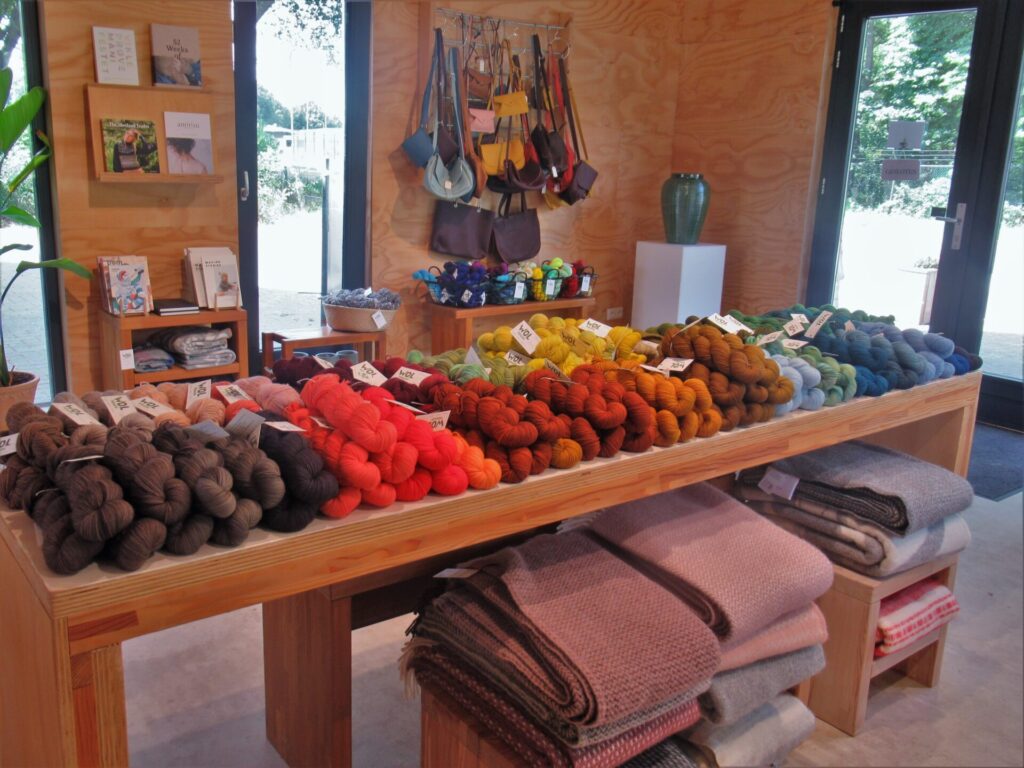
Choose non-superwash yarns for items that do not need frequent washing. Some people say that non-superwash yarns have less saturated colours than superwash ones, but I find that hard to believe looking at these yarns from my nearest indie dyer.