Pale, medium and dark grey, with a some clear blue thrown in now and then – that’s February skies. For people in the Southern hemisphere, like some of my relatives and friends, it’s a different story, of course. But if you’re in the North and tired of dreary days, I hope this blogpost will work as a spot of colour therapy.
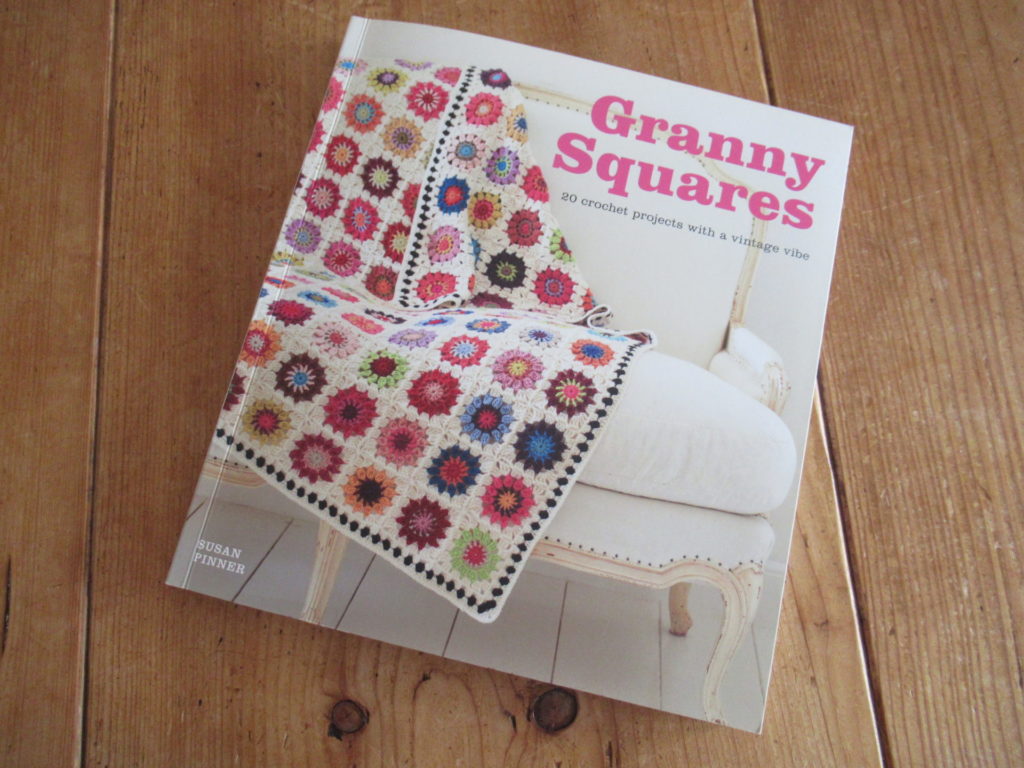
A long time ago, I bought a big bag full of alpaca yarn. Single balls in many different colours and some neutrals to offset all that brightness. I was going to crochet a granny square blanket, something like this:
After crocheting just a few squares I realized that the yarn wasn’t suitable. At least not to my taste. It had zero elasticity, which meant that it lacked the squishiness and coziness factor that a blanket needs. It was also very smooth and slippery, and I was afraid that all those woven in ends would soon unravel.
I put the yarn away until I had a better idea for it.
Many years later, I thought of starting an ‘in-between-projects project’ – something simple to knit while I was finishing another project, to prevent that from becoming a UFO. Something that I could easily put aside when I was ready to start something new, and pick up again when that was at the finishing stage. It needed to be rather boring, or I would still be in danger of creating more UFOs.
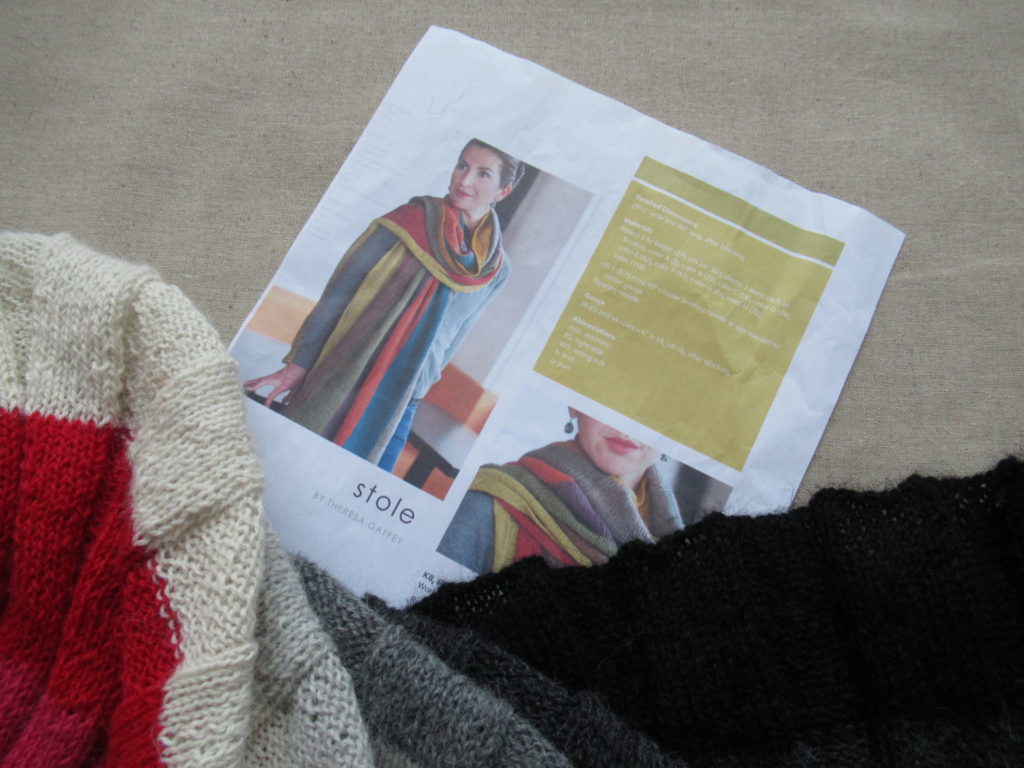
I chose this pattern:
It is simply called ‘Stole’ (Ravelry link) and was designed by Theresa Gaffey. Basically it is no more than a huge expanse of ribbing. My alpaca yarn would be ideal for it – nice and drapey. There wouldn’t be too many ends to weave in that could come undone. And I had many colours to choose from.
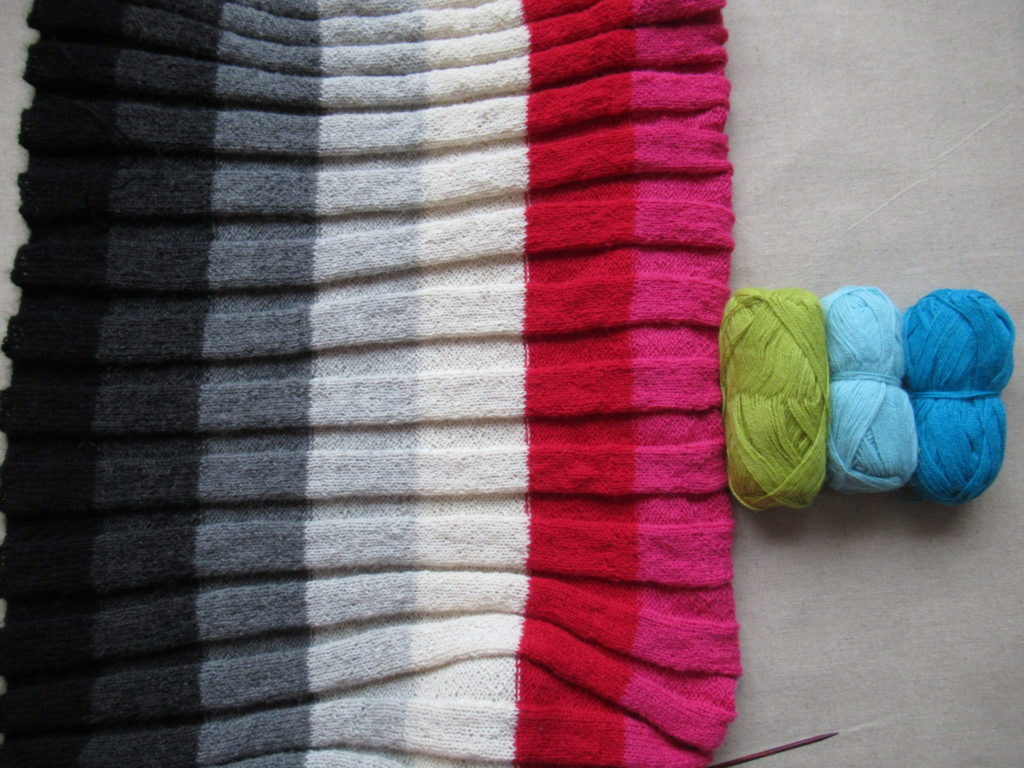
I thought it would be nice to do one half in neutrals (black and greys) and one half in cheerful colours. This was my original colour choice:
But when I was on to the last colour but one, I wasn’t happy. The medium pink looked ‘dirty’ beside the bright fuchsia, and the whole thing seemed out of balance. So I tried out all kinds of alternative colour combinations, always keeping the neutral half intact.
I tried some very bright colours next to the original red and fuchsia. Cheerful, and a lovely contrast with the neutral half…
… but not really ‘me’.
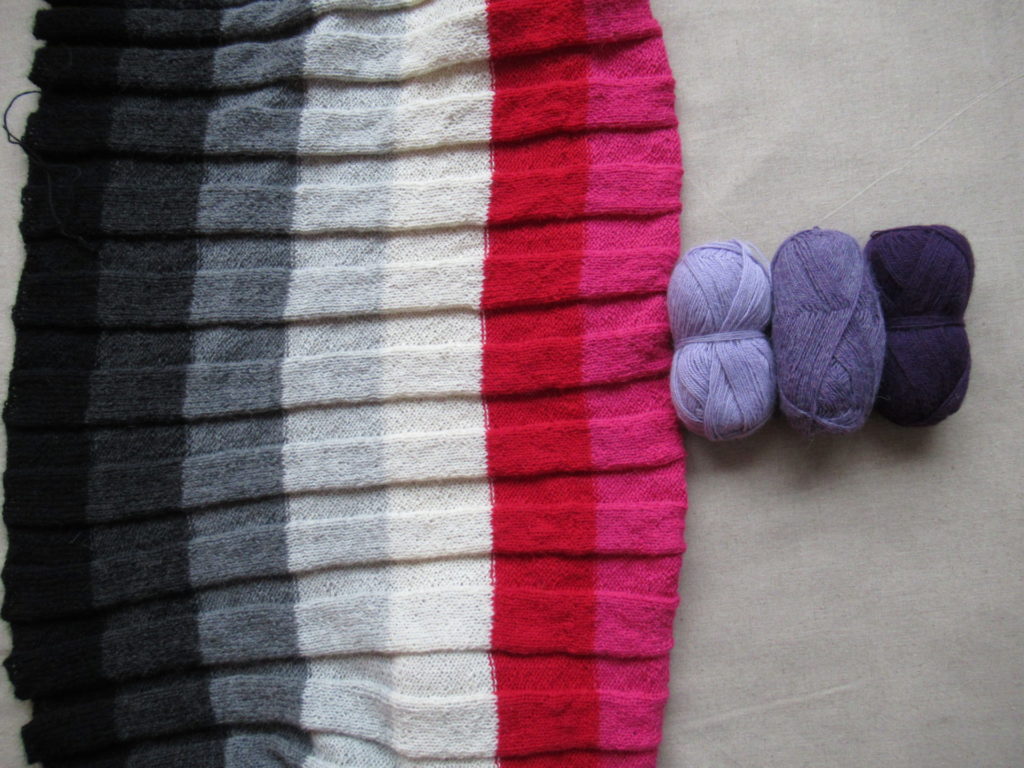
Some purples next to the red and fuchsia then?
Not bad, but not great either.
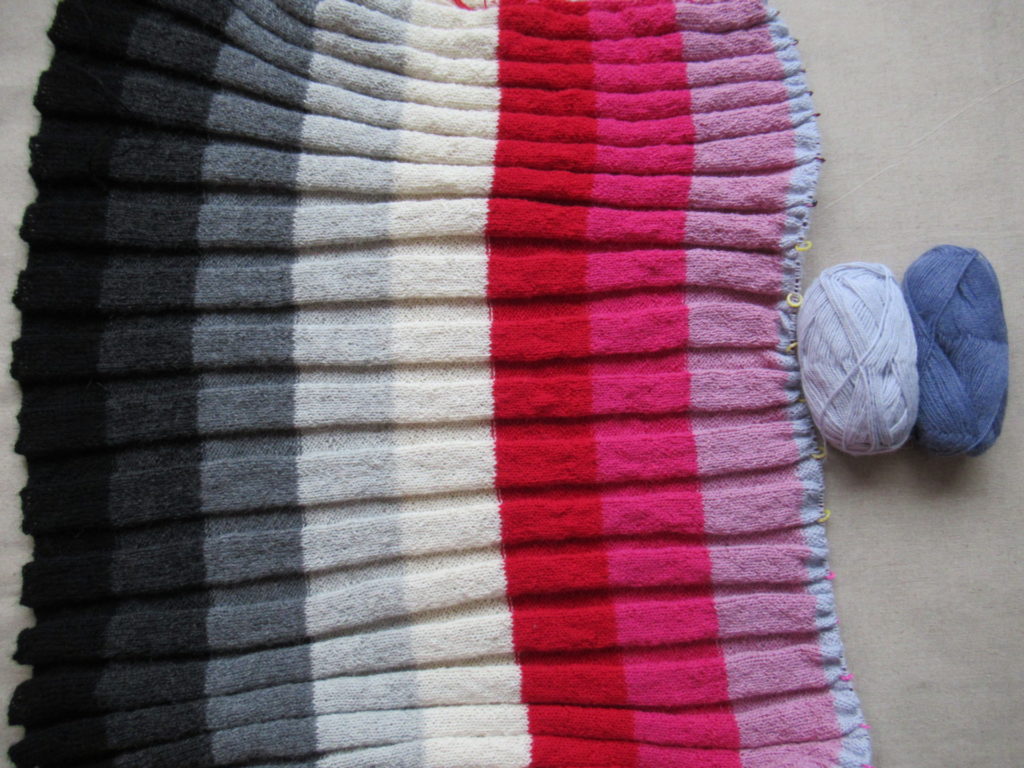
Okay, what if I ripped out the red, fuchsia and pink entirely? That would mean many, many hours of knitting down the drain (there were 400+ stitches on my needles), but I didn’t mind. This wasn’t about finishing something quickly.
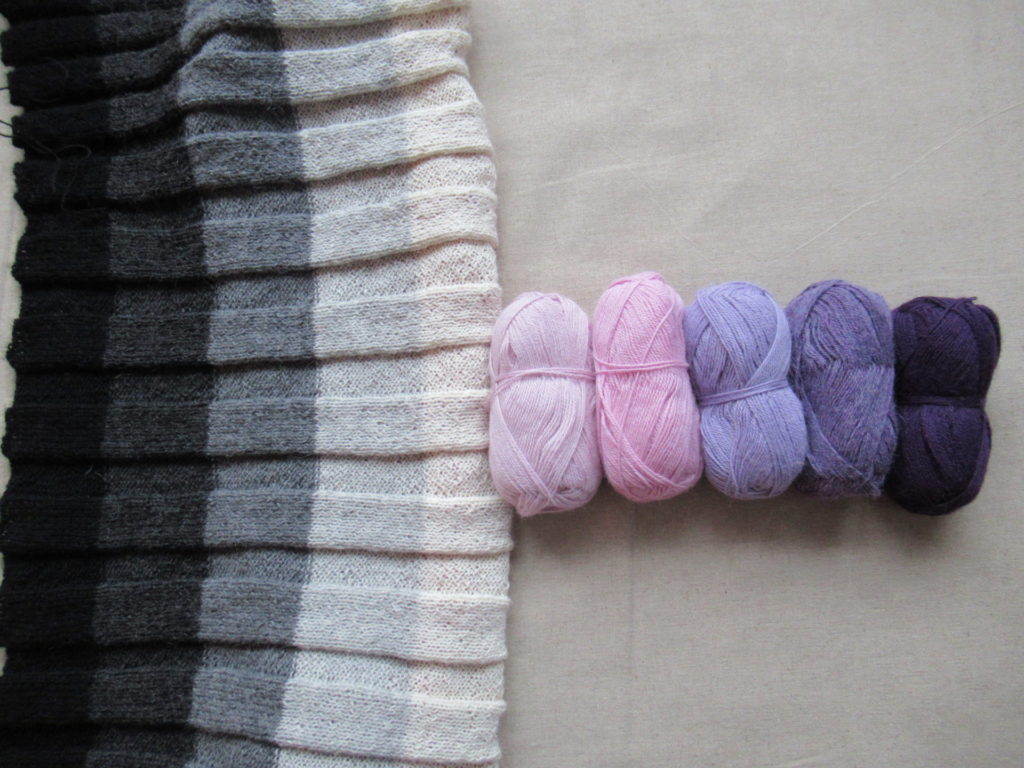
So, what if I chose a gradient of pinks and purples, mirroring the gradient of neutrals?
Nice. Well- balanced. But I wasn’t in love with it.
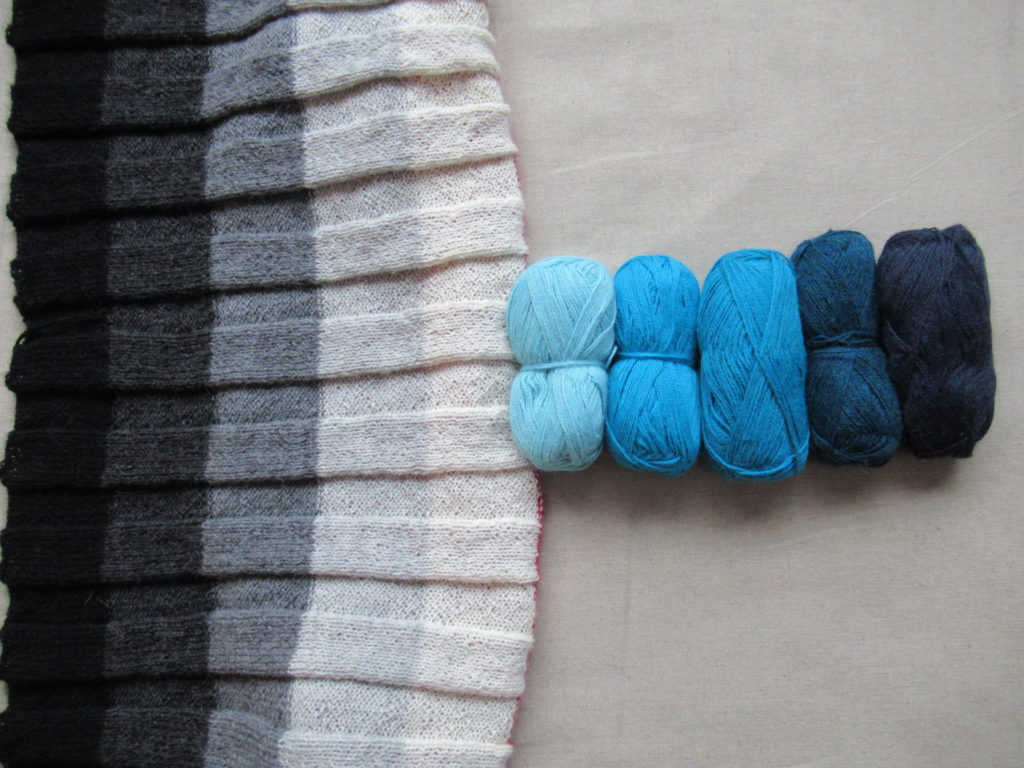
How about a gradient of blues instead?
Ahhh, yes, that felt good. But, really, blues again? Very predictable and not very exciting.
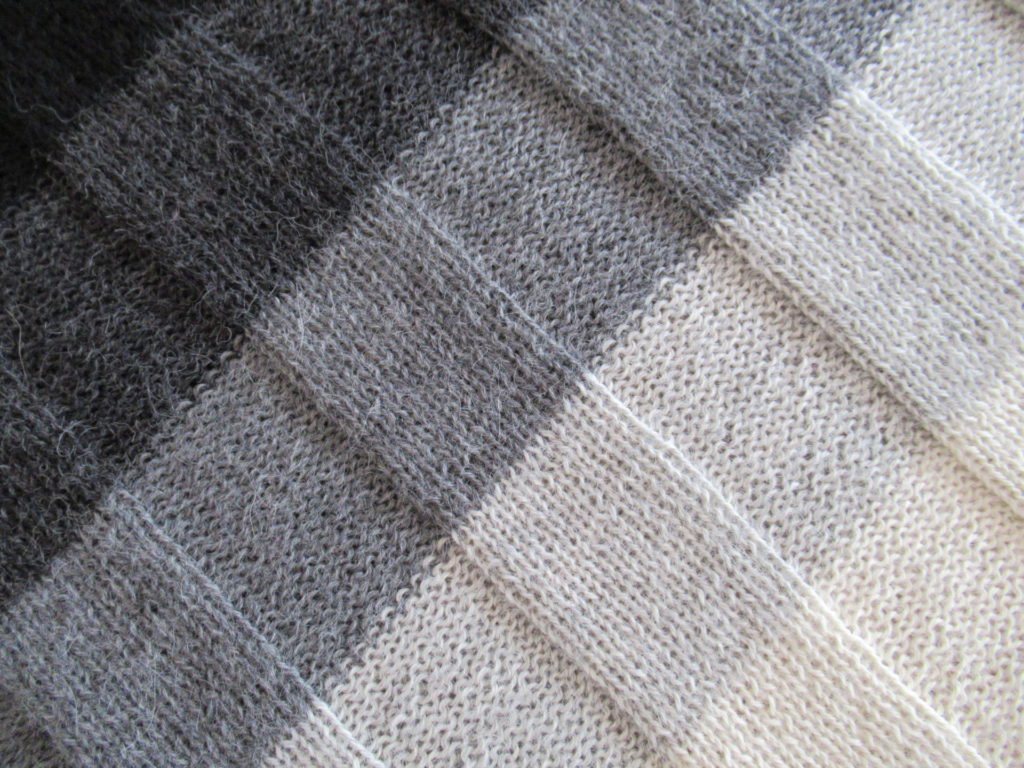
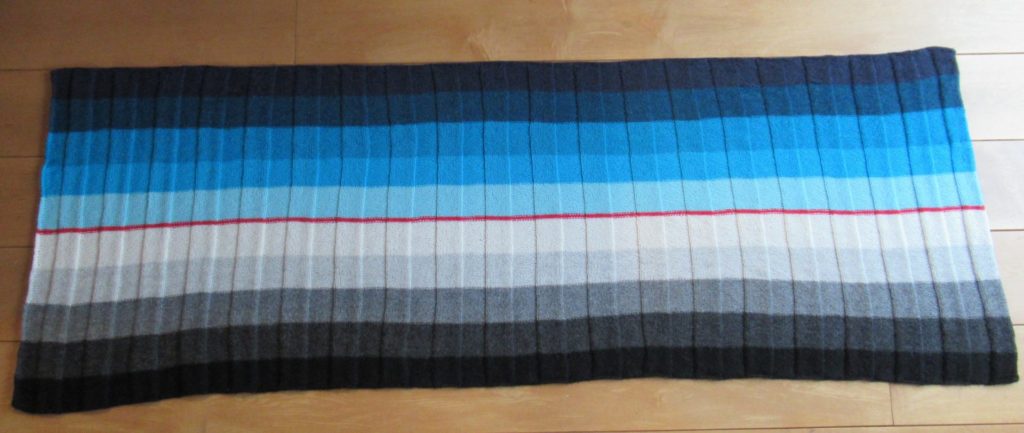
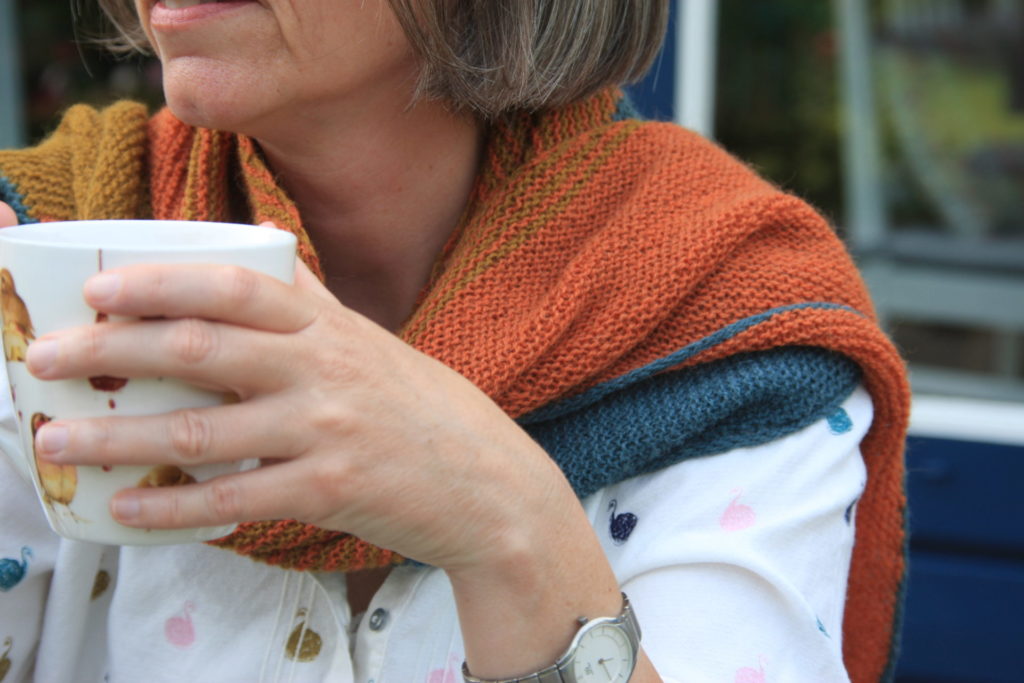
In the end I went with the blues anyway. I ripped the stole back almost entirely to the neutrals, but decided to make it a little more exciting by leaving in a very narrow band of red.
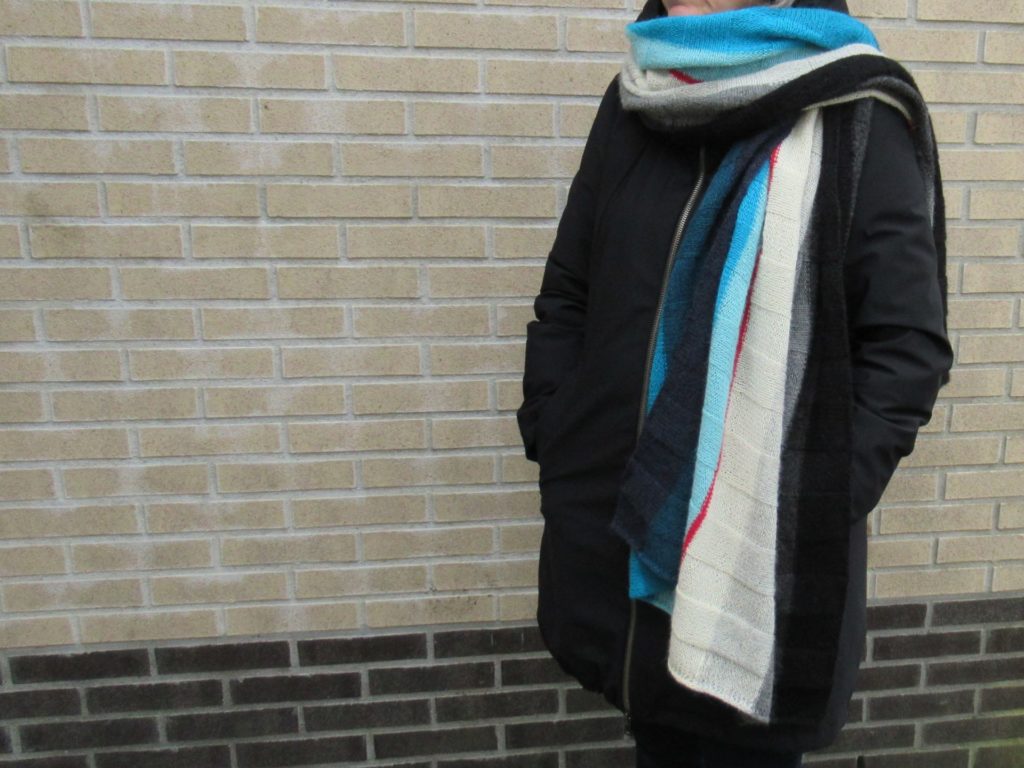
Here is Theresa Gaffey’s Stole finished: (I wasn’t feeling very photogenic and cut my head off. Don’t worry – just in the photo.)
Well, it is no longer Theresa Gaffey’s stole, but very much mine. I used her pattern as a starting point, but cast on more stitches, made the ‘ribs’ several stitches wider, added I-cord edges, chose a very different colour combination, and used 11 colours instead of her 9.
That’s one of the nice things about knitting. You don’t need to be hugely creative to make a project your own. Just choose different colours, tweak a few details if you like, and you end up with something unique.
With its 0.70 by 2.20 m / 27’’ by 87’’ it is a huge stole – almost a blanket.
I didn’t use blocking wires to stretch the knitting out. I just soaked the stole in a no-rinse detergent for 30 minutes and put it in the spin-dryer. Then I stretched it out on the floor, using my hands to smooth and stretch the knitting as much as possible. As an alternative it could be stretched out on a bed, or perhaps even folded double and stretched out over a drying rack. Warning: Some colours may bleed!
Now I still have more of the alpaca left.
Would I like to make another stole like this? Hmmm, maybe later. I loved the meditative nature of this project. And my idea behind it seemed to work – I haven’t created any new UFOs for quite a while. (I haven’t finished any old ones either, but I’m working on that.) But I think I’ll first choose something else as my next in-between-projects project.
‘Pssst! Hey! Take me home with you!’ the ball of yarn in a gradient of blues whispered. It happened at our regional annual crafts fair. ‘I don’t think so,’ I said, ‘You’re far too expensive, and what would I do with you?’ The yarn ball wasn’t impressed. It kept up its insistent whispering, and after walking around it for about a dozen times, I said, ‘Okay, I surrender. I can’t deny that you’re gorgeous, and you can come home with me.’
It would have been so nice to tell you a romantic and poetic story about the inspiration behind Morbihan, my new shawl design. About how I was inspired by the sea – by its myriad shades of blue and its waves lapping the shore. But you may already have gathered from my previous post that it didn’t work that way. It was the other way around. It was the yarn itself that made me make this shawl, and it was only later that I made the connection with the sea.
The yarn that seduced me was Lang Yarns ‘Puno’, a blend of wool, alpaca and silk. What I love about this yarn is, first of all, its gorgeous colours, and also its drape, its softness and its subtle sheen.
And after knitting and blocking, I noticed how beautifully the lighter bits of this semi-solid yarn undulate along with the waves of the lace pattern, especially in the simple stocking stitch sections of the shawl.
This yarn cost € 49.90 for a single ball (or rather ‘cake’). Gulp! Granted, it was a generous 200 grams and 800 metres, but still… Not exactly a bargain.
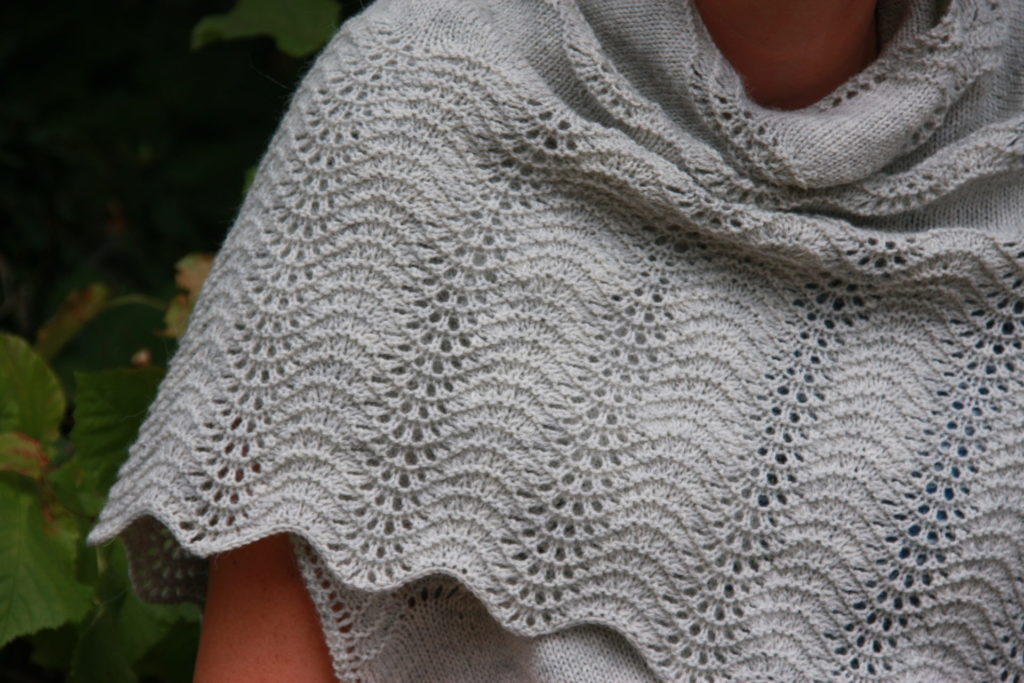
Because I didn’t have any spare yarn for swatches (I wanted to use up all of this precious yarn for my project), I first tried out my ideas with some yarn scraps. When I had a clearer picture of what I wanted to make, I still hesitated about using the Puno. I didn’t want to spoil the yarn by ripping out my efforts several times. So, I bought some inexpensive yarn for a trial version, and it looks like this:
This is Drops ‘Flora’, a blend of wool and alpaca, with a similar weight/metreage ratio as the blue yarn – four 50 gram balls of this yarn are the equivalent of one ball of Puno. This was a bargain. I bought 4 balls with 30% off for the grand total of € 7.44.
Although this was only meant as a trial version, it has become a lovely shawl in itself. What I like about this yarn is its woolly cosiness and how beautifully it shows the lace pattern.
And it didn’t end there. After I’d decided to publish the Morbihan pattern, I wanted to make absolutely sure that there weren’t any errors in it, so I decided to make another one to check it.
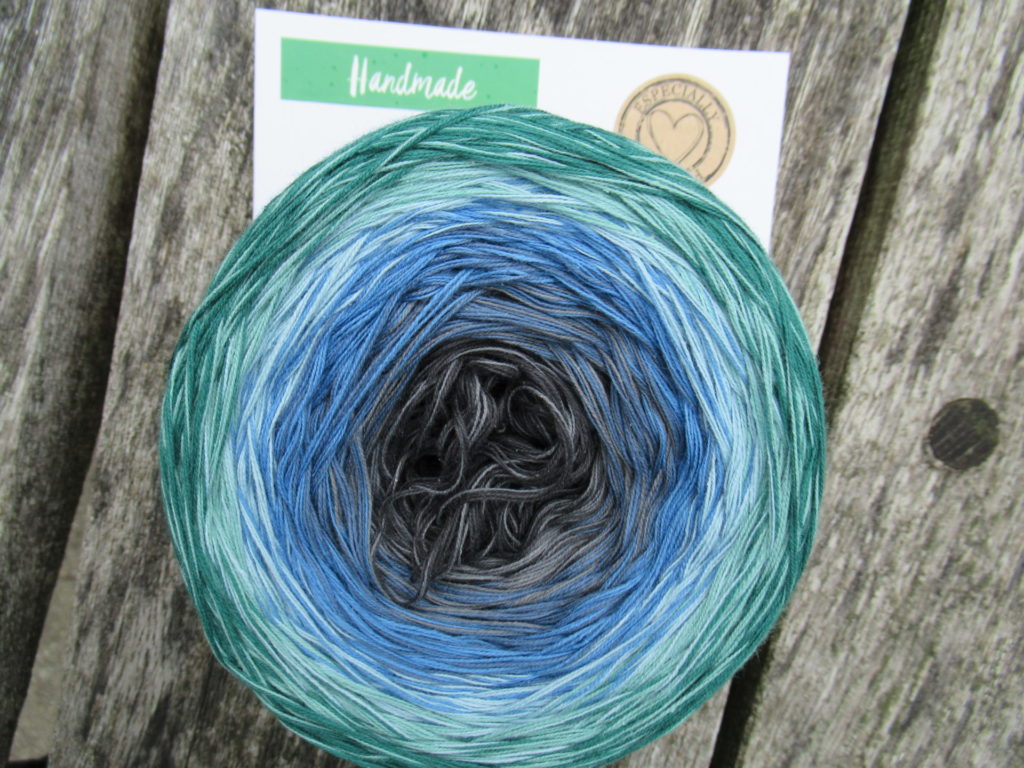
This time I used a cotton yarn. I wouldn’t normally choose cotton for a shawl, but during a very hot period this summer, I started looking for yarns that wouldn’t stick to my hands and found this. I don’t know if your screen is big enough to read it, but the card behind the yarn cake says ‘handmade’.
Huh, handmade? Yes, this yarn cake really is handmade! And it’s organic too!
Saskia, the owner of Wol zo Eerlijk, a yarn shop specializing in fair trade, organic and otherwise sustainable and animal friendly yarns, makes these yarn cakes herself. She combines several threads of a very thin cotton yarn and winds them into fabulous colour gradients. There are over 25 colourways to choose from.
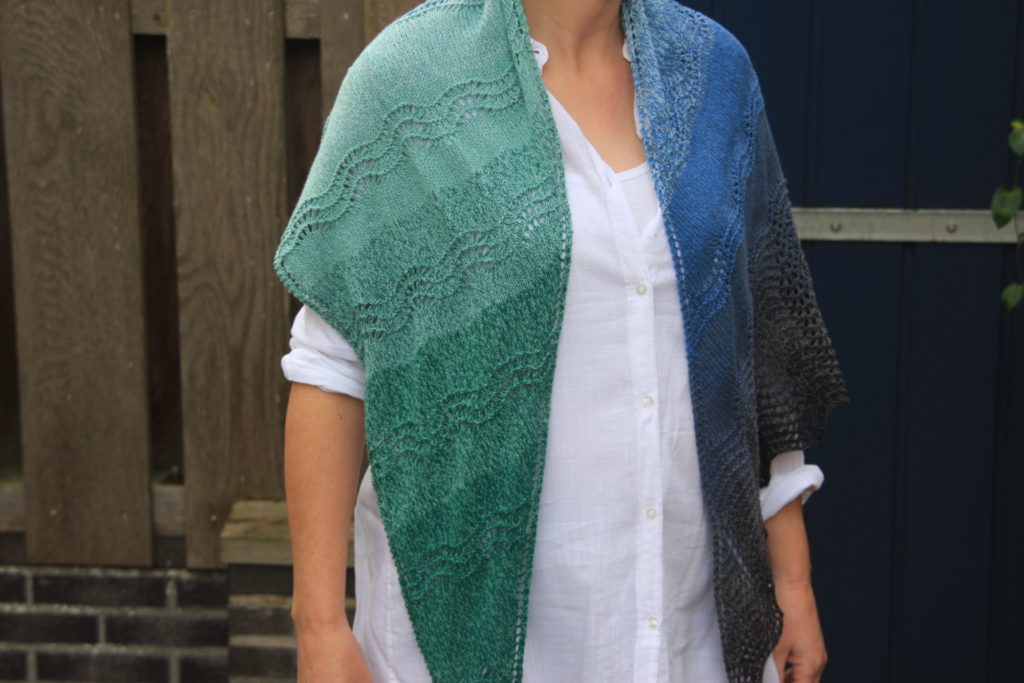
The colourway I chose is called Planet Earth, and goes from a medium green through blue to almost (but not quite) black.
The thin threads that the yarn is made up of, are not twisted around each other, and I was a bit concerned that the yarn would be hard to knit with. I expected to stick my needle between the threads and miss one or two here and there, but personally, I didn’t have any problems.
Because this yarn is handmade, the cakes do not all have exactly the same weight. The ball band says ‘approx. 225 grams’, but mine was 235 grams. This meant that I could add quite a few extra rows to the border (the pattern explains how to do this) and it has become quite a big shawl.
At € 29.95 per cake, this yarn is rather more expensive than that of the grey Morbihan. But considering that it is handmade and organic, and has a generous metreage, I think it really is a bargain, too. It would be an ideal choice for warmer climates, vegans and people allergic to wool.
Well, those are my three versions of Morbihan. I think it will work in almost any yarn – cotton or cashmere, sheep’s wool or silk, viscose or vicuña, alpaca or acrylic… Wait, no, not acrylic! That’s about the only yarn type that I wouldn’t choose. I don’t think it’s very suitable for lace knitting, because it will bounce back after blocking.
Should you decide to make your own Morbihan, in whatever yarn takes your fancy, I wish you happy knitting!
Note: This post isn’t sponsored in any way. The descriptions of the yarns are based on my own experiences with them, and represent my own honest opinions.
Hello! Good morning, good afternoon or good evening, depending on where in the world you are and when you can find a moment to read this.
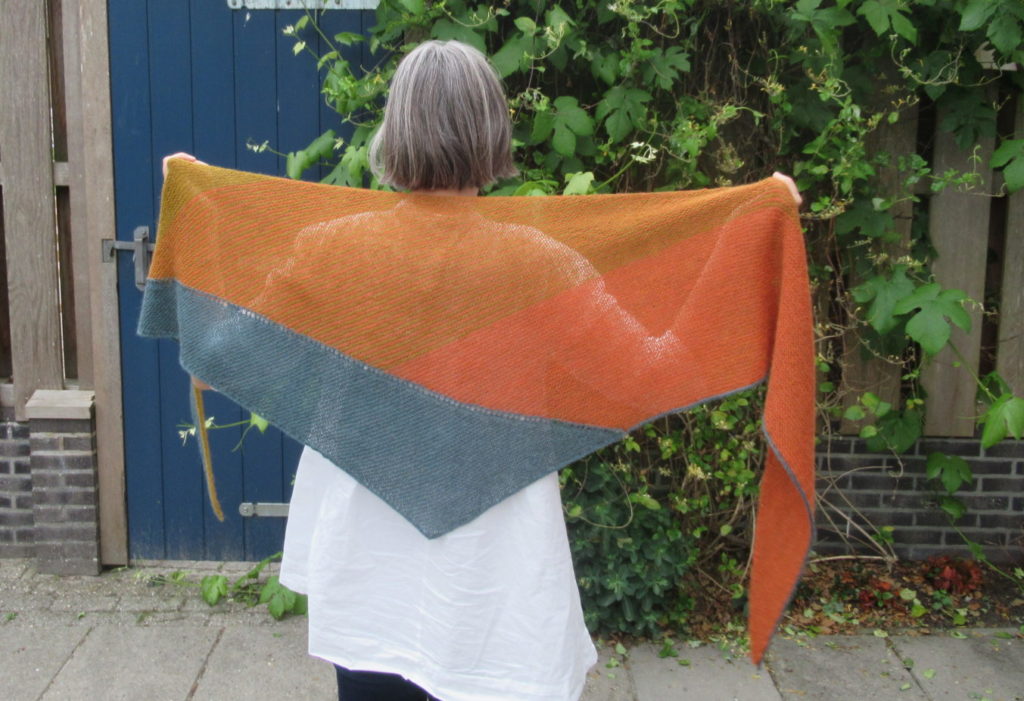
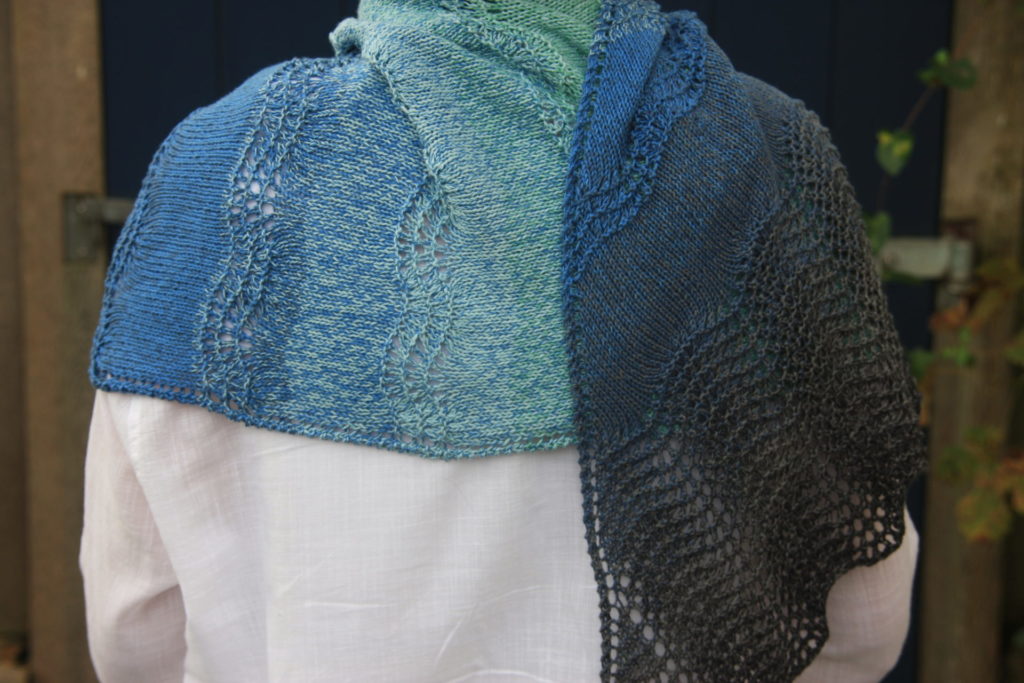
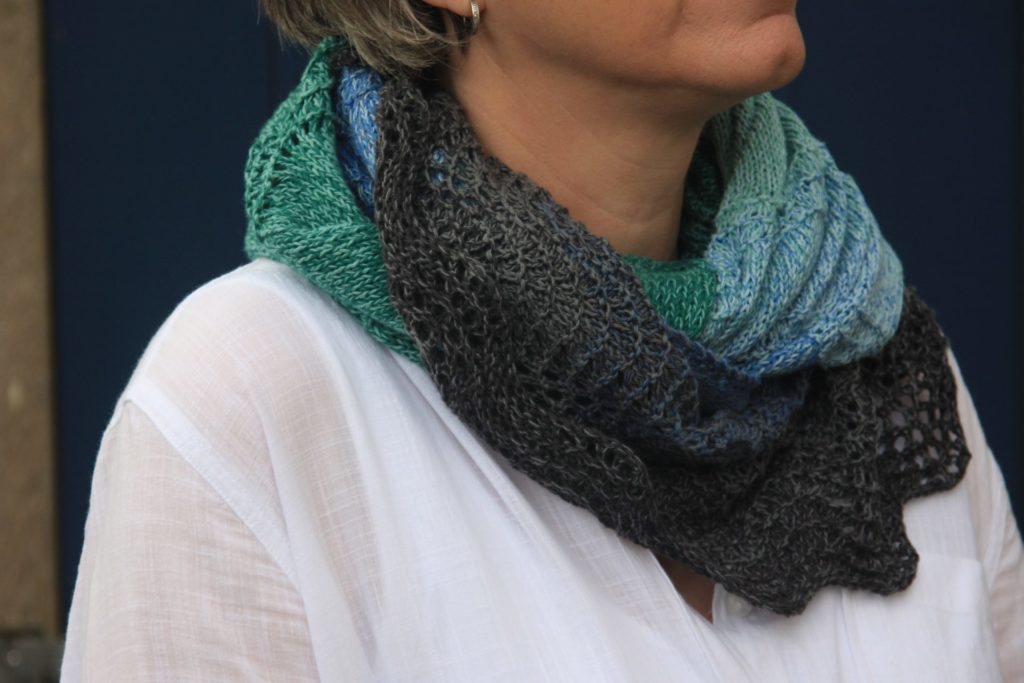
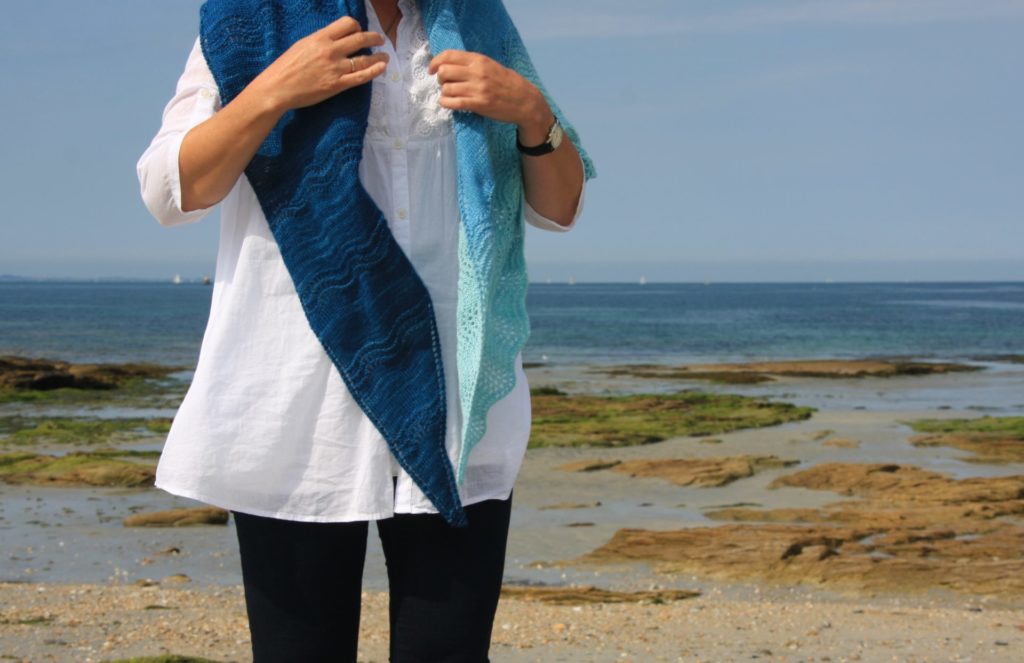
Today, I’d like to tell you about a shawl I’ve designed. I’ve called it Morbihan. As you can see, it’s an asymmetrical triangle, and it is knit in a combination of stocking stitch and a traditional, wavy lace pattern.
But before I tell you more about the shawl itself, I’d like to tell you how it came by its name.
I designed and knit the (then nameless) shawl in the early summer of 2018, months before I started this blog. I made it for myself, but at the back of my mind was the thought, ‘Who knows, maybe I’ll publish the pattern someday.’
That summer, were going to spend our holiday on the south coast of Brittany, France, and while I was packing I decided to add the shawl to my suitcase for chilly evenings. We were to spend part of our holiday in the region of Finistère, and part of it in the region of Morbihan.
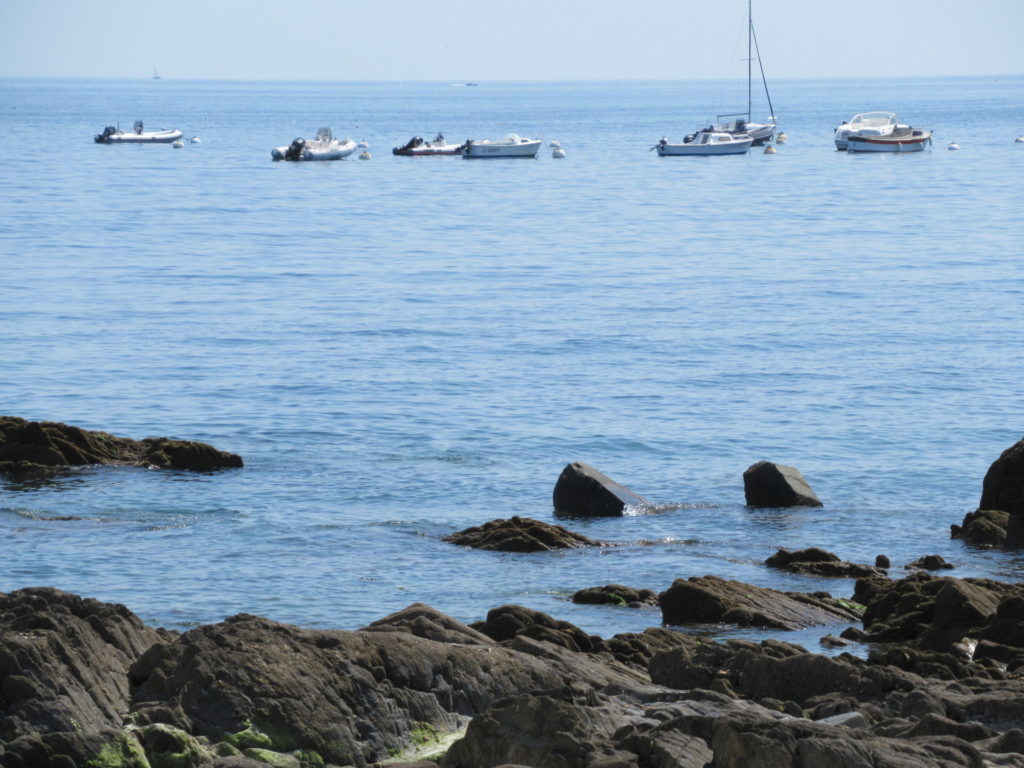
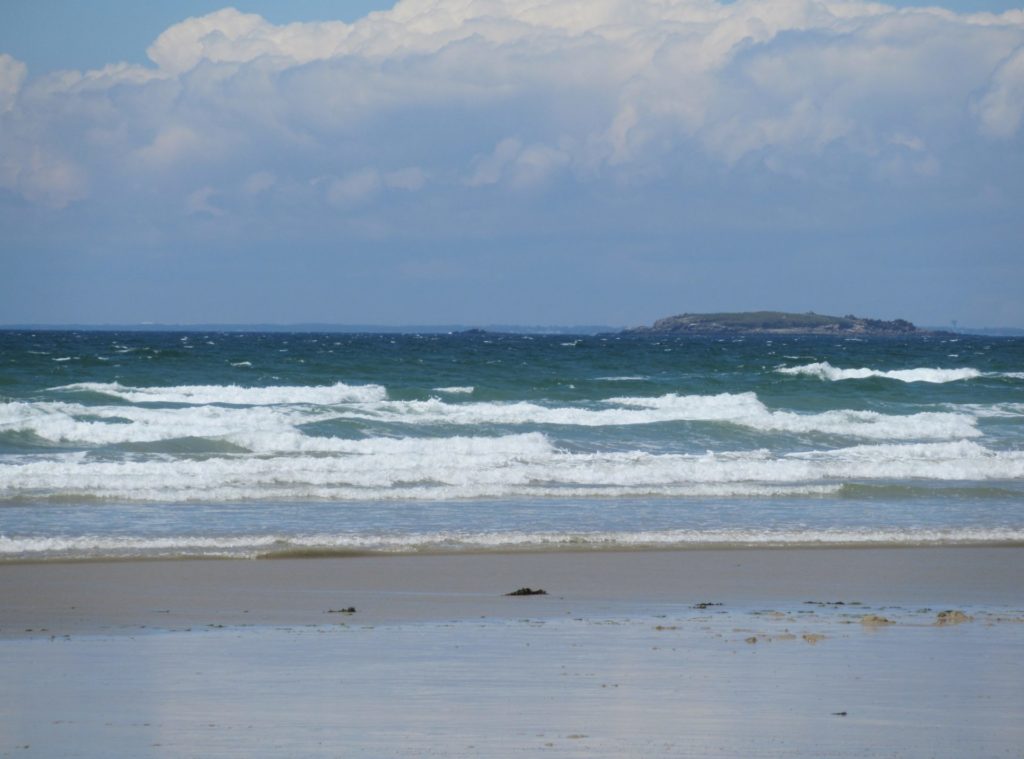
The coastline over there is so, so beautiful, especially that of Morbihan. There are rocky stretches…
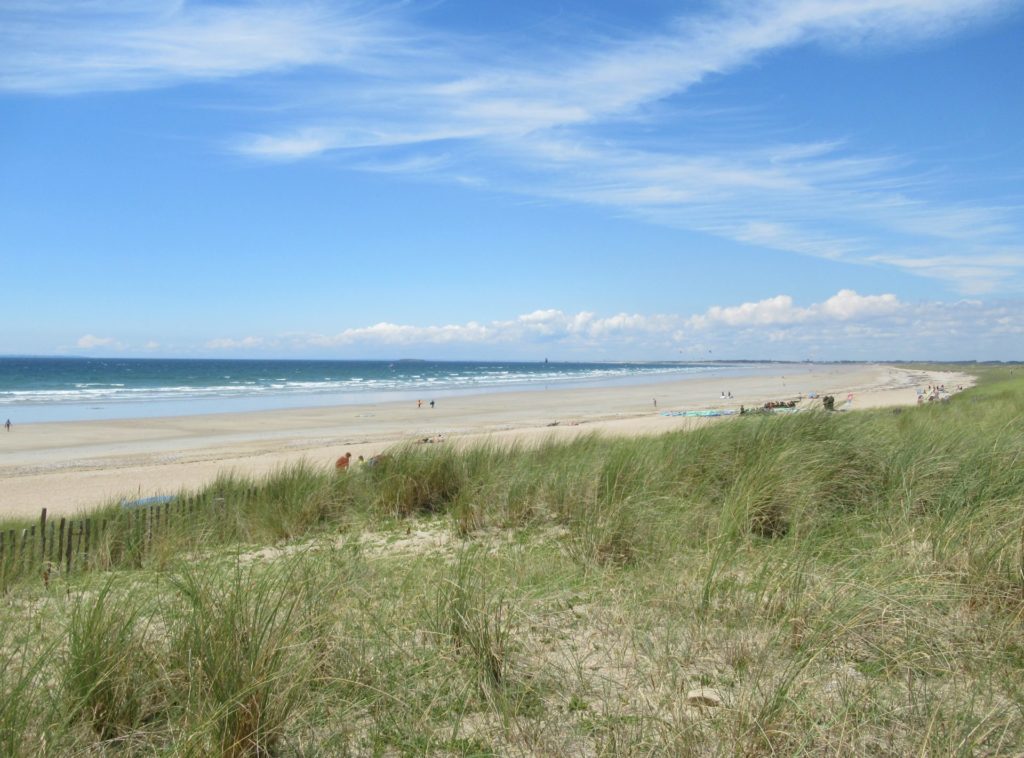
… as well as wide, white sandy beaches.
In the Breton language the gulf of Morbihan, which gave the region its name, is called Ar Mor Bihan, meaning ‘the little sea’.
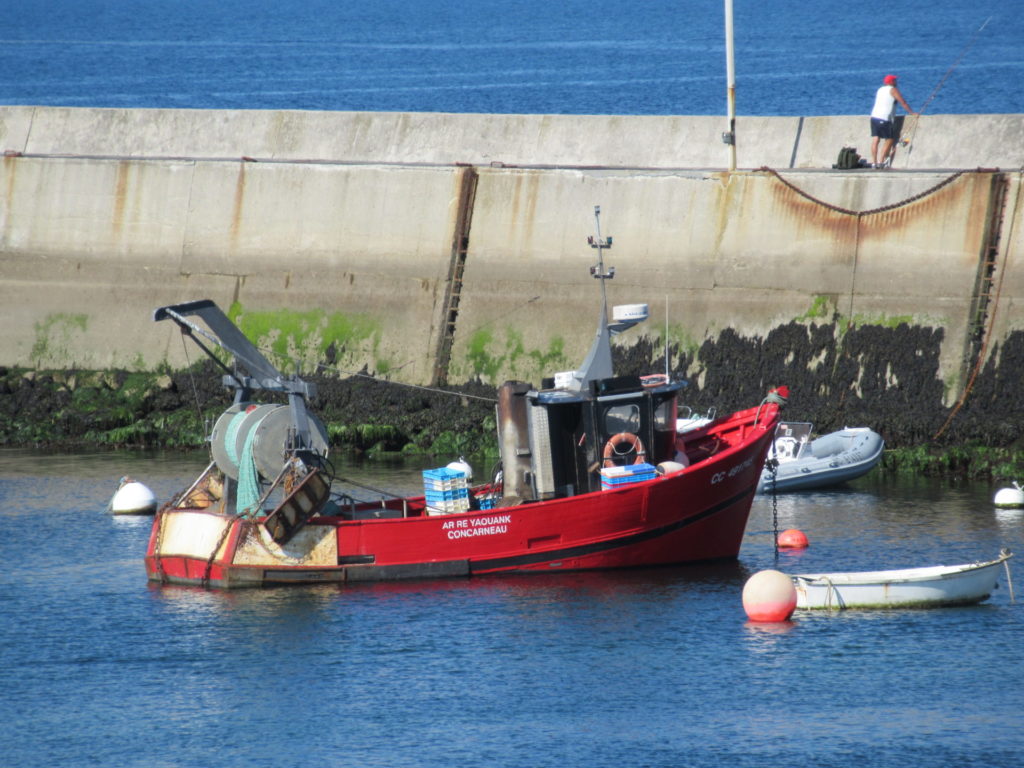
What I love most of all about the coast in this part of France, is the clear light and the vibrant colours. Very different from the generally more muted colours of my own country. The bright red of a fishing boat…
… but especially the many, many shades of blue. The translucent blue of the sky. A blue shutter on a white building. And the ever changing blues of the sea, of course. Sometimes pale and in stripes…
… and sometimes a much darker blue shading to turquoise.
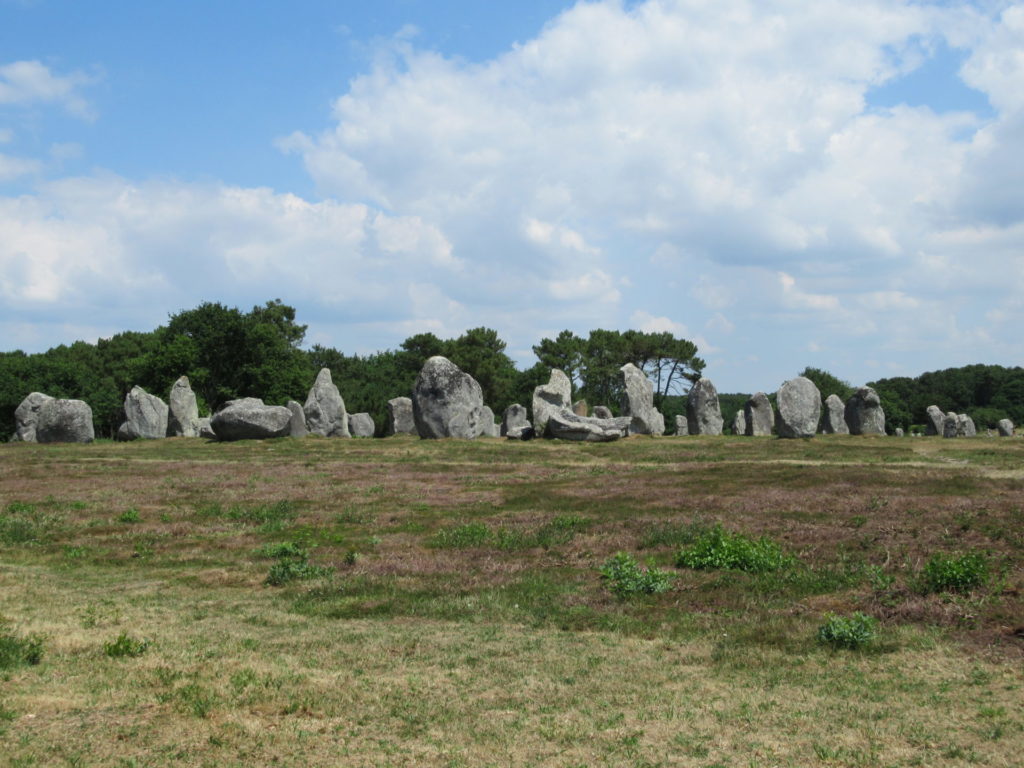
We didn’t spend our entire holiday staring at the sea, though. While we were there, we just had to pay a visit to the famous standing stones of Carnac. The sheer number of upright stones, all neatly arranged in rows pointing in the same direction, is amazing.
There were some interesting museums and galleries, and we also visited a stately manoir, with a granary (below) that was even more beautiful than the house itself.
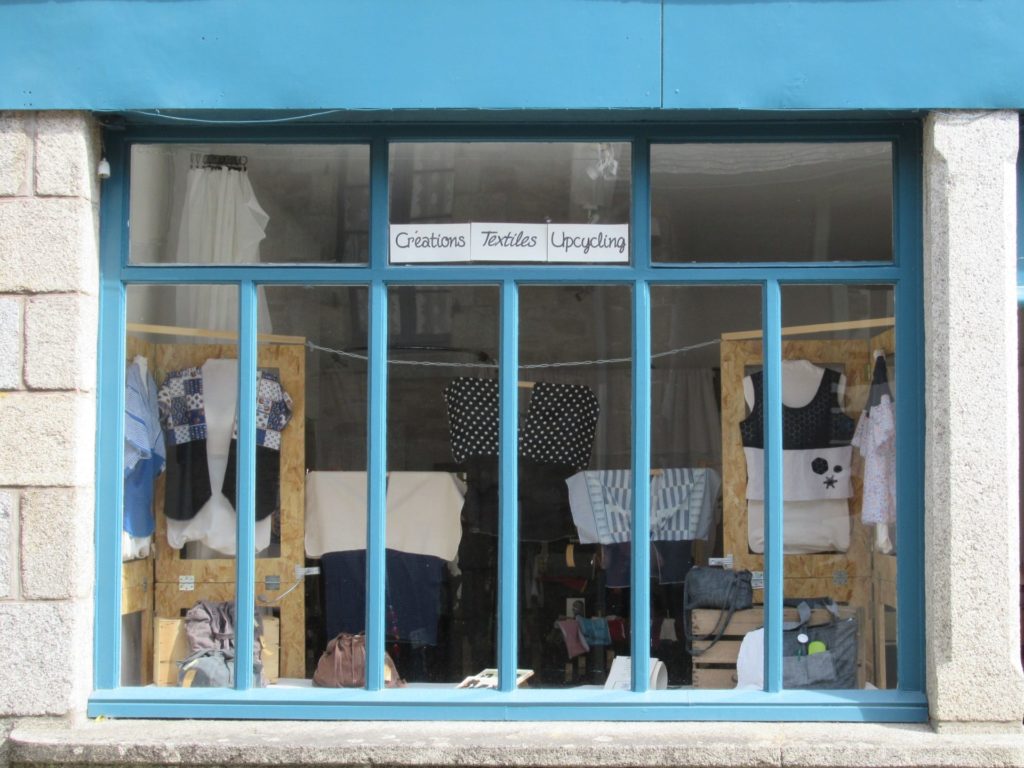
And then there were the delicious thin pancakes called crêpes, the tempting restaurants, and the lovely fishing villages. In one of these villages I took this picture of a shop window:
It’s an ‘upcycling’ shop, where they make and sell wonderful creations from second-hand clothes. Here, too, it was all about blue.
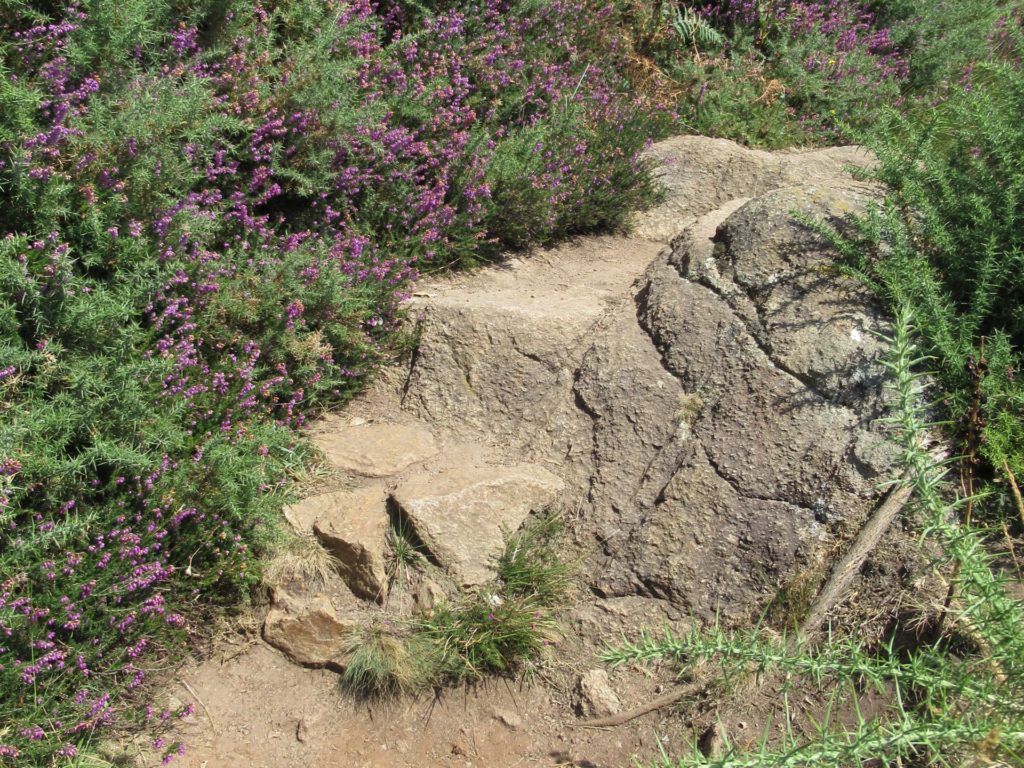
But, all in all, we spent most of our time on the coast, either walking along the coastal path
or strolling along the beach, camera in hand, taking pictures of the sea, rock pools and birds, and just soaking up the sun and gazing out over the sea.
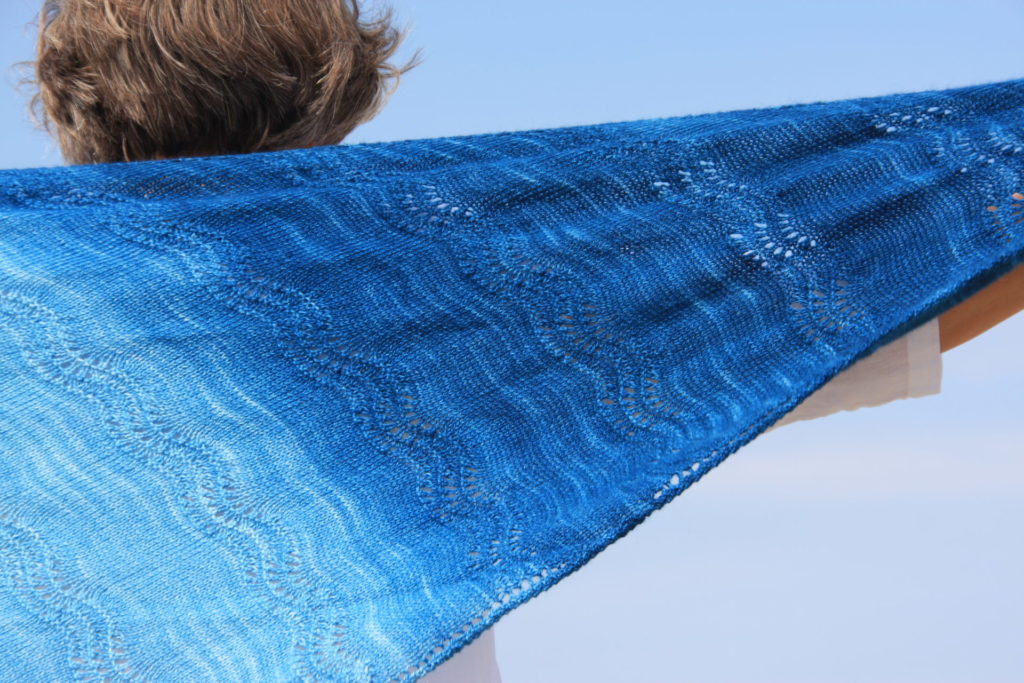
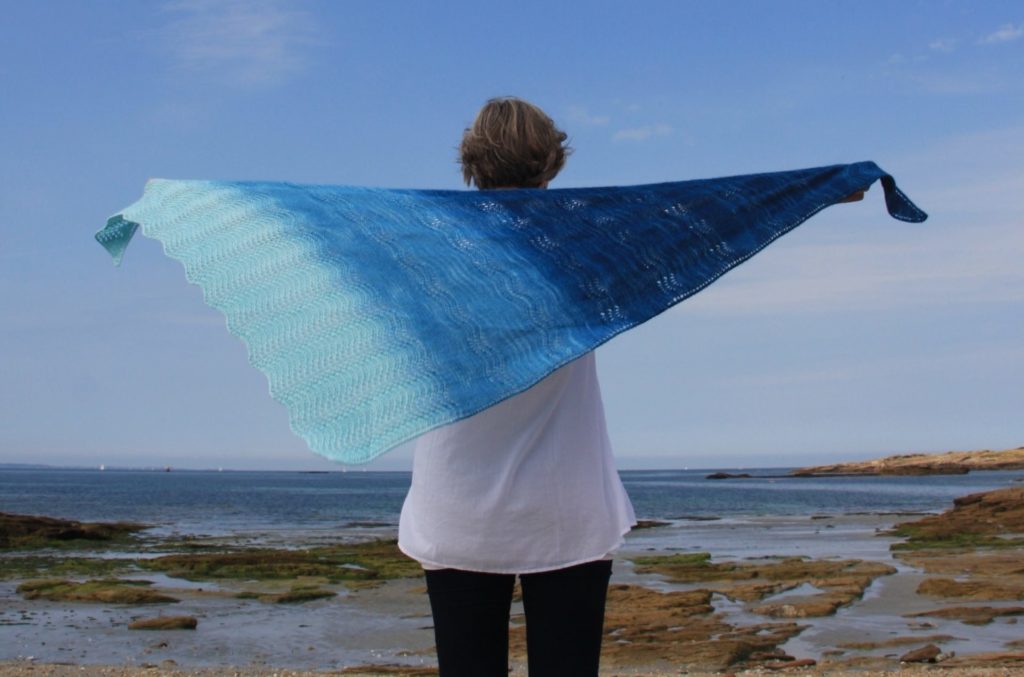
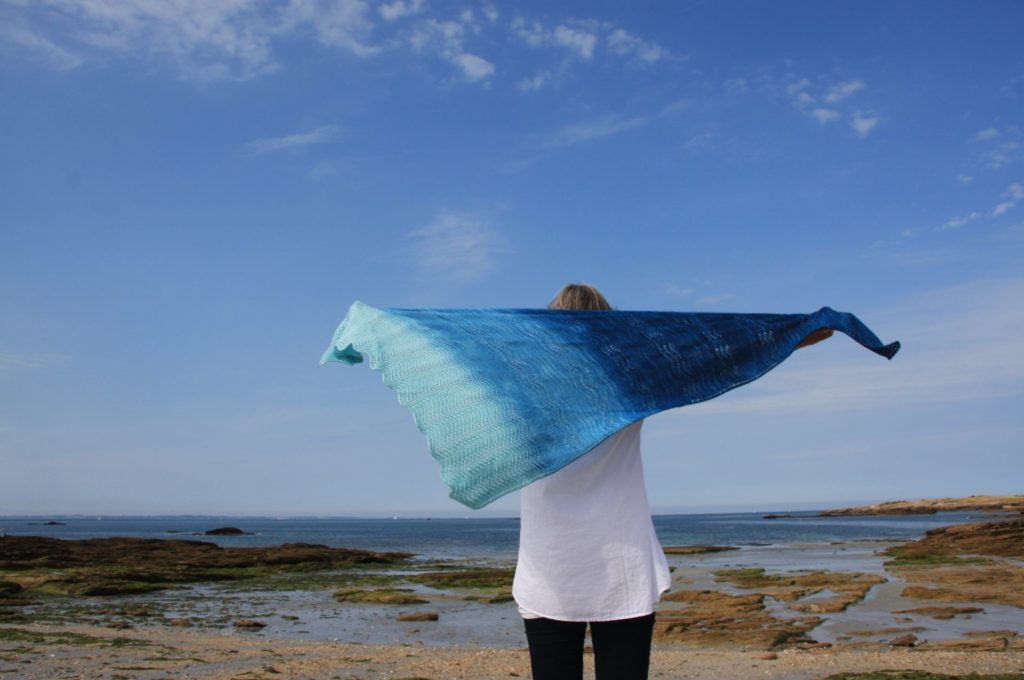
On one of these beach days, I asked my beloved private photographer to take some pictures of my shawl. You’ve already seen it in its entirety at the top of this post, but here’s another picture of it fluttering in the sea breeze.
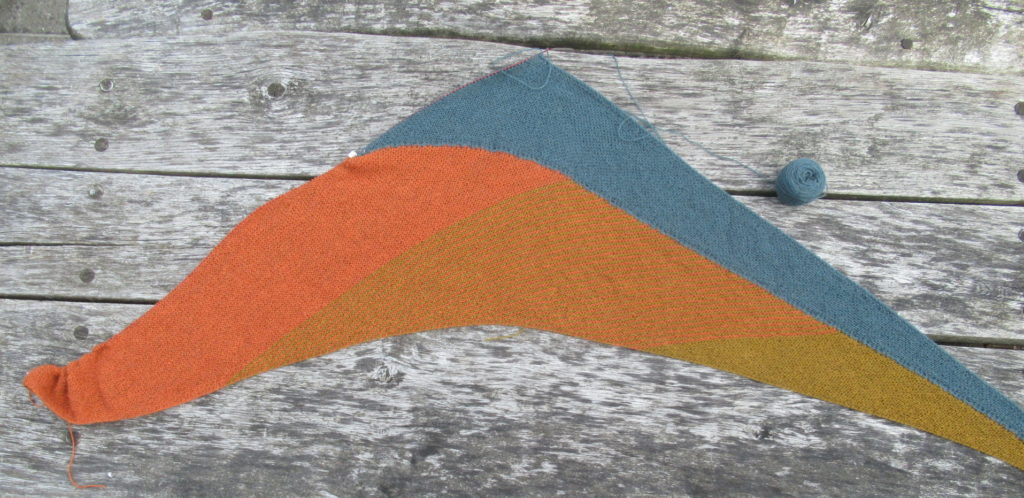
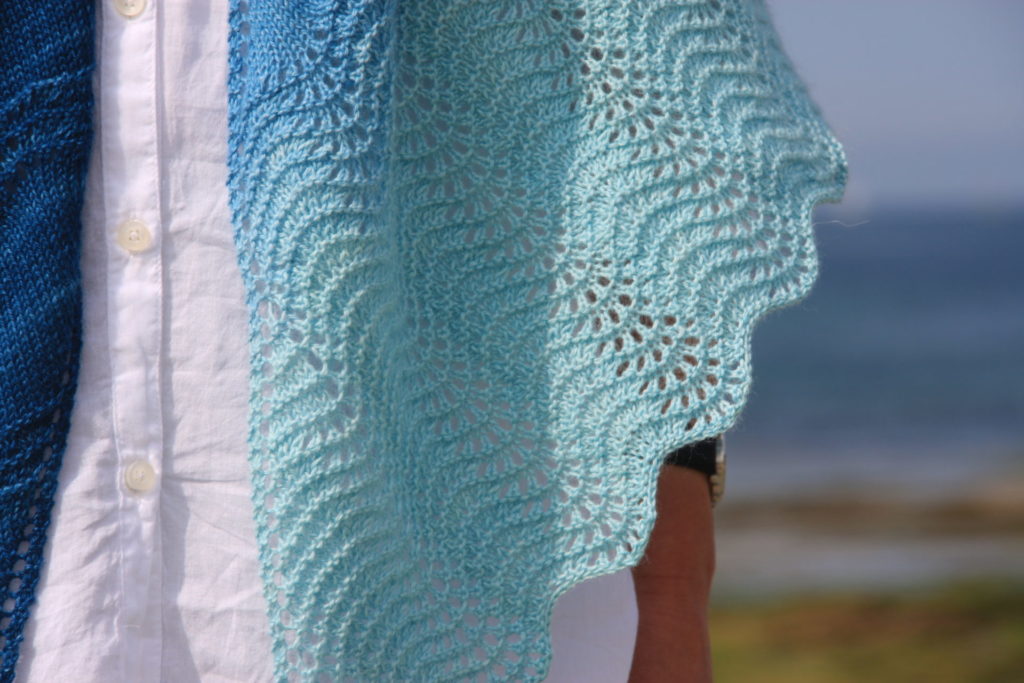
The triangle starts with just 3 stitches and gradually grows wider with increases along one side. The lace pattern I’ve chosen is an all-time favourite called Old Shale. The body of the shawl consists of stocking stitch sections alternating with sections in Old Shale, and it ends in a border knit entirely in the wavy lace pattern.
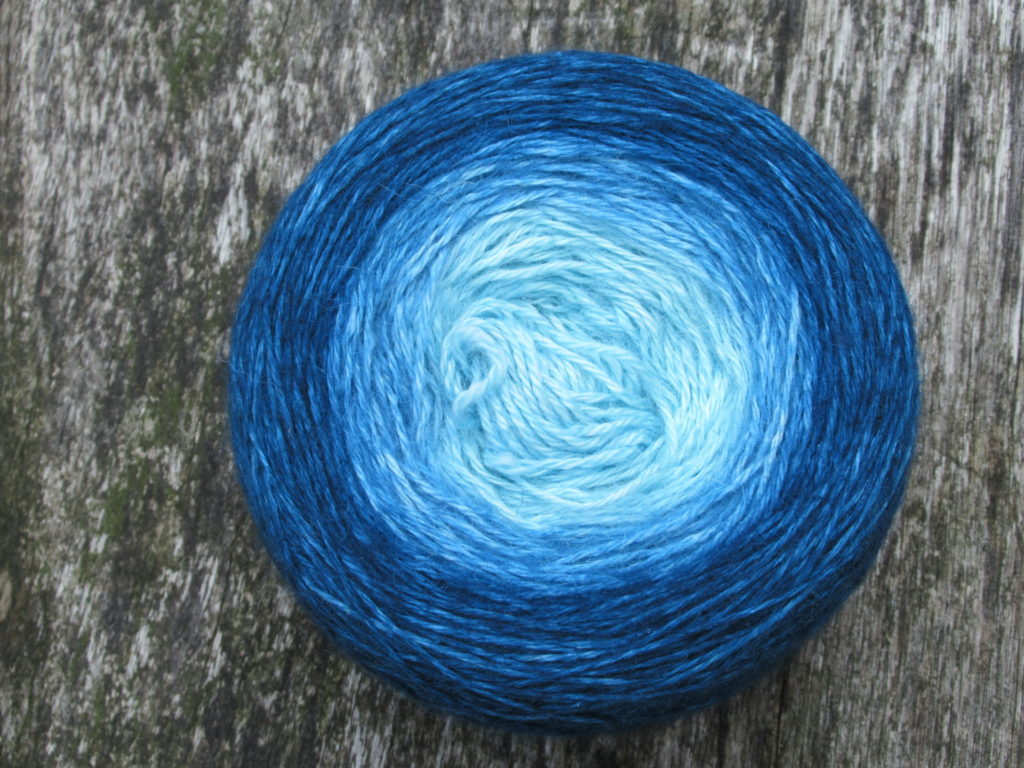
I used a yarn in a gradient of blues, from a deep sea blue at the narrow end to a pale turquoise at the wide border.
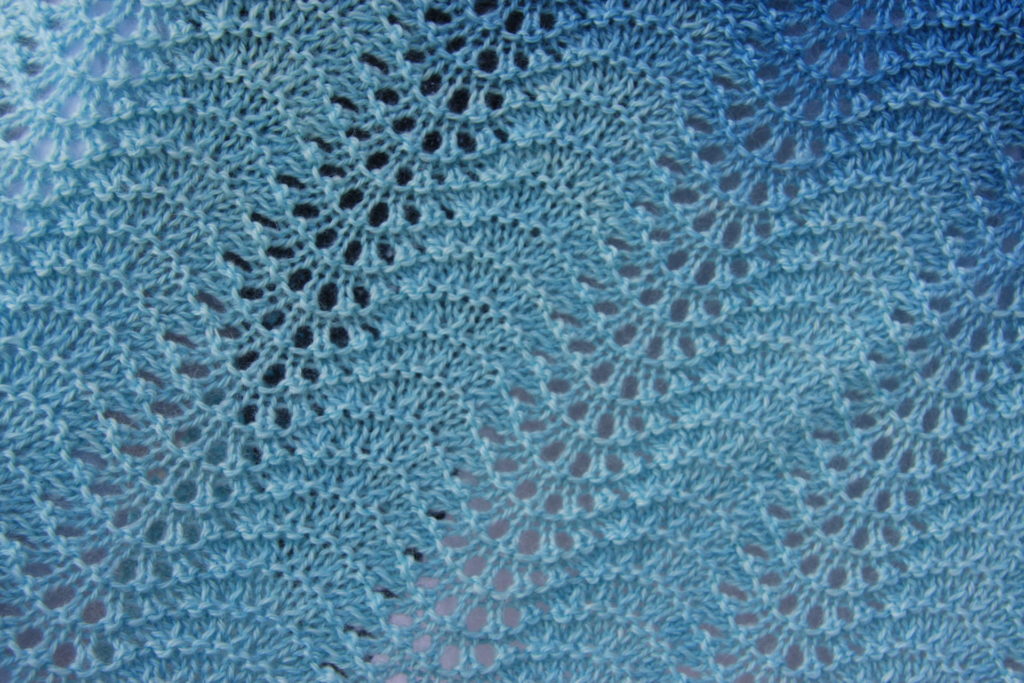
Here’s a close-up of the border.
To an inexperienced knitter, it may look complicated, but it isn’t. It’s a fairly simple shawl, in fact, with the ‘action’ taking place in only one in every four rows of the lace pattern. For the rest it is just a matter of knitting and purling.
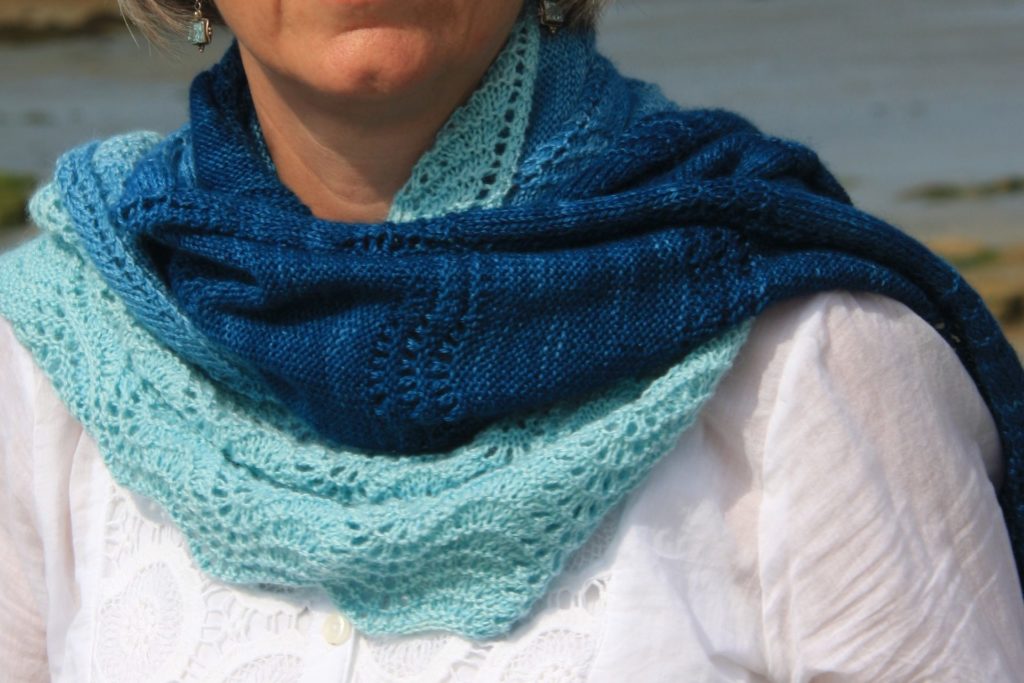
By now, you’ll probably understand why I’ve called this shawl Morbihan. Although I hadn’t planned it beforehand, the shawl and ‘the little sea’ turned out to have much in common. The colours, the waves…
… and also a certain soothing rhythm.
It’s taken me a while, but I’ve finally written out, tested and uploaded the pattern. If you’d like to knit a Morbihan shawl, too, you can find the pattern here on Ravelry.
The pattern has all the details about yarn, knitting needles etcetera, written instructions as well as a chart for the lace pattern, and a tip about making the shawl longer or shorter.
In addition to this one, I’ve made several more versions of Morbihan. I’ll tell you more about them and the yarns I’ve used soon.
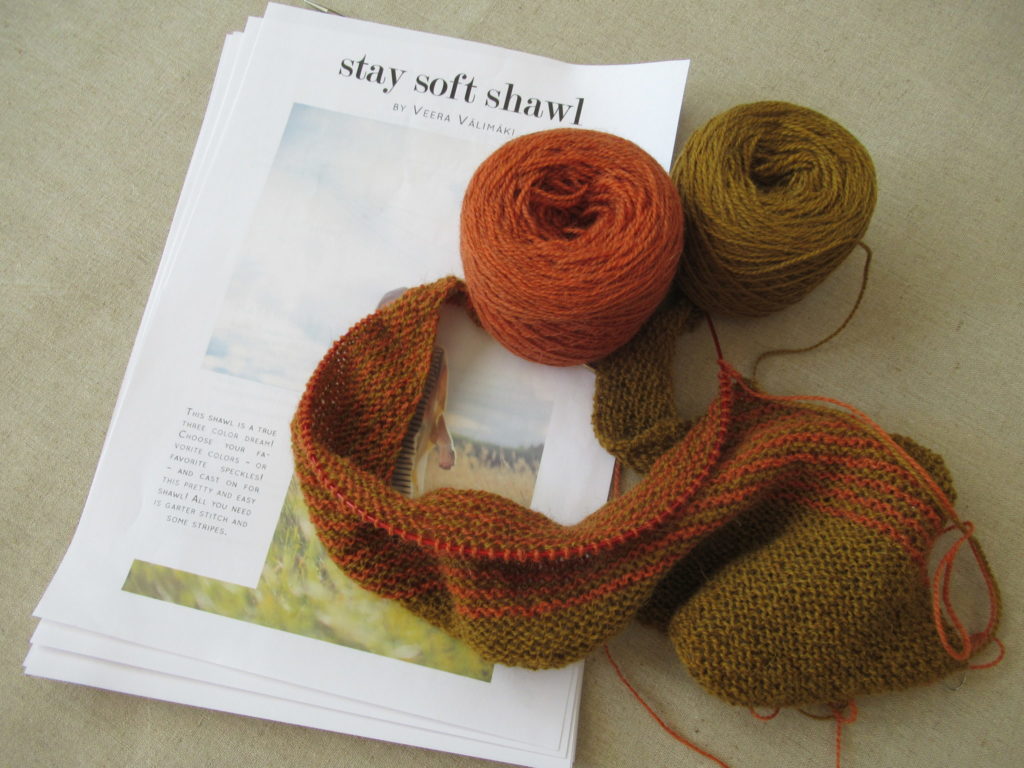
This post is looooong overdue. It’s the third instalment in a series of posts about ‘Stay Soft’, a shawl design by Veera Välimäki. I’d intended to write a step-by-step description of my knitting process way back in June, but… On the one hand, I got caught up in all kinds of new projects. And on the other, I felt unsure. Would people really be interested in reading about my knitting projects in so much detail?
But then two members of my knitting group asked: ‘How is your shawl coming along? You know, the one we helped you choose the pattern for?’ And I also started getting questions from readers, along the lines of: ‘Please explain how you knit the last part of Stay Soft, because I’m stuck.’ Apparently people do want to read about it, so here we go. (There’s a list of useful links at the bottom of this post).
The previous instalment ended after the third part, called ‘Coral Part’ in the pattern. This is what the shawl looked like at that point:
These first 3 parts are fairly straightforward. Now we get to the hardest part of Stay Soft, the part starting with the heading ‘Yellow Speckled Part’. Although there aren’t any mistakes in the pattern, and all the information is there, I still had some trouble figuring out exactly what to do.
First a note about the colours, though. To avoid confusion, these are the colours used by the designer and the ones I used:
Pattern: MC white speckled; CC1 coral-pink; CC2 yellow speckled
My version: MC yellow; CC1 orange; CC2 grey
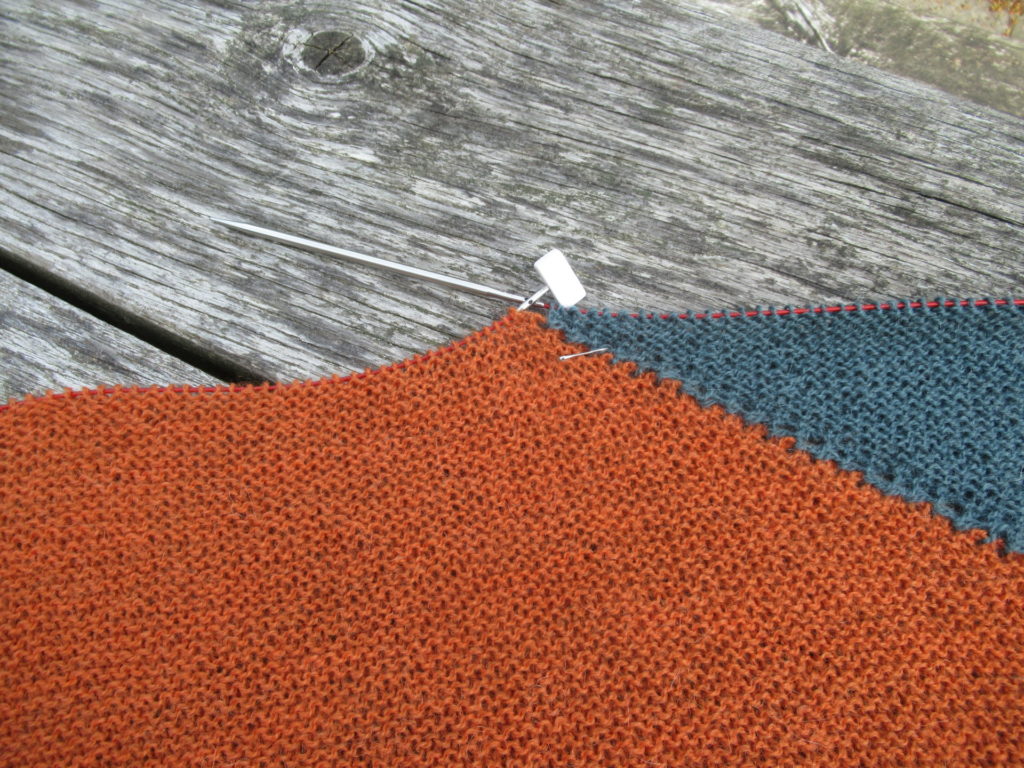
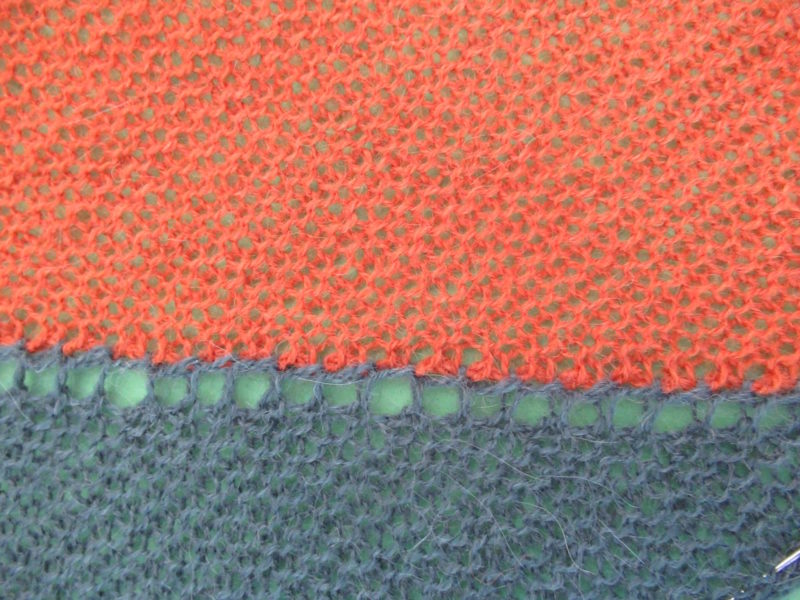
After the first three sections (called ‘Main Color Part’, ‘Stripes’ and ‘Coral Part’ in the pattern), stitches need to be picked up in the second contrast colour (CC2). The pattern says: ‘Use the same needle and CC2’, but I used a different needle, as suggested later on in the pattern. To my mind, this makes it so much easier.
I used interchangeable circular needles. This means that I unscrewed the tips from the cables, screwed them onto another cable, and screwed end stoppers (the rectangular white things in the picture below) on the cable with my orange live stitches. At this point I cut CC1.
Then the pattern says: ‘pick up and knit 5 stitches starting from the cast-on corner of the shawl.’ And here it gets tricky. Where and how do we pick up these stitches?
After taking a good look I found out where to start picking up stitches. It’s at the tip the knitting needle below is pointing at – the very first stitches knit in the first colour (MC). And the stitches should be picked up on the right-hand side.
So, with CC2 and another needle the same size, and with the right side (RS) of the shawl facing, I picked up and knit 5 stitches, starting from the point indicated above. After a few tries, I picked up a stitch EVERY row (not in every ridge, which would be every other row), because otherwise the corner pulled and curled up.
For the next row (WS), the pattern says. ‘Knit the first two stitches, and slide the remaining 3 stitches onto right-hand needle as if to purl’. This made me scratch my head again – should the yarn be held in front or in back? As it turns out, the yarn should be held in front. So: After picking up 5 stitches, turn your work, knit the first 2 stitches, bring yarn to the front, and slip the next 3 stitches purlwise (as if you were going to purl them, but without actually purling them) with the yarn held in front of your work. Then turn your work and knit rows 11 – 18.
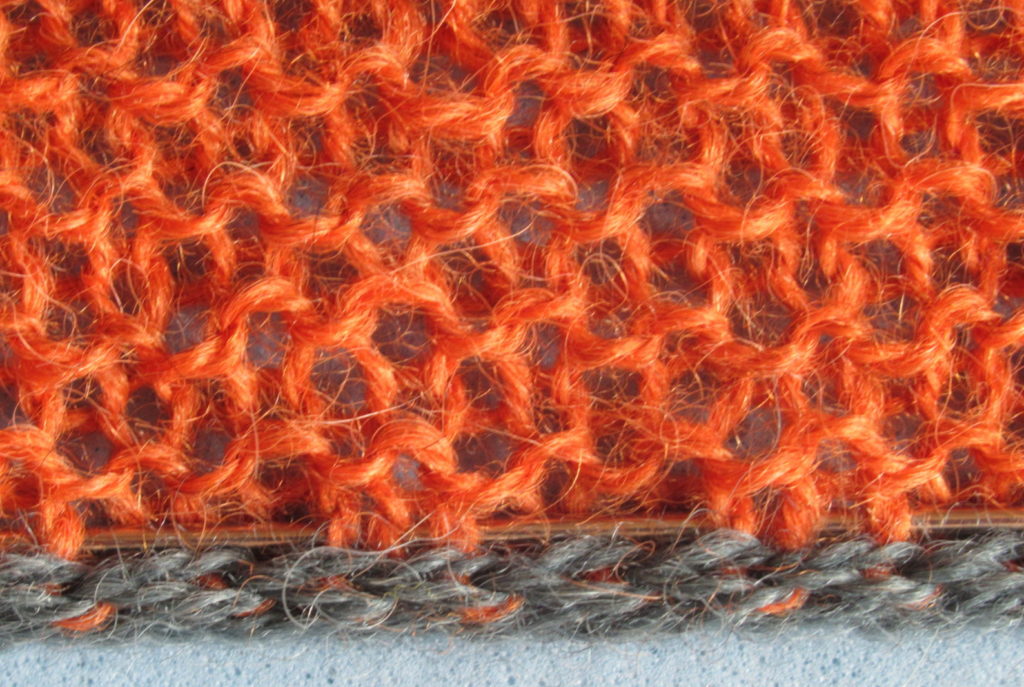
Slipping the last 3 stitches with the yarn held in front gives a sort of I-cord edge. When you’re just starting this edge it doesn’t look very nice or neat, as you can see in the picture below. But it will get better as you continue.
After that, rows 13 – 18 are repeated until the corner is reached, where the live stitches of the ‘coral part’ are waiting.
In this section, 1 stitch is increased in all right side (RS) rows by knitting 1fb, but this is neutralized by knitting 2 sts together in the same row. Only in row 17 it says k1fbf (instead of k1fb), so only in this row 1 stitch is increased. It is important to keep track of this, but I found it impossible to see where I had increased a stitch. To keep track of the increases, I placed a locking stitch marker immediately after I’d knit a ‘row 17’. And as soon as I came to the next increase row, I moved the stitch marker there.
Knitting on like this, a knitted on I-cord edge is formed on the ‘outside’, and a row of holes along the body of the shawl. At first it doesn’t look very attractive, but after a while the edge becomes really neat, and it becomes visible how the part in CC2 brings everything nicely together.
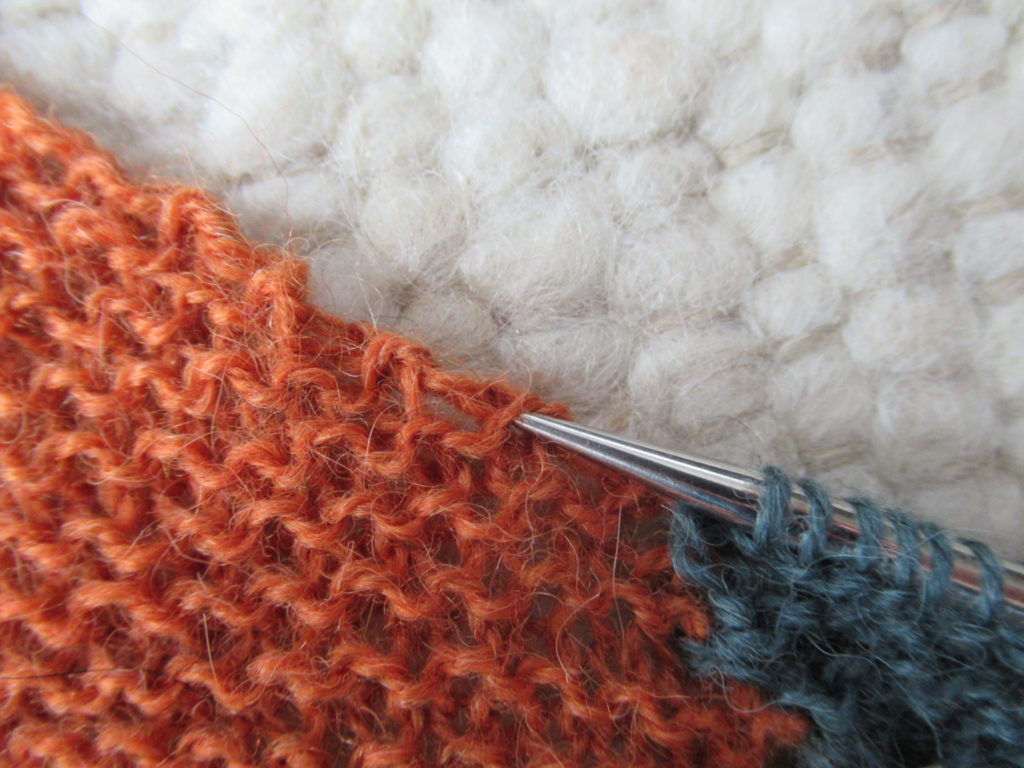
The next picture shows where exactly I picked up the stitches in the RS rows – just below the ‘curve’ or ‘bridge’ of the last knit stitch.
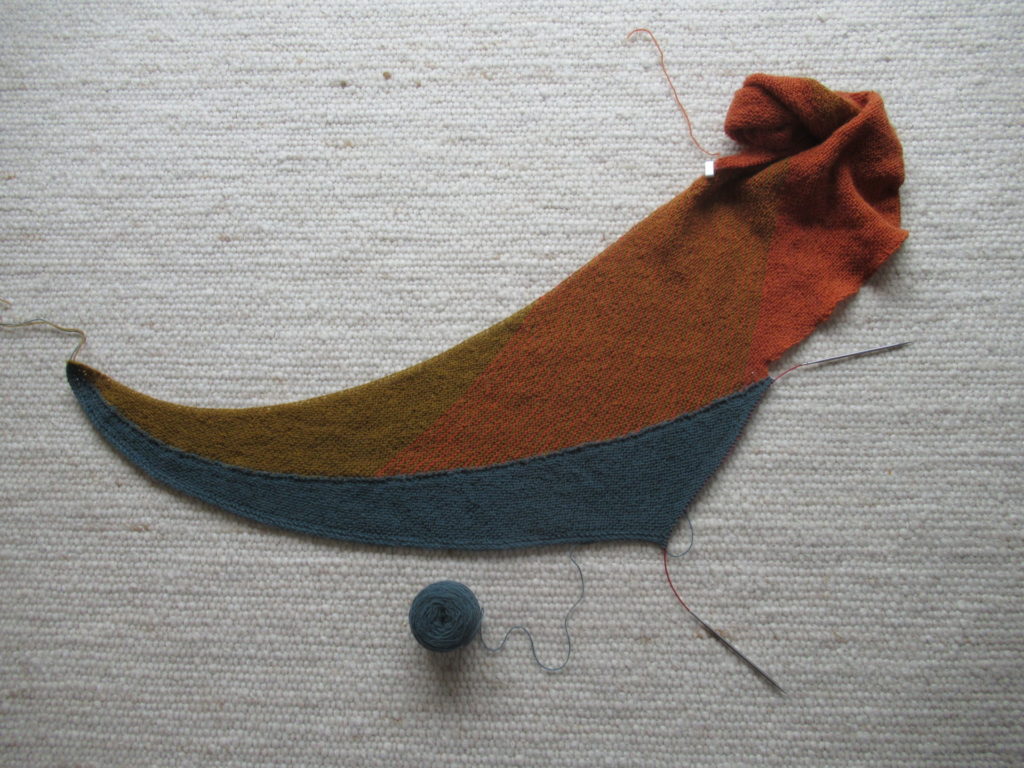
After knitting everything described on page 4 of the pattern, the shawl looks like this:
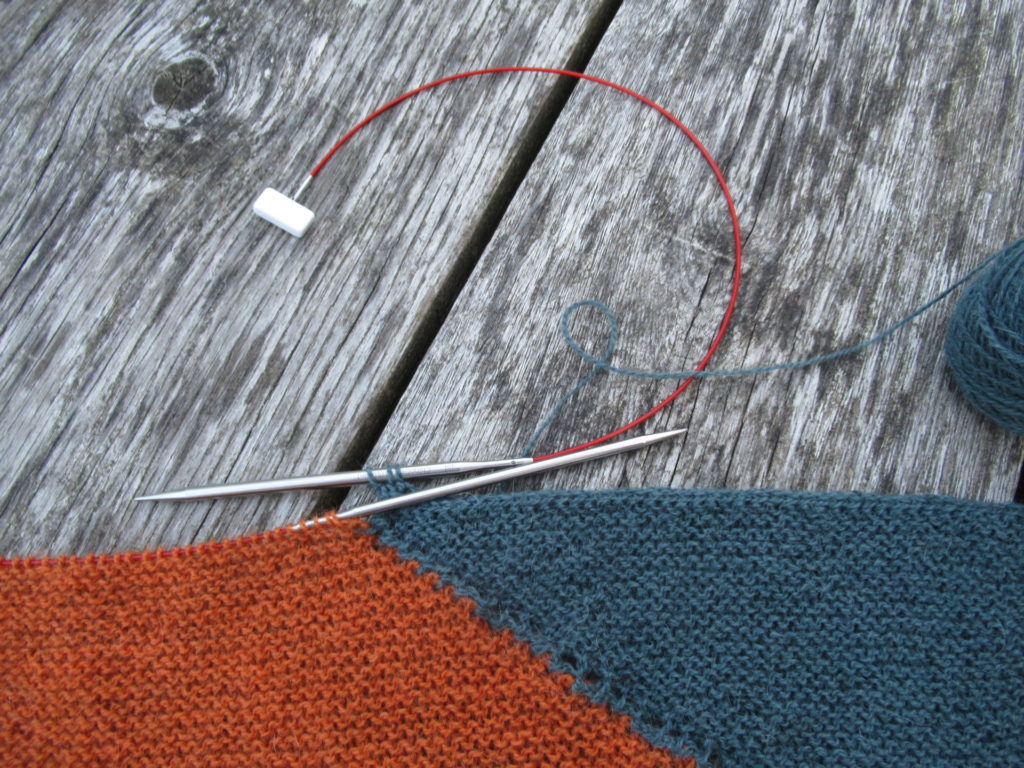
The needle in the grey part meets the end stopper on the cable in the orange part:
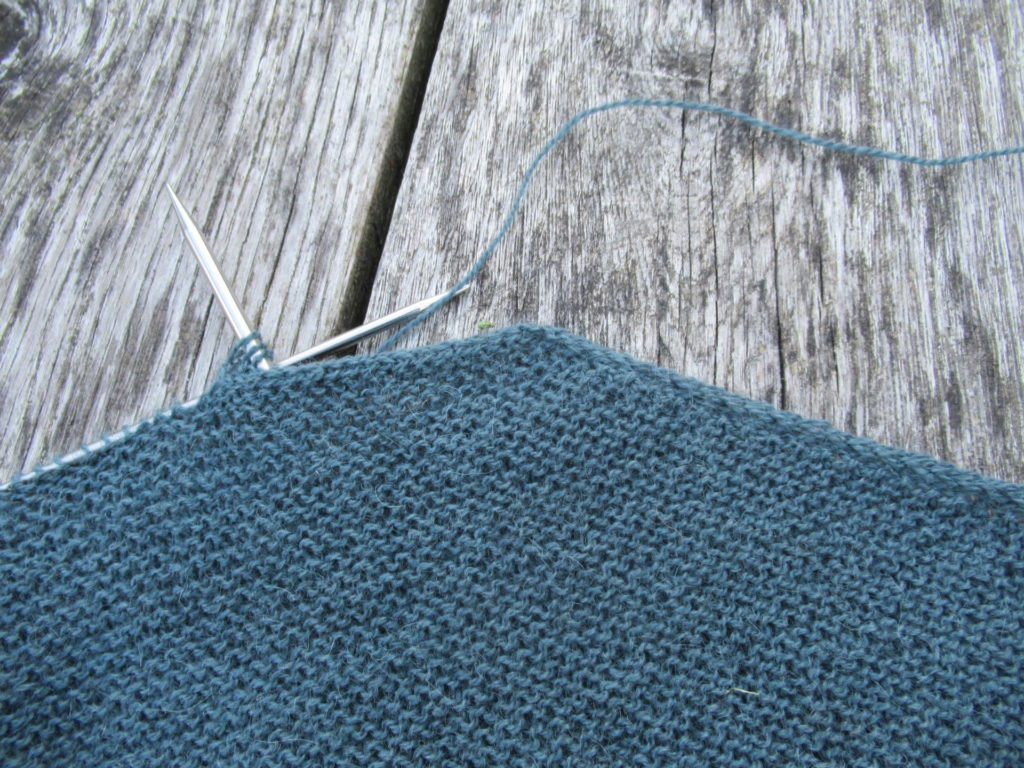
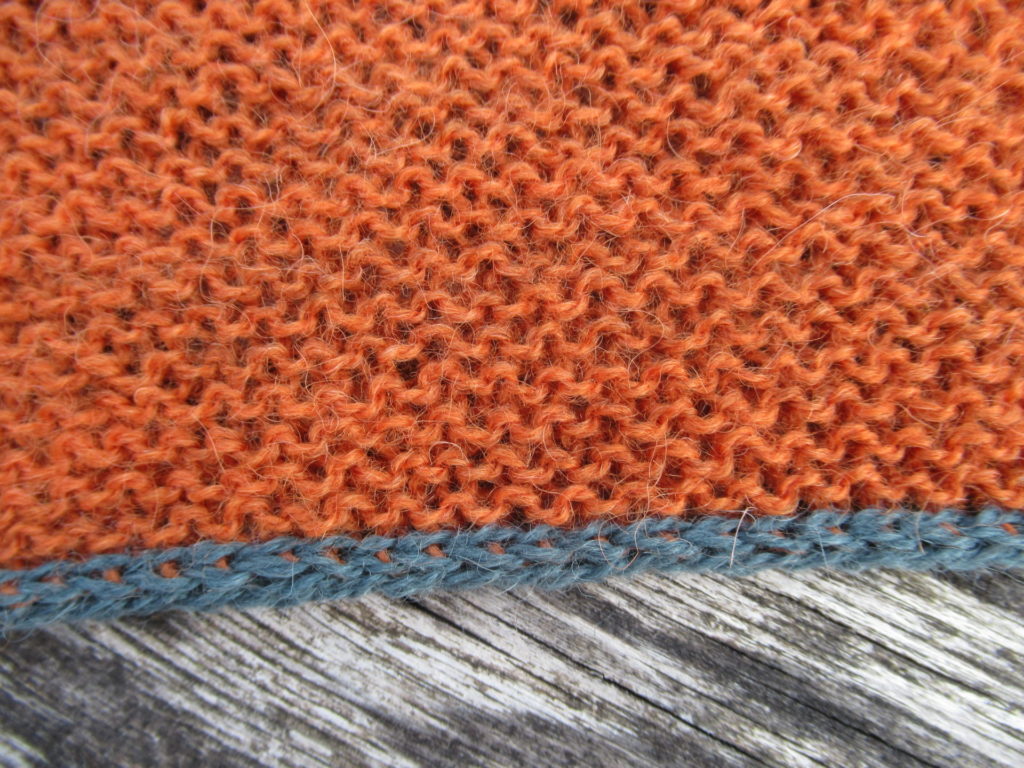
Time to start the I-cord bind-off along the end of the grey section. After about 10 cm/4 inches I noticed that this I-cord was much tighter than the knitted-on I-cord along the side of the grey section. I unraveled it carefully and started again with a thicker needle tip (5.0 mm instead of the 4.0 mm needle I used so far). Yes! Now both I-cords were similar.
Upon arriving at the orange section, I changed the end stopper for a thicker needle tip (in my case 5.0 mm) and continued the I-cord bind-off.
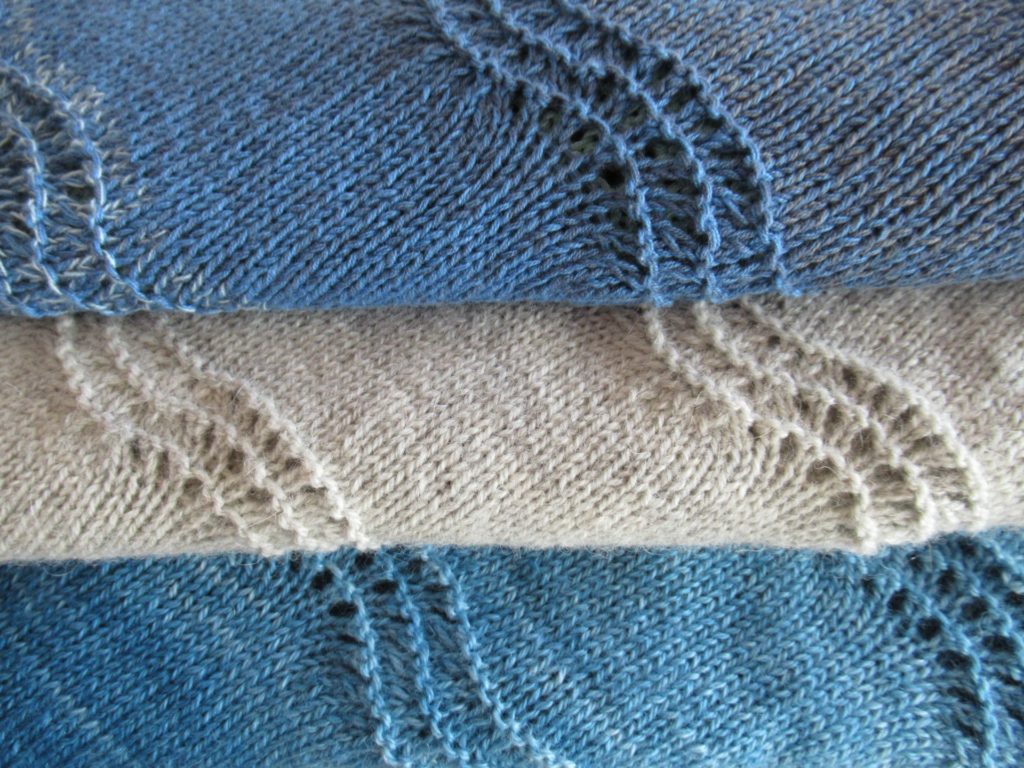
The knitted-on I-cord is just a small detail, but just look at it. It changes Stay Soft from an OK shawl into a fabulous shawl, don’t you think?
After the knitting is completed, it’s time to block the shawl. I think blocking is essential – it makes all the difference. After soaking the shawl in a non-rinse wool detergent (I used Soak, but Eucalan or any other brand works just as well) I spread it out on blocking mats. I threaded blocking wires through the knitted fabric along the edges.
I threaded the blocking wires through the stitches inside the I-cord edges:
While I was knitting I was a bit worried about the row of holes between the body of the shawl and the knitted-on part. They looked terribly irregular. Fortunately that was solved by blocking, too.
What a difference!
Before blocking
After blocking
And that’s it – the shawl’s all done!
I used a thinner yarn than indicated in the pattern (fine fingering instead of ordinary fingering), which gives a nice and airy shawl. When the light falls through it, it looks slightly transparent.
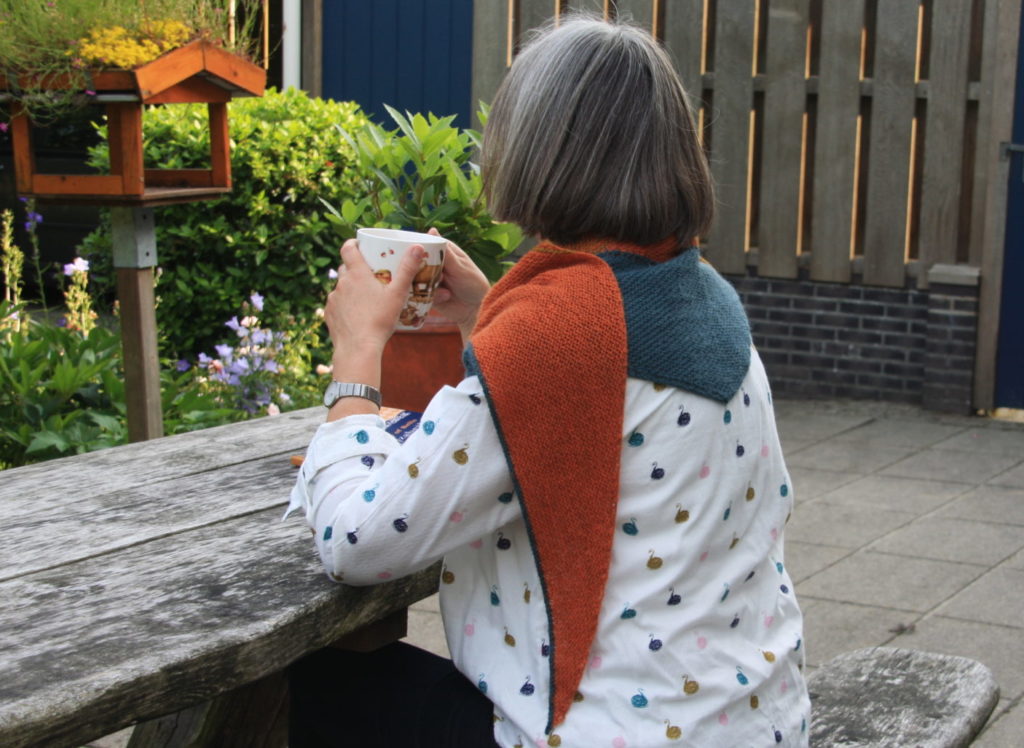
But wrapped around the neck, it is really cosy. Below you can see how the I-cord in a contrasting colour gives a nice crisp edge.
Needles: 4 mm/US 6 and 5 mm/US 8 (the thicker needle only for last stretch of I-cord)
Finished size after blocking: Wingspan 213 cm/84 in; Middle to tip: 57 cm/22.5 in
I think it’s a very wearable, good size shawl from just over 100 grams of yarn. For me, Stay Soft was a really, really enjoyable pattern to knit, in spite of (or perhaps rather because of) all the frogging and puzzling out how to get it right.
Phew! This may very well be my longest blog post to date. At least it was the most complicated one to compile. Thank you dear knitting friends and readers for giving me the motivation to do it.
I hope everything makes sense. If there’s anything that isn’t clear, or if you have any other questions, please leave a comment. I’ll try to answer as best as I can.
I’ve been knitting for over fifty years and I knit almost every single day, so I think I can safely say that I’m an experienced knitter. I can’t say that everything always goes swimmingly, though. After all those years, I still run into obstacles, and I still often have to frog things.
For a long time, I was baffled by the verb ‘to frog’ for unravelling knitting. It wasn’t in any of my dictionaries in this sense of the word. I just didn’t get why people called it frogging. Until Adrienne Martini explained it to me, on page 50 of her hilarious book Sweater Quest: My year of knitting dangerously:
‘Frogging, which doesn’t involve amphibians, means pulling out large swaths of knitting at one go. You rip it. If you don’t get the association, say it out loud.’
Rip it, rip it. Ah, I finally got it! Well, I’m a frequent frogger. Take a seemingly simple shawl like Stay Soft.
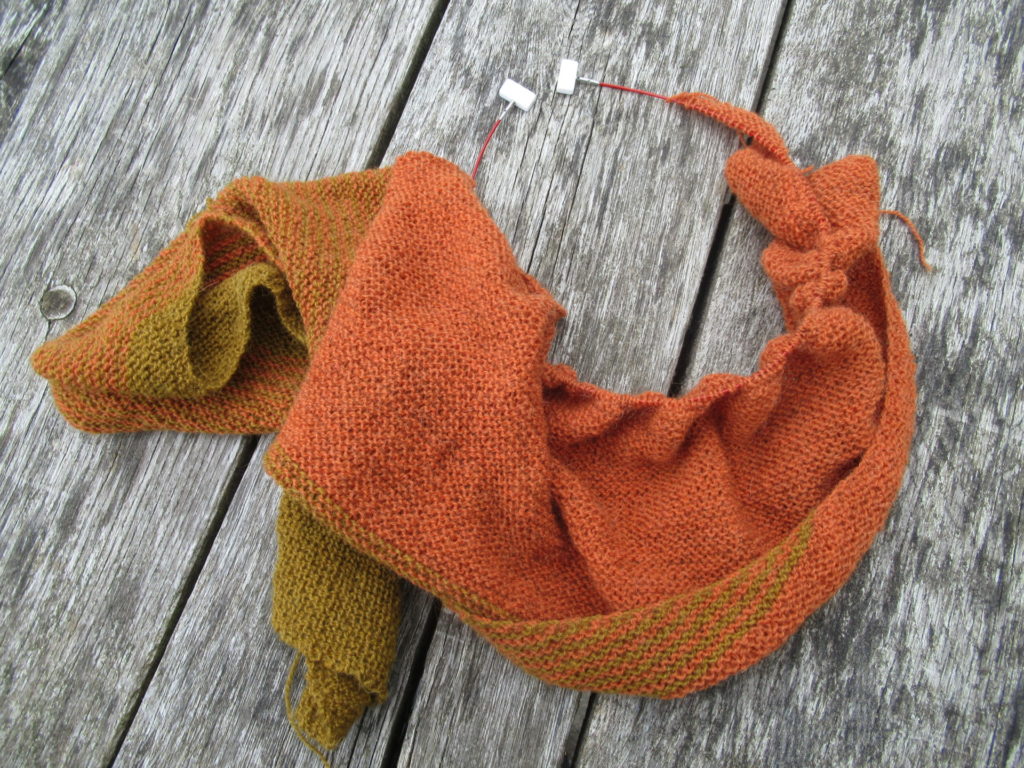
I started out cheerfully, casting on a small number of stitches, gradually increasing along one edge of the garter stitch rows. Everything was plain and clear in the pattern. No need to frog anything this time, right? Wrong.
Because I had a finer yarn and less yardage than the amount specified in the pattern, I’d decided to use a smaller needle size to be on the safe side. But when I’d finished both the yellow and the striped section (i.e. after knitting about one third of the entire shawl)…
… I had an awful lot of the first yarn colour left over – almost two-thirds of the total amount. It would be a shame to waste all that yarn. Besides, the fabric didn’t feel quite right, and it looked as if the final shawl would end up rather small if I went on like this.
So, I frogged everything I’d knit so far and started afresh with the needle size specified in the pattern.
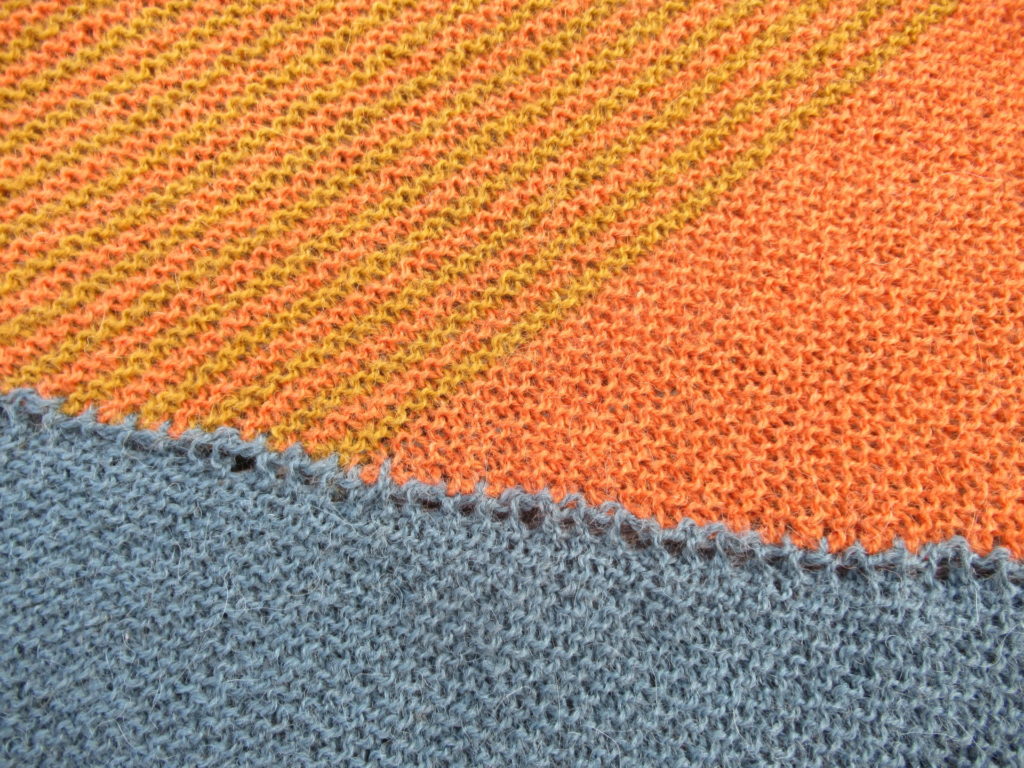
The second time around the fabric looked and felt better. I quickly re-knit the yellow and the striped sections. On the orange section I ran out of yarn after I’d knit 16 rows less than the pattern indicated, but I wasn’t really worried by that.
By that time the shawl already had quite a good size (but rather a strange shape):
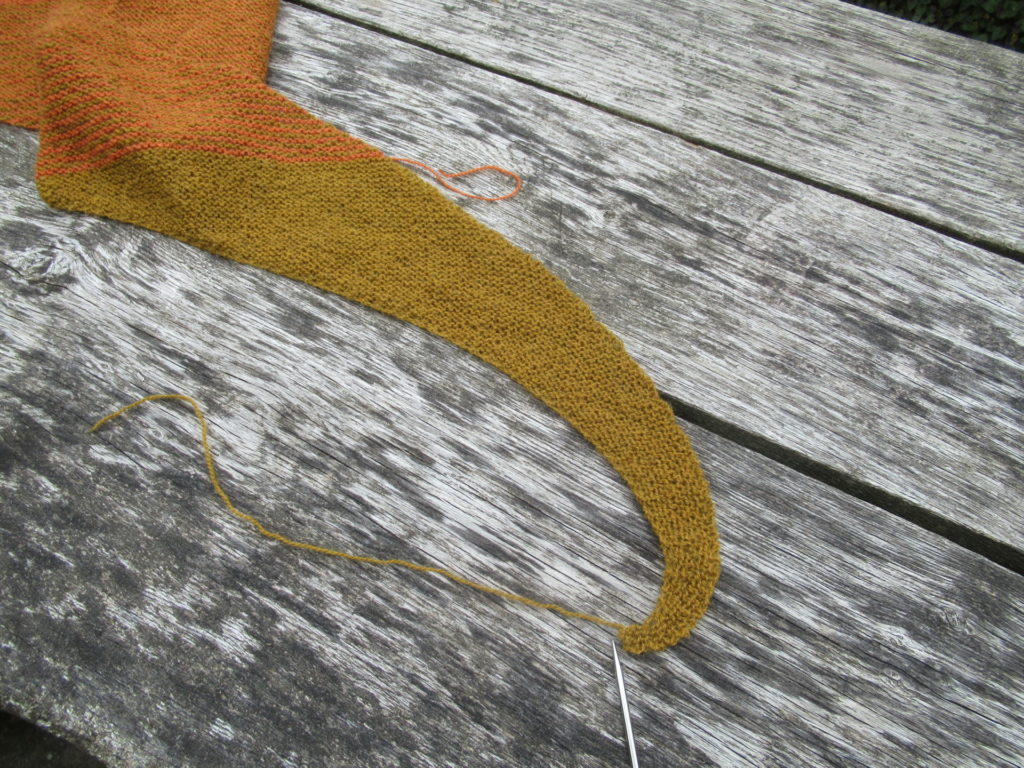
Now it was time to pick up stitches for the third colour. I read through the instructions: ‘pick up and knit 5 stitches starting from the cast-on corner of the shawl.’ Hmmm, where exactly? And how?
This pattern has been knit by many people before, so I thought I’d take a look at other projects on Ravelry, to see how they had done it. I read that others had scratched their heads, too, at this point. Many of them somehow found the solution, and some people even made notes of what they’d done, but I was still a bit confused.
So I tried something, frogged it, tried again, frogged again, until I was happy with the result:
And then I thought: why don’t I write a blog post showing exactly what I’m doing, so that others won’t have to frog as much as did? So that’s what I’m working on now: knitting the rest of the shawl while taking photographs and making notes. If it works out, I’ll show you the results soon.
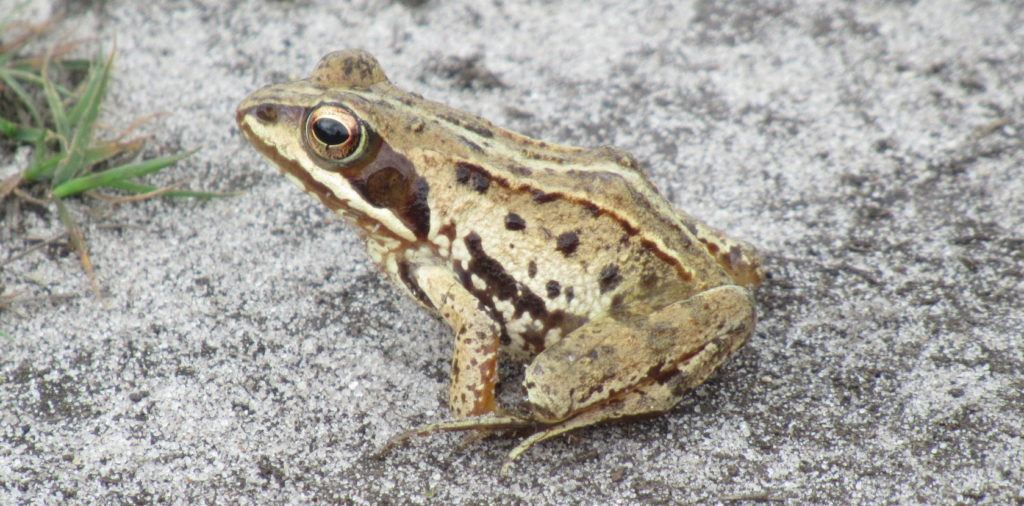
Note: The frog in the photo at the top of this post is a moor frog that hopped across our path during one of our recent walks. During the mating season the males turn blue for a few days. The frog may look quite big in the photograph, but it was only 5 centimeters (2 inches) long at most.
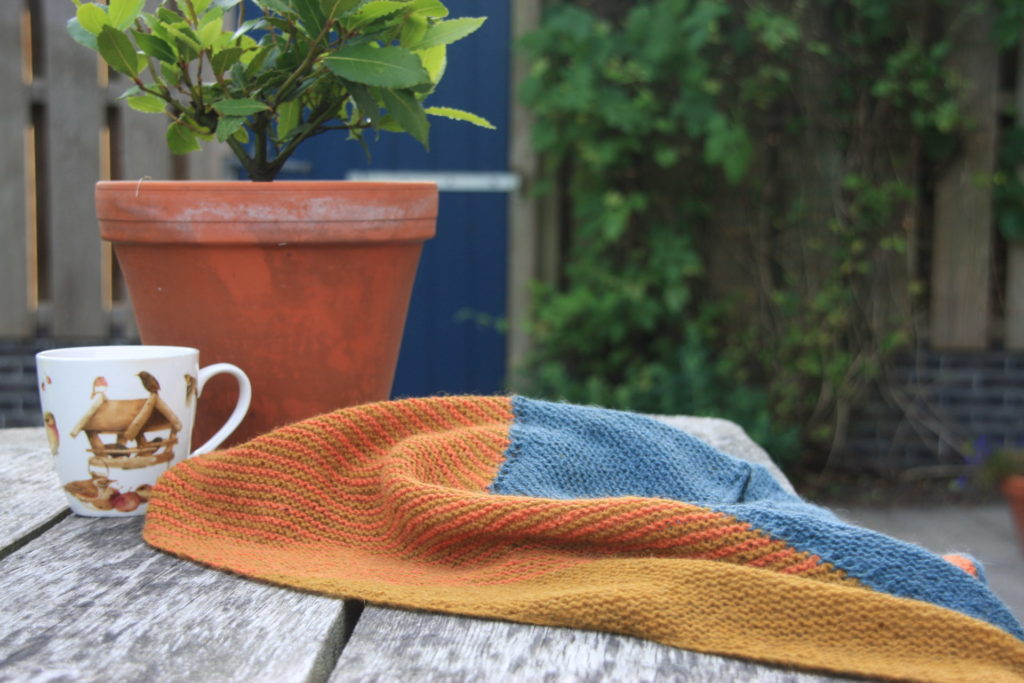
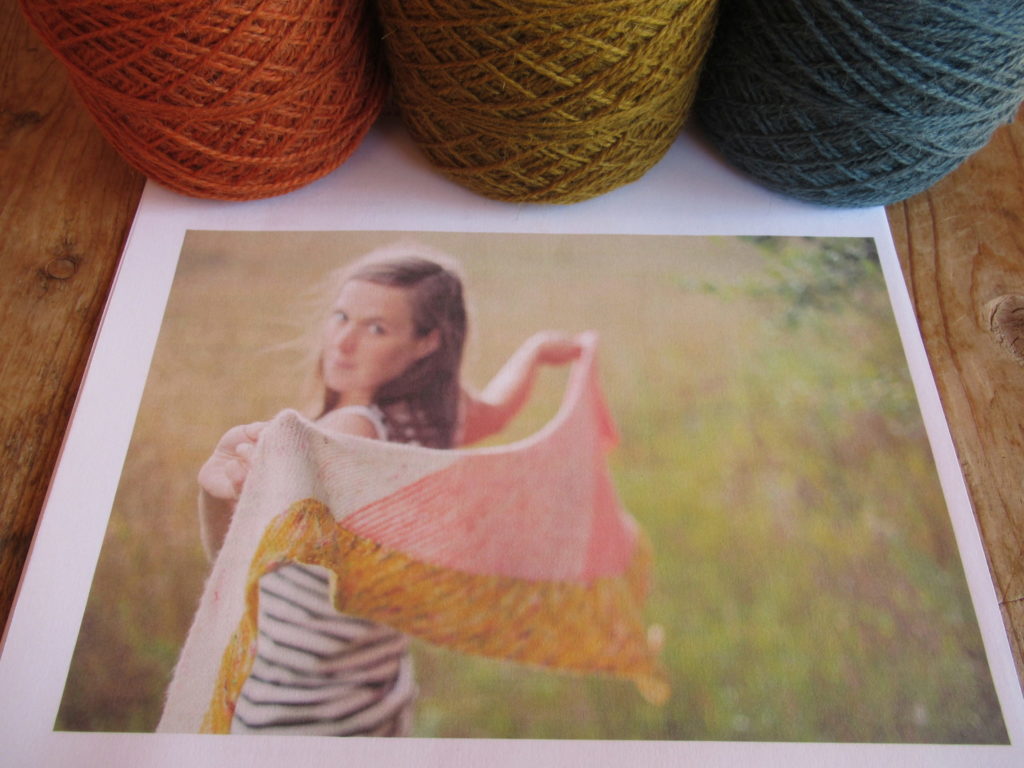
Last November, I found a parcel in our letterbox. It wasn’t my Birthday. I wasn’t expecting any parcels. Had I ordered something that I’d forgotten about? I didn’t think so.
I hurried inside to open it, and I couldn’t help laughing out loud when I saw the contents. It was the red bag in the photo at the top of this post, but even better. It was covered in colourful tape: yellow tape measure tape and cheerful flowery tape. I should have taken a photo straight away, but didn’t think of it at the time. I was too curious what was inside.
I ripped the tape off and found this:
Three beautiful skeins of soft, squishy yarn (and a postcard). A present from a dear friend I’ve known for over 40 years, to thank me for a shawl I’d knit for her. Totally unnecessary, of course, because knitting that shawl was such a pleasure, but what a lovely surprise!
My friend wrote that she’d been to Amsterdam for work, and had taken the time in between two meetings to visit one of my favourite yarn shops to buy some yarn for me. Wasn’t that a wonderfully thoughtful thing to do? She is not a knitter herself. She must have learnt to knit as a child (we all did), but I’ve never seen her knitting.
So how does a non-knitter choose from all those beautiful yarns on display? On the postcard she wrote: ‘For me the shop was a jumble of yarns and wool, but I just had to choose these three autumn colours.’ She may not be a knitter, but she is an art-lover with a good eye for colour.
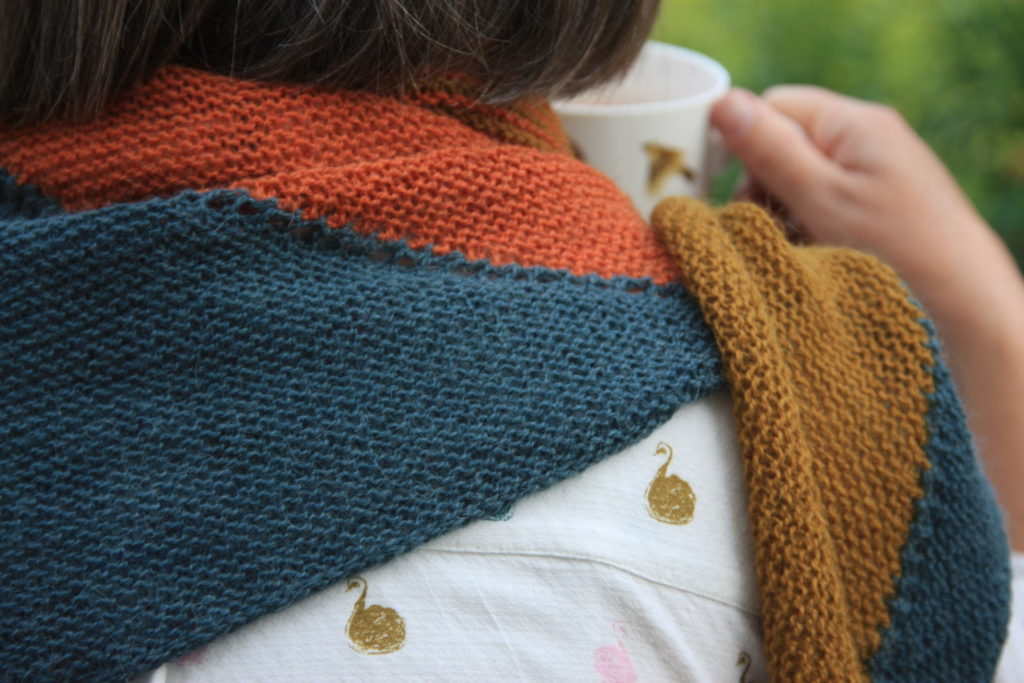
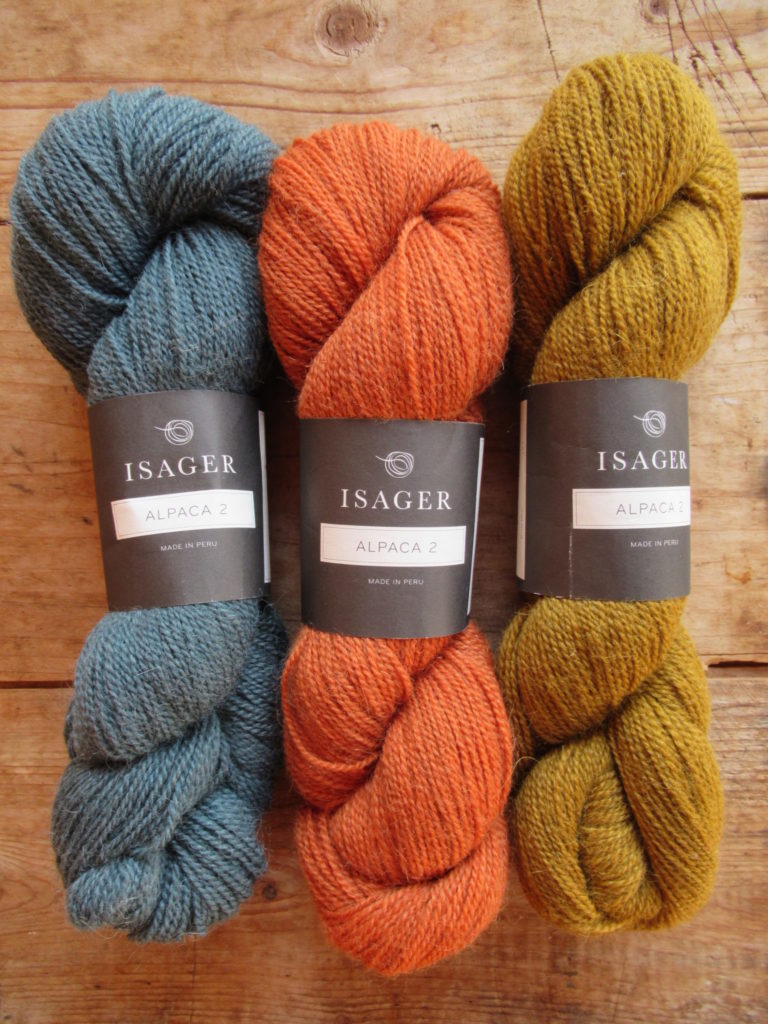
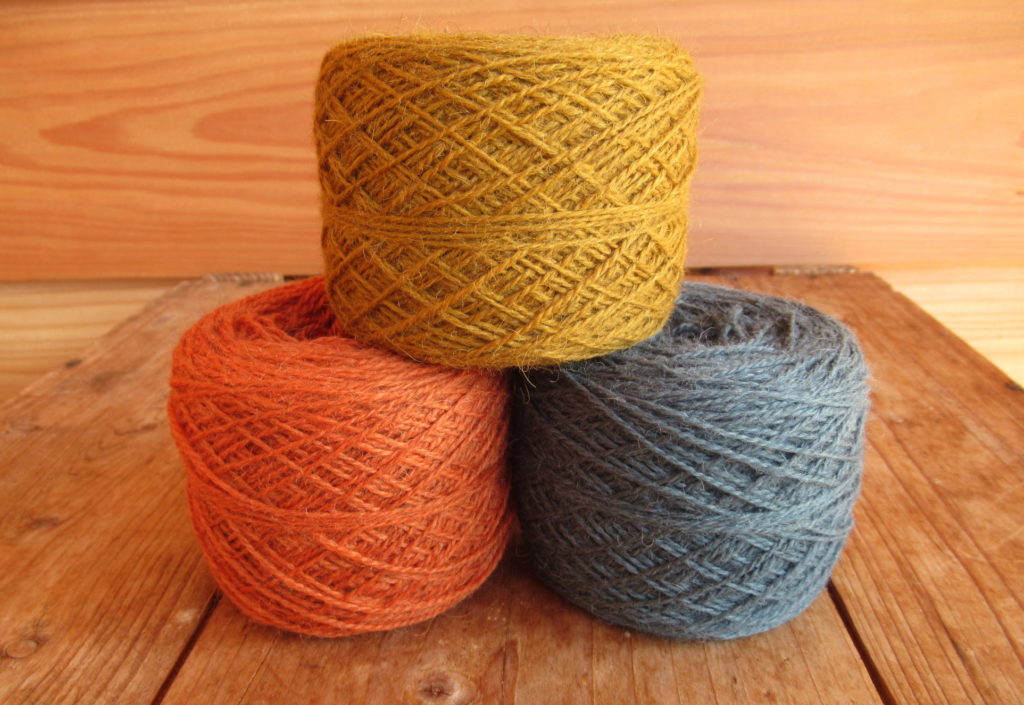
She chose three skeins of Isager ‘Alpaca 2’, a 50/50 blend of alpaca and wool. It’s a yarn I’ve never knit with, but have been wanting to.
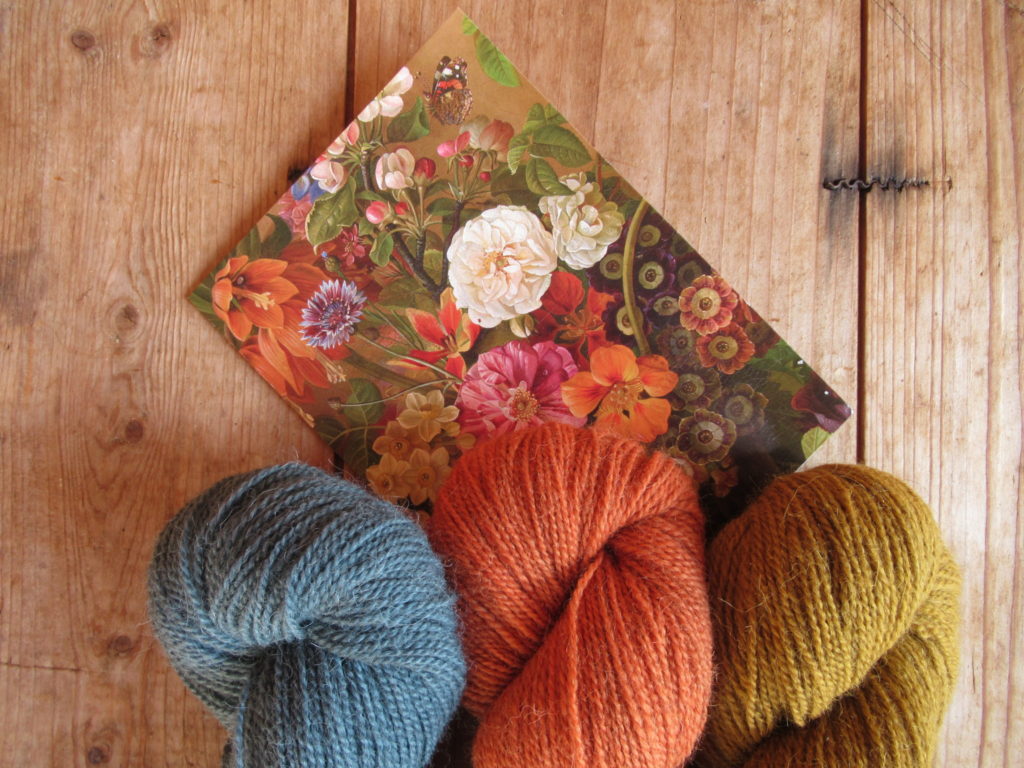
And look how carefully the postcard that she sent was chosen to match the colours of the yarn:
The combination is a thing of beauty in itself. The yarn has been lying around for a while. First in a basket, just to be admired and petted, and later wound onto balls. I don’t know if you can see the colours properly on your screen, so I’ll try to describe them.
There’s a mustardy yellow, a warm marmalade orange, and a blueish or greenish (depending on the light) dark grey. It looks like part of the fibre was from a grey or brown animal, which makes the colours muted and slightly heathered.
Really autumnal, woodland colours. It’s springtime now, but I’m not going to wait for autumn to come around again. I want to make something with this yarn now. But what?
A shawl, I think. Something modern and geometrical. It’s 150 grams altogether, so it won’t be huge, but it should make a good-sized one if I choose the right shape.
What would be a good pattern for this yarn?
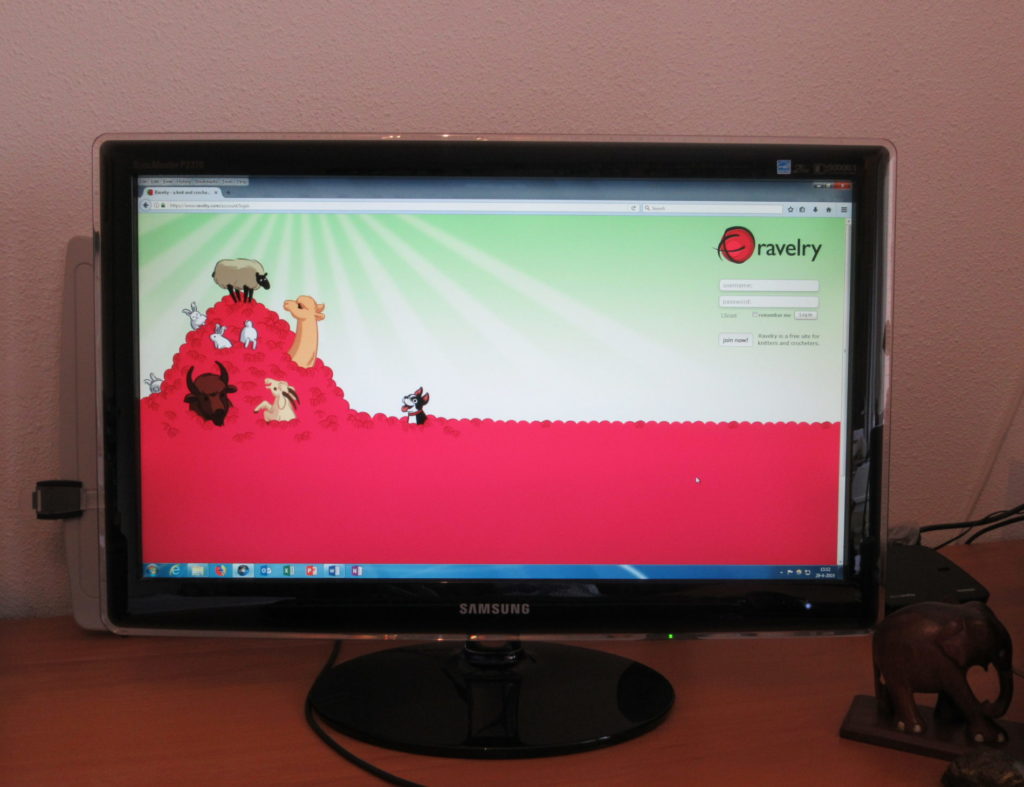
Ravelry
The best place to look for an answer is Ravelry, so that’s where I went. Most of you will be familiar with it, but for those of you who aren’t: Ravelry is a online knitting and crochet community, with currently around 8 million members. It is a great place to meet knitters from all walks of life and all over the world. It is also a database with tons of patterns to choose from. This is the log-in screen:
Entering search criteria for project category and approximate yarn weight I got about 24.000 options to choose from. I refined my search criteria some more, some more again, and then some more, and finally got a manageable number of choices.
One of the patterns that came up was Earth and Sky (Ravelry link) by Stephen West, co-owner of the shop where the yarn was bought. It is a great design, and very suitable for 3 colours.
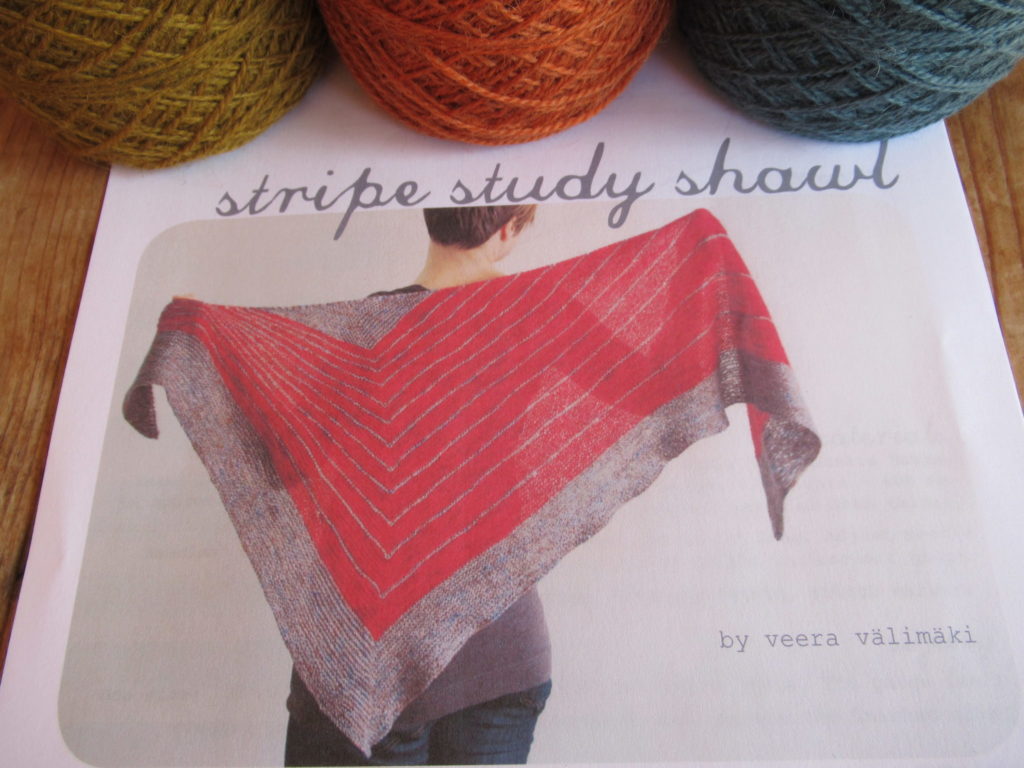
But then I scrolled on and came across Finnish designer Veera Välimäki and thought: Yes, of course! Veera is famous for her geometrical designs. Several of her shawl patterns fit the bill, and I finally whittled them down to two: ‘Stripe Study’ and ‘Stay Soft’.
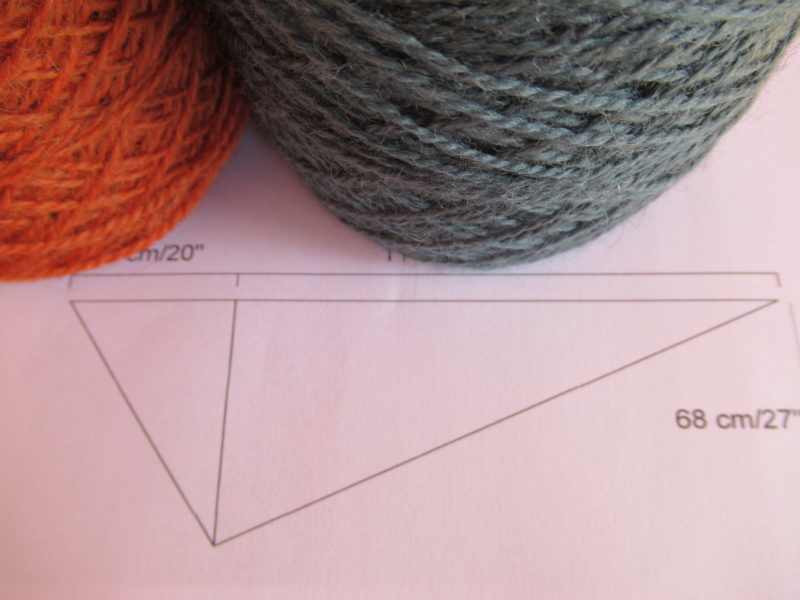
Stripe Study
Stripe Study is an asymmetrical triangle knit from the top down, with the stripes closer together at one end than at the other. A great pattern, but… Stripe Study is designed for 2 colours. The challenge is: how to divide my 3 colours over the shawl to get a pleasing effect and use all of them up as much as possible?
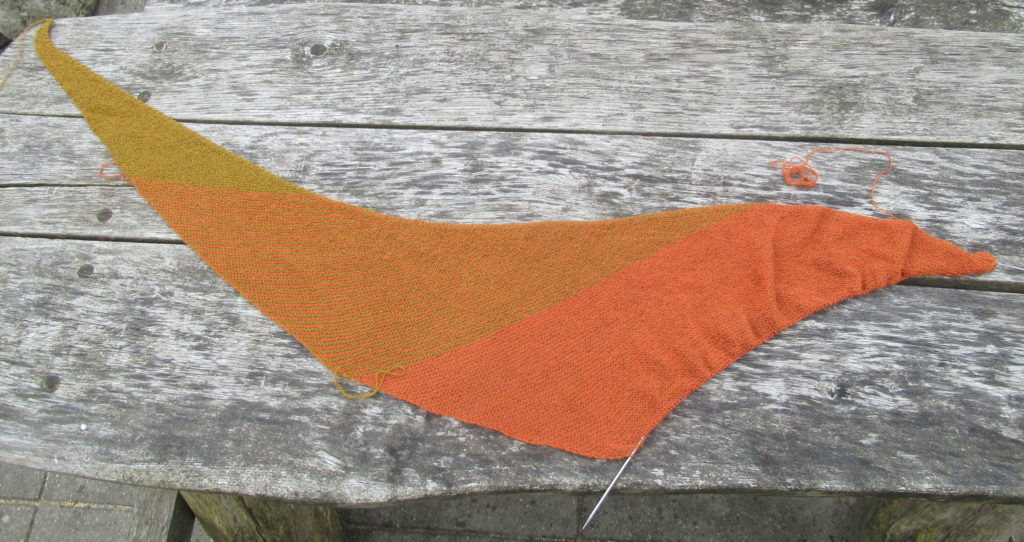
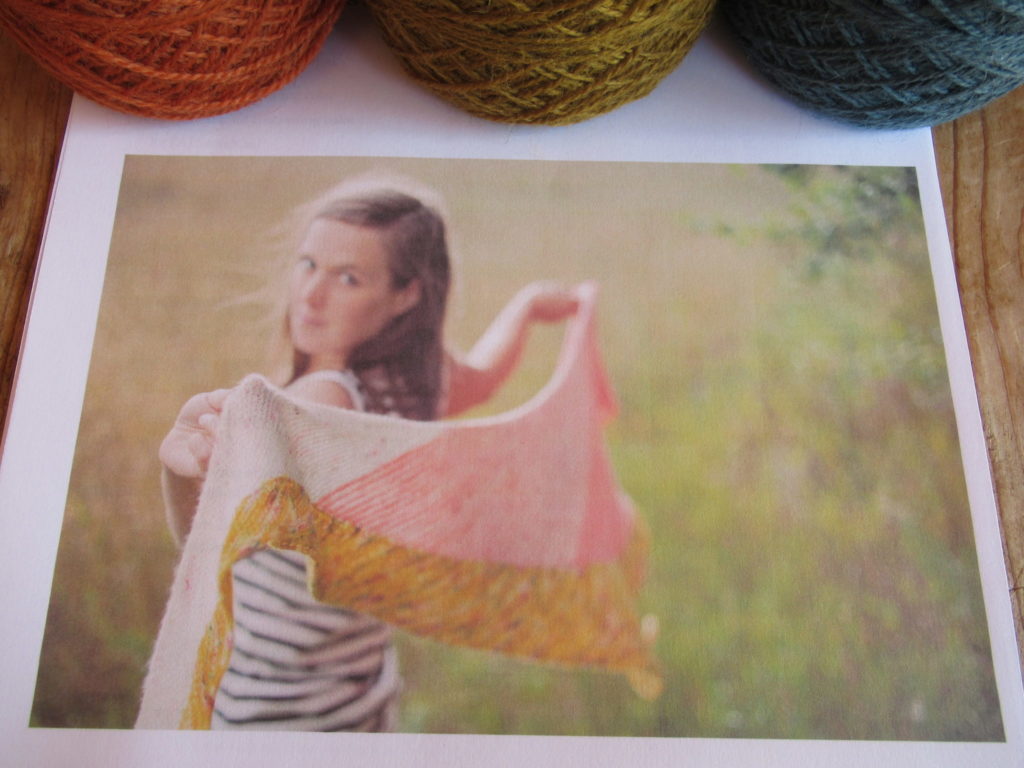
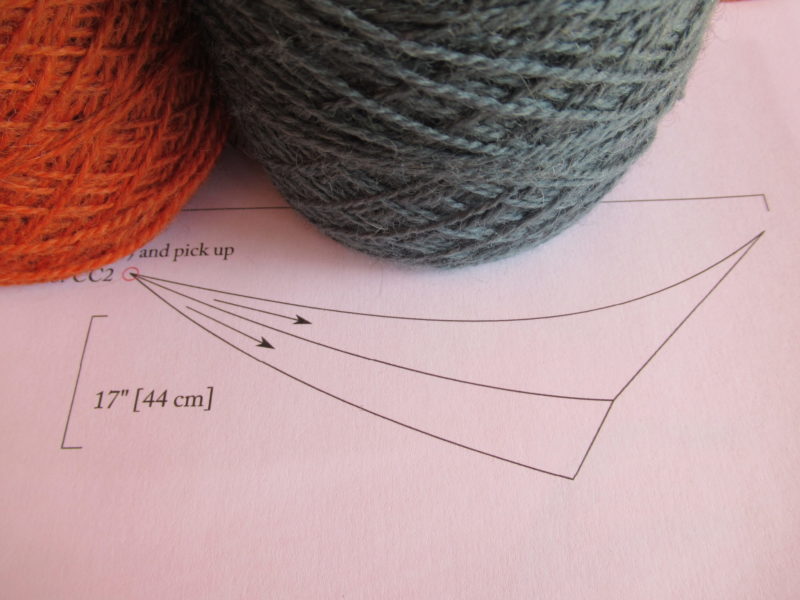
Stay soft
Stay Soft is a shallow, slightly curvy triangle designed specifically for 3 colours. It is knit in 2 sections from one point to the other, with the top section in colours 1 and 2, and a wide border in colour 3. This is a great pattern too, but… My colours have much more contrast than the ones in the example. Would they still form a pleasing whole, or would the contrast be too strong?
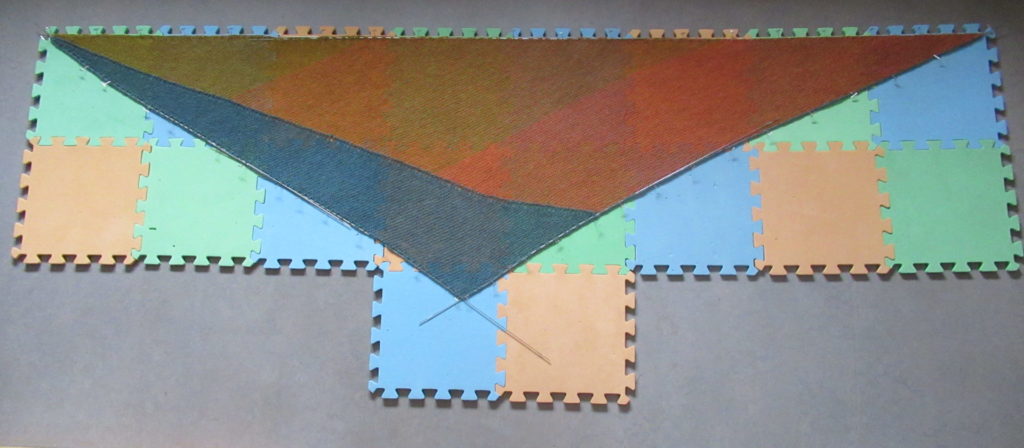
I couldn’t find a better picture of Stay Soft, so I’ve taken photos of the diagrams of both shawls to show their constructions more clearly (click on images to enlarge):
Stripe Study
Stay Soft
Which one is it going to be? I don’t know – there’s something to be said for both. What do you think? Stripe Study, with its bold, straight lines, or Stay Soft, with its softer, curvy shape? Will you help me choose?
Knitting for others can be a pleasure all around, with the emphasis on CAN. I know that it can also lead to uncertainty, frustration and stress (on the part of the knitter) and embarrassment (on the part of the recipient). For handknit gifts to be a success, it’s important to choose well.
I’ve been thinking about what ‘choosing well’ means in this context. A lot of things went through my mind, like choosing the right colour, yarn, size, or type of project. I could write several blog posts on the subject, but basically it is all very simple. I think it all comes down to 3 things:
Only knit gifts for people who will really, really appreciate them (don’t waste your precious knitting time on others – buy them something)
Always take the recipients’ tastes and preferences into consideration (if you’re not sure, ask!)
Never knit anything that you don’t enjoy knitting
And for me, personally, there is one more thing that is very important:
Take your time
I need to be careful to avoid unrealistic deadlines. When knitting becomes a race against the clock, it becomes a chore instead of a joy. So whenever I’m unable to finish something in time for, say, a birthday, I just buy something else or write a card, and tell the person that the handknit gift will be finished soon.
Keeping these principles in mind, I have had a great time knitting warm and woolly gifts over the past few months. I haven’t photographed everything, but here are some pictures of a shawl and a pair of mittens that I knit for our daughter.
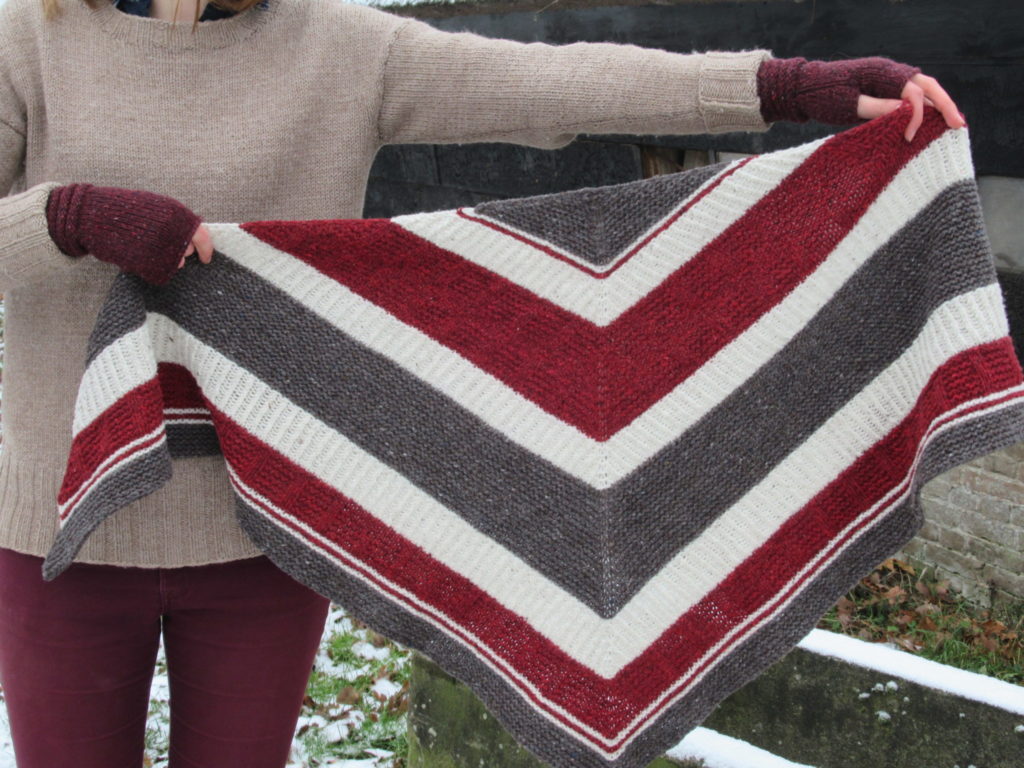
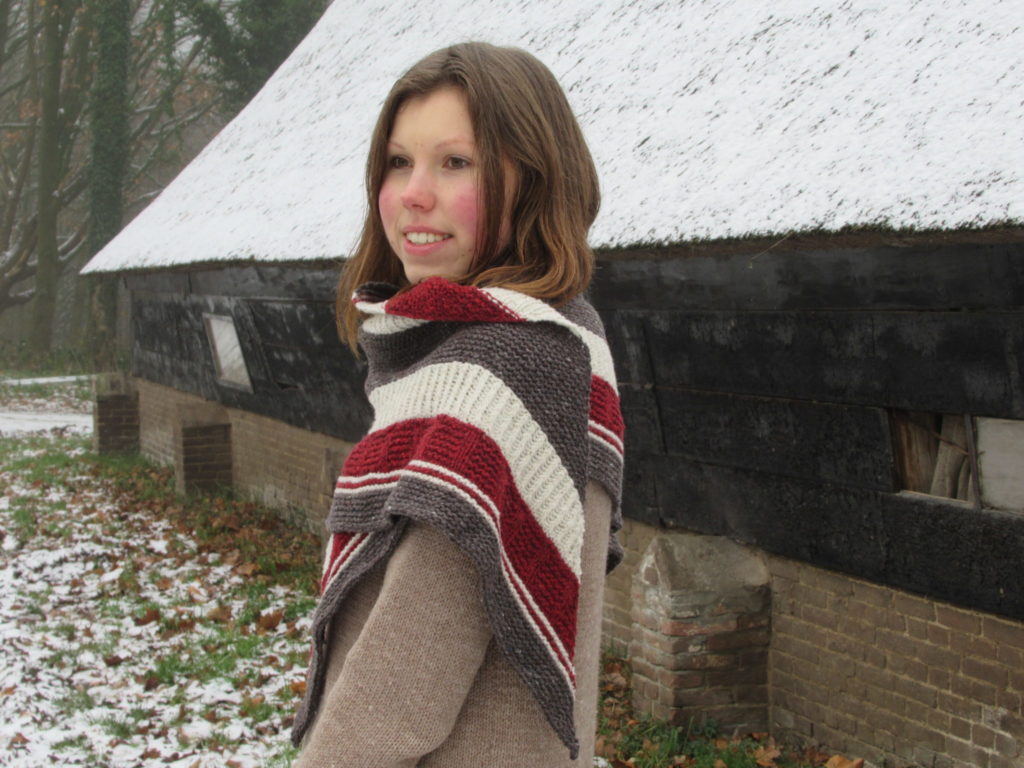
The Shawl
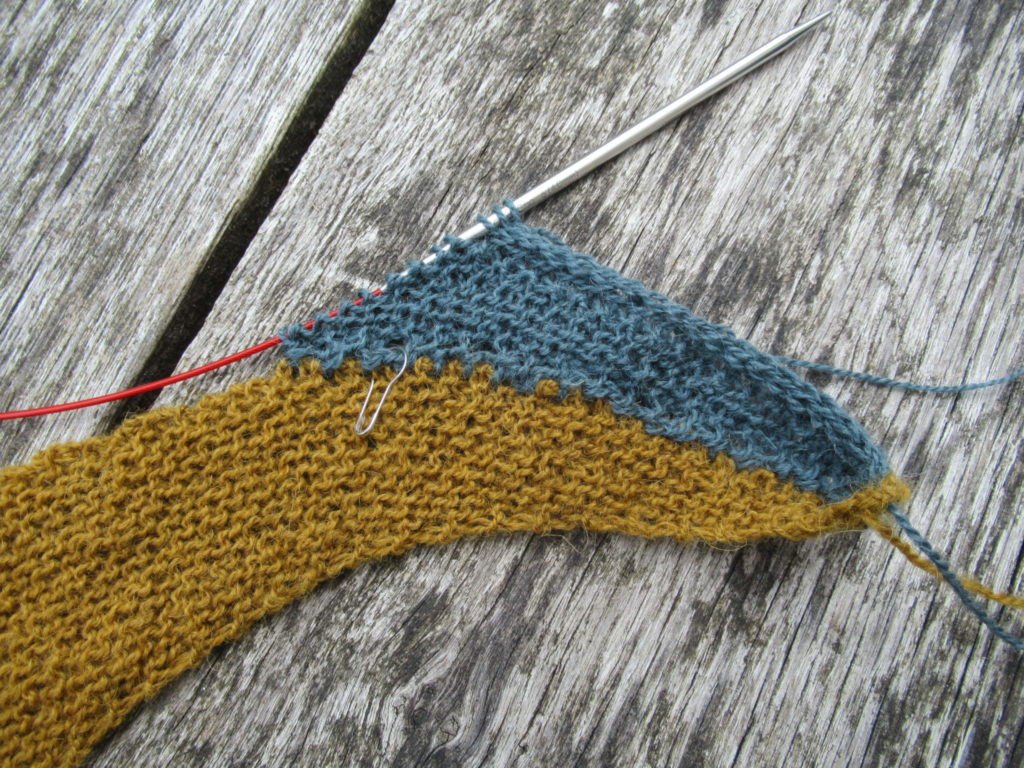
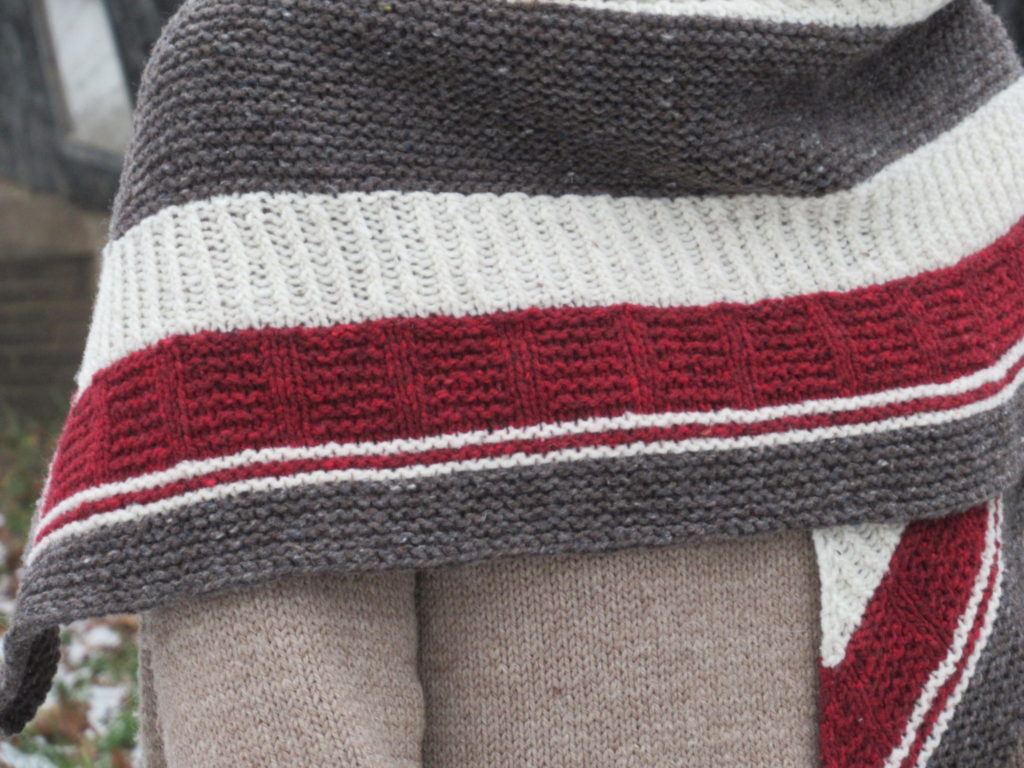
For the shawl I used a pattern called Bradway. It is a fairly quick knit on 5 mm (US #8) needles. The triangle starts with just three stitches and is knit from the middle of the top outwards. It has wide and narrow bands in three different stitch patterns, as the photo below shows from close up:
There are bands in garter stitch, twisted 1/1 rib and ’tiles’ consisting of knit and purl stitches. I was a bit worried that the twisted rib sections would be tighter than the other stitch patterns so that the sections next to them would pucker, but that did not happen at all.
I was not happy with the increases used in the pattern (they did not look good on the reverse side) but that was easy to modify. And the bind-off technique used by the designer was too tight to my taste, so I used a stretchier lace bind-off. (More details about these modifications on Ravelry.)
Bradway is not huge, but big enough to wear wrapped around the neck as a cosy scarf with a winter coat.
The Yarn
I knit Bradway in Brooklyn Tweed Shelter, a yarn that I have been wanting to knit with for ages. It is a gorgeous rustic tweed yarn. For us, in the Netherlands, it is rather expensive, but in my humble opinion it is absolutely worth the price. The colours are fabulous and vibrant, and the tweedy flecks add another dimension. I chose Truffle Hunt (brown), Fossil (natural white) and Long Johns (red).
What struck me while I was knitting with Shelter, was that each of the three colours had a different character. The red yarn (Long Johns) was slightly thinner than the other two as well as more uneven, with thicker and thinner parts.
Looking at the natural white (Fossil) and brown yarn (Truffle Hunt) I could not see any differences, but to my hands they did feel very different. Truffle Hunt somehow felt less supple and the knitted fabric also looked denser than the other two colours. I even wondered if I should use a different needle size. The differences are probably due to the red being dyed and the white and brown being undyed as well as from different fleeces. In spinning I’ve noticed this phenomenon of different colours having different properties, too, even though the wool is from the same sheep breed.
Having said that, the differences did not bother me in the finished shawl. The yarn softened up nicely after a good soak. And blocking evened out any irregularities.
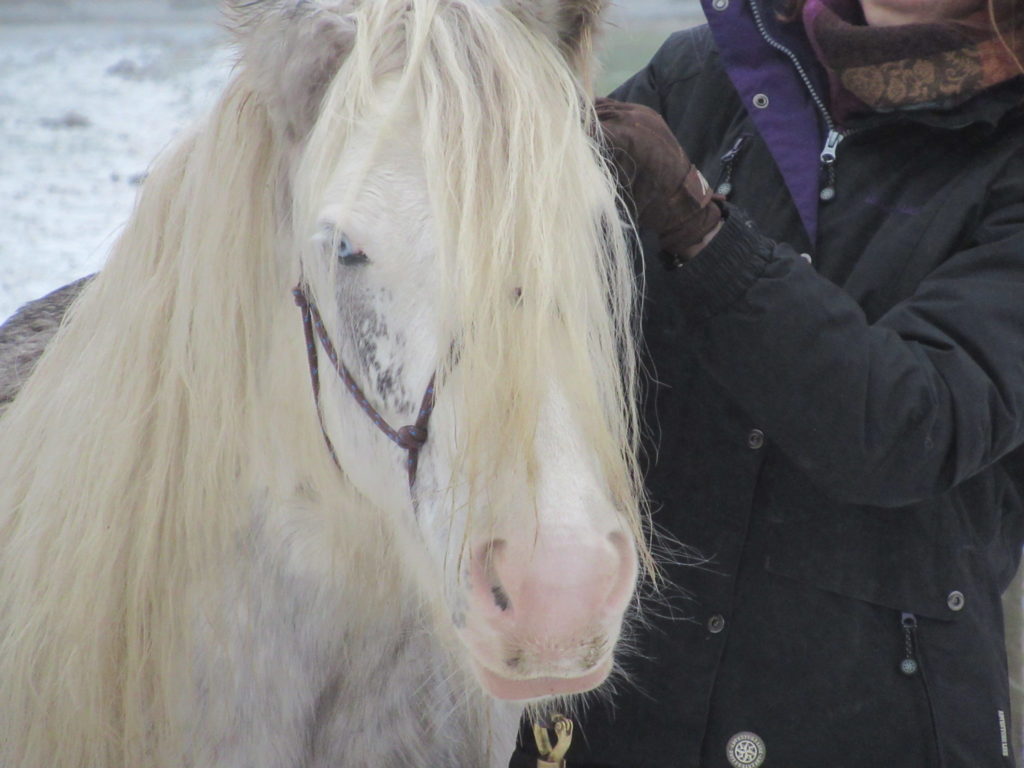
The Horse
The horse? What horse? Well, we decided to combine the photo shoot for this blog post with a visit to our daughter’s horse. She’s so sweet and photogenic. I just couldn’t resist including a picture of her here, in between all the knitting. I hope you don’t mind. Hello Silver!
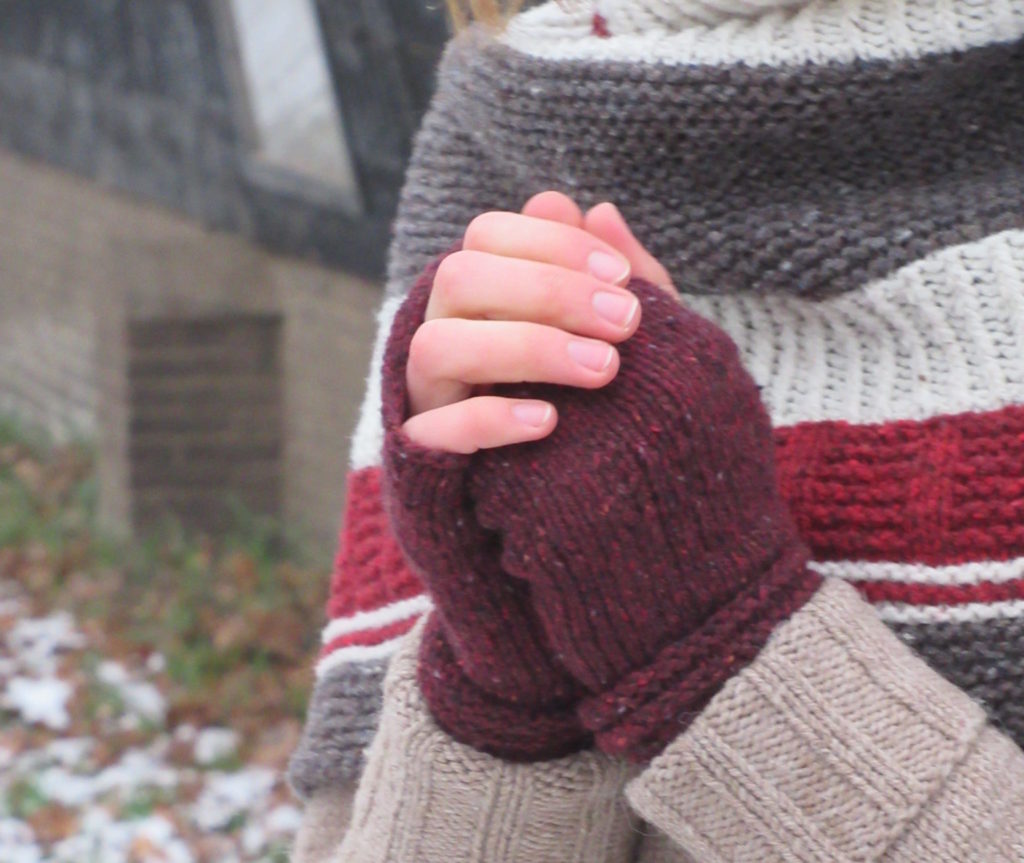
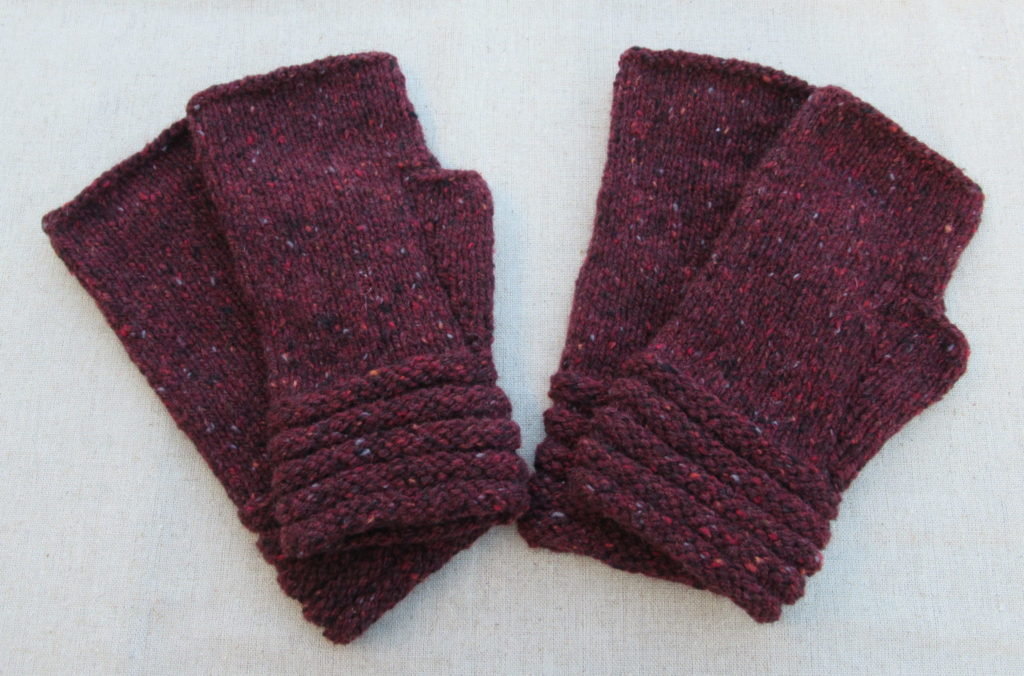
The Mittens
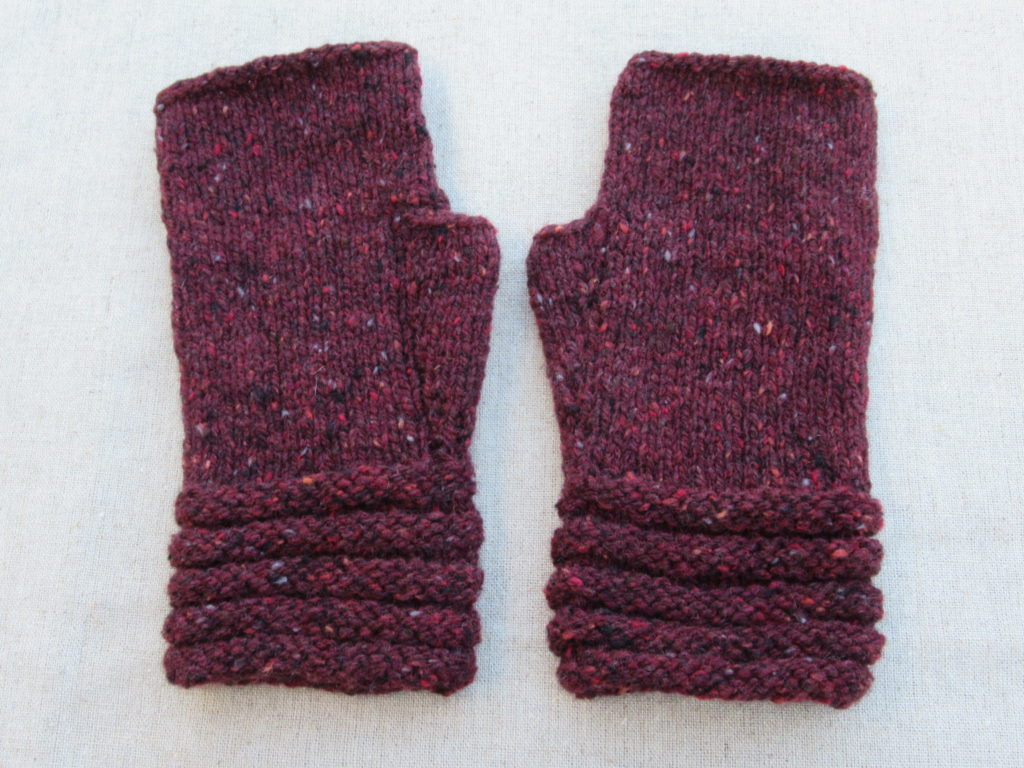
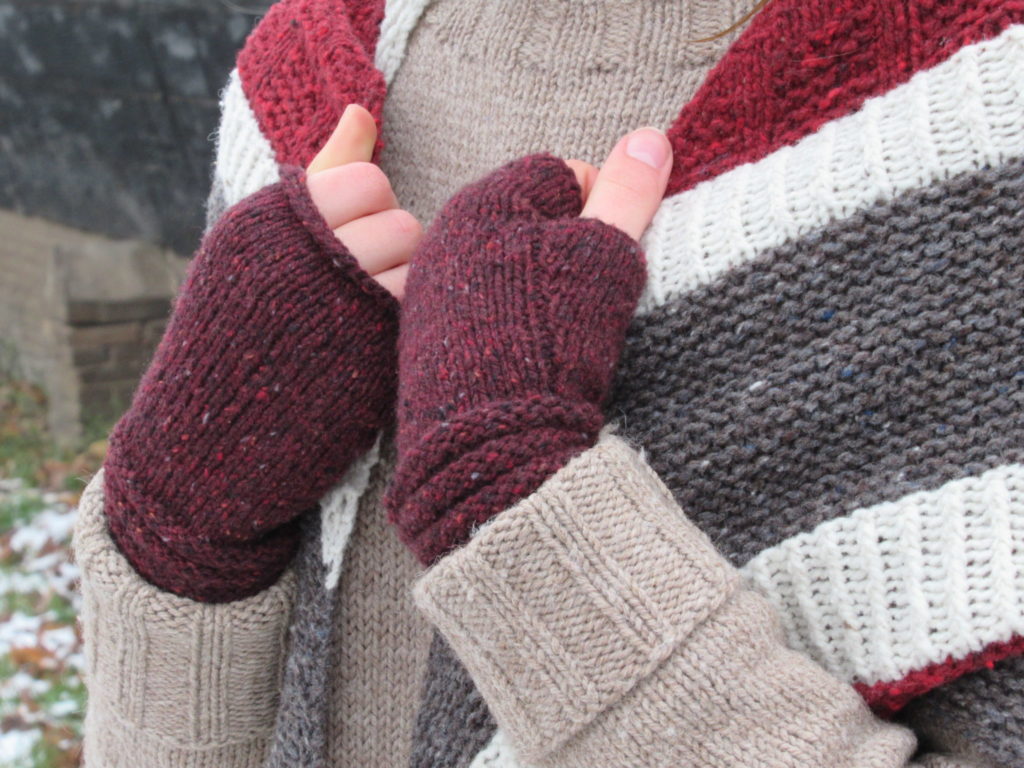
Now, onto the mittens. I’ve knit these Welted Fingerless Gloves several times before, in different yarns. It is such a quick and satisfying knit. Not difficult at all, and just the kind of small project for indulging in a really special luxury yarn (I used Rowan Cashmere Tweed).
‘Welted’ refers to the welts in stocking stitch (US: stockinette stitch) and reverse stocking stitch around the wrist. The really special part about these mittens is the thumb. Actually, they do not have a knitted on thumb, but just a kind of large button hole, which makes them easy to knit and fit perfectly. What I also like is the nice, knitterly detail of a row of purl stitches along the thumb gusset (see photo below).
In fact, I did not knit one but two pairs of the same mittens. The other pair was for the dear daughter of one of my very best friends. I can see her wearing them walking to the bus stop on her way to uni on chilly mornings.
The big gift-giving month of December is over, but I am knitting still more gifts. I have just finished a super soft alpaca cowl and am knitting two more pairs of fingerless mittens, this time for our lovely niece. If you read this, dear niece, the first pair of mittens (the pink ones) is almost finished. Not quite in time for your birthday, but I’ll mail them to you soon!
I’m always on the lookout for new ideas for doable knitted gifts. So, if you have any tips, please let me know. Is there a favourite pattern that you knit again and again?