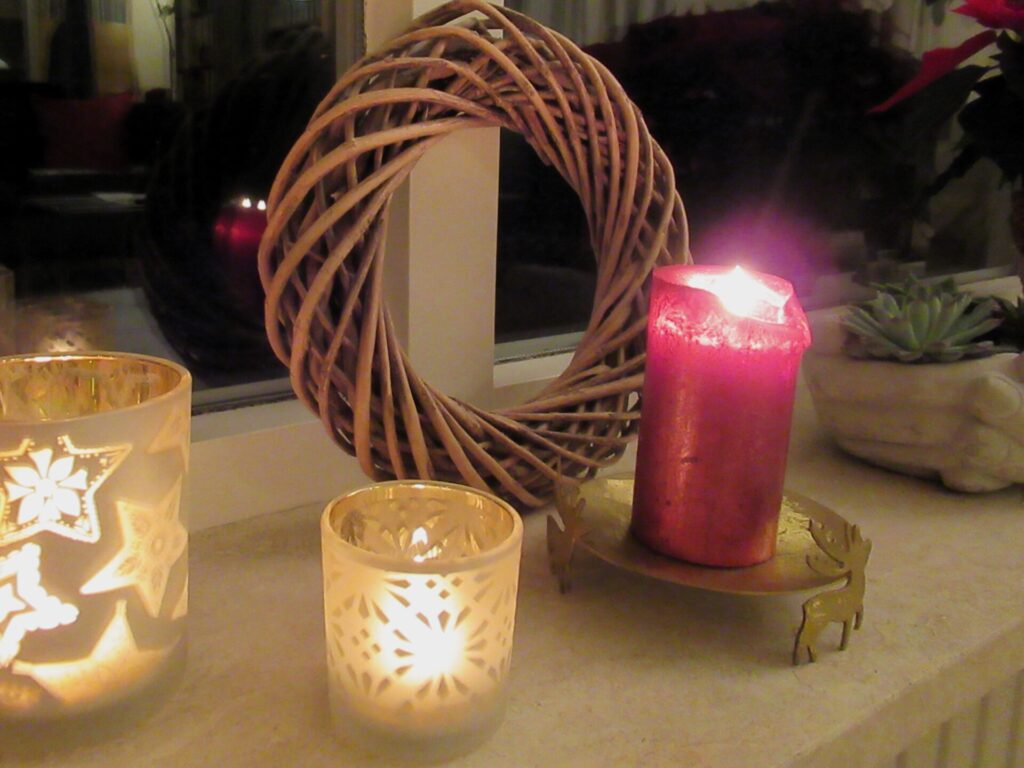
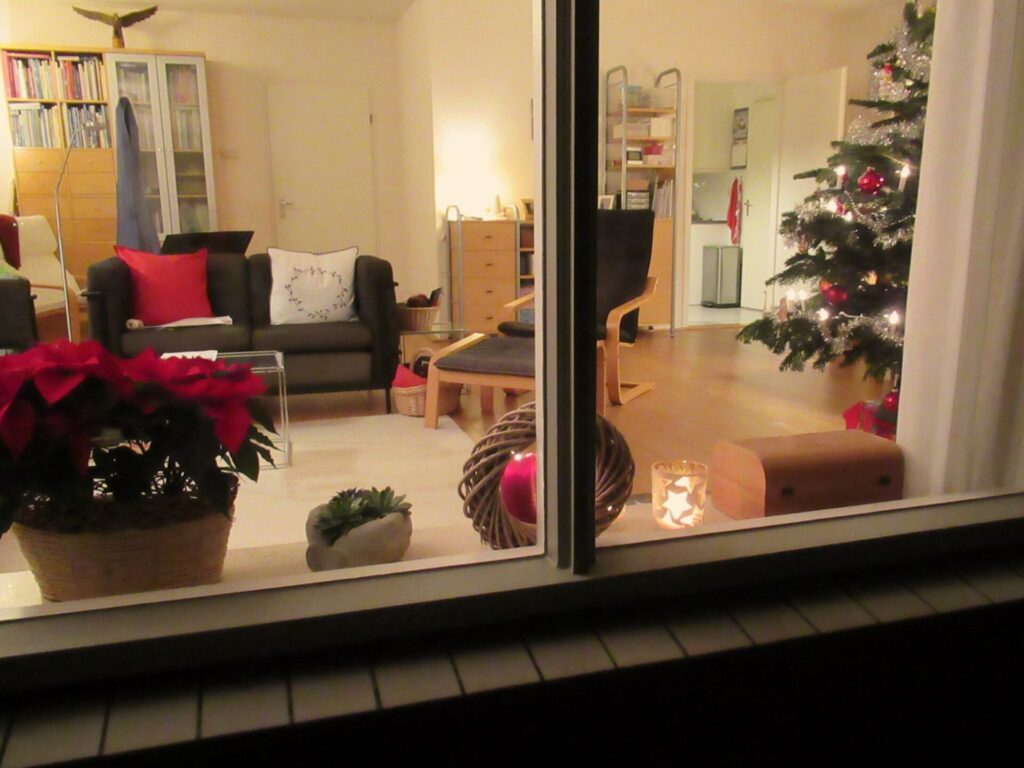
Hello and welcome! It’s a pity I can’t literally invite you all round for some mulled wine or tea, nibbles and a chat, but at least we can spend some time together here on my blog.
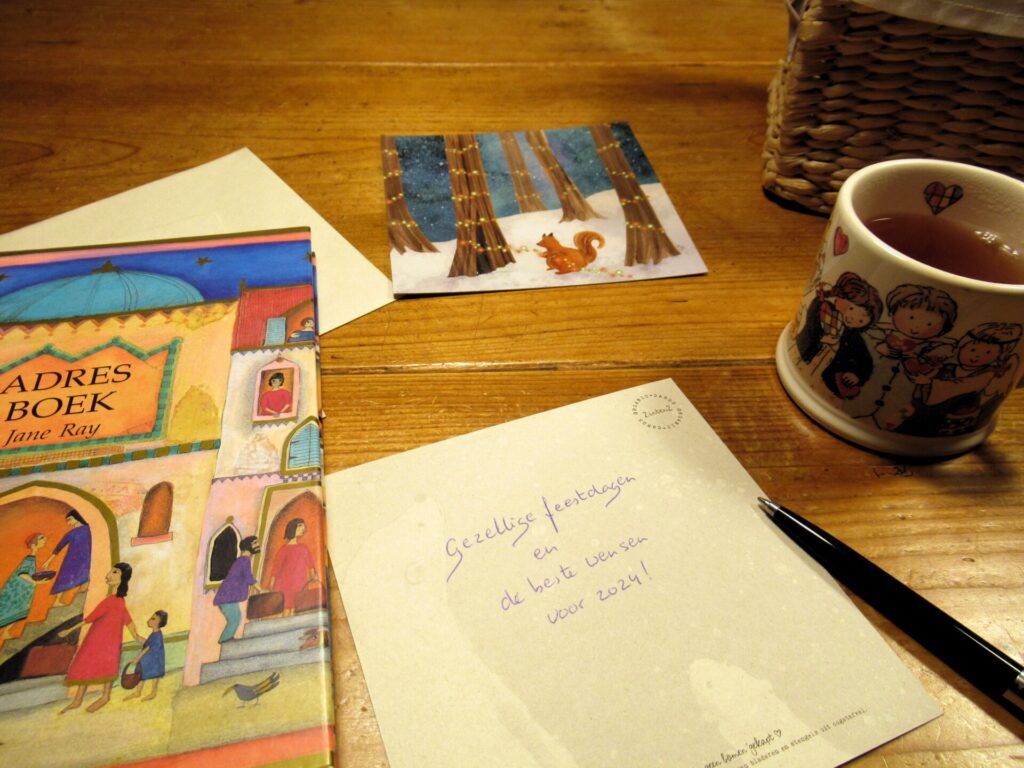
For me, writing a blog post is like writing Christmas cards – a great way to connect. About the card writing my husband said, ‘that’s quite a job, you’ve taken on.’ Not at all. To me it’s like spending some enjoyable moments with all my friends and relatives, holding them in my thoughts and wishing them well.
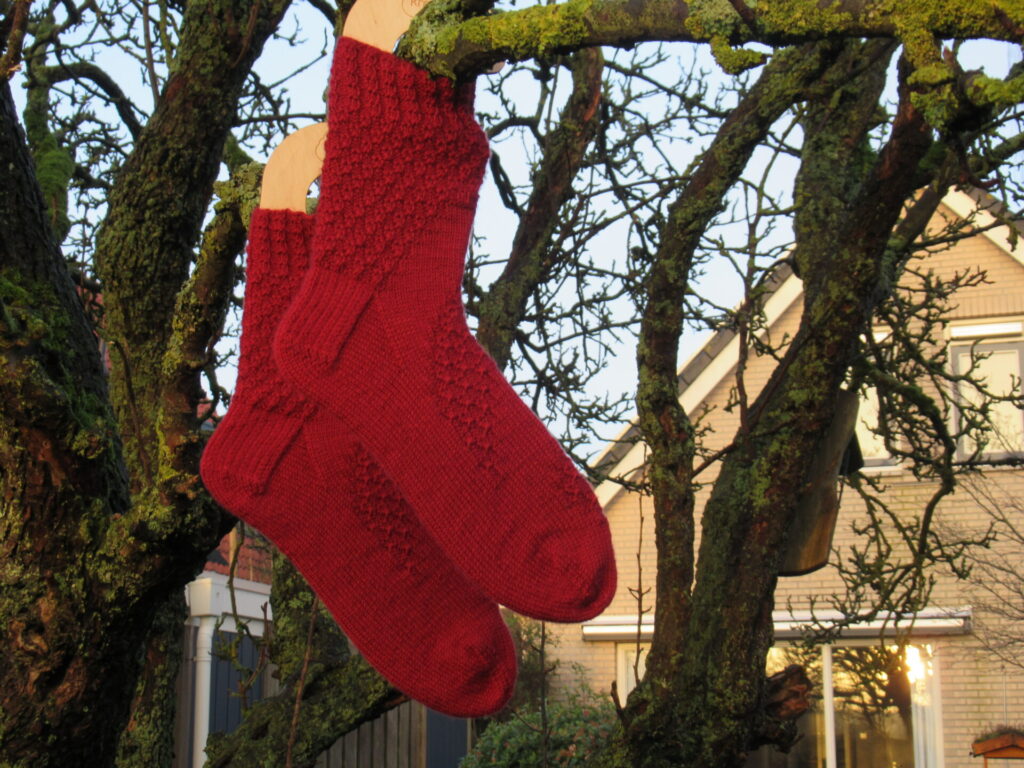
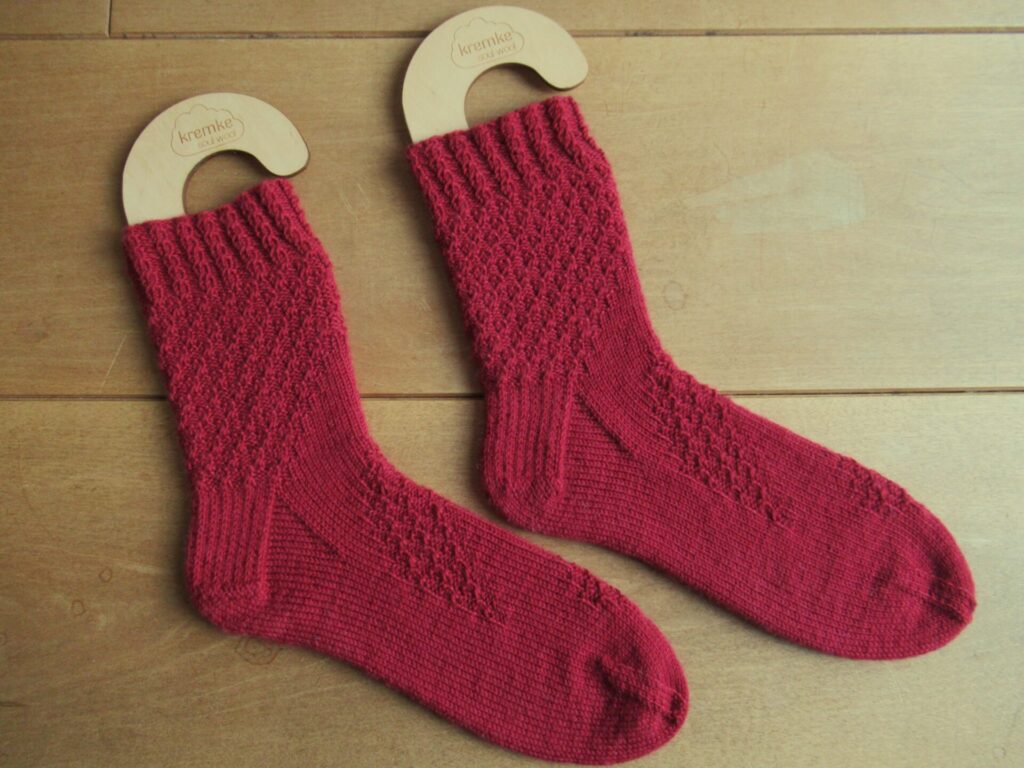
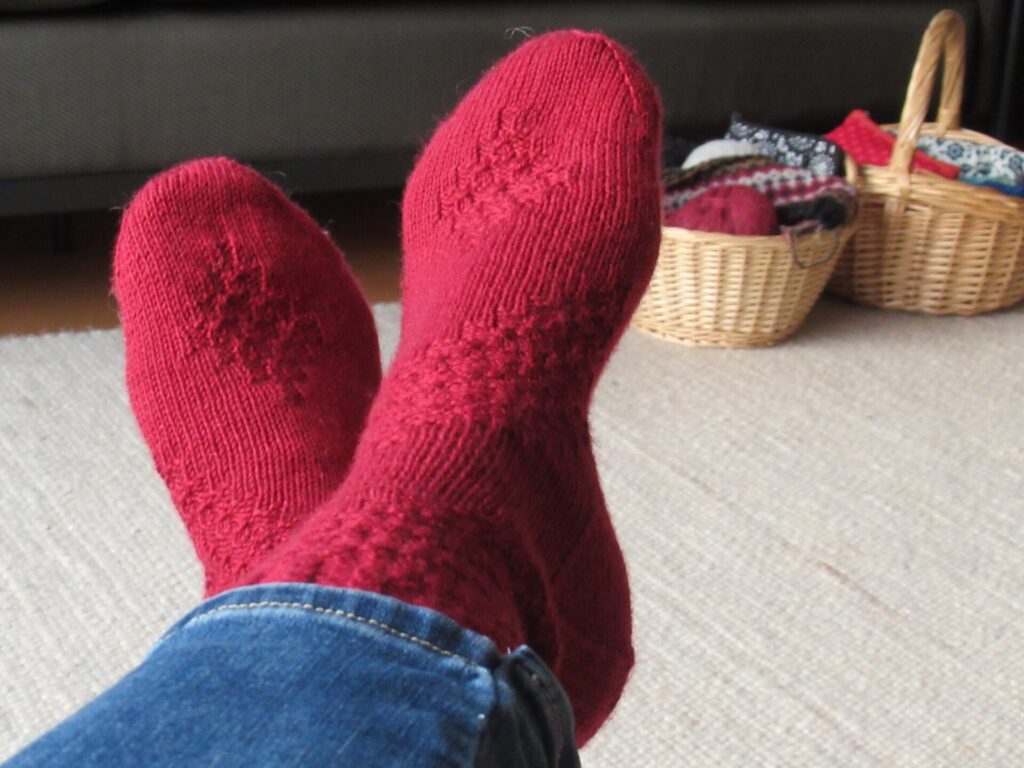
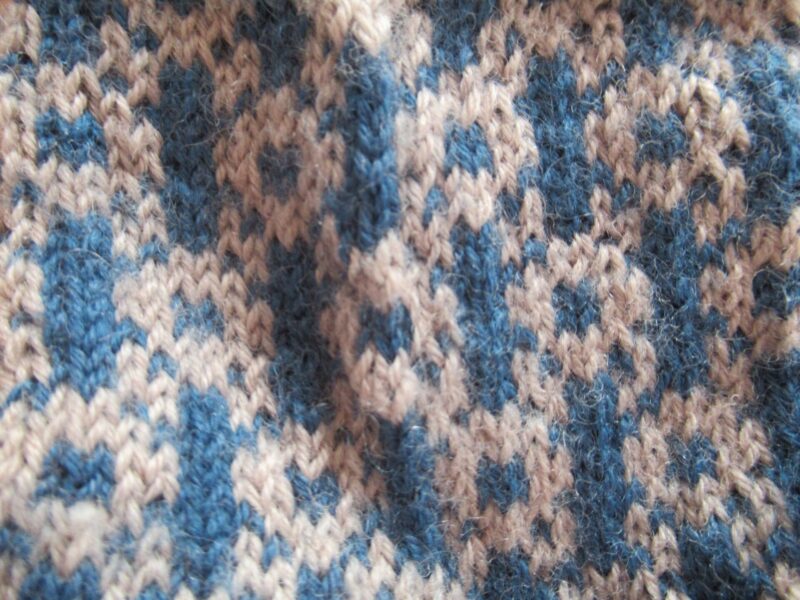
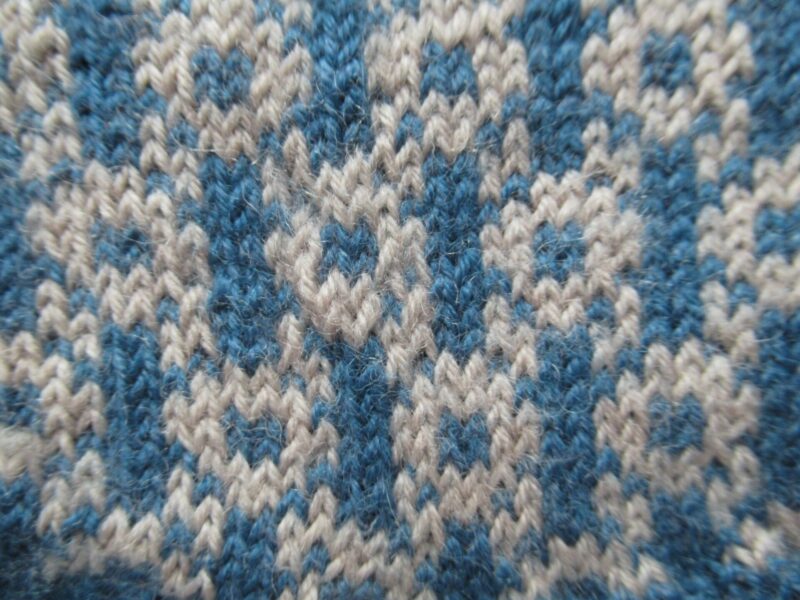
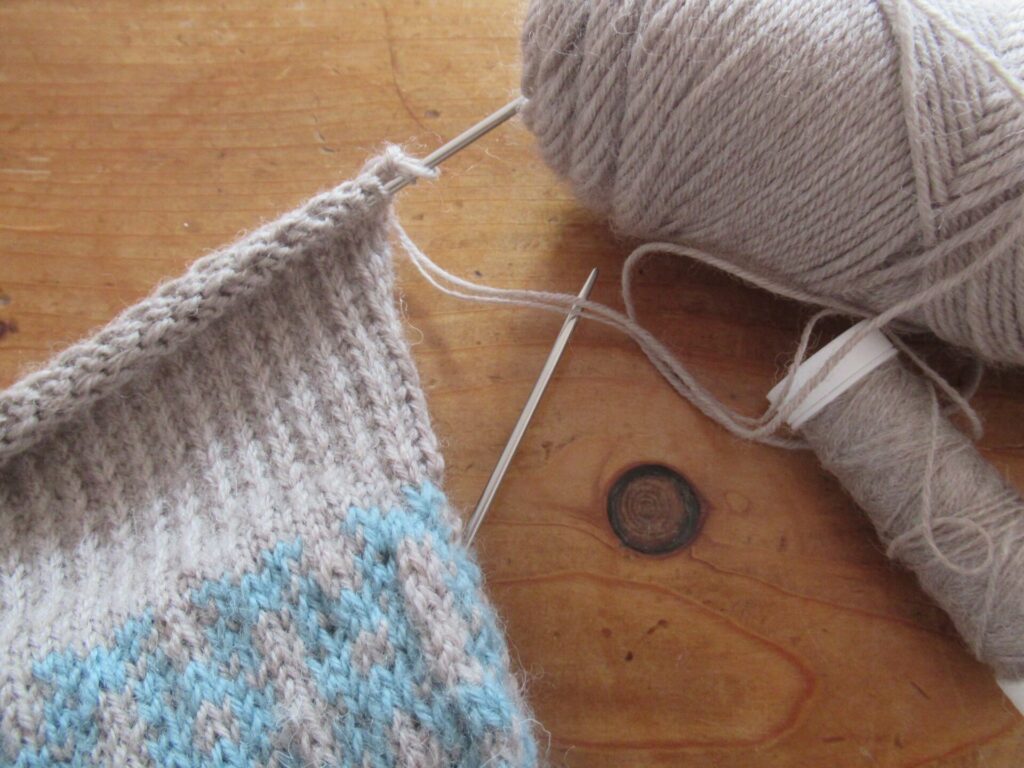
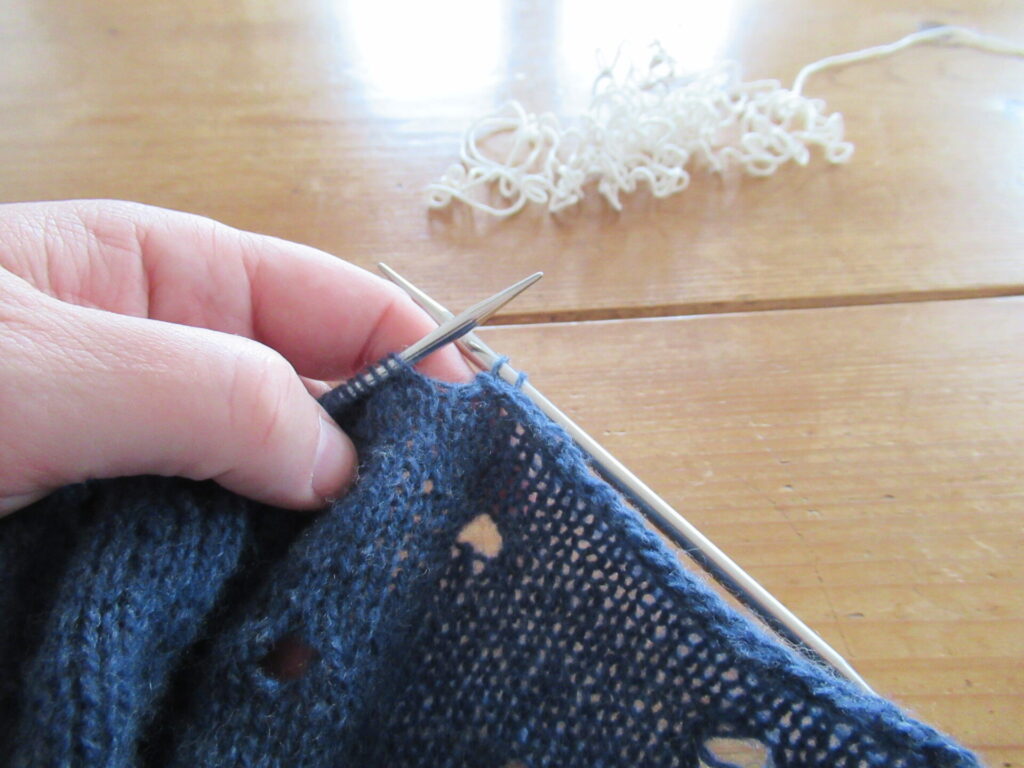
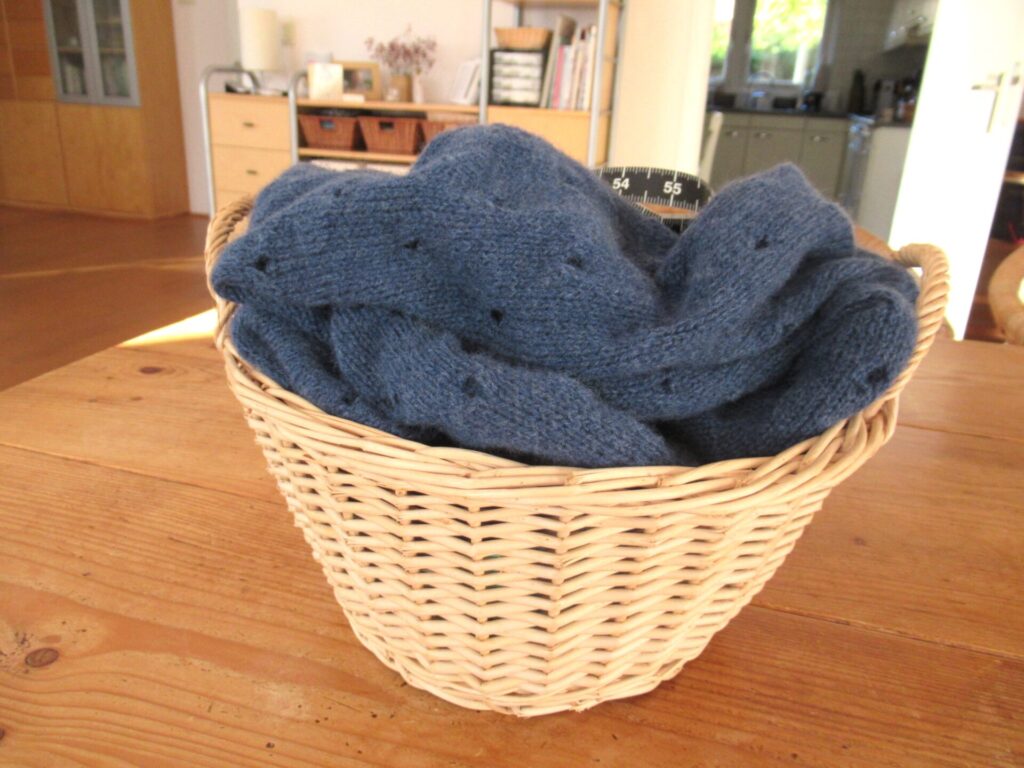
Besides many cards, I’ve also slipped a pair of socks in the mail. They were knit from the cuff down to the toe, with a slip stitch pattern on the heels.
The design is Candle Flame by Mona Schmidt and it’s another pair from 52 Weeks of Socks (here on Ravelry). They have small 2-stitch cables in the cuff. The pattern on the leg and foot is basically the same tiny cable, only alternating the purl stitches and the cables every four rows.
I was going to write up a tutorial about different ways to knit 2-stitch cables, to transcend the look-at-what-I’ve-made level by offering something useful, but didn’t get round to it. Together with many other things, I’m moving it to my could-do list for next year.
In the original design, most of the foot is plain stocking stitch. I didn’t like that very much and added a diamond in the same cable stitch pattern. Candle flames to keep a friend’s feet toasty – isn’t that a lovely idea?
Speaking of candle flames, another friend sent us a card with a quote I’d like to requote here:
‘It is better to light a candle than to curse the darkness.’
Being a therapist, she also gives us some pointers on how to do this, using words like gentleness, self-care, love, joy, sincere attention, connection, hope and humour. Lighting metaphorical candles isn’t always easy and I am grateful to my friend for her message.
I’m taking some time off now, to be with my loved ones, read, go for walks, and knit. Over the next couple of weeks, I’d like to finish the colourwork gifts that didn’t get done in time. They were going to be a surprise anyway and will still be a nice surprise in January, I hope.
I wish you a joyful and peaceful holiday season, with plenty of time for the things that make your candle flame burn brighter. Thank you so much for visiting me here and I hope to see you again in the New Year!
Hello and thank you so much for all your kind responses to last week’s scarf! It’s good to be among people who like and value the same sort of things. I’m only popping in briefly today, with a short post about a small hat inspired by a wee mitten.
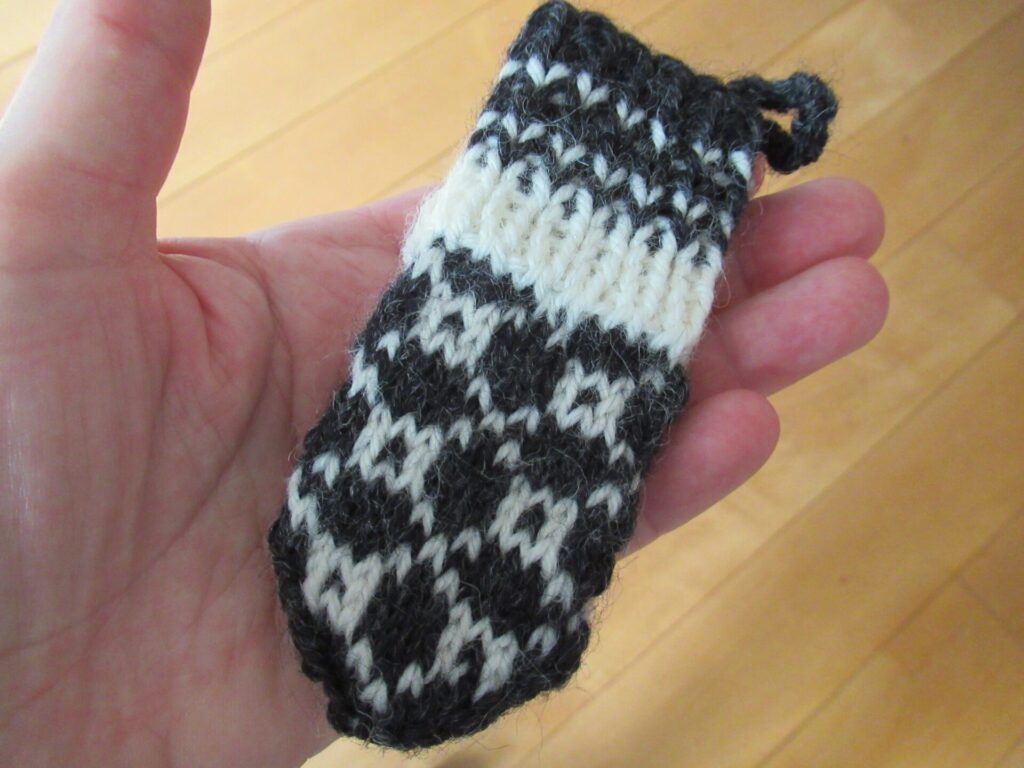
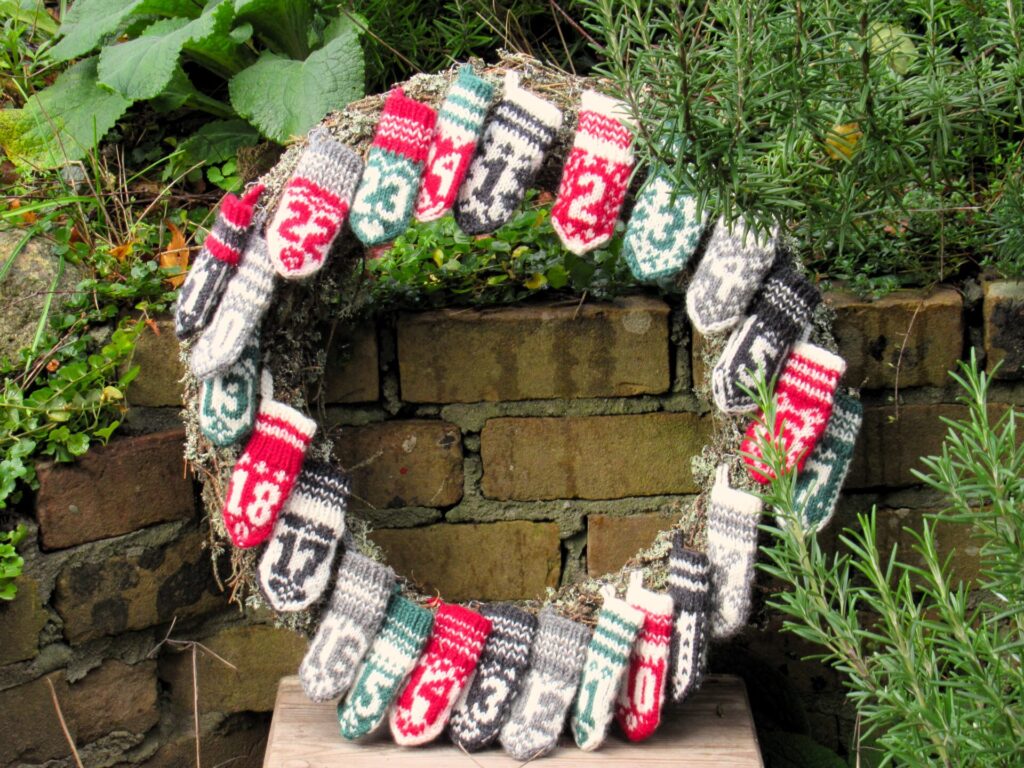
Around this time last year, I was knitting 24 Norwegian Advent calendar mittens. This year, I filled them with tiny gifts, pinned them onto a wreath and gave them away. I was a bit sad to part with them, but know they’ve gone to a good home.
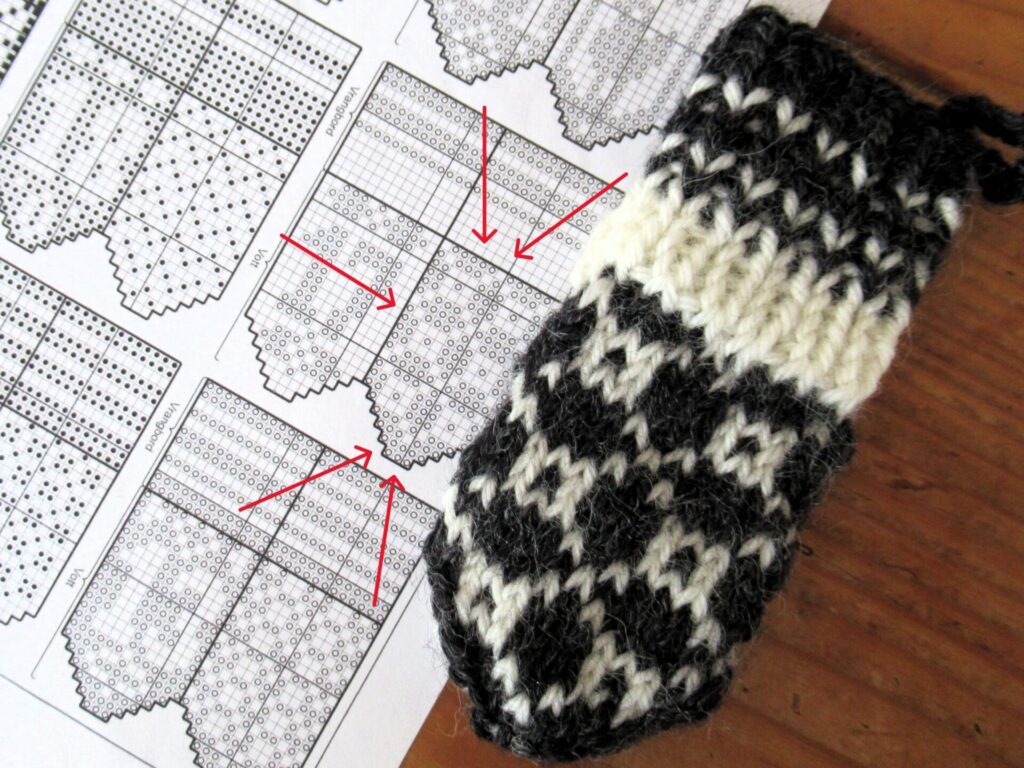
Besides, I’ve still got the pattern and am just as happy with that, because it provides a lot of inspiration. Both the fronts and the backs of the mittens have 2-colour patterns that can be used in all kinds of other projects. Take mitten 17:
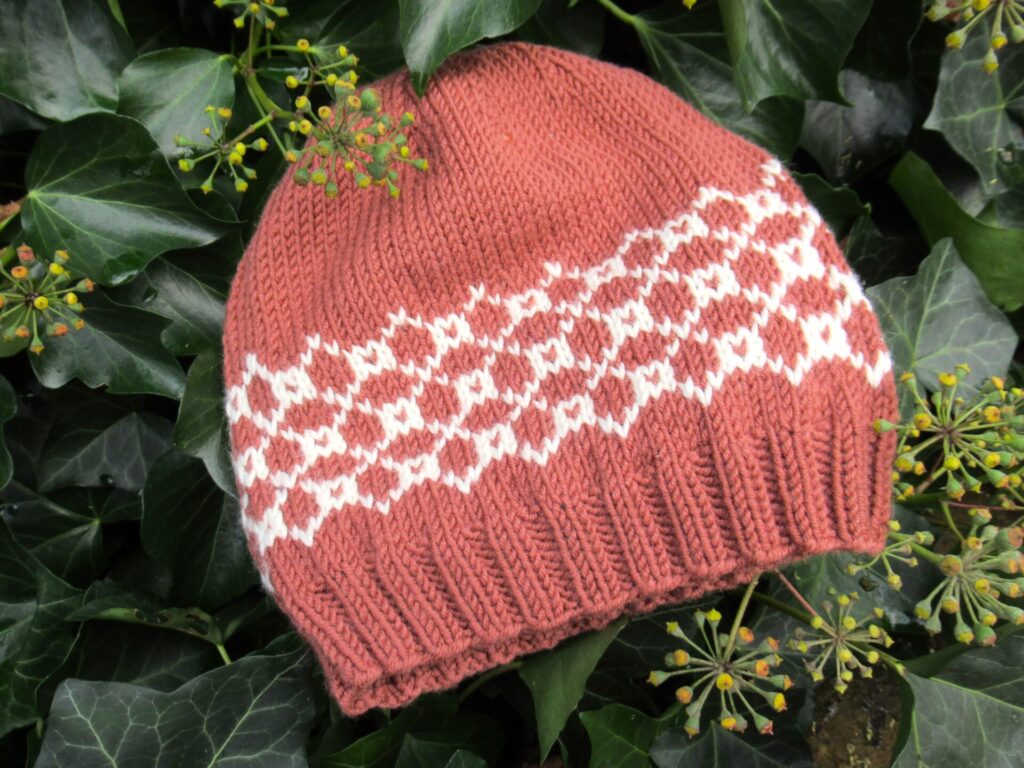
Multiplying the pattern horizontally and working one repeat vertically, I used it to knit a new hat for our grandson.
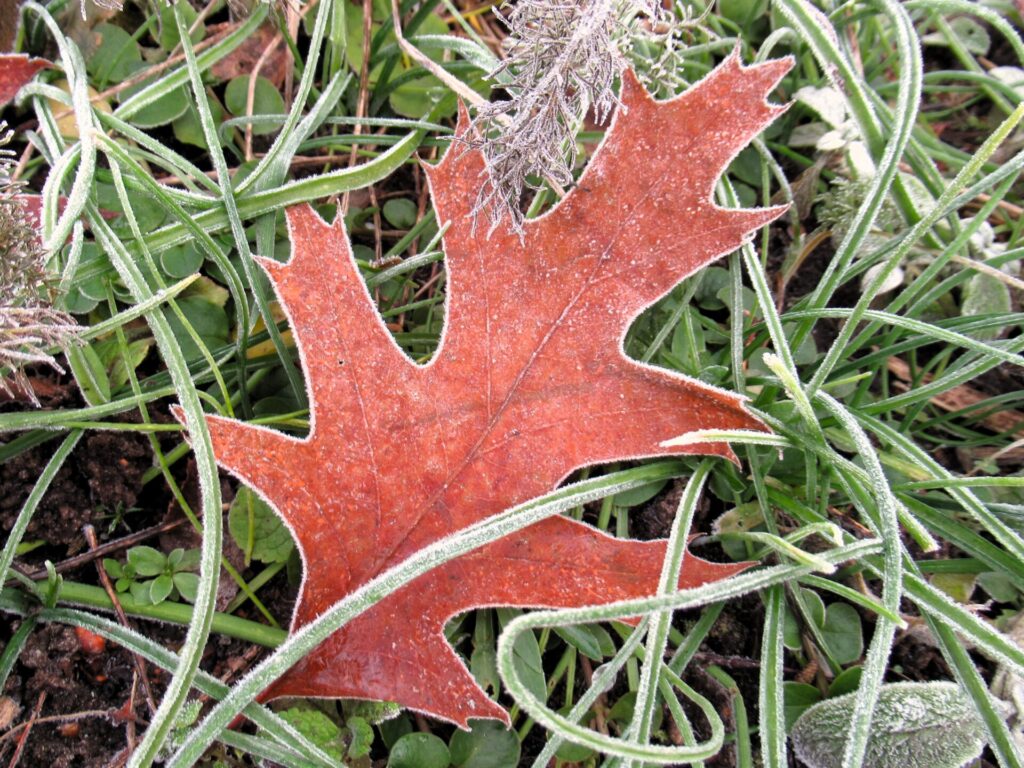
I’d asked his mother about the colour, and she said, ‘fox brown would be nice’. So fox brown it is. Or oak leaf brown.
Oak leaves look so beautiful on misty, frosty days, outlined in white.
A few weeks ago, someone contacted me on Ravelry about the Advent calender mittens. She couldn’t get the pattern downloaded. I tried it out too and, nope, the link wasn’t working. Trying it out again today, I didn’t have any problems downloading it at all! The internet works in mysterious ways.
The Norwegian Julevotter Adventscalendar can be found here on Ravelry. And here is a direct link to the pattern pdf. If you’d like to download it and it isn’t working, trying again another day may be worthwhile. Good luck!
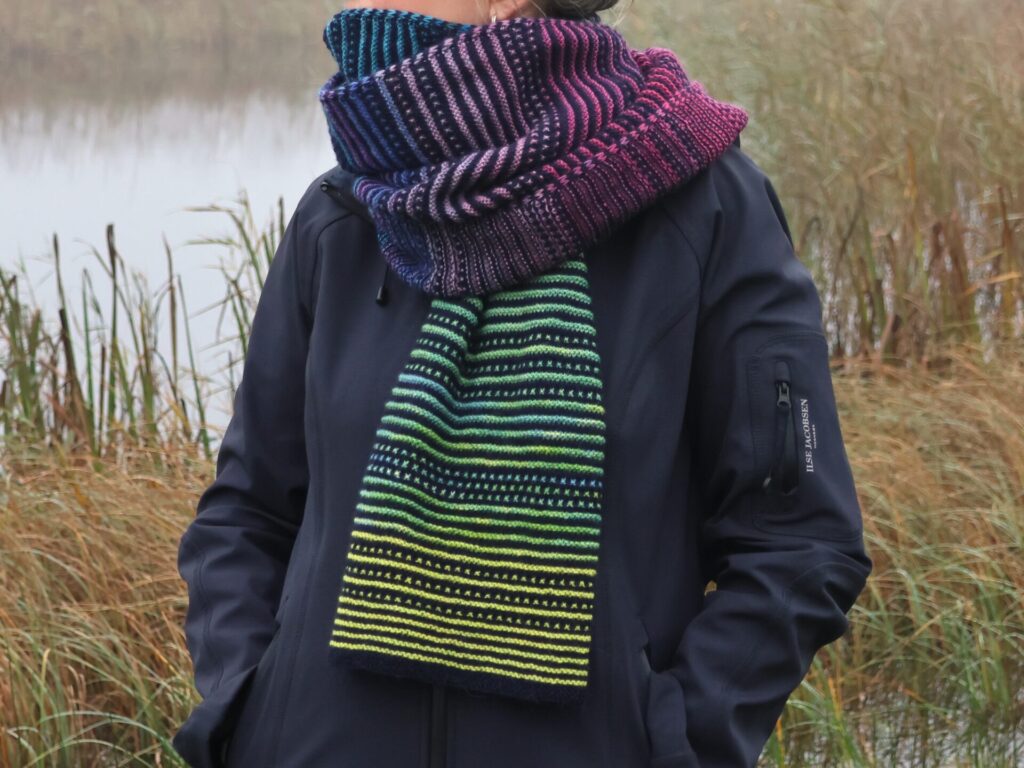
Hello! In between shopping for gifts, knitting gifts, wrapping gifts, and doing everything else that needs doing at this busy time of year, I’ve also wrapped up my Seventh Heaven scarf project. I have been working on it on and off for many months and have now uploaded the pattern to Ravelry. It’s been a fun and colourful journey. Let me tell you about it.
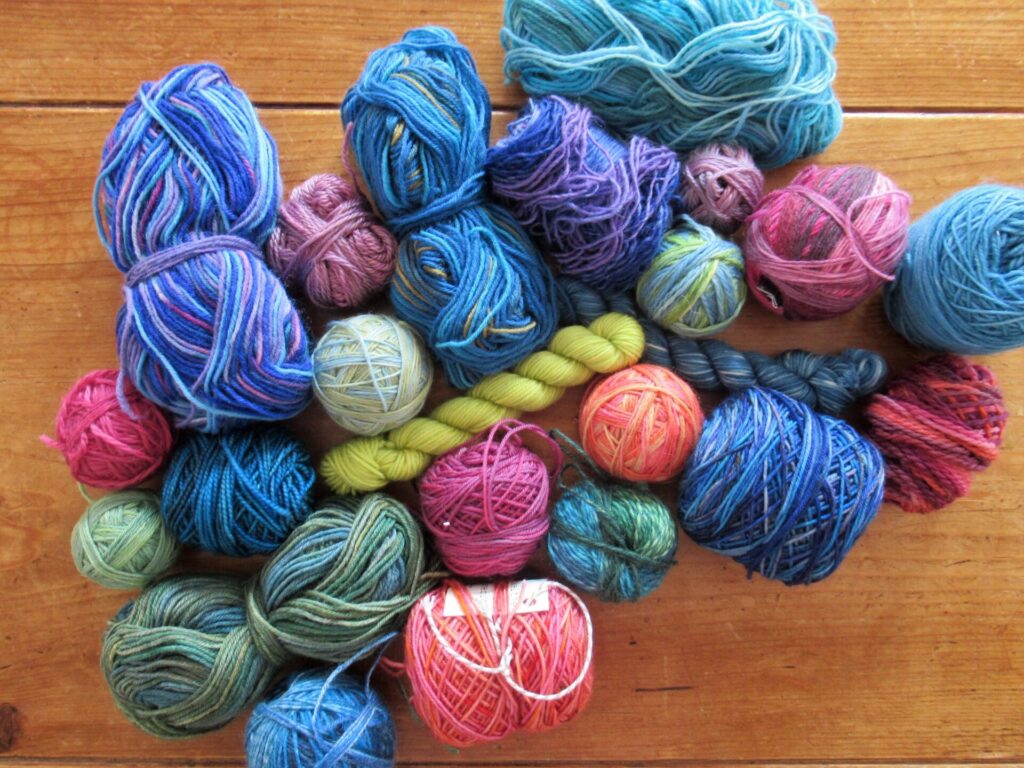
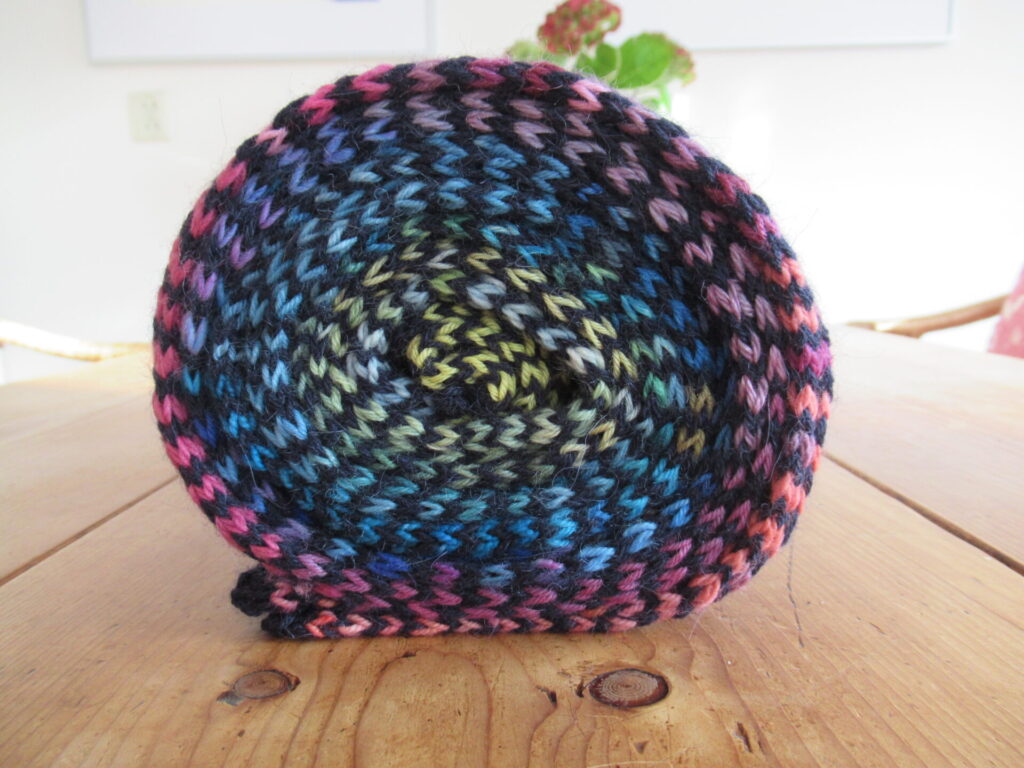
It all began with my search for a simple knitting project, and the idea to do something with my sock yarn remnants and other small bits of fingering-weight yarn.
Inspired by the first knitting booklets I had as a child, I started knitting swatches in simple garter stitch and slip stitches.
I chose a very deep navy blue yarn as a background for my colourful scraps – Isager Sock Yarn, a blend of 40% alpaca, 40% merino wool and 20% recycled nylon. Both the alpaca and the merino wool are ‘easy wash’. Easy wash is an environmentally friendly way to make yarns machine washable without felting or shrinking. I haven’t used this yarn before, but can now say that it is pleasantly smooth to knit with and softens up very nicely after washing.
It was a joy to knit a few rows every day, and the scarf grew and grew.
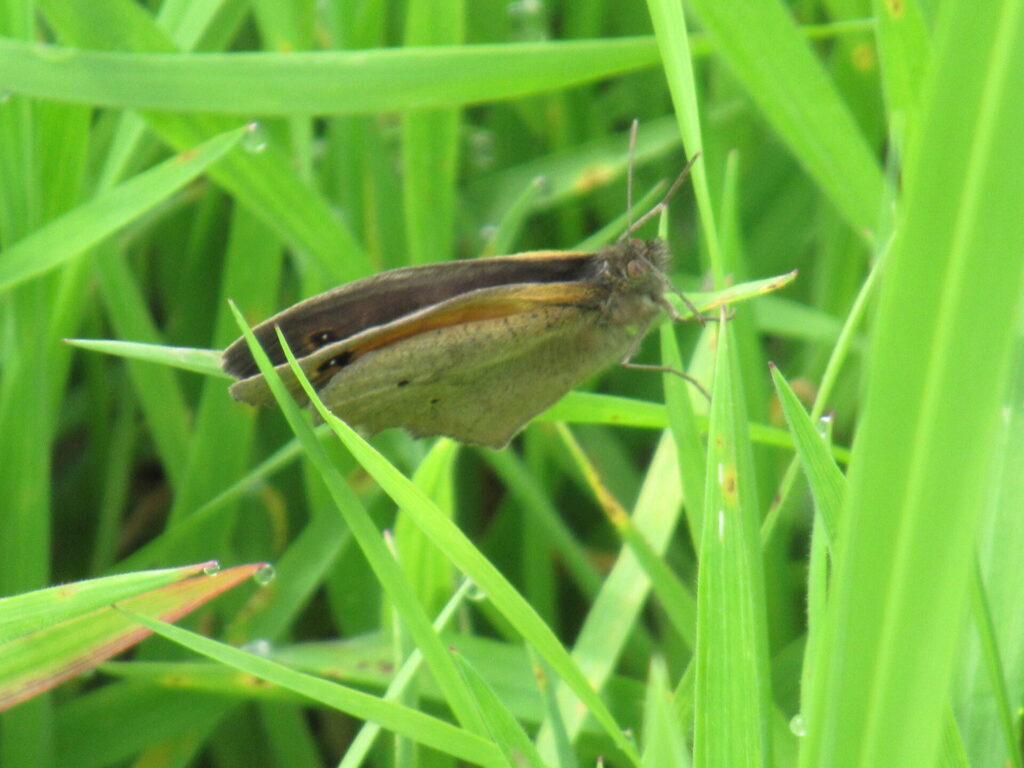
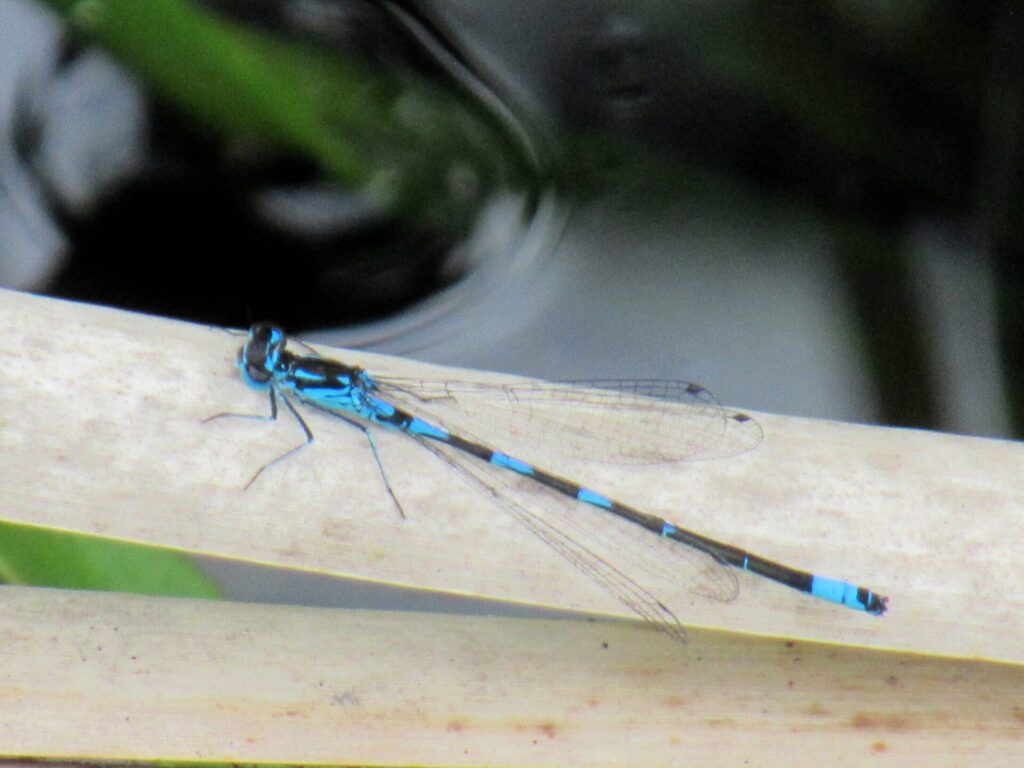
It wasn’t until I’d knit quite a bit that I realized the colours I was using reflected those of my surroundings in spring and summer, in particular the flowers and insects in the wetlands of De Wieden.
I was using the bright greens of fresh young reed stalks and grass…
… the blues of bright skies and damselflies…
… the pinks and purples of thistle, ragged robin and orchid…
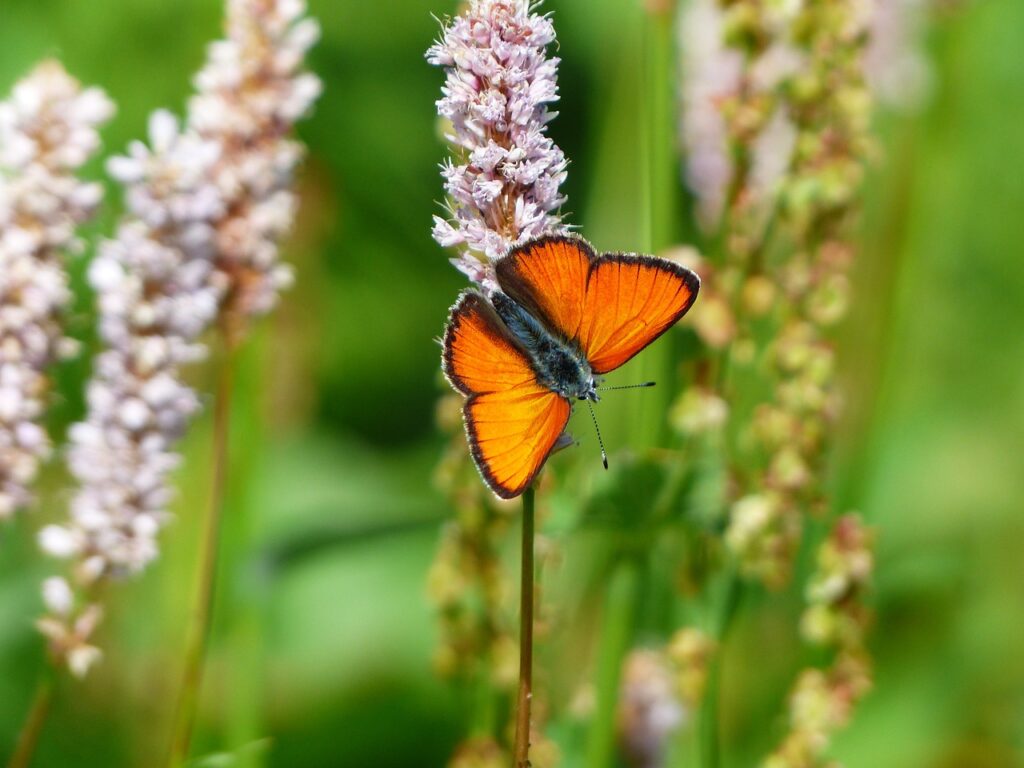
… and the orange of the large copper, a dazzlingly beautiful butterfly. Unfortunately, I haven’t been able to photograph it, because it disappeared from De Wieden about a decade ago. Very sad, but all hope is not lost (more about that further on).
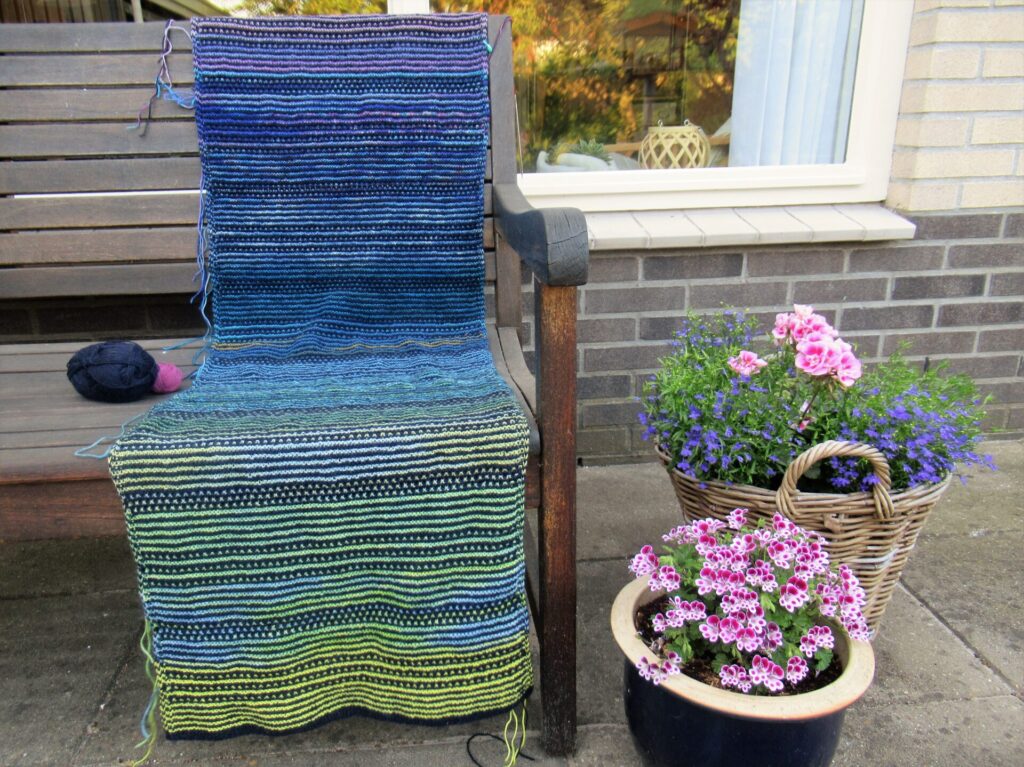
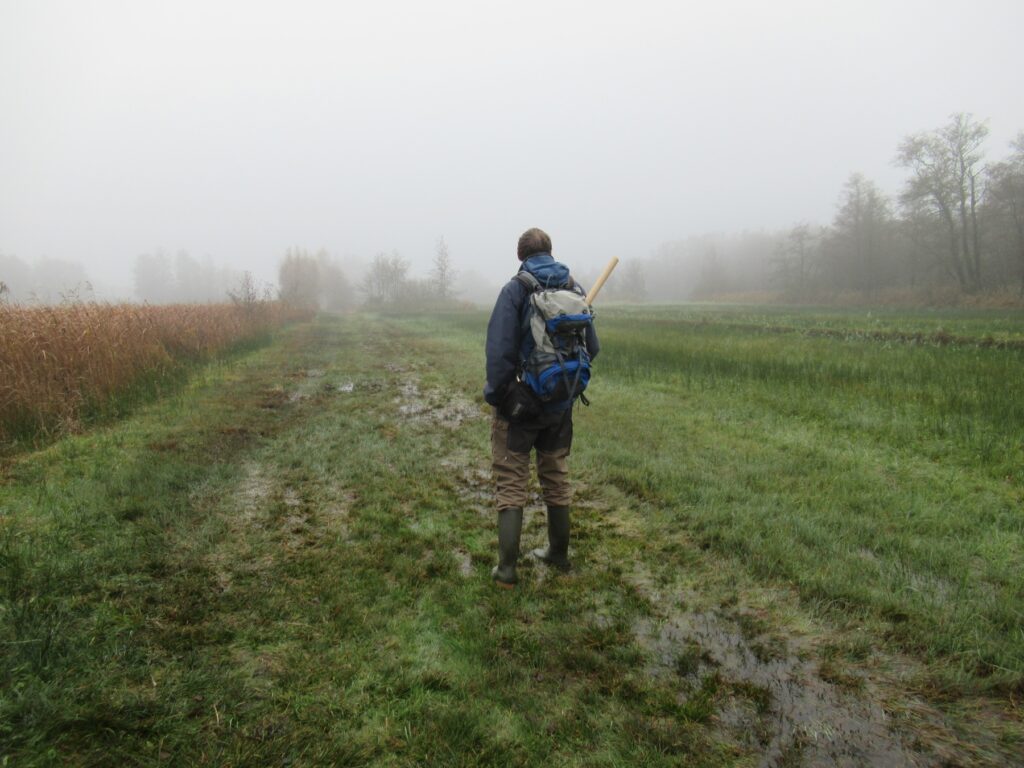
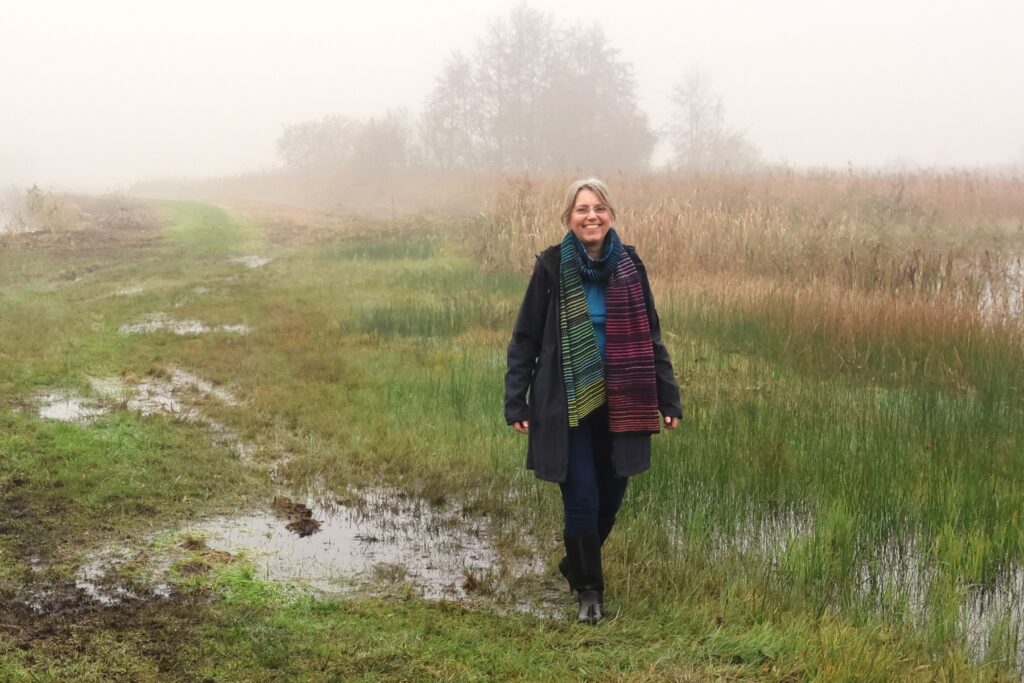
Our photoshoot in De Wieden took place during last week’s foggy walk. My husband carried the scarf rolled up around a long cardboard tube (sticking out from his rucksack) so that it wouldn’t get all crumpled. It’s hard to believe, but the muddy field he is standing in, is a beautiful flower meadow earlier in the year.
This is Seventh Heaven in its full length – a little over 2 metres (80”) long. As you can see from the purple/pink/orange section folded over at the top, the ‘wrong’ side also looks good, with the colours more blended.
It is a generous scarf, but still very wearable.
Because of the fingering-weight yarn used, it is not bulky at all. The colours show up really nicely when the scarf is tied in what I now know is called a Pretzel Knot.
What more can I tell you about the Seventh Heaven scarf? The name was a gift from reader Lynn (thank you again, Lynn – it’s perfect!) and refers to how I feel when I’m in De Wieden, and also when I’m playing with yarns and colours. It has stripes in garter stitch and slip stitches, alternating the background colour and the yarn remnants. Oh, and let’s not forget the lovely I-cord edges!
I thought of giving the Seventh Heaven pattern away as an early Christmas gift to you, my dear readers and Ravelry friends, but have changed my mind. Instead I am turning it into a gift to the large copper .
Large Copper, Photo by Hans via Pixabay
In other words, from now through 2024 I’ll donate the proceeds from all sales of the pattern to Dutch nature conservation organisation Natuurmonumenten, as a contribution to creating the circumstances that will hopefully lure the large copper butterfly back to De Wieden. And it’s not just about saving one almost extinct subspecies of butterfly – the measures taken will also benefit other insects, plants and animals.
It is available in English and Dutch. Besides instructions for knitting the scarf, the pattern also contains tips on choosing yarns and colours for your creating own Seventh Heaven. Should you decide to knit one, I hope it’ll give you just as much joy as it has given me!
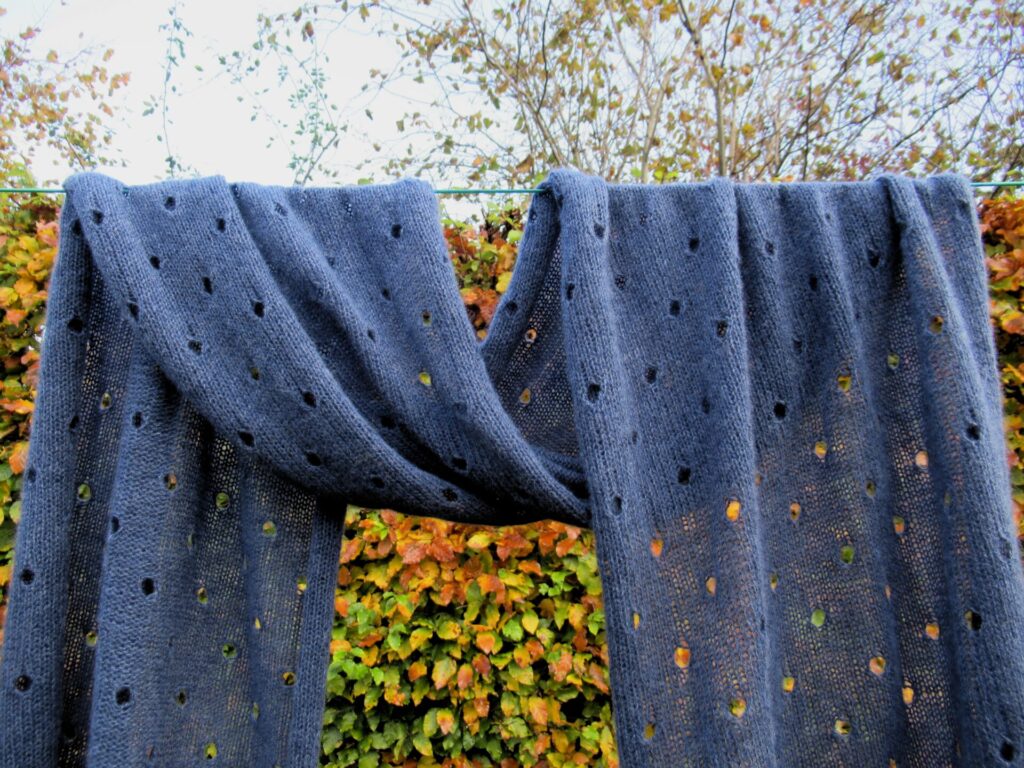
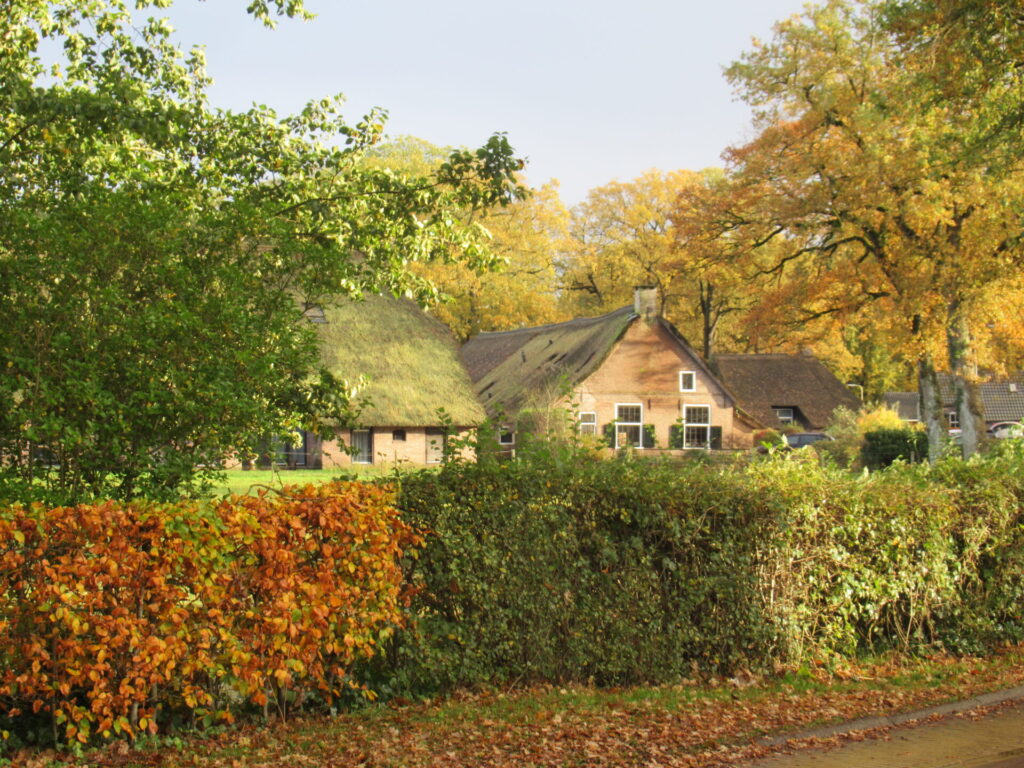
Hello! Draped over the washing line along our beech hedge in its autumn finery is a scarf I’ve just finished. It has an interesting cast-on I’ll tell you about further on, but first a few photos and a bit about the scarf (and about something I found!).
The Polka Dot Scarf, as the design is called, has holes for ‘dots’. A knitting friend sighed, ‘Oh, so much work in such a thin yarn!’ But it wasn’t like that for me at all. For me, it represents many hours of peaceful meditation.
The Polka Dot Scarf pattern can be found here on Ravelry. It is described in two widths and I’ve made the wider version. Knit on 3.75 mm (US 5) needles, mine measures 56 cm by 1.90 m (20 by 74¾ inches) and weighs 150 g. Lightweight, yet warm and cosy.
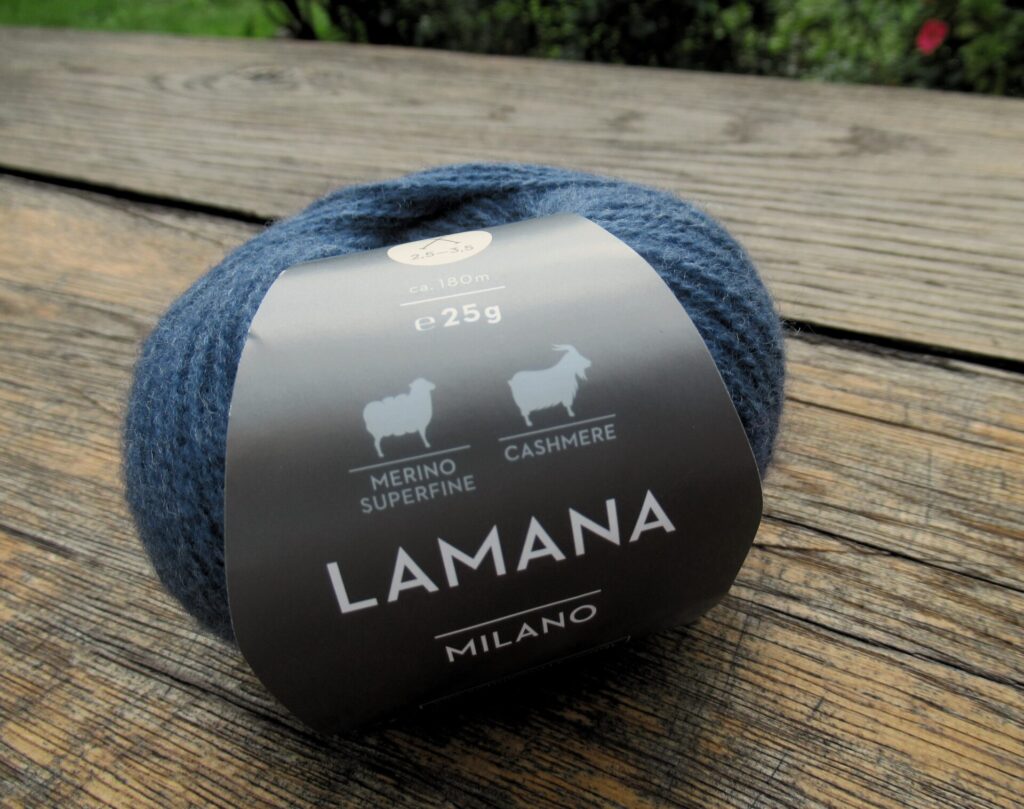
The yarn I’ve used is Lamana ‘Milano’ (90% wool/10% cashmere; 25 g/180 m), a heavy lace-weight in a dark denim shade. The yarn manufacturer has high standards with regard to animal welfare and sustainability, which is a big plus for me.
This is a scarf that really benefits from some severe blocking. (Sorry, forgot to take pictures of the blocking process.) When it was finished I decided that it would be perfect for my grandson’s other grandmother. What do you call someone like that? A fellow nan? A co-granny? Anyway, she wears stylish, unfussy clothes in navy and grey, and I hope she’ll like it.
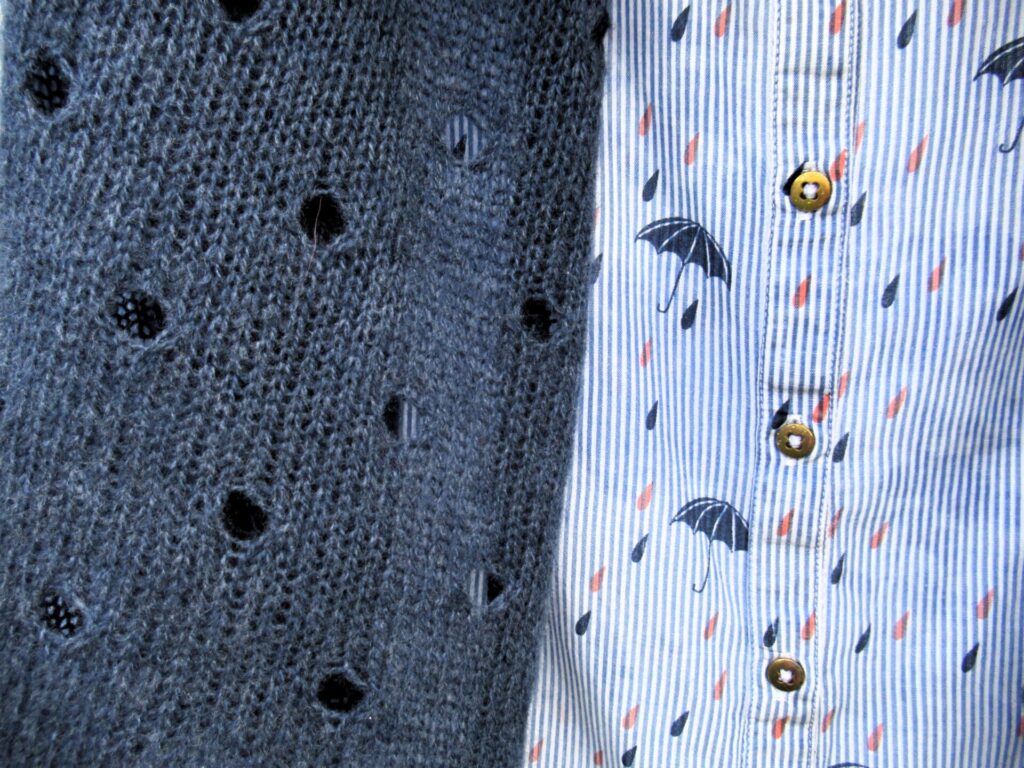
I photographed the Polka Dot Scarf on a blouse with raindrops and umbrellas…
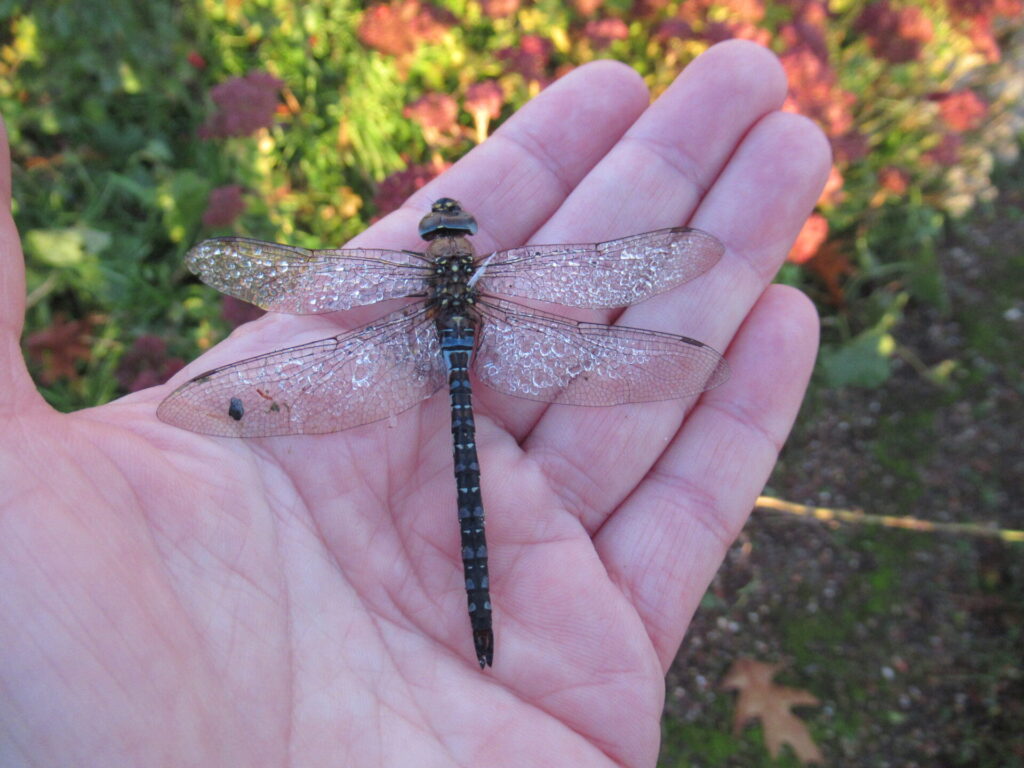
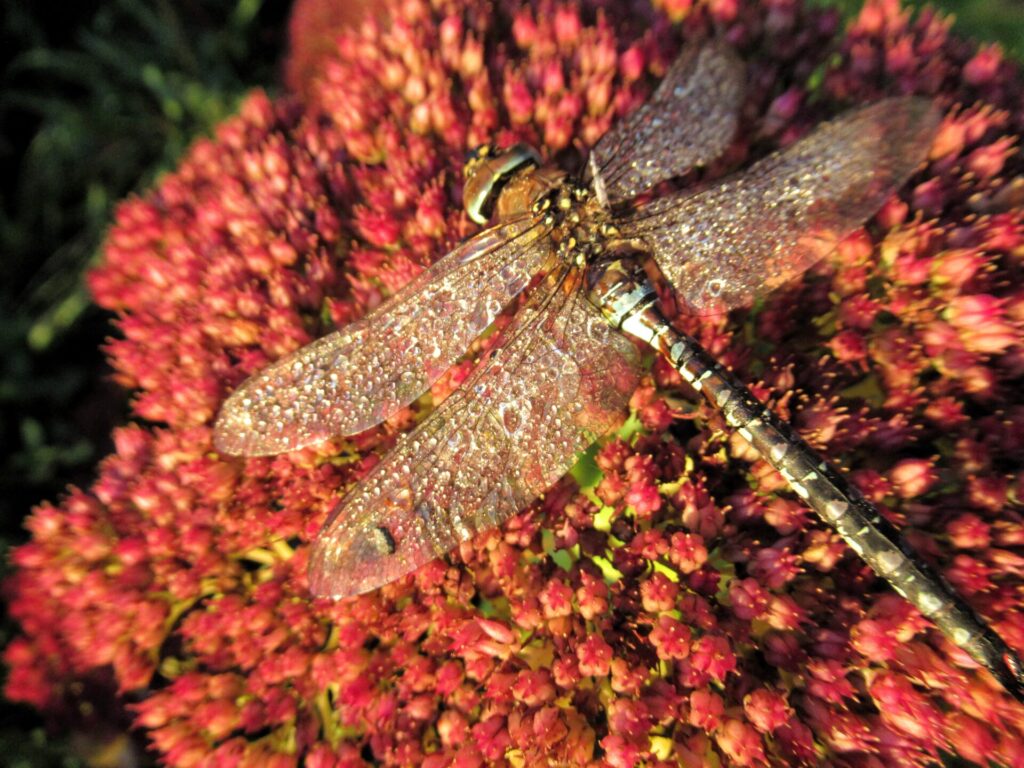
… not just because they looked nice together, but also because the blouse symbolizes the very wet autumn we’re having this year. During a sunny spell on a rainy day, I found a dragonfly in front of our house. A sadly bedraggled but still beautiful creature, with blue markings on its body and head.
It is a migrant hawker, called paardenbijter (horse biter) in Dutch. Does it really bite horses?, I wondered. Will it bite me? And more important: is it alive or dead? The best policy seemed to place it in a sunny spot to dry its raindrop spangled wings and fly away if it was alive or be picked up by a bird if not.
It’s gone now, and I’ll never know whether it’s flown away of its own accord or in a bird’s stomach.
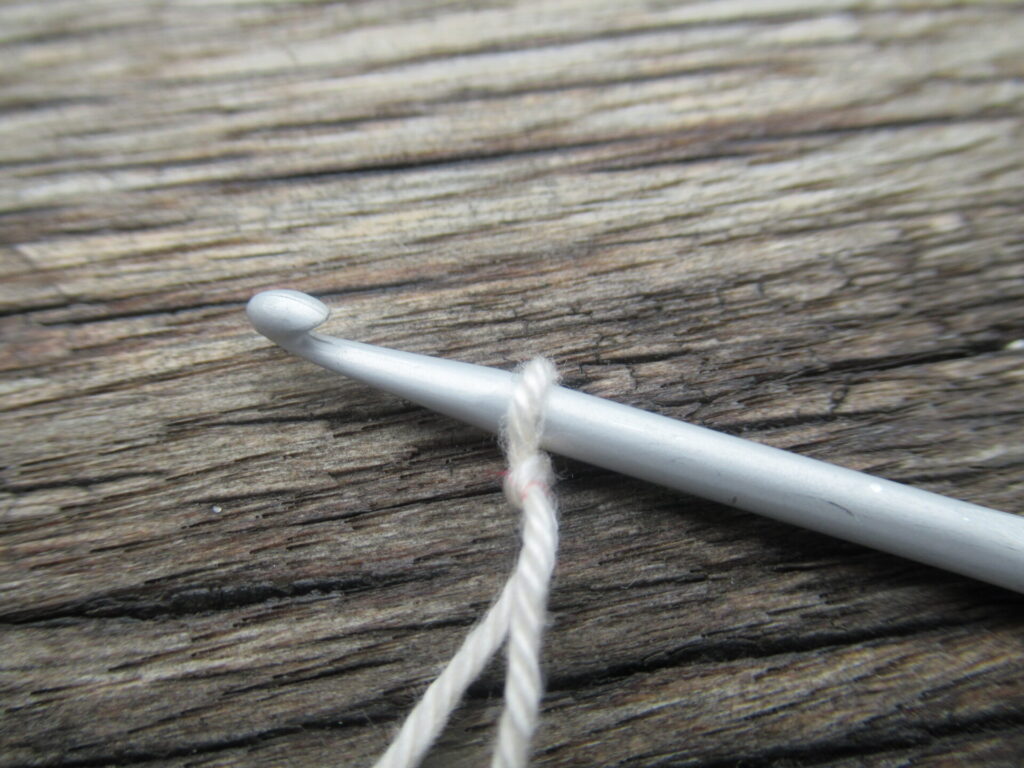
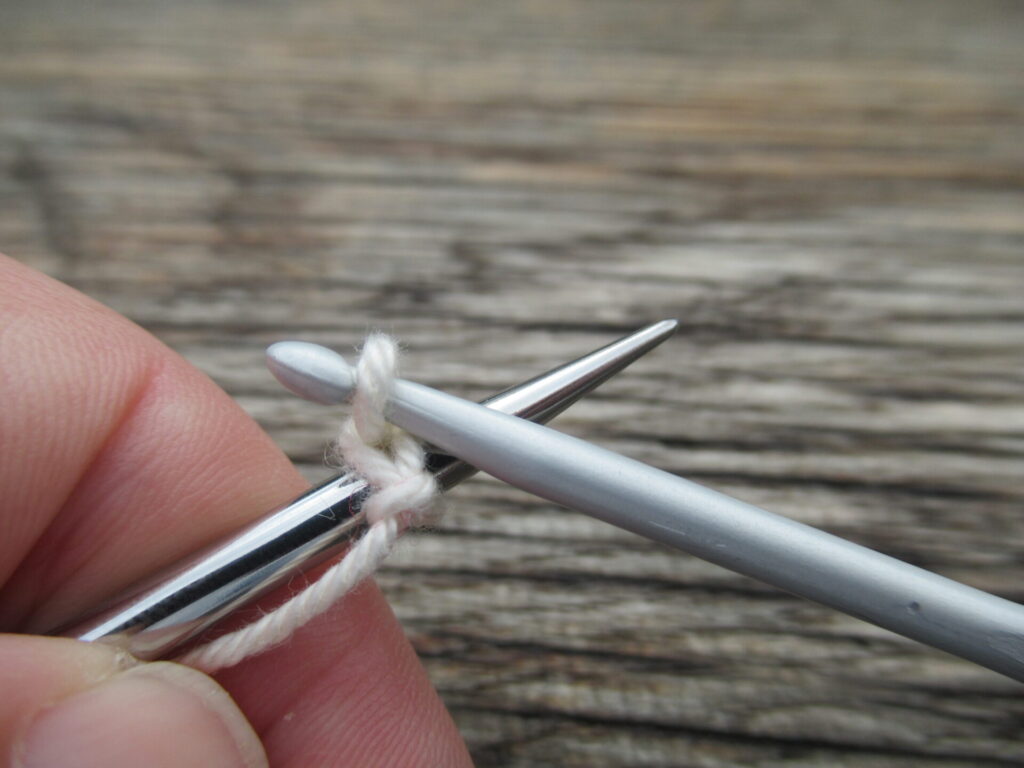
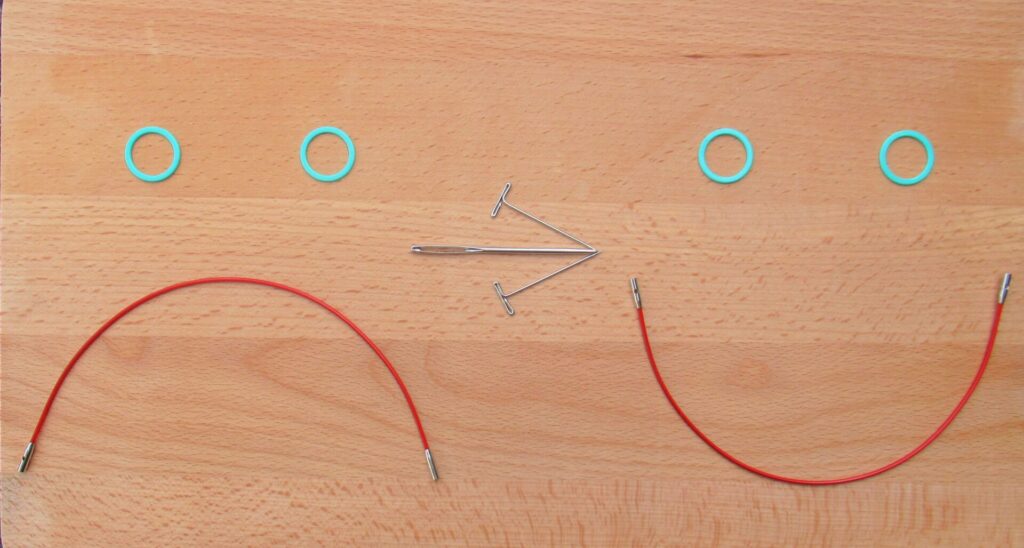
To close off, here is a step-by-step guide to the
Needle-and-Hook provisional cast-on
1 – With a length of smooth waste yarn, make a slip-knot and place it on a crochet hook.
2 – With the hook in your right hand and the knitting needle in your left, form an X. The hook should be on top. Holding the thread behind the knitting needle, wrap the yarn around the hook…
… and pull it through the loop. Now the first stitch is on your needle.
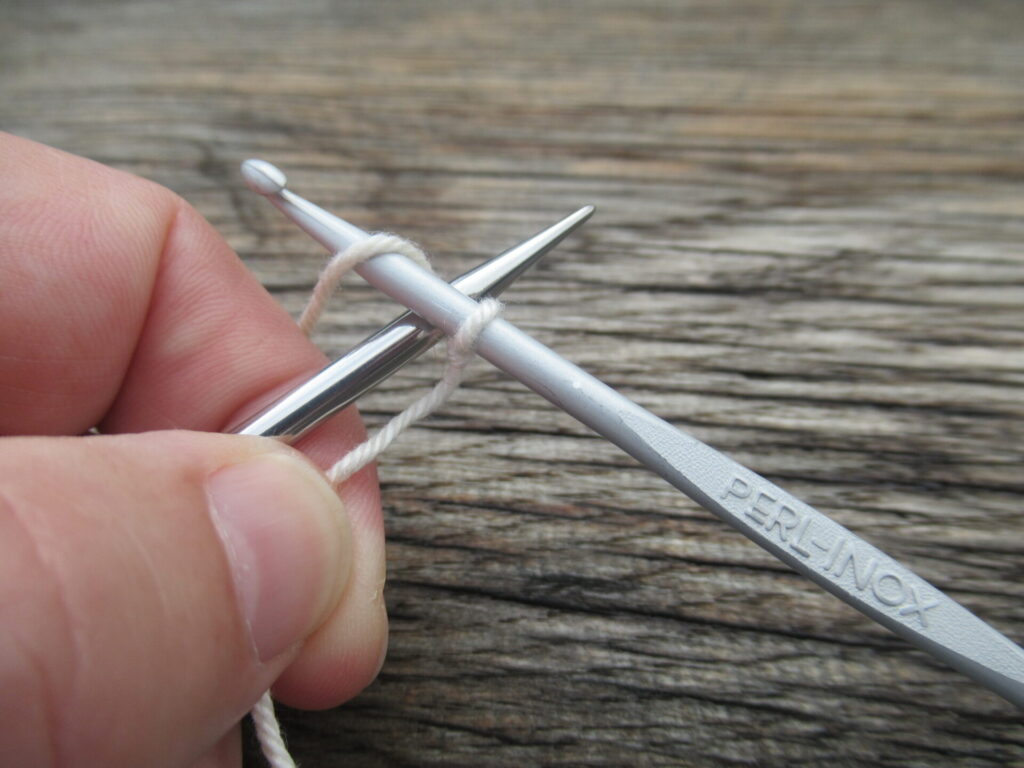
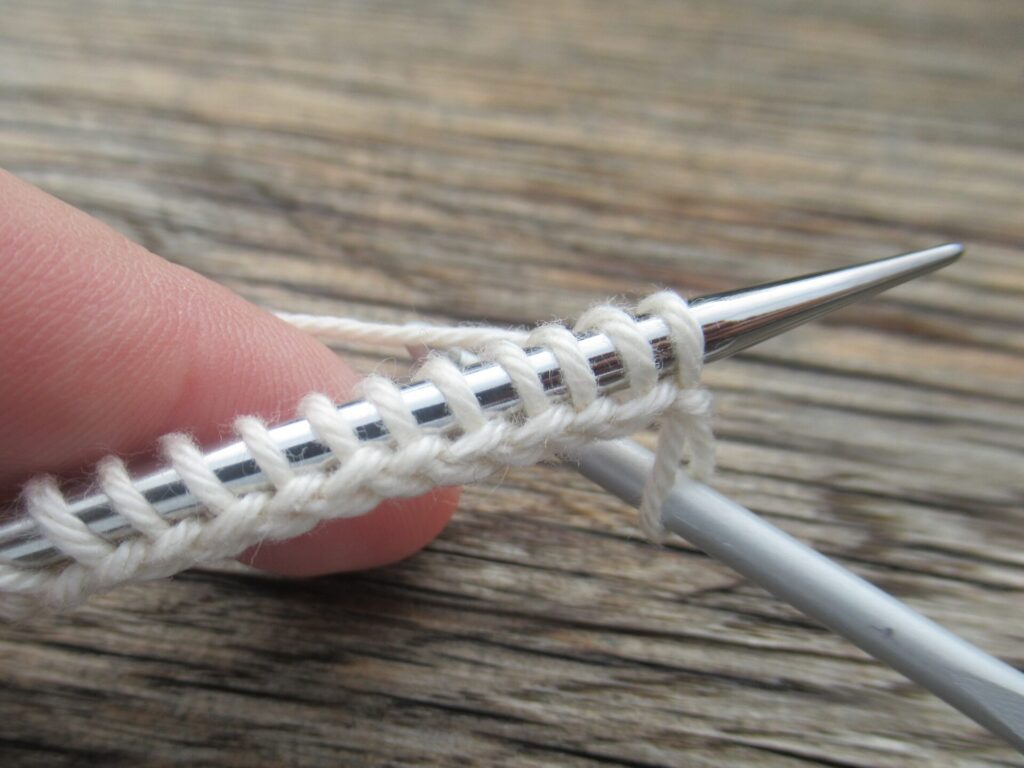
3 – Passing the yarn between the knitting needle and the hook, bring it back behind the needle and repeat step 2 until you have the required number of stitches on your needle.
4 – Crochet a few chain stitches at the end. Hang a stitch marker from the last stitch to remember where to start unravelling later on. Now, start knitting with the yarn chosen for your project.
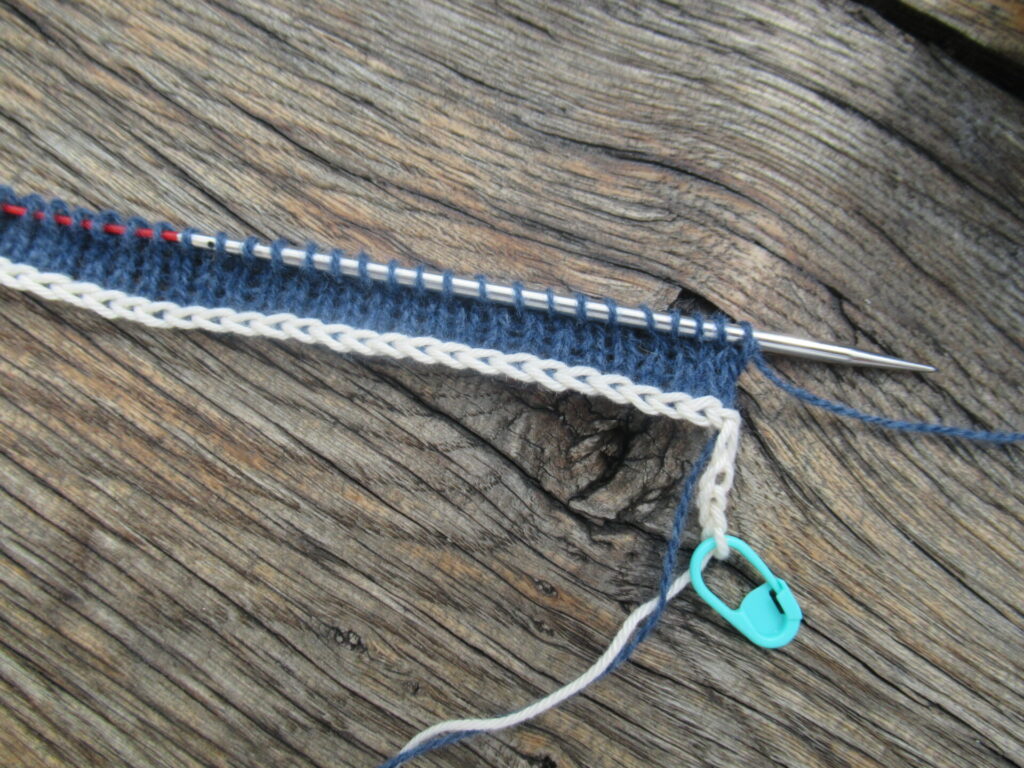
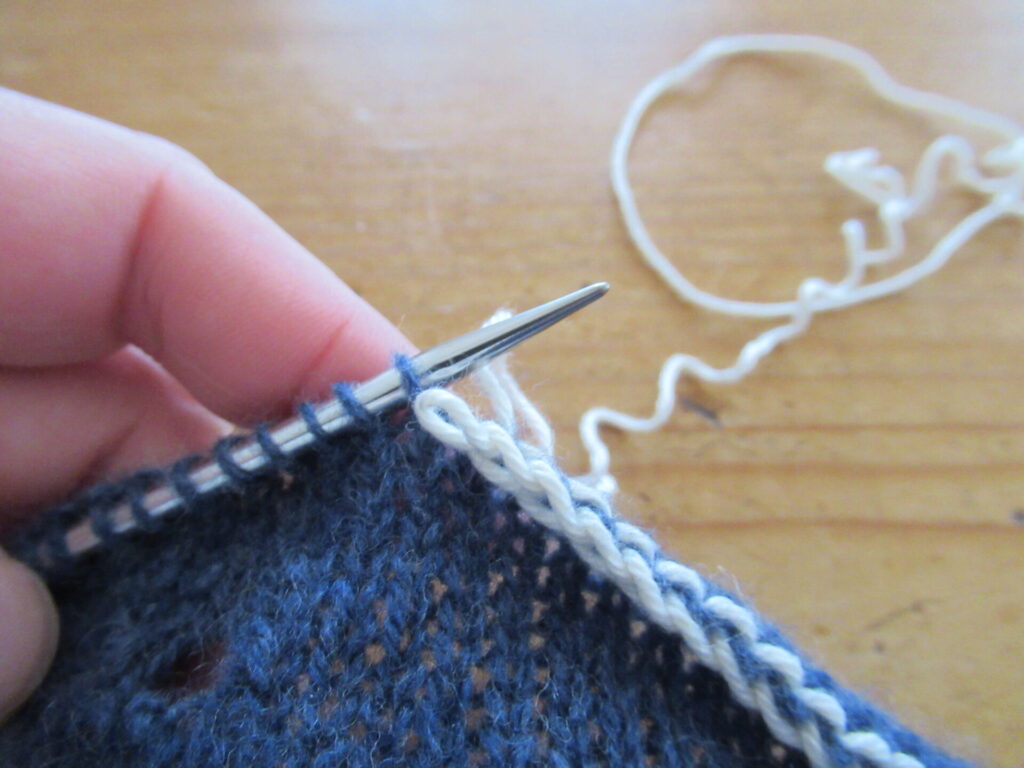
5 – Ready to remove the cast-on? Starting at the tail with the stitch marker, carefully unravel the crochet chain and pick up the live stitches one by one. Don’t forget the half stitch at the end!
This is a really useful technique for e.g. scarves knit from the middle out to the sides. In the case of the Polka Dot Scarf, it’s used for knitting on a nice I-cord edge.
I hope I’ve explained it clearly. If all goes according to plan, I’ll take you out for walk again next week. See you then! xxx
Driving home through the dark from yet another get-together, with the windscreen wipers working furiously and strong gusts of wind buffeting the car, I suddenly thought, Enough! The past couple of weeks have been such fun, but now I need some rest and time alone. For me, knitting and walking are the best ways to rest and recharge. Sleeping helps too, obviously, but sleep can be elusive.
So, I’ve been knitting…
…knitting until a long scarf in a fine yarn was finished. Now it only needs blocking…
…casting on and making good progress on a pair of socks for a friend…
…and knitting on a simple stocking stitch poncho until it’s the size of a nice and warm lap blanket. It’s almost ready to be seamed and then I can knit on the cowl.
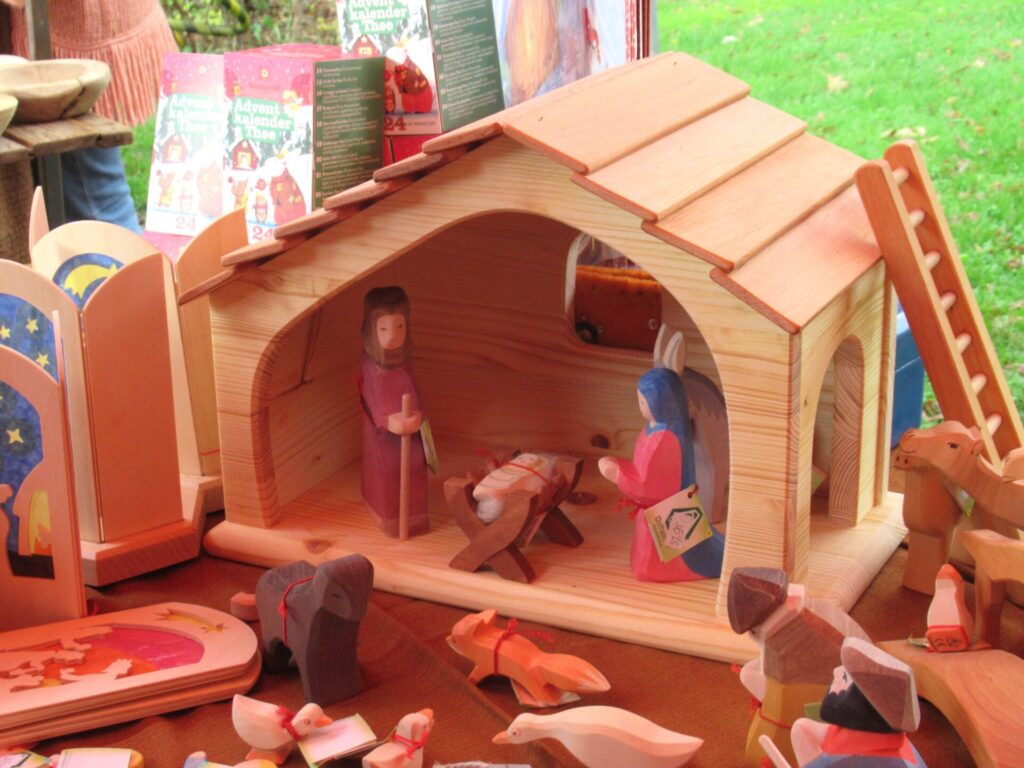
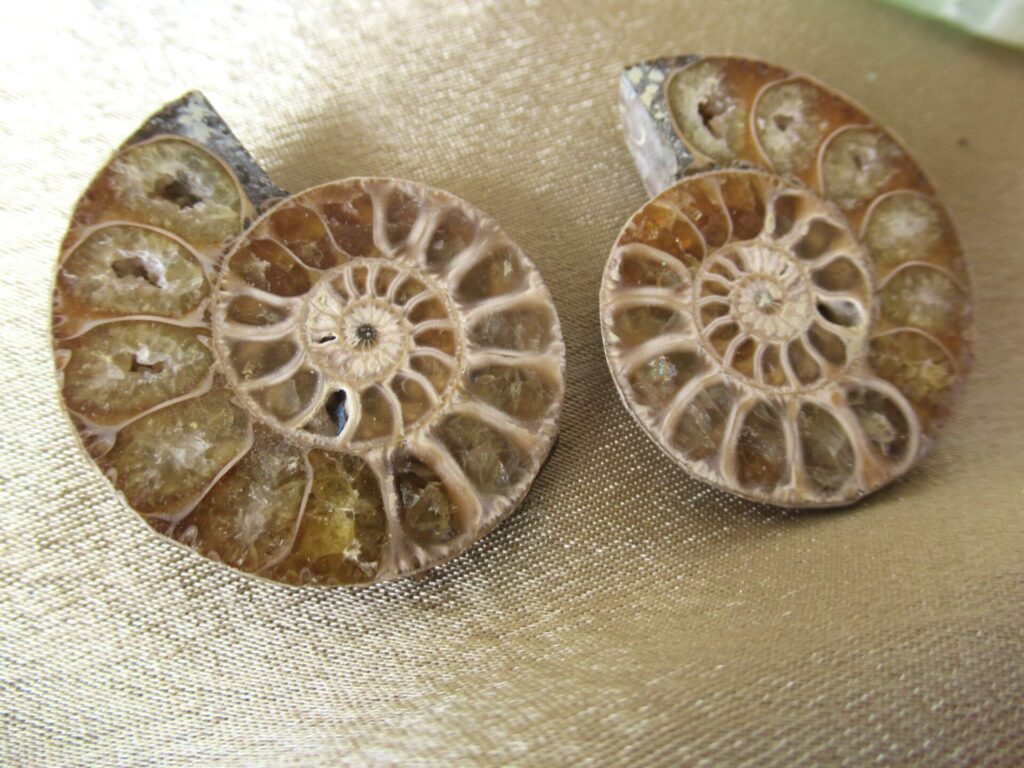
I’ve also been out for a walk every day. Taking my usual walks through our village, walks with our grandson, a walk in a foggy wetland, and a walk around the nearby village of Havelte. The real reason for my visit to Havelte was a tiny Advent market. There were only six stalls, but really nice ones with good quality toys…
…handmade purses and bags, hand carved wooden spoons, watercolour greeting cards, sustainable clothes for children and adults, and semiprecious stones and fossils.
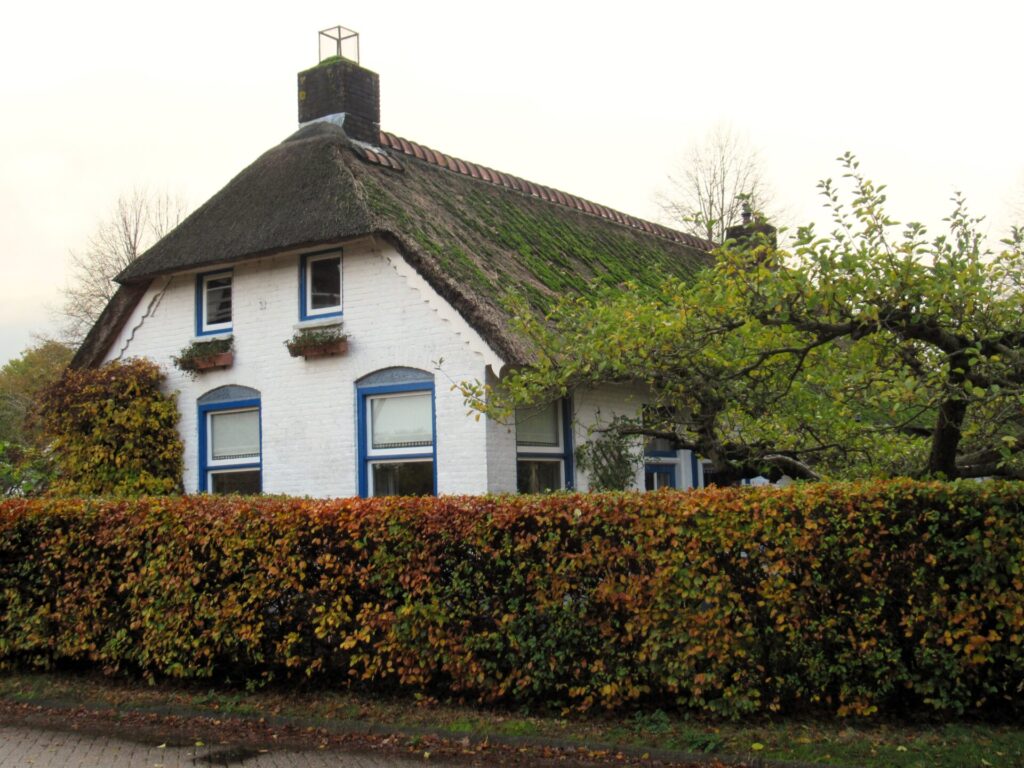
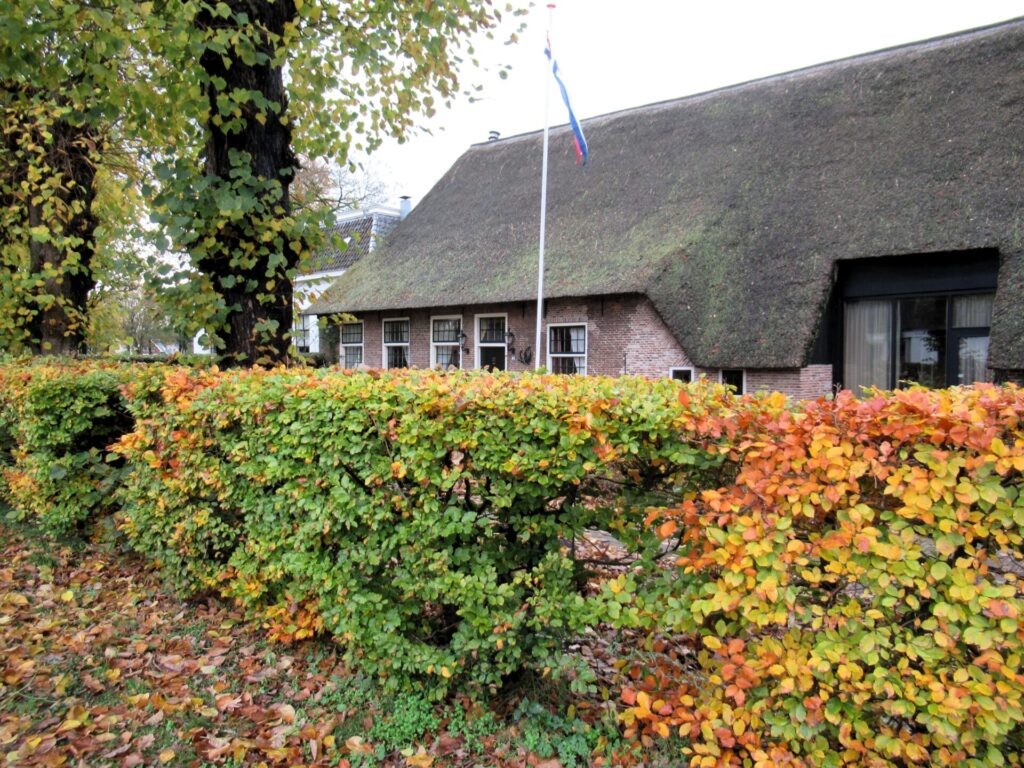
I found several lovely gifts for our December celebrations and then went for a walk. Tourist websites call Havelte ‘The Pearl’ of our part of the country. To me, it’s an ordinary village for the most part, but it does have some lovely spots and beautiful old houses.
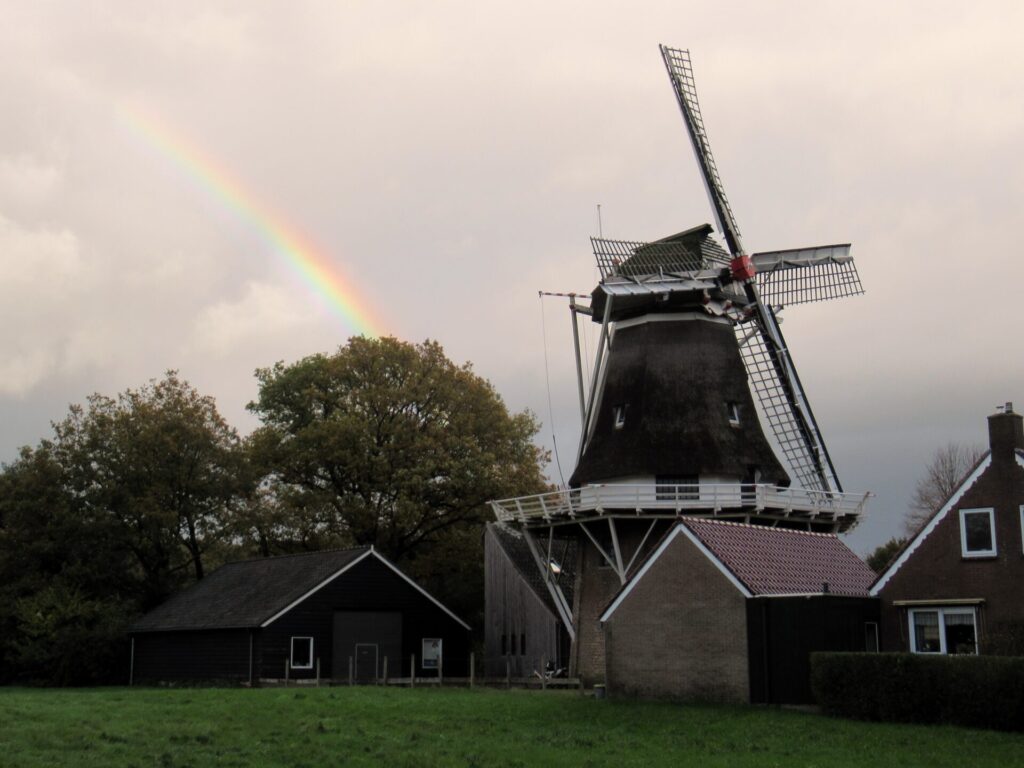
According to the weather forecast it was going to be dry and sunny. Only they forgot to mention the sudden downpours in between the dry and sunny spells. Oh my, such beautiful golden light against the threatening skies! I didn’t do anything to enhance this photo – this is exactly the way it was:
And here is a photograph that’s almost embarrassing. A windmill with a rainbow – can it get any cheesier? But again, this is exactly the way it was:
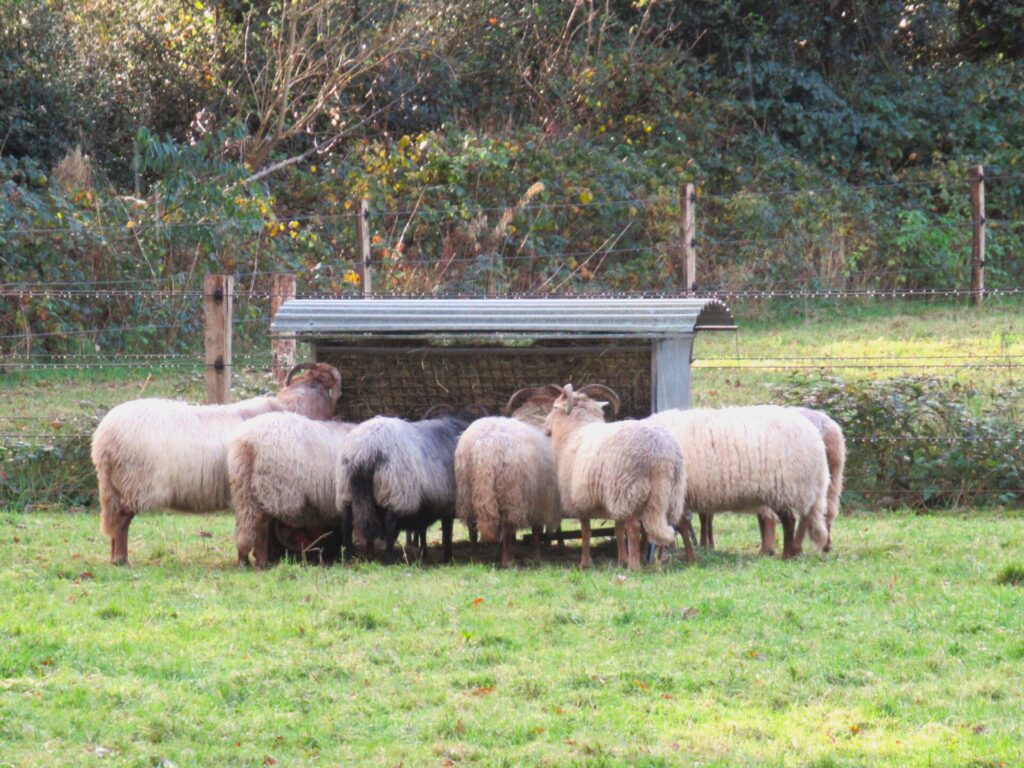
There were hardly any people about, but I did have eye contact with two four-legged villagers. A group of Drenthe Heath sheep crowding around a feeding rack had their backs turned to me.
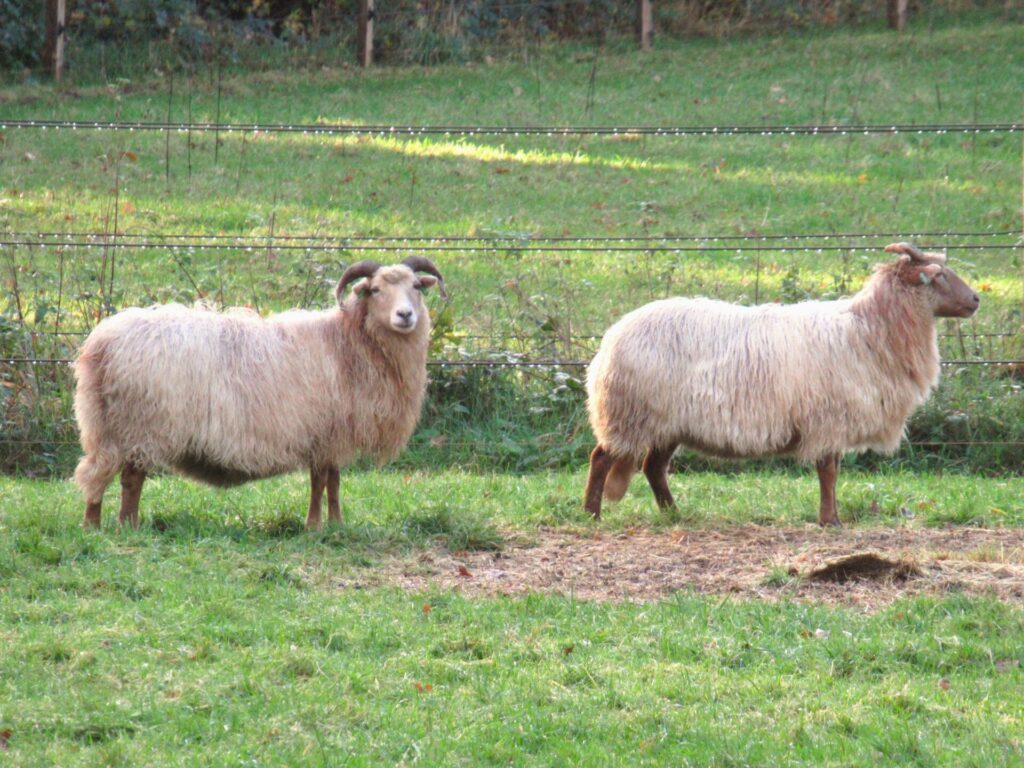
But two sheep had finished eating and one of them was looking straight at me. Hello there, lovely creature.
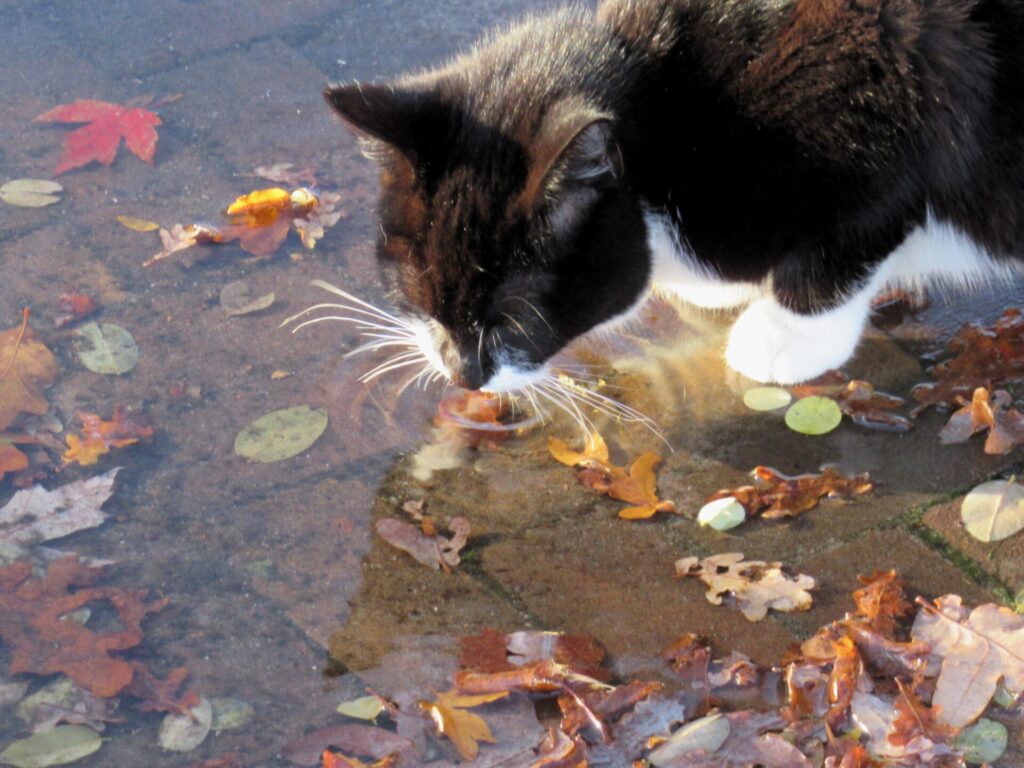
And towards the end of my walk, a cat briefly looked up to see if I was to be trusted and then, apparently satisfied that I was, continued lapping up water from a puddle.
I’ll tell you more about the patterns, techniques and yarns used for the above knitting projects soon, when they are finished. I also have some more gift knitting planned, as well as a new pattern (or two) of my own. All in all, I hope to keep you provided with inspiration for the rest of the year and beyond, and also with a place to rest and recharge. Kalm an, hè?
Last week I was too busy to write. This week, my planner is still not exactly empty but it has enough space for a nice long chat here. So, hello! It’s good to see you!
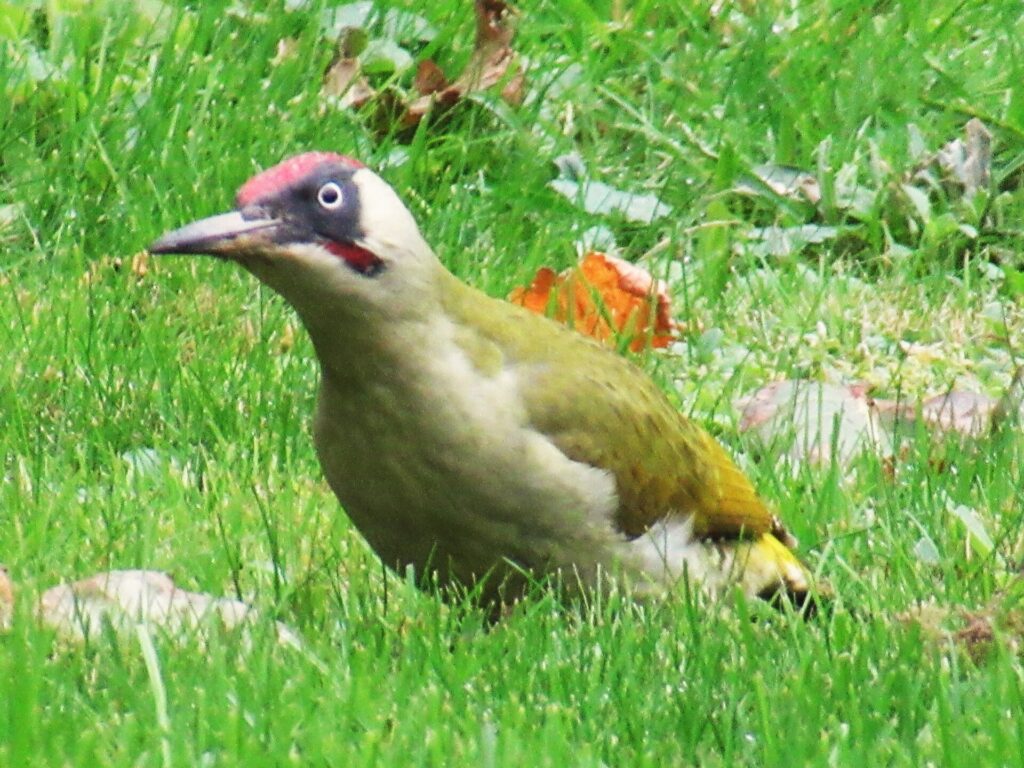
I’d like to tell you a bit about the visitors we’ve had. The first one was non-human. We had been wondering for a while who was responsible for the holes in the grass in our back garden. Now we know – a green woodpecker digging for worms and insects with its long, strong bill.
It’s the first time we’ve seen this beautiful bird in our garden. I hope it’ll come back to visit us often.
The first human visitor was a dear friend coming on a much belated birthday visit. She is a prolific knitter and one of those invaluable friends who give honest feedback on my knitting projects. I really appreciate that, and after her visit rrrrrip went a cowl I was knitting for another friend. Knowing what I love, she gave me some of her own hand dyed yarn in 3 shades of blue and one of the latest knitting books. I’ll tell you about the yarn once I have some idea of what I’ll make with it. The book is Softly – Timeless Knits by Sari Nordlund.
It’s smaller than most knitting books, but packed with patterns: 7 pullovers, 2 vest tops, 3 hats, 3 cardigans, 3 scarves/shawls, 3 pairs of socks, and 1 pair of mitts. A few of the patterns are suitable for beginners, but most have intricate stitch patterns that experienced knitters will love.
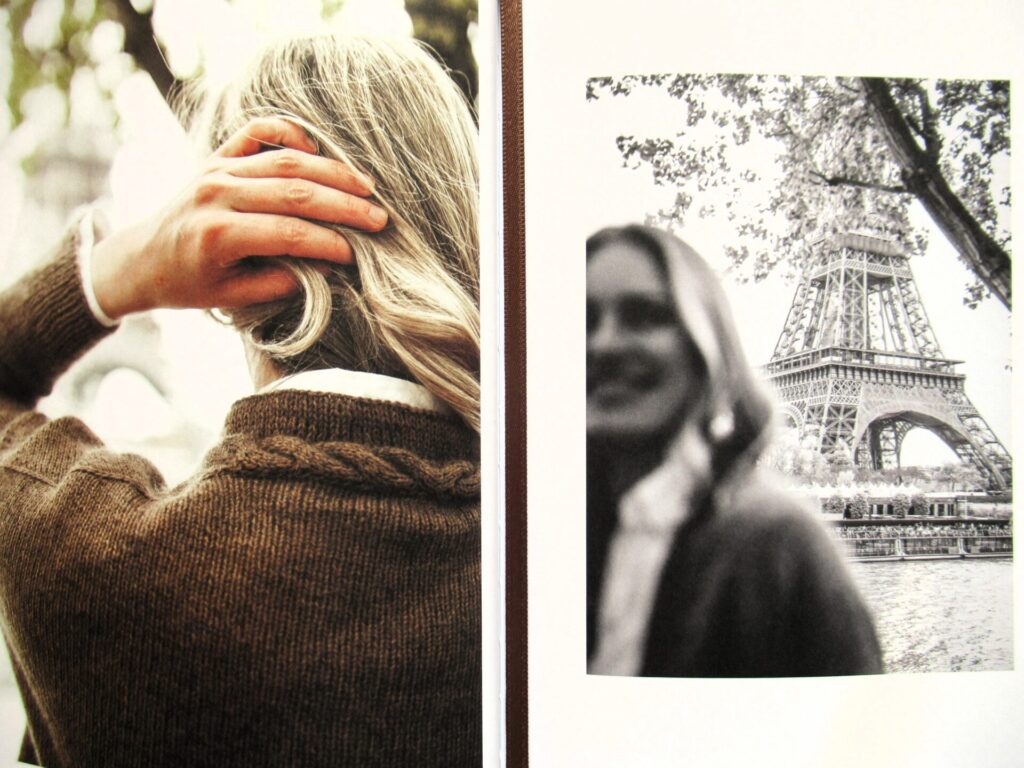
The styling and photography are stunning. All of the designs have been photographed in neutrals with grey and cream-coloured buildings and other architectural elements in the background. Some of the photographs are in black and white. In the foreword Sari said something about Helsinki and I just assumed that the photographs were taken there, until I thought, ‘hang on, do they have an Eiffel Tower replica in Helsinki?’
Looking more closely, I noticed that there were also other familiar landmarks in the background, a Rue de Rivoli sign, and a café called La Comète. Ah, Paris! Beautiful knits, artful photography – what a gorgeous book! The first thing I’ll make from it is a pair of socks with a variety of twisted stitch cables.
Our next visitors were friends we hadn’t seen for ages. Years ago they gave up their jobs and their house to go and live on a boat and sail around the world. They had planned to come back for a visit sooner, but then Covid happened and they got stuck in New Zealand. Well, they were here now, and we were very glad that they had time in their busy schedule to come and stay with us for a while, too.
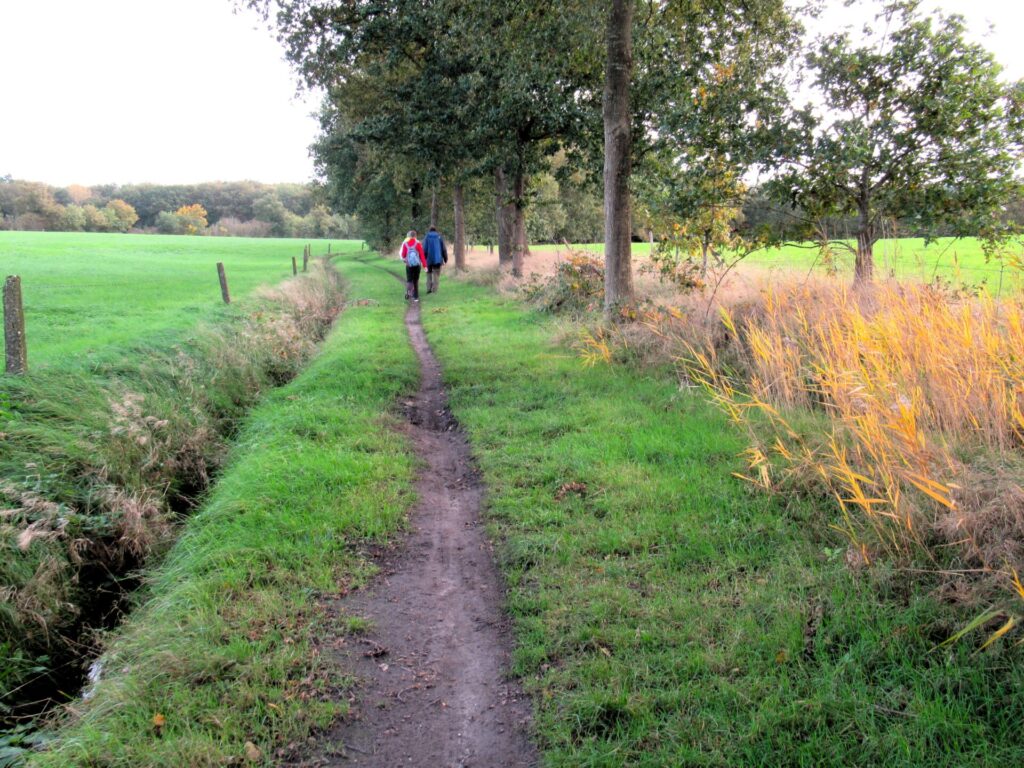
We’ve had a lot of rain lately, but were very lucky with the weather during their stay. On a day without rain we went for a long walk, enjoying each other’s company, the exercise, and the autumn colours.
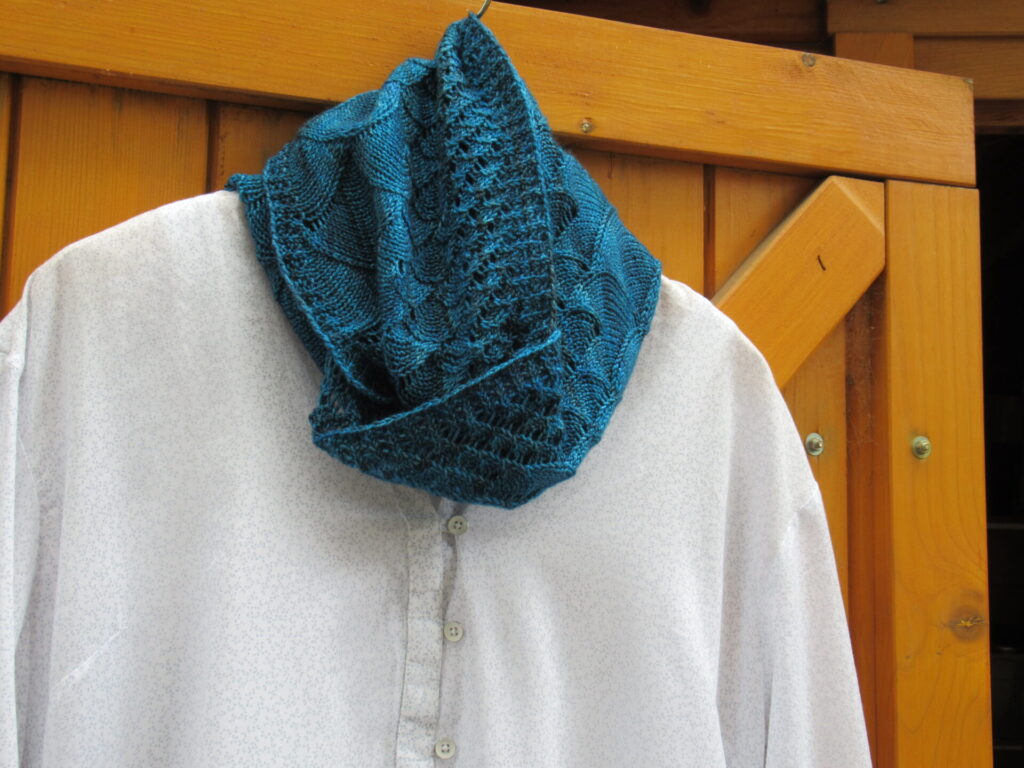
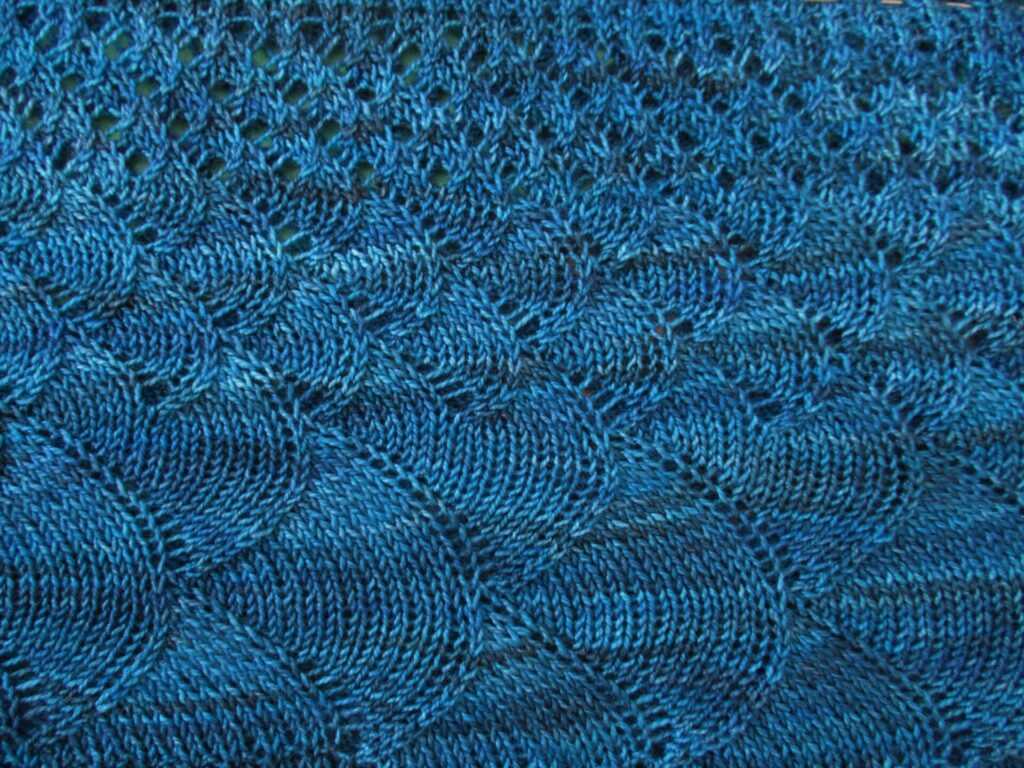
Wanting to give them something personal, useful and not cumbersome, I’d knit her a cowl quite a while ago that was patiently waiting for their visit. It’s Song of the Sea designed by Louise Zass-Bangham.
Knit from Fyberspates Vivacious 4-ply in shade Deep Aqua, it is covered in waves, from wee wavelets to big breakers.
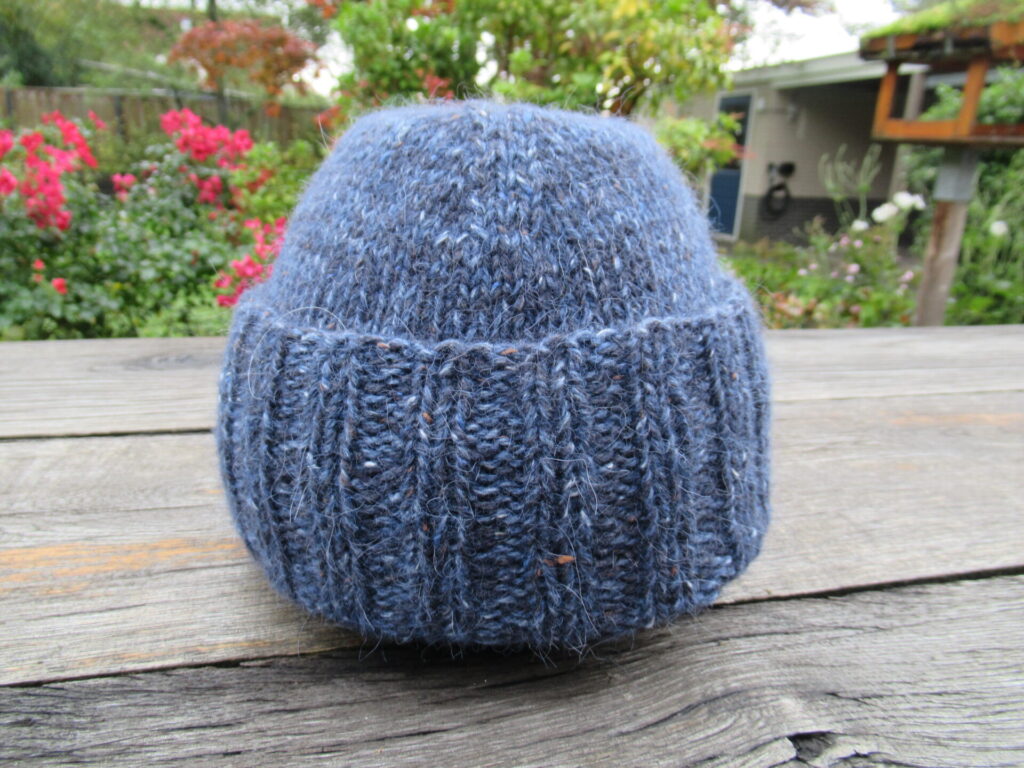
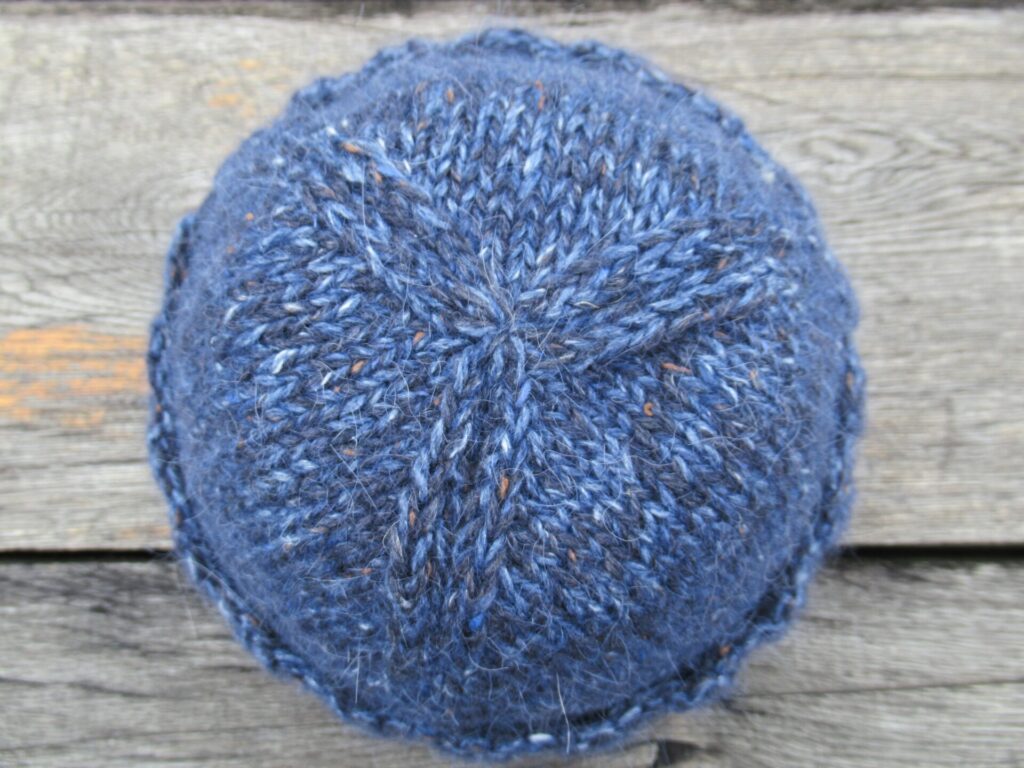
For him, I knit a Boyfriend Watch Cap from two threads of Rowan Felted Tweed held together, in the shades Seafarer and Seasalter.
Because the two shades are not too far apart the effect is not really marled, but a beautiful deep shade of blue with tweedy flecks.
The crown is shaped by decreases in three places.
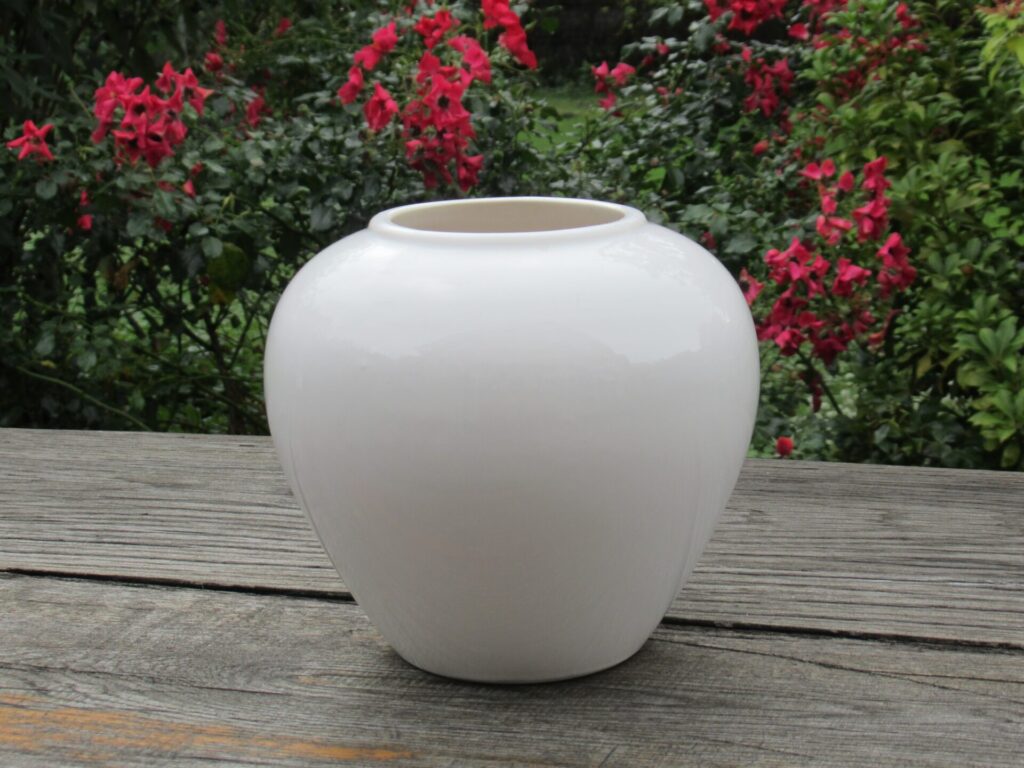
The pattern said to soak the hat and leave it to dry flat, but I happened to have the perfect hat blocker – a flower vase turned upside-down.
Finally, another dear friend came for a visit bringing her 11-year-old daughter. While my friend and I were making music together, her daughter learnt to bake pull-apart rolls from my husband.
A lovely end to a wonderful visitor-filled week! With the warm and comforting smell of freshly baked bread I’m leaving you for now. (Well, I can’t really send you the smell over the internet, more’s the pity, but I hope you can imagine it.) Thank you for visiting. Bye!
Hello! Today’s post starts with a few nifty knitting tips that some of you will love. If that’s not quite your thing, perhaps you’d like to scroll on for some sightseeing.
The green cable cardigan I knit for our grandson in early summer had warned me about the quality of the patterns in the pattern booklet – there were serious errors in the instructions for the sleeves. I loved the vintage look of the baby items in it, though, and was prepared to give it another try.
Forewarned, I looked through the pattern first. What did it say about the sleeves? ‘Work as the sleeves of sweater 11, p. 57.’ But, but… this IS sweater 11 on p. 57! Ugh, I gave up, just looked at the photos and worked out a pattern myself.
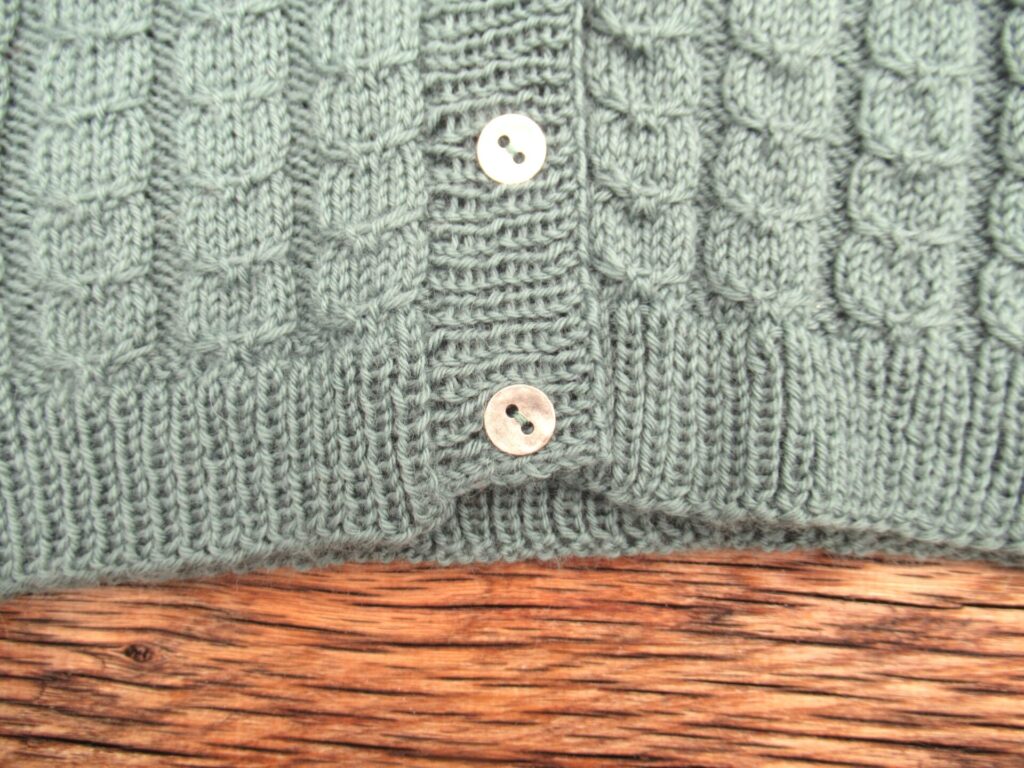
On the green cable cardi, I wasn’t happy with the ends of the button and buttonhole bands – they didn’t form a straight line with the ribbing.
At the time, my friend A. sent me a link with tips for ‘Button Band Gladness’. There was a lot there about how many stitches to pick up, but I didn’t think that was my problem. For me the magic tip came at the very end. Or actually there were two:
1) Find that hard-to-find place VERY close to the edge of the cast-on (or bind-off) to pick up your first (or last) stitch.
2) The first and last stitch of ribbing always roll. So for a k1, p1 rib, instead of starting and ending with one knit stitch, start and end with two.
Especially the last tip helped me get much better button bands, both at the bottom…
… and at the top. Thank you for the link, A.!
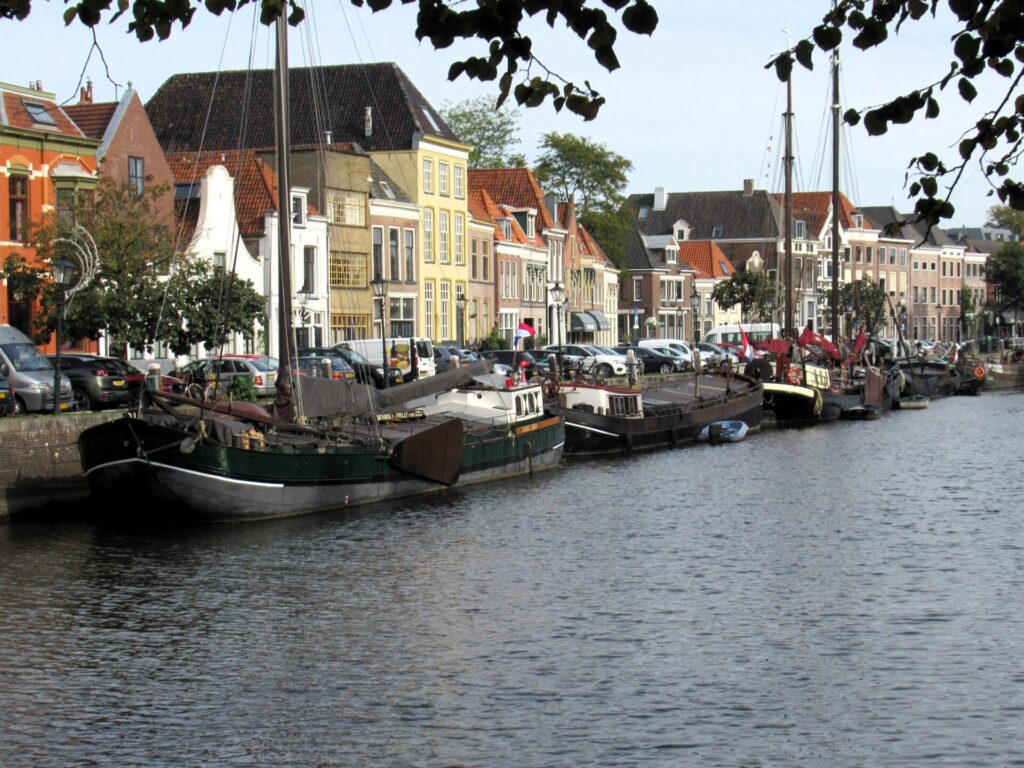
However much I would have liked to sew a pair of trousers to go with the little cardi, I can’t do everything. So, after an appointment in a business district of Zwolle, I drove to the city centre for some shopping. The shortest route from the parking place to the shops crosses two canals. My maternal ancestors lived and worked on boats like these.
Behind the old gables some high new ones are now towering.
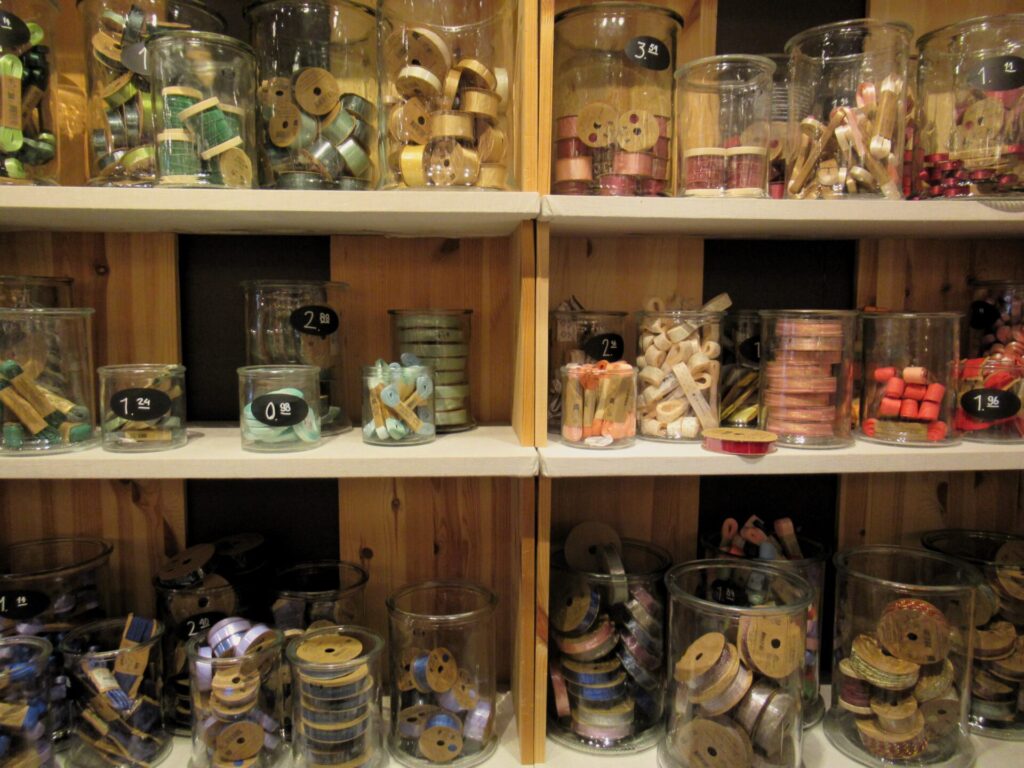
A long time ago, I worked in a psychologists’ practice here and often strolled through the busy shopping streets during my lunch break. I still love coming here from time to time. One of my favourite shops belongs to a Danish retail chain selling things for the home as well as great crafts materials. Wouldn’t you love to have shelves like these at home, with glass jars filled with ribbons, just to look at?
Into my shopping basket went a tin of Danish butter cookies for the hostess of the next get-together of my knitting group and a few other small gifts.
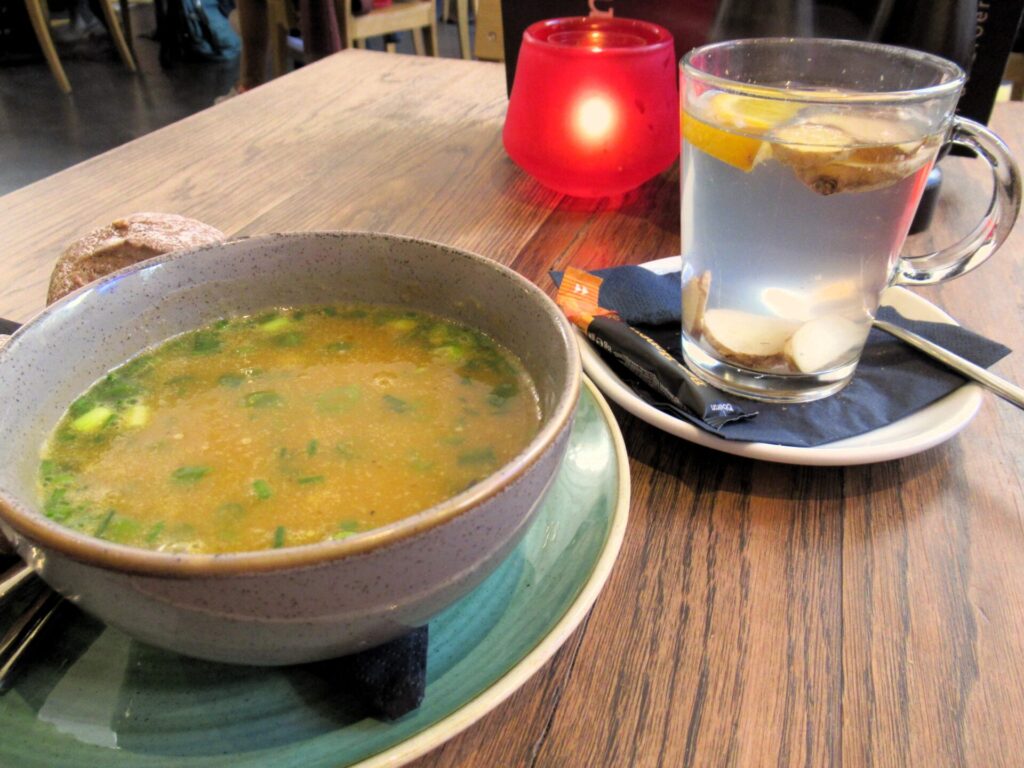
I treated myself to a lunch of pumpkin soup with bread rolls and a glass of fresh ginger-and-orange tea at the café in a big book shop.
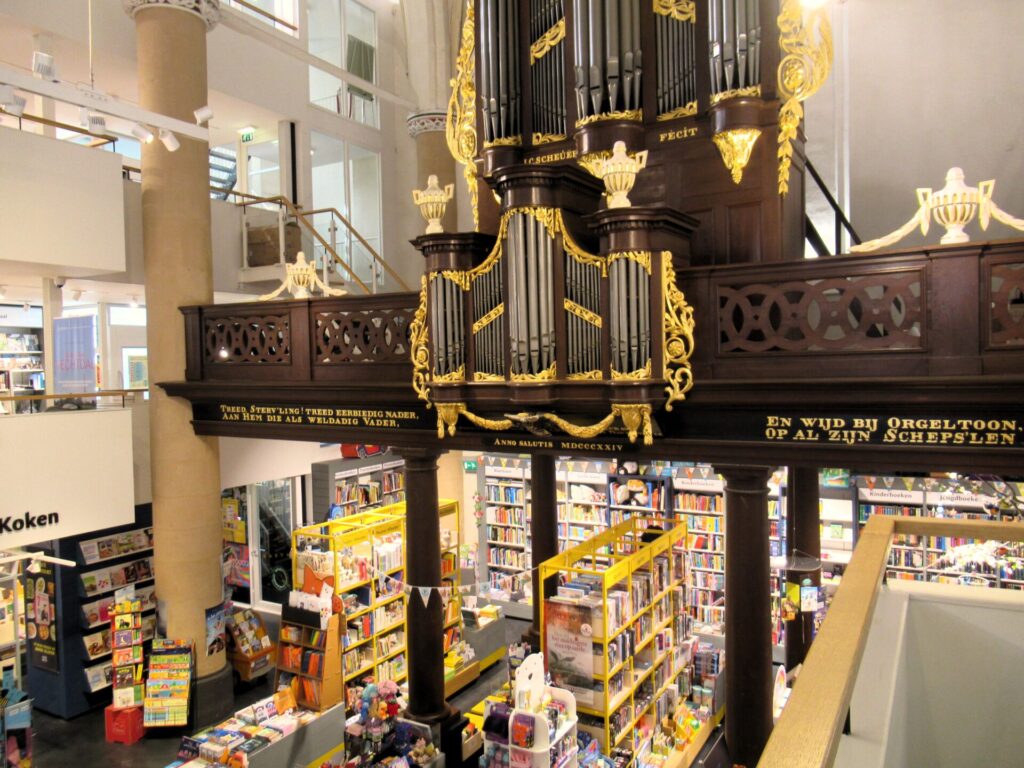
It’s a marvellous shop in a former church building. The original vaulted ceiling and the organ are still there.
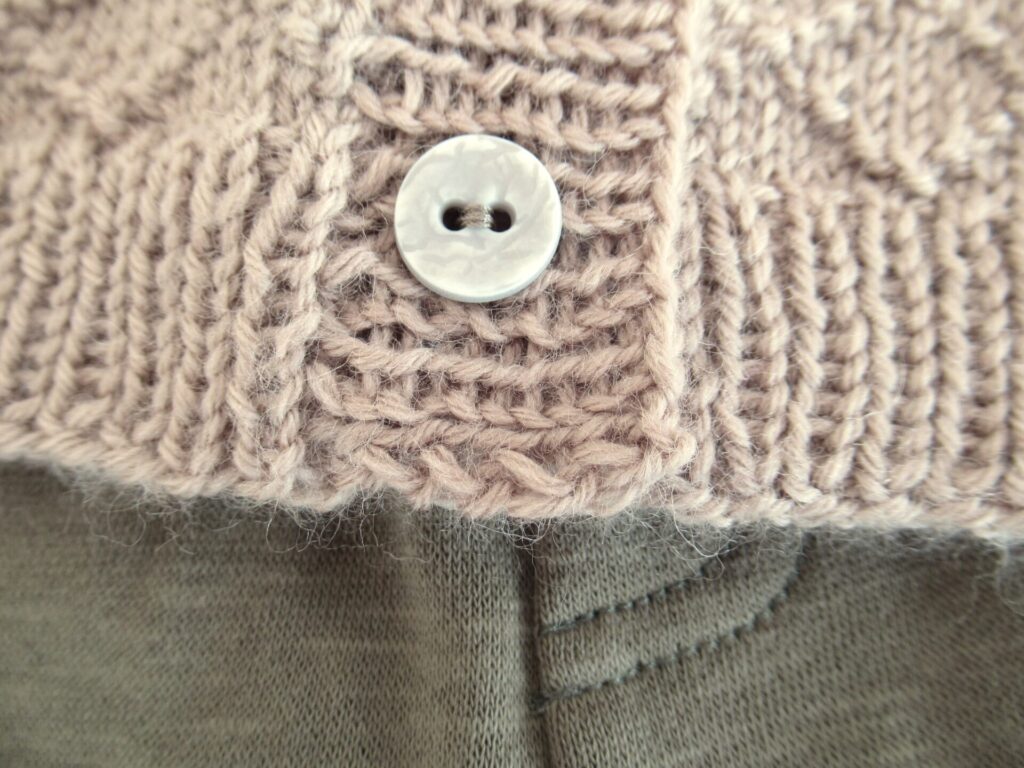
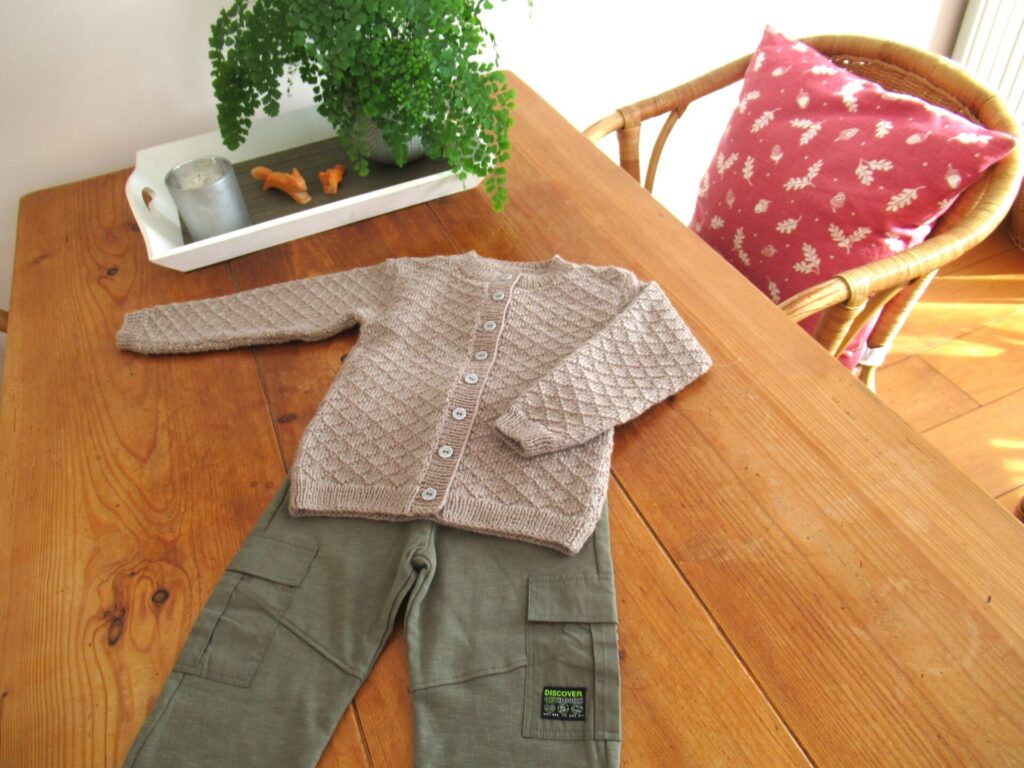
But the old familiar feeling of overwhelm came over me and I left the shop without books. I did succeed in finding a pair of soft size 98 sweat pants in forest green (not in the book shop, obviously). Don’t they look nice with the sand-coloured cardi?
Next week, we’re having friends to stay and I don’t know if I’ll be able to write a post. If not next week, I’ll be back the week after that. See you then!
Hello! Feeling sad, angry and worried about the terrible conflict that is causing so much suffering, I thought I wouldn’t publish a blogpost this week. But I changed my mind, realizing it’s important to keep paying attention to good, beautiful, gentle things, too. No matter how seemingly insignificant they are. So here are some words and pictures from my small corner of the world after all.
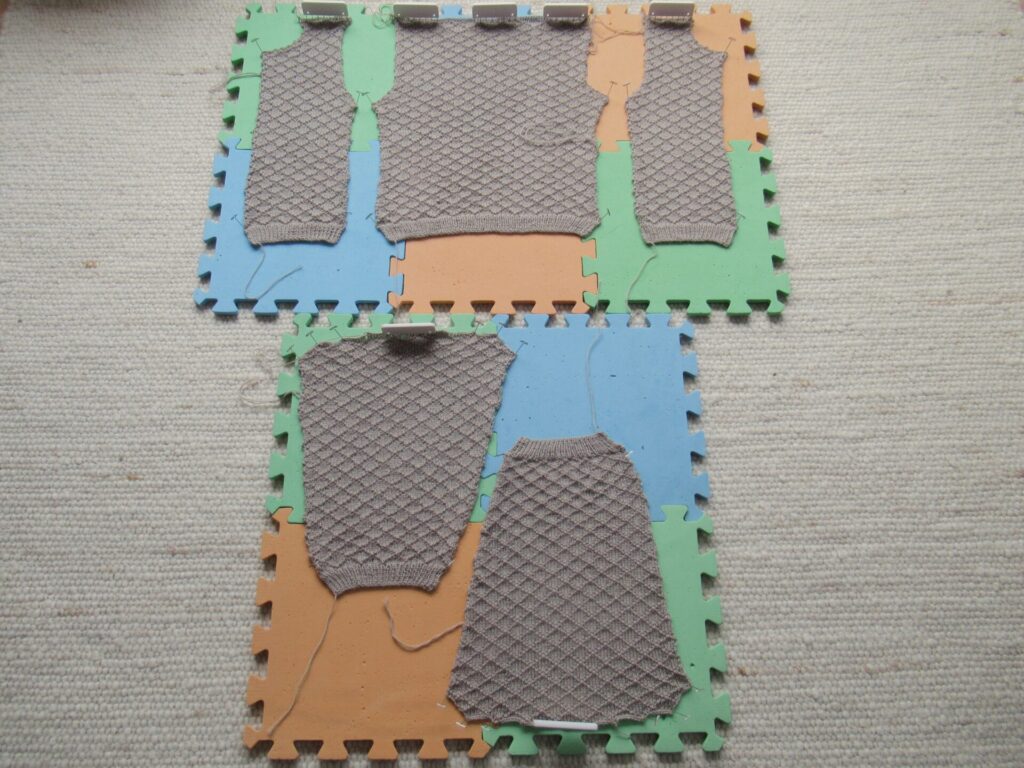
On the knitting front, I’m focusing on finishing my WIPs one by one. An 18-month-size cardigan is drying on my blocking mats. I’m not blocking it the way you’d block a lace shawl, but just laying the pieces out – not stretching them at all, only using pins in a few places and for the rest patting them flat.
I can’t sit around twiddling my thumbs while the cardi is drying of course, so alongside finishing WIPs, I’m knitting a few simple gifts. Quite a few actually, but I’ll also focus on them one by one.
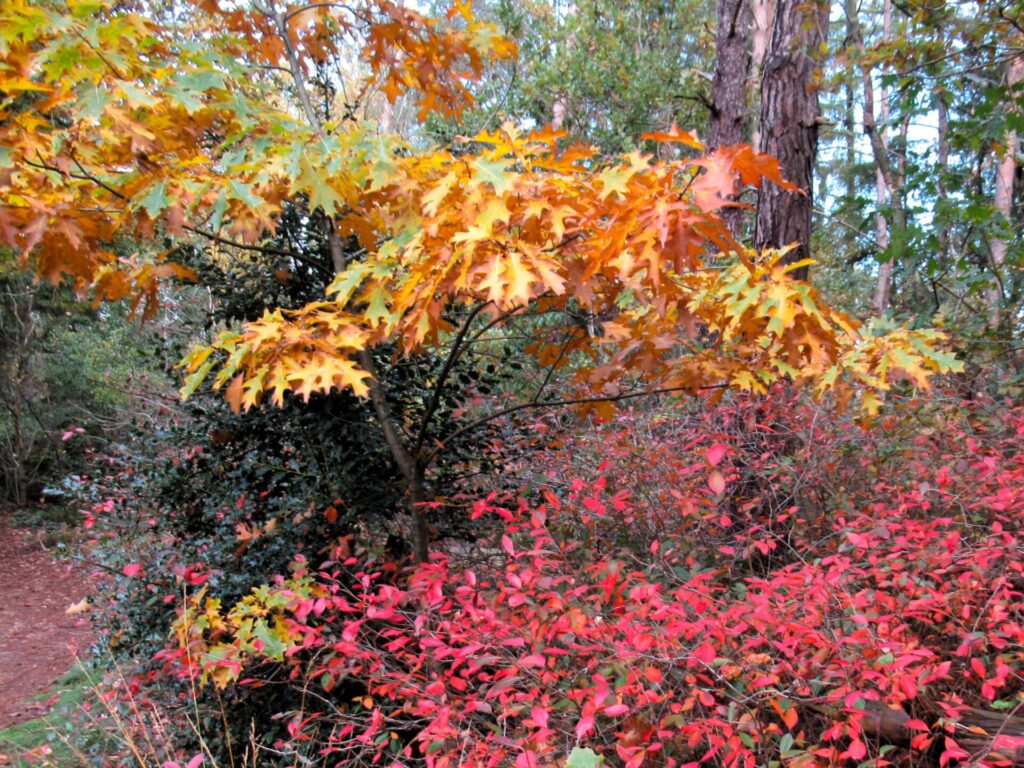
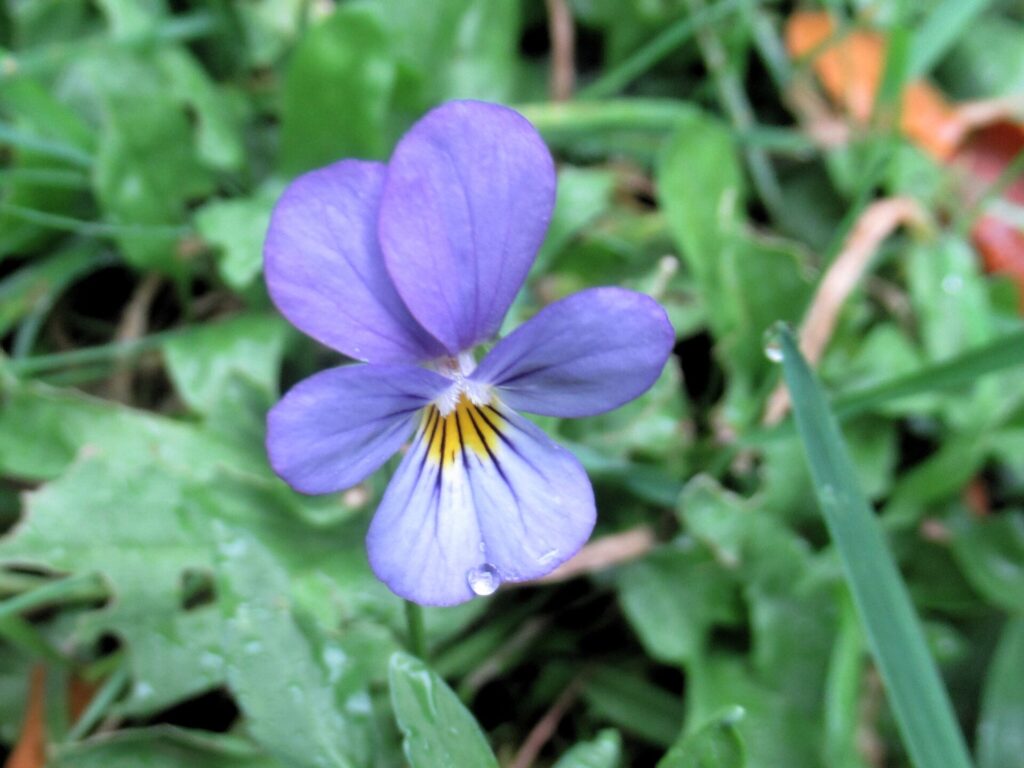
This way, I’m making good progress and that feels great, I have to say. The weather is also conducive to knitting. With cooler temperatures and some dark and rainy days it’s beginning to feel a little like autumn. The wild violets are still flowering and most trees are still green, but the bracken is turning coppery brown…
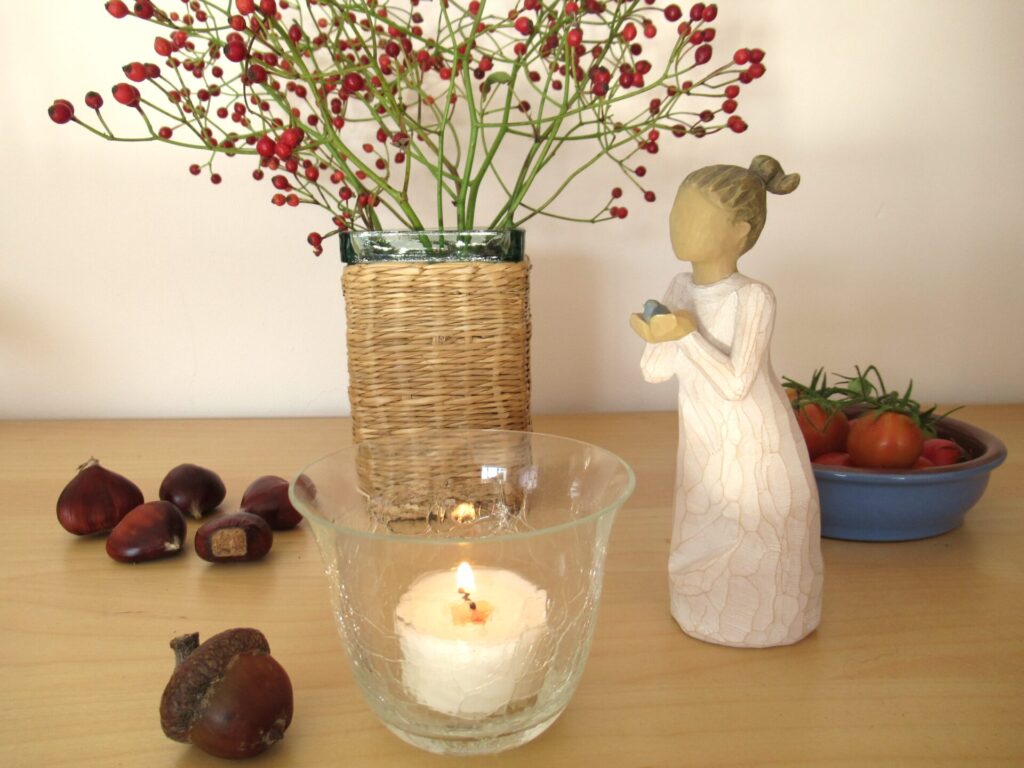
… the forest floor is littered with chestnuts and acorns, and fungi in many different colours and shapes are popping up everywhere.
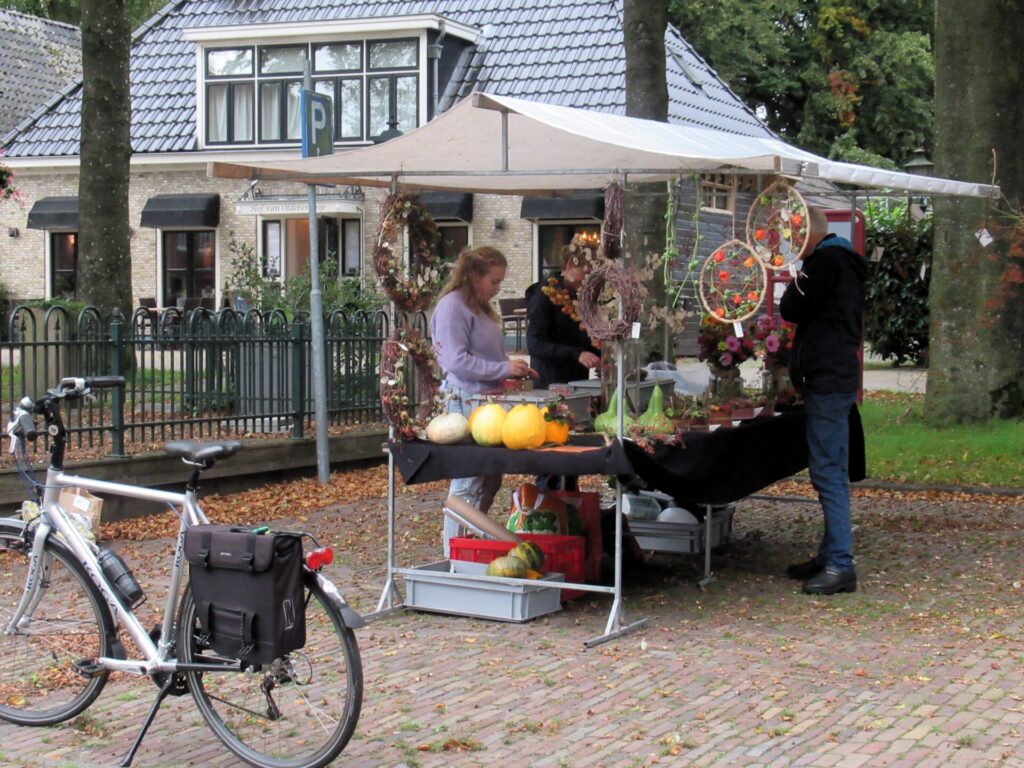
We’ve harvested our last tomatoes, and the last of the farmers’ markets of the year is also behind us. It was windy and rainy and very quiet. We had a chat with some of the stall holders and then it was, ‘Goodbye, see you next year!’ Only one of them said, ‘Let’s hope we’ll meet here again next year.’ He is in his eighties. Yes, let’s hope so.
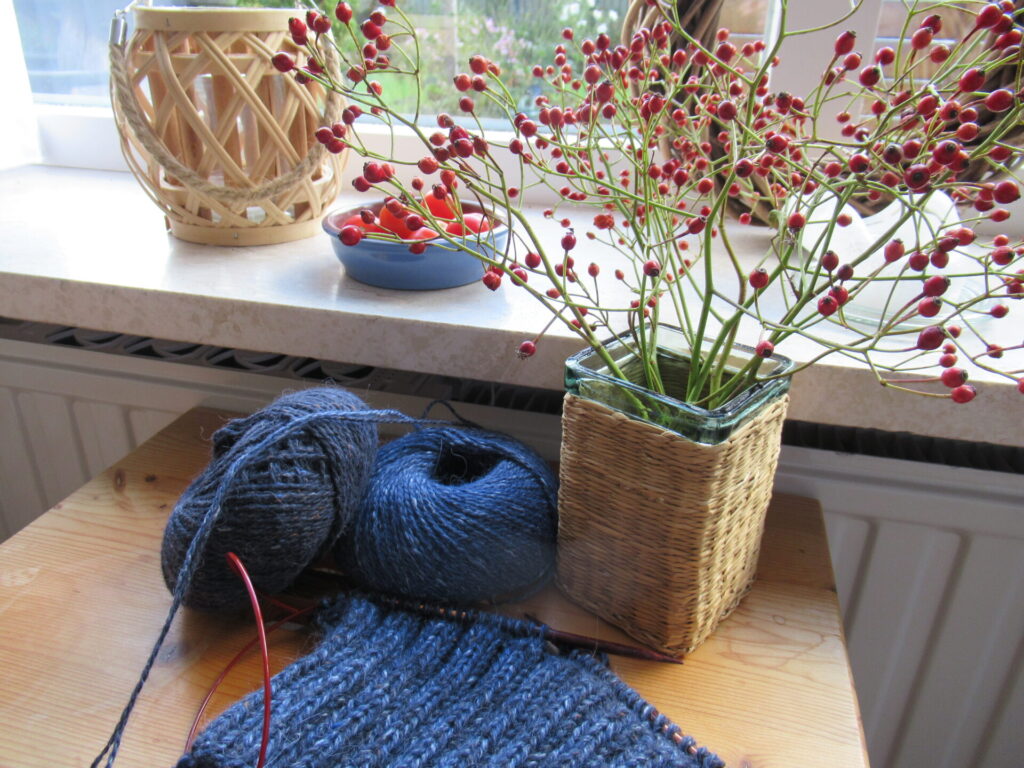
We left with some groceries in our shopping bag, tea/coffee and cake in our stomachs, and a bunch of branches with tiny rosehips wrapped in a newspaper. Just imagine how many teeny tiny roses there must have been on them.
It’s been good sitting here selecting photos and quietly tapping away at my computer. Thank you for visiting and see you again next week!
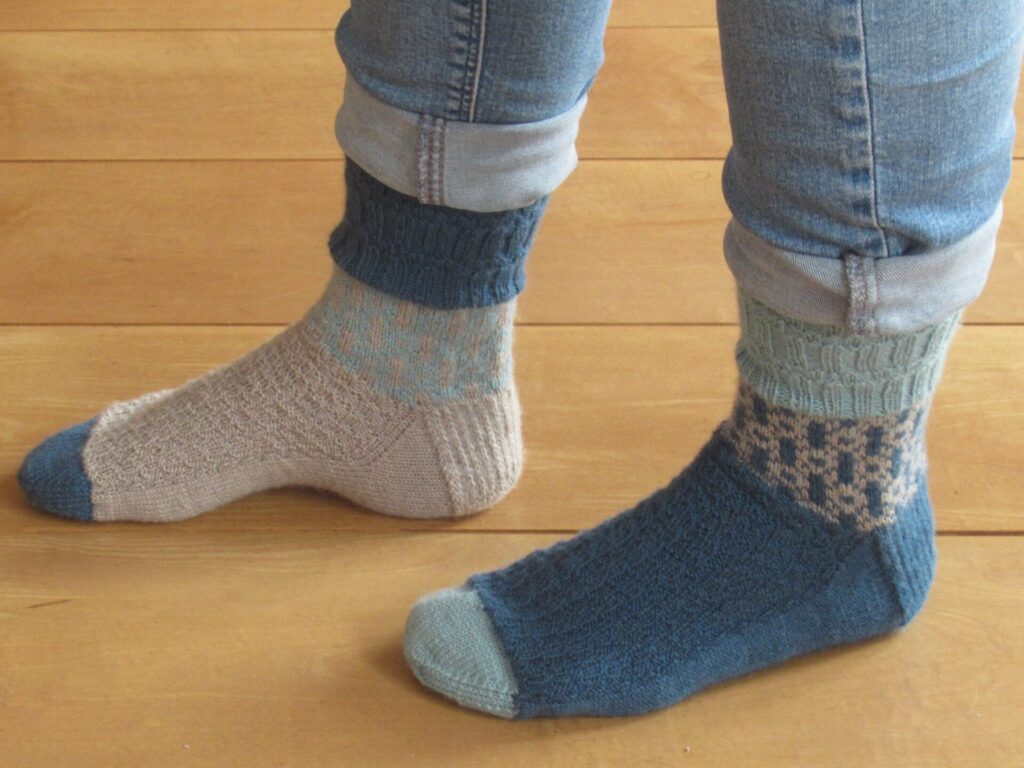
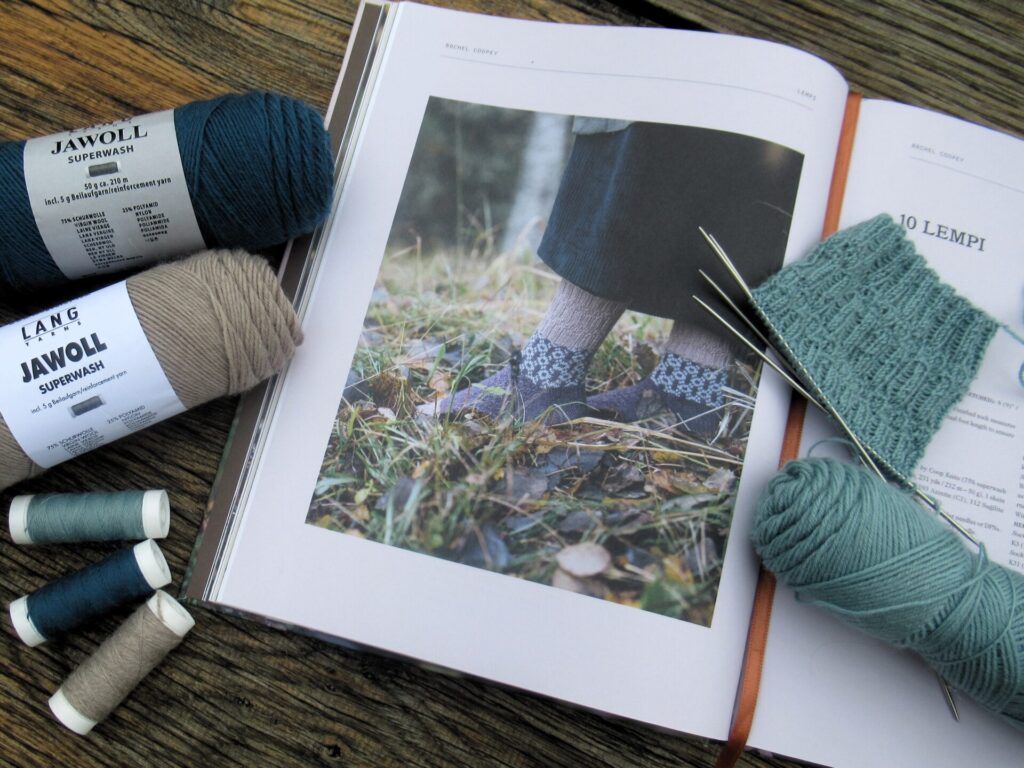
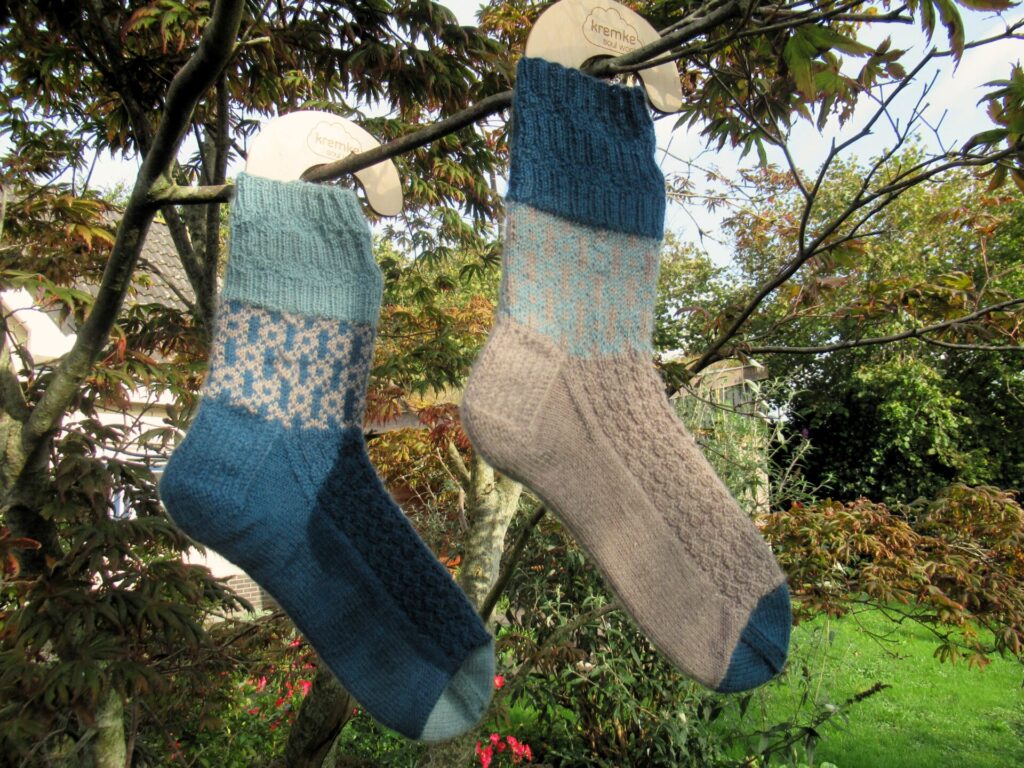
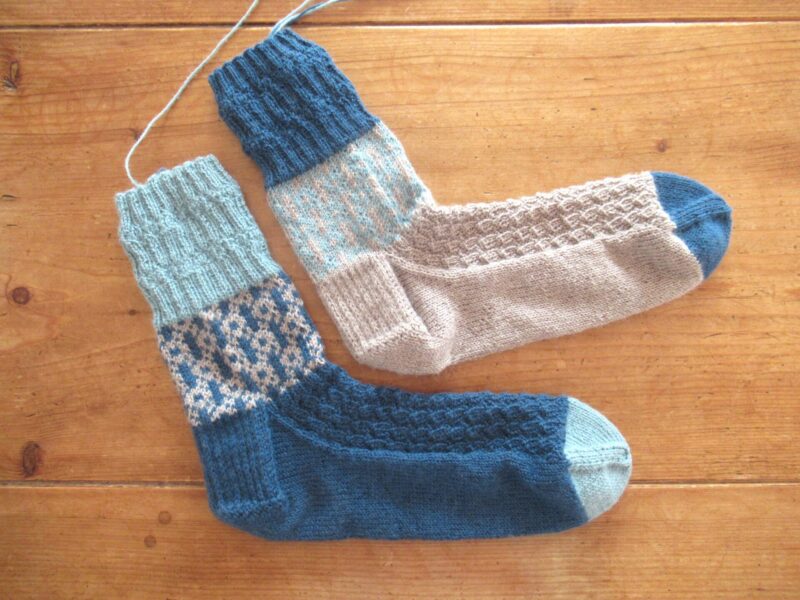
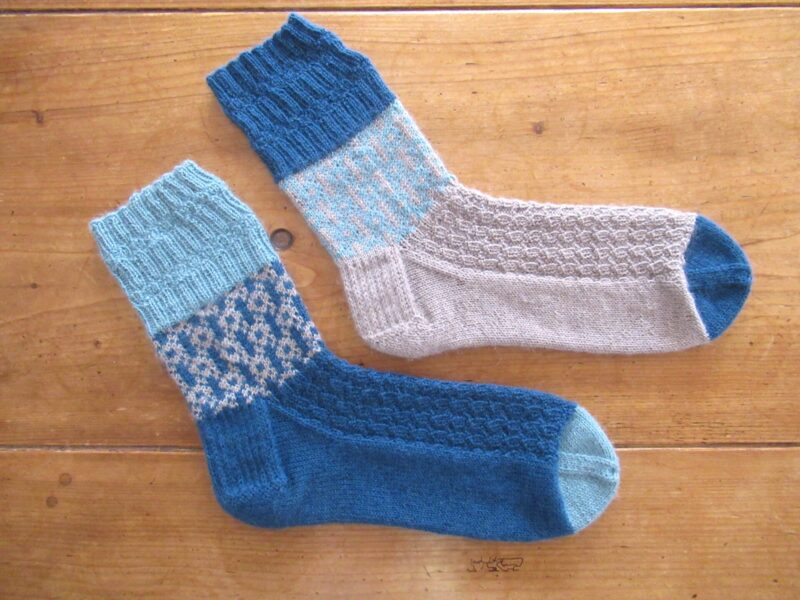
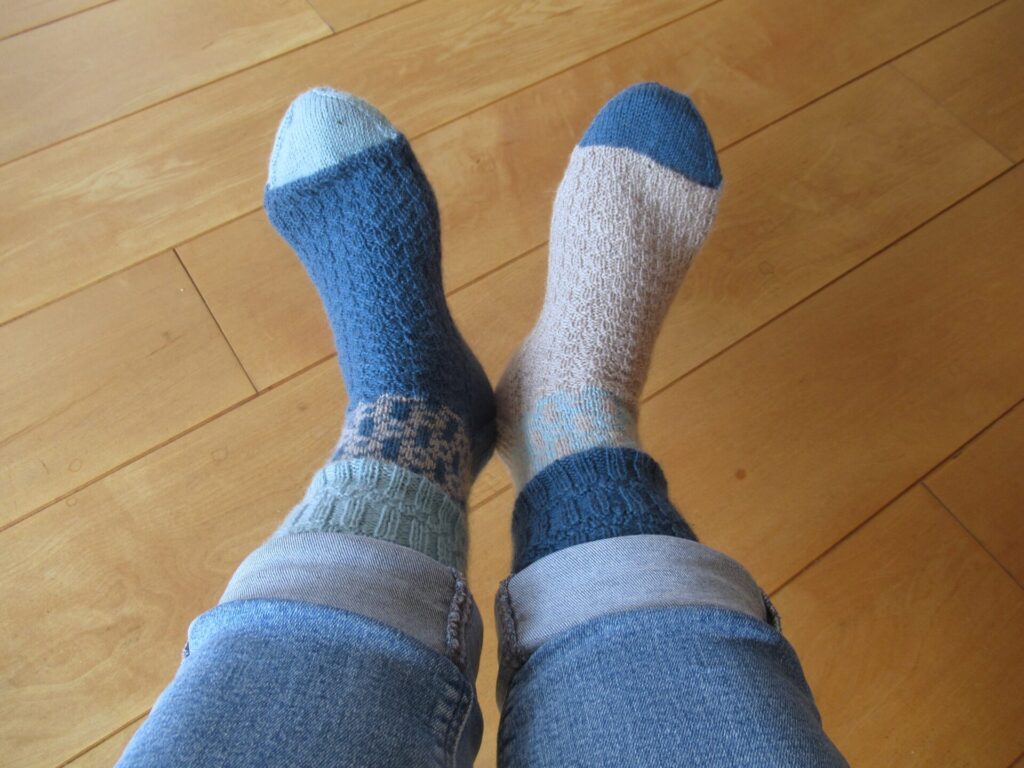
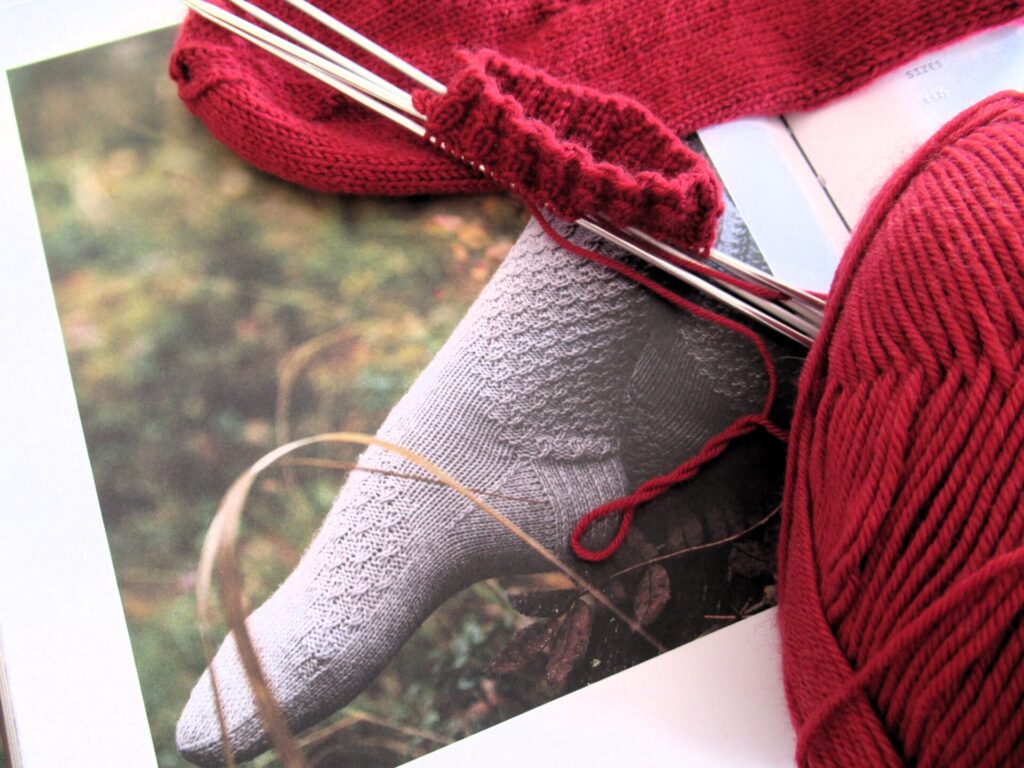
Hello! I hope this finds you and your loved ones all well. First of all, sorry to the non-knitters among you. It’s very knitterly post today I’m afraid, about a pair of socks I’ve just finished – Lempi, another pair from that marvellous book 52 Weeks of Socks. Designed by Rachel Coopey, these are knit in 3 colours from the cuff down to the toe.
The photos in the book are very atmospheric, but don’t always show the details very well. These socks have a variation on k2, p2 ribbing on the cuff and another variation on it on the top of the foot.
I knit the Lempi socks on 2.0 mm (US 0) double-pointed needles and switched to 2.5 mm (US 1½) circulars for the colourwork section. At the toe of the first sock, I realized that there wouldn’t be enough of the main colour for the second sock – I’d already used more than half of it. And I was making the smallest size, too!
Unable to get another skein at short notice, I decided to switch the colours around for the second sock, ending up with an unmatched pair. After soaking I put them on my sock blockers.
Unlike with the pair of stocking stitch socks I blocked on them before, I am very happy with the result now. Blocking really makes a difference – can you see it?
Before blocking
After blocking
It worked especially well for the colourwork section, which was rather uneven before blocking but evened out nicely.
Before blocking
After blocking
The yarn I used (Lang Jawoll superwash) has a small spool of thinner yarn inside each skein for reinforcing heels and toes. With this extra thread and the slip-stitch pattern used, the fabric for the heels became very dense and stiff – it really feels indestructible.
Curious about the meaning of Lempi, I looked it up. Turns out it’s a Finnish word meaning love, or (in compounds) favourite. For instance, lempimusiikki means favourite music, lempiväri means favourite colour and lempisukat means favourite socks.
So, are these my new lempisukat? Not really. I would have preferred both socks to be the same, if I’m honest. Also, in my humble opinion the 3-colour design is not quite balanced. And what really bothers me about my pair is that there is not enough contrast in the colourwork of the second sock. My advice to anyone who’d like to knit a pair of these: Omit the 3rd colour and instead use two 100-gram skeins of yarn with plenty of contrast.
Hello! Does it happen to you, too, that you lose your knitting mojo from time to time? Over the past month or so, I seem to have lost mine. It isn’t as if there is nothing on my needles, it’s just that I’m not feeling terribly enthusiastic about any of it.
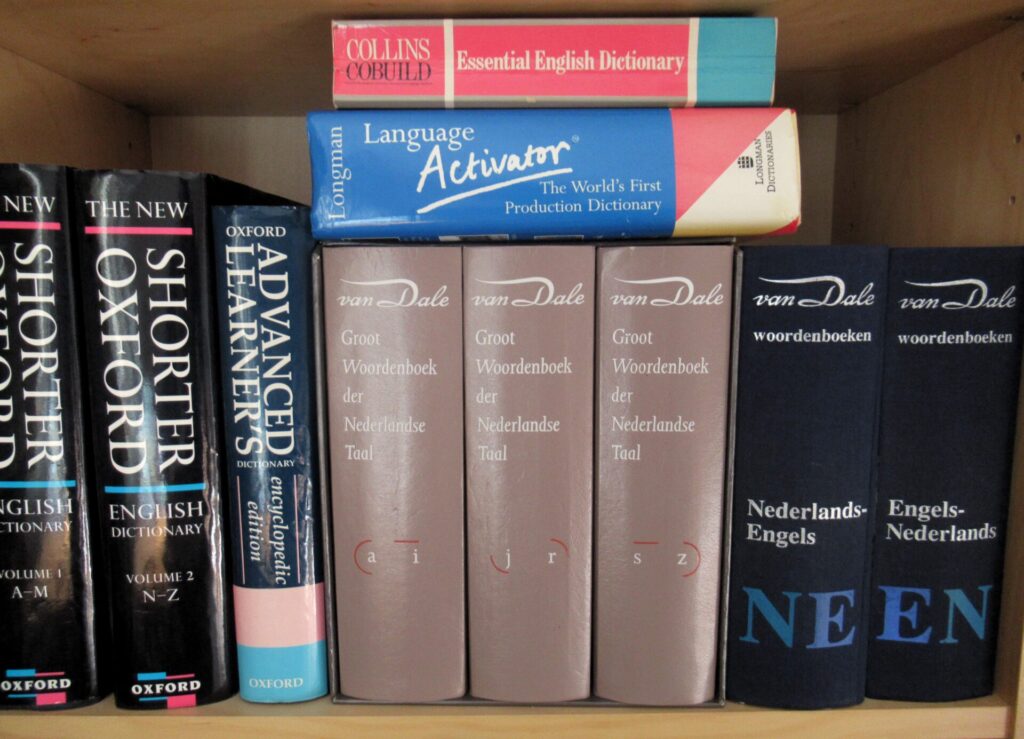
Mojo, what does the word really mean? I’ve always thought of it as a combo of motivation and joy, but is it? As a professional translator, I stopped using paper dictionaries a long time ago, but I still enjoy leafing through them.
The New Shorter Oxford English Dictionary says: Mojo – 1. Magic, voodoo; a charm or amulet; 2. Any narcotic drug, esp. morphine.
Hmm, I think I’ll stick to my own definition: Mojo – Acronym of MOtivation and JOy.
So, how to get your knitting mojo back? Googling for help, I found lots of tips. Well, actually mostly the same ones mentioned over and over again. Selecting those that spoke to me most and adding a couple of my own I’ve made a list of 9 tips (9 is my lucky number).
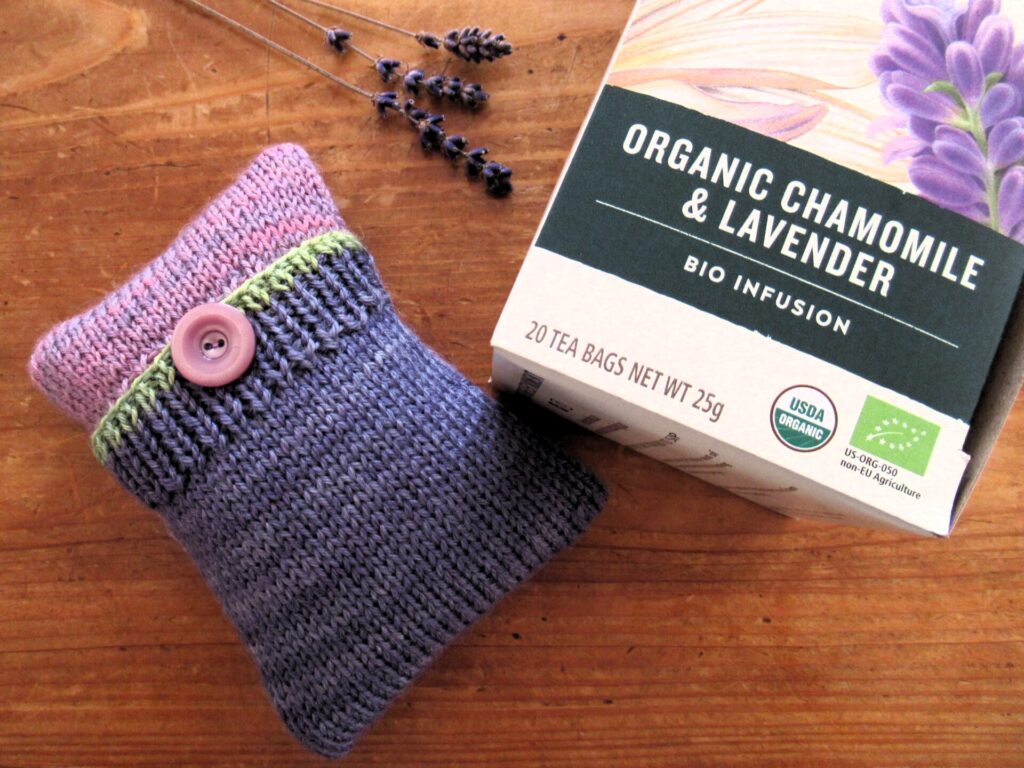
1 Get enough sleep
For me, feeling blah about knitting often means that I’m just plain tired and need more sleep. Getting enough sleep is easier said than done, but I’ll do my best, i.e.: drink calming herbal teas, relax more during the daytime, try to take naps, try not to worry about things I can’t do anything about, do something about those I can, and heed tip 9. I could also knit a new Soothing Sachet and tuck it under my pillow. This is one I knit earlier:
2 Knit together
A real-life knitting group would be best. But lacking that, you could join a KAL or hang out with your favourite Ravelry group. My knitting group only meets every other month, but is always fun and inspiring. Here are a few Ravelry links to the beautiful things some of my knitting friends were making when we met last week: FF Backward, a fun sweater with an interesting construction; Kuno’s Cushion, with linen stitch stripes; Riddari, an Icelandic design with a beautiful yoke; and The Twigs, a refined sweater by a Japanese designer.
3 Visit a yarn shop
Actually, I visited two last week – one of them a small local haberdashery shop and the other one a shop I blogged about a couple of years ago. Looking at yarns and samples, and leafing through the latest books and magazines is always inspiring. If you’re unable to visit a brick-and-mortar shop, there are always online ones.
4 Browse patterns
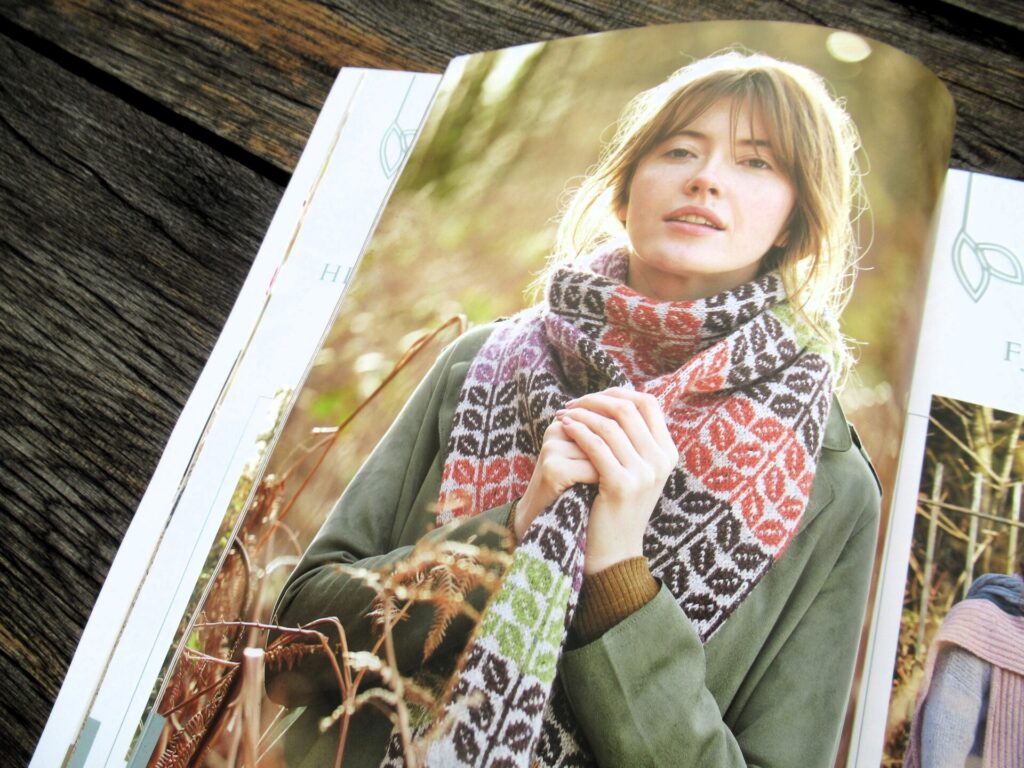
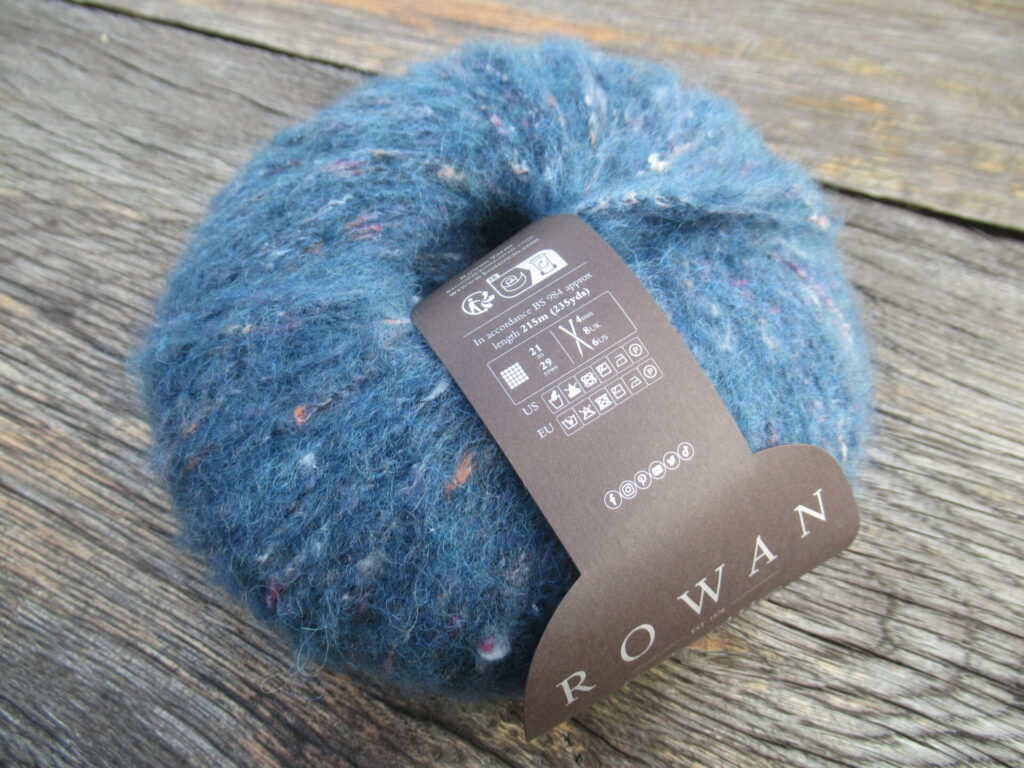
Browsing patterns on Ravelry or Instagram, or looking at pictures in knitting mags may bring back that spark you’re missing. I came home from the above yarn shop with the latest Rowan Magazine, nr 74. It’s quite expensive, and I hesitated, but decided to get it because it’s a special about two beautiful tweed yarns and has several patterns in it that I’d love to knit. My two favourites are Himalayas, included both as a pullover and a cardigan.
This seems like a great idea. Maybe you’ll find yarns you’d forgotten about that would make your fingers itch to knit. I’ll keep this in mind for later…
6 Knit a gift
Perhaps thinking about someone you love and how something you knit for them will keep them warm will bring your knitting mojo back. This tip made me cycle to the small haberdashery shop in our nearest town to get two skeins of yarn for a hat for a friend.
7 Sort your WIPs
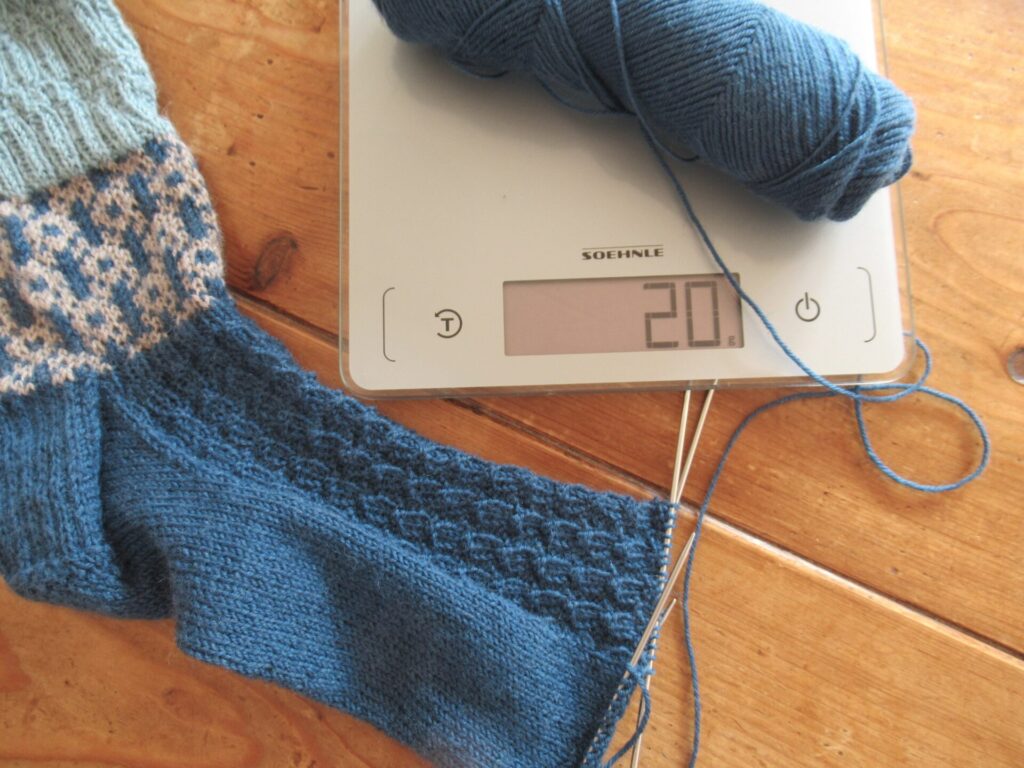
With six works in progress (WIPs) on my needles that are not making a lot of progress, this may be the magical tip for me. Gathering them all together, I realized that there is something about each WIP that’s keeping me from knitting happily on. Take these socks, for instance. The first sock has taken up 30 g of the main colour, so there is only 20 g left for the second sock – uh-oh! What to do now? Buy another skein? Rip back a bit and add stripes? Something else?
8 Start something new
Starting something new is always nice, of course. Maybe you need something challenging to get your needles clicking again. Or maybe something simple. I’m choosing the latter option – a very simple poncho. This will kill two birds with one stone, because I’m also going to knit this together with my favourite group of Ravelry friends.
9 Get some exercise and fresh air
This helps to feel more motivated and joyful in general.
These tips have already made me feel more MOtivated about finishing my WIPs. And I actually feel a tiny spark of JOy about starting the hat and the poncho. I also have the feeling that I may need something more colourful and/or challenging to bring my mojo back completely.
I hope that your knitting mojo hasn’t left you, or if it has, that these tips will help you as they’re helping me. xxx