Basket Weaving

A knitter can’t live without baskets. At least, that’s what I think. There are baskets dotted all around our house, filled with knitting projects, yarn, unspun wool, more yarn and more knitting projects. Some of these baskets were made by Jannie, a basket weaver I often run into at fairs, markets and sheep shearing festivals. This summer I discovered that she doesn’t only make baskets, but also teaches others how to make them, and I entered my name for a workshop.

I asked a friend (who also knits and spins) if she’d like to join me. She said, ‘I’d love to!’, and together we set off early last Saturday.

As soon as we arrived, we were surrounded by baskets. Baskets hanging under the stairs.

And baskets stacked high on shelves.

There were small, fairly simple looking baskets.

And bigger, very complicated looking baskets. (The picture at the top of this post is a close-up of the basket below).

Something like this would be way too difficult for a first effort, of course. What we were going to make, was a round, medium-sized basket with handles. And this is the material we were going to use:

Willow shoots, or osiers. These were sorted by thickness and length and pre-soaked for about 10 days.

We started by slitting three thick pieces of osier in the middle and threading three others through them. With a thinner shoot we started weaving the base.

We continued weaving, while separating the spokes, until it was a reasonable size.

Then we cut off the starter shoots, stuck 24 new long shoots into the base, and added a few rows in a different ‘stitch’ as I would call it as a knitter. I have no idea of basket weaving terminology, but I looked it up, and I think the last few rows in the photo below are called a ‘randing’. They make for a firm base.

Now it was time to bend the shoots upwards. They were tied together near the top, to keep them out of the way and pointing in the right direction. The 3 shoots you can see sticking out on the floor, are the ones we were going to continue weaving with.

We were sat on low wooden benches, with a sloping wooden work surface attached to them. At this stage, a heavy weight was placed inside the basket in progress, to keep it from sliding down the work surface.

Phew, basket weaving is hard work! In need of a short break, I stepped outside. It was a lovely, sunny morning, and the garden around the basket weaving shed was idyllic.

Even outside there were basket-like decorations and structures everywhere, overgrown with plants.

The chickens (and a guinea fowl) were making soft, clucking noises. There were literally heaps of courgettes and tomatoes on the patio, and there were some gorgeous dahlias in bloom.

The same week I went basket weaving, I won a knitting pattern on Ravelry. Although ‘won’ isn’t the right word for it, perhaps. All I did was chat with other knitters about the things we were making and post some pictures. But still, my name was drawn and I received a digital pattern for a big, cosy wrap in a basketweave pattern.

Wasn’t that a nice coincidence? I’m really tempted to cast on straightaway, but I already have so many other plans for the coming months. I think I’ll keep it till later.

Well, after this short break I’m ready to get back inside. Are you coming?

It’s already starting to look like a real basket.

Our example was placed in the middle of the room for inspiration.

Using champagne corks we made even spaces for the handles.

After braiding a sturdy rim and snipping off all the ends sticking out, our baskets were finished. And here they are – tadaah!

And here’s mine at home, filled with some undyed Shetland roving. I’m so proud of my very first, slightly lopsided willow basket.

My friend and I made our baskets at Vlechterij Vinkenslag. Jannie is a very knowledgeable, friendly and patient teacher. Apart from teaching basket weaving, she sells her beautiful baskets, bird feeders and decorative ornaments at crafts markets and fairs.

3 Reasons for Knitting Dishcloths

There aren’t many taboos left in this country. We Dutch are a broad-minded people in general. If someone were to say, for instance, ‘I’m a dominatrix in my spare time,’ people will in all likelihood go like, ‘That sounds fascinating! Tell us all about it.’ But there are still some subjects that we avoid talking about.

When people ask me what I do in my spare time and I tell them that I knit, their eyes tend to glaze over. They say things like: ‘Oh, ah, my Nan used to do that,’ and then the conversation falls flat. It’s the same with housekeeping. We don’t talk about it. It isn’t considered sexy.

Cheryl Mendelson, a former lawyer and professor of philosophy, knows about this taboo. She starts her informative and entertaining book Home Comforts with the words: ‘I am a working woman with a secret life: I keep house.’

When she told people she was writing a book about the nitty-gritty of housekeeping, the reactions she got were not undividedly enthusiastic. And she writes that even for herself ‘the subject was actually something of a hot potato’ (p. 4).

I’ve kept quiet about two such ‘hot potatoes’ for a long time. My nearest and dearest knew about them, but I usually avoided these subjects with strangers. Starting this blog has felt like a kind of coming out with regard to knitting. And with today’s blog post about knitting dishcloths I feel like I’m getting to the next level, because it’s about housekeeping, too. Another subject that makes us cringe.

Handknit dishcloths = knitting + housekeeping = double cringe

(Or is it just me? How do you feel about this? Do you knit dishcloths too? How do people react? Do you mind?)

So, why knit dishcloths anyway?

For me, the seed was sown in Norway in 2006, when I bought Vinterlappar og annen vintermoro, a crafts book with many great ideas for things to make and do in winter. There is also a knitting pattern for a dishcloth in it. It was the picture of the stacks of dishcloths in shades of blue and green that did it for me. How lovely!

But knitting dishcloths? No, no, no, I wasn’t going there. Too twee by half!

I came across more handknit dishcloths in Scandinavian magazines that made me sigh ‘how lovely’, but always a feeling of embarrassment held me back.

Early this summer a knitting friend showed me the dishcloths she’d knit. Again I thought ‘how lovely’. And this time, I  finally caved in. Why? Well, for several reasons.

Reasons for knitting dishcloths #1: Choosing the yarn is fun

Choosing yarn is always fun. In this case you’ll need cotton, a material available in many, many colours, which makes it even more fun. And the advantage with choosing yarn for dishcloths compared to items to wear is that you can choose any colours you like – bright or subtle. They don’t have to look good with your clothes, your hair or your complexion.

As I don’t have a lot of experience knitting with cotton yarns, this opened up a whole new world for me. I browsed around in shops and on the internet until I hit on a yarn that came with a shade card. (I love shade cards!)

I chose 3 shades of blue and cast on for my first dishcloth. And that brings us to

Reason for knitting dishcloths #2: Scope for trying out stitch patterns

Dishcloths are ideal for trying out and enjoying the rhythms of all kinds of stitch patterns. I started with one in broken rib:

Lovely in all its simplicity, but the edges were rather loose. Hmmm – something to do differently next time.

I immediately cast on for the next one. This time in broken basket weave, a pattern that required a little more attention.

Even nicer than the first, because it has a border in garter stitch that gives it stability, and because the stitch pattern is more interesting to knit and look at.

For my third dishcloth I chose a stitch pattern called Cable Stitch in the booklet I used. At home we call this stitch ‘Coffee Beans’. I had my doubts about this one, because it is a very stretchy stitch that I would normally rather choose for something like sock cuffs. It looked really nice in the photograph, though, so I tried it anyway. But I ended up with a long and narrow dishcloth, which was not what I was aiming for:

After washing I was able to block it to a square cloth…

… but I’m not happy with the edges, and I wonder what is going to happen when I use it and wash it again. I definitely don’t intend to block my dishcloths every time I’ve washed them.

By this time I was so taken with these simple little cloths, that I asked our daughter to get some more yarn from a shop she passes every day on her way to work. ‘Please choose some harmonious shades,’ I said. And she picked these:

Nice and subtle, aren’t they? While you’re reading this, there are more dishcloths in the making. I’ll write about these, about the yarns, and about my experiences with using and washing them in another post.

Ah, dishcloths are such great little projects. And that brings us to reason number three.

Reason for knitting dishcloths #3: Portability

A dishcloth would make an ideal travel project – small, lightweight, not too difficult. But…

… what if I’m knitting on the train and someone asks me what I’m making? What do I do then? I can’t just admit I’m knitting a dishcloth, can I? Way too embarrassing!

Still, one day, with a long train journey ahead of me, I put my embarrassment aside. I didn’t have anything else suitable to take along, so I grabbed my current dishcloth and stuffed it into my backpack. But when the guard who came along to check our tickets asked me, ‘What are you making? A scarf?’ I was only too relieved that she hurried on without waiting for an answer. Phew!

Will there ever come a day when I can say, ‘I’m a dishcloth knitter and proud of it’?

Knitting Sideways

Mid-September. The mornings are starting to feel chilly and the smell of autumn is in the air. In the garden there are still some roses to be picked and the autumn anemones are flowering profusely. It’s the time of year to start thinking of warm and woolly knits. But first it’s time to finish some summer projects.

My ‘big’ summer knitting project was an oversized T-shirt, from a pattern called Sideways Tee, designed by Churchmouse. I’m not much of a summer knitter – I prefer woolen yarns and cosy socks, sweaters and shawls. But after a very hot spell early in the season, I realized that I needed something cool and summery to knit or I wouldn’t be able to knit at all on hot days.

Now I’d like to show you what I made and how I set about it. I like looking over other makers’ shoulders and hope that what I’m doing will be interesting and useful to others too.

Before I start knitting a garment, I always swatch. I don’t swatch for socks, and I don’t always swatch for shawls and scarves. But for garments it makes all the difference between success and failure.

This time it was a good thing I did, too. For the first swatch, I used the recommended needle size (4.5 mm) but didn’t get the right gauge. So I went down a size (to 4.0 mm), knit another swatch and, yay, the gauge was correct. I washed both swatches to make sure the knitting didn’t shrink or grow, but it was fine, so I could start knitting.

The Sideways Tee has an interesting construction. Both front and back are started from a provisional cast-on in the middle, and are knit outward to the sides. It isn’t called Sideways Tee for nothing.

In this case it isn’t your usual ‘crochet a chain and pick up stitches from the bumps.’ It’s a more sophisticated provisional cast-on, that is crocheted over the knitting needle.

I’ve used this technique before, and think the result is much better than with the crocheted chain technique.

At first sight this Tee looks very simple. But the only thing that is simple about it, is the stitch pattern – a simple stocking stitch. Other than that it has many interesting features, like sloping shoulders, side shaping and short rows. The 8 pages of the pattern are packed with instructions, diagrams and special techniques.

I could easily lose my way leafing back and forth through all these pages, and took several measures to prevent confusion.

To start with I marked everything related to my size with a pink highlighter (I’ve discovered that yellow becomes invisible in lamp light). I used a row counter (the bright green thing) as well as sticky notes to keep track of where I was in the pattern.

The first half of the back ended with some short rows, done with a special technique called C&T (Clip and Turn) by the designer. It involves lots of locking markers, as you can see here:

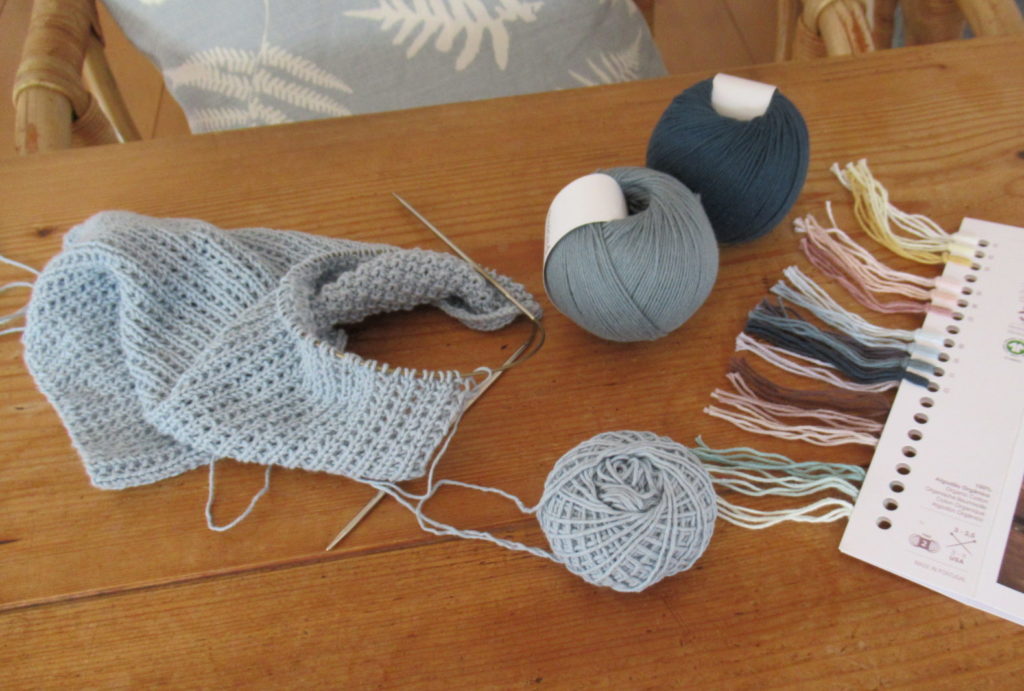
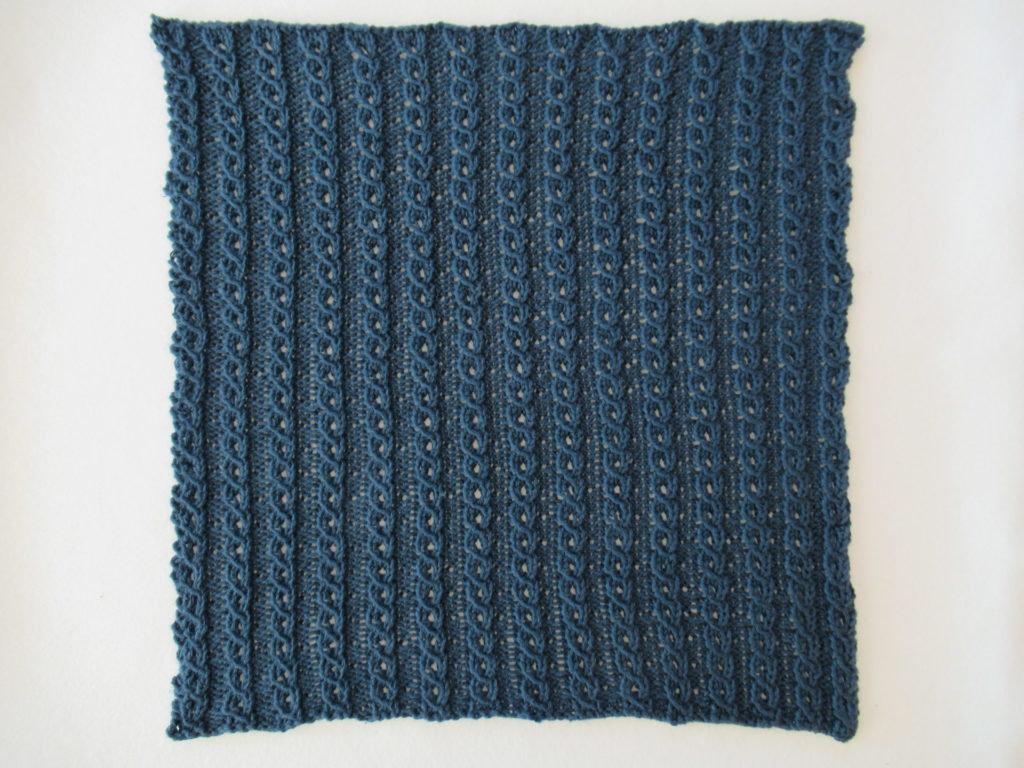
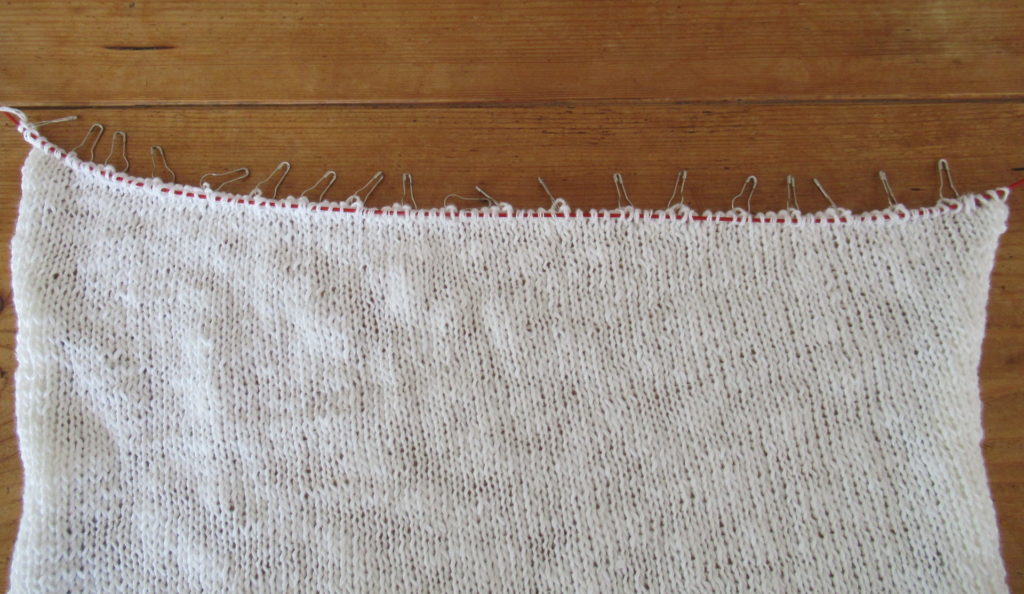
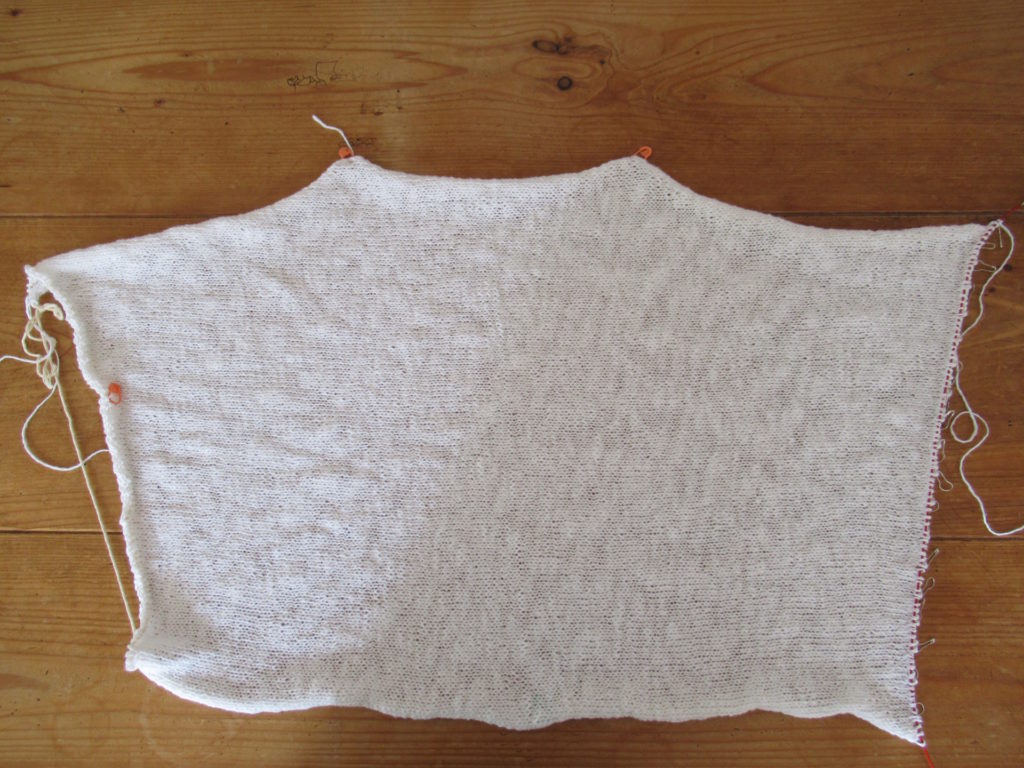
I used some very fine metal locking markers for this. They were a gift from a friend and I really like them, because they don’t distort the knitted fabric like the thicker plastic ones can do with this technique. (I did use plastic ones to indicate armholes, neckline etc.) In the final row, all the gaps caused by the short rows are closed and the stitches are placed onto a piece of waste yarn.

Then the stitches  from the provisional cast-on in the middle are picked up, while the waste yarn used for the cast-on is removed.

This technique works very well. I think it’s rather daring to start like this, because you could easily get a wonky row right in the middle of the front and back that would spoil the entire garment. But I can’t see where I picked up the stitches – can you?

After finishing back and front it was time to start seaming the shoulders. At this point my Tee looked like this:

For me, this was the absolute low point of this project. It looked terrible, like some kind of frumpy, strangely shaped, too short poncho. If it wasn’t for this blog, I could easily have thrown it into a corner never to look at it again. But I’d planned to show the finished T-shirt here, so I persevered.

After closing all the seams and knitting on the edgings, I washed the shirt and threw it into the dryer until almost dry before blocking it.

When it was on my blocking mats I saw that it was going to be okay after all.

The size was exactly as it should be according to the pattern. I was really happy with that. I only pinned the shirt into place with a few T-pins. After drying, I steam pressed it for an extra neat finish.

And this is what my Sideways Tee looks like when worn:

It’s a very different type of garment from what I usually choose. Usually I choose more fitted, A-line shaped garments. So this was a bit of a gamble, but all in all I’m happy with it.

The only thing I’m not too happy about, is the neck edging. There is a row of rather loose stitches along the front neck.

I don’t know what I could have done differently. Maybe it’s because the yarn has no bounce and doesn’t fill up the holes, or maybe it’s because the sideways knit stitches stretch too much. I don’t know. It’s just a small detail, however – the rest is fine.

I like the drape and feel of the knitted fabric. I think it’s a flattering shape. And I like the sloping shoulders and fit of the ‘sleeves’ (which are, basically, just armholes with an edging).

Finally, here’s a shot of the back. It’s definitely oversized, but far from shapeless.

Well, I finished that nicely in time for summer, didn’t I? (Summer 2020, that is.)

Oh, and then there’s the yarn, of course. I almost forgot to mention it, but it’s one of the most important elements. It can make or break a knitting project.

I chose Juniper Moon Farm ‘Zooey’ for my Sideways Tee because it felt cool and crisp, and because it happened to be available from a local yarn shop. And I chose white because it’s a nice and summery colour that goes well with jeans.

Zooey is a 60% cotton, 40% linen blend with thicker and thinner parts. It is loosely twined and, because of that, very splitty. It is easy to miss one of the strands, resulting in a thin spot in the knitted fabric, or to mistake one stitch for two and accidentally increase a stitch. I’m speaking from experience. Both have happened to me and I’ve had to frog quite a bit to fix it.

After a while I got used to the yarn, and developed a knitting technique that prevented me from sticking the needle into stitches by pushing the strands together with my index finger. This is definitely not a yarn for mindless knitting. Having said that, it gives a very nice fabric – drapey with a lovely irregular structure.

Well, that’s the story about my Sideways Tee. If you’d like to make one too, I can recommend it. It’s a really enjoyable and interesting knit. Looking ahead to autumn, I think it will work very well in a cosy woolen yarn, too.

To end today’s blog post, in style with the focus on white, here’s a picture of our beautiful autumn-flowering Japanese anemones ‘Honorine Jobert’.

Note: This post isn’t sponsored in any way. I only mentioned the pattern store and yarn brand because I think it’s essential information.

Summer Walks Part II – Coast

On a day that was too hot for walking through woods or across heathland, we thought a walk along the coast might be a good idea, with hopefully a refreshing breeze. So we set off for my native Friesland. Our starting-point was the old town of Stavoren (photo above), and our destination was Hindeloopen, another small harbour town. (It was a one-way walk – we took the train back.)

This isn’t the coast as in sea shore, but rather the coastline along the IJsselmeer, a former inland sea that was closed off around 1930 and is now a big freshwater lake. The dykes are still there, and our trail ran right across the top. Well, it wasn’t really a trail, just grass, but you get the idea.

In reality the dyke is much steeper than it looks here. The narrow road on the right is a bicycle track. Nice when you’re cycling, because it’s sheltered from the prevailing wind. But not much fun when you’re walking, because you’d miss the lovely views over the lake.

With a delicious breeze from behind it was an ideal day for this walk. Looking to the left, we saw a choppy lake with some sailing boats.

And looking to the right, we saw agricultural land, with some farms and modern windmills. Completely flat, with endless horizons.

All along the dyke, there were lots of fences with stiles to climb.

The fences are there to confine the Texel sheep to certain sections of the dyke. The sheep are kept company by water birds, like these black and white barnacle geese.

The sheep were not shy at all. They didn’t run away when we came close, like they usually do. We had to step around and over sheep and lambs lazing and grazing on our path. And some of the sheep were downright pushy. When we sat down on the grass to eat our sandwiches, they came begging for a share. They must have been fed by other walkers.

‘Come on, give us some of your bread,’ they seemed to say. And, ‘I really like the smell of that cheese.’ They refused to be shooed away and were so insistent, that in the end we got up and walked on, eating the rest of our lunch along the way.

In the distance we could already see our destination. It wasn’t just a perfect day for walking, but for wind and kite surfing, too.

Against the big blue sky, Hindeloopen looked very small, with its church and the houses with their red roofs huddled behind the dyke. And, in fact, it is small now, with under 900 inhabitants. In the 17th and 18th centuries, when the lake was still a sea, it used to be an important harbour and trade centre, with three times the number of people and a fleet of around a hundred ships.

It’s nice to imagine merchant ships leaving and entering the town via the lock (photo below) that is now used by pleasure boats. On their outward-bound journeys they would be filled with gin and wool. And coming back from Scandinavia and Russia they would be carrying wood.

We slowly strolled through the old town centre and saw some monumental merchant’s houses – a sign of great wealth in earlier times.

There was a museum, too, as well as several shops selling local traditional crafts. Hindeloopen is renowned for its decorative painting style, with garlands and stylized flowers on a red, green, blue or cream background. Here are several trays and a ‘butte’.

A butte is a traditional travelling case used by seamen for their personal belongings. I think it’s a thing of beauty and would like to own one someday. But as it’s all handmade, it has quite a hefty price tag. It’s not that it isn’t worth it, but it isn’t an amount I’d spend on a whim.

I came home with some more modest souvenirs – two pieces of fabric and two postcards.

The fabrics are inspired by some of those used in the colourful traditional costumes of Hindeloopen. I don’t know what I’m going to use them for yet, but I’ll think of something.

One of the cards shows some of the typical decorative painting on a wooden platter. And the other shows a woman in traditional dress. (Unfortunately the postcard doesn’t tell us who the artist is.) In the painting, the fabrics are simplified to solid colours. In reality they would be flowered and checked, in mainly red, blue and white. There’s an picture of a complete costume on the town’s museum website.

And what is the woman doing? Knitting – what else?