Hello, and welcome to another Place to Sit and Knit. It’s there, under the giant white-and-yellow striped parasol behind the artichokes. I hadn’t planned on writing the second instalment in this series so soon, but couldn’t resist.
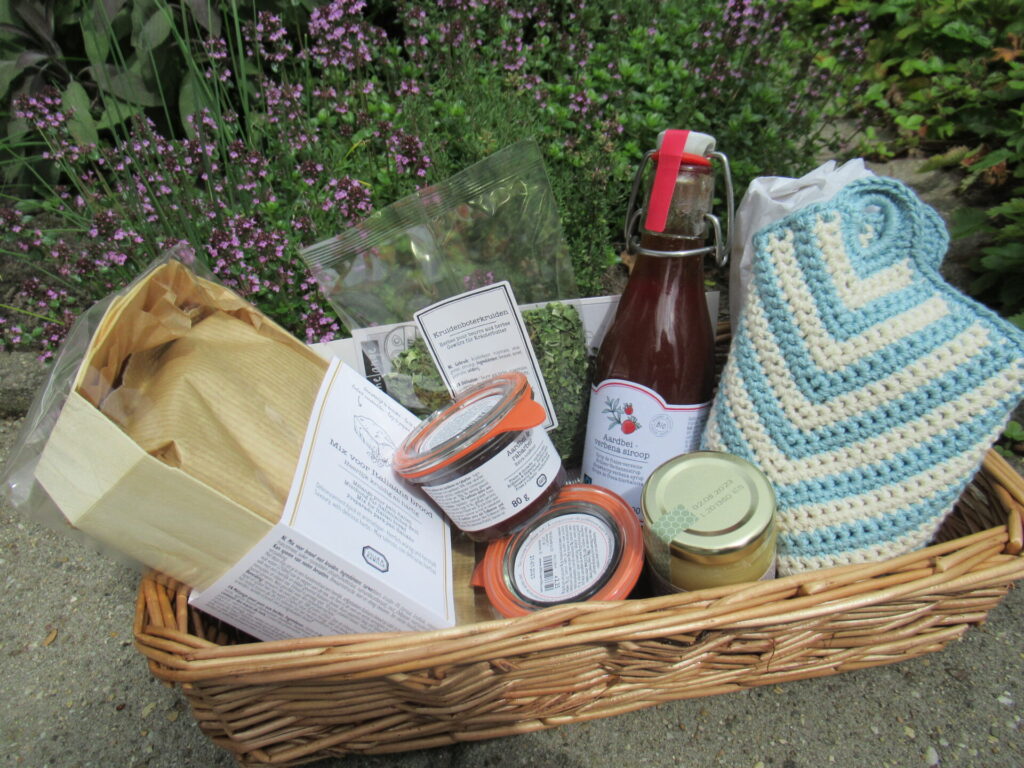
It was our niece who brought us here. She has been a student at Nijmegen university for a year now – a lonely year filled with zoom lectures. She rents a room in a house with several other students in a village outside the city. We arrive bearing a basket filled with goodies and a pair of old-fashioned crochet pot holders.
We’ve kept in touch by e-mail, Whatsapp, snailmail and phone, but it is wonderful to see her face IRL again and to finally see where she has been studying so diligently on her own all year. I really, really hope our young people will be able to have a slightly more normal life after the summer.
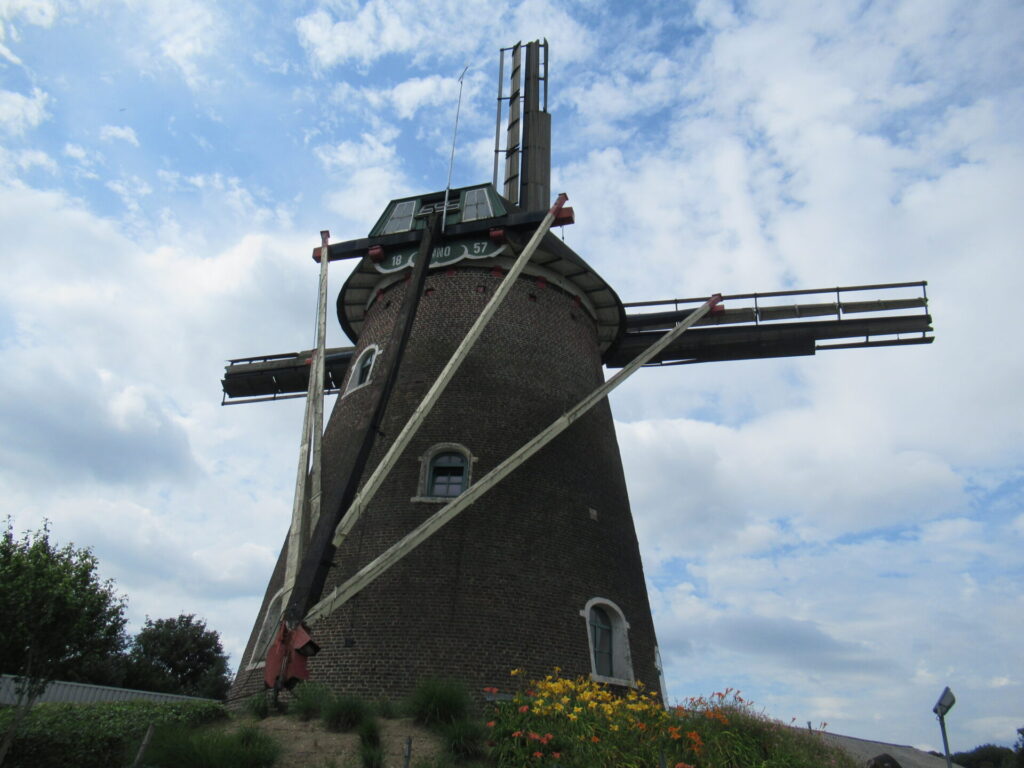
After several mugs of tea/coffee and a guided tour of the village we paid a visit to the local windmill.
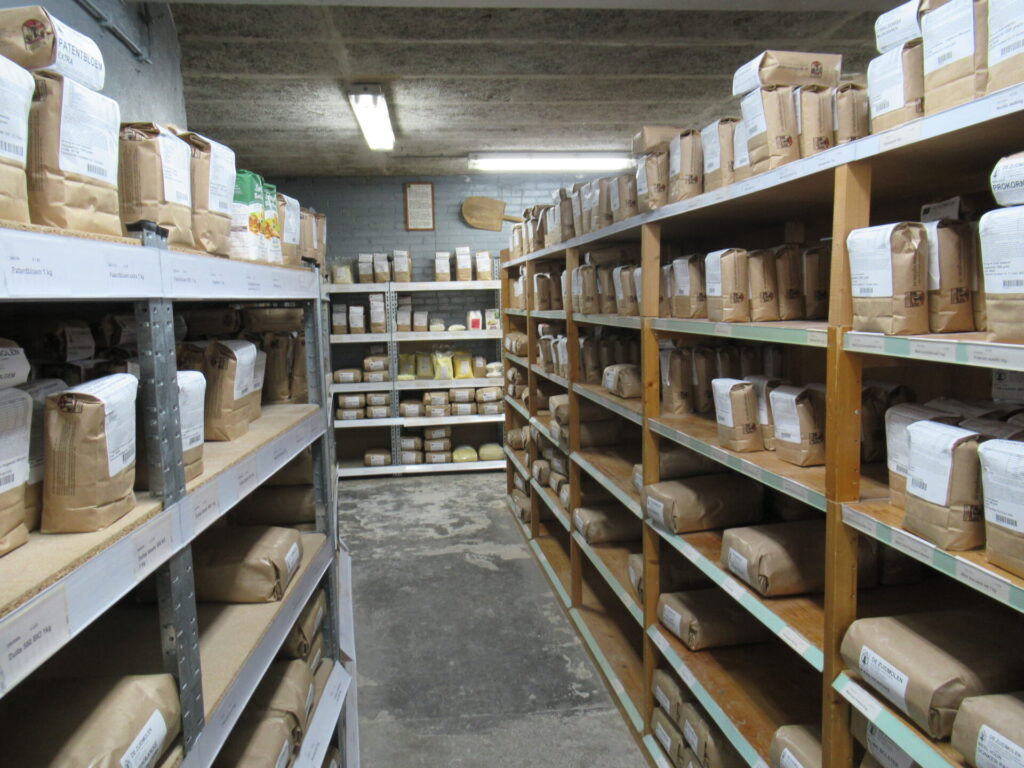
It is no longer functioning, but now houses a shop selling everything a home baker will ever need, from dozens of different kinds of flour to seeds and nuts, dried fruit, yeast, baking tins, proofing baskets and much more.
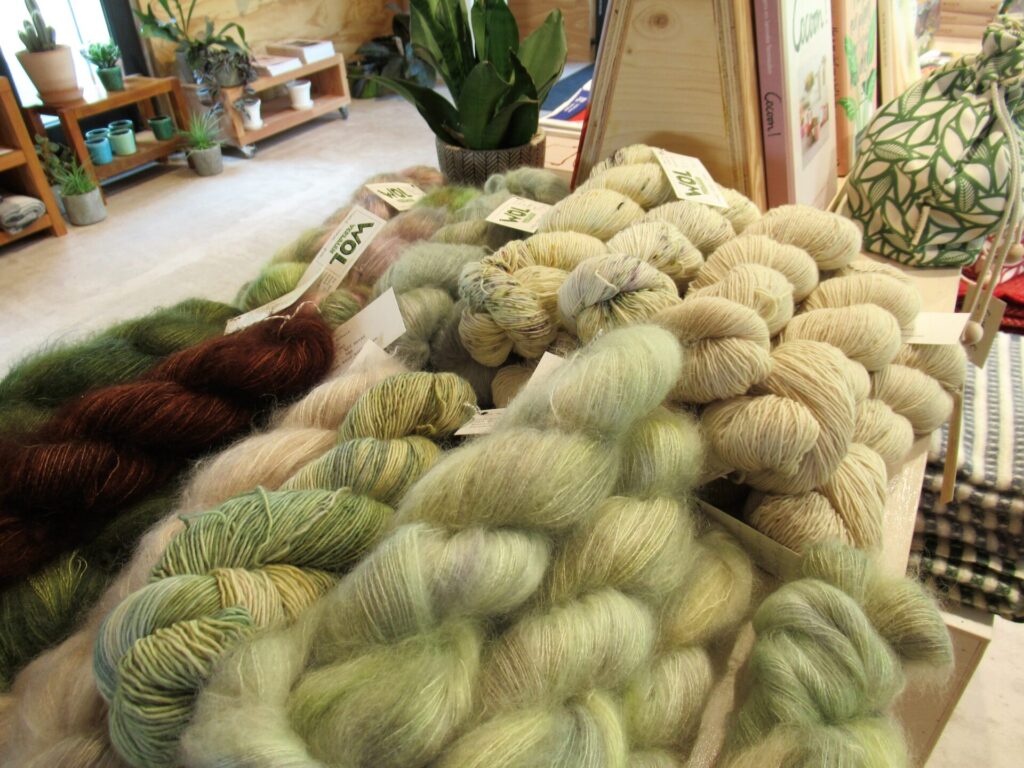
To my husband this is what a yarn shop is to me. This time I was the one waiting patiently outside. (I didn’t mind – I brought my knitting.) This time it was my turn to ask, ‘Did you get everything you wanted? Are you sure you don’t need anything else?’
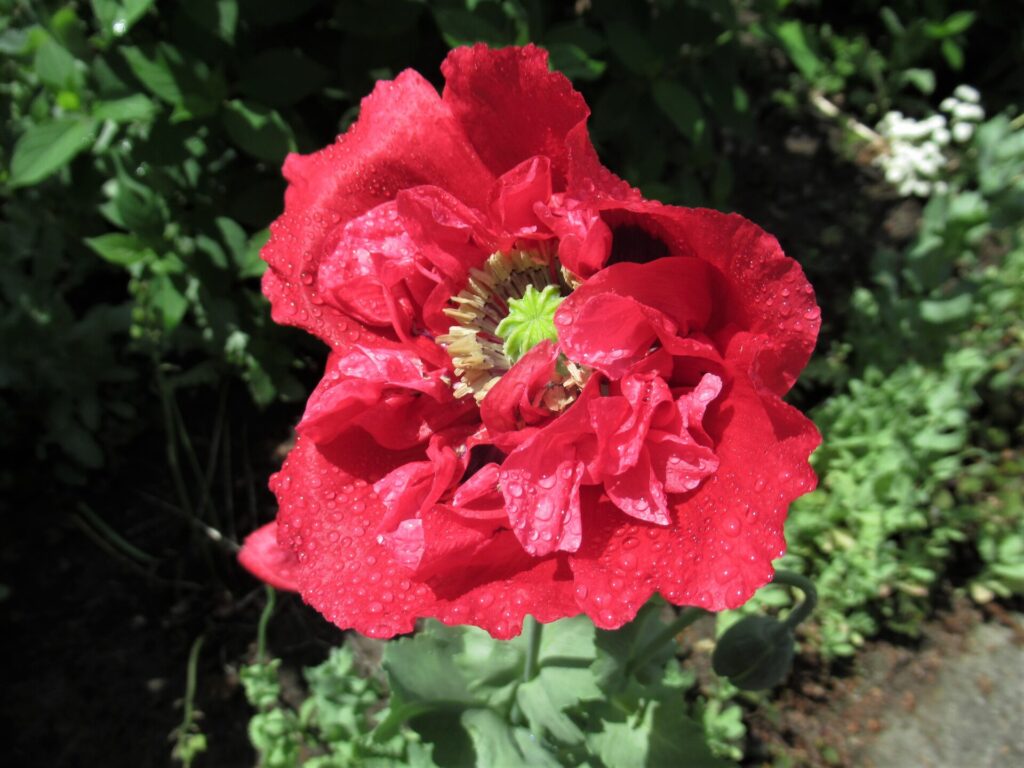
As we rarely get to this part of the country, we thought we’d better cram as much into our day as possible. So, on to our next stop: Nijmegen Botanical Garden. There are actually two gardens separated by a beech avenue: the botanical garden proper and a flower garden.
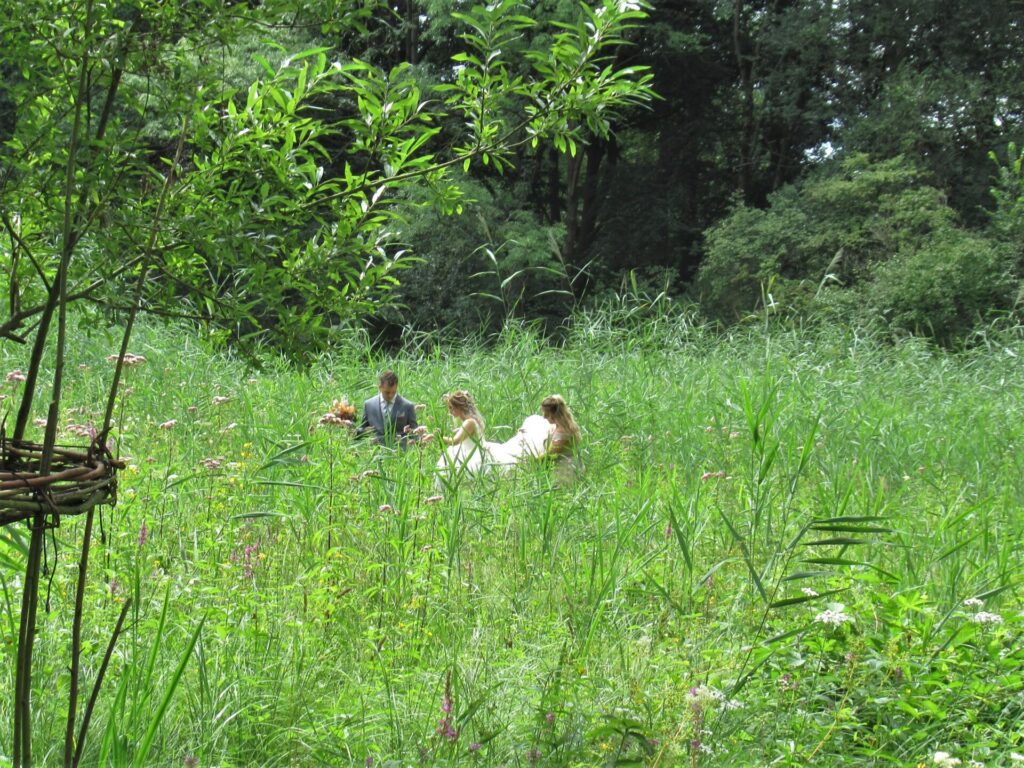
On the afternoon of our visit, the bog area of the botanical garden looked like something from a fairy tale.
At least from a distance. I hope they’ve been able to keep the wedding dress and the bridegroom’s shoes from getting too muddy and their tempers from getting too frayed. Whose idea was it to take wedding pictures in a bog anyway?
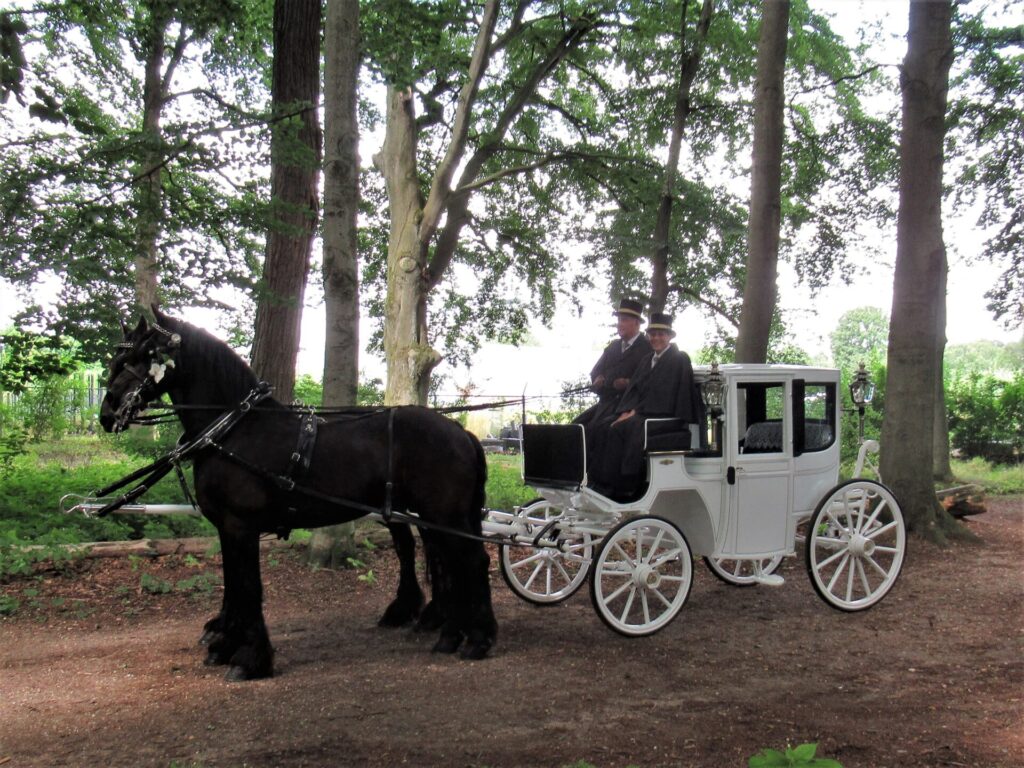
The Friesian horses drawing their fairy tale carriage were pacing back and forth outside the garden, only stopping for me to take a picture.
It’s beautiful to look at, but I’m so glad I’ve never had to go through the ordeal of a fairy tale wedding like that.
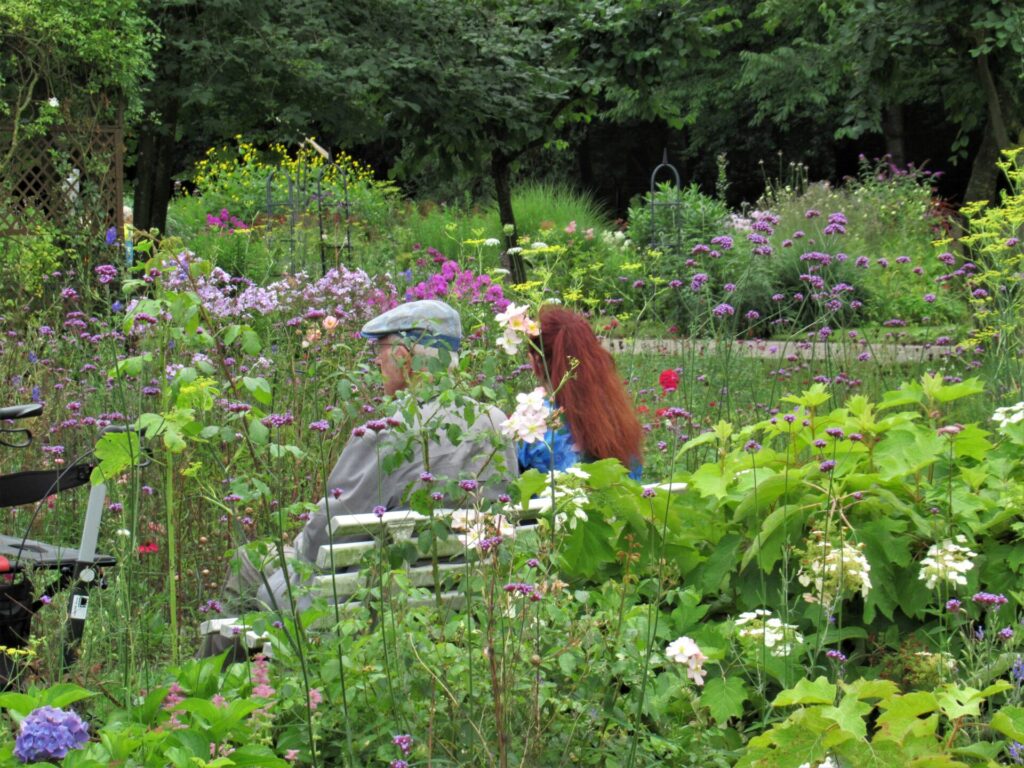
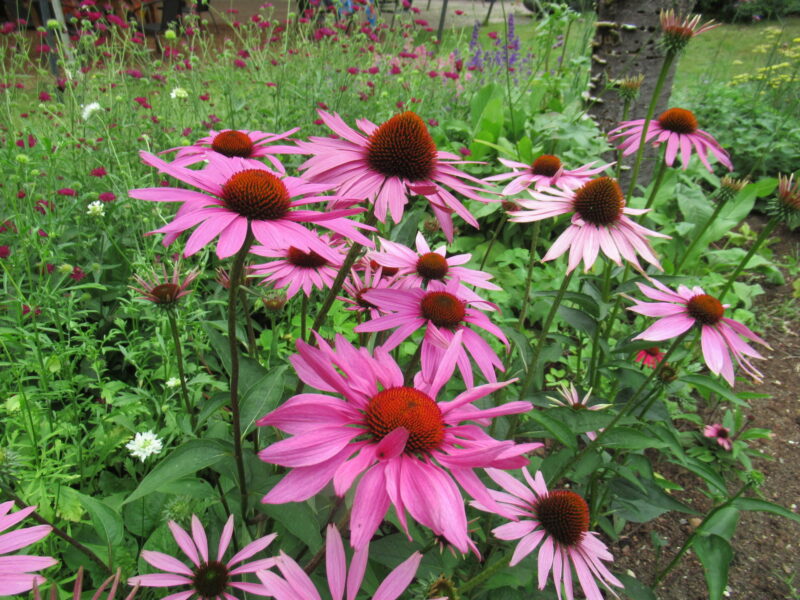
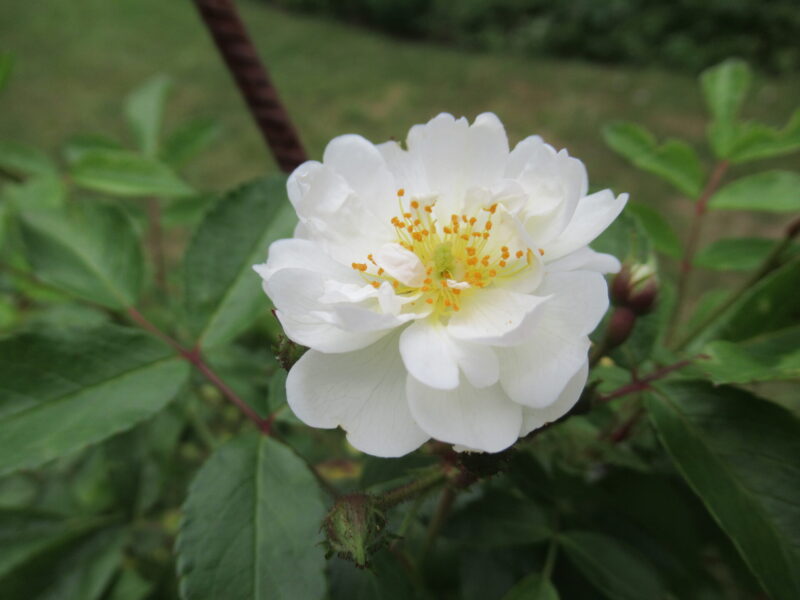
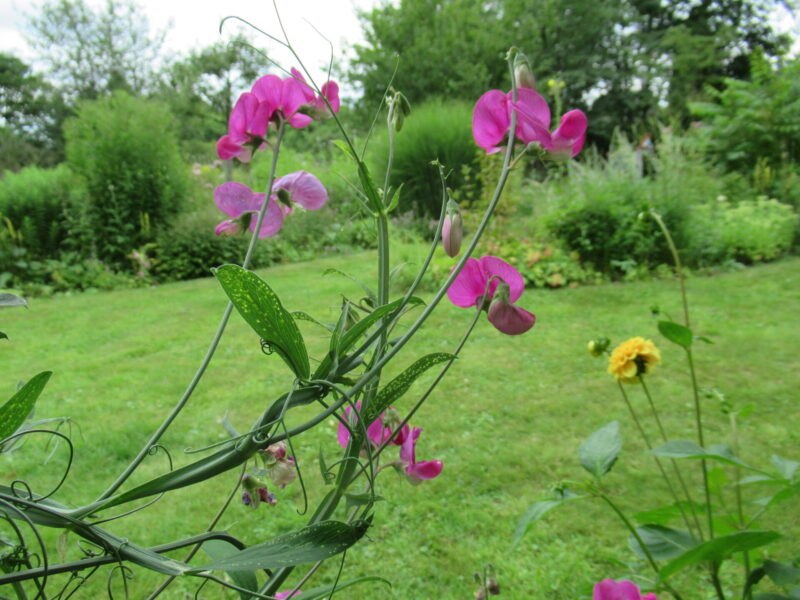
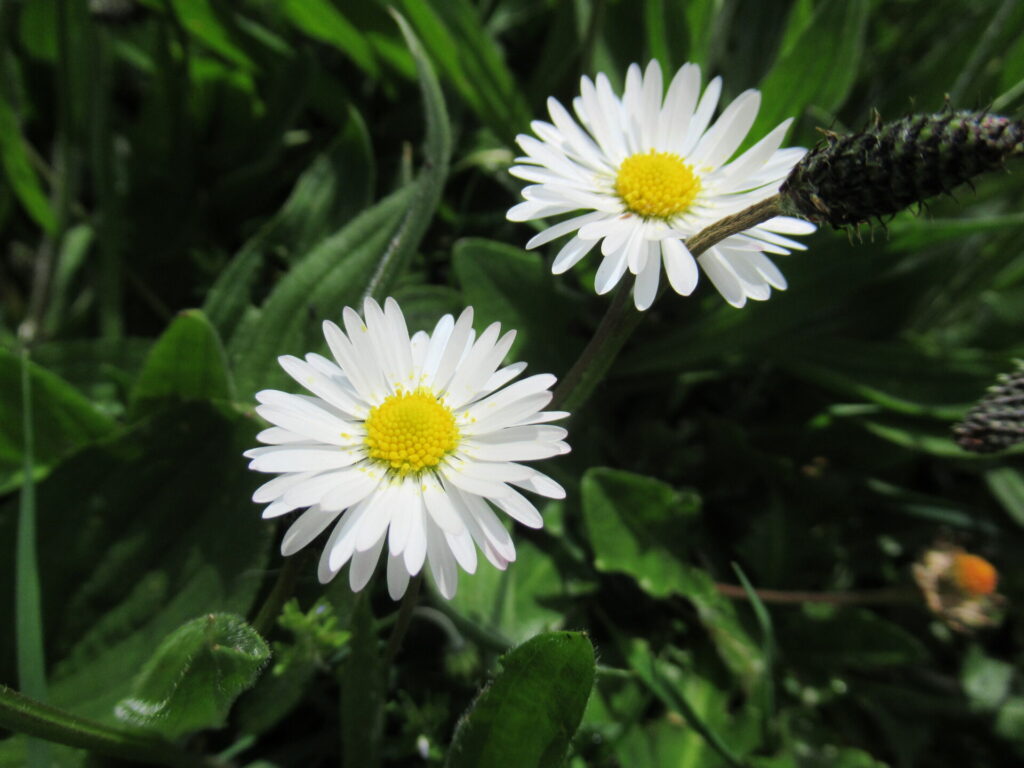
Today’s Place to Sit and Knit is in the flower garden. There are lots of lovely places to sit and knit here. Ordinary benches surrounded by flowers.
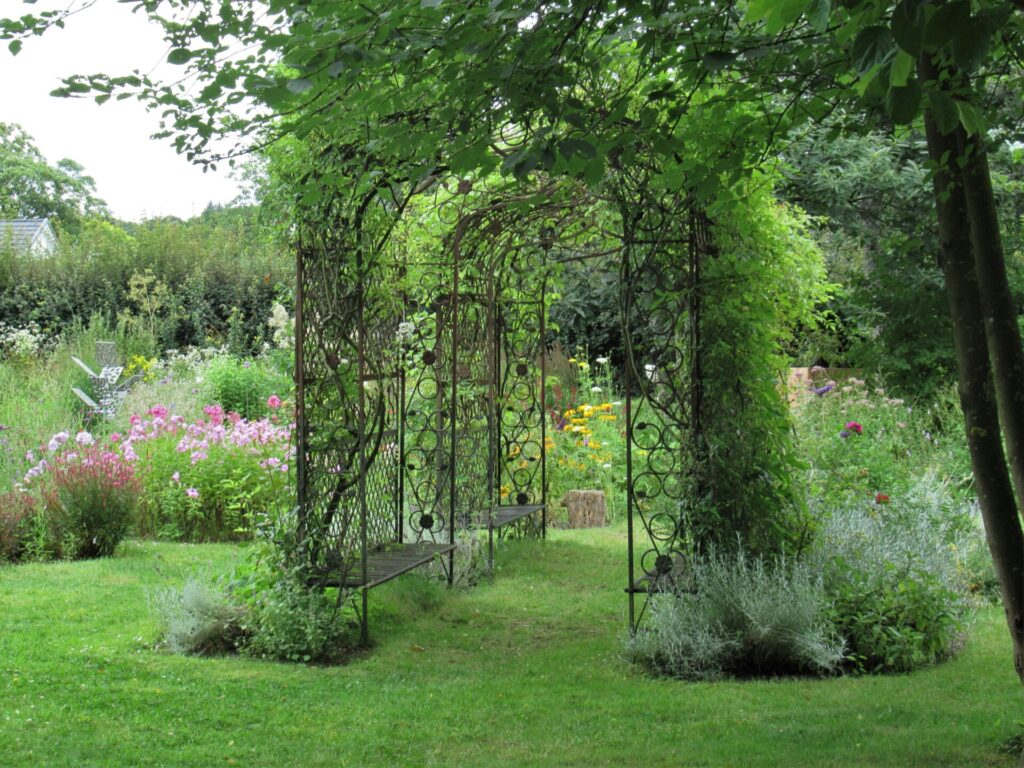
And extraordinary seats covered in foliage.
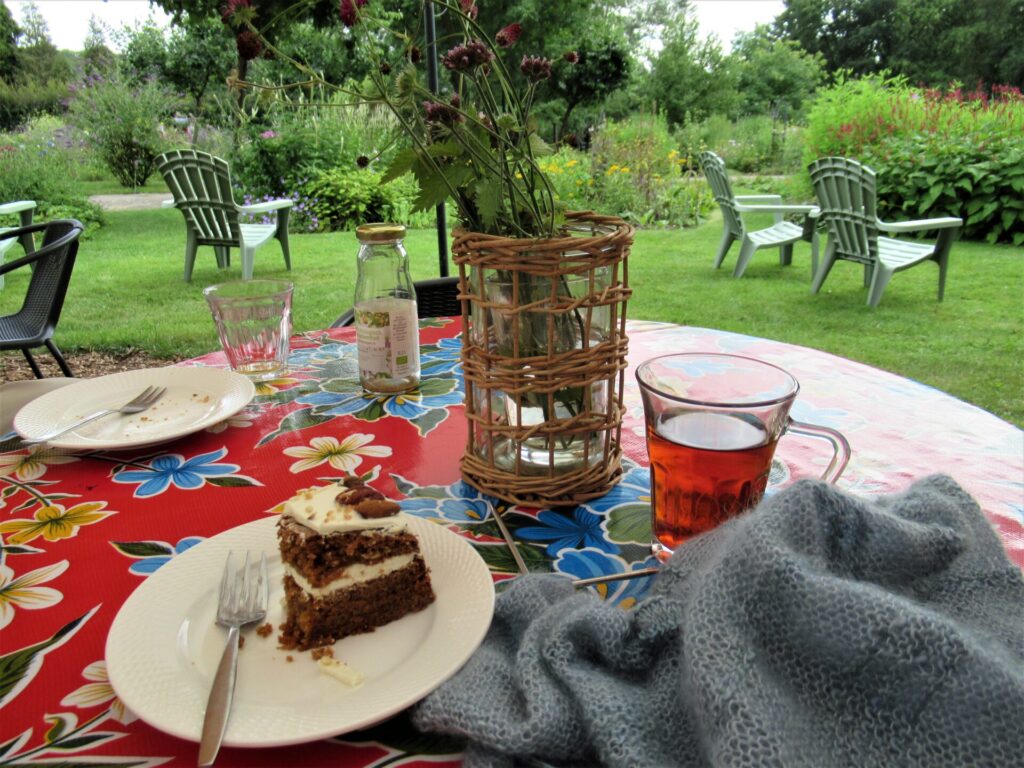
We’re heading for the tables and chairs under the big parasol.
Time for some tea, fruit juice and carrot cake. Did you bring your knitting? What are you making?
I’m ‘working’ on my new shawl design, using a combination of silk/mohair lace yarn and a fingering-weight merino yarn. It doesn’t look like much yet, does it? It’s a work in progress and I’m not ready to show you more at this stage. Sorry! These things always take a long time, at least for me. I plan to have the pattern finished sometime in September. Saying that here out loud feels like giving myself a deadline, and I think that’s a good thing or I’ll stay dithering over the details forever.
At the first of our Places to Sit and Knit, my blogging friend Helga from Sweden told me about a linen top she is knitting, using a pattern called Siw (Ravelry link). It is an oversized top with a lovely lace panel on the shoulders. It might be just the thing for some linen yarn that has been marinating in my stash for a while.
My yarn is thinner than the yarn used in the pattern, but it may work. I’ll swatch and see.
With the 1,071,226 patterns currently available on Ravelry, it can be hard to decide what to knit. There are all kinds of filters available to help us choose, but for me nothing beats tips and inspiration from friends – real-life knitting friends, Ravelry friends and friends met in the blogosphere. Thanks, Helga! How is your Siw coming along?
It’s nice here, isn’t it, just sitting and knitting, sipping a drink, and enjoying the flowers (click on images to enlarge). And the best thing is: admission is free and you can come back anytime you like!
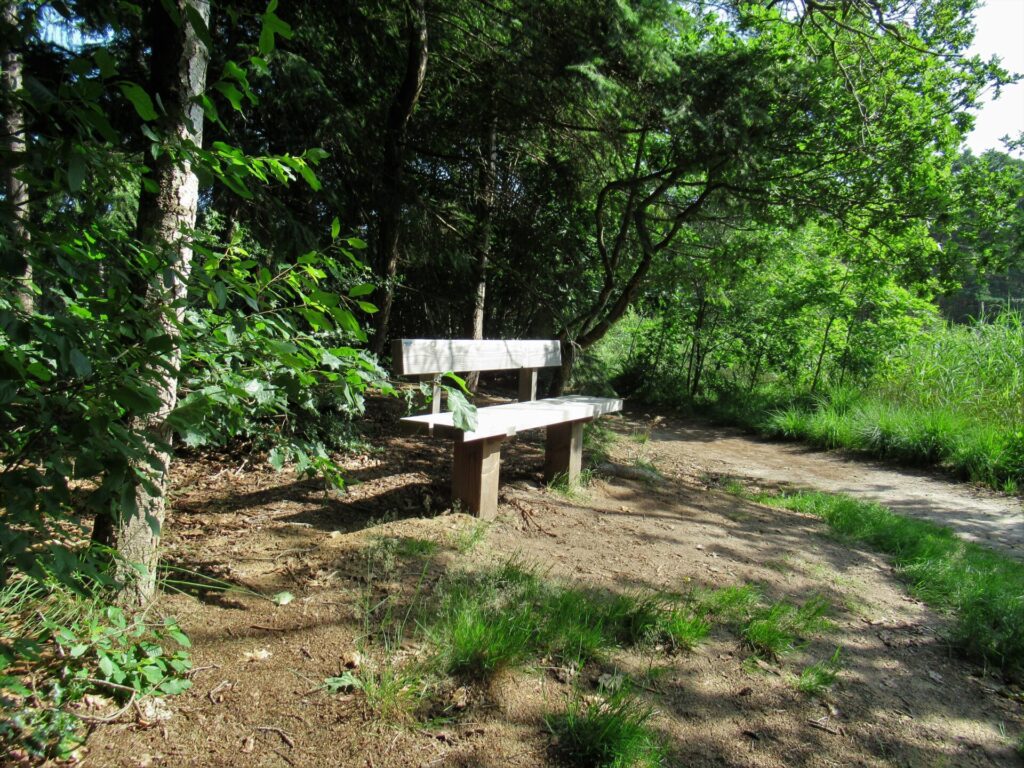
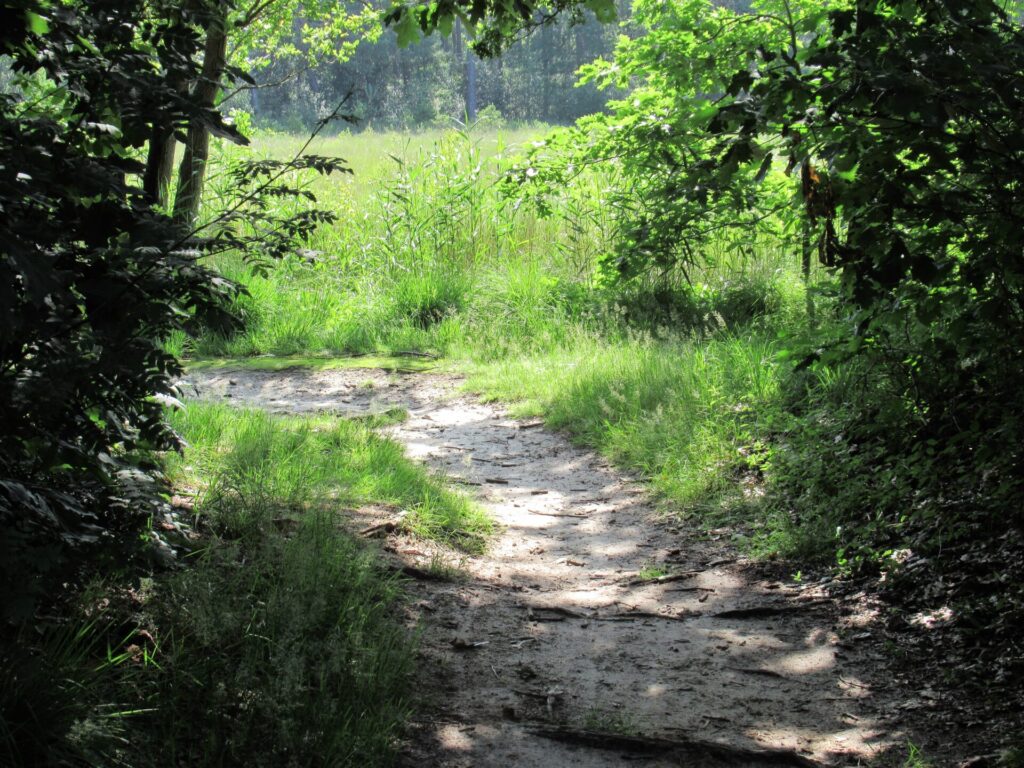
Hello! Today, I’m taking you along for a short walk, to a lovely place to sit and knit.
The bench in the photo above is about a mile from our home, a 20-minute walk. It is around the bend of a sandy path.
At first glance the view from the bench is underwhelming.
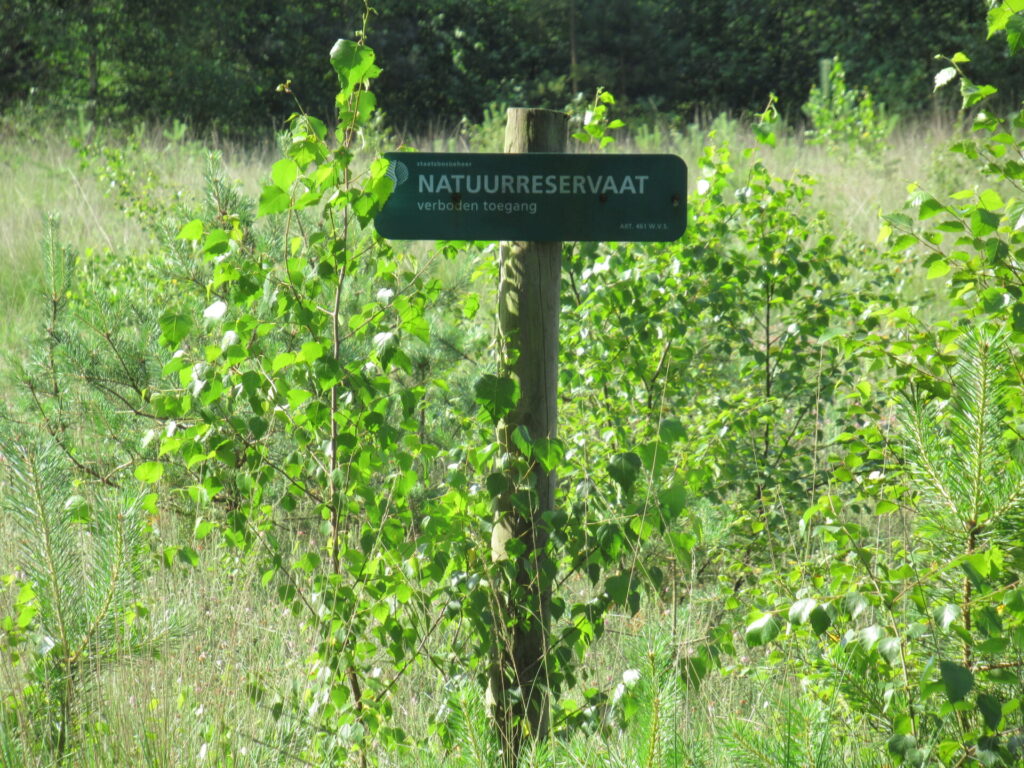
But the better you get to know the spot, the more you start to appreciate it. We cannot enter it, not just because it is a protected nature reserve…
… but also because it is a bog and we’d have a hard time keeping our feet (and the rest of ourselves) dry.
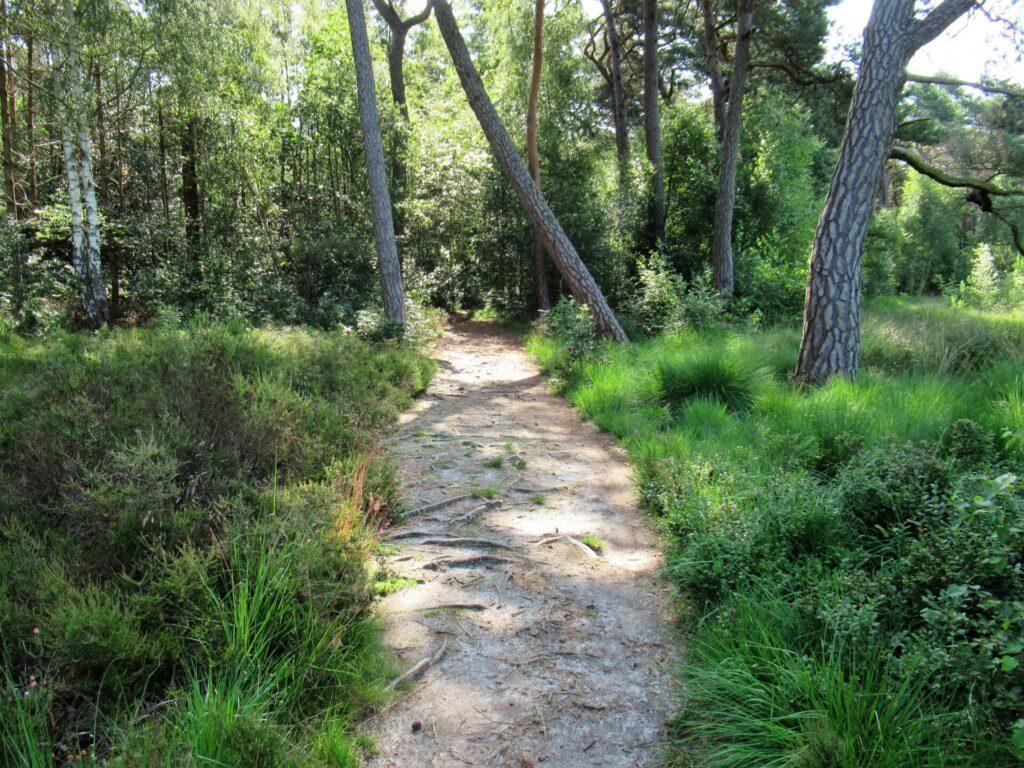
But we can walk around it.
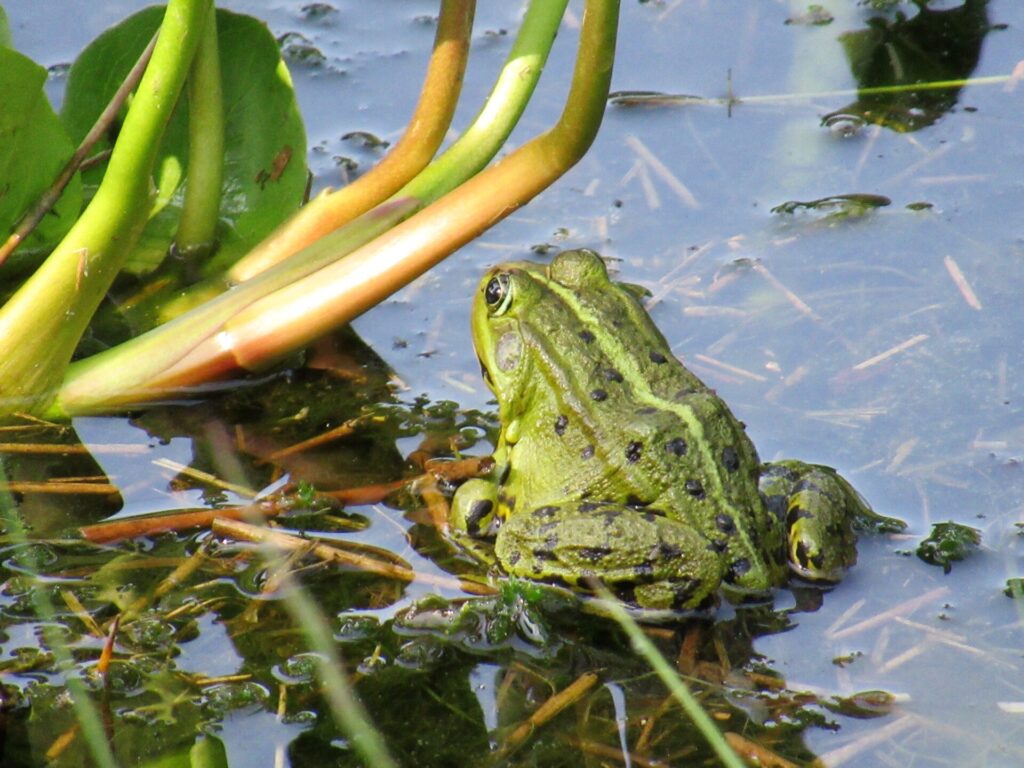
We can say hello to some of the inhabitants. Hello big green frog!
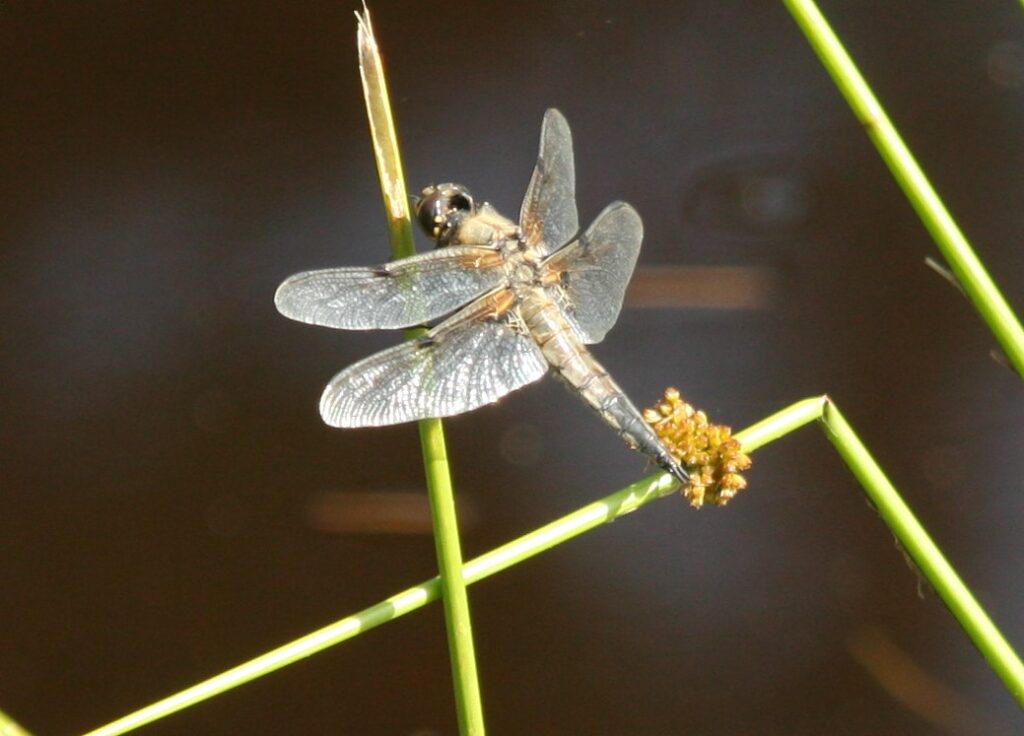
Dragonflies are whirring through the air or sunning themselves.
At first glance, the vegetation is unspectacular, too. But again, the better you look, the more you see.
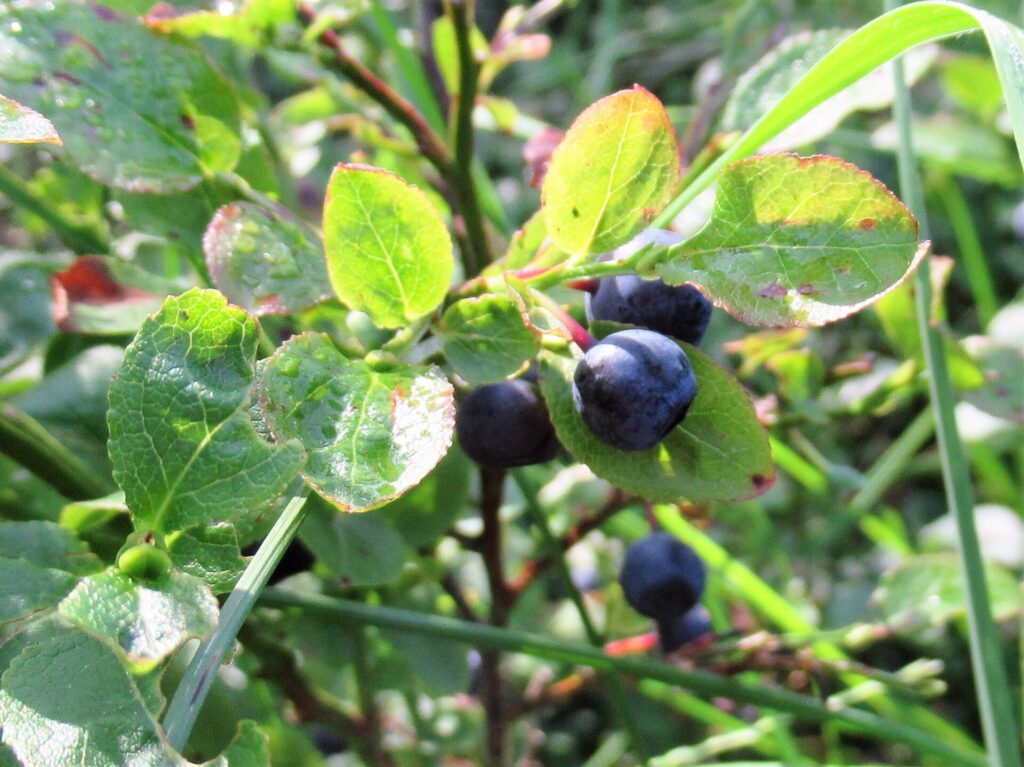
Our native blueberries, billberries, are much smaller than the ones in the shop. They are easily overlooked, but kneeling down and looking between the leaves you can see that they are ripe.
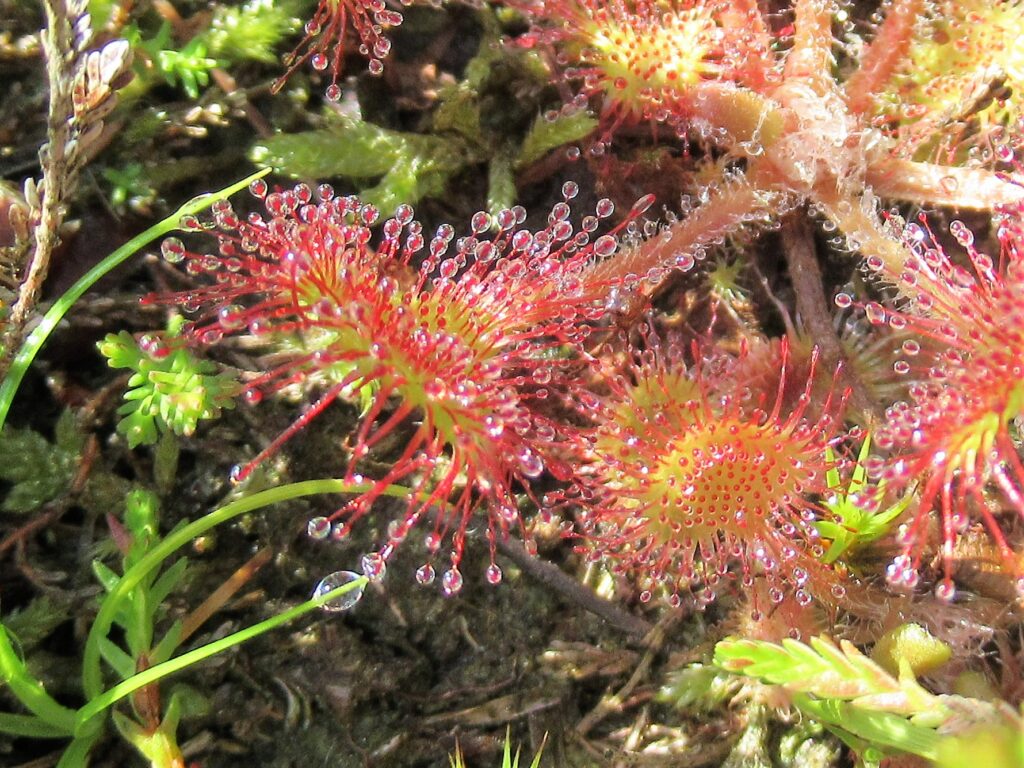
Another thing that is easily overlooked is the sundew. It is a teeny tiny carnivorous plant, with round leaves of only a few millimetres across.
Looked at from very close up, it is beautiful, with its glistening, sticky and treacherous (to insects) drops.
Strolling around here, taking photographs and enjoying the quiet, I suddenly had the idea of doing a series about ‘Places to Sit and Knit’. I thought we could virtually sit here, and in some other lovely places, together, look around and chat about our knitting a bit.
Of course, a blog is always mainly one-way traffic, but I am really interested in what is on your needles or hooks. Do leave a comment telling me about it, if you feel like it. Mention the name of a pattern or yarn and I may know what it looks like, or I’ll look it up on Ravelry or elsewhere. If you don’t feel comfortable leaving comments on blogs, that’s fine, too.
Today, I don’t have a lot of knitting to show you, though. There are the beginnings of a small object from sock yarn remnants that doesn’t look like much yet:
Some swatches for a new shawl design I’m working on:
And a December gift for someone who’ll probably be reading this that I want to keep a surprise:
And I’m not entirely sure this will really become a series either. Maybe the idea will fall by the wayside, or maybe not. Anyway, I think it’s a nice idea and I’ll try to keep it in mind.
Well, let’s head back home, past the house with the prettiest front door for miles around…
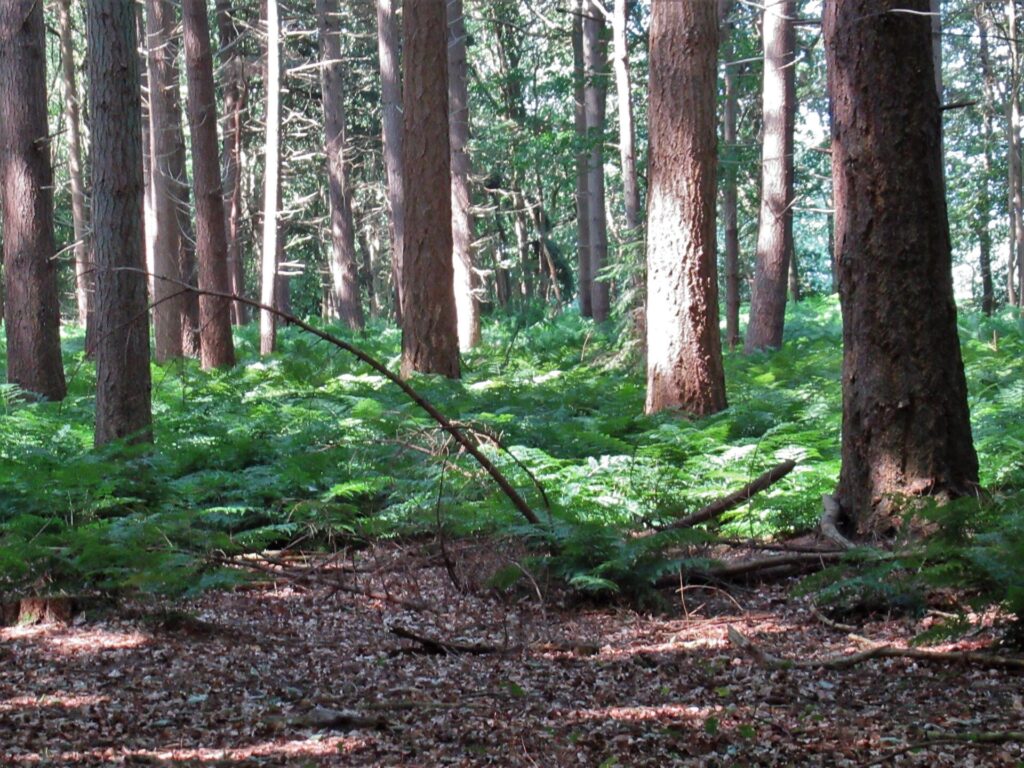
… and through a ferny, sun-dappled (at least today) part of the wood.
As of tomorrow, I have planned two weeks off. My husband prefers to keep working through the summer, albeit at a more leasurely pace, but I really need some time to just sit and knit. Apart from not setting the alarm clock and not doing work of any kind, I haven’t planned anything. The plan is to have no plan. That also goes for my blog. I may pop in if there is something to write about and I feel like sharing it, but I’m not sure.
I hope that you’ll also have some unplanned time this summer. To just sit and knit. Or to read, go for walks, maybe even travel a bit, or do nothing. Whatever you are planning (or not planning) to do, I wish you a lovely time!
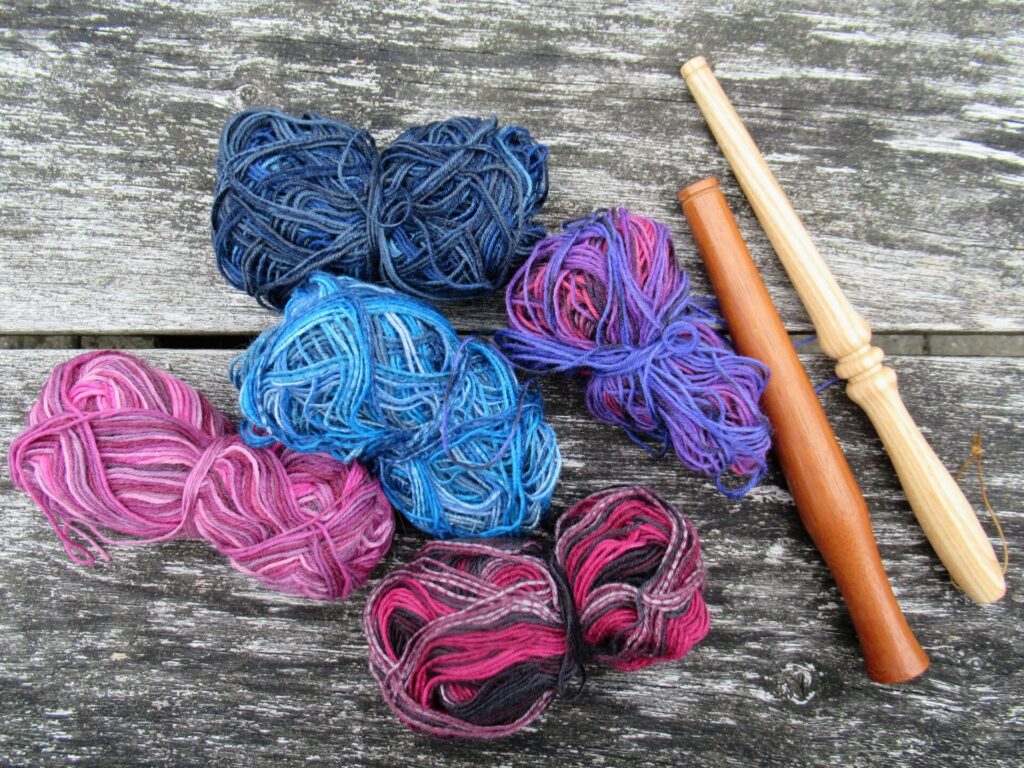
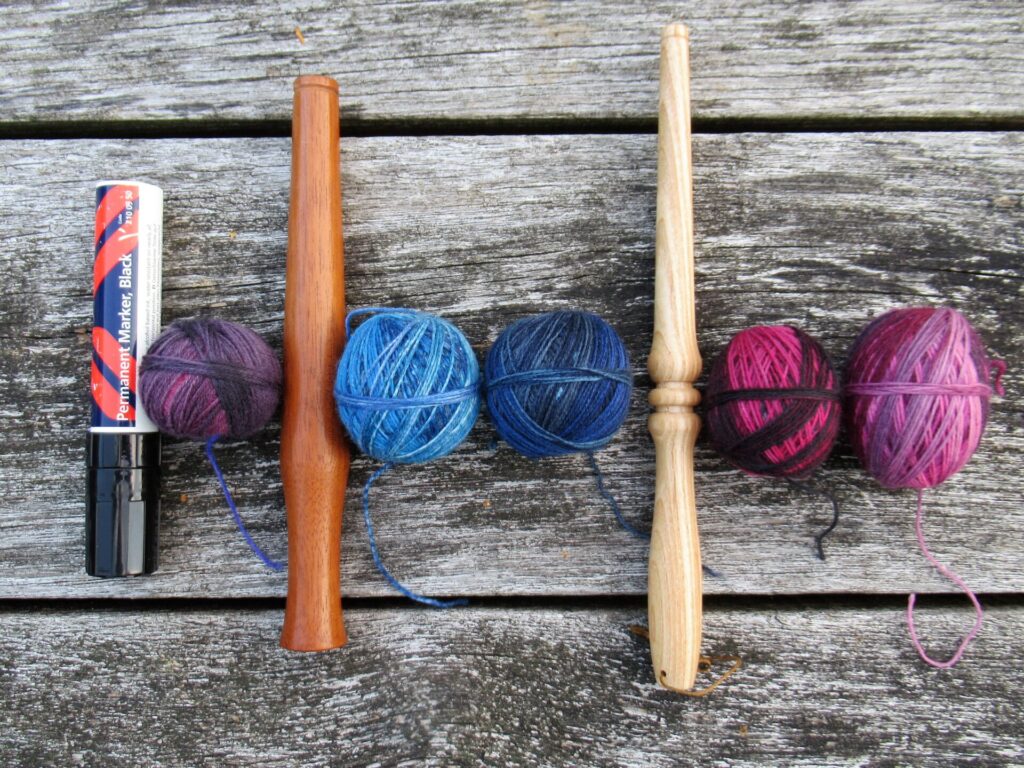
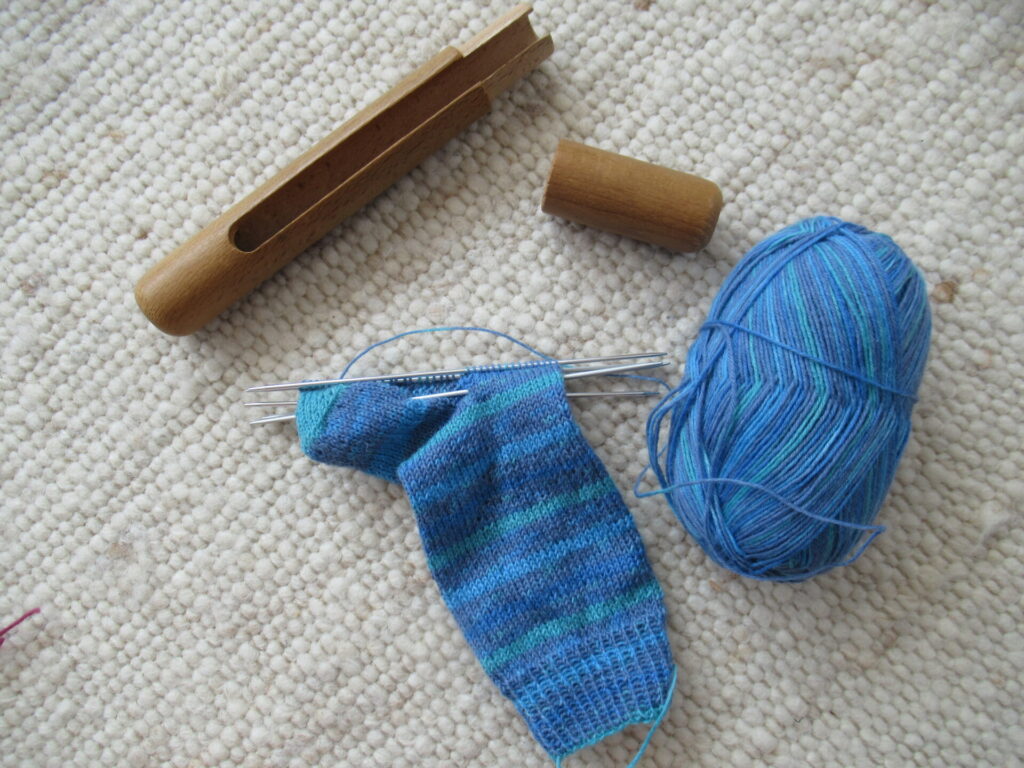
I have no idea how many people own and use a nøstepinne. Maybe you have owned and used one for years and what I’m writing today is nothing new. It’s for those of you who do not have one and maybe have never even heard of it that I’m writing about the What, Why and How of using and choosing a nøstepinne.
What is a nøstepinne?
Nøstepinne is a Scandinavian word that can also be spelled as nöstepinne, nystepinne or nøstepinde, depending on whether you are in Norway, Sweden or Denmark. It is often translated as ‘nest stick’, but that is just silly. As far as I know, nöste or nøste means ball of yarn. And my Swedish-English dictionary tells me that ‘nysta’ means ‘to wind’, or ‘make up into balls or a ball’. Pinne means pin or stick. So nystepinne (or however it’s spelled) simply means ‘ball winding stick’. And that is what it is, a stick for winding yarn balls on.
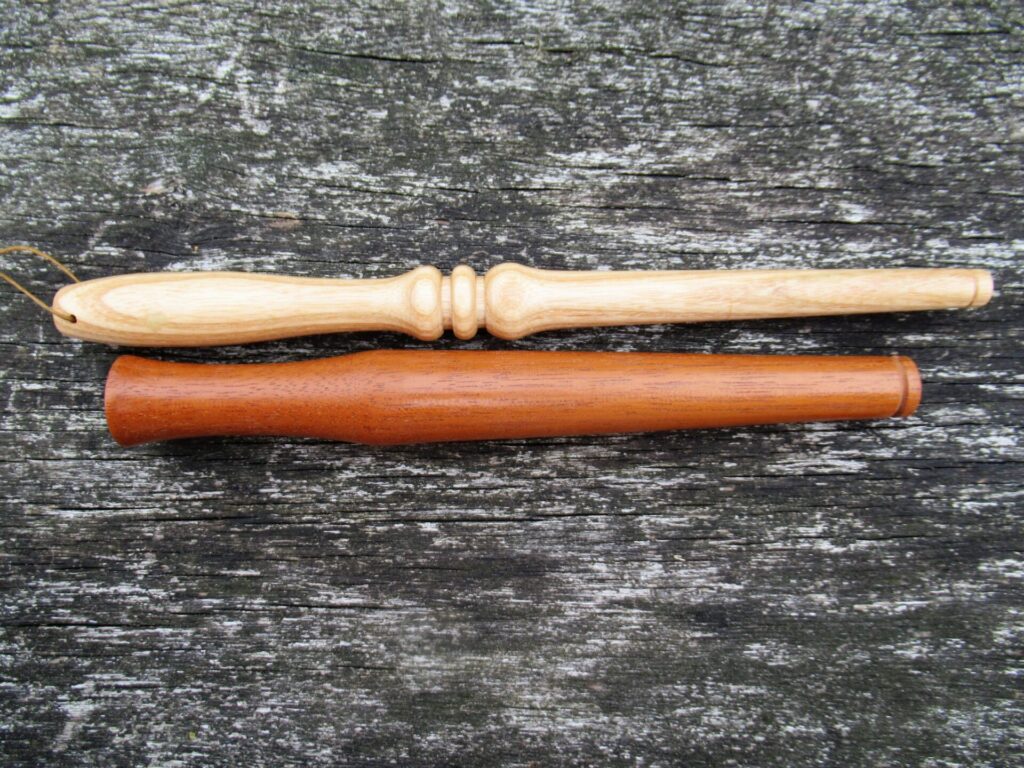
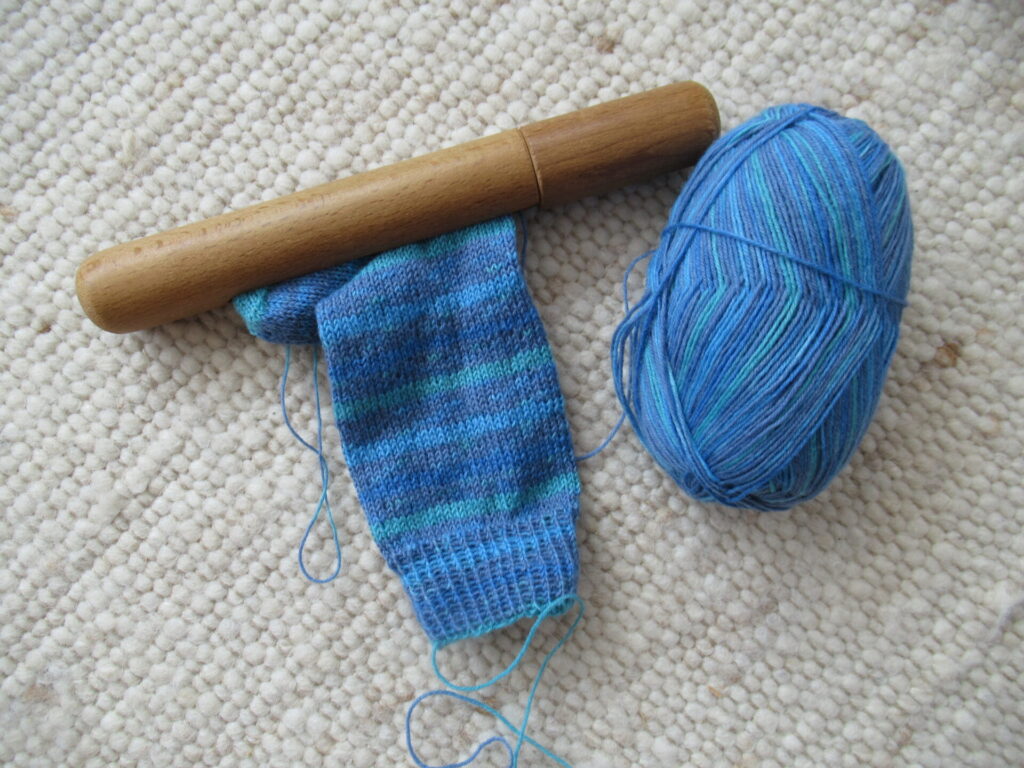
I am the proud owner of two nøstepinner:
The darker coloured one is a souvenir from Shetland that I’ve had for almost a decade. I think it was hand-made by a Shetland woodworker, but it didn’t come with any information about the name of the maker or the type of wood used. The lighter coloured one is from ChiaoGoo and is a recent acquisition.
KnitPro also has nøstepinner and there are many lovely handmade ones to be found on Etsy.
Why use a nøstepinne?
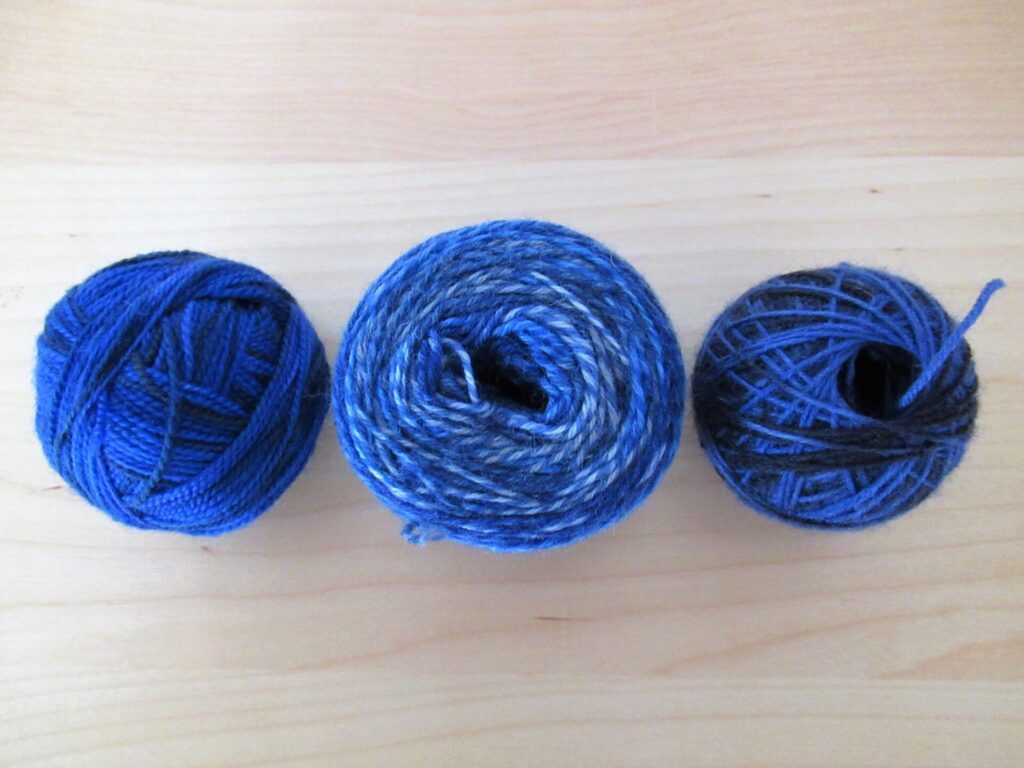
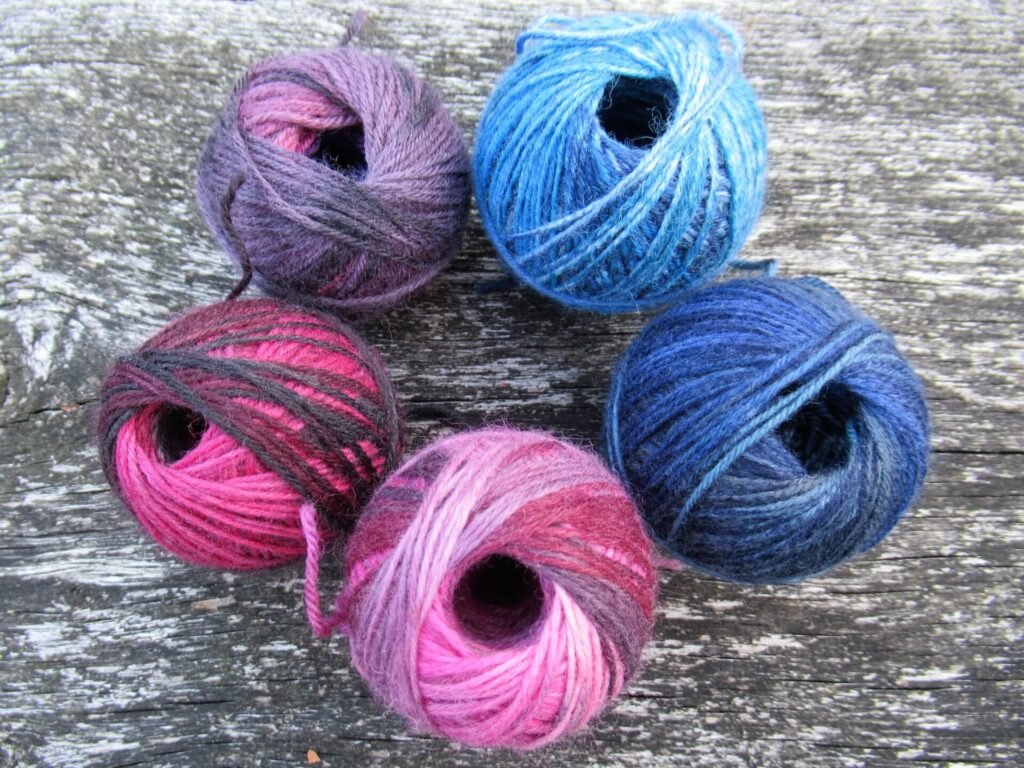
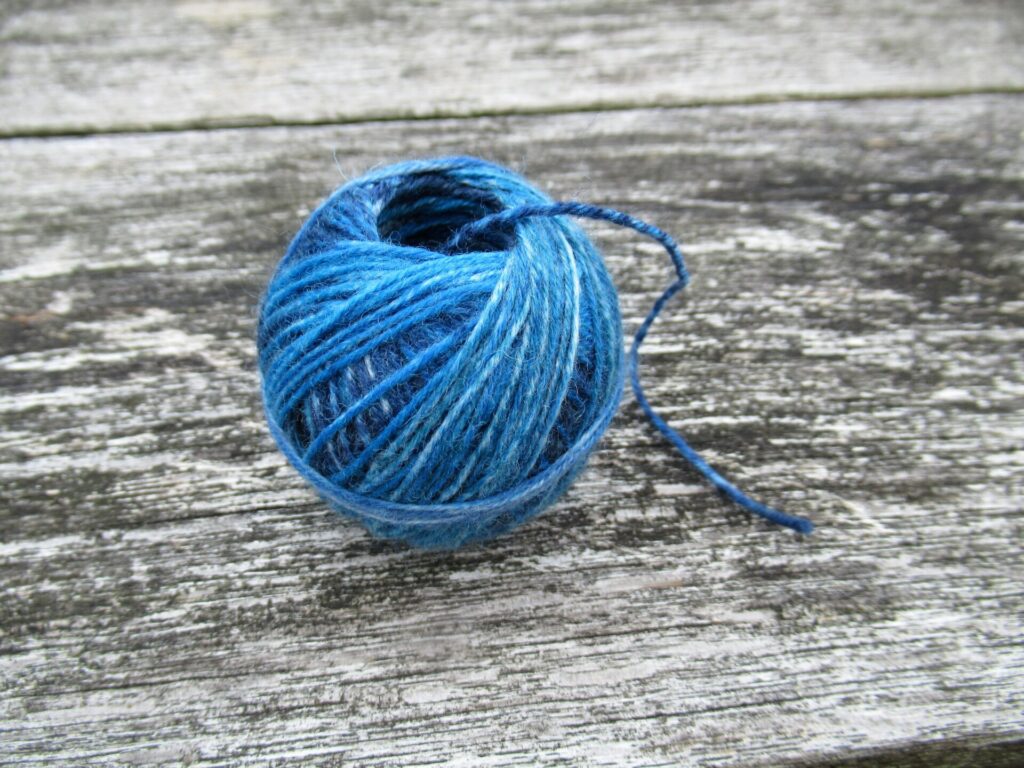
Before answering that question, here is a picture of 3 balls of yarn wound in different ways viewed from above:
From left to right: an ordinary hand-wound ball, a yarn ‘cake’ wound on a cranked ball winder, and a ball wound on a nøstepinne. Each method has it’s pros and cons. So why use a nøstepinne?
It makes centre-pull balls. This can be useful for various reasons; to name a few:
The ball doesn’t roll away if you use the thread from the inside.
It is possible to knit with two threads held together, one from the inside and one from the outside of the ball
In spinning, a 2-ply yarn can be made by plying the thread from the inside with the thread from the outside. A cranked yarn winder also makes centre-pull balls, winding yarn by hand without a nøstepinne does not.
It is slow. Much, much slower that using a cranked yarn winder and also slower than winding a ball in the ordinary way. Is that an advantage? If you ask me, absolutely! Winding yarn into a ball with a nøstepinne is a meditative, peaceful thing to do. It is good for the soul.
It is easy to take along and can be used anywhere.
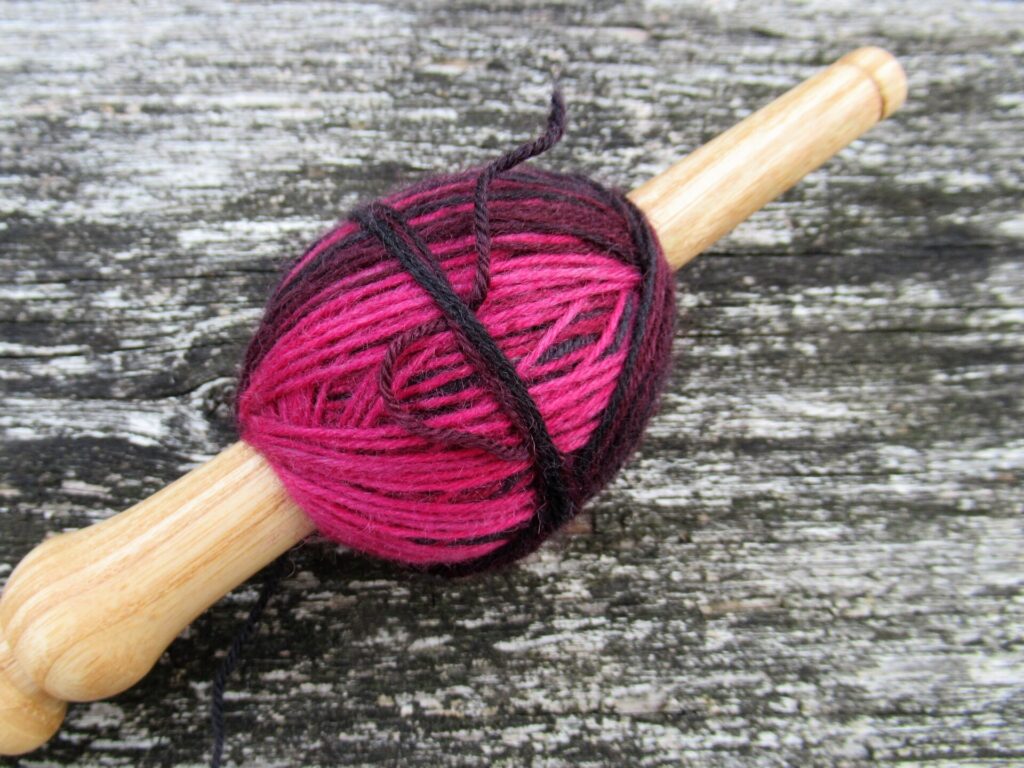
It makes wonderfully aesthetically pleasing balls of yarn. Again, good for the soul. Just look at the before and after pictures of some sock yarn remnants below and I think you know what I mean.
Before
After
How to use a nøstepinne
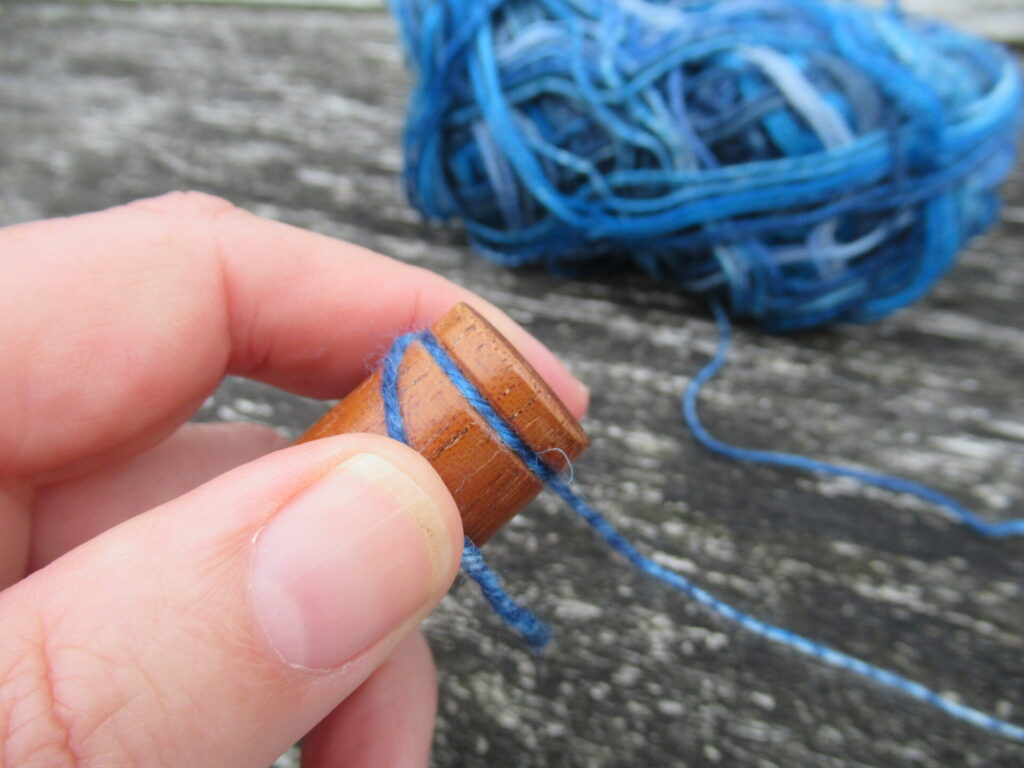
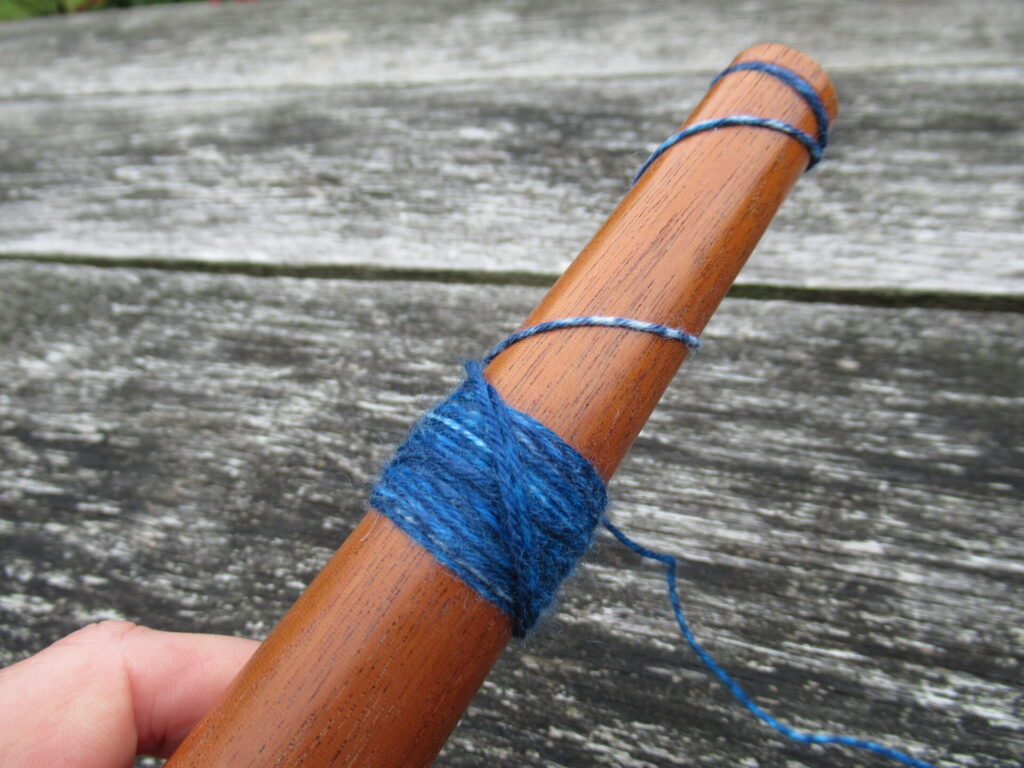
First wrap the yarn several times around the thin notch at the top of the nøstepinne. (If it doesn’t have a notch, make a loop at the top, or hold the yarn in place with your thumb near the other end of the nøstepinne.)
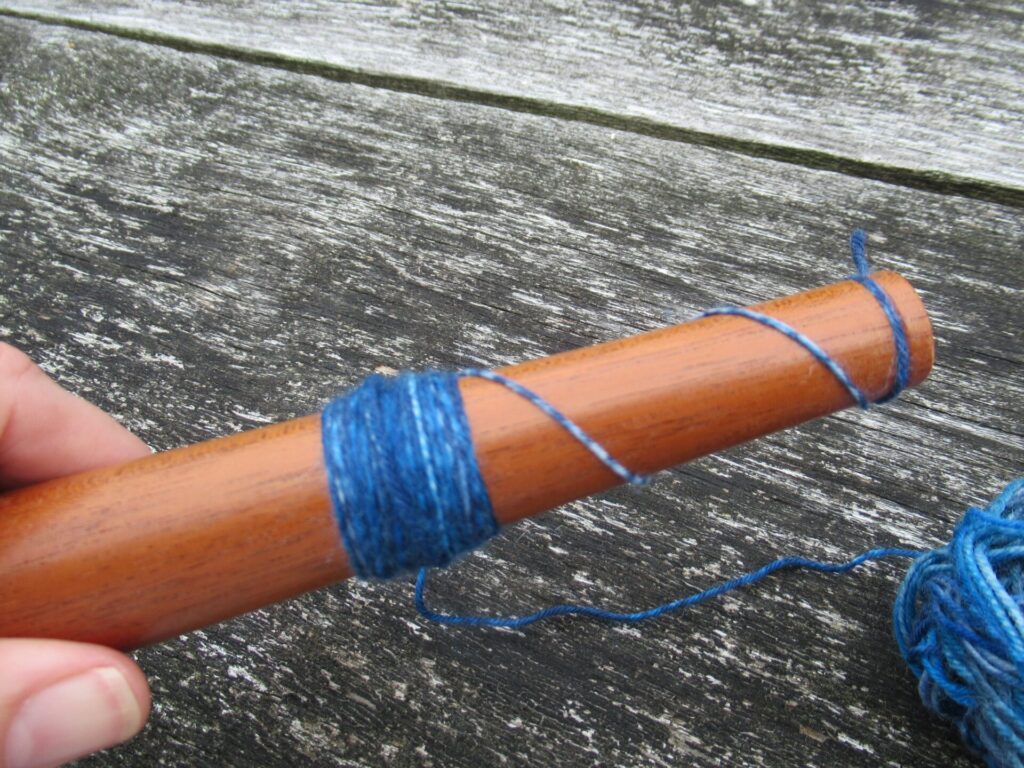
Then wrap the yarn around the shaft of the nøstepinne as shown below. Wrap 4 or 5 layers of yarn around a width of about 2.5 cm (1 inch).
Now start winding the yarn around this beginning diagonally, from bottom right to top left. Keep winding in the same direction all the time, while slowly turning the nøstepinne towards you.
A brief video by Ann Kingstone showing the process very clearly can be viewed here. Her method is slightly different from mine. That’s fine – everybody develops their own technique over time.
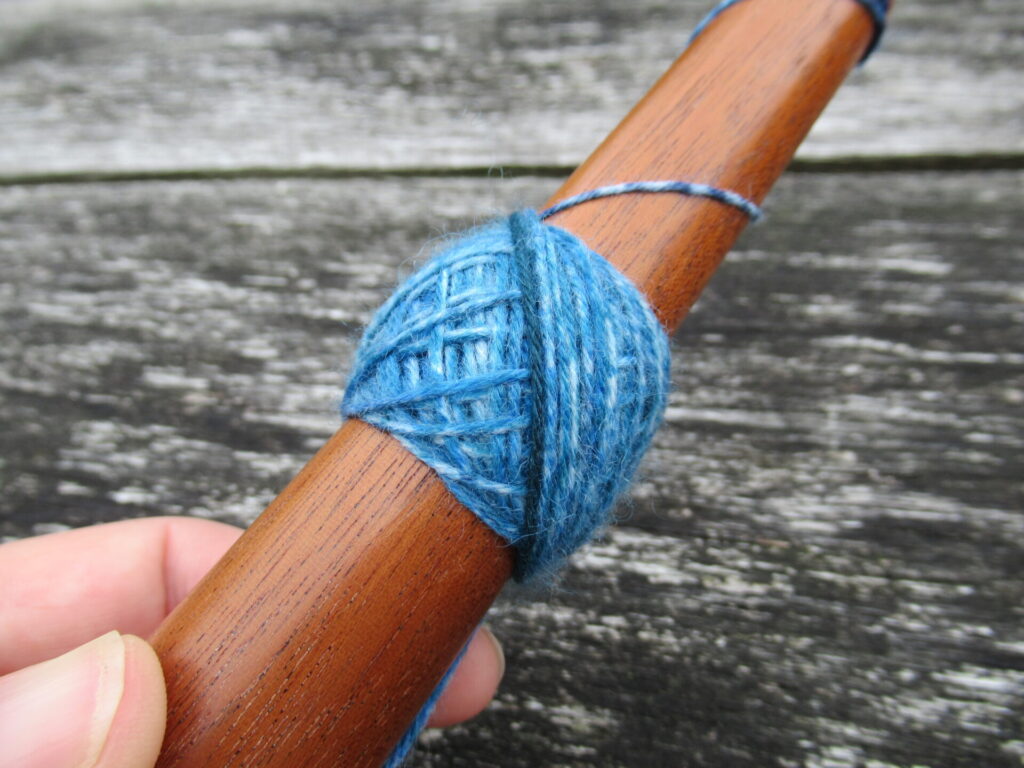
Watch your little ball grow…
… and grow.
Especially with self-striping yarn it is very satisfying to see layer upon layer of yarn build up on your nøstepinne.
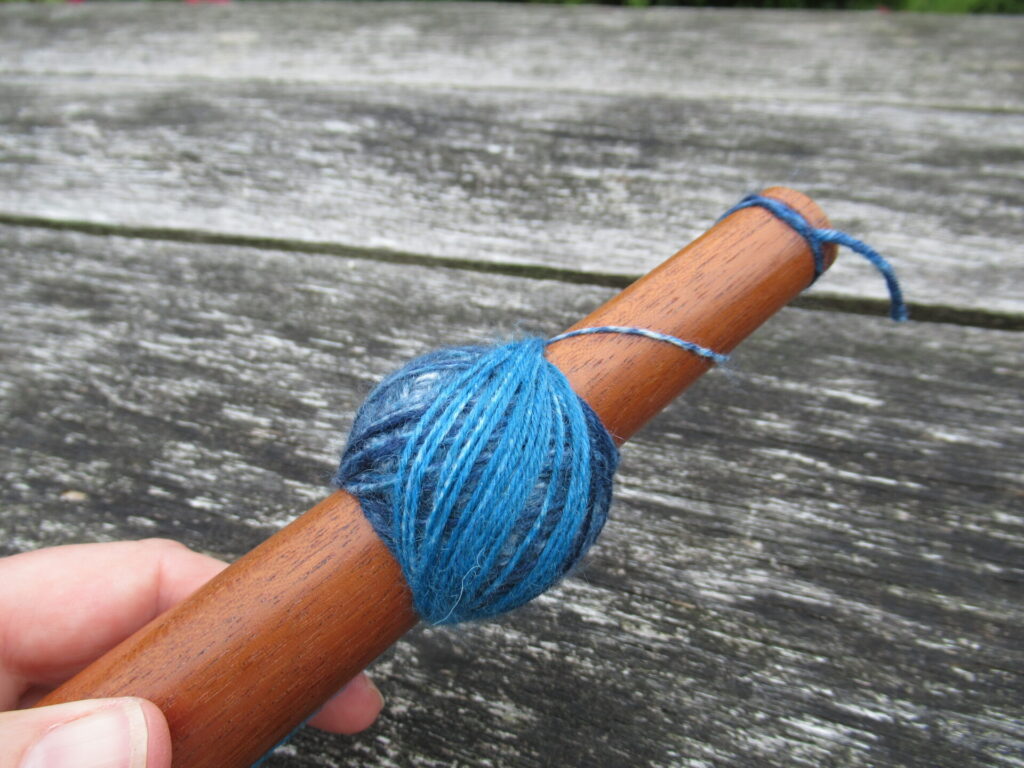
Finally, when you’re almost at the end of your yarn, wrap the yarn around horizontally several times, tuck the end in under the horizontal strands, and remove the ball from the nøstepinne.
Nice, no?
How to choose a nøstepinne
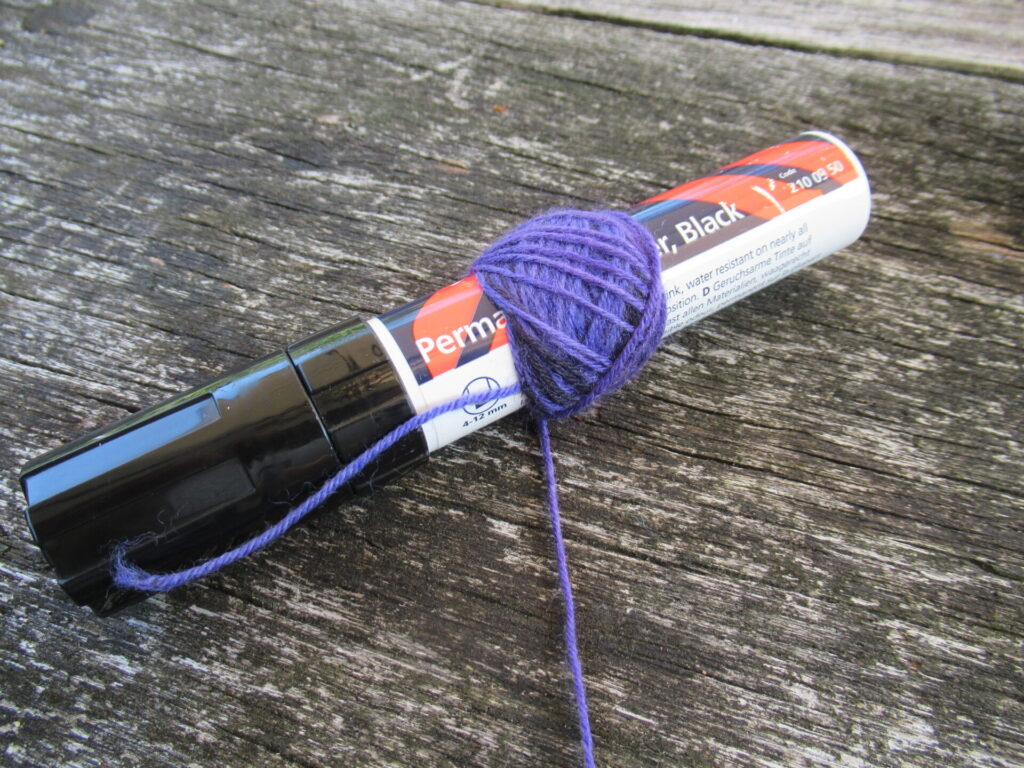
You don’t really need a ‘real’ nøstepinne to begin with. To try out whether you like making yarn balls in this way, other things that can be found in any home can be used, like the inner tube from a roll of cling film or aluminium foil, or a thick marker:
A real wooden nøstepinne is much nicer to the touch, of course. So if you like winding balls in this way and decide to go looking for a wooden one, here are some things to consider:
The smoothness of the wood
The colour – do you prefer lighter or darker wood?
The style – simple or more elaborately turned
The size – in my experience a thicker nøstepinne is easier for a beginner; when starting a ball, it is harder to make the yarn catch behind the horizontal beginning on a thin nøstepinne
The ball shape – the thicker the nøstepinne, the rounder the ball, and the thinner the nøstepinne the more egg-shaped the ball tends to become:
Well, that’s all I can tell you about nøstepinner. If you’d like to try making yarn balls in this way, too, please take your time. It is really simple, but it takes a little practice for it to become a natural, flowing movement. I hope you’ll enjoy making these neat balls of yarn as much as I do.
It’s been an unsettling and busy week. Certain things have taken up so much of my attention that other things have piled up. Now what am I going to do? Rush around the house cleaning and tidying? Tackle a pile of ironing? Do some admin? Or write a blog post? Reading this, you know the answer.
Ah, it’s good to sit here, look through my photos and chat with you. Today I’m going to chat about a belated birthday visit to one of my dearest friends, who is a wonderful knitter, spinner and yarn dyer.
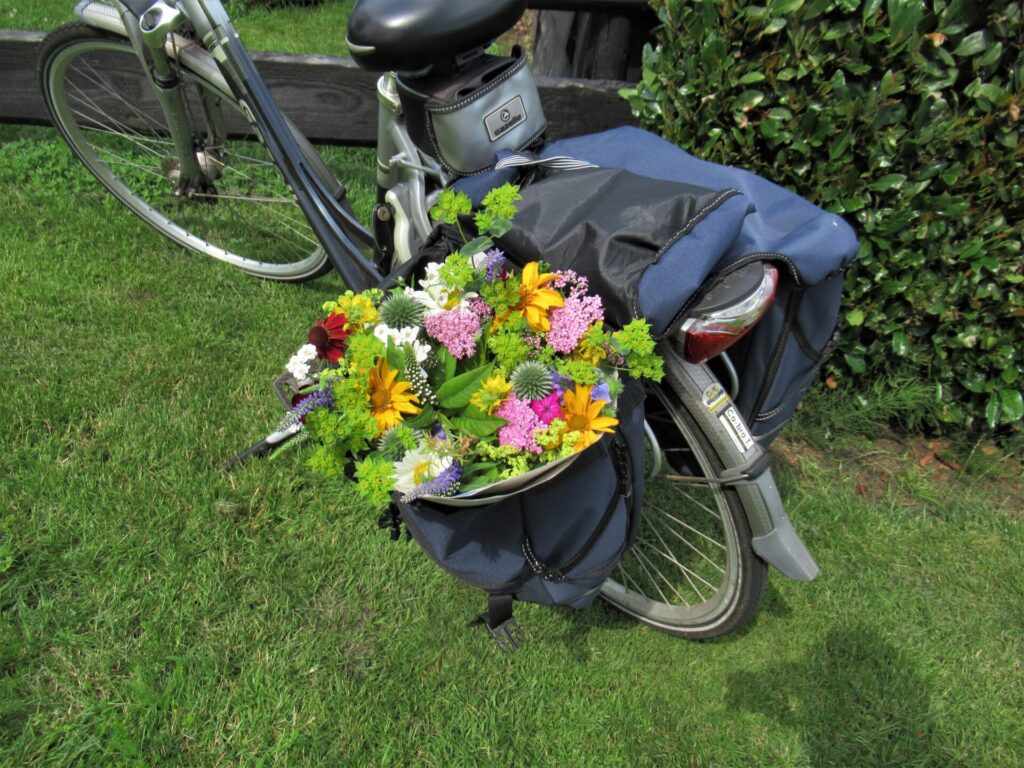
Shortly before leaving home, I hopped onto my bicycle for a quick visit to the flower garden just outside our village. (In case you have found my blog recently, you can read more about it here.)
Armed with a bunch of flowers and a bag filled with small birthday gifts, I set off for my friend’s place. I won’t give you a full account of my visit – you can imagine that: sitting in her garden with mugs of tea, cake, and endless talk and laughter. What I’d like to show you, is how my friend inspires me.
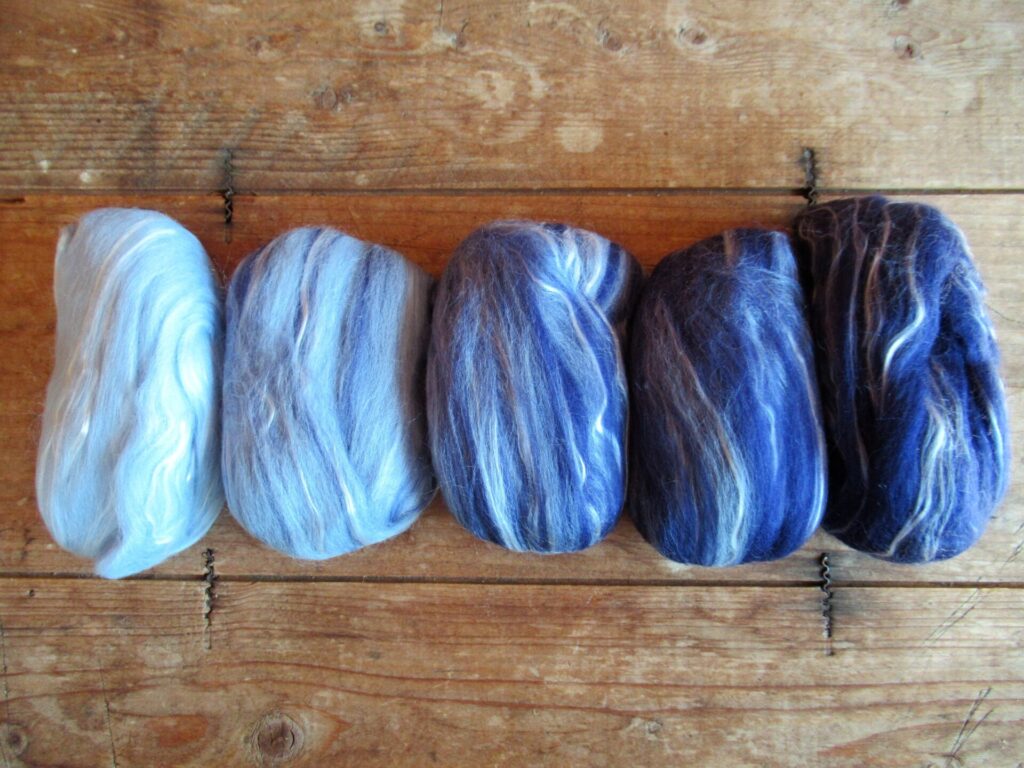
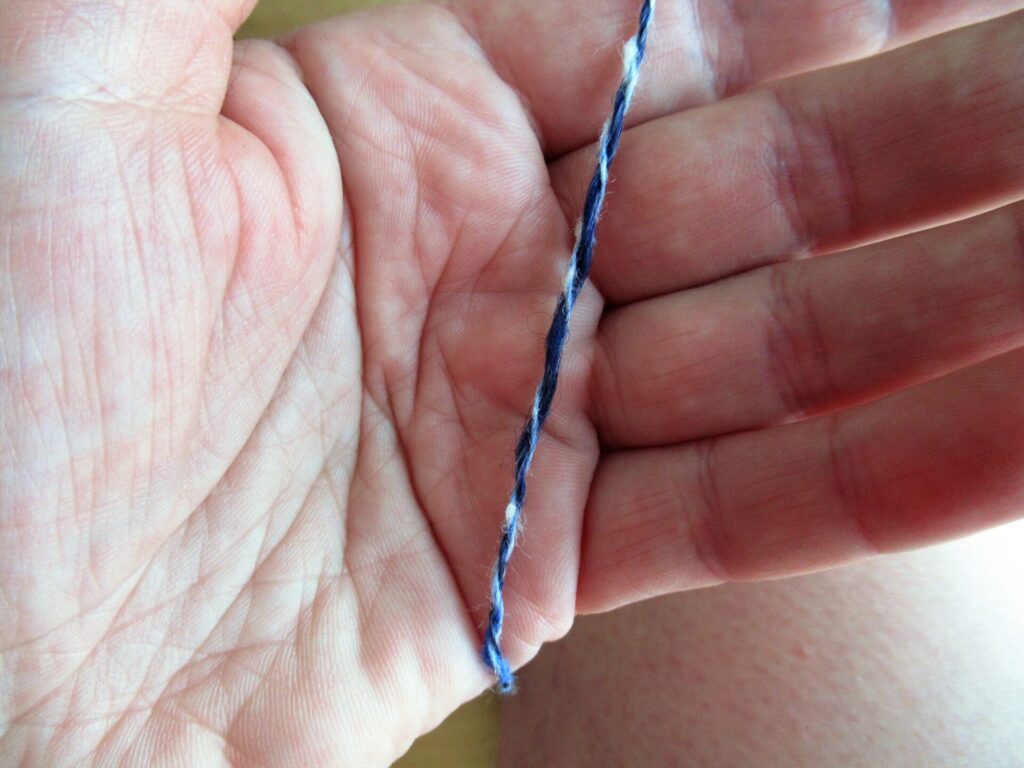
Last year she gave me some spinning fibres in a gradient of blues.
I spun the yarn a long time ago – looking back through my blog posts I saw that I mentioned it in August 2020. And then it stayed on the bobbin for almost a year!
I wasn’t sure what to do with it. In order to keep the gradient intact, I could do various things:
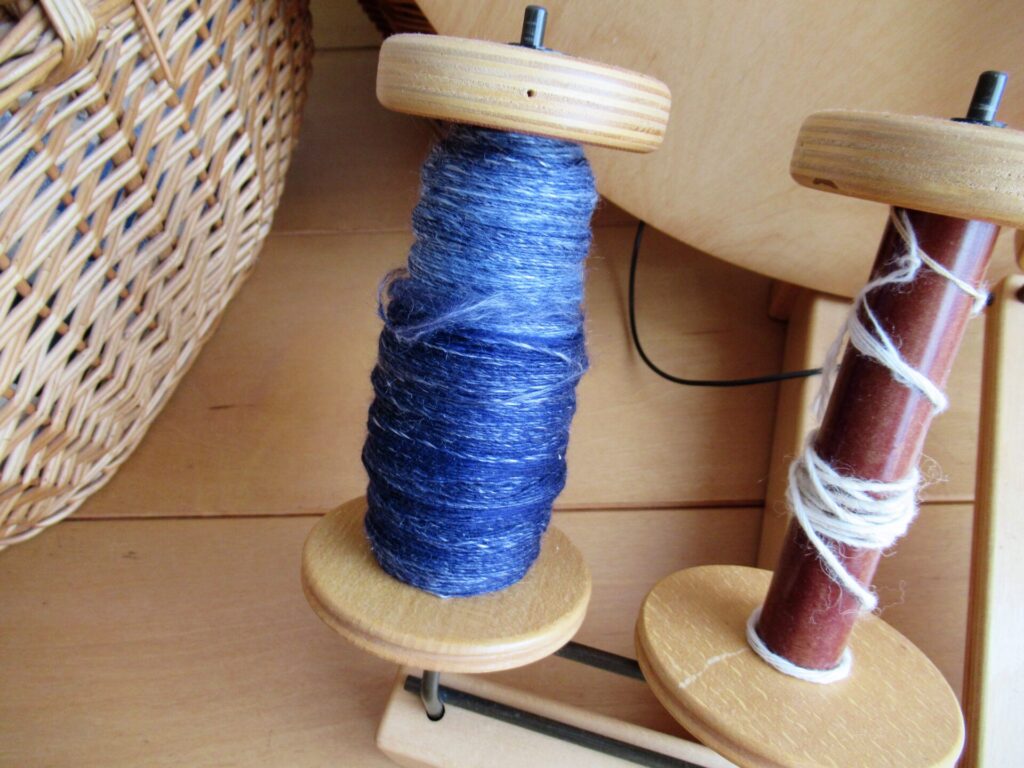
I could have split the fibres up in two portions and made it into a 2-ply yarn, but I didn’t. I spun it into a fairly thin single ply.
I could ply this single thread in on itself (aka chain plying or Navajo plying).
I could ply it with another thread.
Chain plying would have given me a fairly short yardage, and the possibilities for things to knit with it would be limited. So, after thinking it over for a loooooong time, I decided on the last option. I could have spun a thread to ply the gradient with myself, but I chose a commercial thread instead.
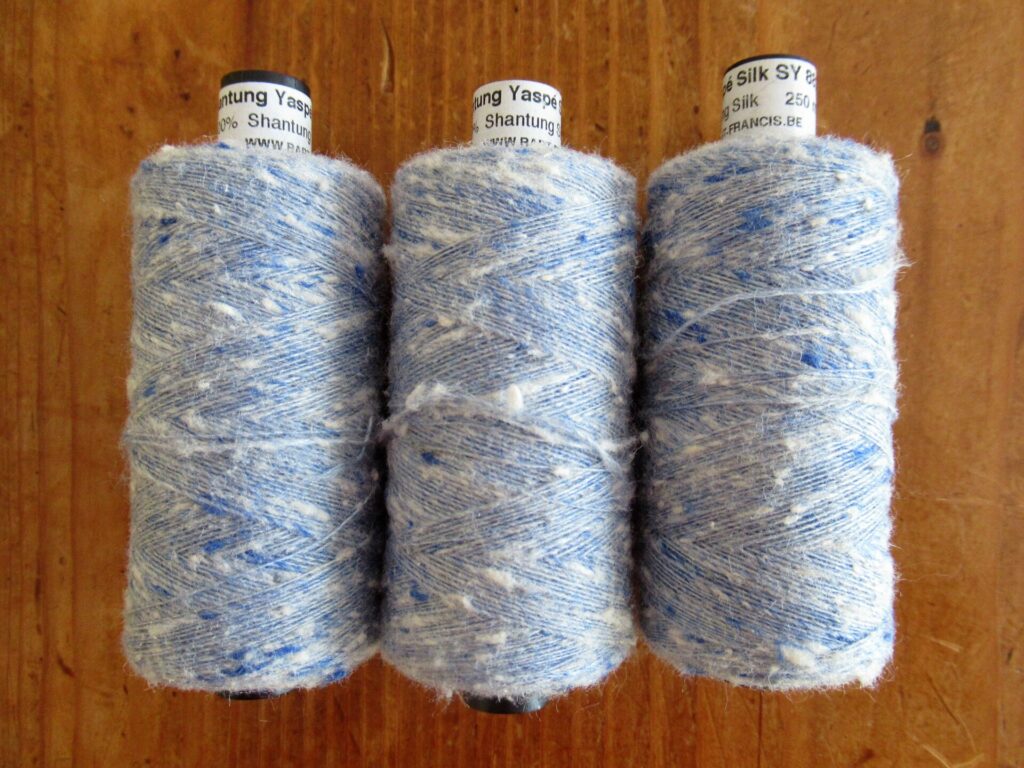
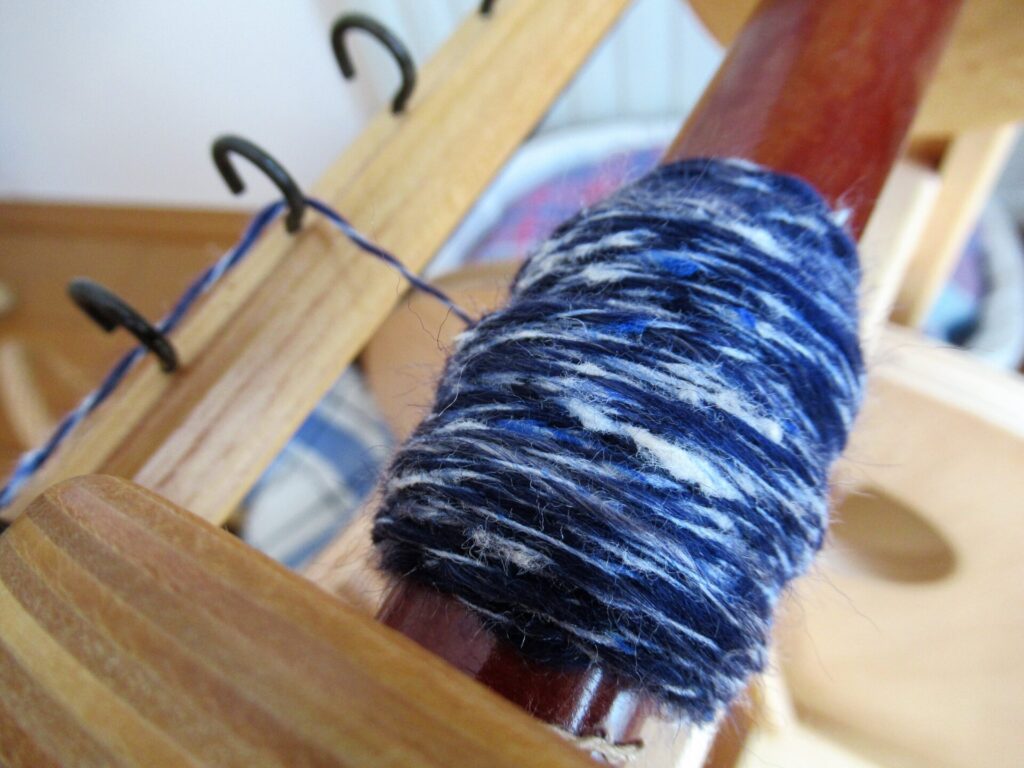
This is a lace-weight silk yarn sold as ‘Shantung Yaspee’ by two weird and wonderful Belgian guys who stock some very special yarns and fibres. (Ever heard of the fibre categories Bizaroides, Experimental Recycle Upcycling, or Brazilian Chicken?!)
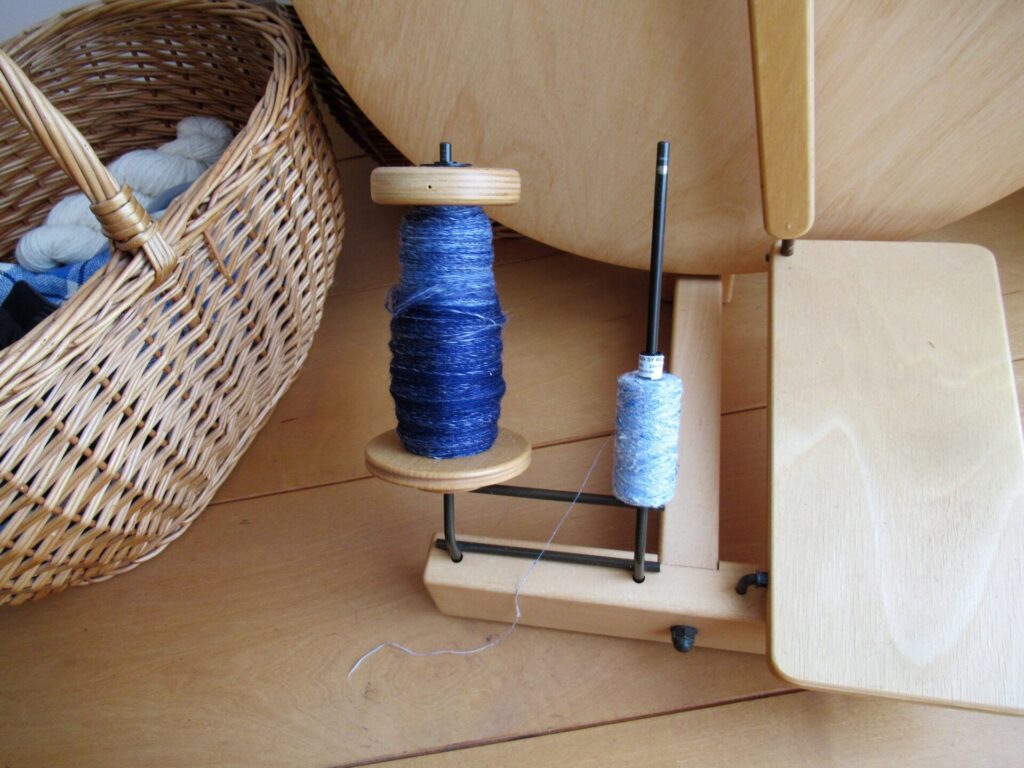
My inspiring friend had used this technique before, and I was curious to see how it would work out. It was very handy that the silk yarn fitted onto the bobbin holder of my spinning wheel.
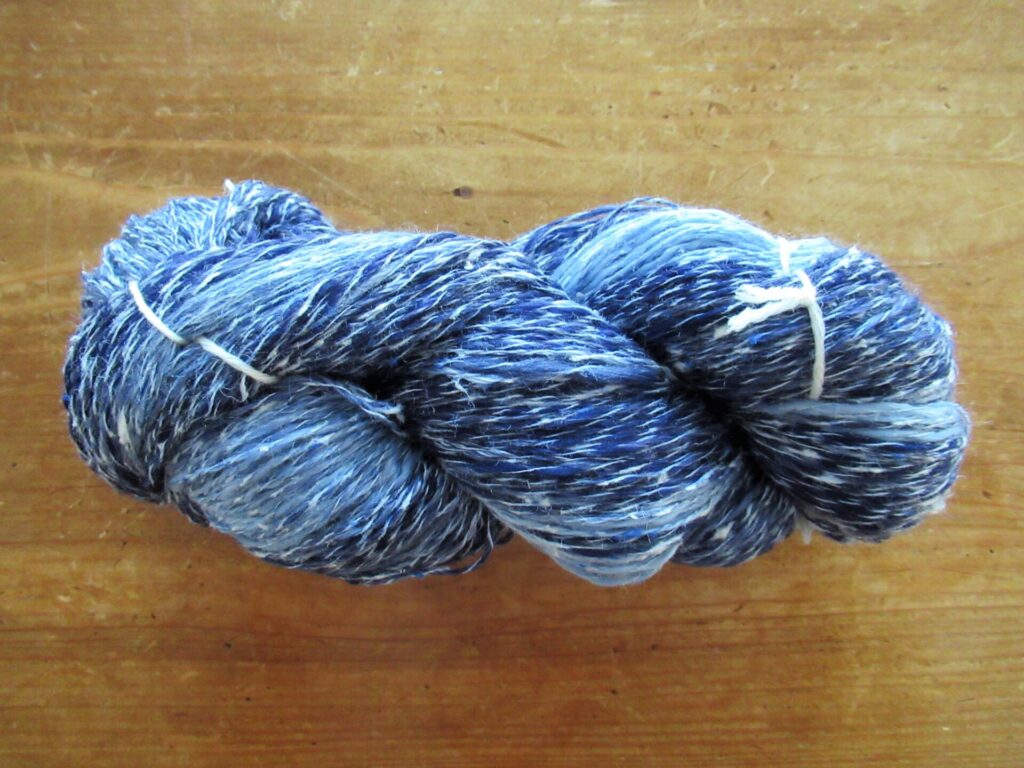
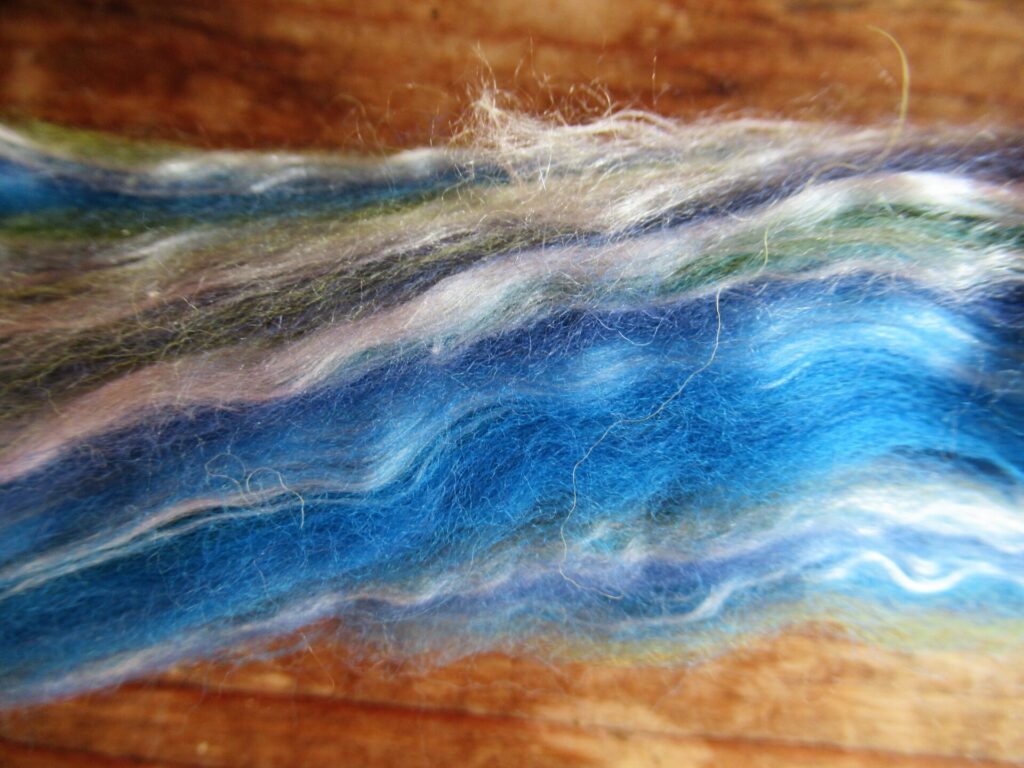
Plying these two different fibres together went very well. It gave a lovely barber pole effect at the dark end of the gradient.
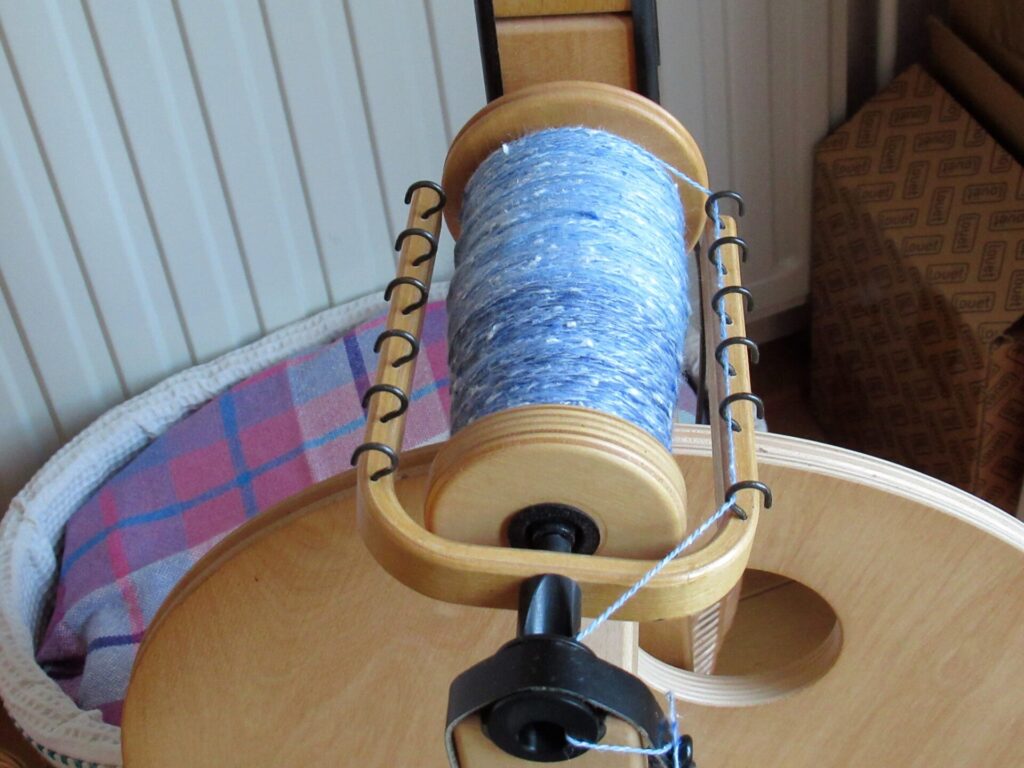
At the light end, the effect was more subtle. All in all the shantung silk, with its nubs of white and royal blue, and my hand-spun merino-and-Tencel, made a lovely tweedy kind of yarn, from deep navy to start with…
… to a pale baby blue.
Here it is – 138 grams/572 m/625 yds of a merino/Tencel/silk blend…
… ready to be knit up into… something. I have a vague idea, but it’ll take a while to take shape.
I arrived at my friend’s place bearing gifts, and also left with gifts. Tidying her crafts room she came across some fibres she wasn’t going to use and thought I might be happy with. And I am!
This is what she gave me – some turquoise-and-lime wool blended with undyed silk:
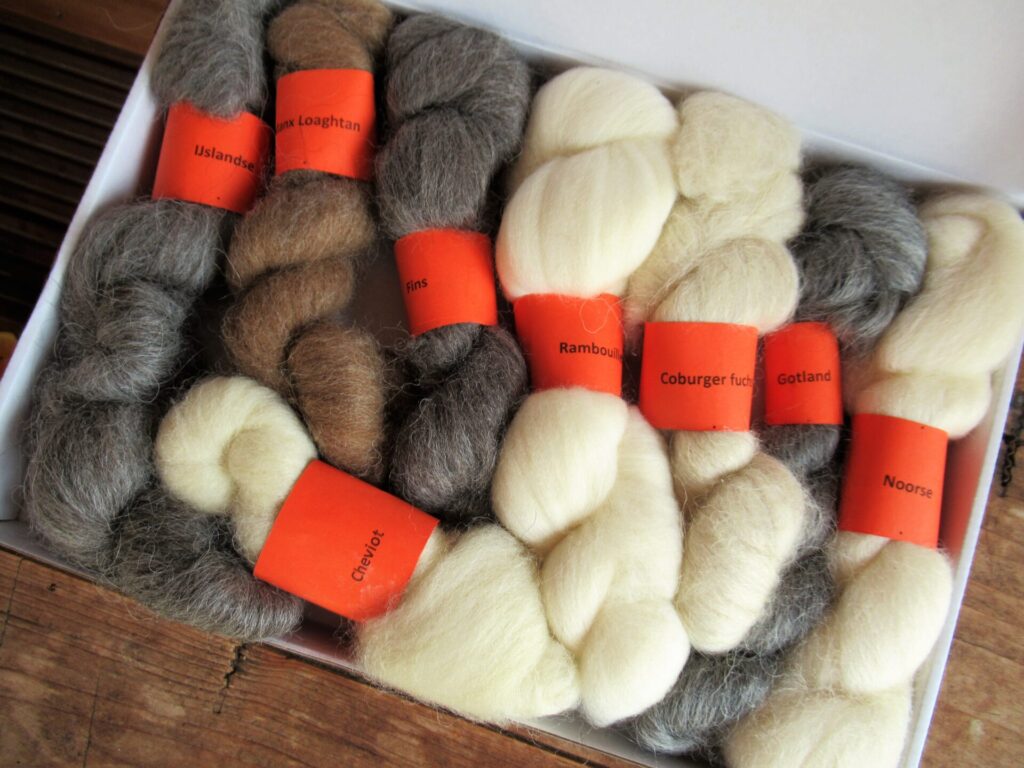
And a box filled with small quantities of wool from various sheep breeds.
I think I’ll start spinning the turquoise-and-lime blend straightaway – such cheerful colours!
What with the current explosion of Covid-numbers in this country, the extreme downpours and flooding in the south and our surrounding countries, and news of unprecedented heatwaves and conflicts in other parts of the world I sometimes have the feeling that the end of the world is near.
Will spinning yarn save the world? No, of course not. What spinning (and an inspiring friend) can do, is lift my mood of gloom and doom, so that I can keep functioning and making a positive contribution, albeit in a very small way. Spinning is such a gentle, soothing thing to do. Do consider giving it a try, if you are not a spinner already.
Again, I hope you’re all safe and well. Take care!
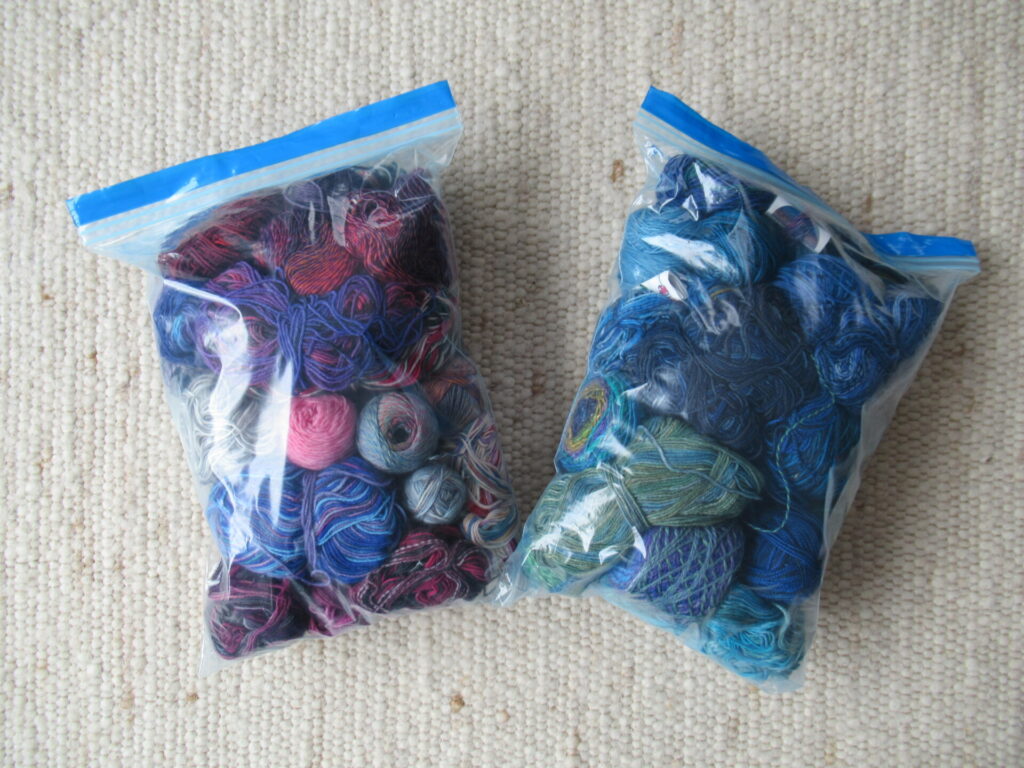
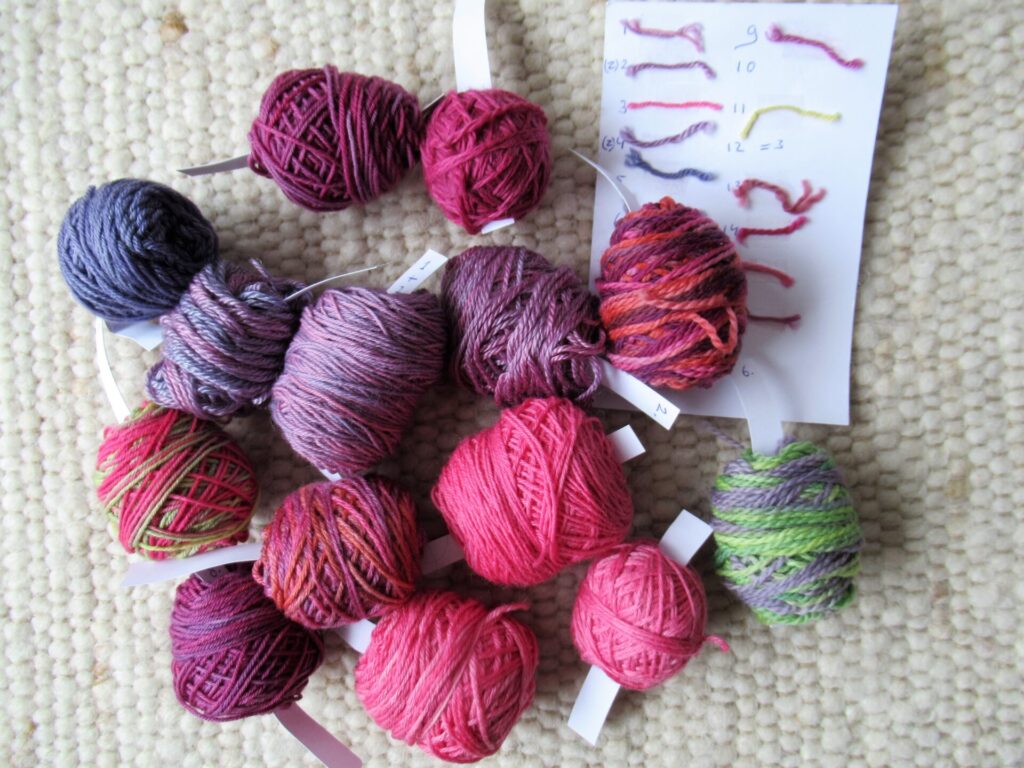
Here (above) is my entire collection of scraps and mini skeins of sock yarn. I’m fairly sure most of you will have some stored away somewhere, too. I keep mine in a plastic carrier bag. Not just any old plastic carrier bag, but one from that wonderful Norwegian institution Husfliden. Besides the yarn, it holds happy memories.
In it are two bags filled with sock yarn remnants, more or less sorted by colour.
Because I am allergic to dust mite, I store all my yarn in plastic. Not very attractive, but I just can’t go around wheezing and sneezing all the time, especially now.
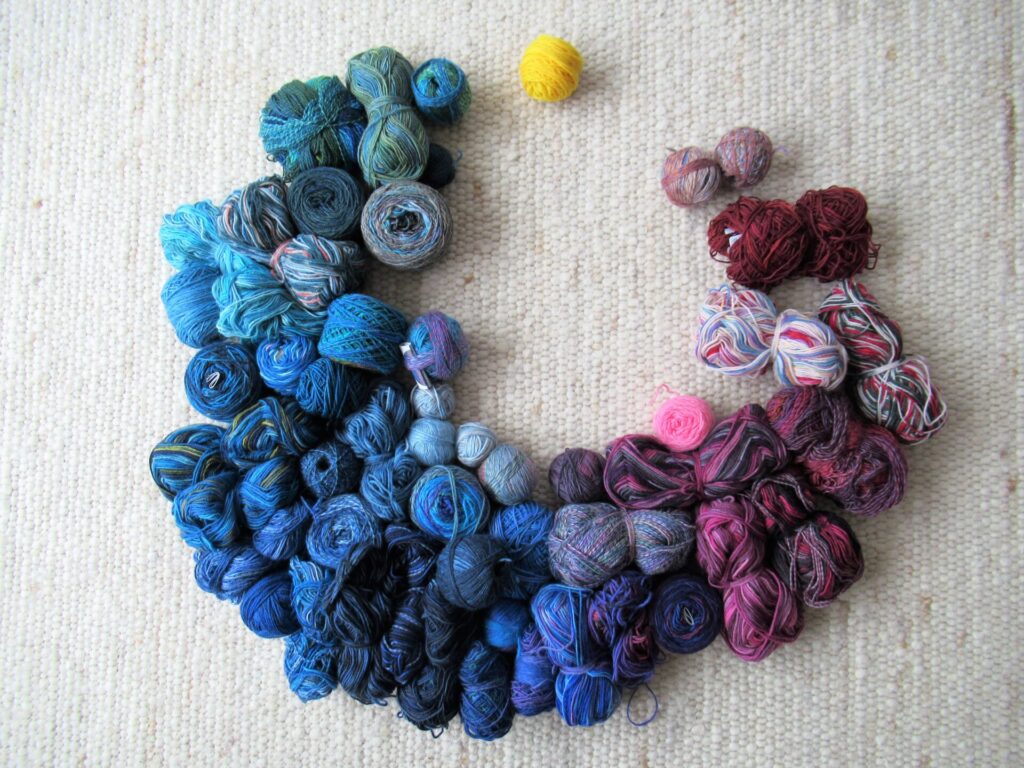
Emptying them out, there is a heap of mainly pinks and purples, and another heap of mainly blues and greens.
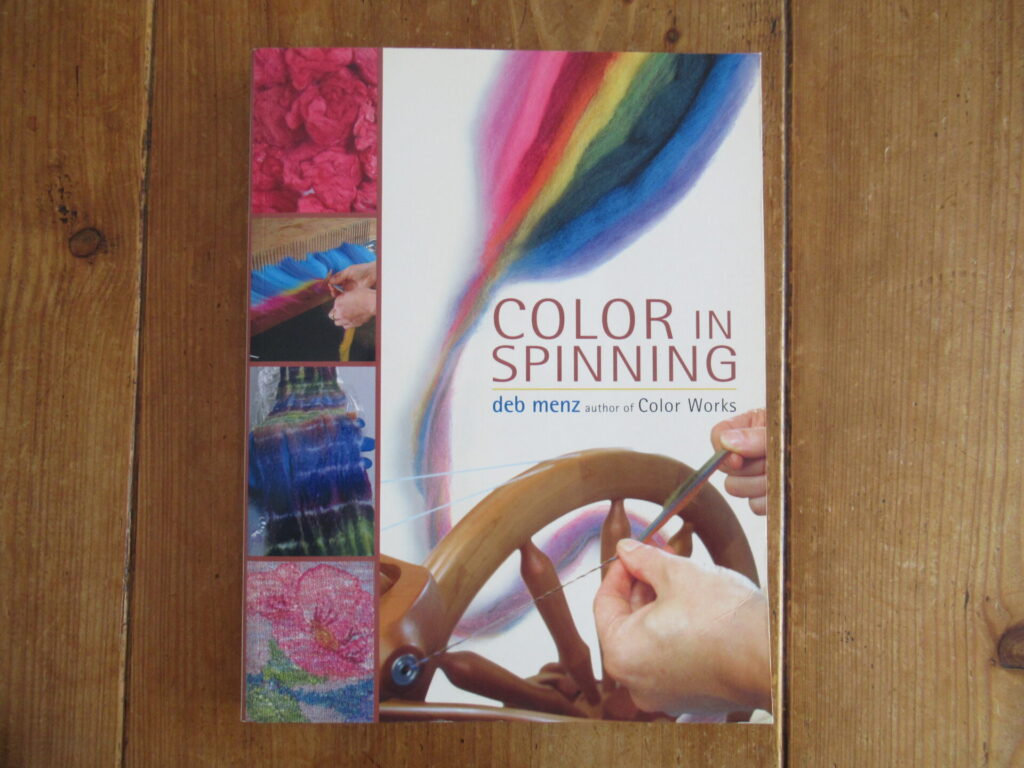
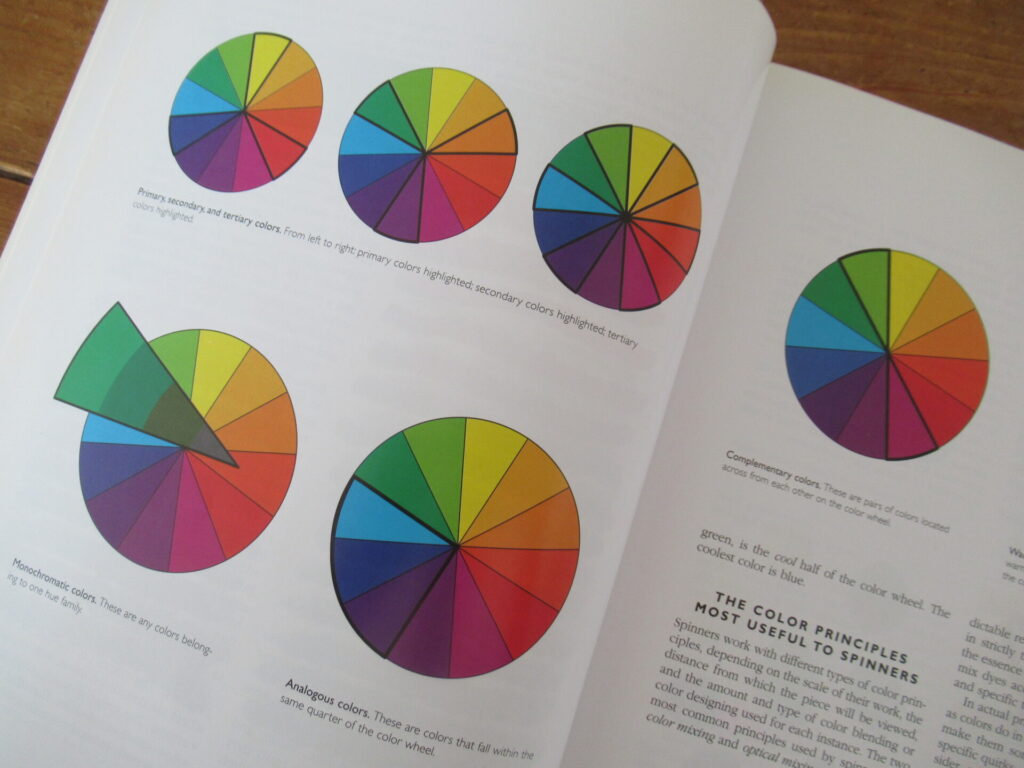
On my bookshelves there is a book called Color in Spinning.
It contains a lot of information about and inspiration for choosing and combining colours for blending, spinning and plying your own yarns. It works with the colour wheel.
Although I usually choose colours intuitively, it is interesting to look at them within the framework of the colour wheel for a change. Arranging my sock yarn remnants in this way, it looks like this:
A hugely unbalanced colour wheel. Many, many blues. Some bluey greens, pinks and purples. Just one ball of bright yellow (whatever did I use that for?). And hardly any brighter greens, oranges or reds.
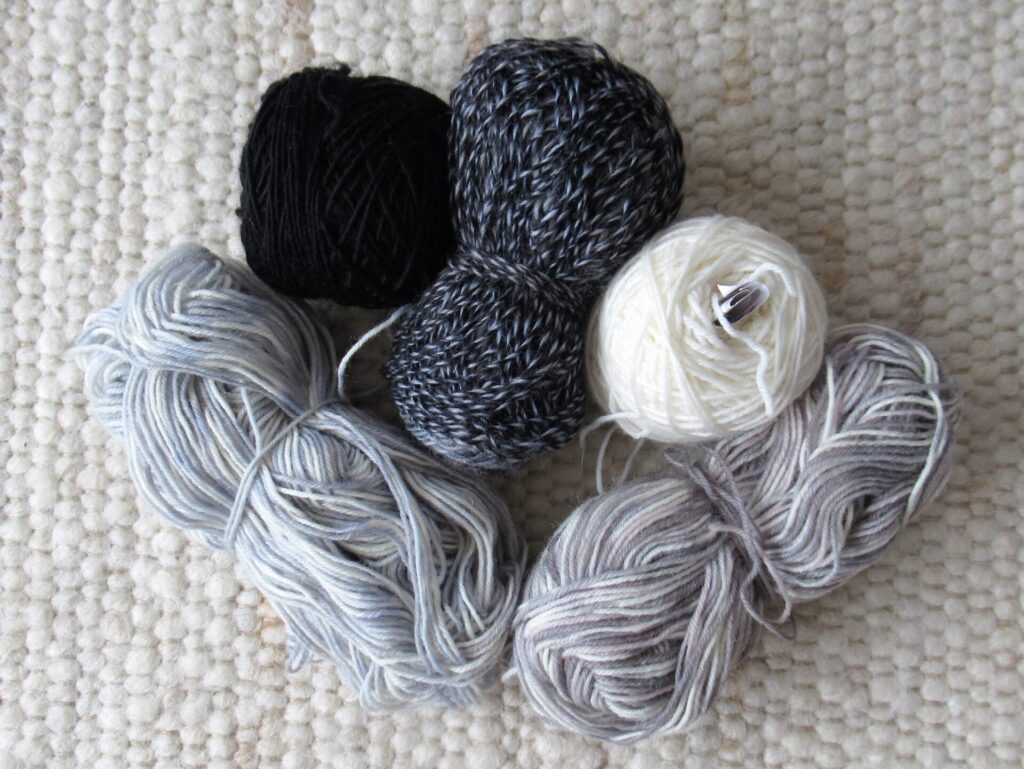
My collection of neutrals is tiny, too.
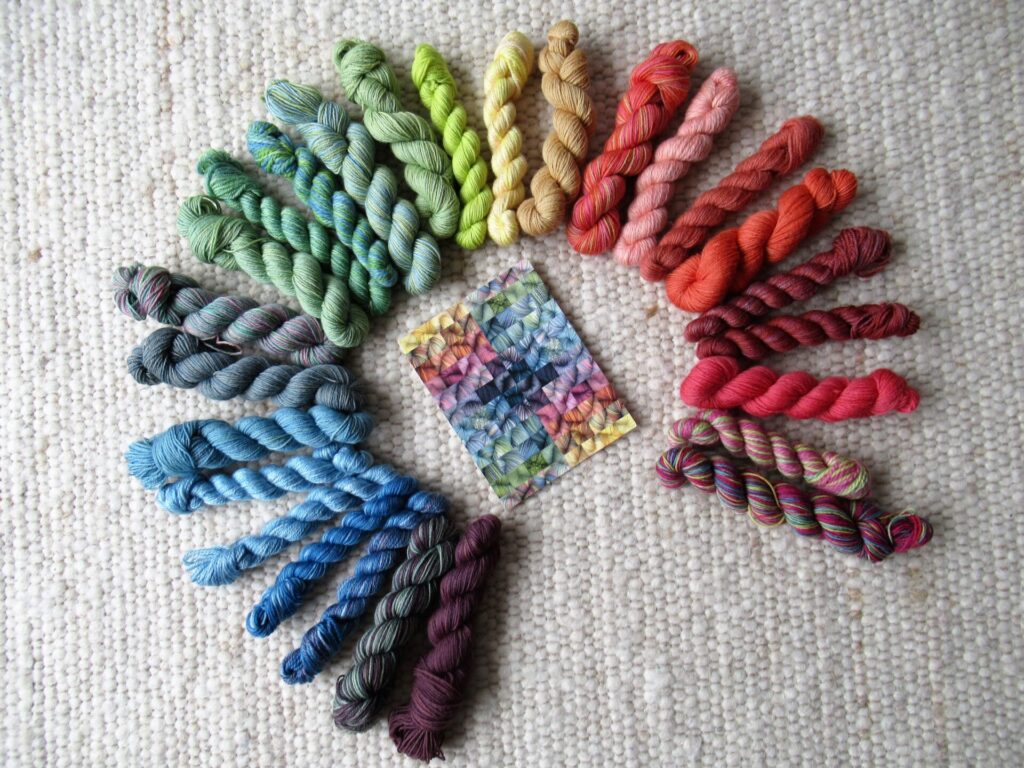
But there is more in my carrier bag. A selection of naturally dyed mini skeins that once entered my house through a subscription. The Natural Dye Studio (which no longer exists) sent me several small skeins in different fibres and colours once every week or so for a while. Here they are, also laid out in a sort of colour wheel.
A very different range of colours from my sock yarn remnants – much more balanced. But here, too, there is a gap in the wheel. Why? Where are the pinks and purples? After some digging, I found the missing section in a different bag.
Although I loved looking at and petting the hand dyed mini skeins, I have never actually done anything with them. I didn’t know what to do with such small quantities (10-20 g each) and some of them were really not ‘my’ colours.
Apparently I did have a plan for the pink and purple section of the colour wheel. They are wound into small balls and numbered. And I even made a colour card. There are no further notes with it, though, and I can’t for the life of me remember what I was going to do with them. Well, never mind. I’ll mix them in with the rest of my collection.
I have very clear preferences, easily summed up as blues…
…and pinks.
But the world would be a dull place without yellows…
…oranges…
And reds.
In many respects, I think the world would be a poorer place without the entire rainbow. But when it comes to knitting, I don’t know.
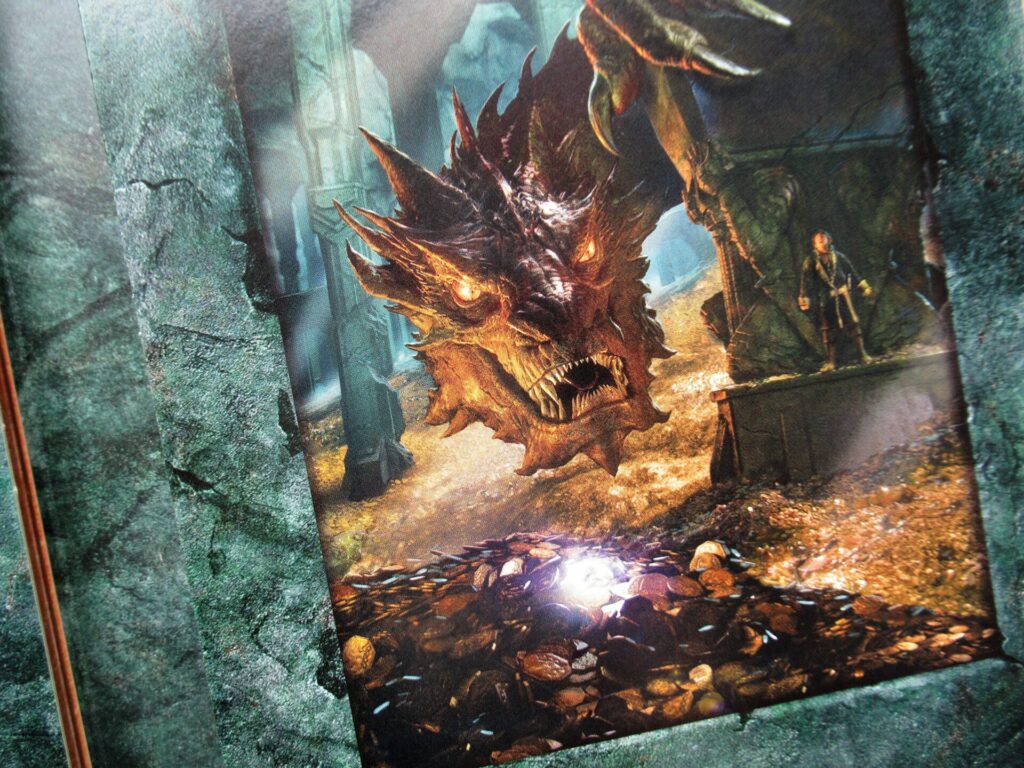
Although I feel dubious about some of the colours, in a sense I feel like Smaug, with my hoard of yarnie gold.
But unlike Smaug, I’m more than happy to share my treasure with others. In the past, I have given my yarn scraps away to sock yarn blanket and dolls’ clothes knitters. Now I’d like to knit some gifts with them.
I think it’s going to be a real challenge to make something beautiful with these small quantities of yarn. Well, maybe ‘beautiful’ is raising the bar too high. Let’s say something really nice. Gifts that won’t force the recipients to lie about how much they love them.
Will I be able to do that? And will I be able to step outside my colour comfort zone and use those bright green, orange, red and yellow mini skeins? I’m not sure, but I’ll give it a try.
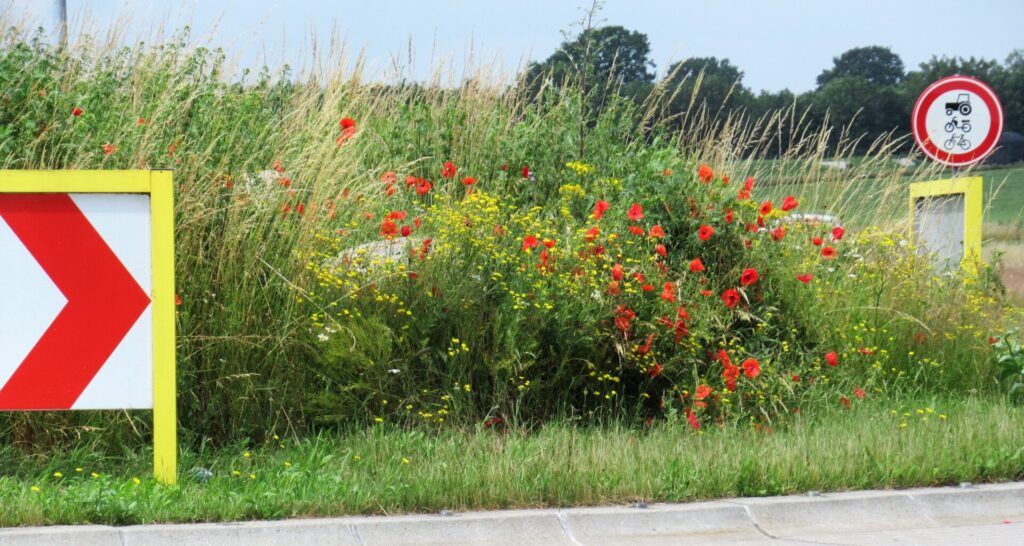
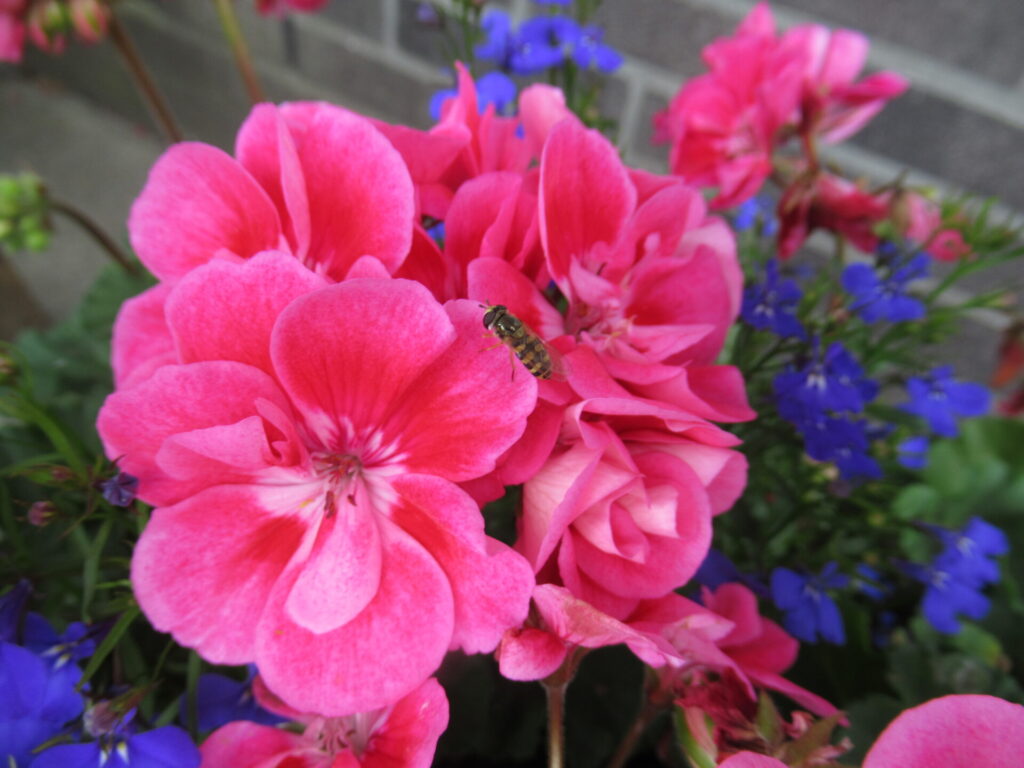
I took the picture below, of a roundabout just outside our village, several days ago. Not my colours in knitting, but on a roundabout? Wow!
In Dutch, we have the expression achter de geraniums zitten (sitting behind the pelargoniums). It’s hard to explain exactly what it means, but on the whole it’s considered a Bad Thing. Not quite as bad as pushing up the daisies…
… but it comes very close. Sitting behind the pelargoniums, you’re a dull old stick-in-the-mud.
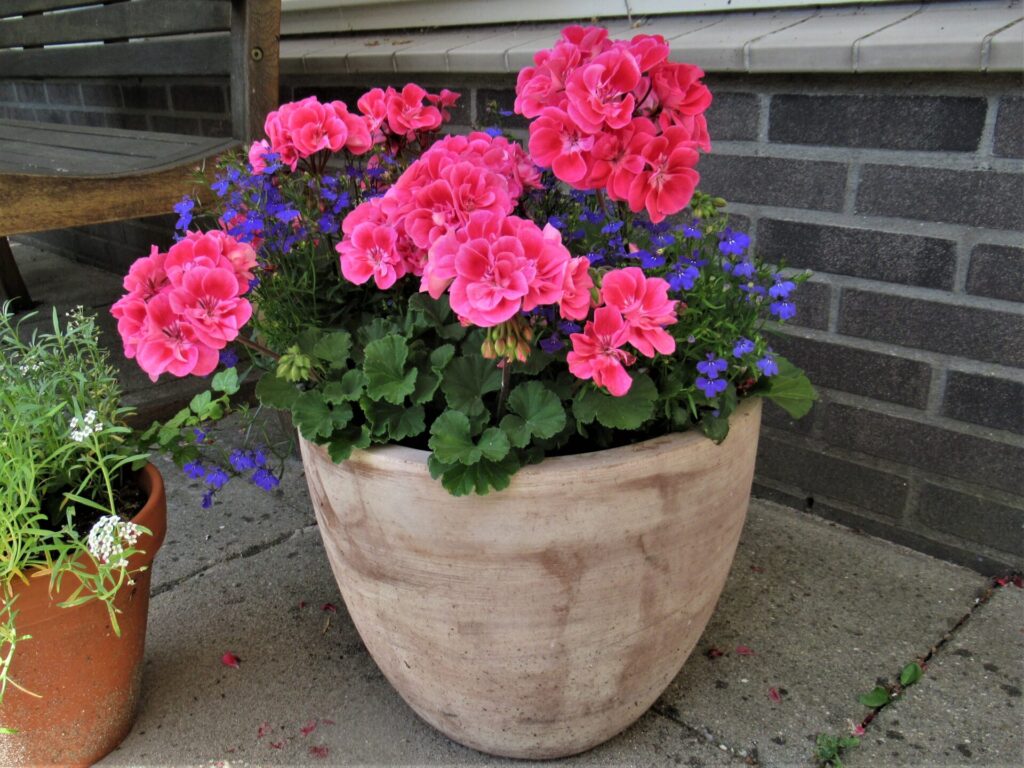
I never particularly liked pelargoniums. But since we came to live here, almost 20 years ago, we’ve bought them from our local brass band every year to sponsor their uniforms and instruments.
Ironically, last year – when we spent more time behind the pelargoniums than ever before, figuratively speaking – we had to go without them. Fortunately this year, the brass band players were able to go round the doors selling them again.
I don’t know if I’ll ever love pelargoniums, but I’ve come to like them over the years. They provide some nice splashes of colour around the house.
And how about sitting behind those pelargoniums?
According to our government, it is no longer necessary to do so. I don’t know what it’s like in your part of the world, but here almost all of the covid-measures have suddenly been dropped. As of last Saturday, we don’t have to wear face masks anymore, and almost everything is allowed (with 1.5 metres distance). It’s a BIG step, and I wonder where it is going to take us.
It is not going to take us (my husband and me) anywhere much in the foreseeable future. We don’t have big plans. I mean, it would be a shame if we weren’t here to enjoy our wonderfully fragrant miniature strawberries, wouldn’t it?
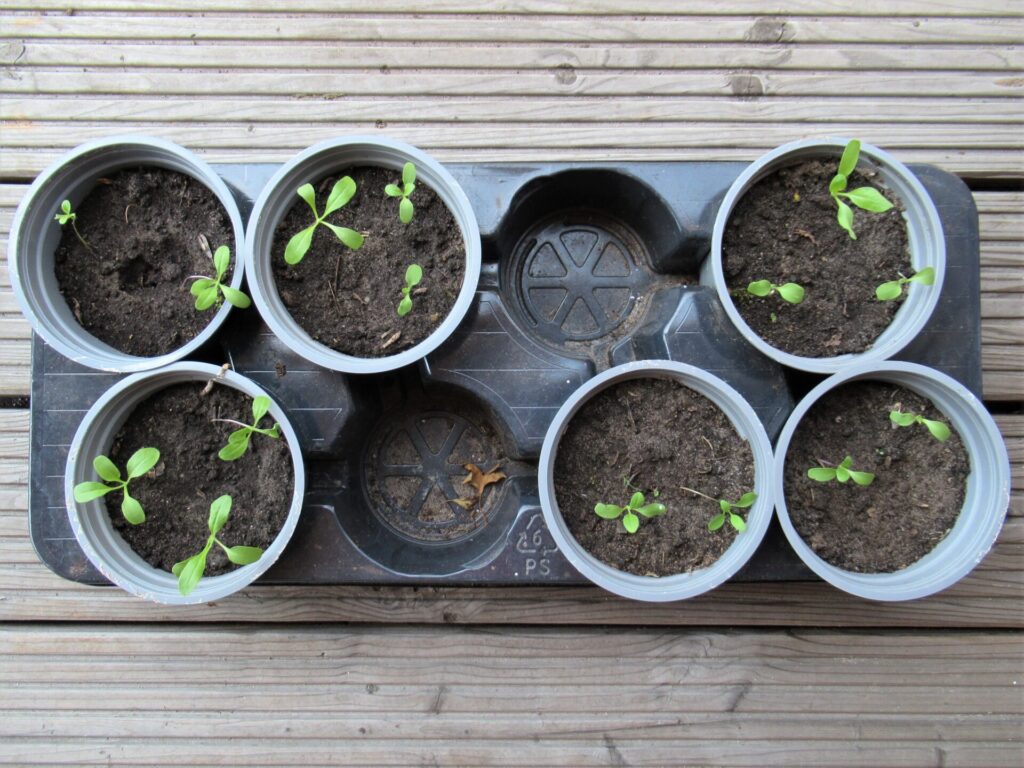
And who among our neighbours would be crazy enough to pamper my little woad seedlings the way I do? Yes, the seeds have germinated! Well, most of them anyway.
We will just continue living our lives, and doing the things we normally do this summer. But we are planning to take a day off now and then to venture away from behind our pelargoniums. I hope you’ll virtually join us on some of our outings.
One thing we have planned, is a visit to our niece. She left home last September to go to uni and I am really looking forward to finally see where she has been studying so diligently on her own this past year. Before that trip, I am crocheting her a pair of old-fashioned pot holders from blue and cream cotton.
On the knitting front, I don’t have any big plans either. I’ll focus on small projects from those yarn remnants I talked about last week. There is one big project I want to finish, though – the soft, light and relaxed cardi I started earlier this year. Only, I found out that I’ve made a mistake in one of the front bands. Oops.
I think I know how to fix it, but I need to pluck up the courage for that.
Some crochet is also on my list of things to do this summer. Not a big blanket or anything – I’ll keep it small, too.
For the rest, I’ll keep enjoying the small miracles surrounding us and sharing them with you.
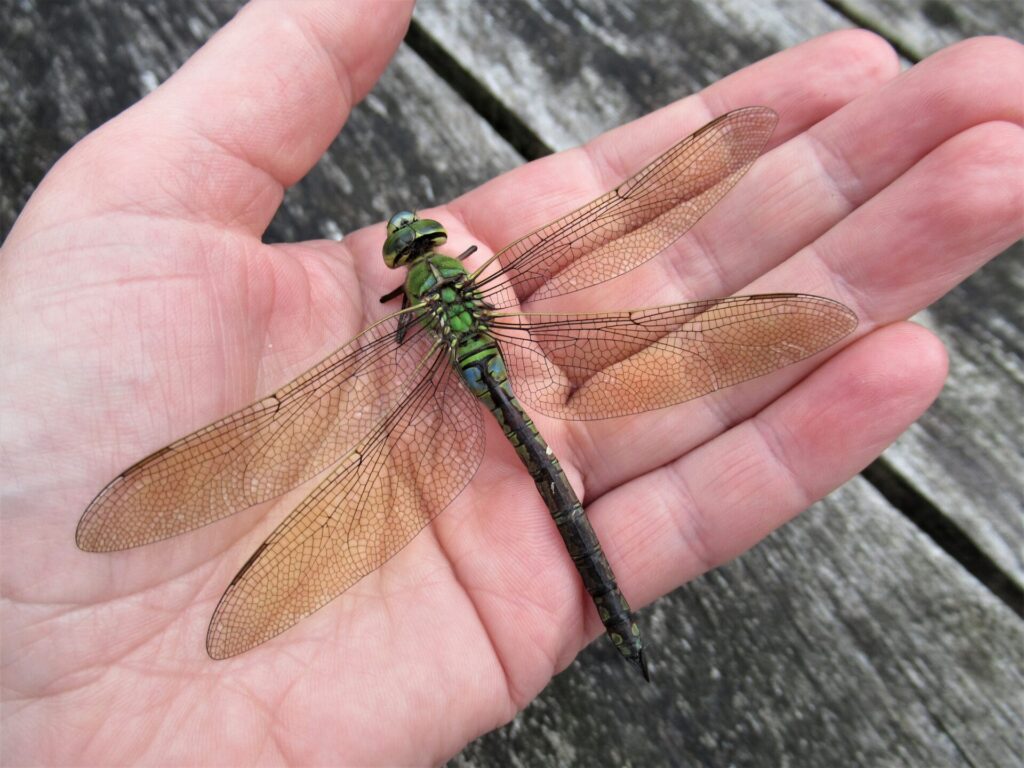
The other day, when I was starting to lower our awning, I heard a dry, crackling sound. Like something dropping down from it. And this is what I found:
An emperor dragonfly. I couldn’t see it breathing, and after observing it for a while concluded that it was dead. A rare opportunity to study it more closely. Such a beautiful creature.
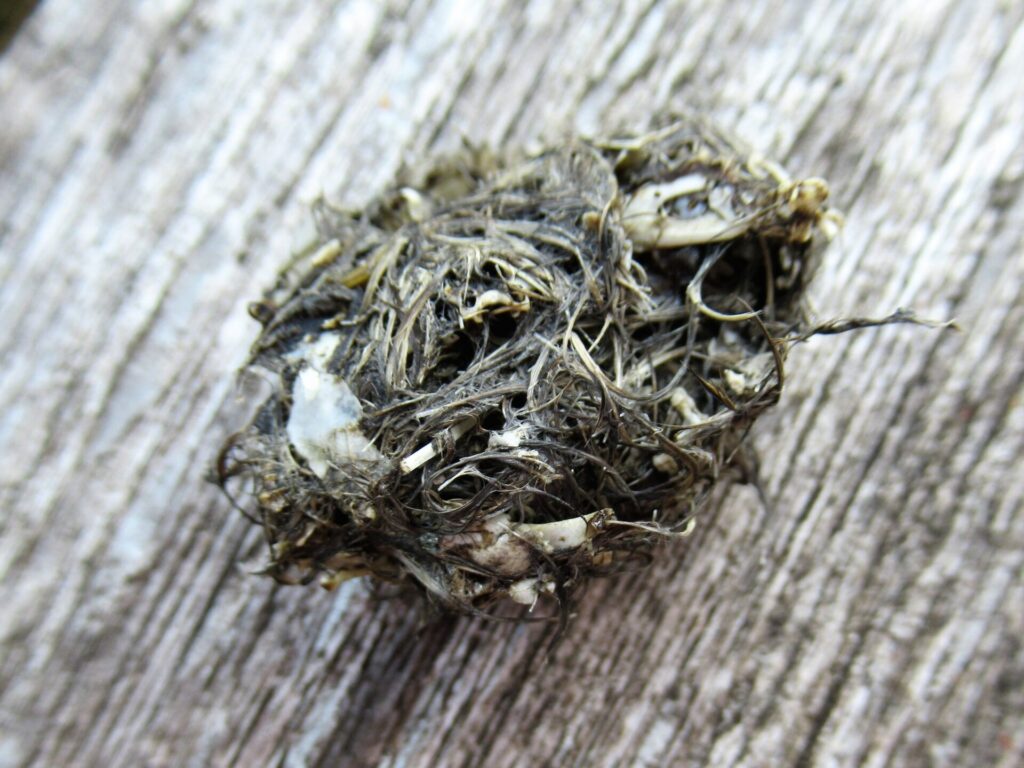
Another thing I found just outside our backdoor this past week is this:
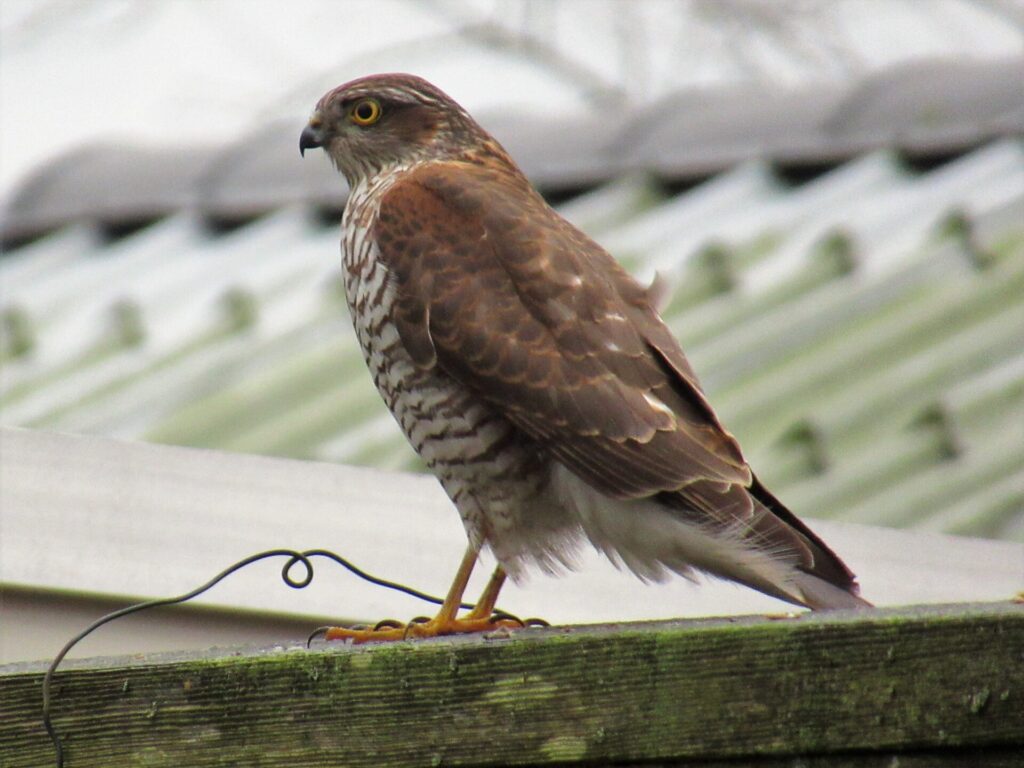
I’ve zoomed in on it; in reality it is only about 3 cm long. At first I thought it was a bit of moss fallen from off the roof, but when I looked more closely, I saw ‘things’ in it and realized it was a pellet. Probably regurgitated by this sparrowhawk.
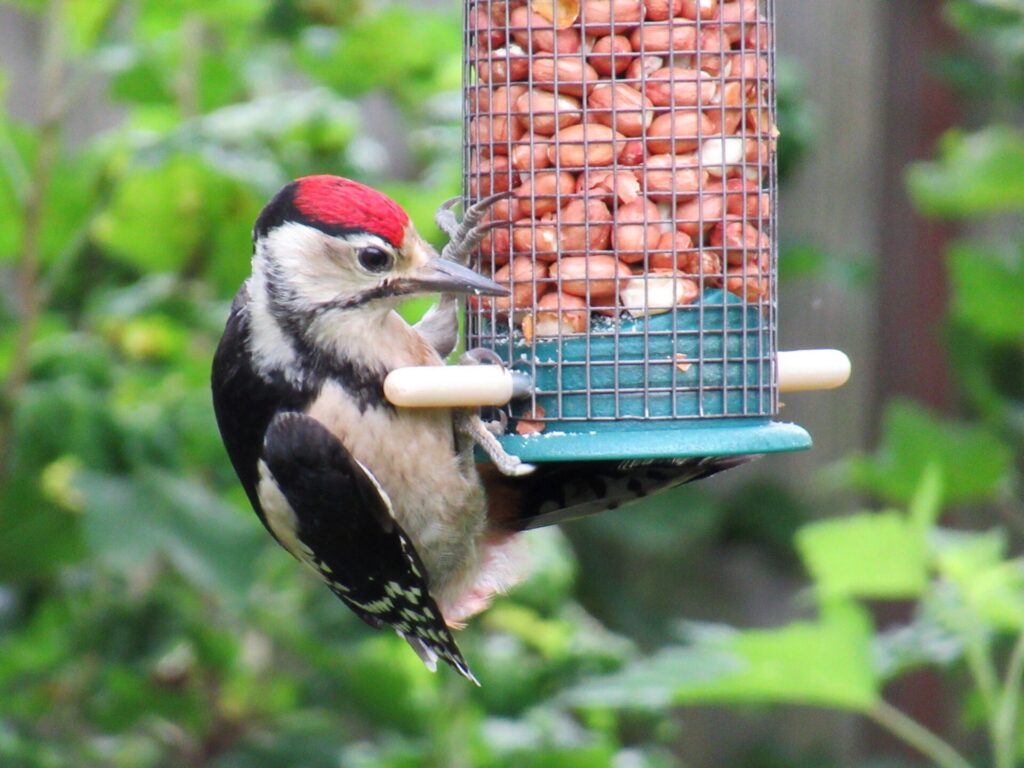
I may seem like a dull old stick-in-the-mud to others, spending so much time behind the pelargoniums. But life never feels dull to me. To close off, here is one of the young woodpeckers who visit our garden every day.
Wherever you are in the world, and whether you are staying behind the pelargoniums or not, I wish you a safe and enjoyable summer and hope you’ll pay me a visit here from time to time.
PS If you’d like to see a dragonfly breathing (they breathe through the lower part of their body), here is a lovely video I found on YouTube.
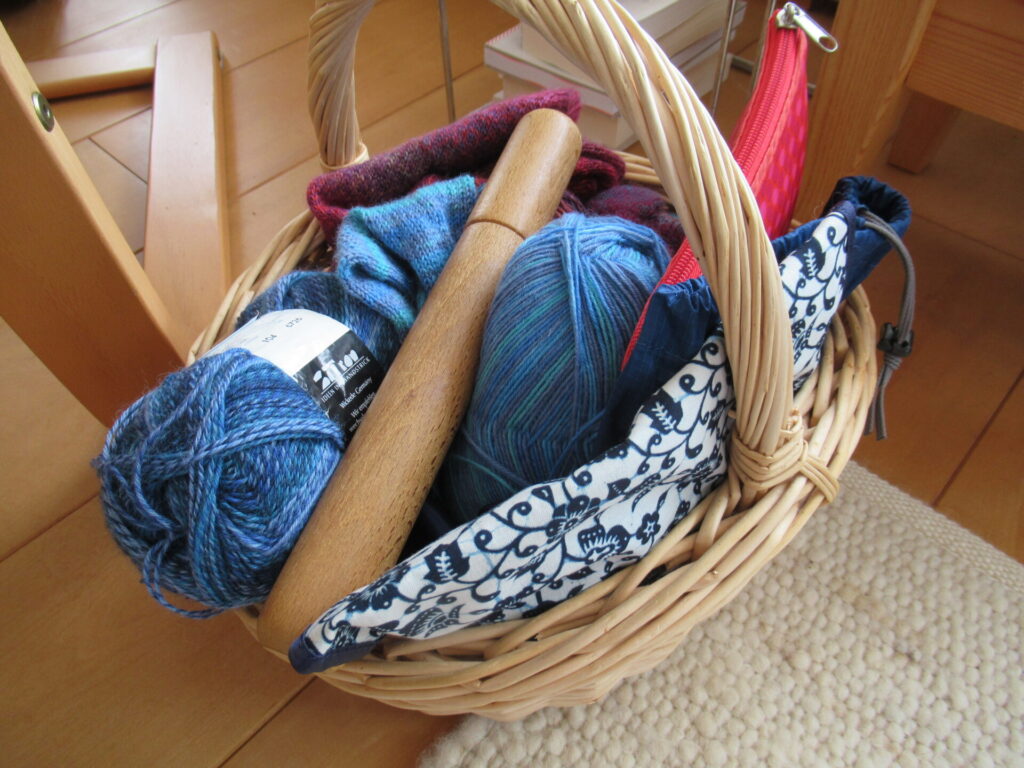
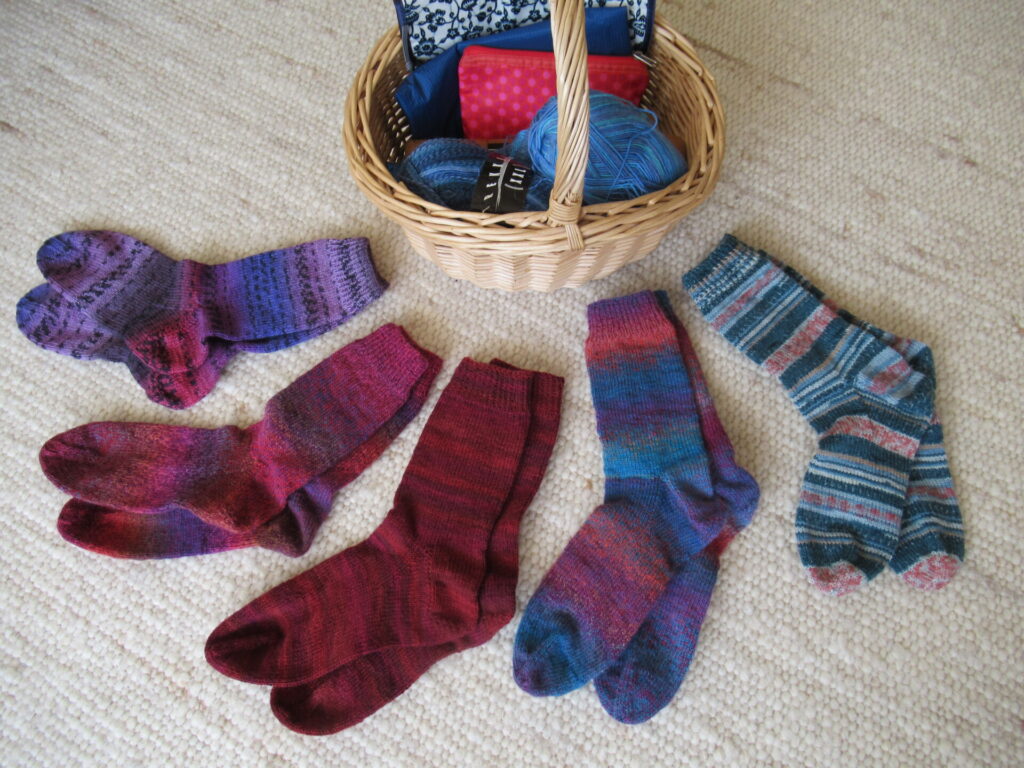
Several weeks ago, some of you commented on how tidy my knitting baskets looked. Well, they don’t look like that all of the time.
Do you know that feeling, that things seem to pile up of their own accord? This time it’s my sock knitting basket. It doesn’t look too bad in the picture above, but it really is crammed to the brim. This week’s cooler days are perfect for tackling it. So, let’s turn it upside down.
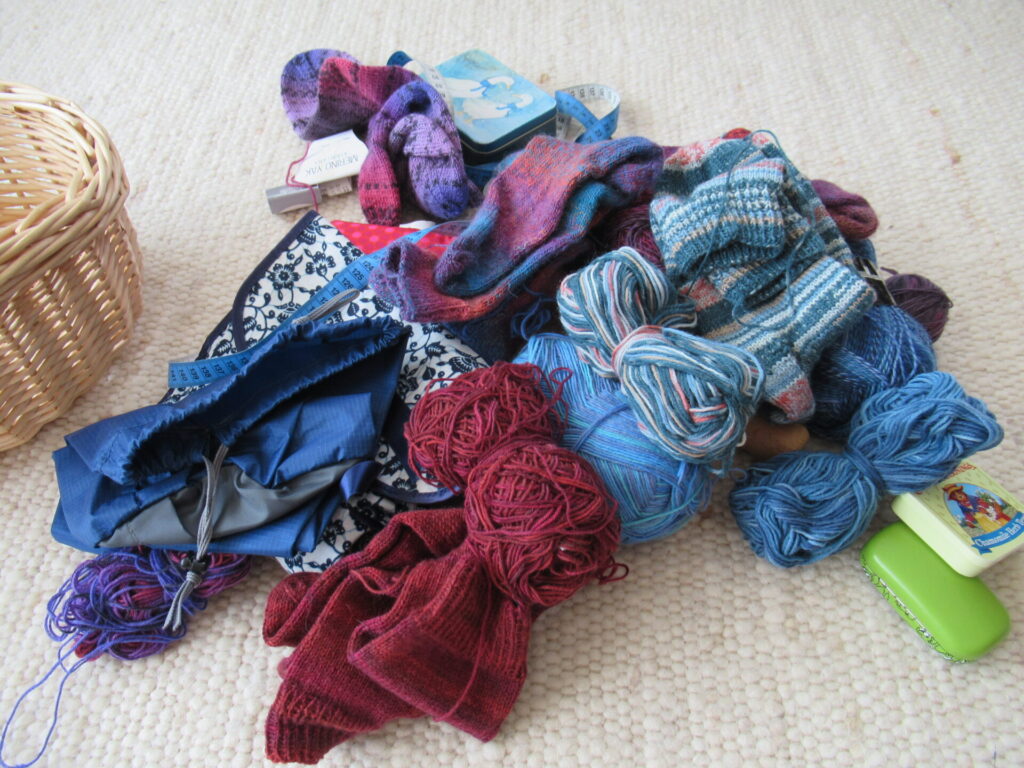
It’s amazing how much stuff a relatively small basket can hold.
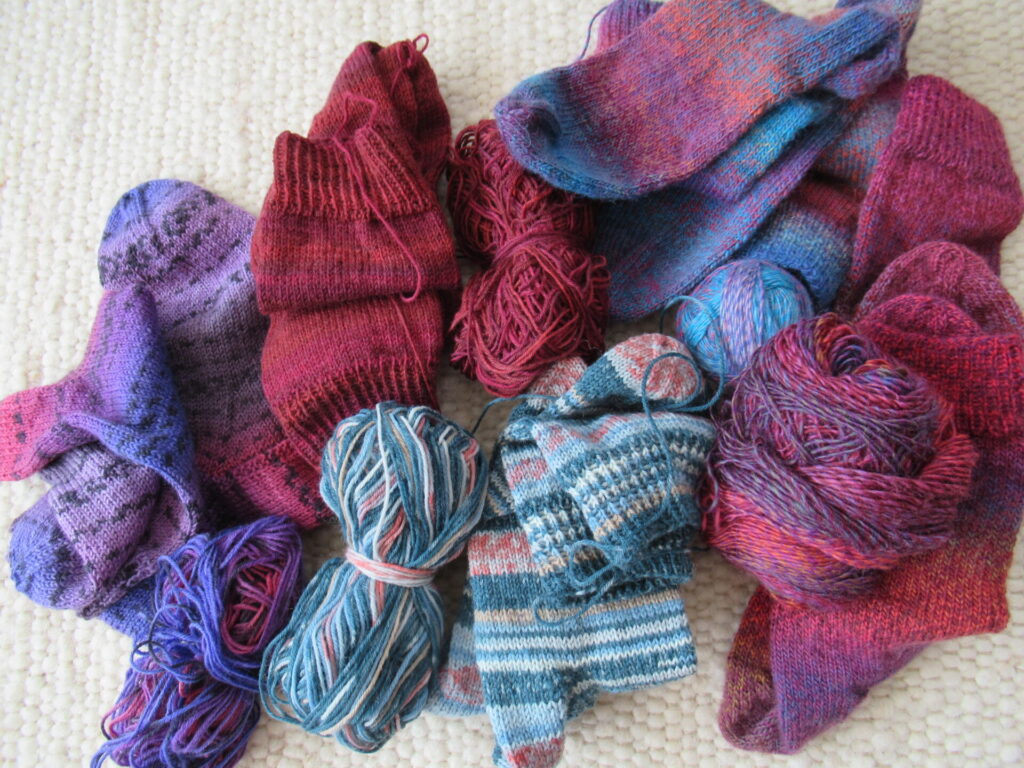
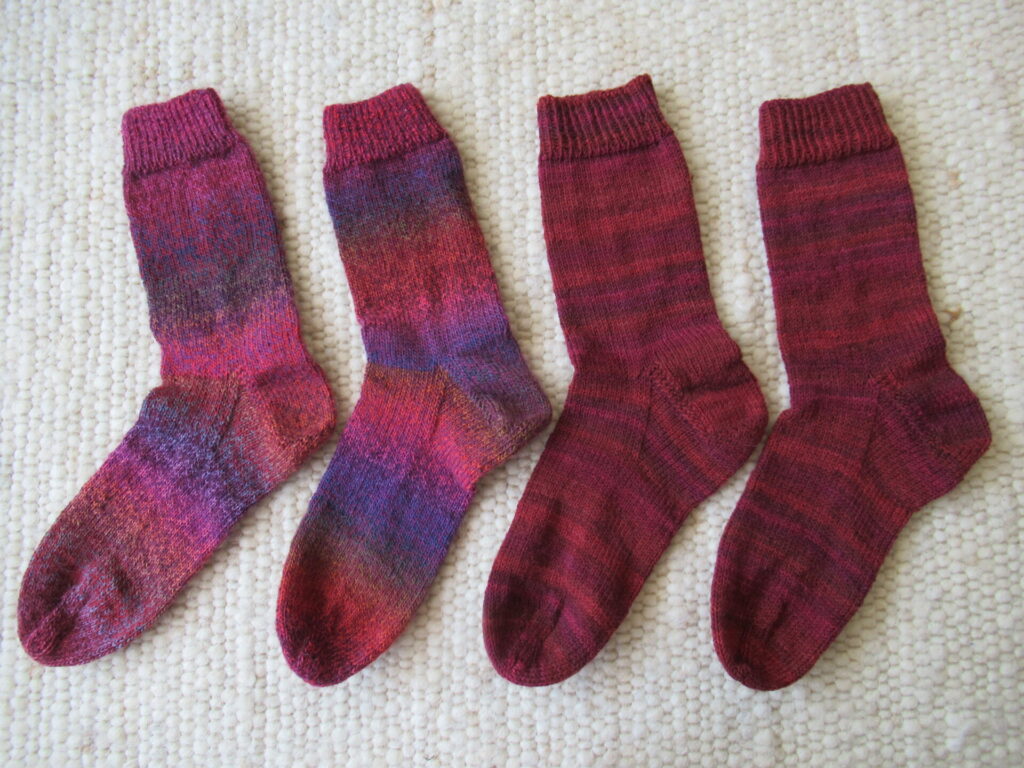
First of all there are five pairs of socks with the ends still to weave in. And for every pair of socks there is some leftover yarn.
There is pair of socks in progress in the basket, too. I always have a simple sock on my needles. It takes me anywhere from several days to months to knit a pair, depending on what else I’m knitting and what is going on in my life.
The thing next to it is a wooden sock-knitting-needles-with-a-sock-on-them-protector. Is there a name for these things? Can you even buy them? Mine was a free gift with a magazine four decades ago and is one of my most beloved possessions.
This is what it looks like closed.
Also in my basket are some leftover bits of yarn and labels of socks that I don’t even remember knitting, yarn for the next pair of socks, and a project bag.
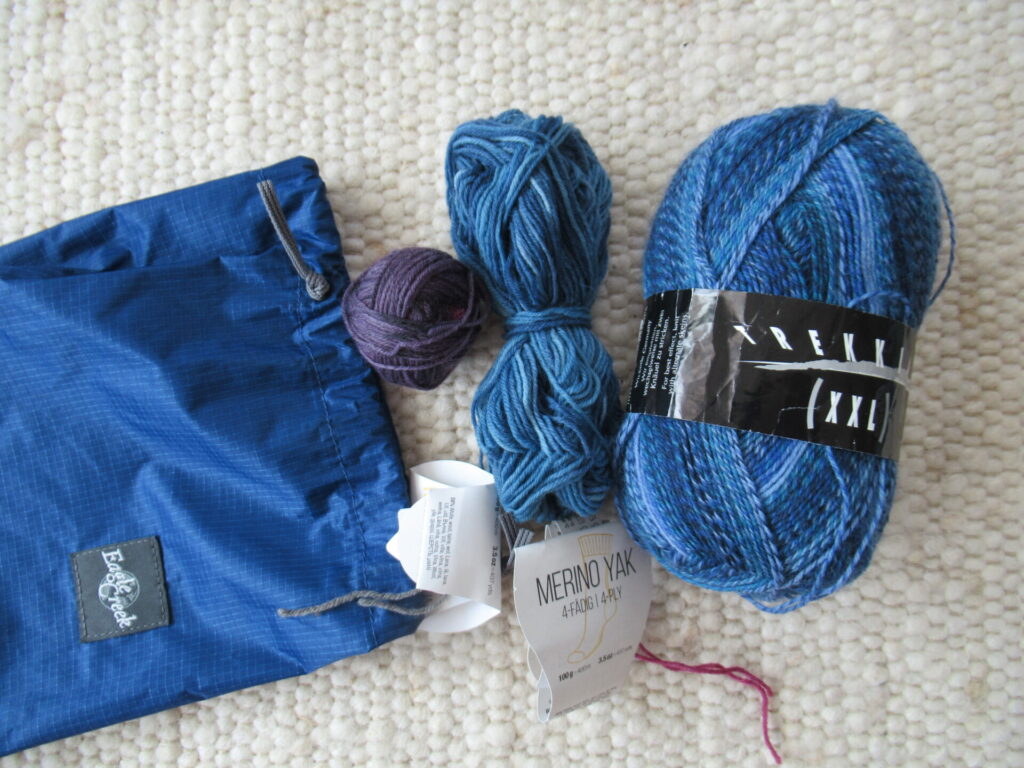
There are all kinds of cute hand-sewn project bags around, but I prefer these plain ones. I have several of them and bought them at an outdoor sports store. I prefer them because of the smooth material. It’s easy to slip my sock knitting into them, and they are also easy to slip into a bag or backpack. Besides, they are water-resistant.
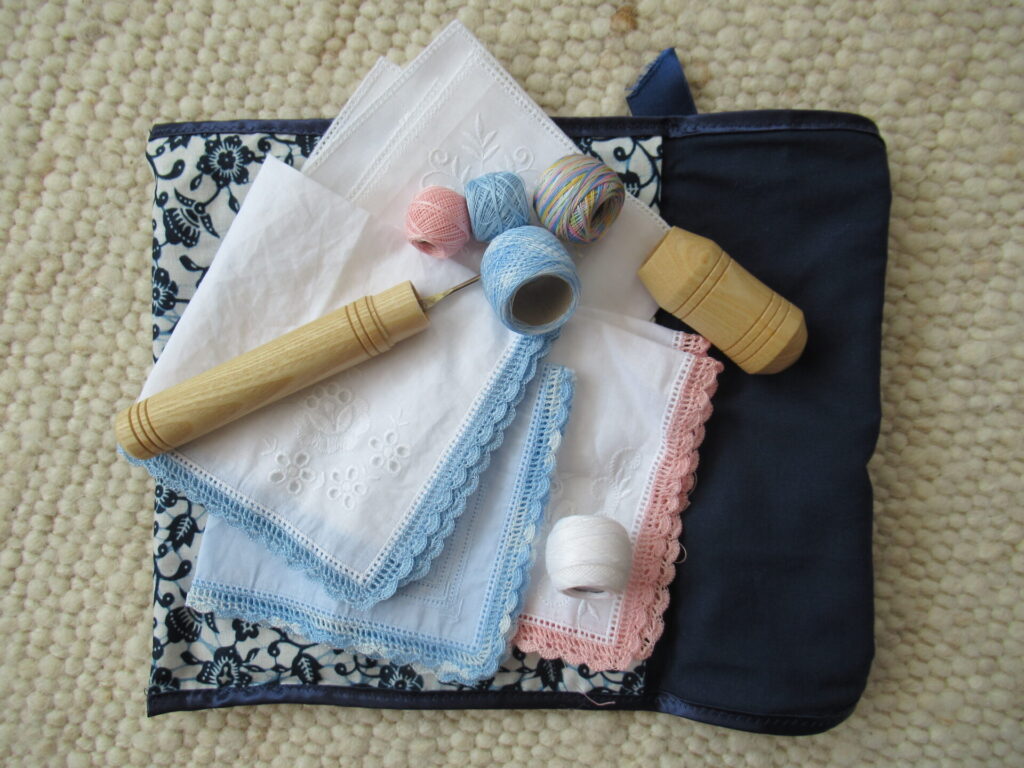
The next thing in my sock knitting basket is something that doesn’t really belong there – my crochet lace hankies. They do live in a cute hand-sewn project bag (I’m not entirely consistent), that was made by my late mum.
I know it’s a very old-fashioned thing to do, but I love doing this fine crochet. And I love the delicate hankies themselves too, for polishing my glasses when they get steamed up or wet from cycling in the rain.
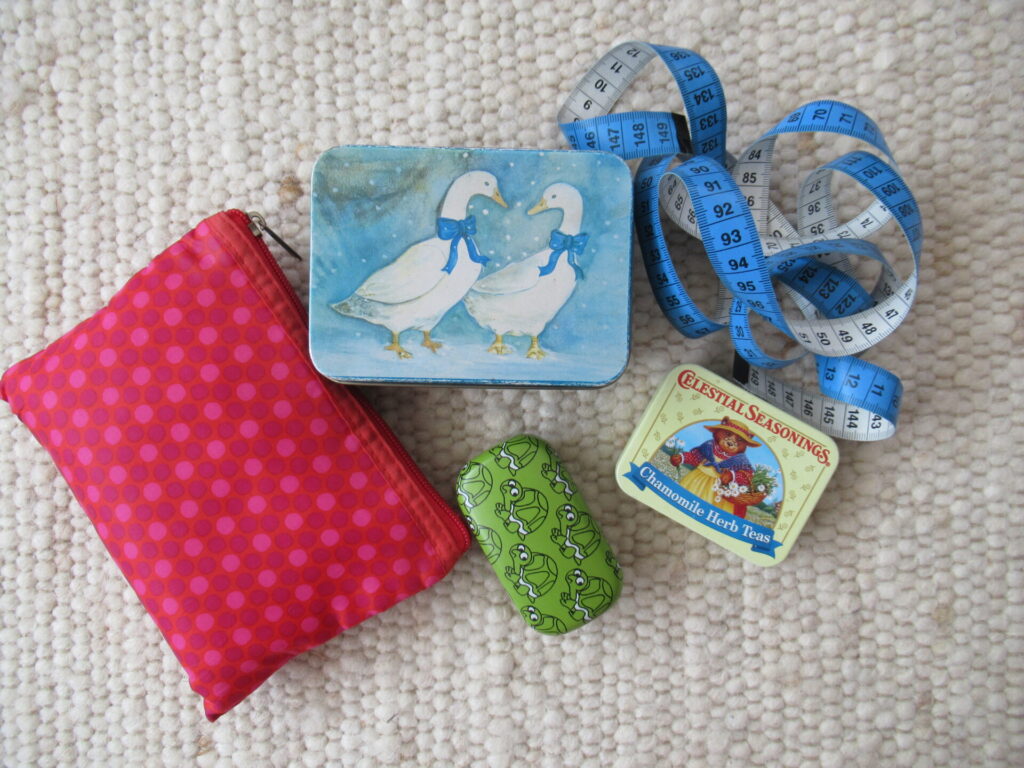
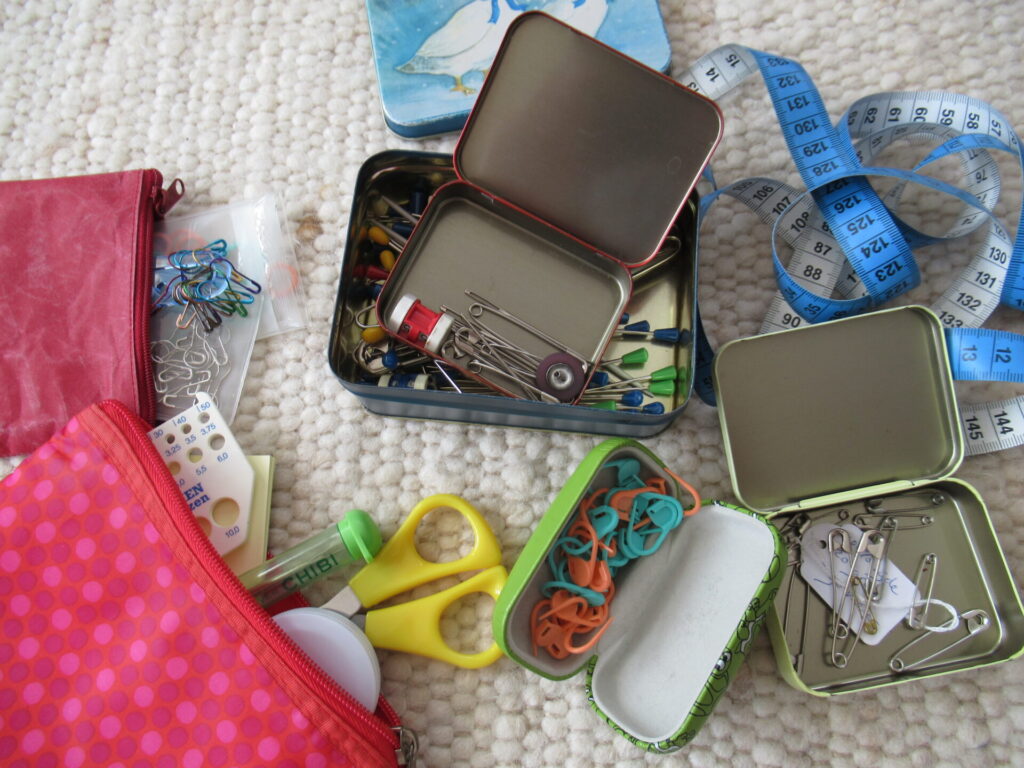
There are also several boxes and pouches in my knitting basket.
They are filled with all kinds of knitting tools and notions that I like to keep handy.
There is a problem with one of the pairs of socks in the basket (the ones below left). I’ve made them for a friend. I made another pair from the same yarn for someone else, and have since discovered that this yarn isn’t suitable for socks at all. Those socks were worn to shreds after just a couple of weeks.
It’s like that with some sock yarn. It would be lovely for, say, a shawl, but shouldn’t be sold as sock yarn, in my opinion.
But I only found that out after I had knit these pink-and-purple ones. I thought of ripping them out and using the yarn for something else. But I’ve decided to give them to my friend after all and tell her to give them to her cats to play with when they get too ratty. (I can already hear her cats meowing, ‘Did someone say ratty? We love all things ratty!’)
I also knit her another pair in a really good sock yarn (the ones on the right).
In less than an hour, my sock knitting basket is tidy. (How long will it stay that way?) And I have five pairs of finished socks that only need to be washed and dried before they can be worn or given away.
The leftover yarn has joined the rest of my sock yarn scraps. I used to give them all away, but now I have a few ideas for things to make with them myself. If they materialize, I’ll share them here with you.
Are you a sock knitter too? What do you do with your sock yarn scraps?
‘Urgent: Woad Growers Wanted’, a newsletter that landed in my inbox said. At first I thought, ‘Go away, I’m too busy.’ But after a while I thought, ‘Oh, why not? It sounds really interesting, and it won’t take any time at all!’ So I answered that I’d like to be involved and received a packet of woad seed.
It came with a lovely postcard of a blanket knit from local and hand spun wool. It is one of the blankets that was made last year, as part of a community project aimed at rescuing local wool from being labelled as waste and shipped off to China.
The call for woad growers came from the same people who organized the blanket project. They are now working on more ideas for things to do with local wool, and one of them is dyeing it with locally grown woad.
I won’t pretend to know everything there is to know about woad. In fact, I knew very little about it before I became involved in this project.
From the newsletter, I learnt that for centuries, wool was dyed blue with woad in the Netherlands and other parts of Europe. In the 18th century, Frisian wool comber Eise Eisinga won international awards for his beautiful blue wool. In his spare time, Eise built a planetarium that is now a museum (I knew that, I’ve been to it and it’s great!). The museum still owns his original dye recipes, including one for dyeing with woad.
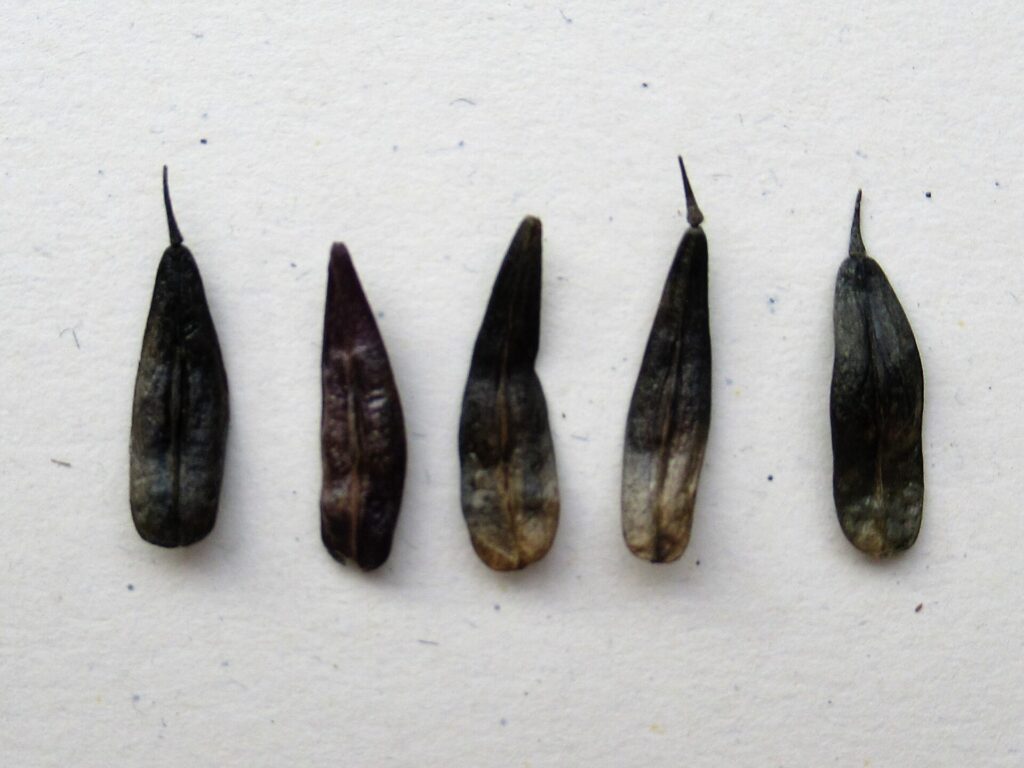
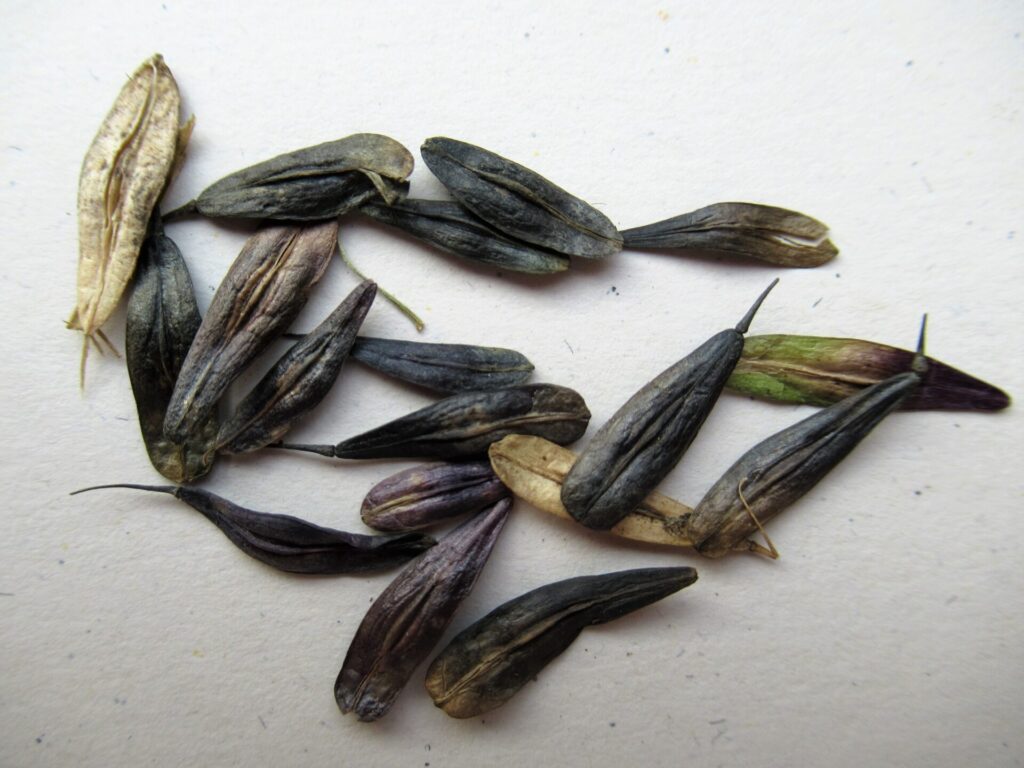
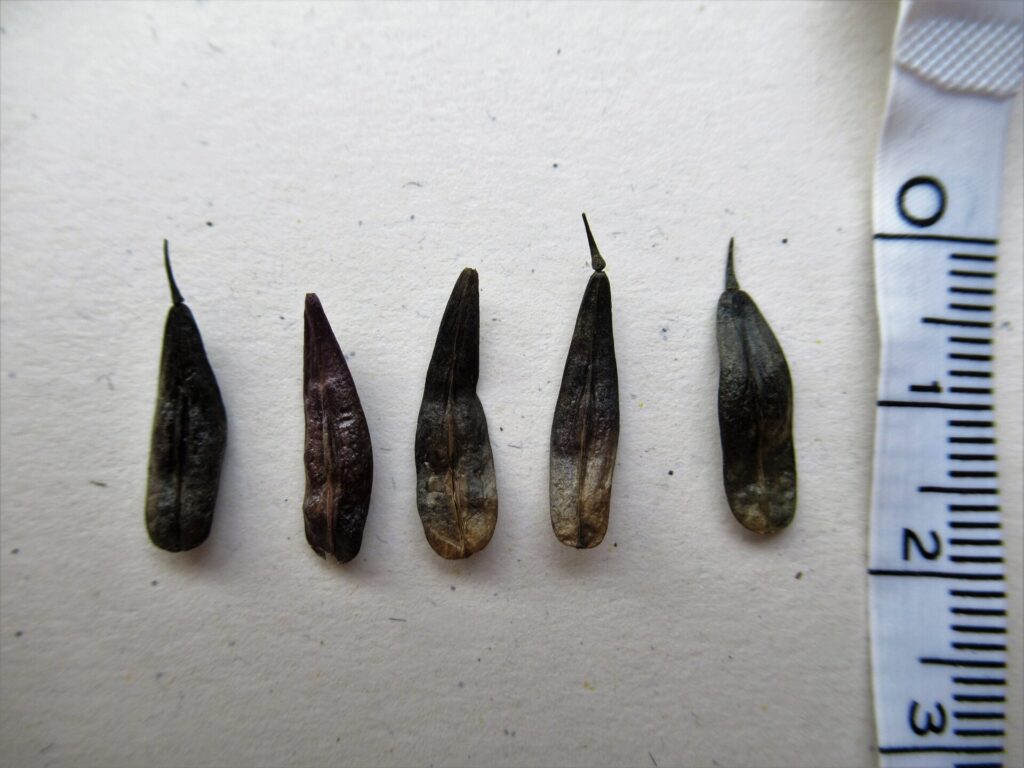
The seeds themselves vary in colour from pale yellow and green to a deep purplish blue.
They measure about 2 cm/¾”.
When I thought ‘it won’t take any time at all’ I was kidding myself. When I get involved in a project like this, I can’t just plant a few seeds. I take it seriously, want to do it well, and want to know more than the newsletter tells me. Here are a few things I found out:
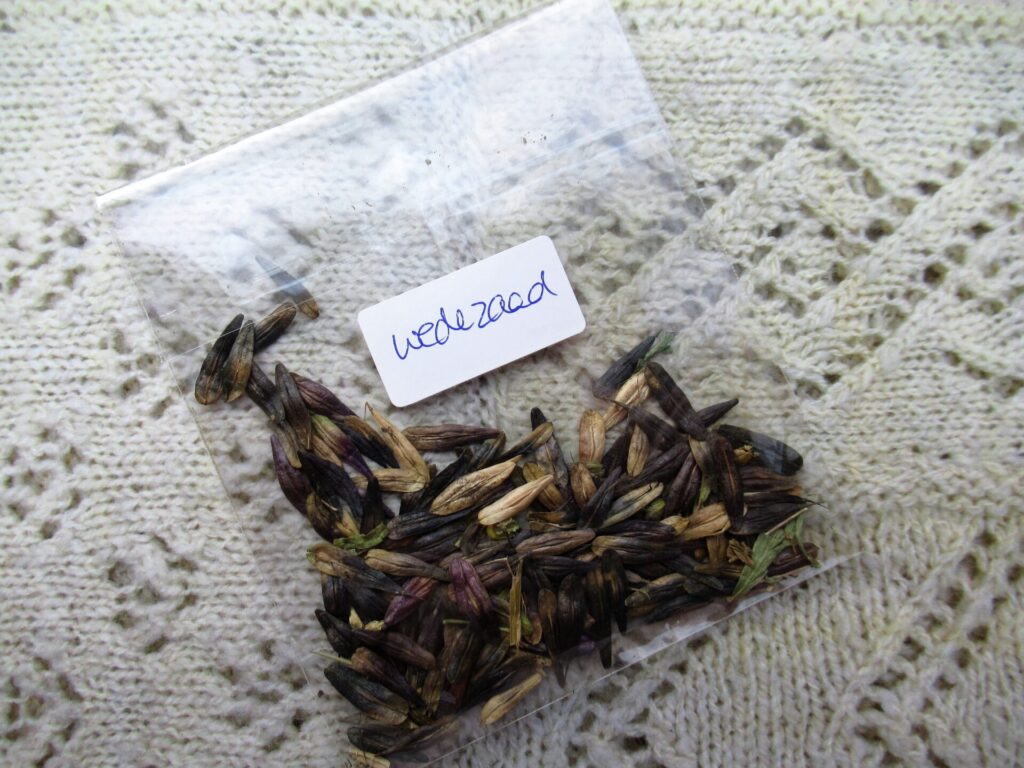
In Latin woad is called Isatis tinctoria. In het Nederlands heet de plant wede, auf Deutsch Färberweid, en Français pastel des teinturier, och på Svenska vejde.
Tinctoria in a plant name means that the plant can be used for dyeing, as in: Indigofera tinctoria (indigo), Genista tinctoria (dyer’s broom), Cota tinctoria (yellow camomile) etcetera.
Woad belongs to the brassica family, which also includes broccoli, mustard, cabbages and oilseed rape.
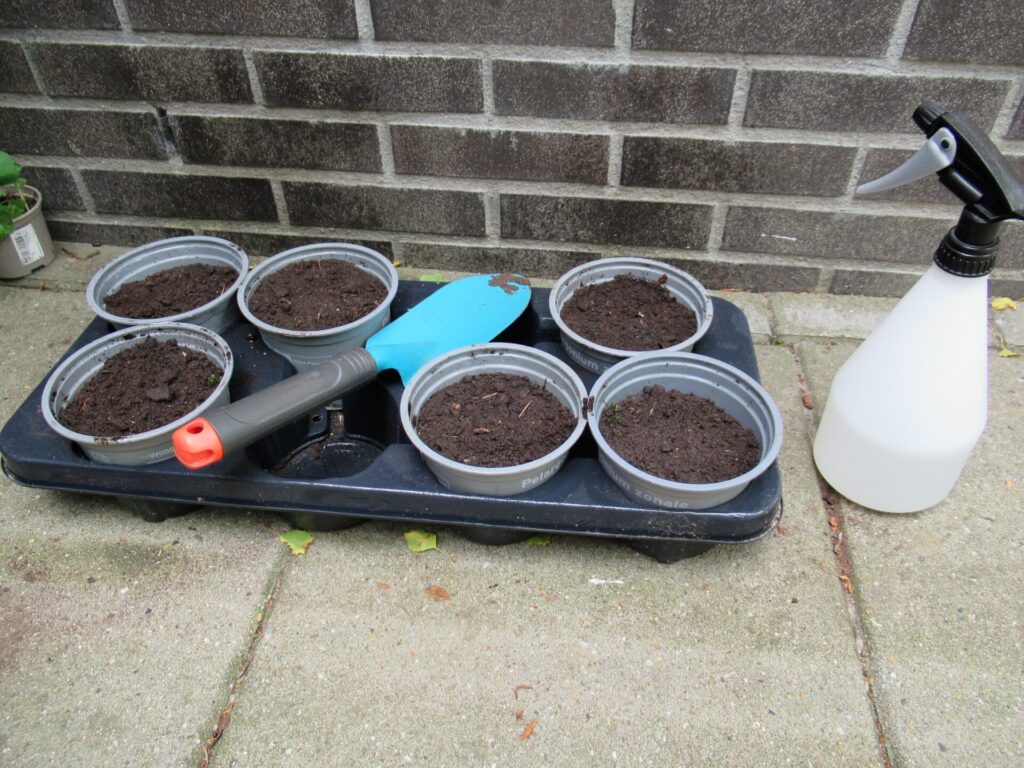
I was going to sow the seeds directly in the garden. But the instructions say that they should be kept moist at all times, so because of the hot and dry weather, I decided to sow them in pots first.
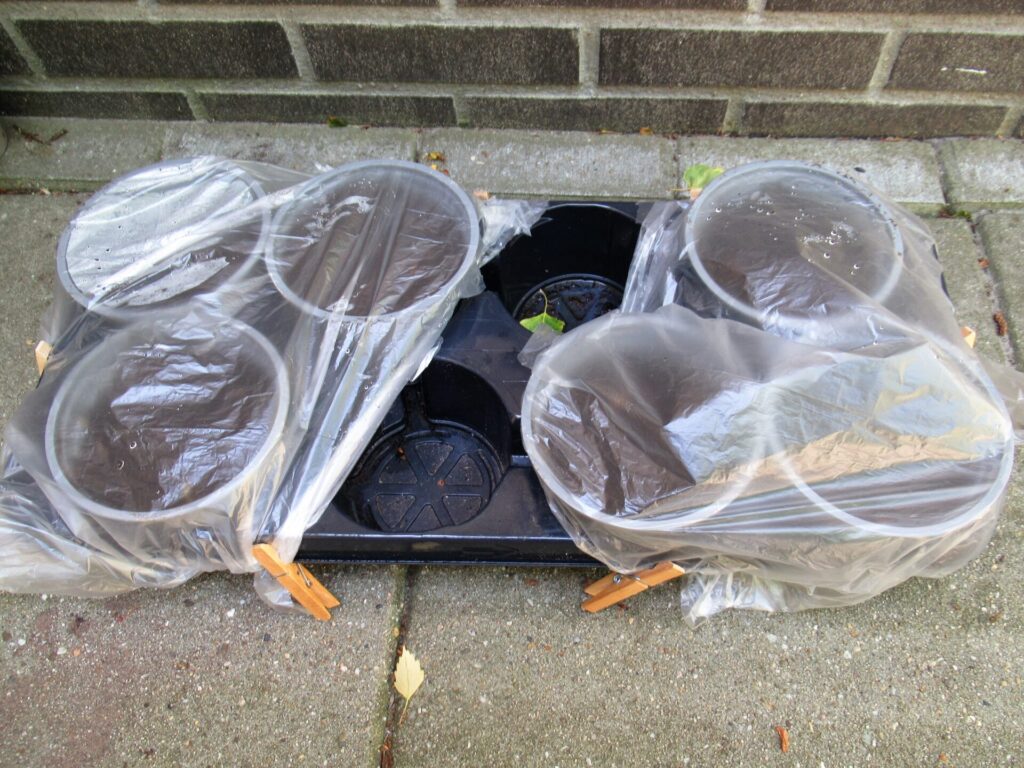
I didn’t use special potting soil, but just dug some soil from the garden, sowed the seeds, covered them with a thin layer of soil, and carefully moistened the soil with a plant sprayer afterwards. Although I placed the pots in the shade, the hot wind had already dried out the soil several hours later. So I spray-misted them again and covered them with plastic.
Now, several days later, I’m really glad I planted the seeds in pots. If I hadn’t, they wouldn’t have stood a chance. Some other plants in the garden are already wilting in the heat.
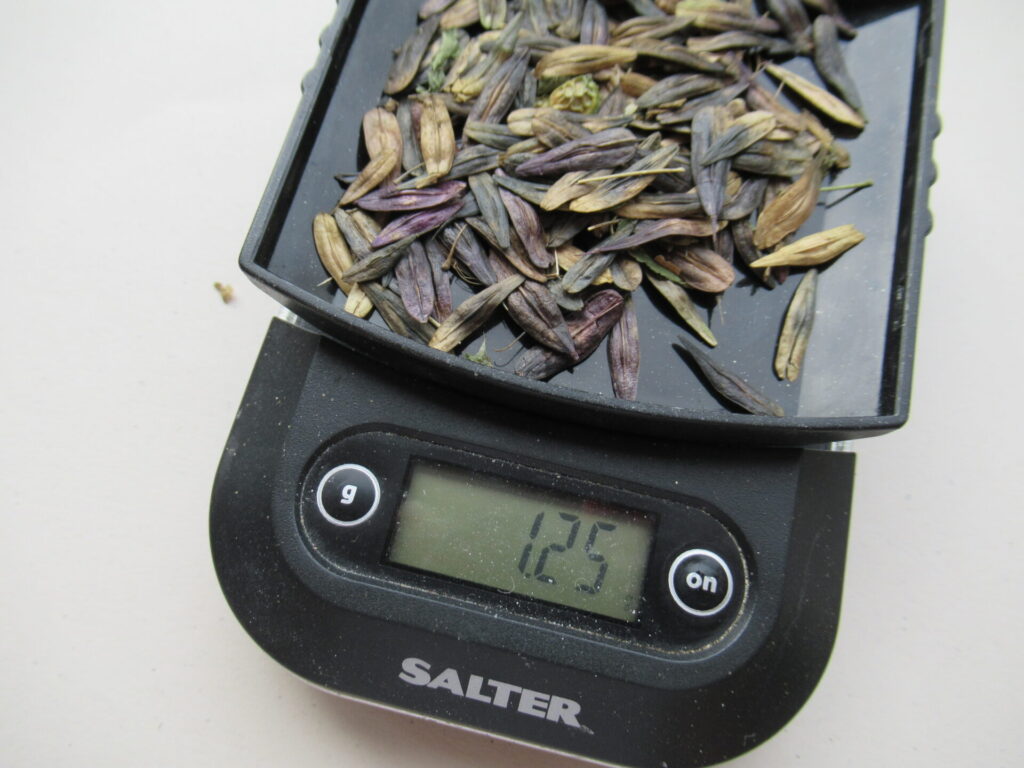
I was sent 1.25 grams of seed and selected some of the plumpest, most promising looking ones.
Using only 3 seeds per pot, I have quite a few left. I thought of giving them to a friend, but I’m keeping them for the time being, in case the seeds don’t germinate and I need to try again. I’m hovering over them like an anxious mother hen. Am I using the right kind of soil? Are the seeds still moist? Aren’t they too wet? Are they getting enough sunlight?
I’ll keep you updated about their progress. In the meantime, here are a few links for those of you who’d like to know more.
Links:
A picture of Eise Eisinga’s woad-dyed wool samples with his handwritten notes can be found here.
An interesting short video about the wool comber/dyer and astronomer (with English subtitles) can be viewed here. It was filmed in Eise’s beautiful blue living room with his working model of the solar system on the ceiling. (Scroll down to second video. Be patient – it continues after the quote.)
If you’ve missed the blog post about my humble attempts at rescuing some local wool and about the Wool Rescue Handbook, you can read it here.
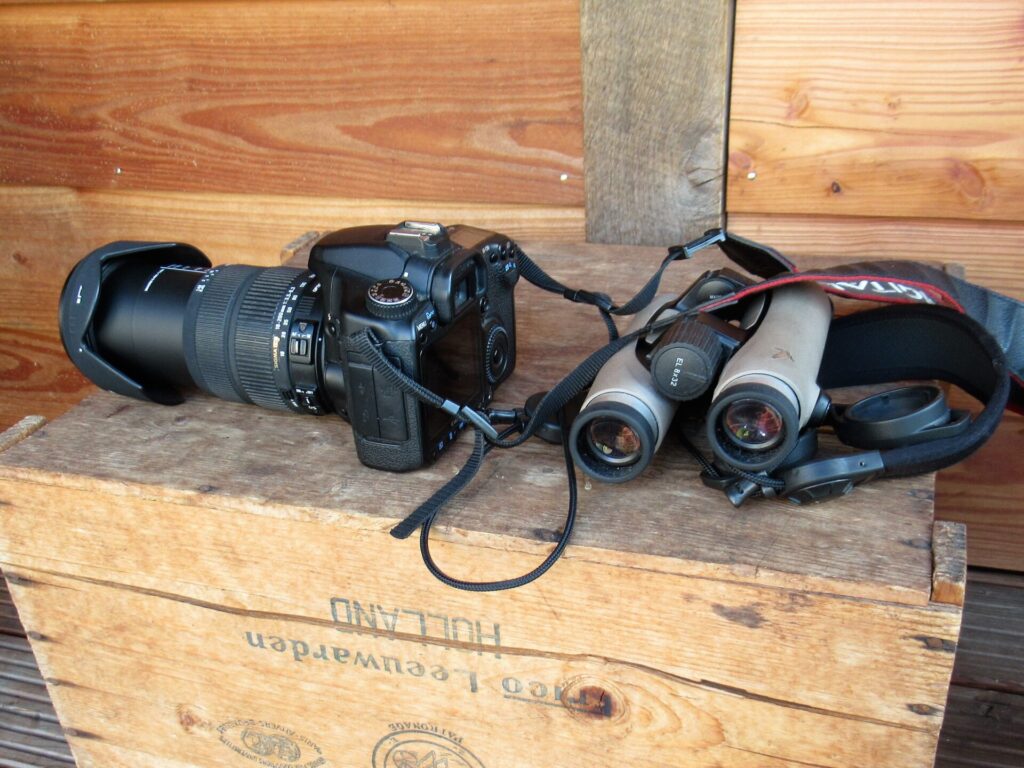
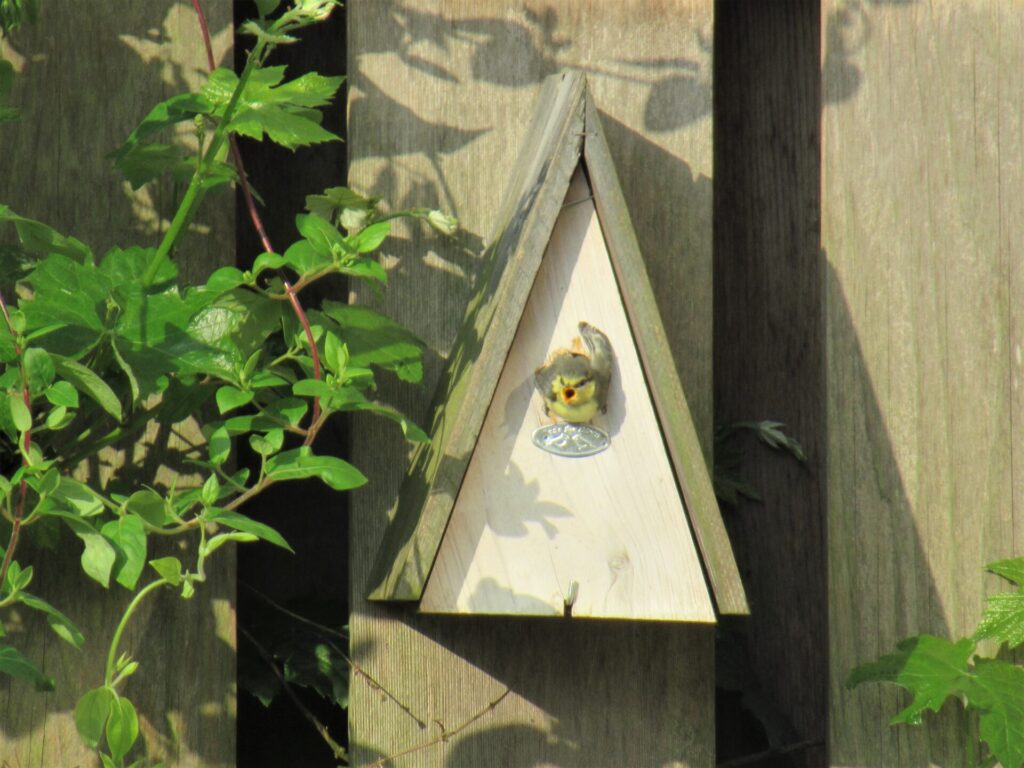
On weekdays, when I come downstairs my husband is already at the table having breakfast and reading the morning paper. But one morning a few days ago, he wasn’t there. I found him on the veranda with his camera and binoculars. ‘Shhh,’ he said, ‘the blue tits are fledging.’
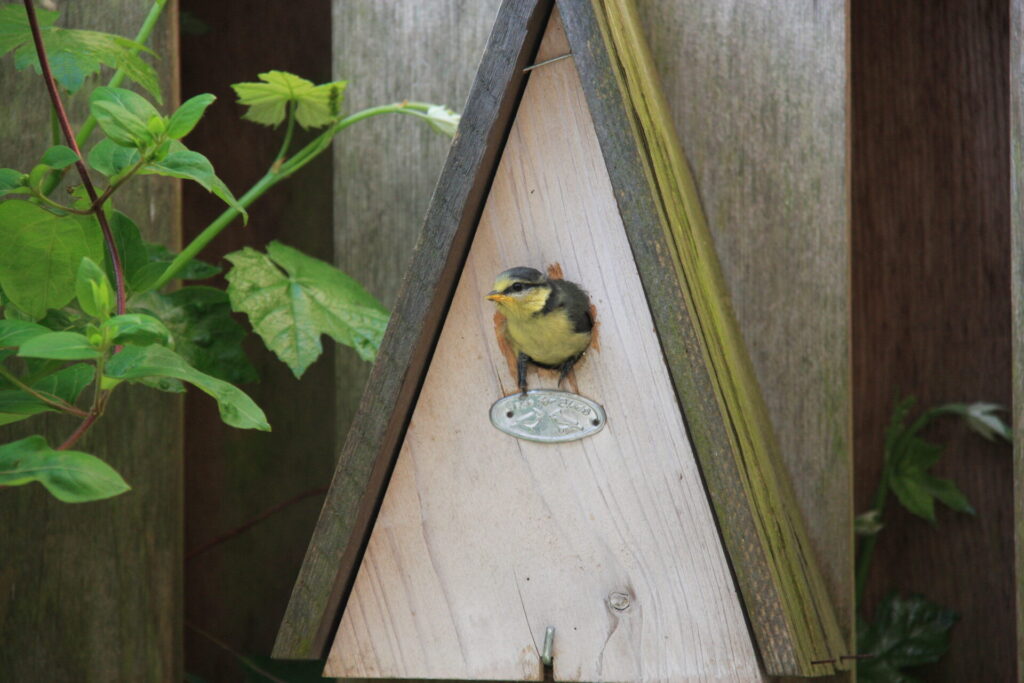
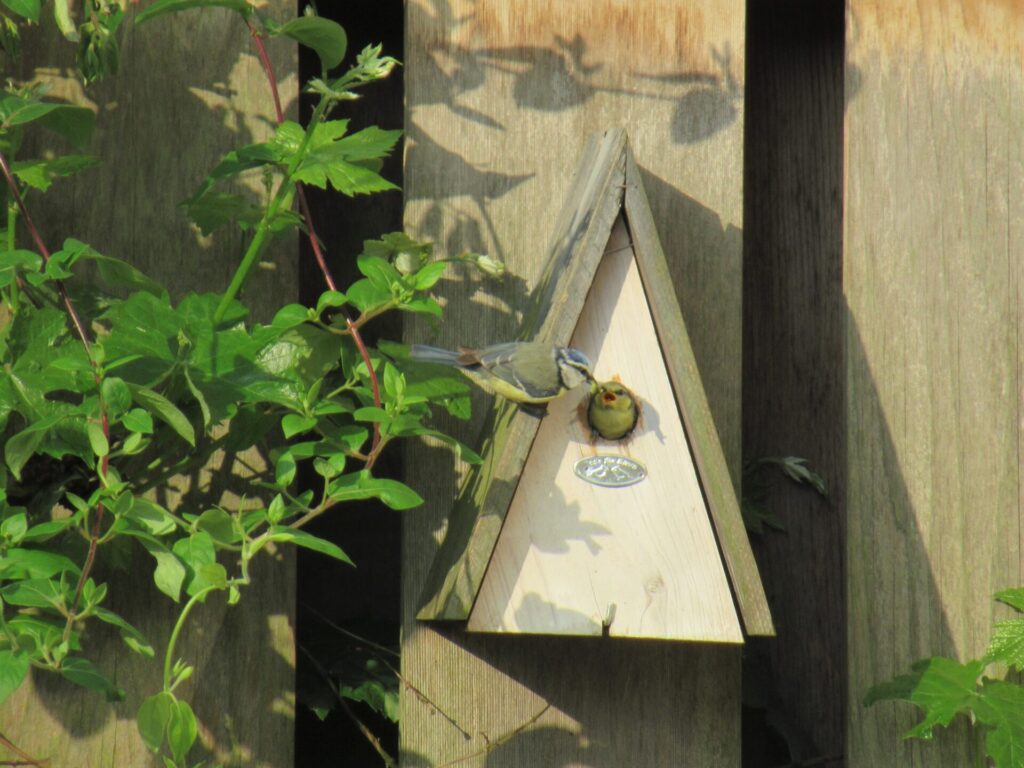
I grabbed my small camera, too, and together we sat watching the blue tits leave the nest box just outside our living room window (some of the pictures in this post are his). First one stuck its head out. And when it got a little bolder, its feet came out as well, grabbing the edge of the opening.
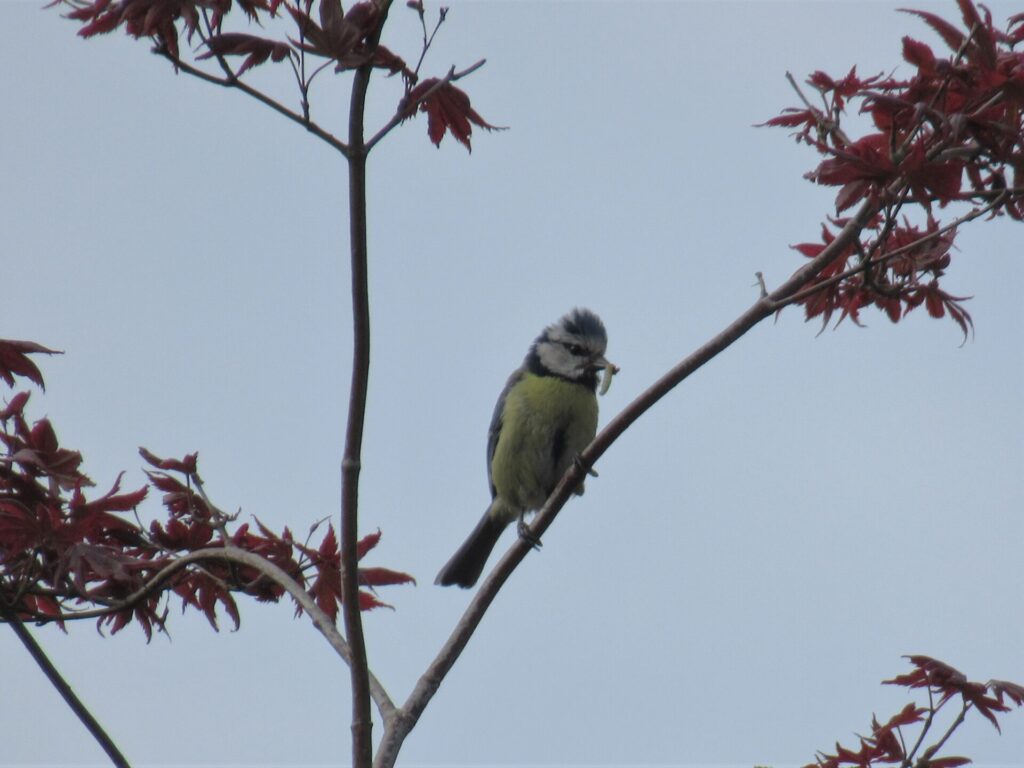
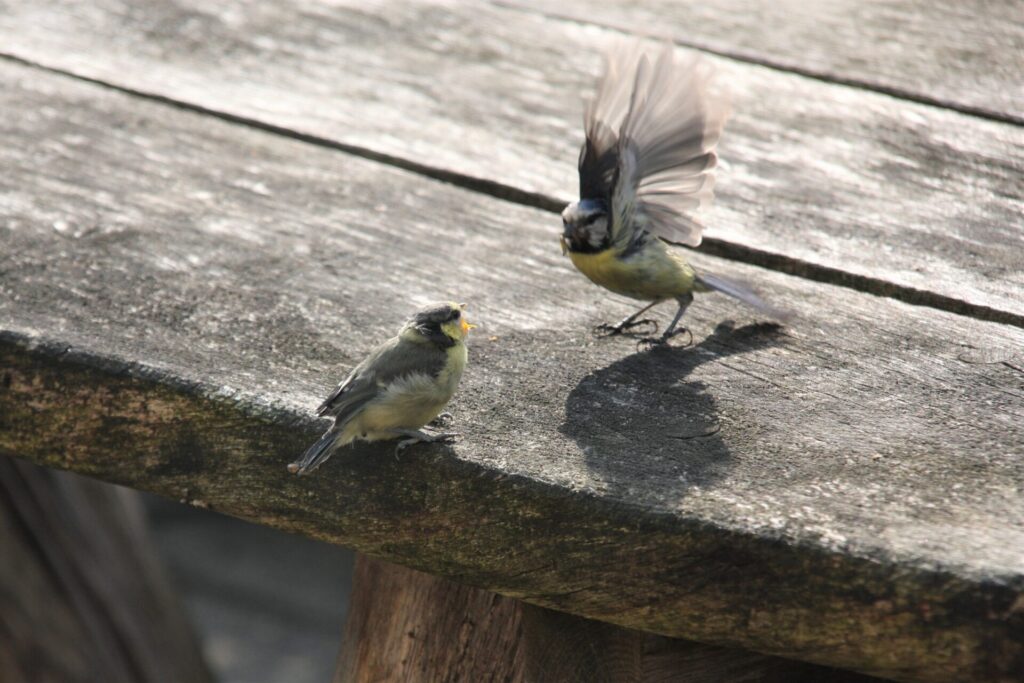
Then it decided ‘no, I’m not ready yet’ and popped back inside. They took their time fledging. While the young were plucking up courage, the parents kept plucking caterpillars from trees and bushes.
They kept feeding their young all the time.
And then, one by one, the young birds decided that the time was right. With a wriggle and a wrench they flew out.
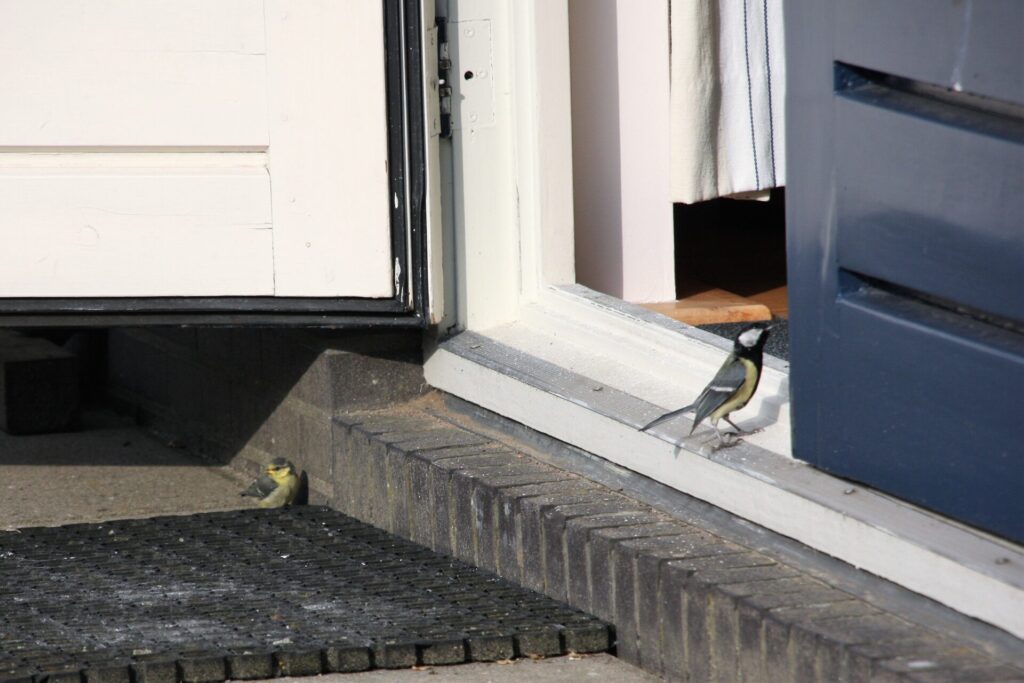
When we had counted 7, we thought that the nest box was empty. But after a while, another little blue tit came out. The others all immediately flew up into a tree or onto the fence, but this one seemed weaker. It flew down to the rubber mat in front of the French windows.
And while it was sitting there, looking around at the big wide world, a great tit flew onto the threshold. It took one look around and then disappeared into our living room. I wonder what it thought when it came flying out a few minutes later. ‘Goodness, so much space! And what do they want with all that stuff inside their nests? Aren’t humans weird creatures?!’
After a while, the last little blue tit scurried away to find cover.
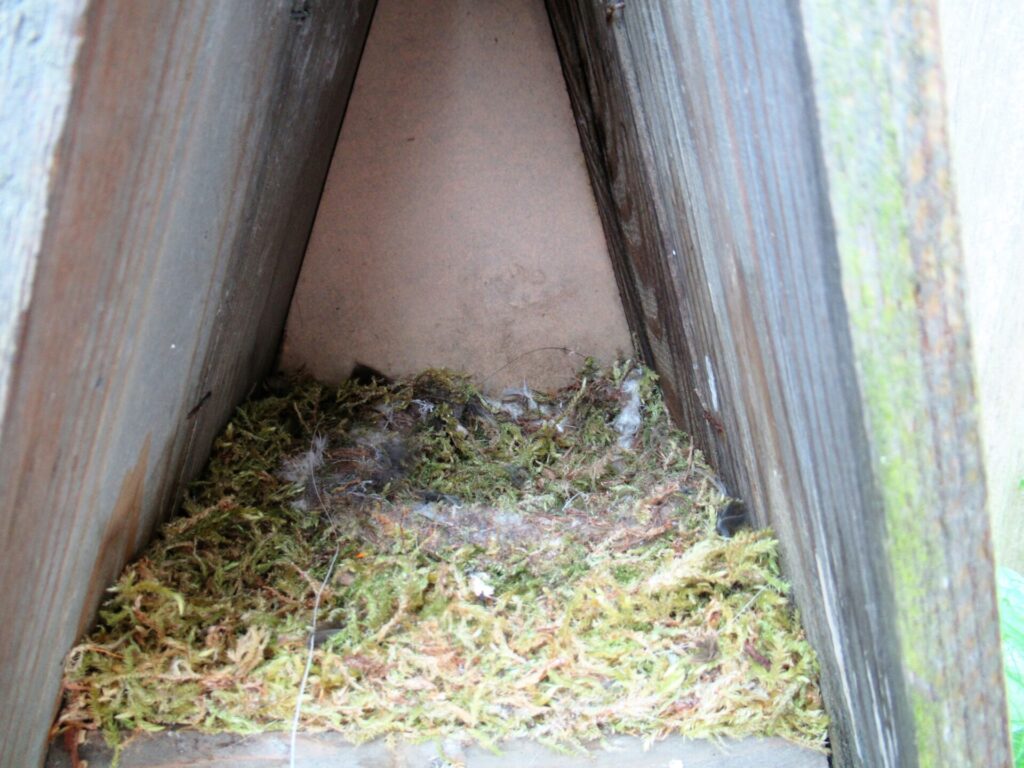
That evening we cleaned out the nest box. Unlike us, the blue tits didn’t have much stuff inside their nest – just a thick layer of moss and some feathers.
We heard that it’s a difficult year for blue tits. Because of the cold and wet spring there were not enough caterpillars when they needed them. With 8 healthy chicks, ours were lucky. Maybe the peanuts from our feeder also helped a little.
The parents will keep feeding their young until they can fend for themselves.
Now we’re waiting for the great tits. They have nests in two other nest boxes in our garden. And also for the second nest of the blackbirds in the beech hedge.
Meanwhile I am incubating a clutch of knitting ideas. It’s not a straightforward as with the blue tits’ eggs. I don’t know how long the incubation will take and exactly what I need to feed them when they hatch. What kind of TLC do they need if I want them to fledge? I can only go by what my intuition tells me.
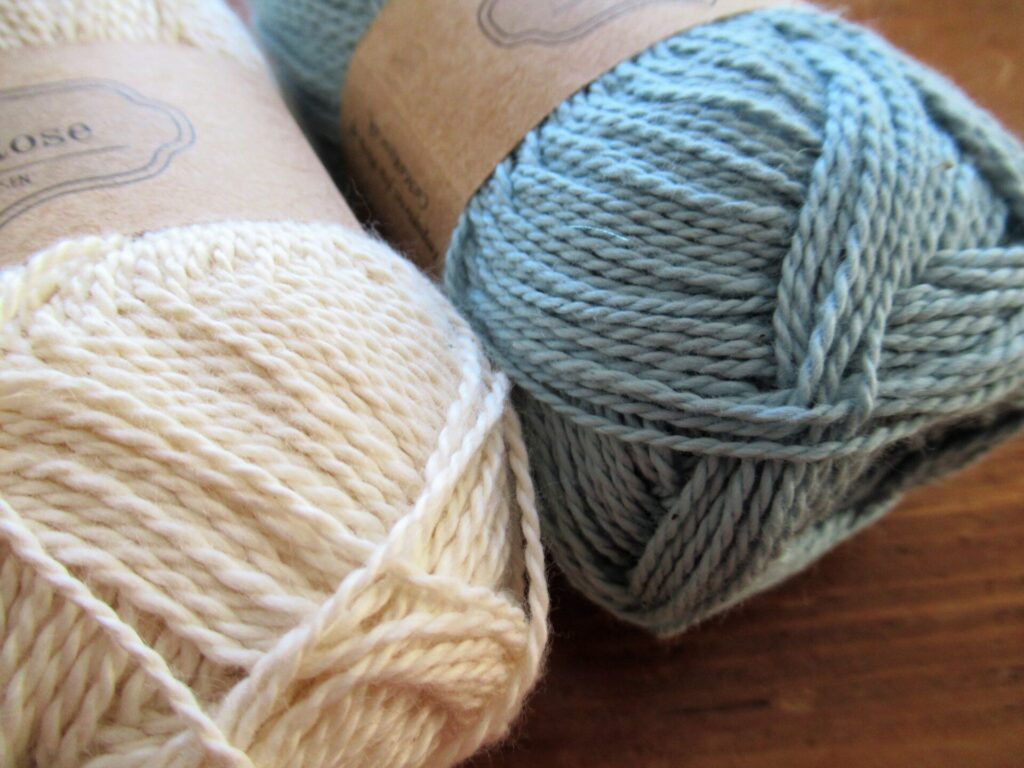
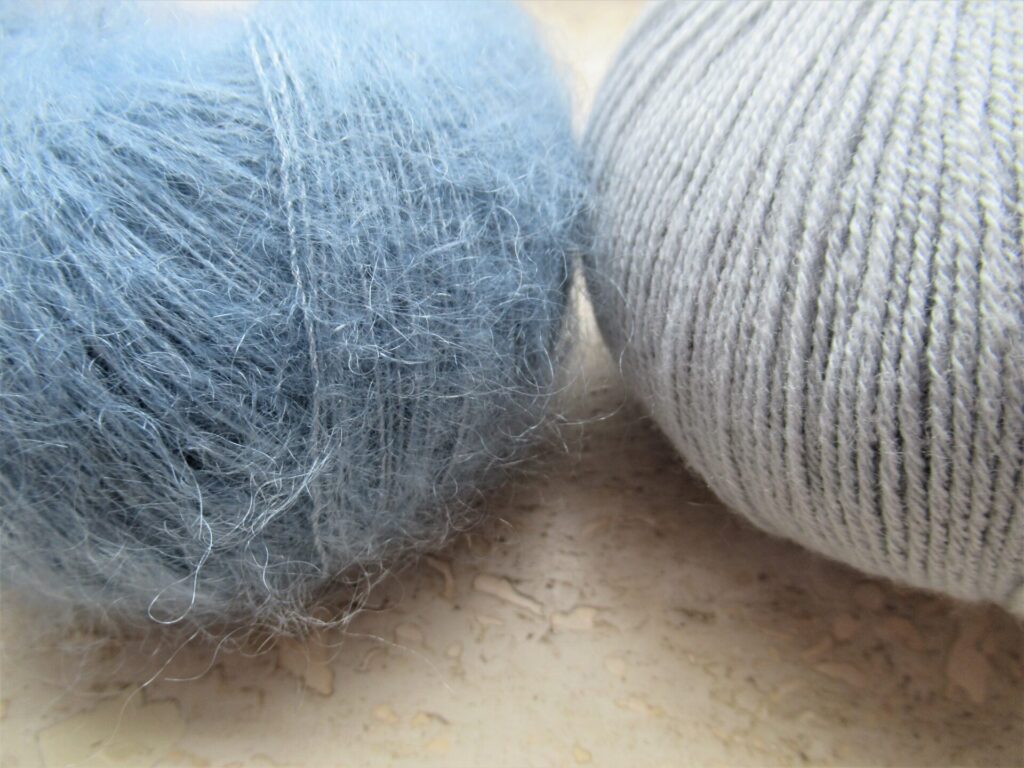
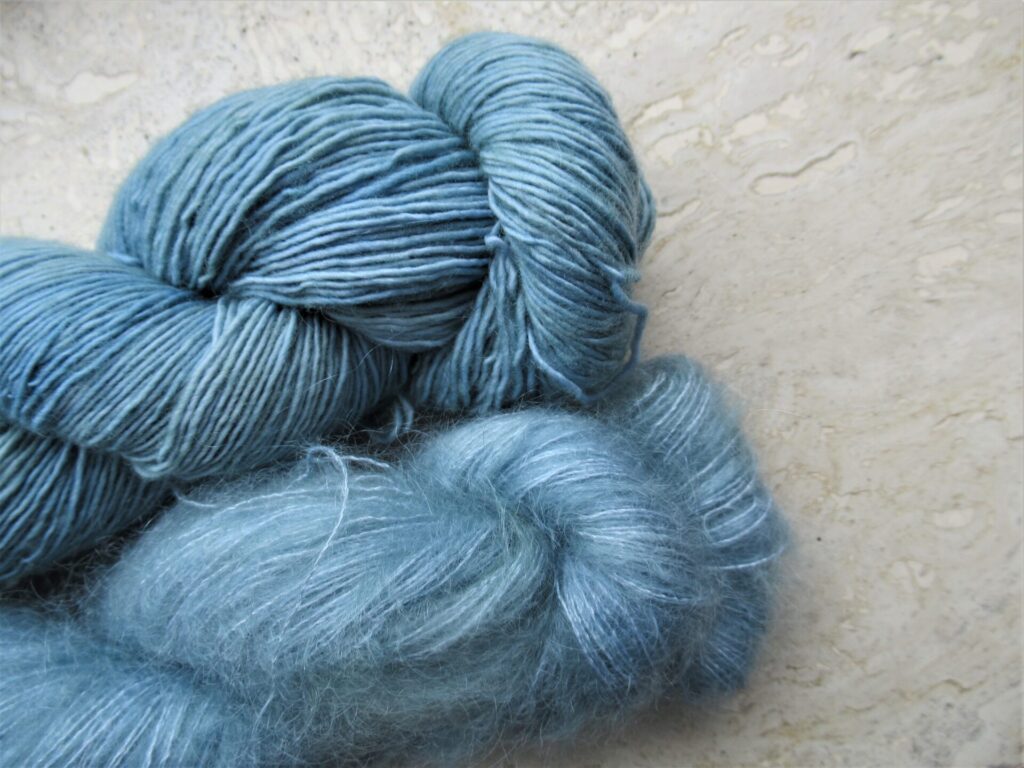
One thing my intuition told me was, ‘Buy yarn’. I wondered at the wisdom of this advice at this early stage, but I let myself be led by it anyway and bought some yarn in blue tit blue.
And some more yarn, also in beautiful hues of blue.
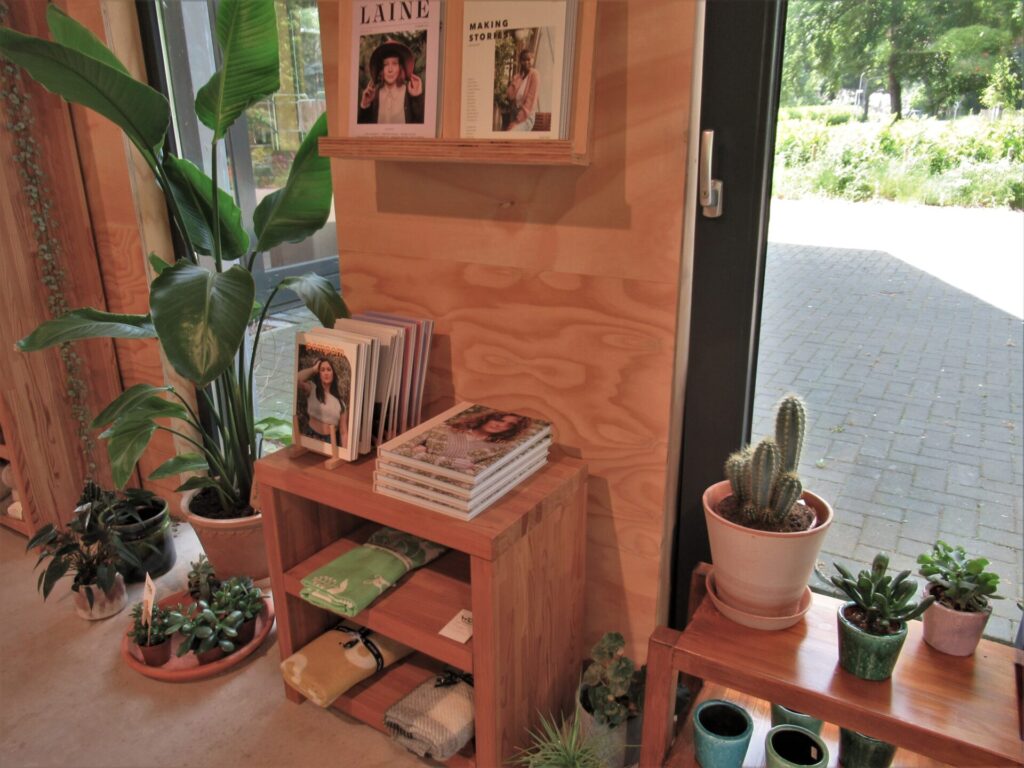
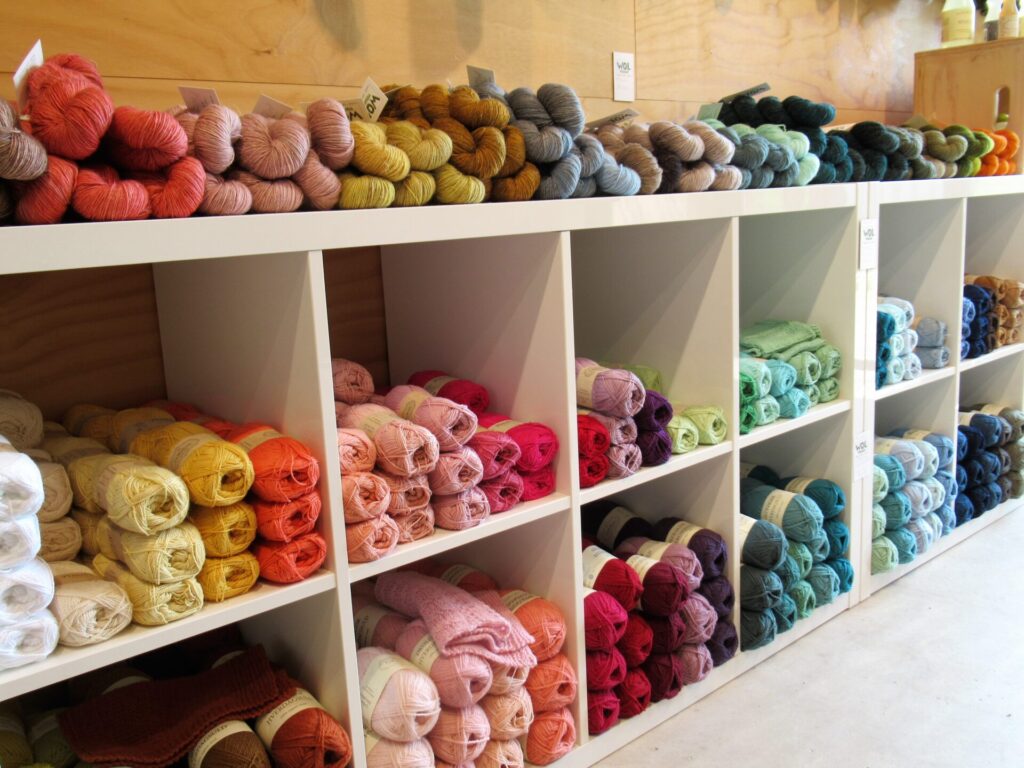
Time will tell whether this was a wise thing to do. At least browsing around Wolverhalen was a very enjoyable thing to do. (You may have read about it in a previous post.) Leafing through some pattern books and magazines…
… immersing myself in colour…
… and swooning over skeins lovingly hand dyed by Catharina.
I don’t know yet what shape my ideas will take. I’ll do what I can to make them fledge successfully and hope to show you more if and when they’re ready to fly out into the big wide world.
Until then, I’ll try to keep feeding you/myself/us all kinds of other tasty morsels. Bye for now and take care!
It’s good to be back here after a busy and bumpy couple of weeks. What with several ups and downs, keeping up with everyday life, and helping our daughter and her boyfriend husband paint their new home…
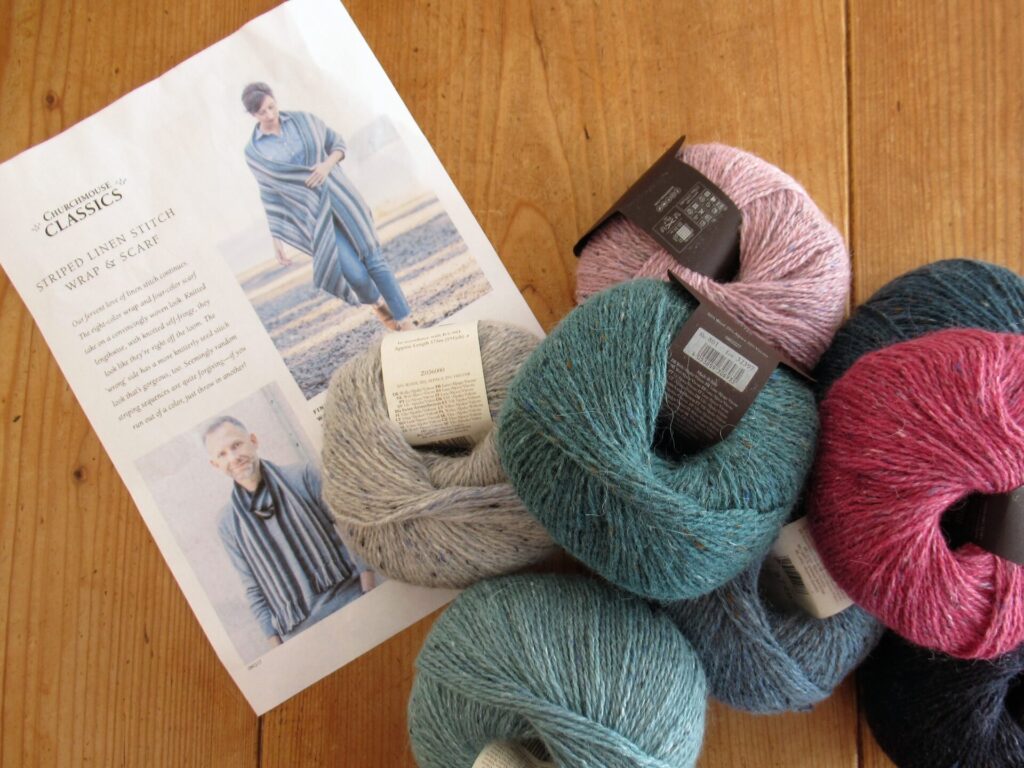
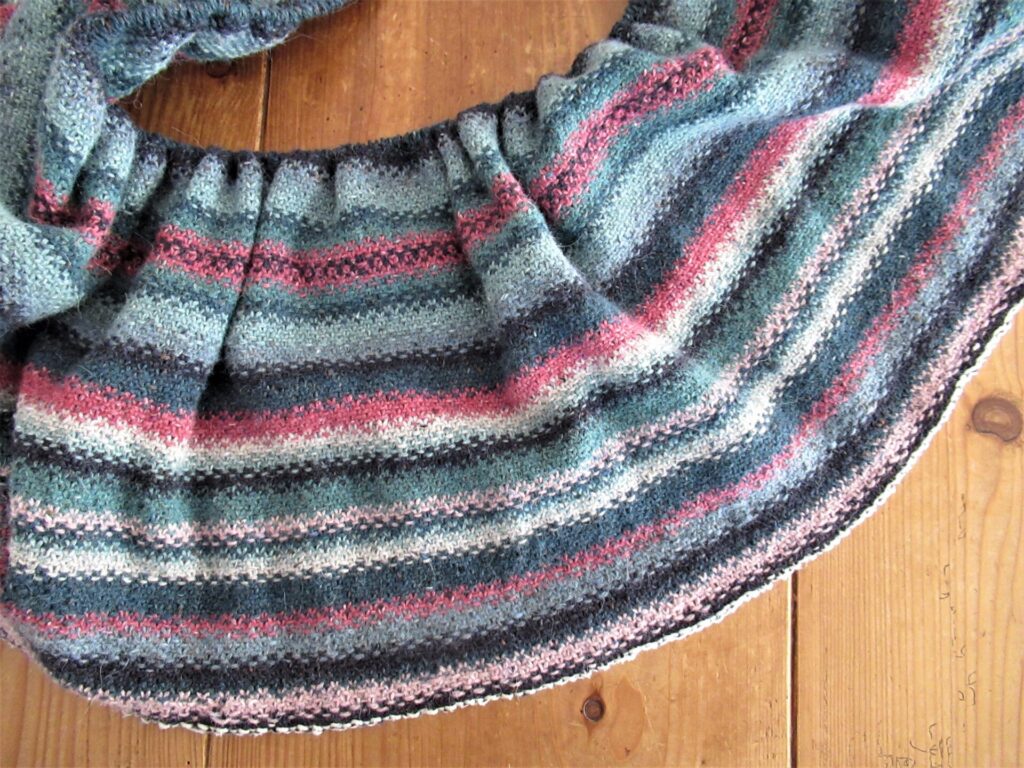
…there hasn’t been much progress on the knitting front. All I’ve done is knit row after comforting row on my Striped Linen Stitch Wrap.
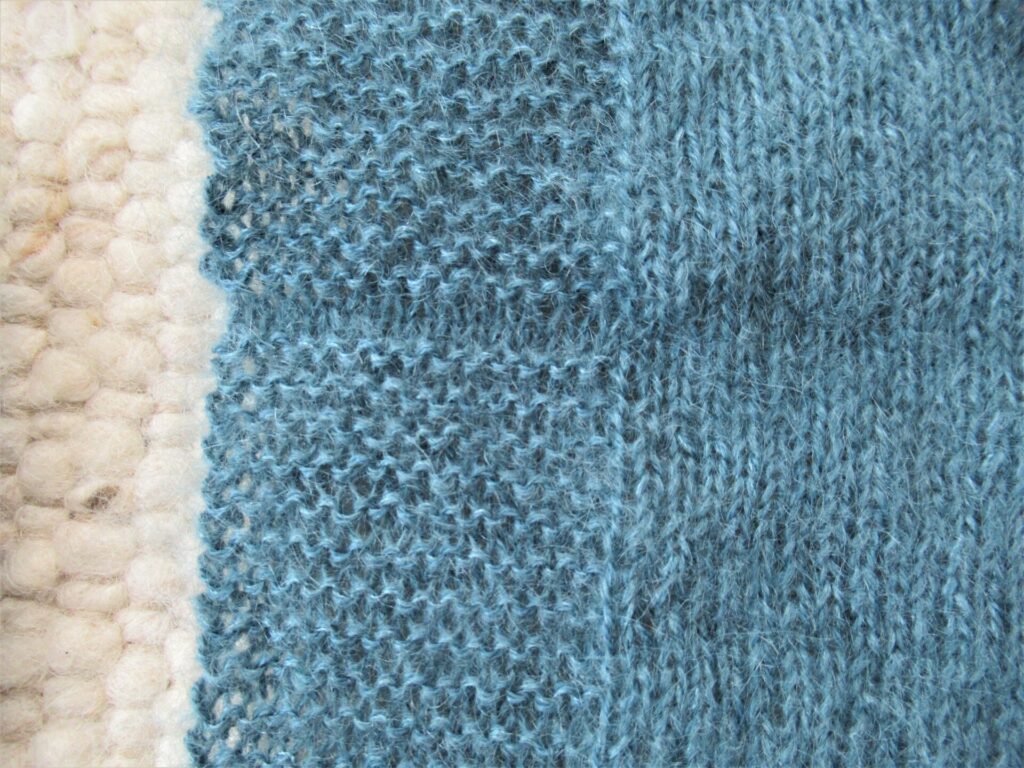
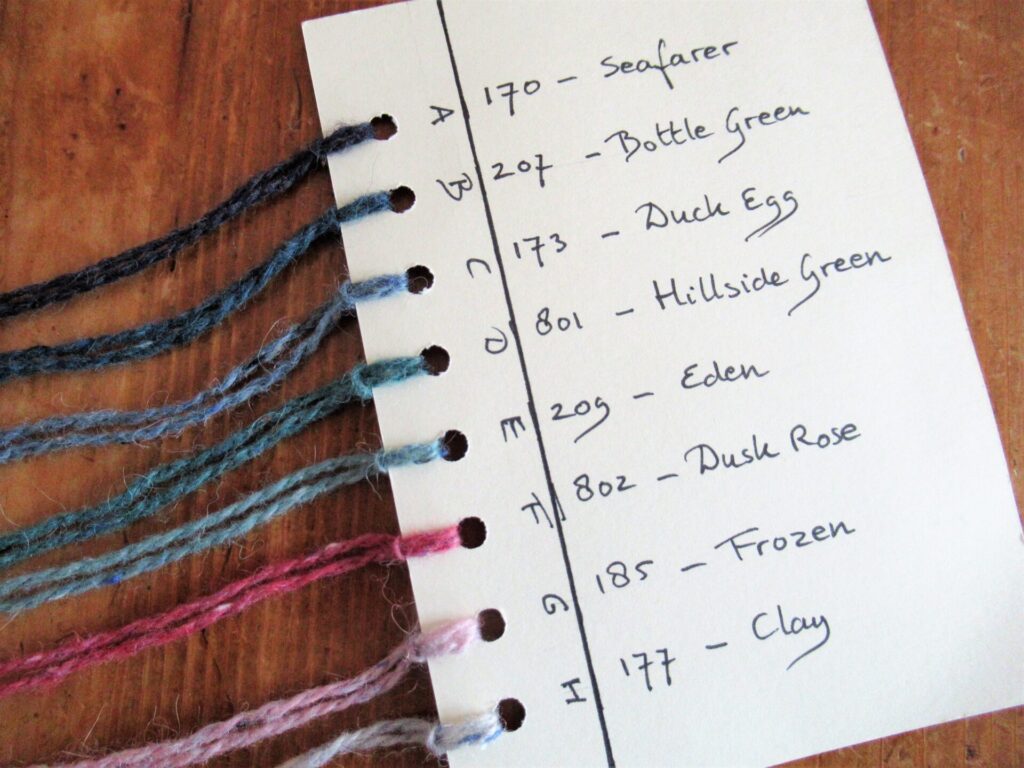
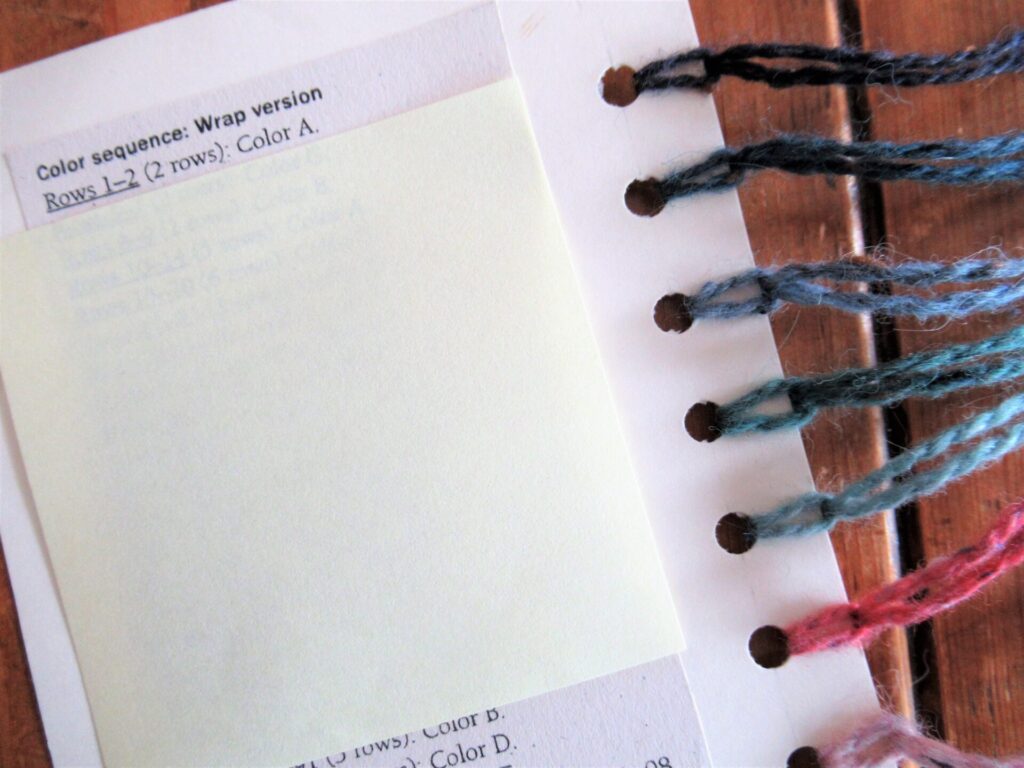
So, I thought I’d write about that a bit. I’m knitting it in 8 colours of Rowan Felted Tweed. Different colours from the ones used in the pattern, but I’ve tried to find the same balance between darker and lighter shades. I chose 5 blues/greens, 2 pinks and 1 grey.
Because some of the blues and greens are hard to distinguish in the evenings, I decided to make a colour card, similar to embroidery floss organizer cards. With the colours from A-H with their names on the front…
… and the description of the stripe sequence cut out from the pattern glued to the back. I’m using a sticky note to keep track of where I am in the pattern.
Making the card was a fun little project, and it turned out to be a handy tool. A great idea for multi-colour knitting, if I say so myself. I used a standard blank 10.5 x 5 cm (5¾ x 4¼”) correspondence card, measured out the places for the holes with a ruler and pencil, and punched the holes with an ordinary 2-hole punch held at an angle to make one hole at a time.
This linen stitch wrap starts with a provisional cast-on, which will be unravelled later to knit an I-cord along the entire length. I think the best-know type of provisional cast-on is picking up stitches from a crocheted chain – the method I used for my Thús loop.
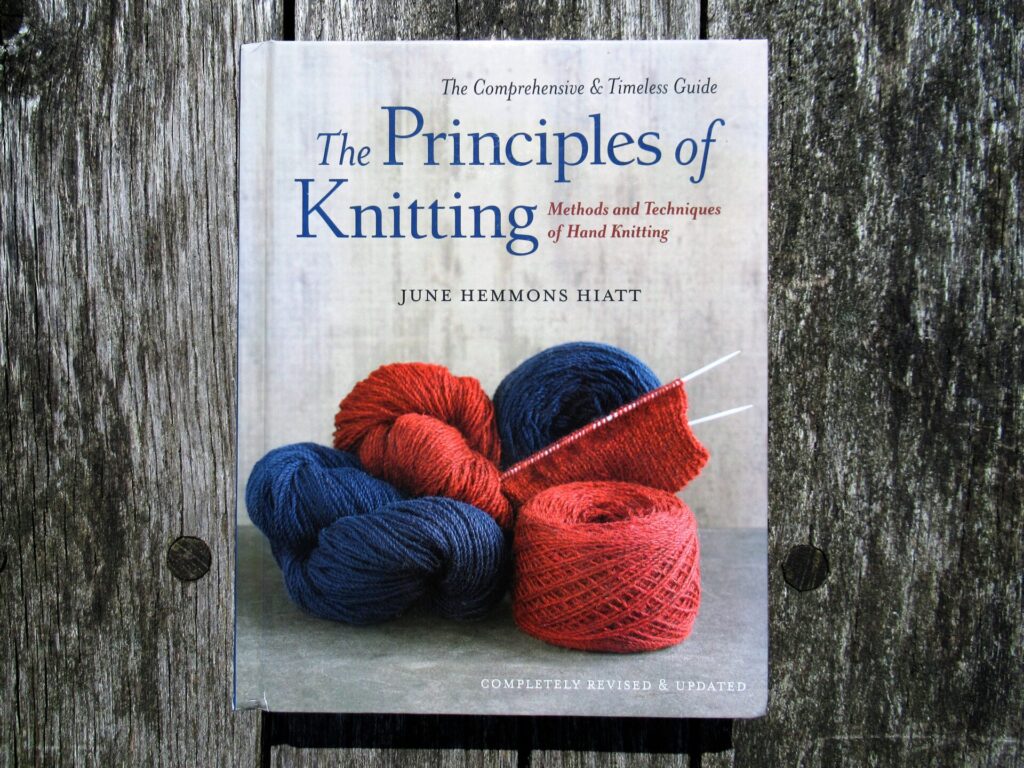
The method used for this wrap, just called ‘provisional cast-on’ in the pattern, is a little more sophisticated. In June Hemmons Hiatt’s 2 kg/712 page tome The Principles of Knitting it is called ‘Hook and Needle Chained Cast-On’.
If you’re like me and are interested in all kinds of cast-ons and bind-offs, edge stitches, increases and decreases, etc. etc. this is definitely a book for your Birthday or Christmas wish list.
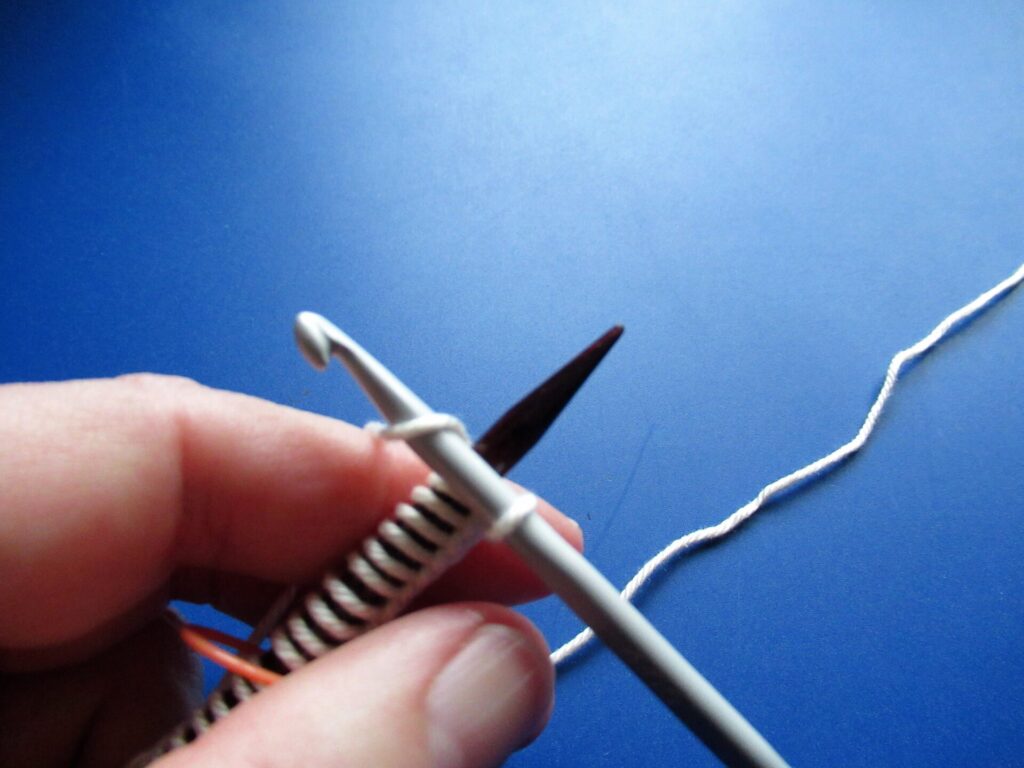
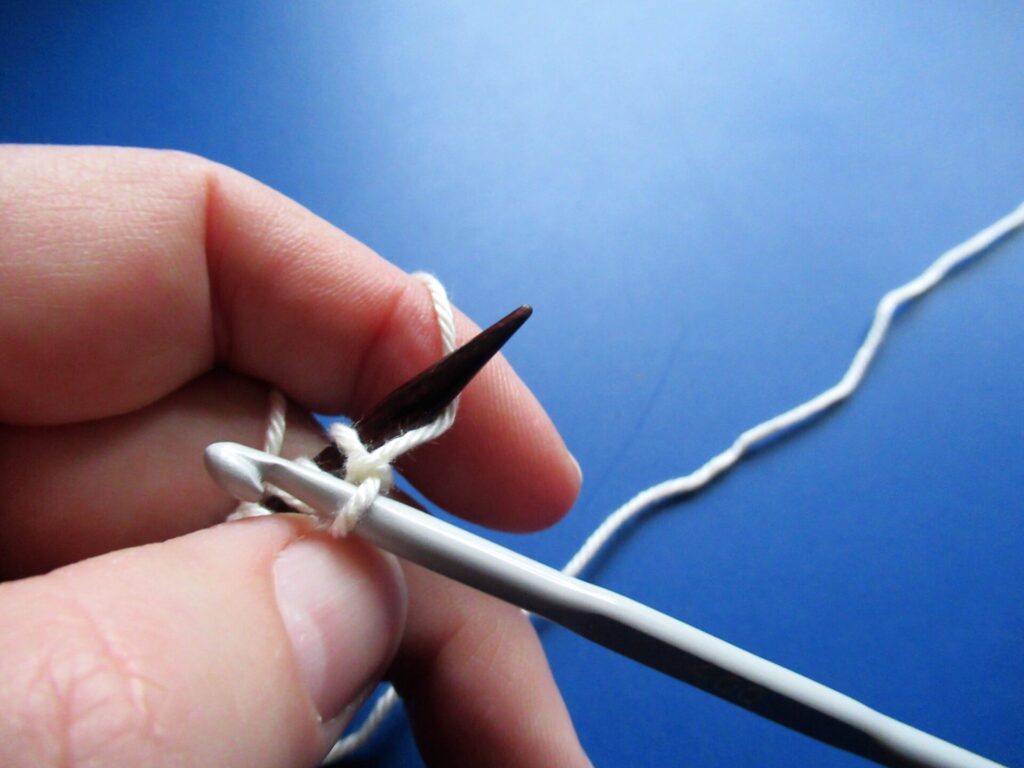
I’ve taken pictures of the Hook and Needle Chained Cast-On as I went along, hoping it might be helpful and interesting to other knitters. The method uses a knitting needle, a crochet hook and a piece of smooth waste yarn. This is how it’s done step by step.
First of all, make a slip knot in the waste yarn and place it on the crochet hook. (I took my pictures after I already had a few stitches on my needle.)
Hold the knitting needle in your left hand, crochet hook in your right hand, and waste yarn over your left index finger. Knitting needle and hook form an X. The crochet hook is in front and the yarn runs behind the knitting needle.
Wrap the yarn around the crochet hook…
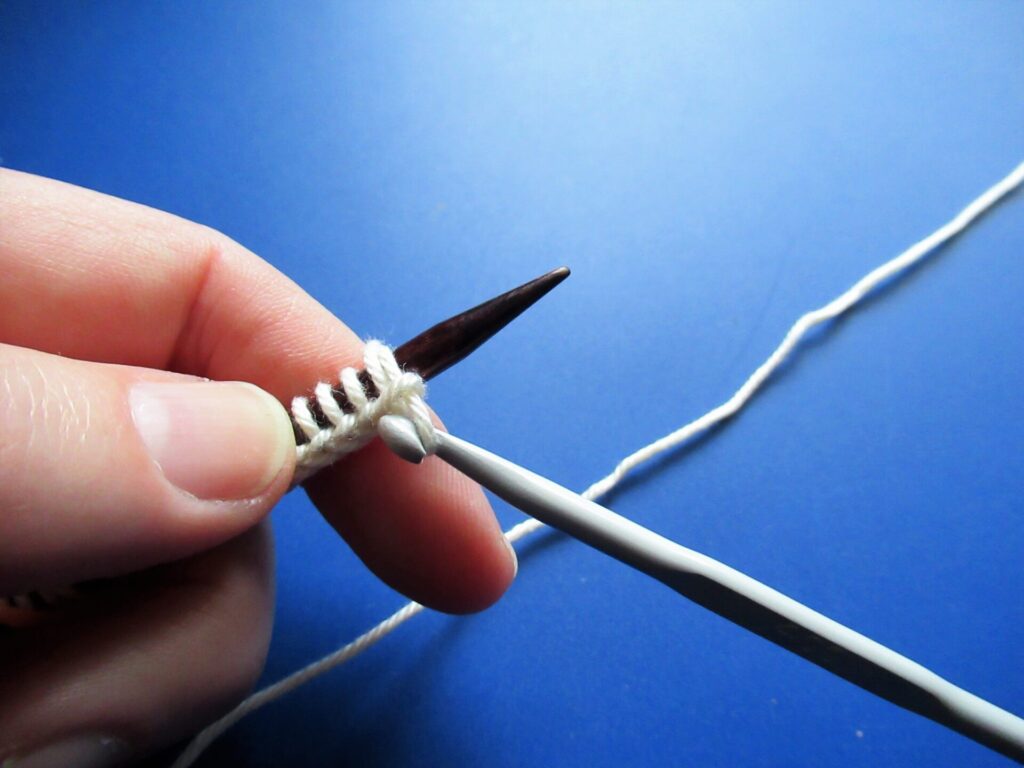
… and pull the yarn through the loop.
With your finger, or with the help of your hook, return the yarn under the needle and to the back. Now it is in the same position as in step 1.
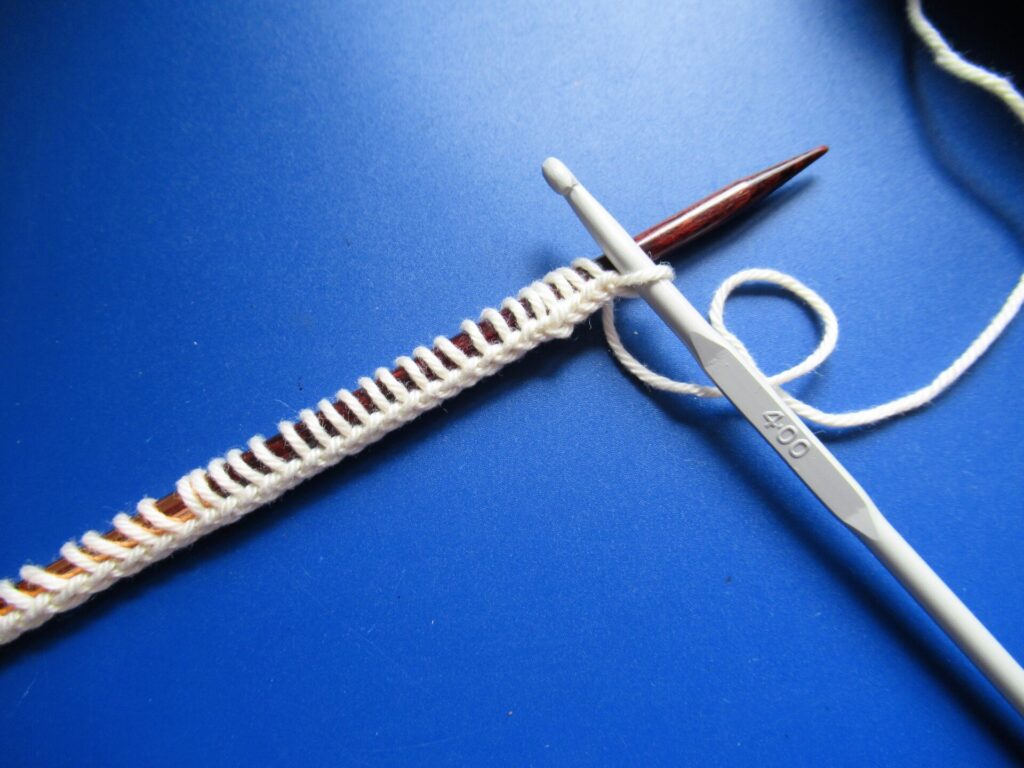
Repeat steps 1-4 until the required number of stitches is on the needle. The stitches end up on the needle like any knitting stitches, with a neat row of chains running along the length of the knitting needle. This is very easy to unravel later on.
For my wrap, I needed to cast on 400+ stitches. I didn’t time myself, but I think it took me about two hours. Phew! But I know it’s worth the time and effort.
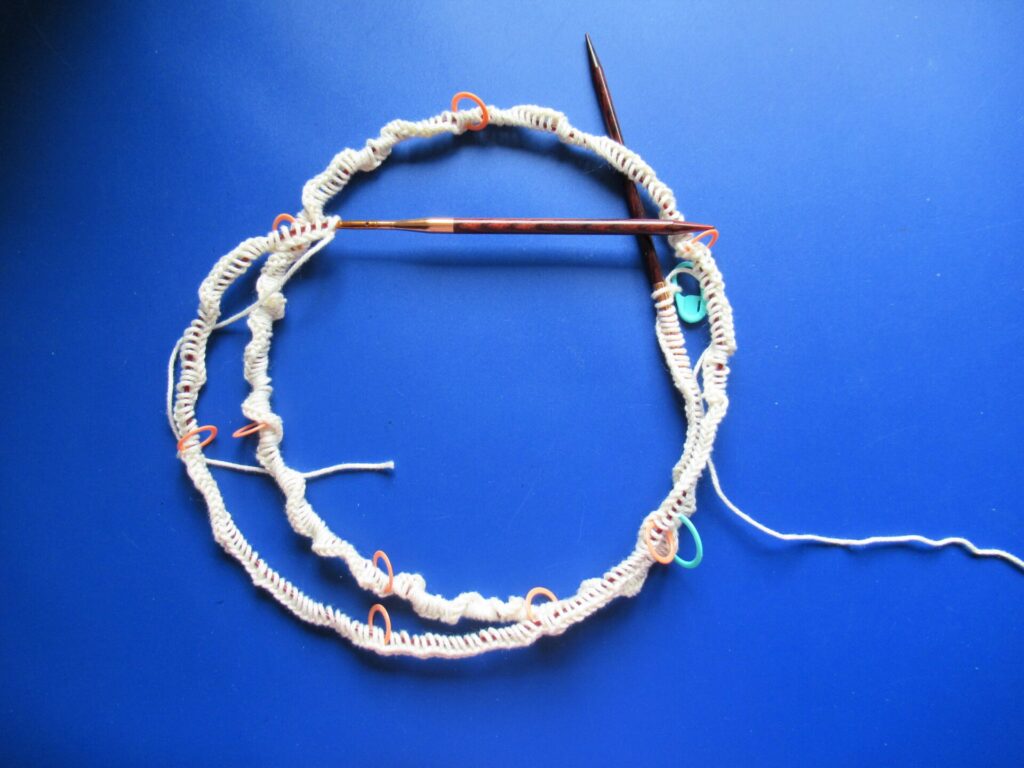
The stitch markers (picture below) are there to make counting this large number of stitches easier. I removed them as soon as I started knitting.
This was meant to be a project I would only work on in between projects requiring more attention. But the long rows of linen stitch are so addictive that I’m over halfway already. The white stitches along the bottom are the provisional cast-on.
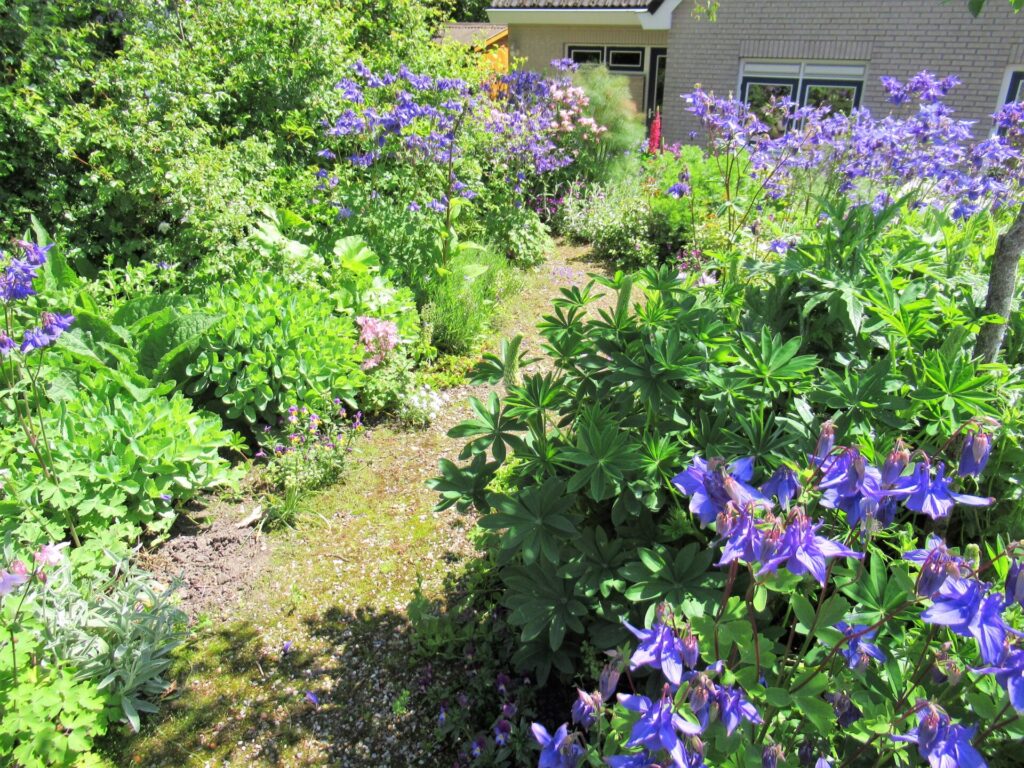
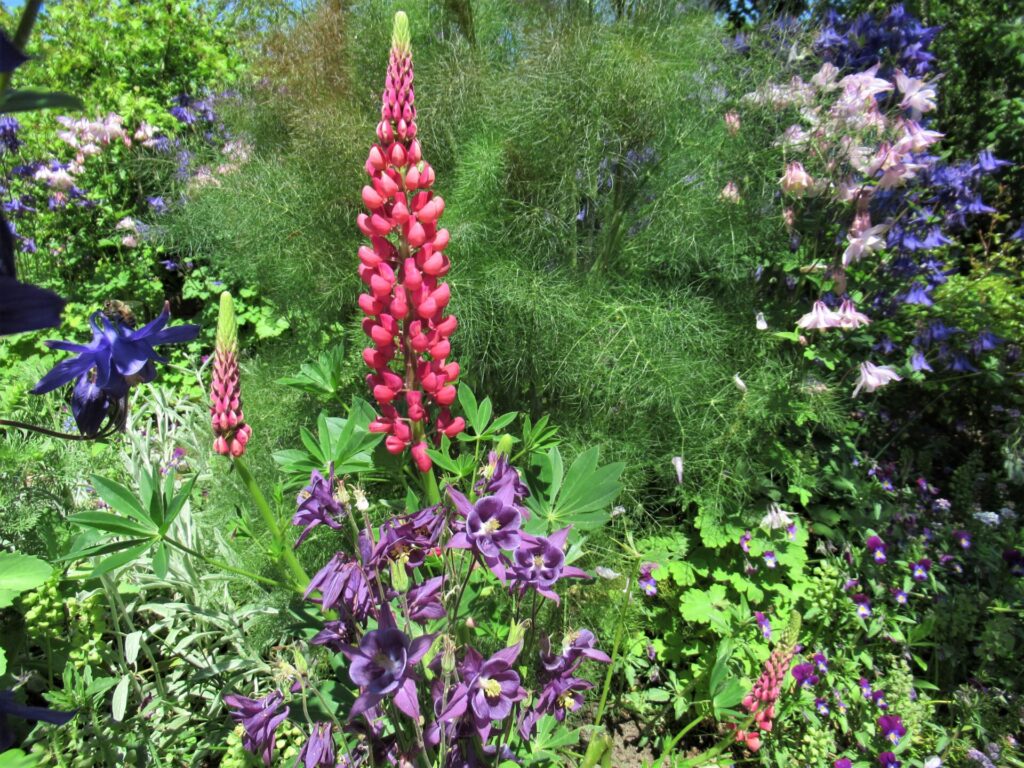
I’m going to put it aside for a while now, though, because after a rainy and cold spring, it suddenly feels like summer! Thanks to all of the rain, our front garden is a sea of lush greenery, with white, pink and purple aquilegias…
… and here and there a lupin.
It’s far too hot to have a large woolly wrap on my lap now. My mind is already bubbling with ideas for projects for summery temperatures, but I also think I should finish a few things before I start anything new. Last week, I thought I had run out of ideas and things to write about, and now I don’t know what to do first or last. I’m so glad it was only a temporary slump.
I hope your life is moving along without too many bumps in the road. See you again next week (if I don’t get held up or sidetracked again)!